brake light CHEVROLET DYNASTY 1993 Workshop Manual
[x] Cancel search | Manufacturer: CHEVROLET, Model Year: 1993, Model line: DYNASTY, Model: CHEVROLET DYNASTY 1993Pages: 2438, PDF Size: 74.98 MB
Page 302 of 2438
(2) The voltage output from each of the wheel
speed sensors is verified to be within the correct op-
erating range. If a vehicle is not set in motion within 3 minutes
from the time the ignition switch is turned to the on
position. The solenoid valve test is bypassed but the
pump/motor is activated briefly to verify that it is op-
erating correctly.
WARNING SYSTEMS OPERATION
The ABS system uses an Amber Antilock Warning
Lamp, located in the instrument cluster. The purpose
of the warning lamp is discussed in detail below. The Amber Antilock Warning Light will turn on
whenever the CAB detects a condition which results
in a shutdown of the Antilock brake system. The
Amber Antilock Warning Lamp is normally on until
the CAB completes its self tests and turns the lamp
off (approximately 1-2 seconds). When the Amber
Antilock Warning Light is on, only the Antilock
brake function of the brake system if affected. The
standard brake system and the ability to stop the car
will not be affected when only the Amber Antilock
Warning Light is on.
NORMAL OPERATION OF WARNING LAMP
With ignition key turned to the Crank position, the
Red Brake Warning Lamp and Amber Antilock
Warning Lamp will turn on as a bulb check. The
Amber Antilock Warning Lamp will stay on for 1-2
seconds then turn off, once verification of Antilock
Brake System self diagnosis is completed.
ANTILOCK BRAKE SYSTEM COMPONENTS
The following is a detailed description of the Ben-
dix Antilock 4 Brake System components. For infor-
mation on servicing the Four Wheel Disc Brake
System, see the standard Brake section in the Front
Wheel Drive Car, chassis service manual.
MODULATOR ASSEMBLY
WARNING: THE ONLY COMPONENTS OF THE
MODULATOR ASSSEMBLY THAT ARE SERVICE-
ABLE, ARE THE 2 PROPORTIONING VALVES,
BLEED SCREWS AND THREAD SAVERS. THE RE-
MAINING COMPONENTS OF THE MODULATOR AS-
SEMBLY ARE NOT INTENDED TO BE
SERVICEABLE ITEMS. NO ATTEMPT SHOULD BE
MADE TO REMOVE OR SERVICE ANY OTHER COM-
PONENTS OF THE MODEULATOR ASSEMBLY.
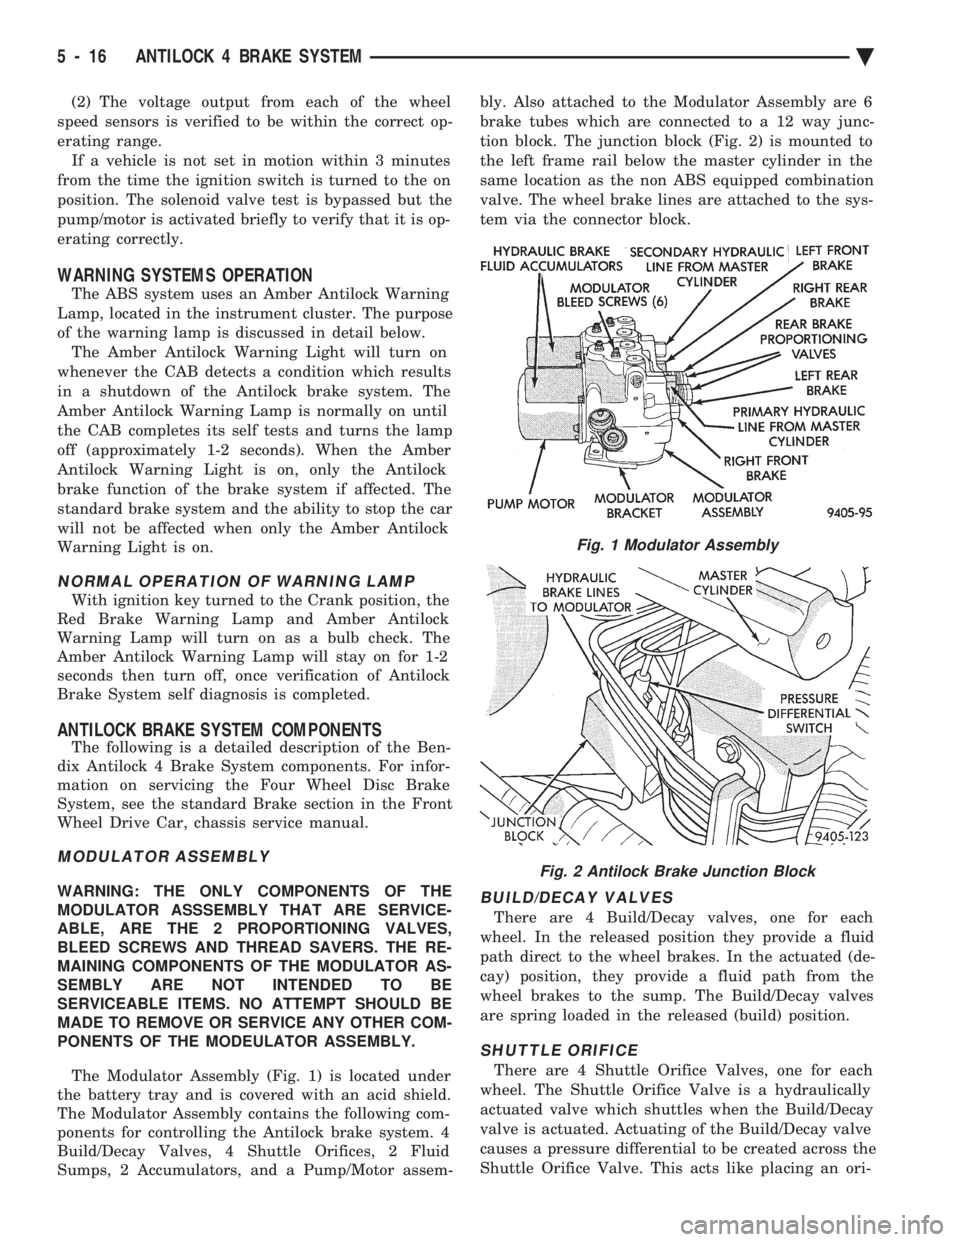
The Modulator Assembly (Fig. 1) is located under
the battery tray and is covered with an acid shield.
The Modulator Assembly contains the following com-
ponents for controlling the Antilock brake system. 4
Build/Decay Valves, 4 Shuttle Orifices, 2 Fluid
Sumps, 2 Accumulators, and a Pump/Motor assem- bly. Also attached to the Modulator Assembly are 6
brake tubes which are connected to a 12 way junc-
tion block. The junction block (Fig. 2) is mounted to
the left frame rail below the master cylinder in the
same location as the non ABS equipped combination
valve. The wheel brake lines are attached to the sys-
tem via the connector block.BUILD/DECAY VALVES
There are 4 Build/Decay valves, one for each
wheel. In the released position they provide a fluid
path direct to the wheel brakes. In the actuated (de-
cay) position, they provide a fluid path from the
wheel brakes to the sump. The Build/Decay valves
are spring loaded in the released (build) position.
SHUTTLE ORIFICE
There are 4 Shuttle Orifice Valves, one for each
wheel. The Shuttle Orifice Valve is a hydraulically
actuated valve which shuttles when the Build/Decay
valve is actuated. Actuating of the Build/Decay valve
causes a pressure differential to be created across the
Shuttle Orifice Valve. This acts like placing an ori-
Fig. 1 Modulator Assembly
Fig. 2 Antilock Brake Junction Block
5 - 16 ANTILOCK 4 BRAKE SYSTEM Ä
Page 303 of 2438
fice (restriction) in the line between the wheel and
the Build/Decay Valve. This restriction provides a
controlled build rate to each wheel brake during an
Antilock stop. The Shuttle Orifice Valve will remain
in the orificed position until the ABS cycle is com-
plete. When the ABS cycle has been completed the
Build/Decay valves will return to their released posi-
tion which will equalize the pressure across the
Shuttle Orifice Valves. When the pressure equalizes,
the spring loaded Shuttle Orifice valves will return
to the unrestricted position.
FLUID SUMPS
There are two Fluid Sumps in the Hydraulic As-
sembly, one for the primary and secondary hydraulic
circuits. The Fluid Sumps store the brake fluid that
is decayed from the wheel brakes during an ABS cy-
cle. This fluid is then pumped to an accumulator
and/or the hydraulic system in order to provide build
pressure. The typical pressure in the sumps is 50 psi,
during ABS operation only.
HYDRAULIC SPRING ACCUMULATOR
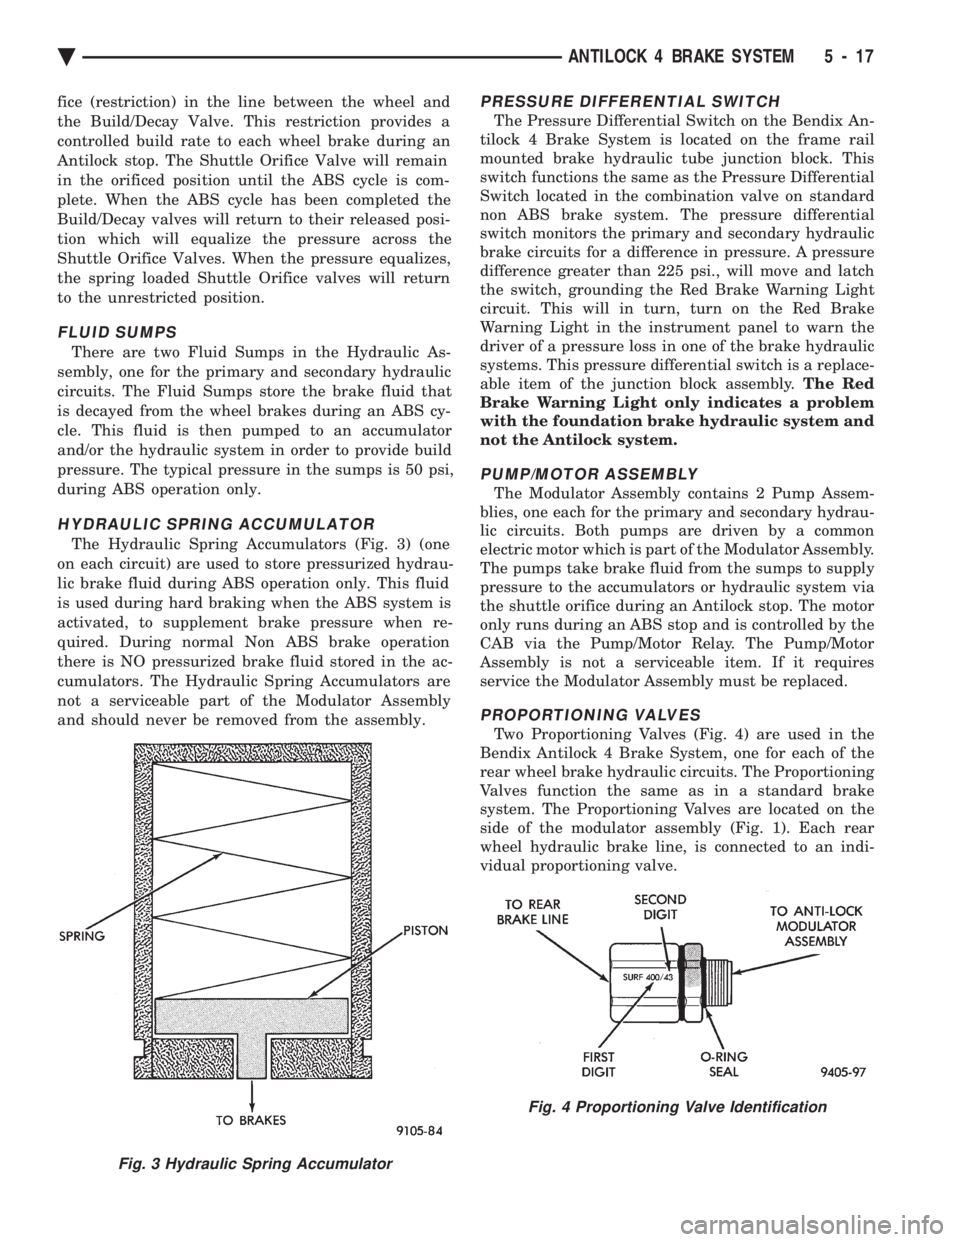
The Hydraulic Spring Accumulators (Fig. 3) (one
on each circuit) are used to store pressurized hydrau-
lic brake fluid during ABS operation only. This fluid
is used during hard braking when the ABS system is
activated, to supplement brake pressure when re-
quired. During normal Non ABS brake operation
there is NO pressurized brake fluid stored in the ac-
cumulators. The Hydraulic Spring Accumulators are
not a serviceable part of the Modulator Assembly
and should never be removed from the assembly.
PRESSURE DIFFERENTIAL SWITCH
The Pressure Differential Switch on the Bendix An-
tilock 4 Brake System is located on the frame rail
mounted brake hydraulic tube junction block. This
switch functions the same as the Pressure Differential
Switch located in the combination valve on standard
non ABS brake system. The pressure differential
switch monitors the primary and secondary hydraulic
brake circuits for a difference in pressure. A pressure
difference greater than 225 psi., will move and latch
the switch, grounding the Red Brake Warning Light
circuit. This will in turn, turn on the Red Brake
Warning Light in the instrument panel to warn the
driver of a pressure loss in one of the brake hydraulic
systems. This pressure differential switch is a replace-
able item of the junction block assembly. The Red
Brake Warning Light only indicates a problem
with the foundation brake hydraulic system and
not the Antilock system.
PUMP/MOTOR ASSEMBLY
The Modulator Assembly contains 2 Pump Assem-
blies, one each for the primary and secondary hydrau-
lic circuits. Both pumps are driven by a common
electric motor which is part of the Modulator Assembly.
The pumps take brake fluid from the sumps to supply
pressure to the accumulators or hydraulic system via
the shuttle orifice during an Antilock stop. The motor
only runs during an ABS stop and is controlled by the
CAB via the Pump/Motor Relay. The Pump/Motor
Assembly is not a serviceable item. If it requires
service the Modulator Assembly must be replaced.
PROPORTIONING VALVES
Two Proportioning Valves (Fig. 4) are used in the
Bendix Antilock 4 Brake System, one for each of the
rear wheel brake hydraulic circuits. The Proportioning
Valves function the same as in a standard brake
system. The Proportioning Valves are located on the
side of the modulator assembly (Fig. 1). Each rear
wheel hydraulic brake line, is connected to an indi-
vidual proportioning valve.
Fig. 3 Hydraulic Spring Accumulator
Fig. 4 Proportioning Valve Identification
Ä ANTILOCK 4 BRAKE SYSTEM 5 - 17
Page 309 of 2438
earlier in this service manual supplement. Then follow
the diagnostic procedures outlined in this section. Many conditions that generate customer complaints
may be normal operating conditions, but are judged to
be a problem due to not being familiar with the ABS
system. These conditions can be recognized without
performing extensive diagnostic work, given adequate
understanding of the operating principles and perfor-
mance characteristics of the ABS system.
DEFINITIONS
Several abbreviations are used in this manual. They
are presented here for reference.
² CABÐController Antilock Brake
² ABSÐAntilock Brake System
² PSIÐPounds per Square Inch (pressure)
² WSSÐWheel Speed Sensor
² ACÐAlternating Current
ABS COMPUTER SYSTEM SERVICE PRECAUTIONS
The ABS system uses an electronic control module,
the CAB. This module is designed to withstand normal
current draws associated with vehicle operation. How-
ever care must be taken to avoid overloading the CAB
circuits. In testing for open or short circuits, do
not ground or apply voltage to any of the circuits
unless instructed to do so by the appropriate
diagnostic procedure. These circuits should only be
tested using a high impedance multi-meter, special
tools or the DRB II tester as described in this section.
Power should never be removed or applied to any
control module with the ignition in the ON position.
Before removing or connecting battery cables, fuses, or
connectors, always turn the ignition to the OFF posi-
tion.
ABS GENERAL SERVICE PRECAUTIONS
TEST DRIVING ABS COMPLAINT VEHICLES
Most ABS complaints will require a test drive as a
part of the diagnostic procedure. The purpose of the
test drive is to duplicate the condition. Remember conditions that result in the turn-
ing on of the Red Brake Warning Lamp may
indicate reduced braking ability. The following
procedure should be used to test drive an ABS
complaint vehicle. Before test driving a brake complaint vehicle, note
whether the Red or Amber Brake Warning Lamp is
turned on. If the Red Brake Warning Lamp, is
turned on, refer to the base brake Control Valves
Section in the Front Wheel Drive, chassis service
manual. If the Amber Antilock Warning light was or
is on, read record and erase the faults. While the
Amber ABS Warning Lamp is on the ABS system is
not functional. The standard brake system and abil- ity to stop the car is not affected, if only the Amber
Antilock Warning Lamp is on.
(1) Turn ignition key to the off position and then
back to the on position. Note whether the Amber ABS
Warning Lamp continues to stay on. If it does refer to
the 1994 Bendix Antilock 4 Brake System Diagnostic
Manual for the required diagnostic test procedures. (2) If the Amber ABS Warning Lamp goes out, shift
vehicle into gear and drive car to a speed of 5 mph to
complete the ABS drive-off cycle. If at this time, the
Amber ABS Warning Lamp goes on refer to the 1994
Bendix Antilock 4 Brake System Diagnostic Manual. (3) If the Amber ABS Warning Lamp remains OUT,
continue to drive the vehicle a short distance. During
this test drive be sure that the vehicle achieves at least
25 mph. Brake to at least one complete stop and again
accelerate to 25 mph. (4) If a functional problem with the ABS system is
determined while test driving a vehicle. Refer to the
Bendix Antilock 4 Brake System Diagnostics Manual
for required diagnostic test procedures and proper use
of the DRB II tester.
ABS BRAKE SYSTEM ON VEHICLE SERVICE
The following are general precautions which
should be observed whenever servicing and or
diagnosing the ABS system and other vehicle
electronic systems. Failure to observe these pre-
cautions may result in ABS system damage. (1) If welding work is to be performed on a vehicle
using an arc welder. The wiring harness connector
should be disconnected from the CAB before beginning
any welding operation. (2) The CAB 60 way connector and modulator as-
sembly 10 way connector, should never be connected or
disconnected with the ignition in the on position. (3) Some components of Bendix Antilock 4 Brake
System assemblies can not be serviced separately from
the assembly and will require replacement of the
complete assembly for servicing. Do not disassemble
any component which is designated as non-serviceable.
CAUTION: Brake fluid will damage painted surfaces.
If brake fluid is spilled on any painted surfaces, wash
off with water immediately.
WHEEL SPEED SENSOR CABLES
Proper installation and routing of the Wheel Speed
Sensor Cables is critical to continued system opera-
tion. Be sure that cables are installed, routed and
clipped properly. Failure to install speed sensor ca-
bles as shown in the on car service section of this
Ä ANTILOCK 4 BRAKE SYSTEM 5 - 23
Page 310 of 2438
manual. May result in contact with moving parts or
over extension of cables, resulting in component fail-
ure and an open circuit.
MECHANICAL DIAGNOSTICS AND SERVICE
PROCEDURES
SPECIAL SERVICE TOOL
Some diagnostic procedures in this section require
the use of the DRB diagnostics tester. The proper ap-
plication and procedures for the use of this tool are
described below.
DRB DIAGNOSTIC TESTER
Some of the diagnostic procedures that are ex-
plained in this section require the use of the DRB Di-
agnostics Tester to insure that proper diagnostics are
performed. Refer to those sections for proper testing
procedures and the DRB operators manual for its
proper operational information.
INTERMITTENT FAULTS
As with virtually any electronic system, intermit-
tent faults in the ABS system may be difficult to ac-
curately diagnose. Most intermittent faults are caused by faulty elec-
trical connections or wiring. When an intermittent
fault is encountered, check suspect circuits for: (1) Poor mating of wiring harness connector halves
or terminals not fully seated in the connector body. (2) Improperly formed or damaged terminals. All
connector terminals in a suspect circuit should be
checked and carefully reformed to increase contact
tension with its mating terminal. (3) Poor terminal to wire connection. This requires
removing the terminal from the connector body to in-
spect. (4) Pin presence in the connector assembly
(5) Connector push-in, spread, and corrosion.
If a visual check does not find the cause of the
problem, operate the car in an attempt to duplicate
the condition and record the set Fault code. Most failures of the ABS system will disable the
Antilock function for the entire ignition cycle even if
the fault clears before key-off. There are some failure
conditions, however, which will allow ABS operation
to resume during the ignition cycle in which it oc-
curred, if the failure condition is no longer present.
The following conditions may result in intermittent
illumination of the Amber Antilock Warning Lamp.
All other failures will cause the lamp to remain on
until the ignition switch is turned off. Circuits in-
volving these inputs to the CAB should be investi-
gated if a complaint of intermittent warning system
operation is encountered. (1) Low system voltage: If Low System Voltage is
detected by the CAB, the CAB will turn on the Am-
ber Antilock Warning Lamp until normal system voltage is achieved. Once normal voltage is seen at
the CAB, normal operation resumes.
(2) Antilock system and pump/motor relay. If the
relays fail to make the ground circuit connection or
has an intermittent ground. The CAB will turn on
the Amber Antilock Warning Light. (3) Excess decay, an extended pressure decay pe-
riod, will turn on the Amber Antilock Warning Light
until the vehicle comes to a complete stop. Additionally, any condition which results in inter-
ruption of electrical current to the CAB or modulator
assembly, may cause the Amber Antilock Warning
Lamp to turn on intermittently.
ABS BRAKE SYSTEM DIAGNOSTIC FEATURES
ABS SYSTEM SELF DIAGNOSIS
The ABS system is equipped with a self diagnostic
capability which may be used to assist in isolation of
ABS faults. The features of the self diagnostics sys-
tem are described below.
START-UP CYCLE
The self diagnostic ABS start up cycle begins when
the ignition switch is turned to the on position. An
electrical check is completed on the ABS components.
Such as Wheel Speed Sensor Continuity and System
and other Relay continuity. During this check the
Amber Antilock Light is turned on for approximately
1- 2 seconds. Further Functional testing is accomplished once
the vehicle is set in motion, known as drive-off.
² The solenoid valves and the pump/motor are acti-
vated briefly to verify function.
² The voltage output from the wheel speed sensors is
verified to be within the correct operating range. If the vehicle is not set in motion within 3 minutes
from the time the ignition switch is set in the on po-
sition. The solenoid test is bypassed but the pump/
motor is activated briefly to verify that it is
operating correctly.
CONTROLLER ANTILOCK BRAKE CAB
Fault codes are kept in a Non-Volatile memory un-
til either erased by the technician using the DRB or
erased automatically after 50 ignition cycles (key
ON-OFF cycles). The only fault that will not be
erased after 50 (KEY CYCLES) is the CAB fault. A
CAB fault can only be erased by the technician using
the DRB diagnostic tester. More than one fault can
be stored at a time. The number of key cycles since
the most recent fault was stored is also displayed.
Most functions of the CAB and ABS system can be
accessed by the technician for testing and diagnostic
purposes by using the DRB.
5 - 24 ANTILOCK 4 BRAKE SYSTEM Ä
Page 311 of 2438
LATCHING VERSUS NON-LATCHING ABS FAULTS
Some faults detected by the CAB are latching; the
fault is latched and ABS is disabled until the igni-
tion switch is reset. Thus ABS is disabled even if the
original fault has disappeared. Other faults are non-
latching; any warning lights that are turned on, are
only turned on as long as the fault condition exists.
As soon as the condition goes away, the Antilock
Warning Light is turned off. Although a fault code
will be set in most cases.
BENDIX ANTILOCK 4 BRAKE SYSTEM DIAGNOSTICS
Bendix Antilock 4 Brake System Diagnostics, be-
yond basic mechanical diagnostics, covered earlier in
this section, are accomplished by using the DRB scan
tool. See testing procedures outlined in the 1994 Ben-
dix Antilock 4 Diagnostics Manual. Please refer to the above mentioned manual for
any further electronic diagnostics and service proce-
dures that are required on the Bendix Antilock 4
Brake System.
ON-CAR ABS BRAKE SYSTEM SERVICE
GENERAL SERVICE PRECAUTIONS
The following are general cautions which should be
observed when servicing the Bendix Antilock 4
Brake System and other vehicle electronic systems.
Failure to observe these precautions may result in
Antilock Brake System component damage. If welding work is to be performed on a vehicle us-
ing an electric arc welder, disconnect the 60 way wir-
ing harness connector from the CAB, prior to
performing the welding operation. The wiring harness connector should never be con-
nected or disconnected from the CAB with the igni-
tion key in the ON or Run position. (3) Most components making up the assemblies of
the Bendix Antilock 4 Brake System can not be ser-
viced separately from those assemblies. This will re-
quire replacement of the complete assembly for the
servicing of these components. Do not disassemble
any component from an assembly which is desig-
nated as non-serviceable.
CHECKING BRAKE FLUID LEVEL
CAUTION: Only use brake fluid conforming to DOT
3 specifications, such as Mopar or Equivalent. Do
not use any fluid which contains a petroleum base.
Do not use a container which has been used for pe-
troleum based fluids or a container which is wet
with water. Petroleum based fluids will cause swell-
ing and distortion of rubber parts in the hydraulic
brake system. Water will mix with brake fluid, low-
ering the boiling point of the brake fluid, possibly causing brake fluid to boil resulting in brake fade.
Keep all brake fluid containers capped to prevent
contamination. Remove the front cap of the master
cylinder reservoir and fill to the bottom of the split
ring.
For the specific procedure for the inspection of
brake fluid level and adding of brake to the reser-
voir. Refer to the Service Adjustments Section in this
group of the service manual.
BLEEDING BENDIX ANTILOCK 4 BRAKE SYSTEM
The base brakes and Antilock Brake System must
be bled anytime air is permitted to enter the hydrau-
lic system, due to disconnection of brake lines, hoses
or components. If the Antilock Modulator Assembly is removed
from the vehicle, both the Base Brake System and
the Antilock Brake System must be bled using the
appropriate procedure. It is important to note that
excessive air in the brake system will cause a soft or
spongy feeling brake pedal. During brake bleeding operations, ensure that
brake fluid level remains close to the FULL level in
the reservoir. Check brake fluid level periodically
during bleeding procedure, adding DOT 3 brake fluid
as required.
CAUTION: The base brake and Antilock brake hy-
draulic systems, on the Bendix Antilock 4 Brake
System, can NOT be bled using any type of brake
pressure bleeding equipment. This type of bleeding
equipment does not develop the pressure required
in the brake hydraulic system, to adequately bleed
all trapped air. The only approved method for bleed-
ing air out of the hydraulic system on vehicles
equipped with the Bendix Antilock 4 Brake System,
is the manual procedure of pressurizing the hydrau-
lic system using constant, moderate to heavy foot
pressure on the brake pedal.
The Bendix Antilock 4 Brake System must be bled
as two independent brake systems. The non ABS por-
tion of the brake system is to be bled the same as
any non ABS system. Refer to the Service Adjust-
ments section in this manual for the proper bleeding
procedure to be used. The Bendix Antilock 4 Brake
System can only be bled using a manual method of
pressurizing the brakes hydraulic system. The Antilock portion of brake system MUST be
bled separately. This bleeding procedure requires the
use of the DRB Diagnostic tester and the bleeding se-
quence procedure outlined below.
Ä ANTILOCK 4 BRAKE SYSTEM 5 - 25
Page 313 of 2438
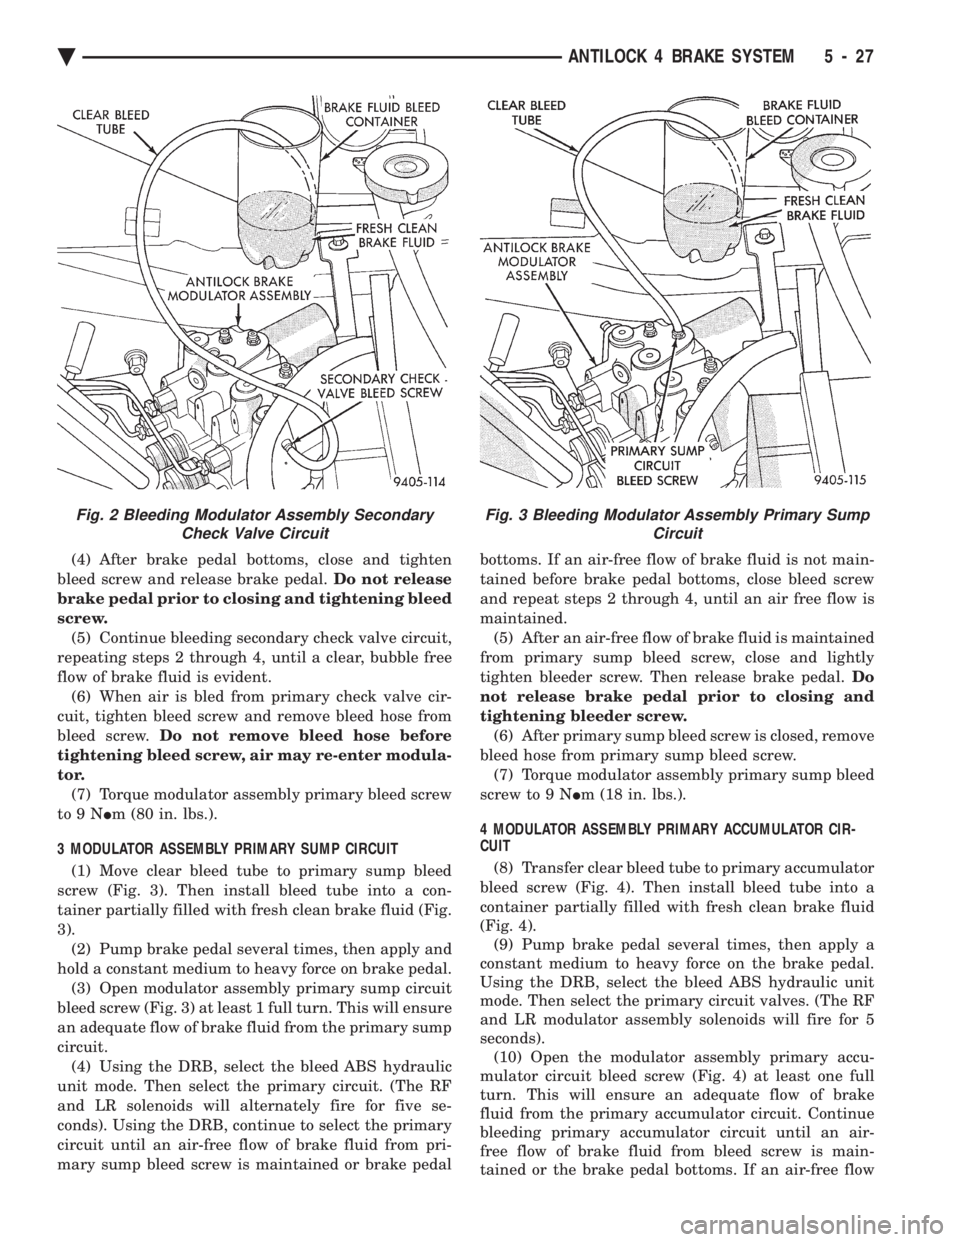
(4) After brake pedal bottoms, close and tighten
bleed screw and release brake pedal. Do not release
brake pedal prior to closing and tightening bleed
screw. (5) Continue bleeding secondary check valve circuit,
repeating steps 2 through 4, until a clear, bubble free
flow of brake fluid is evident. (6) When air is bled from primary check valve cir-
cuit, tighten bleed screw and remove bleed hose from
bleed screw. Do not remove bleed hose before
tightening bleed screw, air may re-enter modula-
tor. (7) Torque modulator assembly primary bleed screw
to9N Im (80 in. lbs.).
3 MODULATOR ASSEMBLY PRIMARY SUMP CIRCUIT (1) Move clear bleed tube to primary sump bleed
screw (Fig. 3). Then install bleed tube into a con-
tainer partially filled with fresh clean brake fluid (Fig.
3). (2) Pump brake pedal several times, then apply and
hold a constant medium to heavy force on brake pedal. (3) Open modulator assembly primary sump circuit
bleed screw (Fig. 3) at least 1 full turn. This will ensure
an adequate flow of brake fluid from the primary sump
circuit. (4) Using the DRB, select the bleed ABS hydraulic
unit mode. Then select the primary circuit. (The RF
and LR solenoids will alternately fire for five se-
conds). Using the DRB, continue to select the primary
circuit until an air-free flow of brake fluid from pri-
mary sump bleed screw is maintained or brake pedal bottoms. If an air-free flow of brake fluid is not main-
tained before brake pedal bottoms, close bleed screw
and repeat steps 2 through 4, until an air free flow is
maintained.
(5) After an air-free flow of brake fluid is maintained
from primary sump bleed screw, close and lightly
tighten bleeder screw. Then release brake pedal. Do
not release brake pedal prior to closing and
tightening bleeder screw. (6) After primary sump bleed screw is closed, remove
bleed hose from primary sump bleed screw. (7) Torque modulator assembly primary sump bleed
screw to 9 N Im (18 in. lbs.).
4 MODULATOR ASSEMBLY PRIMARY ACCUMULATOR CIR-
CUIT
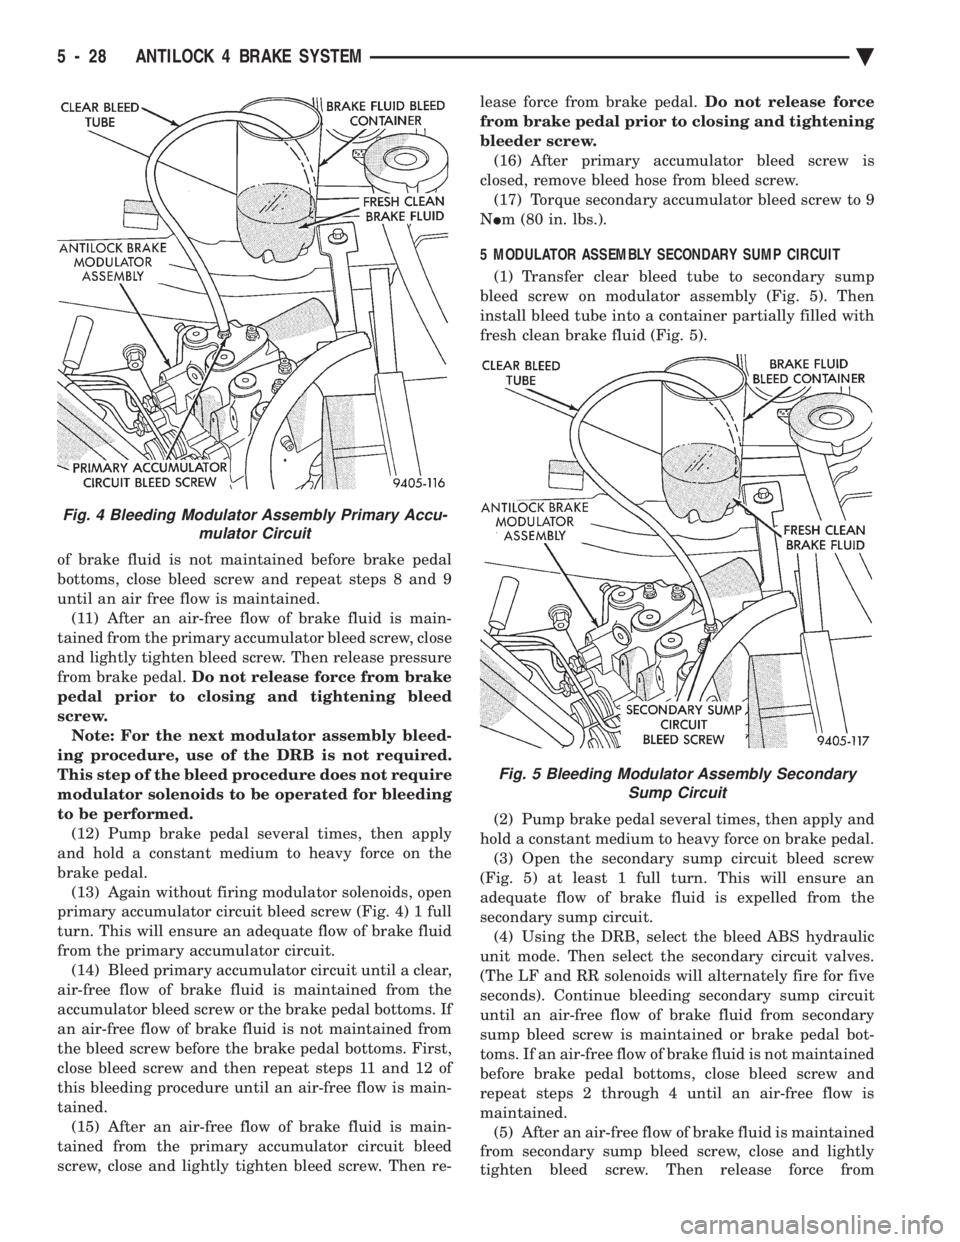
(8) Transfer clear bleed tube to primary accumulator
bleed screw (Fig. 4). Then install bleed tube into a
container partially filled with fresh clean brake fluid
(Fig. 4). (9) Pump brake pedal several times, then apply a
constant medium to heavy force on the brake pedal.
Using the DRB, select the bleed ABS hydraulic unit
mode. Then select the primary circuit valves. (The RF
and LR modulator assembly solenoids will fire for 5
seconds). (10) Open the modulator assembly primary accu-
mulator circuit bleed screw (Fig. 4) at least one full
turn. This will ensure an adequate flow of brake
fluid from the primary accumulator circuit. Continue
bleeding primary accumulator circuit until an air-
free flow of brake fluid from bleed screw is main-
tained or the brake pedal bottoms. If an air-free flow
Fig. 3 Bleeding Modulator Assembly Primary Sump CircuitFig. 2 Bleeding Modulator Assembly SecondaryCheck Valve Circuit
Ä ANTILOCK 4 BRAKE SYSTEM 5 - 27
Page 314 of 2438
of brake fluid is not maintained before brake pedal
bottoms, close bleed screw and repeat steps 8 and 9
until an air free flow is maintained.(11) After an air-free flow of brake fluid is main-
tained from the primary accumulator bleed screw, close
and lightly tighten bleed screw. Then release pressure
from brake pedal. Do not release force from brake
pedal prior to closing and tightening bleed
screw. Note: For the next modulator assembly bleed-
ing procedure, use of the DRB is not required.
This step of the bleed procedure does not require
modulator solenoids to be operated for bleeding
to be performed. (12) Pump brake pedal several times, then apply
and hold a constant medium to heavy force on the
brake pedal. (13) Again without firing modulator solenoids, open
primary accumulator circuit bleed screw (Fig. 4) 1 full
turn. This will ensure an adequate flow of brake fluid
from the primary accumulator circuit. (14) Bleed primary accumulator circuit until a clear,
air-free flow of brake fluid is maintained from the
accumulator bleed screw or the brake pedal bottoms. If
an air-free flow of brake fluid is not maintained from
the bleed screw before the brake pedal bottoms. First,
close bleed screw and then repeat steps 11 and 12 of
this bleeding procedure until an air-free flow is main-
tained. (15) After an air-free flow of brake fluid is main-
tained from the primary accumulator circuit bleed
screw, close and lightly tighten bleed screw. Then re- lease force from brake pedal.
Do not release force
from brake pedal prior to closing and tightening
bleeder screw. (16) After primary accumulator bleed screw is
closed, remove bleed hose from bleed screw. (17) Torque secondary accumulator bleed screw to 9
N Im (80 in. lbs.).
5 MODULATOR ASSEMBLY SECONDARY SUMP CIRCUIT (1) Transfer clear bleed tube to secondary sump
bleed screw on modulator assembly (Fig. 5). Then
install bleed tube into a container partially filled with
fresh clean brake fluid (Fig. 5).
(2) Pump brake pedal several times, then apply and
hold a constant medium to heavy force on brake pedal. (3) Open the secondary sump circuit bleed screw
(Fig. 5) at least 1 full turn. This will ensure an
adequate flow of brake fluid is expelled from the
secondary sump circuit. (4) Using the DRB, select the bleed ABS hydraulic
unit mode. Then select the secondary circuit valves.
(The LF and RR solenoids will alternately fire for five
seconds). Continue bleeding secondary sump circuit
until an air-free flow of brake fluid from secondary
sump bleed screw is maintained or brake pedal bot-
toms. If an air-free flow of brake fluid is not maintained
before brake pedal bottoms, close bleed screw and
repeat steps 2 through 4 until an air-free flow is
maintained. (5) After an air-free flow of brake fluid is maintained
from secondary sump bleed screw, close and lightly
tighten bleed screw. Then release force from
Fig. 4 Bleeding Modulator Assembly Primary Accu- mulator Circuit
Fig. 5 Bleeding Modulator Assembly SecondarySump Circuit
5 - 28 ANTILOCK 4 BRAKE SYSTEM Ä
Page 315 of 2438
brake pedal. Do not release brake pedal prior to
closing and tightening bleeder screw. (6) After secondary sump bleed screw is closed, re-
move bleed hose from bleed screw. (7) Torque secondary sump bleed screw to 9 N Im (80
in. lbs.).
6 MODULATOR ASSEMBLY SECONDARY ACCUMULATOR
CIRCUIT
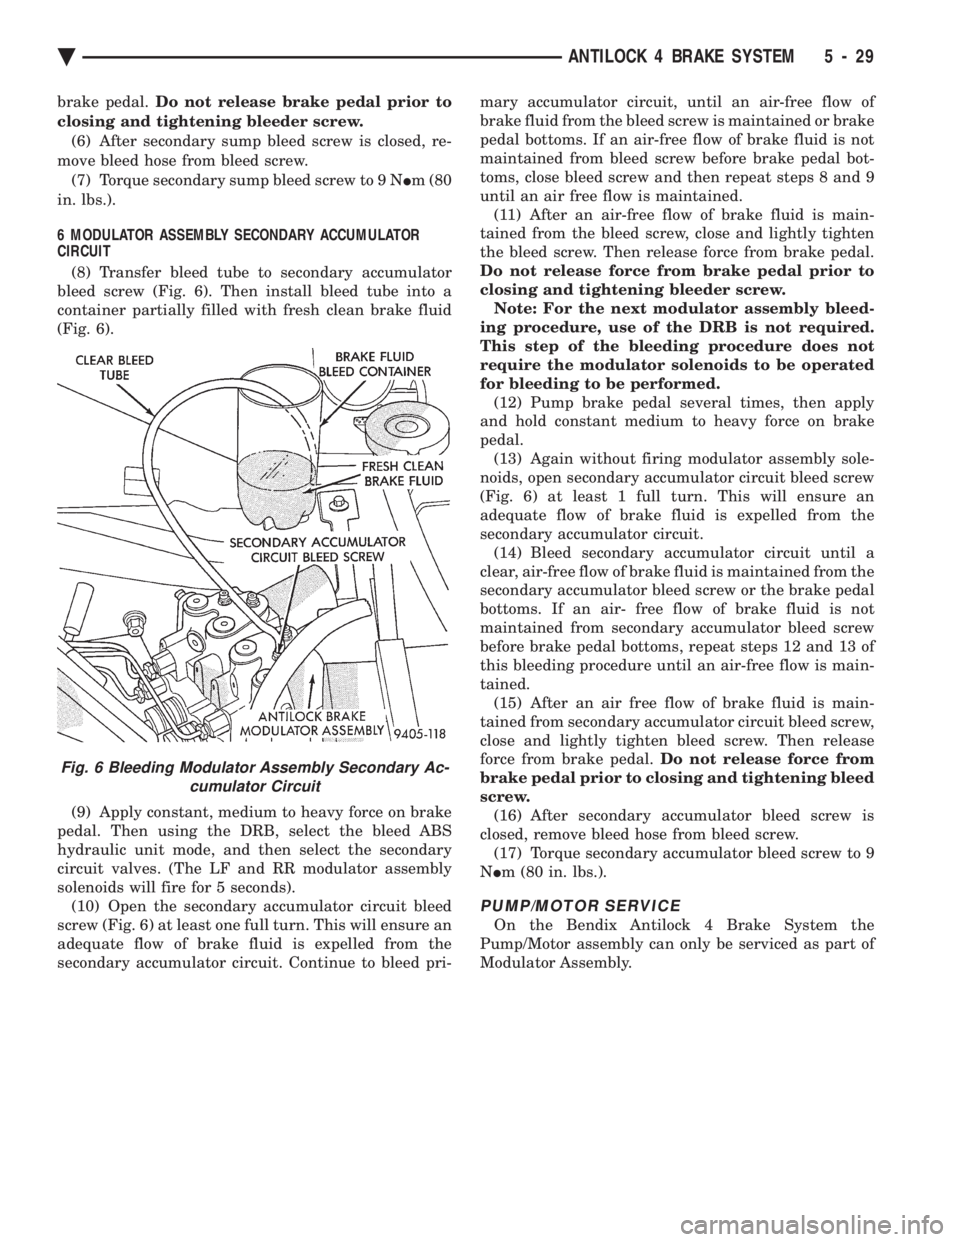
(8) Transfer bleed tube to secondary accumulator
bleed screw (Fig. 6). Then install bleed tube into a
container partially filled with fresh clean brake fluid
(Fig. 6).
(9) Apply constant, medium to heavy force on brake
pedal. Then using the DRB, select the bleed ABS
hydraulic unit mode, and then select the secondary
circuit valves. (The LF and RR modulator assembly
solenoids will fire for 5 seconds). (10) Open the secondary accumulator circuit bleed
screw (Fig. 6) at least one full turn. This will ensure an
adequate flow of brake fluid is expelled from the
secondary accumulator circuit. Continue to bleed pri- mary accumulator circuit, until an air-free flow of
brake fluid from the bleed screw is maintained or brake
pedal bottoms. If an air-free flow of brake fluid is not
maintained from bleed screw before brake pedal bot-
toms, close bleed screw and then repeat steps 8 and 9
until an air free flow is maintained. (11) After an air-free flow of brake fluid is main-
tained from the bleed screw, close and lightly tighten
the bleed screw. Then release force from brake pedal.
Do not release force from brake pedal prior to
closing and tightening bleeder screw. Note: For the next modulator assembly bleed-
ing procedure, use of the DRB is not required.
This step of the bleeding procedure does not
require the modulator solenoids to be operated
for bleeding to be performed. (12) Pump brake pedal several times, then apply
and hold constant medium to heavy force on brake
pedal. (13) Again without firing modulator assembly sole-
noids, open secondary accumulator circuit bleed screw
(Fig. 6) at least 1 full turn. This will ensure an
adequate flow of brake fluid is expelled from the
secondary accumulator circuit. (14) Bleed secondary accumulator circuit until a
clear, air-free flow of brake fluid is maintained from the
secondary accumulator bleed screw or the brake pedal
bottoms. If an air- free flow of brake fluid is not
maintained from secondary accumulator bleed screw
before brake pedal bottoms, repeat steps 12 and 13 of
this bleeding procedure until an air-free flow is main-
tained. (15) After an air free flow of brake fluid is main-
tained from secondary accumulator circuit bleed screw,
close and lightly tighten bleed screw. Then release
force from brake pedal. Do not release force from
brake pedal prior to closing and tightening bleed
screw. (16) After secondary accumulator bleed screw is
closed, remove bleed hose from bleed screw. (17) Torque secondary accumulator bleed screw to 9
N Im (80 in. lbs.).
PUMP/MOTOR SERVICE
On the Bendix Antilock 4 Brake System the
Pump/Motor assembly can only be serviced as part of
Modulator Assembly.
Fig. 6 Bleeding Modulator Assembly Secondary Ac- cumulator Circuit
Ä ANTILOCK 4 BRAKE SYSTEM 5 - 29
Page 325 of 2438
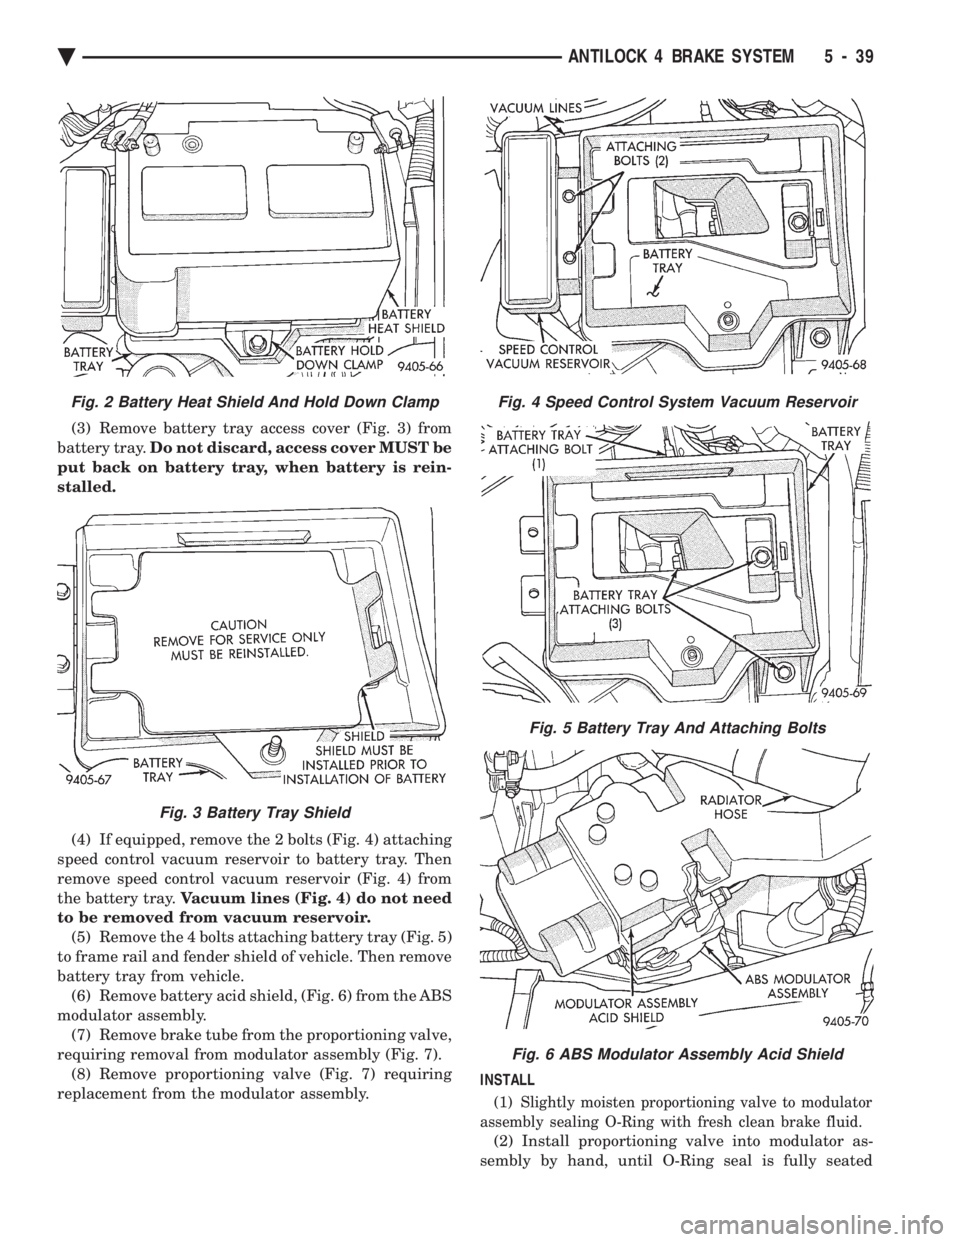
(3) Remove battery tray access cover (Fig. 3) from
battery tray. Do not discard, access cover MUST be
put back on battery tray, when battery is rein-
stalled.
(4) If equipped, remove the 2 bolts (Fig. 4) attaching
speed control vacuum reservoir to battery tray. Then
remove speed control vacuum reservoir (Fig. 4) from
the battery tray. Vacuum lines (Fig. 4) do not need
to be removed from vacuum reservoir. (5) Remove the 4 bolts attaching battery tray (Fig. 5)
to frame rail and fender shield of vehicle. Then remove
battery tray from vehicle. (6) Remove battery acid shield, (Fig. 6) from the ABS
modulator assembly. (7) Remove brake tube from the proportioning valve,
requiring removal from modulator assembly (Fig. 7). (8) Remove proportioning valve (Fig. 7) requiring
replacement from the modulator assembly. INSTALL
(1) Slightly moisten proportioning valve to modulator
assembly sealing O-Ring with fresh clean brake fluid.
(2) Install proportioning valve into modulator as-
sembly by hand, until O-Ring seal is fully seated
Fig. 4 Speed Control System Vacuum Reservoir
Fig. 5 Battery Tray And Attaching Bolts
Fig. 6 ABS Modulator Assembly Acid Shield
Fig. 2 Battery Heat Shield And Hold Down Clamp
Fig. 3 Battery Tray Shield
Ä ANTILOCK 4 BRAKE SYSTEM 5 - 39
Page 385 of 2438
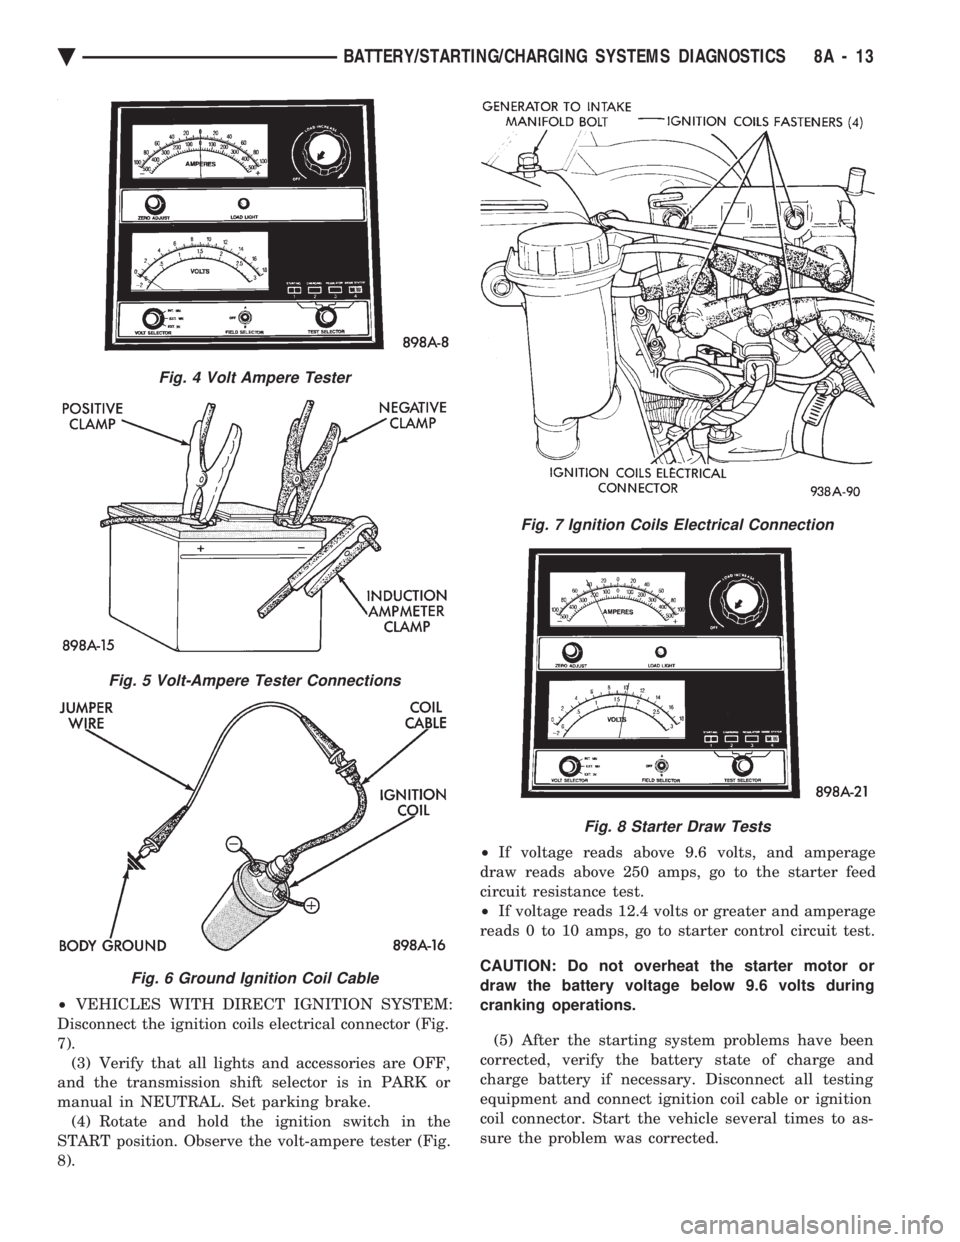
² VEHICLES WITH DIRECT IGNITION SYSTEM:
Disconnect the ignition coils electrical connector (Fig.
7). (3) Verify that all lights and accessories are OFF,
and the transmission shift selector is in PARK or
manual in NEUTRAL. Set parking brake. (4) Rotate and hold the ignition switch in the
START position. Observe the volt-ampere tester (Fig.
8). ²
If voltage reads above 9.6 volts, and amperage
draw reads above 250 amps, go to the starter feed
circuit resistance test.
² If voltage reads 12.4 volts or greater and amperage
reads 0 to 10 amps, go to starter control circuit test.
CAUTION: Do not overheat the starter motor or
draw the battery voltage below 9.6 volts during
cranking operations.
(5) After the starting system problems have been
corrected, verify the battery state of charge and
charge battery if necessary. Disconnect all testing
equipment and connect ignition coil cable or ignition
coil connector. Start the vehicle several times to as-
sure the problem was corrected.
Fig. 4 Volt Ampere Tester
Fig. 5 Volt-Ampere Tester Connections
Fig. 6 Ground Ignition Coil Cable
Fig. 7 Ignition Coils Electrical Connection
Fig. 8 Starter Draw Tests
Ä BATTERY/STARTING/CHARGING SYSTEMS DIAGNOSTICS 8A - 13