CHEVROLET PLYMOUTH ACCLAIM 1993 Service Manual
Manufacturer: CHEVROLET, Model Year: 1993, Model line: PLYMOUTH ACCLAIM, Model: CHEVROLET PLYMOUTH ACCLAIM 1993Pages: 2438, PDF Size: 74.98 MB
Page 1881 of 2438
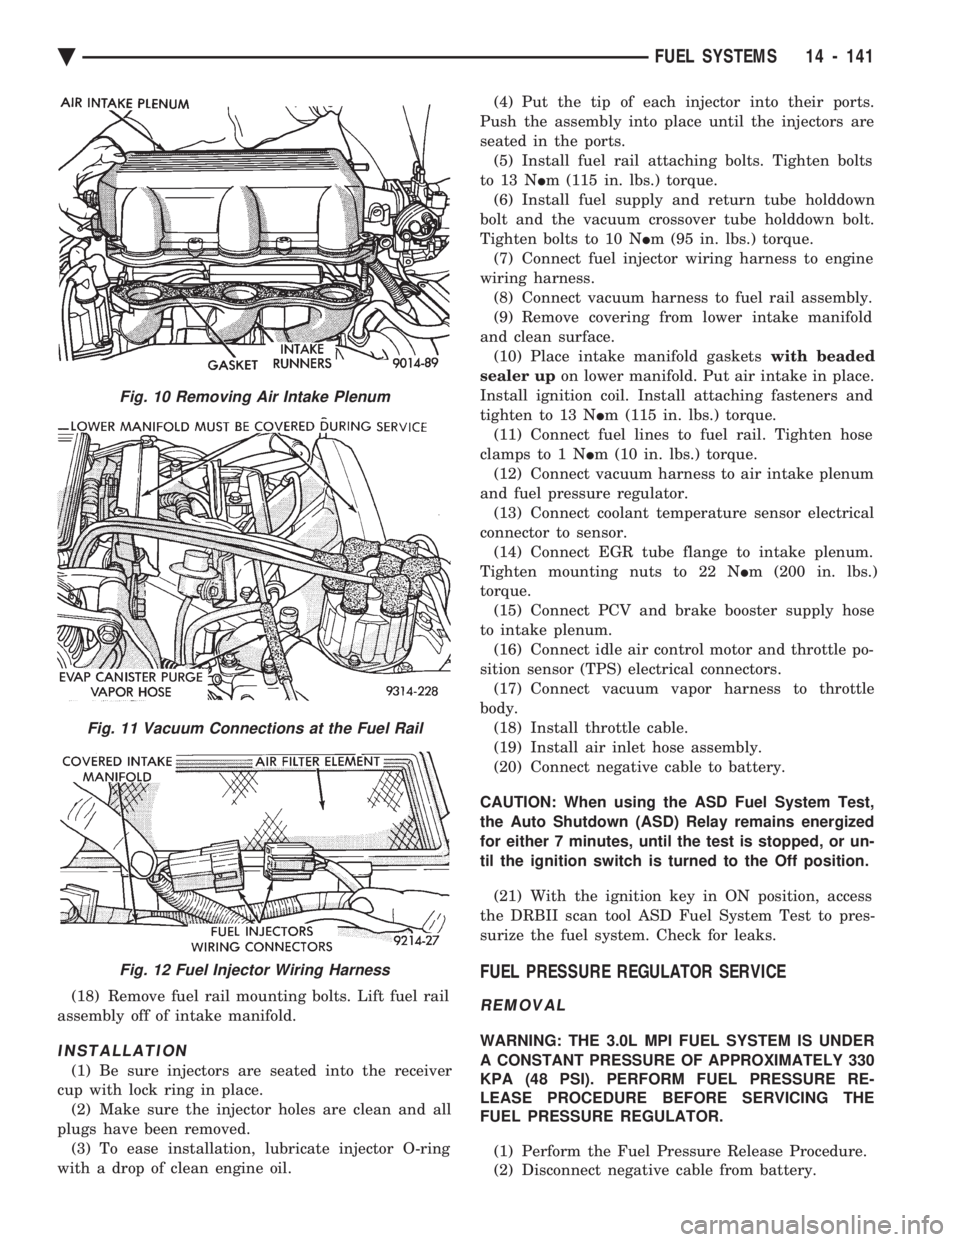
(18) Remove fuel rail mounting bolts. Lift fuel rail
assembly off of intake manifold.
INSTALLATION
(1) Be sure injectors are seated into the receiver
cup with lock ring in place. (2) Make sure the injector holes are clean and all
plugs have been removed. (3) To ease installation, lubricate injector O-ring
with a drop of clean engine oil. (4) Put the tip of each injector into their ports.
Push the assembly into place until the injectors are
seated in the ports. (5) Install fuel rail attaching bolts. Tighten bolts
to 13 N Im (115 in. lbs.) torque.
(6) Install fuel supply and return tube holddown
bolt and the vacuum crossover tube holddown bolt.
Tighten bolts to 10 N Im (95 in. lbs.) torque.
(7) Connect fuel injector wiring harness to engine
wiring harness. (8) Connect vacuum harness to fuel rail assembly.
(9) Remove covering from lower intake manifold
and clean surface. (10) Place intake manifold gaskets with beaded
sealer up on lower manifold. Put air intake in place.
Install ignition coil. Install attaching fasteners and
tighten to 13 N Im (115 in. lbs.) torque.
(11) Connect fuel lines to fuel rail. Tighten hose
clamps to 1 N Im (10 in. lbs.) torque.
(12) Connect vacuum harness to air intake plenum
and fuel pressure regulator. (13) Connect coolant temperature sensor electrical
connector to sensor. (14) Connect EGR tube flange to intake plenum.
Tighten mounting nuts to 22 N Im (200 in. lbs.)
torque. (15) Connect PCV and brake booster supply hose
to intake plenum. (16) Connect idle air control motor and throttle po-
sition sensor (TPS) electrical connectors. (17) Connect vacuum vapor harness to throttle
body. (18) Install throttle cable.
(19) Install air inlet hose assembly.
(20) Connect negative cable to battery.
CAUTION: When using the ASD Fuel System Test,
the Auto Shutdown (ASD) Relay remains energized
for either 7 minutes, until the test is stopped, or un-
til the ignition switch is turned to the Off position. (21) With the ignition key in ON position, access
the DRBII scan tool ASD Fuel System Test to pres-
surize the fuel system. Check for leaks.
FUEL PRESSURE REGULATOR SERVICE
REMOVAL
WARNING: THE 3.0L MPI FUEL SYSTEM IS UNDER
A CONSTANT PRESSURE OF APPROXIMATELY 330
KPA (48 PSI). PERFORM FUEL PRESSURE RE-
LEASE PROCEDURE BEFORE SERVICING THE
FUEL PRESSURE REGULATOR.
(1) Perform the Fuel Pressure Release Procedure.
(2) Disconnect negative cable from battery.
Fig. 10 Removing Air Intake Plenum
Fig. 11 Vacuum Connections at the Fuel Rail
Fig. 12 Fuel Injector Wiring Harness
Ä FUEL SYSTEMS 14 - 141
Page 1882 of 2438
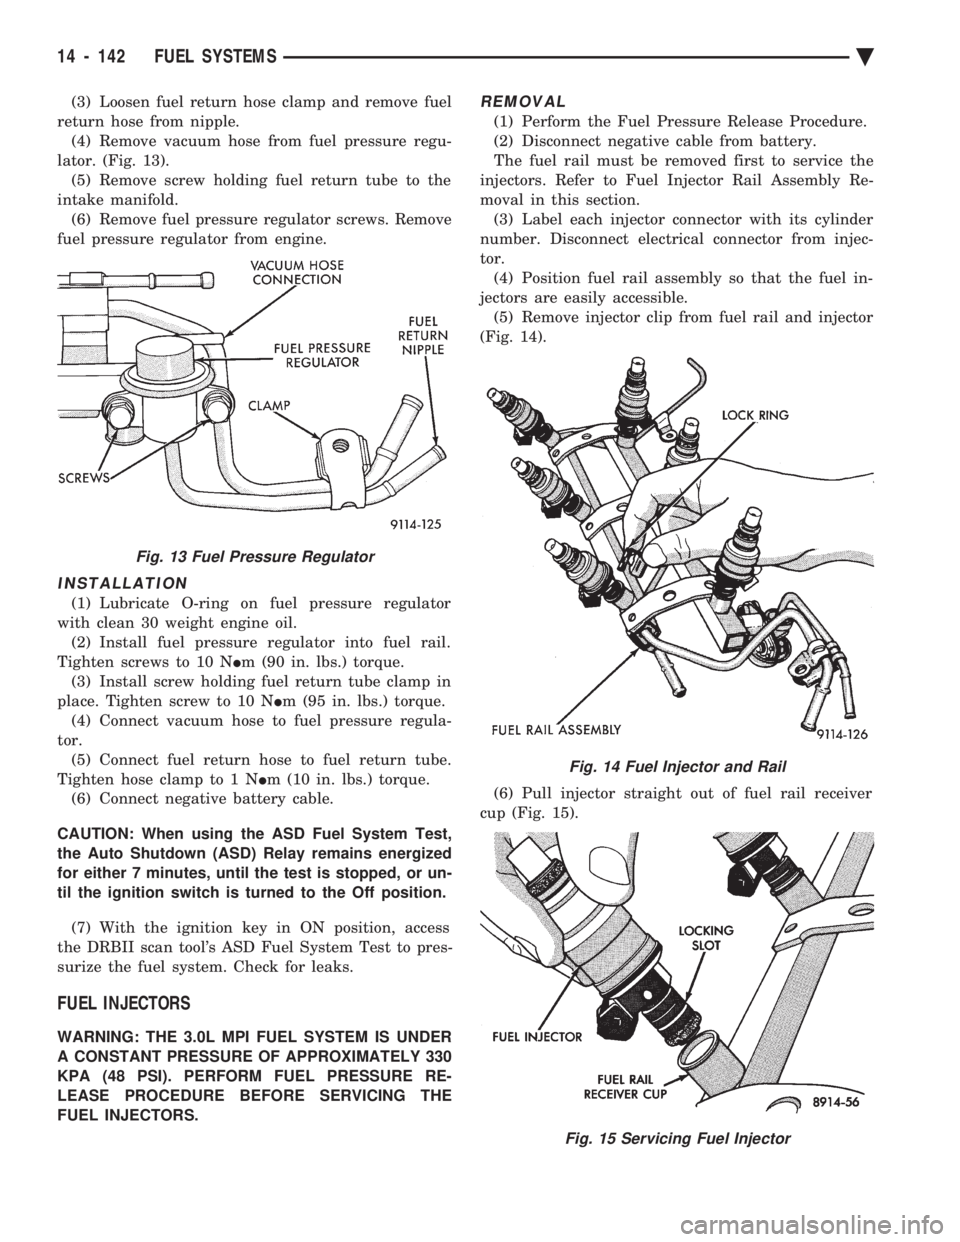
(3) Loosen fuel return hose clamp and remove fuel
return hose from nipple. (4) Remove vacuum hose from fuel pressure regu-
lator. (Fig. 13). (5) Remove screw holding fuel return tube to the
intake manifold. (6) Remove fuel pressure regulator screws. Remove
fuel pressure regulator from engine.
INSTALLATION
(1) Lubricate O-ring on fuel pressure regulator
with clean 30 weight engine oil. (2) Install fuel pressure regulator into fuel rail.
Tighten screws to 10 N Im (90 in. lbs.) torque.
(3) Install screw holding fuel return tube clamp in
place. Tighten screw to 10 N Im (95 in. lbs.) torque.
(4) Connect vacuum hose to fuel pressure regula-
tor. (5) Connect fuel return hose to fuel return tube.
Tighten hose clamp to 1 N Im (10 in. lbs.) torque.
(6) Connect negative battery cable.
CAUTION: When using the ASD Fuel System Test,
the Auto Shutdown (ASD) Relay remains energized
for either 7 minutes, until the test is stopped, or un-
til the ignition switch is turned to the Off position.
(7) With the ignition key in ON position, access
the DRBII scan tool's ASD Fuel System Test to pres-
surize the fuel system. Check for leaks.
FUEL INJECTORS
WARNING: THE 3.0L MPI FUEL SYSTEM IS UNDER
A CONSTANT PRESSURE OF APPROXIMATELY 330
KPA (48 PSI). PERFORM FUEL PRESSURE RE-
LEASE PROCEDURE BEFORE SERVICING THE
FUEL INJECTORS.
REMOVAL
(1) Perform the Fuel Pressure Release Procedure.
(2) Disconnect negative cable from battery.
The fuel rail must be removed first to service the
injectors. Refer to Fuel Injector Rail Assembly Re-
moval in this section. (3) Label each injector connector with its cylinder
number. Disconnect electrical connector from injec-
tor. (4) Position fuel rail assembly so that the fuel in-
jectors are easily accessible. (5) Remove injector clip from fuel rail and injector
(Fig. 14).
(6) Pull injector straight out of fuel rail receiver
cup (Fig. 15).
Fig. 13 Fuel Pressure Regulator
Fig. 14 Fuel Injector and Rail
Fig. 15 Servicing Fuel Injector
14 - 142 FUEL SYSTEMS Ä
Page 1883 of 2438
(7) Check injector O-ring for damage. If O-ring is
damaged, it must be replaced. If injector is to be re-
used, a protective cap must be installed on the injec-
tor tip to prevent damage. (8) Repeat procedure for remaining injectors.
INSTALLATION
(1) Before installing an injector, the rubber O-ring
must be lubricated with a drop of clean engine oil to
aid in installation. (2) Being careful not to damage O-ring, install in-
jector nozzle end into fuel rail receiver cap (Fig. 15). (3) Install injector clip by sliding open end into top
slot of the injector. The edge of the receiver cup will
slide into the side slots of clip (Fig. 14). (4) Repeat steps for remaining injectors.
(5) Install fuel rail assembly. Refer to Fuel Rail
Assembly Installation in this section. (6) Connect electrical connectors to injectors in cor-
rect order. (7) Connect negative battery cable.
CAUTION: When using the ASD Fuel System Test,
the Auto Shutdown (ASD) Relay remains energized
for either 7 minutes, until the test is stopped, or un-
til the ignition switch is turned to the Off position.
(8) With the ignition key in ON position, access
the DRBII scan tool ASD Fuel System Test to pres-
surize the fuel system. Check for leaks.
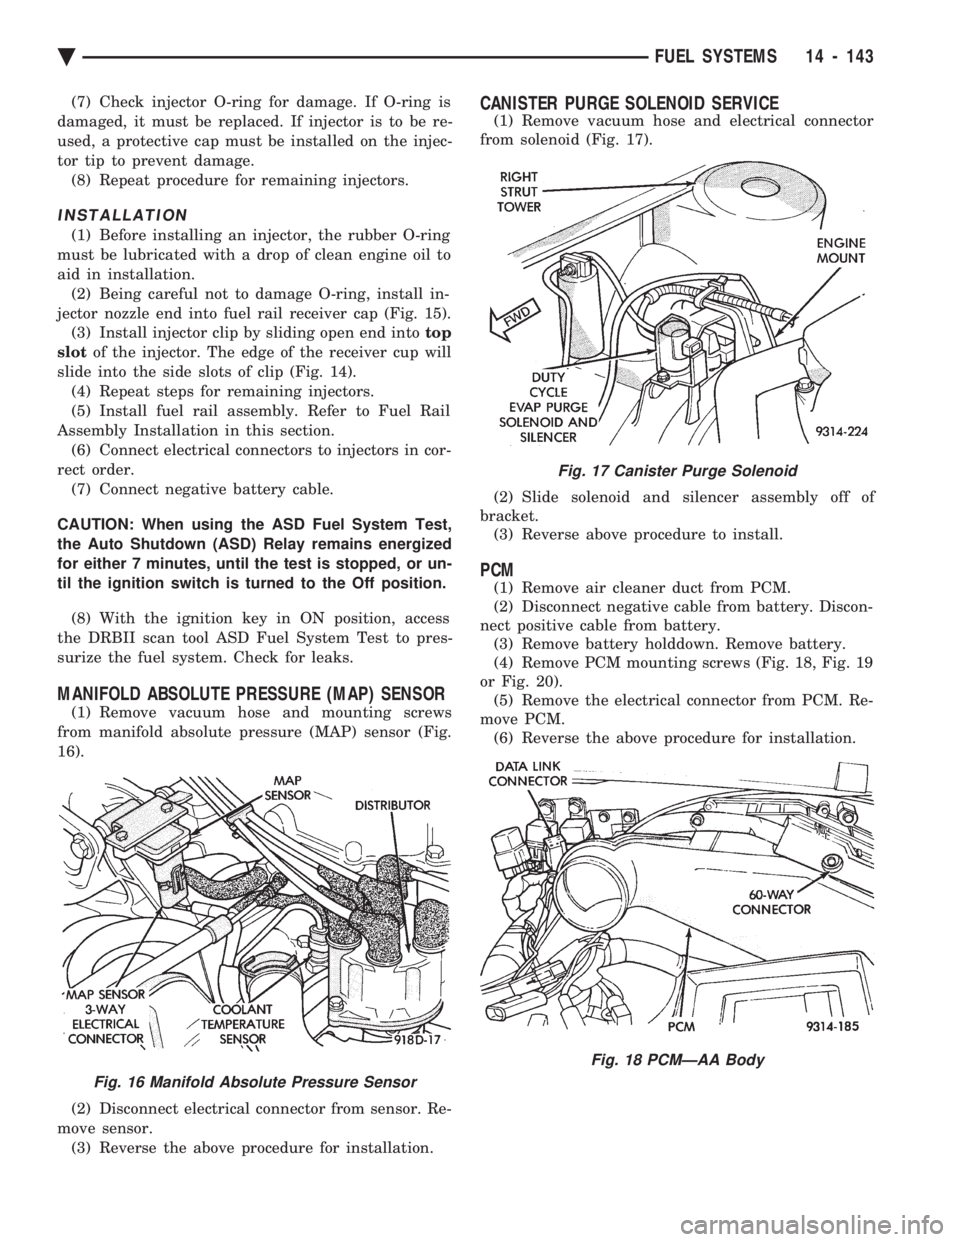
MANIFOLD ABSOLUTE PRESSURE (MAP) SENSOR
(1) Remove vacuum hose and mounting screws
from manifold absolute pressure (MAP) sensor (Fig.
16).
(2) Disconnect electrical connector from sensor. Re-
move sensor. (3) Reverse the above procedure for installation.
CANISTER PURGE SOLENOID SERVICE
(1) Remove vacuum hose and electrical connector
from solenoid (Fig. 17).
(2) Slide solenoid and silencer assembly off of
bracket. (3) Reverse above procedure to install.
PCM
(1) Remove air cleaner duct from PCM.
(2) Disconnect negative cable from battery. Discon-
nect positive cable from battery. (3) Remove battery holddown. Remove battery.
(4) Remove PCM mounting screws (Fig. 18, Fig. 19
or Fig. 20). (5) Remove the electrical connector from PCM. Re-
move PCM. (6) Reverse the above procedure for installation.
Fig. 16 Manifold Absolute Pressure Sensor
Fig. 17 Canister Purge Solenoid
Fig. 18 PCMÐAA Body
Ä FUEL SYSTEMS 14 - 143
Page 1884 of 2438
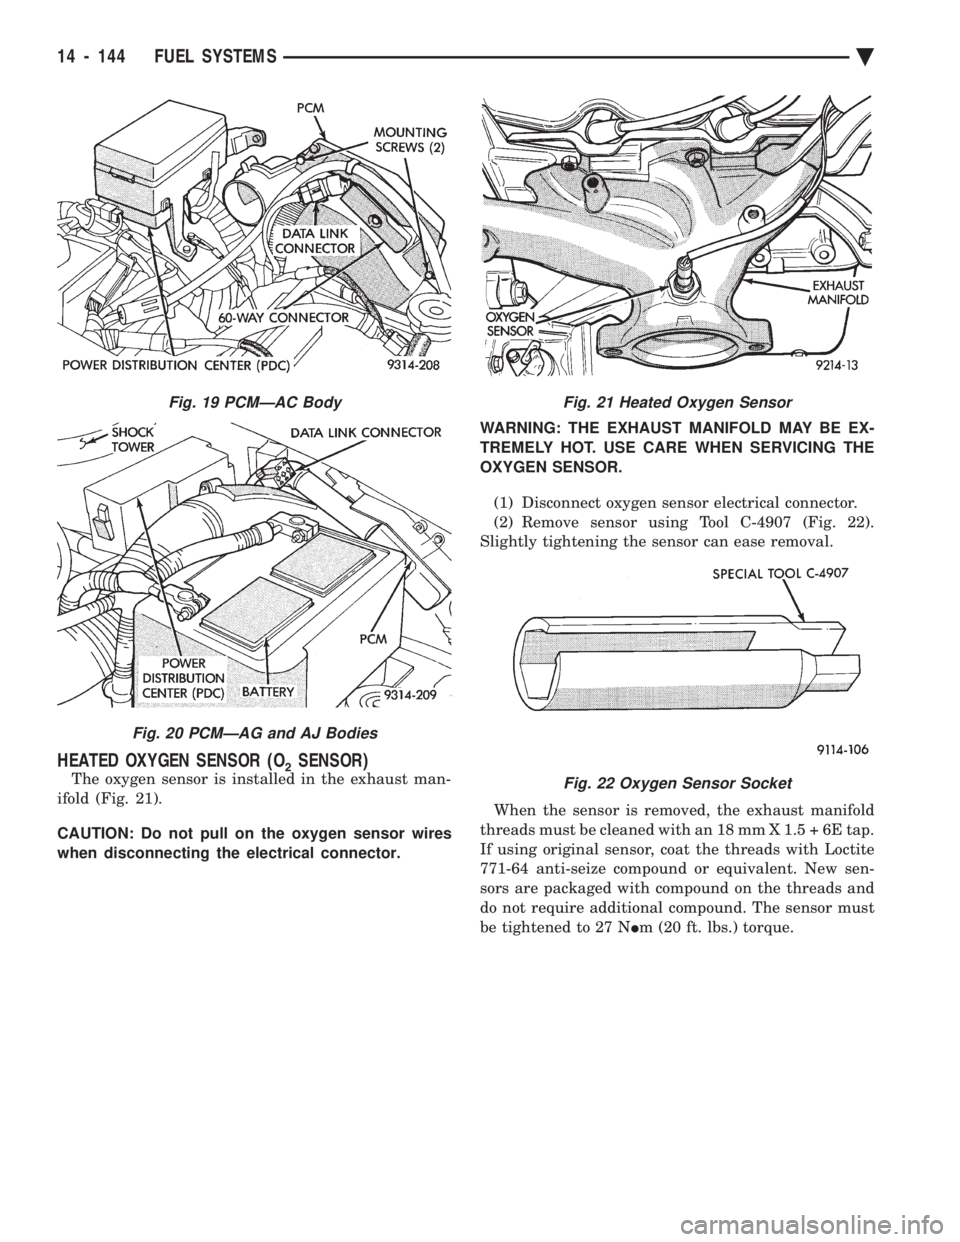
HEATED OXYGEN SENSOR (O2SENSOR)
The oxygen sensor is installed in the exhaust man-
ifold (Fig. 21).
CAUTION: Do not pull on the oxygen sensor wires
when disconnecting the electrical connector. WARNING: THE EXHAUST MANIFOLD MAY BE EX-
TREMELY HOT. USE CARE WHEN SERVICING THE
OXYGEN SENSOR.
(1) Disconnect oxygen sensor electrical connector.
(2) Remove sensor using Tool C-4907 (Fig. 22).
Slightly tightening the sensor can ease removal.
When the sensor is removed, the exhaust manifold
threads must be cleaned with an 18 mm X 1.5 + 6E tap.
If using original sensor, coat the threads with Loctite
771-64 anti-seize compound or equivalent. New sen-
sors are packaged with compound on the threads and
do not require additional compound. The sensor must
be tightened to 27 N Im (20 ft. lbs.) torque.
Fig. 19 PCMÐAC Body
Fig. 20 PCMÐAG and AJ Bodies
Fig. 21 Heated Oxygen Sensor
Fig. 22 Oxygen Sensor Socket
14 - 144 FUEL SYSTEMS Ä
Page 1885 of 2438
3.3L AND 3.8L MULTI-PORT FUEL INJECTIONÐSYSTEM OPERATION INDEX
page page
Air Conditioning (A/C) Clutch RelayÐPCM Output. 150
Air Conditioning Switch SenseÐPCM Input .... 147
Auto Shutdown (ASD) Relay and Fuel Pump RelayÐPCM Output .................... 151
Battery VoltageÐPCM Input ............... 147
Brake SwitchÐPCM Input ................. 147
Camshaft Position SensorÐPCM Input ....... 147
Canister Purge SolenoidÐPCM Output ....... 151
CCD Bus .............................. 146
Crankshaft Position SensorÐPCM Input ...... 148
Data Link ConnectorÐPCM Output .......... 152
Electric EGR Transducer (EET) SolenoidÐPCM Output .............................. 152
Engine Coolant Temperature SensorÐPCM Input. 148
Fuel Injectors and Fuel Rail Assembly ........ 155
Fuel InjectorsÐPCM Output ............... 152
Fuel Pressure Regulator .................. 156
Fuel Supply Circuit ...................... 155
General Information ...................... 145
Generator FieldÐPCM Output .............. 150
Heated Oxygen Sensor (O2Sensor)ÐPCM Input. 149
Idle Air Control MotorÐPCM Output ......... 151
Ignition CoilÐPCM Output ................. 153
Malfunction Indicator Lamp (Check Engine Lamp)ÐPCM Output ................... 151
Manifold Absolute Pressure (MAP) SensorÐPCM Input ................................ 149
Modes of Operation ...................... 153
Powertrain Control Module ................. 146
Radiator Fan RelayÐPCM Output ........... 153
Speed Control SolenoidsÐPCM Output ....... 153
Speed ControlÐPCM Input ................ 150
System Diagnosis ....................... 146
TachometerÐPCM Output ................. 153
Throttle Body ........................... 155
Throttle Position Sensor (TPS)ÐPCM Input .... 150
Transaxle Control ModuleÐPCM Output ...... 152
Transaxle Park/Neutral SwitchÐPCM Input .... 150
Vehicle Speed and Distance InputÐPCM Input . 150
GENERAL INFORMATION
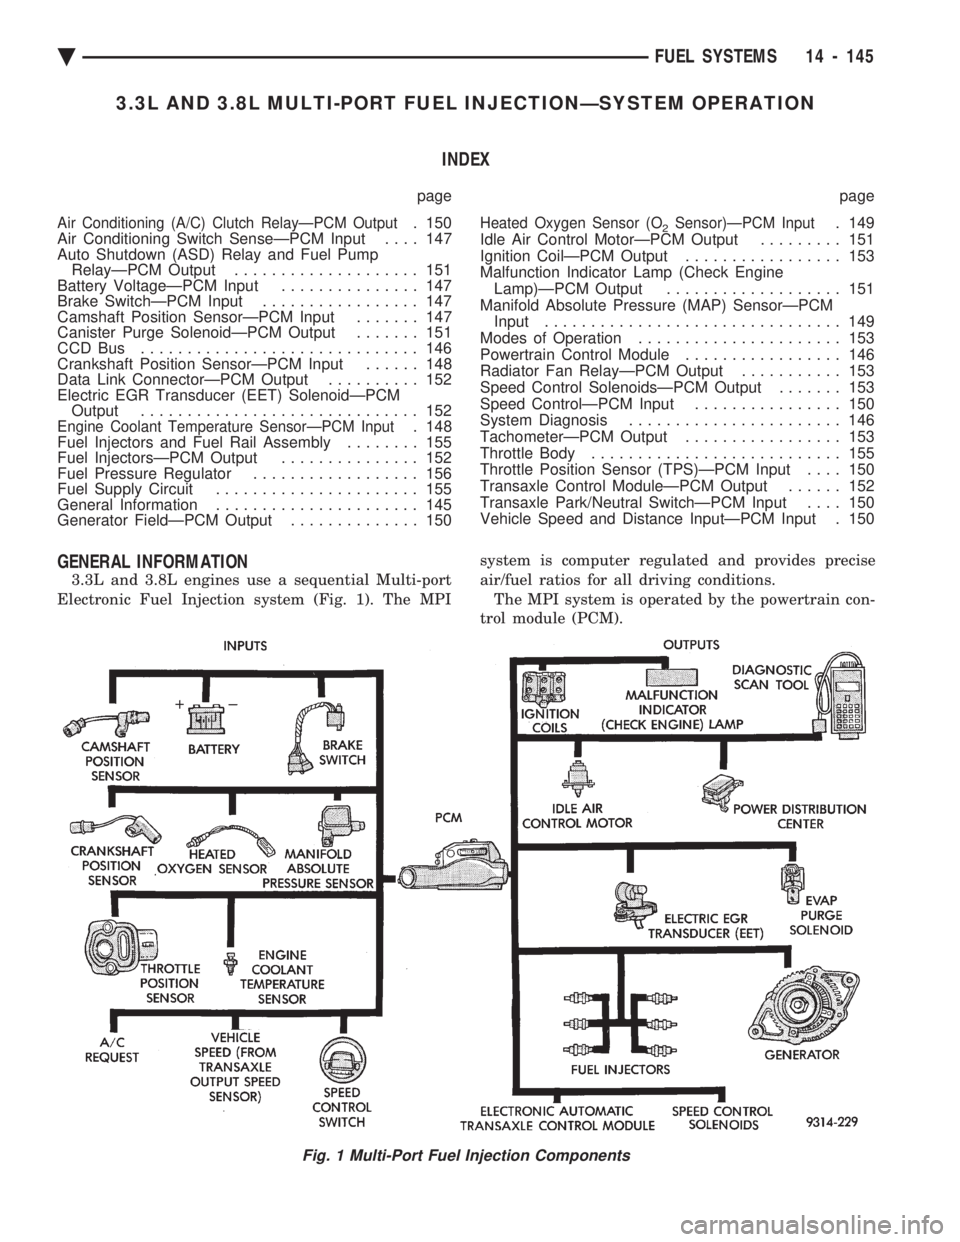
3.3L and 3.8L engines use a sequential Multi-port
Electronic Fuel Injection system (Fig. 1). The MPI system is computer regulated and provides precise
air/fuel ratios for all driving conditions.
The MPI system is operated by the powertrain con-
trol module (PCM).
Fig. 1 Multi-Port Fuel Injection Components
Ä FUEL SYSTEMS 14 - 145
Page 1886 of 2438
The PCM regulates ignition timing, air-fuel ratio,
emission control devices, cooling fan, charging sys-
tem, idle speed and speed control. Various sensors
provide the inputs necessary for the PCM to correctly
operate these systems. In addition to the sensors,
various switches also provide inputs to the PCM. All inputs to the PCM are converted into signals.
The PCM can adapt its programming to meet chang-
ing operating conditions. Fuel is injected into the intake port above the in-
take valve in precise metered amounts through elec-
trically operated injectors. The PCM fires the
injectors in a specific sequence. The PCM maintains
an air fuel ratio of 14.7 parts air to 1 part fuel by
constantly adjusting injector pulse width. Injector
pulse width is the length of time the injector is ener-
gized. The PCM adjusts injector pulse width by opening
and closing the ground path to the injector. Engine
RPM (speed) and manifold absolute pressure (air
density) are the primary inputs that determine injec-
tor pulse width.
SYSTEM DIAGNOSIS
The PCM tests many of its own input and output
circuits. If a fault is found in a major system, the in-
formation is stored in memory. Technicians can dis-
play fault information through the malfunction
indicator lamp (instrument panel Check Engine
lamp) or by connecting the DRBII scan tool. For di-
agnostic trouble code information, refer to the 3.3L/
3.8L Multi-Point Fuel InjectionÐOn-Board
Diagnostics section of this group.
CCD BUS
Various modules exchange information through a
communications port called the CCD Bus. The pow-
ertrain control module (PCM) transmits engine RPM
and vehicle load information on the CCD Bus.
POWERTRAIN CONTROL MODULE
The powertrain control module (PCM) is a digital
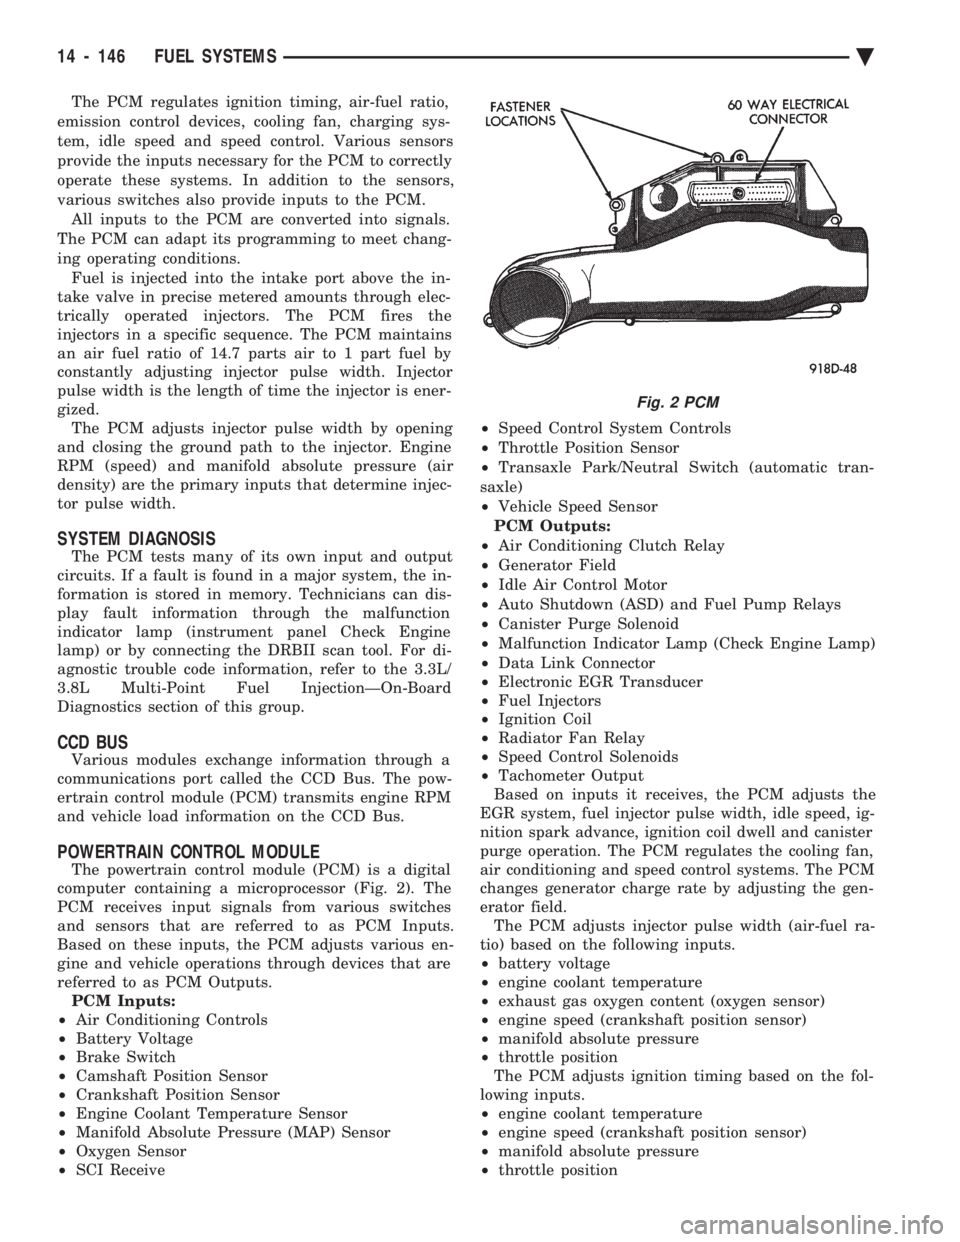
computer containing a microprocessor (Fig. 2). The
PCM receives input signals from various switches
and sensors that are referred to as PCM Inputs.
Based on these inputs, the PCM adjusts various en-
gine and vehicle operations through devices that are
referred to as PCM Outputs. PCM Inputs:
² Air Conditioning Controls
² Battery Voltage
² Brake Switch
² Camshaft Position Sensor
² Crankshaft Position Sensor
² Engine Coolant Temperature Sensor
² Manifold Absolute Pressure (MAP) Sensor
² Oxygen Sensor
² SCI Receive ²
Speed Control System Controls
² Throttle Position Sensor
² Transaxle Park/Neutral Switch (automatic tran-
saxle)
² Vehicle Speed Sensor
PCM Outputs:
² Air Conditioning Clutch Relay
² Generator Field
² Idle Air Control Motor
² Auto Shutdown (ASD) and Fuel Pump Relays
² Canister Purge Solenoid
² Malfunction Indicator Lamp (Check Engine Lamp)
² Data Link Connector
² Electronic EGR Transducer
² Fuel Injectors
² Ignition Coil
² Radiator Fan Relay
² Speed Control Solenoids
² Tachometer Output
Based on inputs it receives, the PCM adjusts the
EGR system, fuel injector pulse width, idle speed, ig-
nition spark advance, ignition coil dwell and canister
purge operation. The PCM regulates the cooling fan,
air conditioning and speed control systems. The PCM
changes generator charge rate by adjusting the gen-
erator field. The PCM adjusts injector pulse width (air-fuel ra-
tio) based on the following inputs.
² battery voltage
² engine coolant temperature
² exhaust gas oxygen content (oxygen sensor)
² engine speed (crankshaft position sensor)
² manifold absolute pressure
² throttle position
The PCM adjusts ignition timing based on the fol-
lowing inputs.
² engine coolant temperature
² engine speed (crankshaft position sensor)
² manifold absolute pressure
² throttle position
Fig. 2 PCM
14 - 146 FUEL SYSTEMS Ä
Page 1887 of 2438
² transaxle gear selection (park/neutral switch)
The PCM also adjusts engine idle speed through
the idle air control motor based on the following in-
puts.
² brake switch
² engine coolant temperature
² engine speed (crankshaft position sensor)
² throttle position
² transaxle gear selection (park/neutral switch)
² vehicle speed
The auto shutdown (ASD) and fuel pump relays are
mounted externally, but turned on and off by the
PCM through the same circuit. The camshaft position sensor and crankshaft posi-
tion sensor signals are sent to the PCM. If the PCM
does not receive both signals within approximately
one second of engine cranking, it deactivates the
ASD and fuel pump relays. When these relays are
deactivated, power is shut off to the fuel injector, ig-
nition coil, oxygen sensor heating element and fuel
pump. The PCM contains a voltage converter that
changes battery voltage to a regulated 8.0 volts. The
8.0 volts power the camshaft position sensor, crank-
shaft position sensor and vehicle speed sensor. The
PCM also provides a 5.0 volts supply for the coolant
temperature sensor, manifold absolute pressure sen-
sor and throttle position sensor.
AIR CONDITIONING SWITCH SENSEÐPCM INPUT
When the air conditioning or defrost switch is put
in the ON position and the low pressure, high pres-
sure and ambient temperature switches are closed,
the PCM receives an input for air conditioning. After
receiving this input, the PCM activates the A/C com-
pressor clutch by grounding the A/C clutch relay.
BATTERY VOLTAGEÐPCM INPUT
The PCM monitors the battery voltage input to de-
termine fuel injector pulse width and generator field
control. If battery voltage is low the PCM will in-
crease injector pulse width.
BRAKE SWITCHÐPCM INPUT
When the brake switch is activated, the PCM re-
ceives an input indicating that the brakes are being
applied. the brake signal cancels speed control and
unlocks the torque convertor. The brake switch is
mounted on the brake pedal support bracket.
CAMSHAFT POSITION SENSORÐPCM INPUT
The camshaft position sensor provides cylinder
identification to the powertrain control module
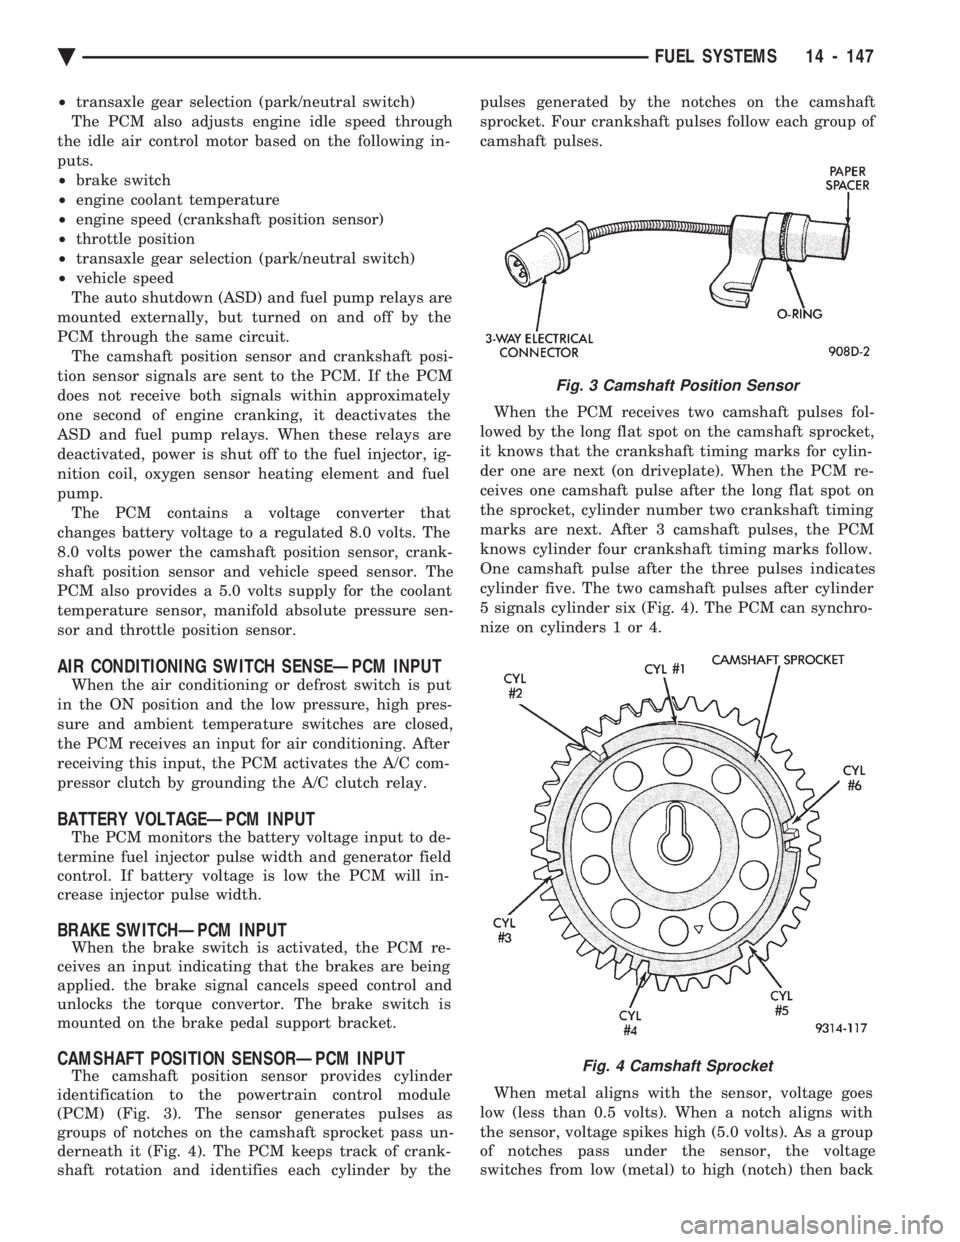
(PCM) (Fig. 3). The sensor generates pulses as
groups of notches on the camshaft sprocket pass un-
derneath it (Fig. 4). The PCM keeps track of crank-
shaft rotation and identifies each cylinder by the pulses generated by the notches on the camshaft
sprocket. Four crankshaft pulses follow each group of
camshaft pulses.
When the PCM receives two camshaft pulses fol-
lowed by the long flat spot on the camshaft sprocket,
it knows that the crankshaft timing marks for cylin-
der one are next (on driveplate). When the PCM re-
ceives one camshaft pulse after the long flat spot on
the sprocket, cylinder number two crankshaft timing
marks are next. After 3 camshaft pulses, the PCM
knows cylinder four crankshaft timing marks follow.
One camshaft pulse after the three pulses indicates
cylinder five. The two camshaft pulses after cylinder
5 signals cylinder six (Fig. 4). The PCM can synchro-
nize on cylinders 1 or 4.
When metal aligns with the sensor, voltage goes
low (less than 0.5 volts). When a notch aligns with
the sensor, voltage spikes high (5.0 volts). As a group
of notches pass under the sensor, the voltage
switches from low (metal) to high (notch) then back
Fig. 3 Camshaft Position Sensor
Fig. 4 Camshaft Sprocket
Ä FUEL SYSTEMS 14 - 147
Page 1888 of 2438
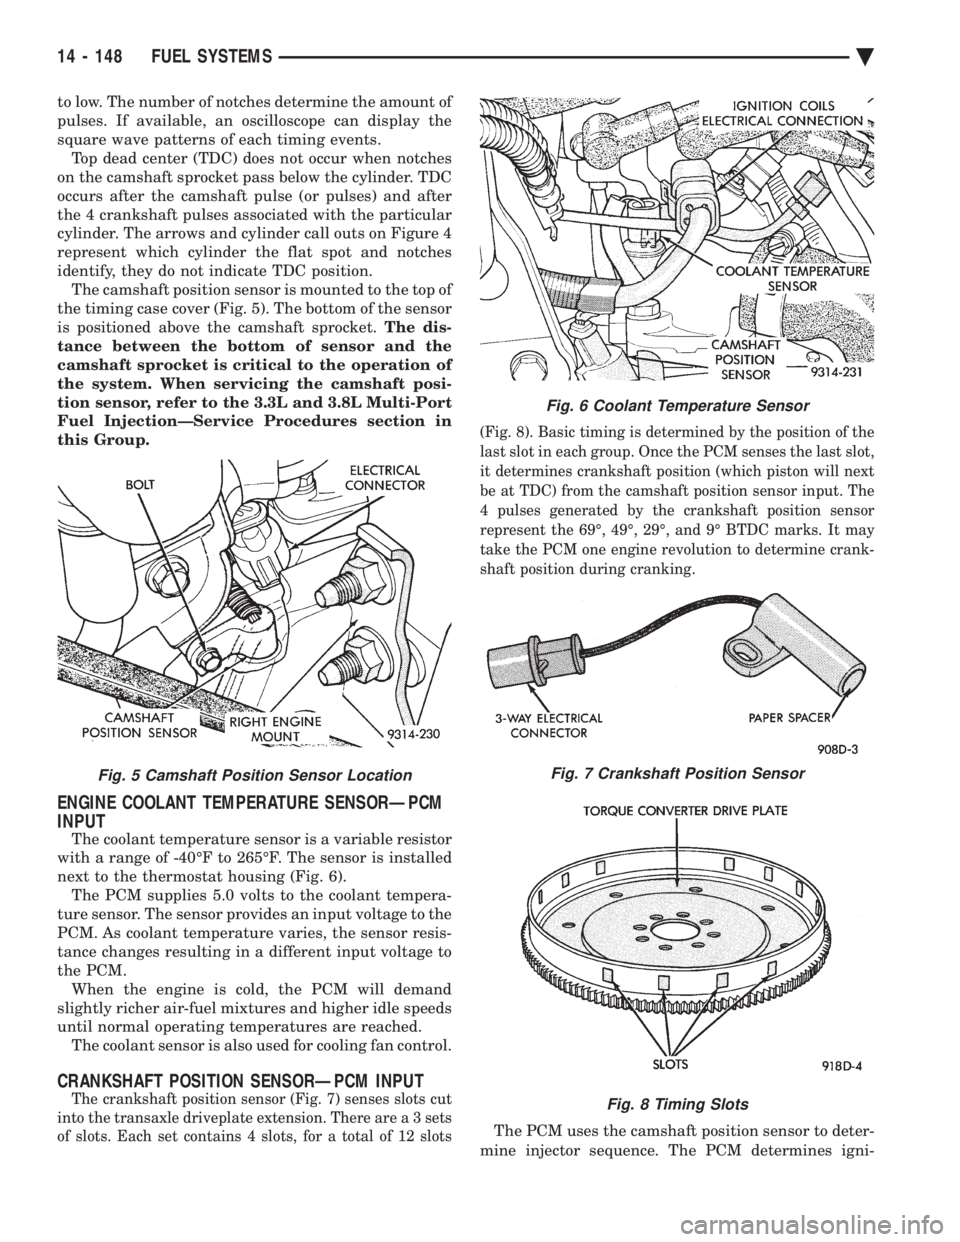
to low. The number of notches determine the amount of
pulses. If available, an oscilloscope can display the
square wave patterns of each timing events. Top dead center (TDC) does not occur when notches
on the camshaft sprocket pass below the cylinder. TDC
occurs after the camshaft pulse (or pulses) and after
the 4 crankshaft pulses associated with the particular
cylinder. The arrows and cylinder call outs on Figure 4
represent which cylinder the flat spot and notches
identify, they do not indicate TDC position. The camshaft position sensor is mounted to the top of
the timing case cover (Fig. 5). The bottom of the sensor
is positioned above the camshaft sprocket. The dis-
tance between the bottom of sensor and the
camshaft sprocket is critical to the operation of
the system. When servicing the camshaft posi-
tion sensor, refer to the 3.3L and 3.8L Multi-Port
Fuel InjectionÐService Procedures section in
this Group.
ENGINE COOLANT TEMPERATURE SENSORÐPCM
INPUT
The coolant temperature sensor is a variable resistor
with a range of -40ÉF to 265ÉF. The sensor is installed
next to the thermostat housing (Fig. 6). The PCM supplies 5.0 volts to the coolant tempera-
ture sensor. The sensor provides an input voltage to the
PCM. As coolant temperature varies, the sensor resis-
tance changes resulting in a different input voltage to
the PCM. When the engine is cold, the PCM will demand
slightly richer air-fuel mixtures and higher idle speeds
until normal operating temperatures are reached. The coolant sensor is also used for cooling fan control.
CRANKSHAFT POSITION SENSORÐPCM INPUT
The crankshaft position sensor (Fig. 7) senses slots cut
into the transaxle driveplate extension. There ar e a 3 sets
of slots. Each set contains 4 slots, for a total of 12 slots (Fig. 8). Basic timing is determined by the position of the
last slot in each group. Once the PCM senses the last slot,
it determines crankshaft position (which piston will next
be at TDC) from the camshaft position sensor input. The
4 pulses generated by the crankshaft position sensor
represent the 69É, 49É, 29É, and 9É BTDC marks. It may
take the PCM one engine revolution to determine crank-
shaft position during cranking.
The PCM uses the camshaft position sensor to deter-
mine injector sequence. The PCM determines igni-
Fig. 5 Camshaft Position Sensor Location
Fig. 6 Coolant Temperature Sensor
Fig. 7 Crankshaft Position Sensor
Fig. 8 Timing Slots
14 - 148 FUEL SYSTEMS Ä
Page 1889 of 2438
tion timing from the crankshaft position sensor. Once
crankshaft position has been determined, the PCM
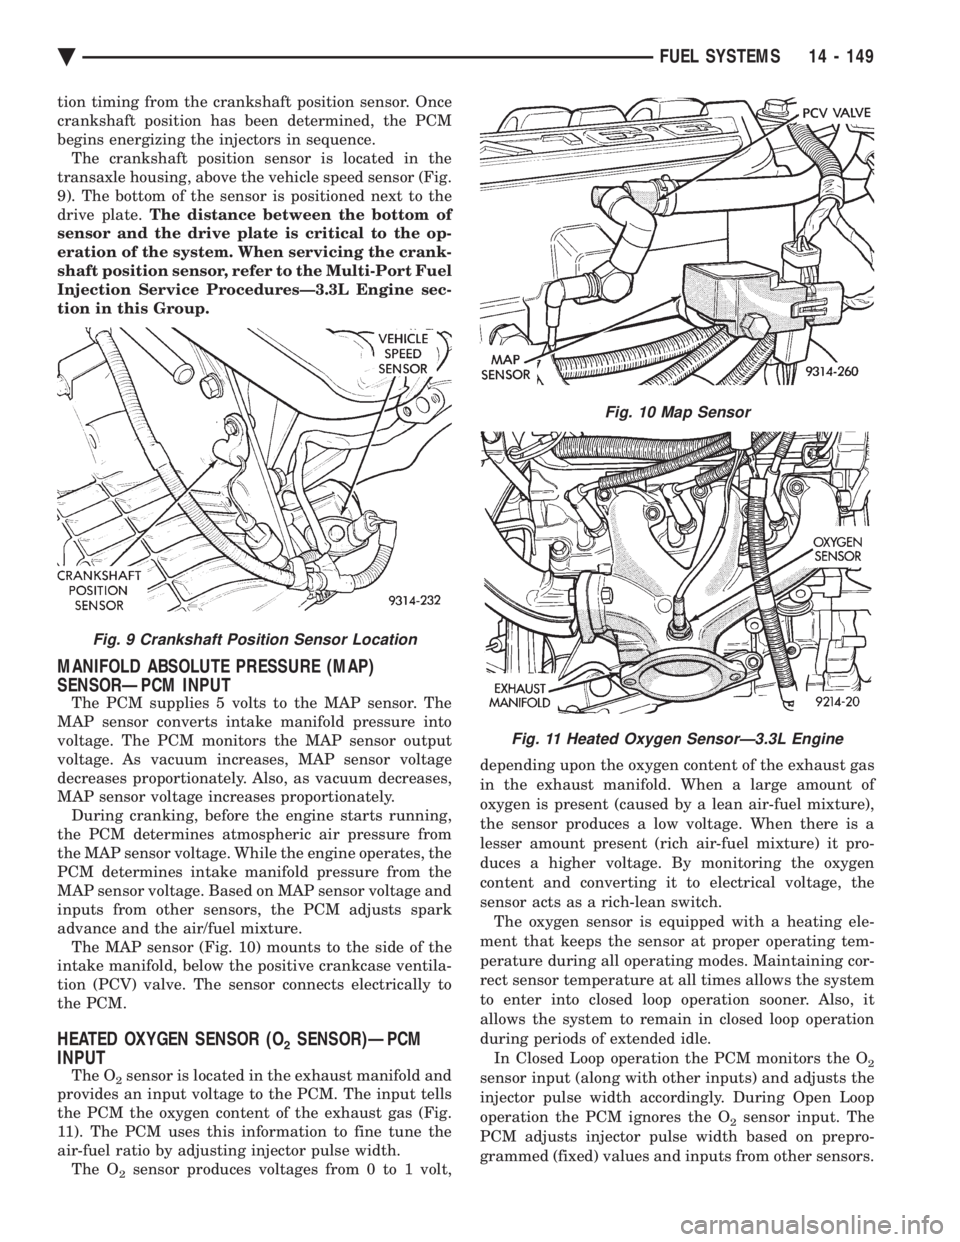
begins energizing the injectors in sequence. The crankshaft position sensor is located in the
transaxle housing, above the vehicle speed sensor (Fig.
9). The bottom of the sensor is positioned next to the
drive plate. The distance between the bottom of
sensor and the drive plate is critical to the op-
eration of the system. When servicing the crank-
shaft position sensor, refer to the Multi-Port Fuel
Injection Service ProceduresÐ3.3L Engine sec-
tion in this Group.
MANIFOLD ABSOLUTE PRESSURE (MAP)
SENSORÐPCM INPUT
The PCM supplies 5 volts to the MAP sensor. The
MAP sensor converts intake manifold pressure into
voltage. The PCM monitors the MAP sensor output
voltage. As vacuum increases, MAP sensor voltage
decreases proportionately. Also, as vacuum decreases,
MAP sensor voltage increases proportionately. During cranking, before the engine starts running,
the PCM determines atmospheric air pressure from
the MAP sensor voltage. While the engine operates, the
PCM determines intake manifold pressure from the
MAP sensor voltage. Based on MAP sensor voltage and
inputs from other sensors, the PCM adjusts spark
advance and the air/fuel mixture. The MAP sensor (Fig. 10) mounts to the side of the
intake manifold, below the positive crankcase ventila-
tion (PCV) valve. The sensor connects electrically to
the PCM.
HEATED OXYGEN SENSOR (O2SENSOR)ÐPCM
INPUT
The O2sensor is located in the exhaust manifold and
provides an input voltage to the PCM. The input tells
the PCM the oxygen content of the exhaust gas (Fig.
11). The PCM uses this information to fine tune the
air-fuel ratio by adjusting injector pulse width. The O
2sensor produces voltages from 0 to 1 volt, depending upon the oxygen content of the exhaust gas
in the exhaust manifold. When a large amount of
oxygen is present (caused by a lean air-fuel mixture),
the sensor produces a low voltage. When there is a
lesser amount present (rich air-fuel mixture) it pro-
duces a higher voltage. By monitoring the oxygen
content and converting it to electrical voltage, the
sensor acts as a rich-lean switch. The oxygen sensor is equipped with a heating ele-
ment that keeps the sensor at proper operating tem-
perature during all operating modes. Maintaining cor-
rect sensor temperature at all times allows the system
to enter into closed loop operation sooner. Also, it
allows the system to remain in closed loop operation
during periods of extended idle. In Closed Loop operation the PCM monitors the O
2
sensor input (along with other inputs) and adjusts the
injector pulse width accordingly. During Open Loop
operation the PCM ignores the O
2sensor input. The
PCM adjusts injector pulse width based on prepro-
grammed (fixed) values and inputs from other sensors.
Fig. 9 Crankshaft Position Sensor Location
Fig. 10 Map Sensor
Fig. 11 Heated Oxygen SensorÐ3.3L Engine
Ä FUEL SYSTEMS 14 - 149
Page 1890 of 2438
SPEED CONTROLÐPCM INPUT
The speed control system provides four separate
voltages (inputs) to the PCM. The voltages corre-
spond to the On/Off, Set, and Resume. The speed control ON voltage informs the PCM
that the speed control system has been activated.
The speed control SET voltage informs the PCM that
a fixed vehicle speed has been selected. The speed
control RESUME voltage indicates the previous fixed
speed is requested. The speed control OFF voltage
tells the PCM that the speed control system has been
deactivated. Refer to Group 8H for further speed con-
trol information.
TRANSAXLE PARK/NEUTRAL SWITCHÐPCM
INPUT
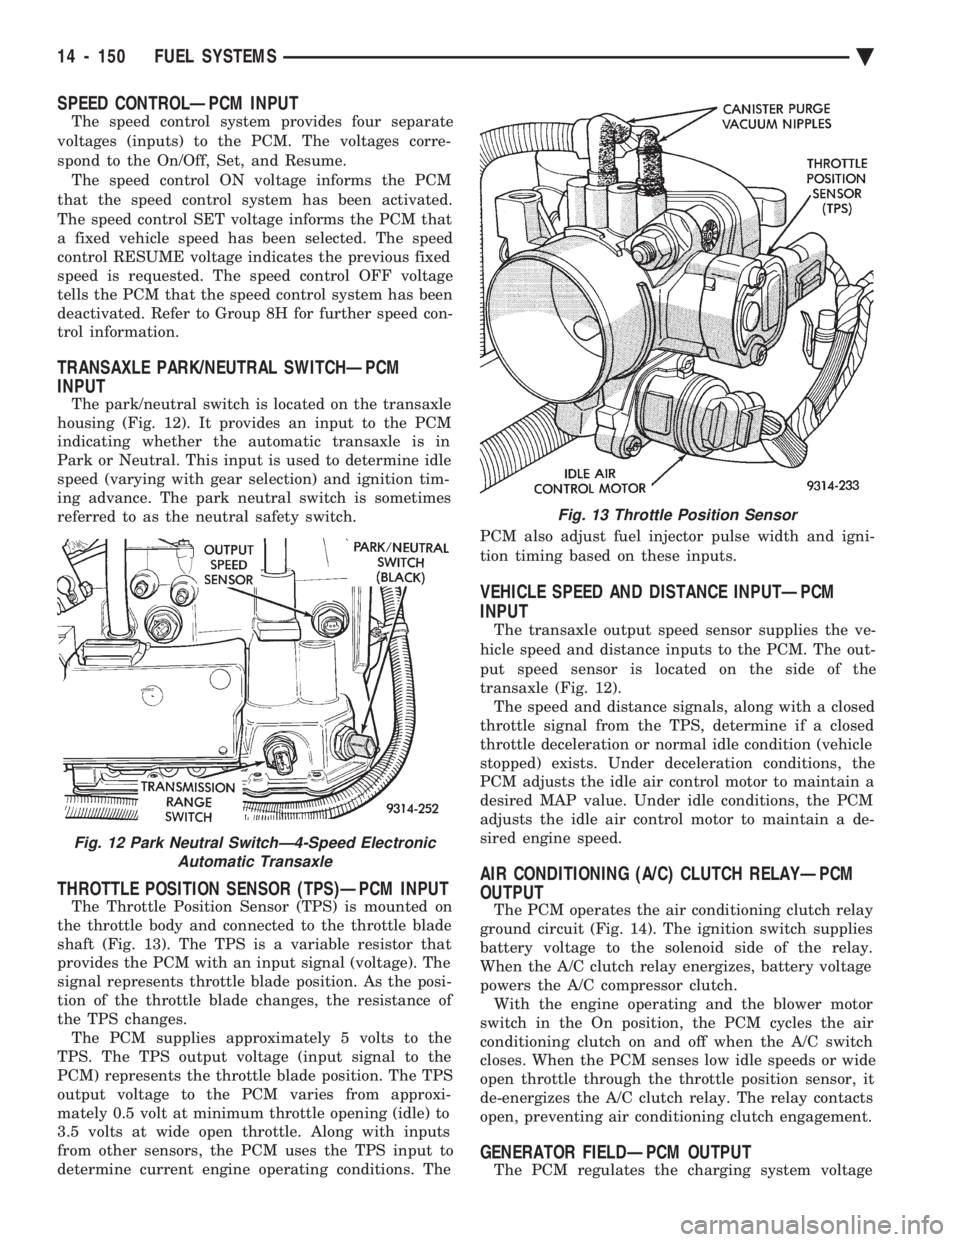
The park/neutral switch is located on the transaxle
housing (Fig. 12). It provides an input to the PCM
indicating whether the automatic transaxle is in
Park or Neutral. This input is used to determine idle
speed (varying with gear selection) and ignition tim-
ing advance. The park neutral switch is sometimes
referred to as the neutral safety switch.
THROTTLE POSITION SENSOR (TPS)ÐPCM INPUT
The Throttle Position Sensor (TPS) is mounted on
the throttle body and connected to the throttle blade
shaft (Fig. 13). The TPS is a variable resistor that
provides the PCM with an input signal (voltage). The
signal represents throttle blade position. As the posi-
tion of the throttle blade changes, the resistance of
the TPS changes. The PCM supplies approximately 5 volts to the
TPS. The TPS output voltage (input signal to the
PCM) represents the throttle blade position. The TPS
output voltage to the PCM varies from approxi-
mately 0.5 volt at minimum throttle opening (idle) to
3.5 volts at wide open throttle. Along with inputs
from other sensors, the PCM uses the TPS input to
determine current engine operating conditions. The PCM also adjust fuel injector pulse width and igni-
tion timing based on these inputs.
VEHICLE SPEED AND DISTANCE INPUTÐPCM
INPUT
The transaxle output speed sensor supplies the ve-
hicle speed and distance inputs to the PCM. The out-
put speed sensor is located on the side of the
transaxle (Fig. 12). The speed and distance signals, along with a closed
throttle signal from the TPS, determine if a closed
throttle deceleration or normal idle condition (vehicle
stopped) exists. Under deceleration conditions, the
PCM adjusts the idle air control motor to maintain a
desired MAP value. Under idle conditions, the PCM
adjusts the idle air control motor to maintain a de-
sired engine speed.
AIR CONDITIONING (A/C) CLUTCH RELAYÐPCM
OUTPUT
The PCM operates the air conditioning clutch relay
ground circuit (Fig. 14). The ignition switch supplies
battery voltage to the solenoid side of the relay.
When the A/C clutch relay energizes, battery voltage
powers the A/C compressor clutch. With the engine operating and the blower motor
switch in the On position, the PCM cycles the air
conditioning clutch on and off when the A/C switch
closes. When the PCM senses low idle speeds or wide
open throttle through the throttle position sensor, it
de-energizes the A/C clutch relay. The relay contacts
open, preventing air conditioning clutch engagement.
GENERATOR FIELDÐPCM OUTPUT
The PCM regulates the charging system voltage
Fig. 13 Throttle Position Sensor
Fig. 12 Park Neutral SwitchÐ4-Speed Electronic Automatic Transaxle
14 - 150 FUEL SYSTEMS Ä