CHEVROLET PLYMOUTH ACCLAIM 1993 Service Manual
PLYMOUTH ACCLAIM 1993
CHEVROLET
CHEVROLET
https://www.carmanualsonline.info/img/24/56861/w960_56861-0.png
CHEVROLET PLYMOUTH ACCLAIM 1993 Service Manual
Trending: maintenance reset, brake pads replacement, windshield wipers, wiring diagram, drain bolt, diagram, park assist
Page 2091 of 2438
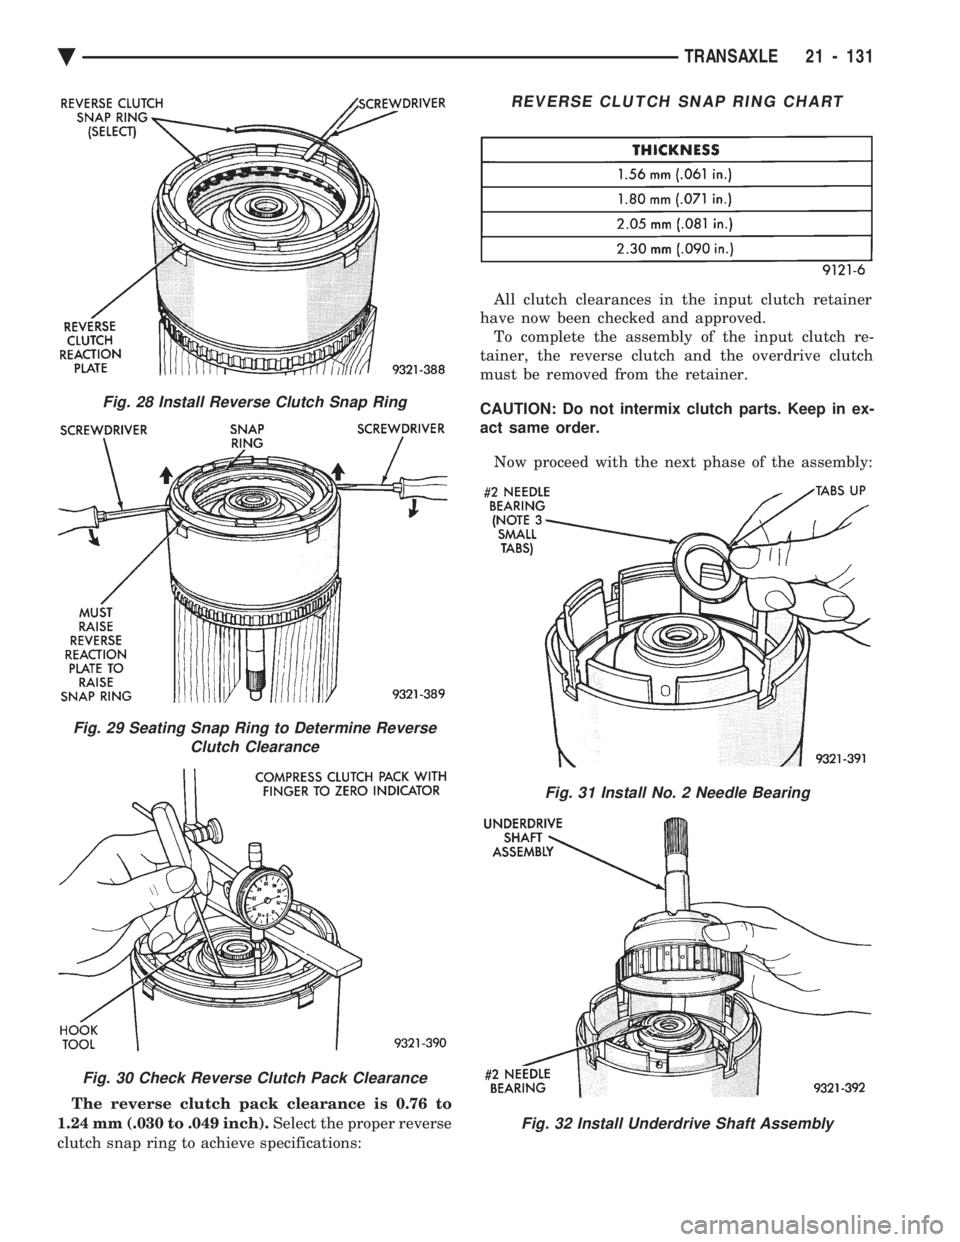
The reverse clutch pack clearance is 0.76 to
1.24 mm (.030 to .049 inch). Select the proper reverse
clutch snap ring to achieve specifications: All clutch clearances in the input clutch retainer
have now been checked and approved. To complete the assembly of the input clutch re-
tainer, the reverse clutch and the overdrive clutch
must be removed from the retainer.
CAUTION: Do not intermix clutch parts. Keep in ex-
act same order.
Now proceed with the next phase of the assembly:
REVERSE CLUTCH SNAP RING CHART
Fig. 31 Install No. 2 Needle Bearing
Fig. 32 Install Underdrive Shaft Assembly
Fig. 28 Install Reverse Clutch Snap Ring
Fig. 29 Seating Snap Ring to Determine Reverse Clutch Clearance
Fig. 30 Check Reverse Clutch Pack Clearance
Ä TRANSAXLE 21 - 131
Page 2092 of 2438
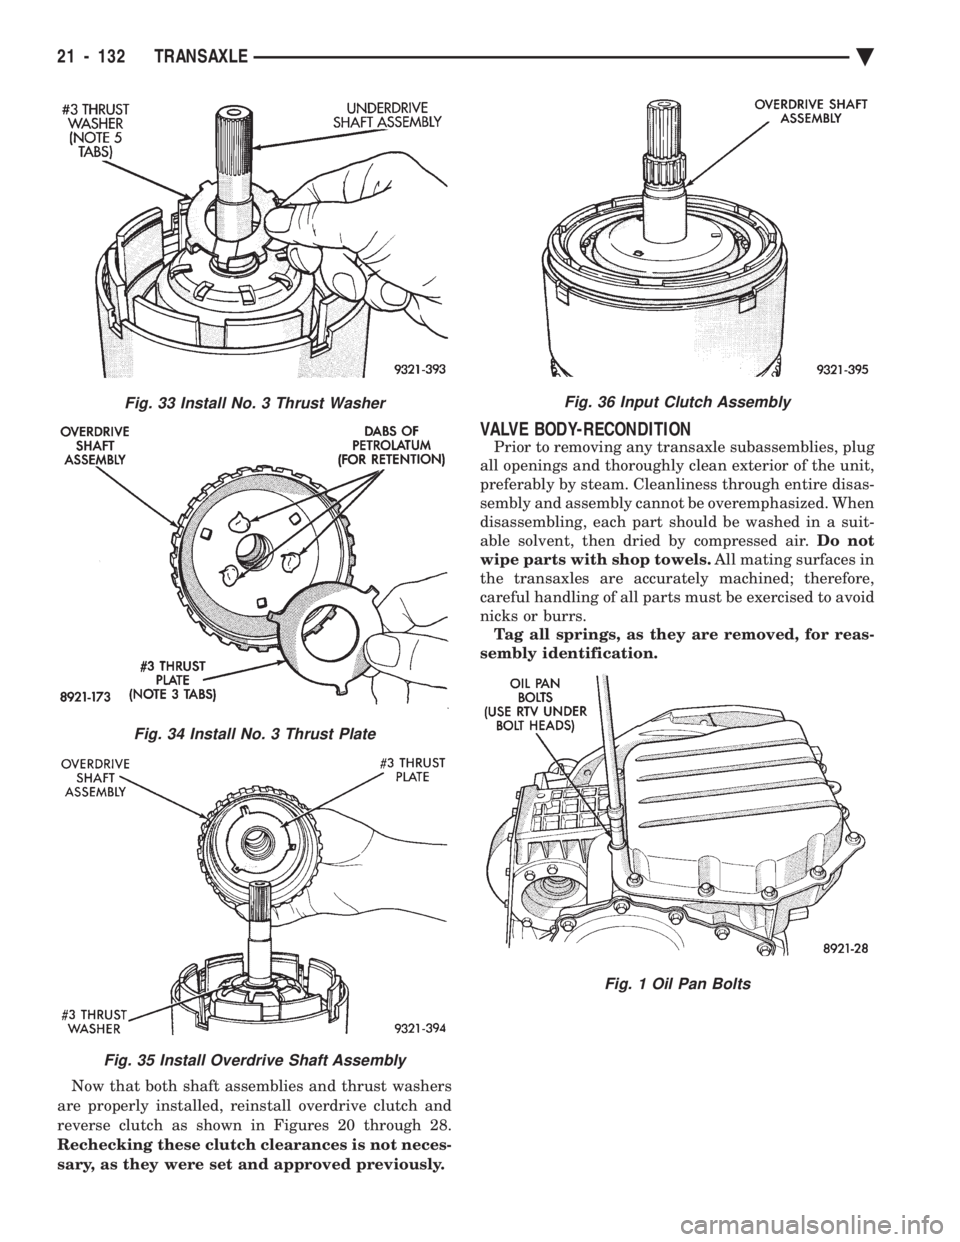
Now that both shaft assemblies and thrust washers
are properly installed, reinstall overdrive clutch and
reverse clutch as shown in Figures 20 through 28.
Rechecking these clutch clearances is not neces-
sary, as they were set and approved previously.
VALVE BODY-RECONDITION
Prior to removing any transaxle subassemblies, plug
all openings and thoroughly clean exterior of the unit,
preferably by steam. Cleanliness through entire disas-
sembly and assembly cannot be overemphasized. When
disassembling, each part should be washed in a suit-
able solvent, then dried by compressed air. Do not
wipe parts with shop towels. All mating surfaces in
the transaxles are accurately machined; therefore,
careful handling of all parts must be exercised to avoid
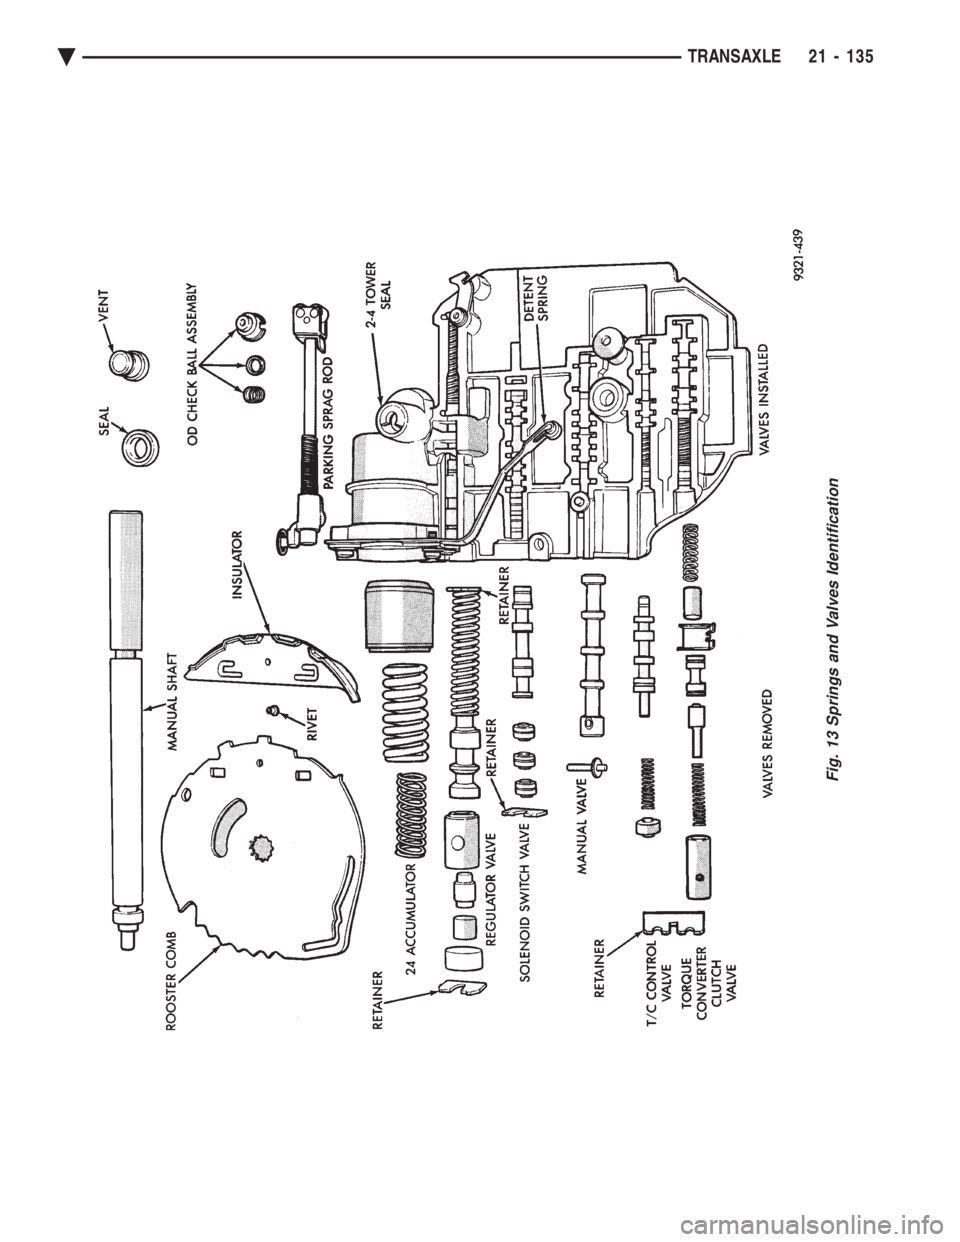
nicks or burrs. Tag all springs, as they are removed, for reas-
sembly identification.
Fig. 33 Install No. 3 Thrust Washer
Fig. 34 Install No. 3 Thrust Plate
Fig. 35 Install Overdrive Shaft Assembly
Fig. 36 Input Clutch Assembly
Fig. 1 Oil Pan Bolts
21 - 132 TRANSAXLE Ä
Page 2093 of 2438
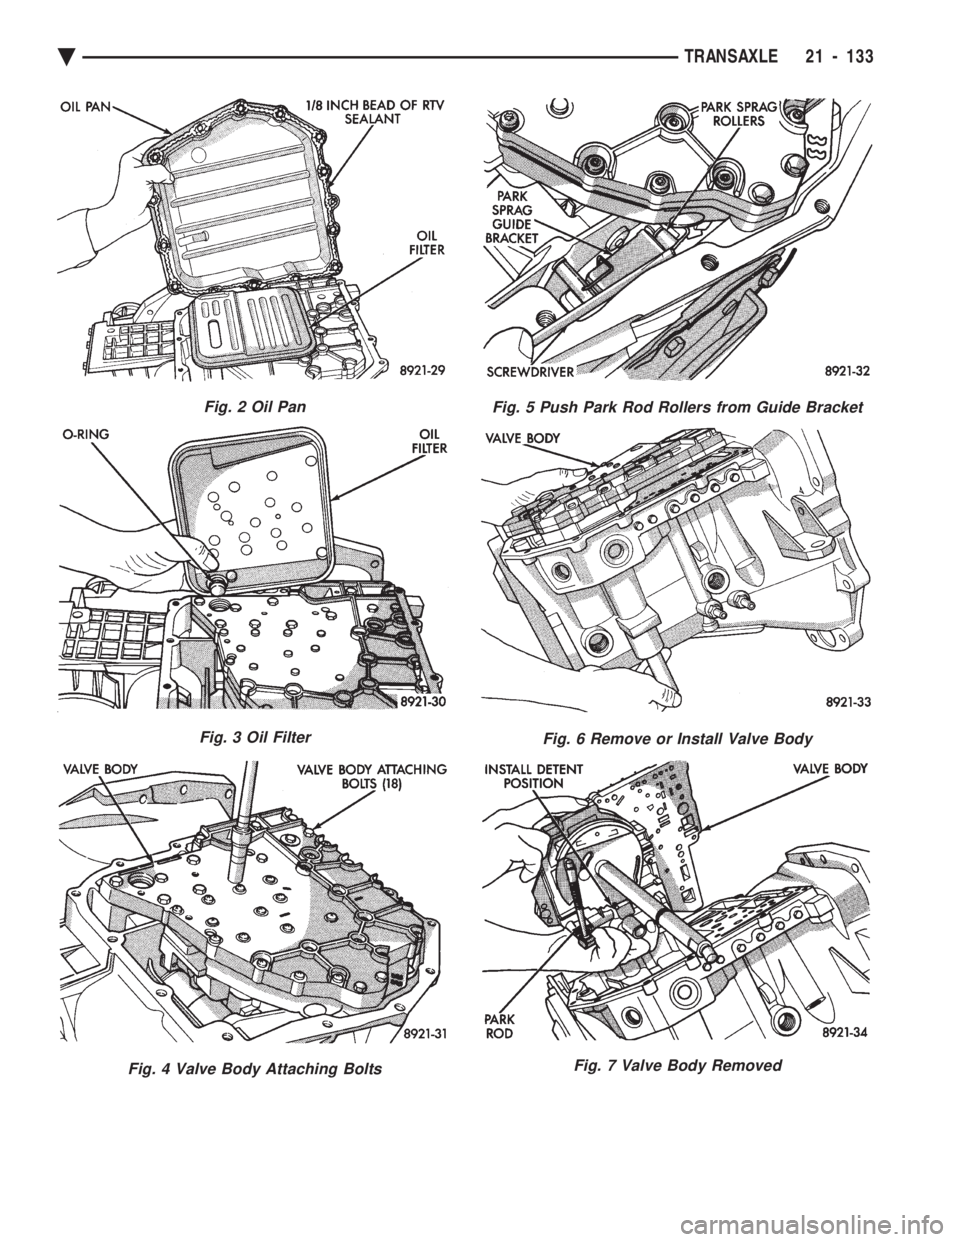
Fig. 2 Oil Pan
Fig. 3 Oil Filter
Fig. 4 Valve Body Attaching Bolts
Fig. 5 Push Park Rod Rollers from Guide Bracket
Fig. 6 Remove or Install Valve Body
Fig. 7 Valve Body Removed
Ä TRANSAXLE 21 - 133
Page 2094 of 2438
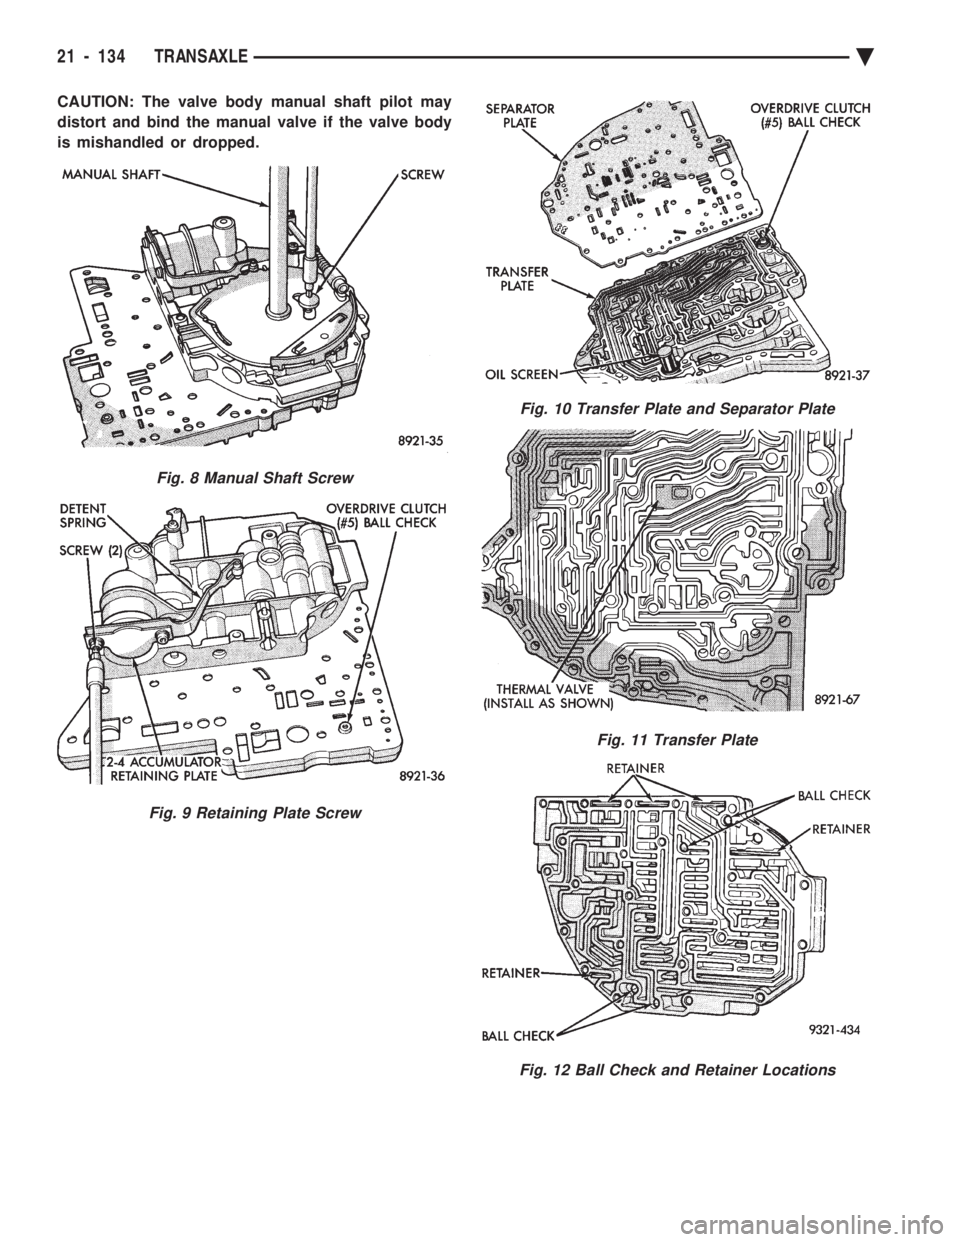
CAUTION: The valve body manual shaft pilot may
distort and bind the manual valve if the valve body
is mishandled or dropped.
Fig. 8 Manual Shaft Screw
Fig. 9 Retaining Plate Screw
Fig. 10 Transfer Plate and Separator Plate
Fig. 11 Transfer Plate
Fig. 12 Ball Check and Retainer Locations
21 - 134 TRANSAXLE Ä
Page 2095 of 2438
Fig. 13 Springs and Valves Identification
Ä TRANSAXLE 21 - 135
Page 2096 of 2438
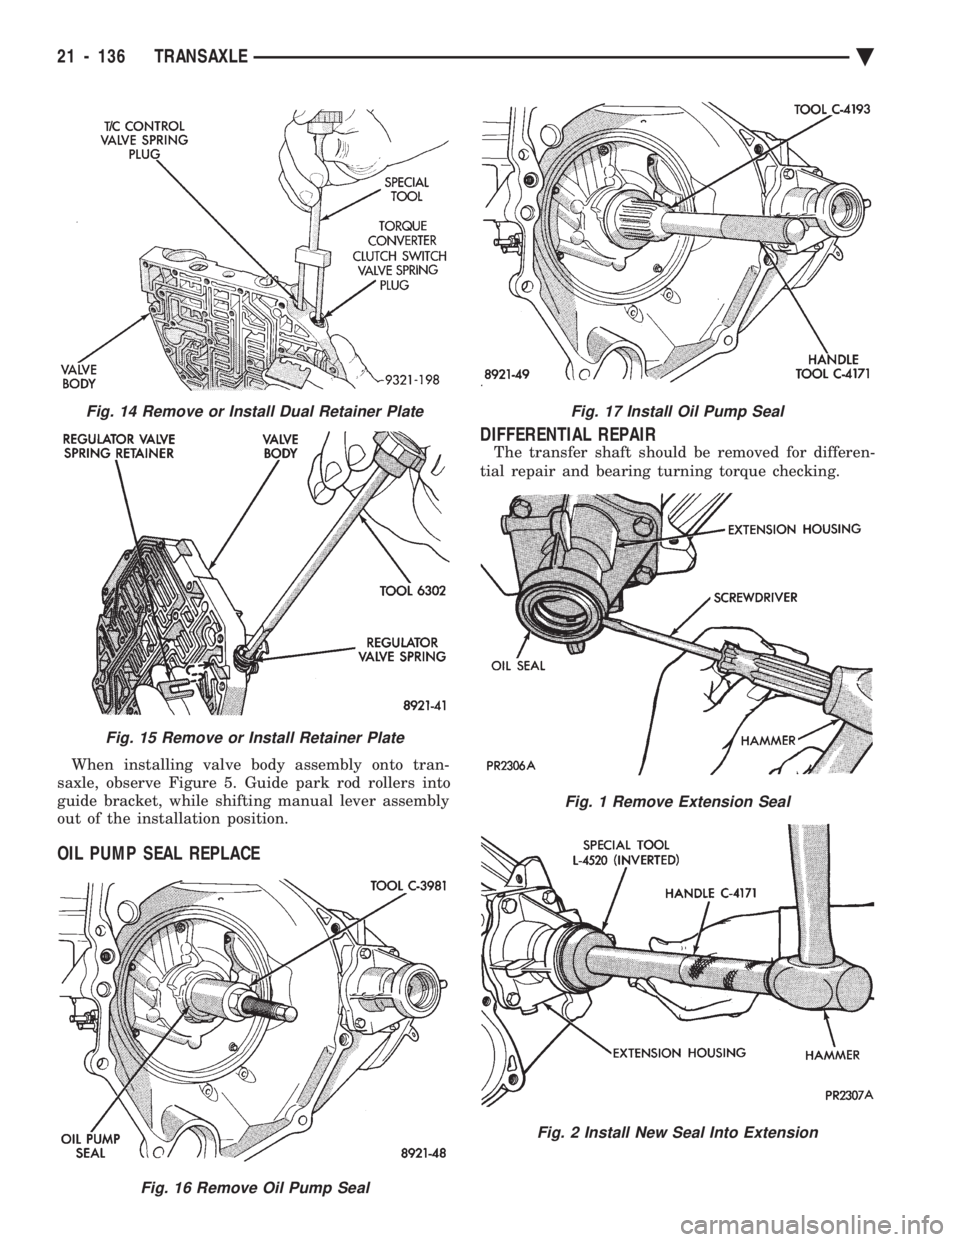
When installing valve body assembly onto tran-
saxle, observe Figure 5. Guide park rod rollers into
guide bracket, while shifting manual lever assembly
out of the installation position.
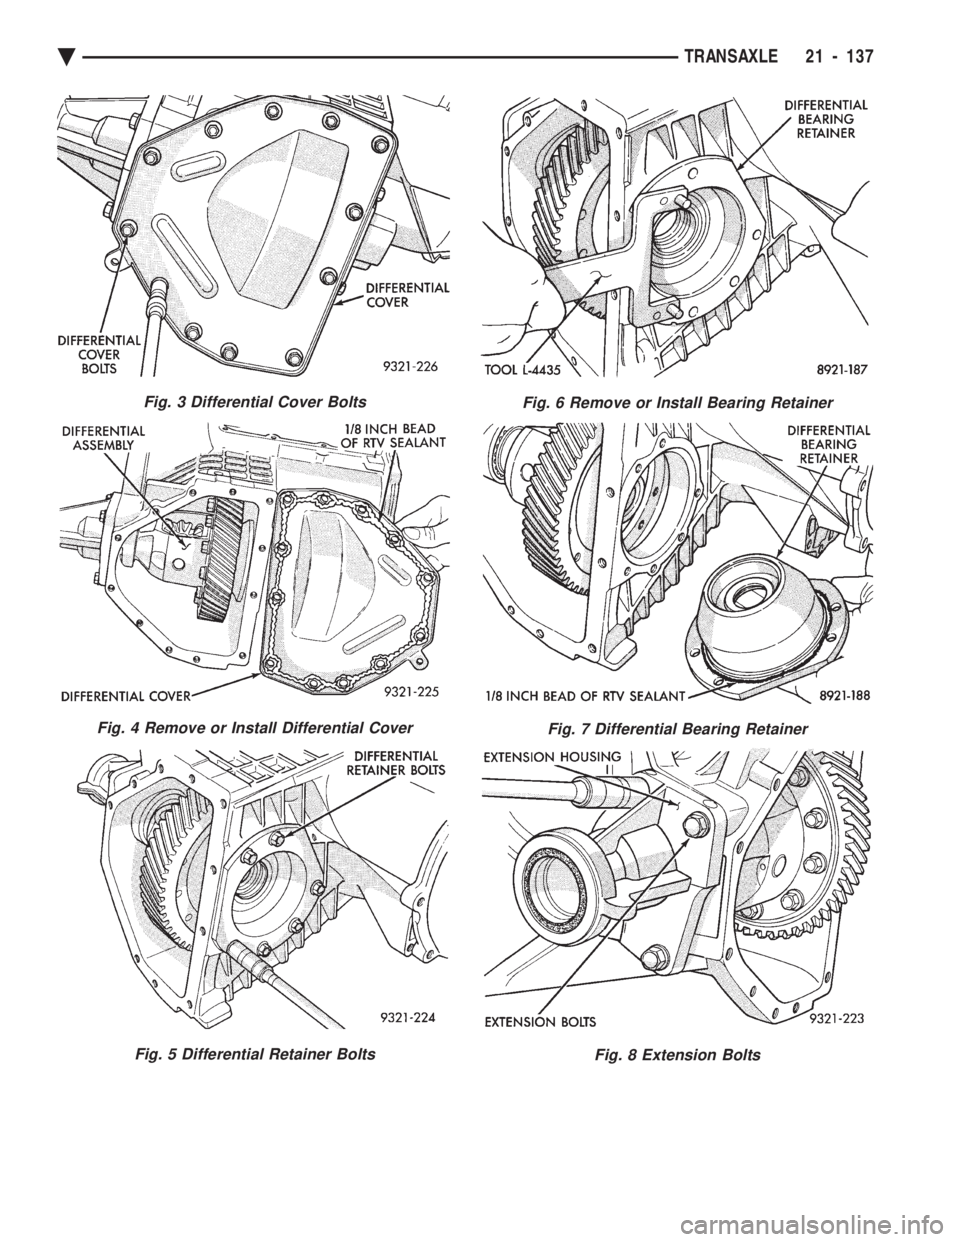
OIL PUMP SEAL REPLACE DIFFERENTIAL REPAIR
The transfer shaft should be removed for differen-
tial repair and bearing turning torque checking.
Fig. 16 Remove Oil Pump Seal
Fig. 17 Install Oil Pump Seal
Fig. 1 Remove Extension Seal
Fig. 2 Install New Seal Into Extension
Fig. 14 Remove or Install Dual Retainer Plate
Fig. 15 Remove or Install Retainer Plate
21 - 136 TRANSAXLE Ä
Page 2097 of 2438
Fig. 3 Differential Cover Bolts
Fig. 4 Remove or Install Differential Cover
Fig. 5 Differential Retainer Bolts
Fig. 6 Remove or Install Bearing Retainer
Fig. 7 Differential Bearing Retainer
Fig. 8 Extension Bolts
Ä TRANSAXLE 21 - 137
Page 2098 of 2438
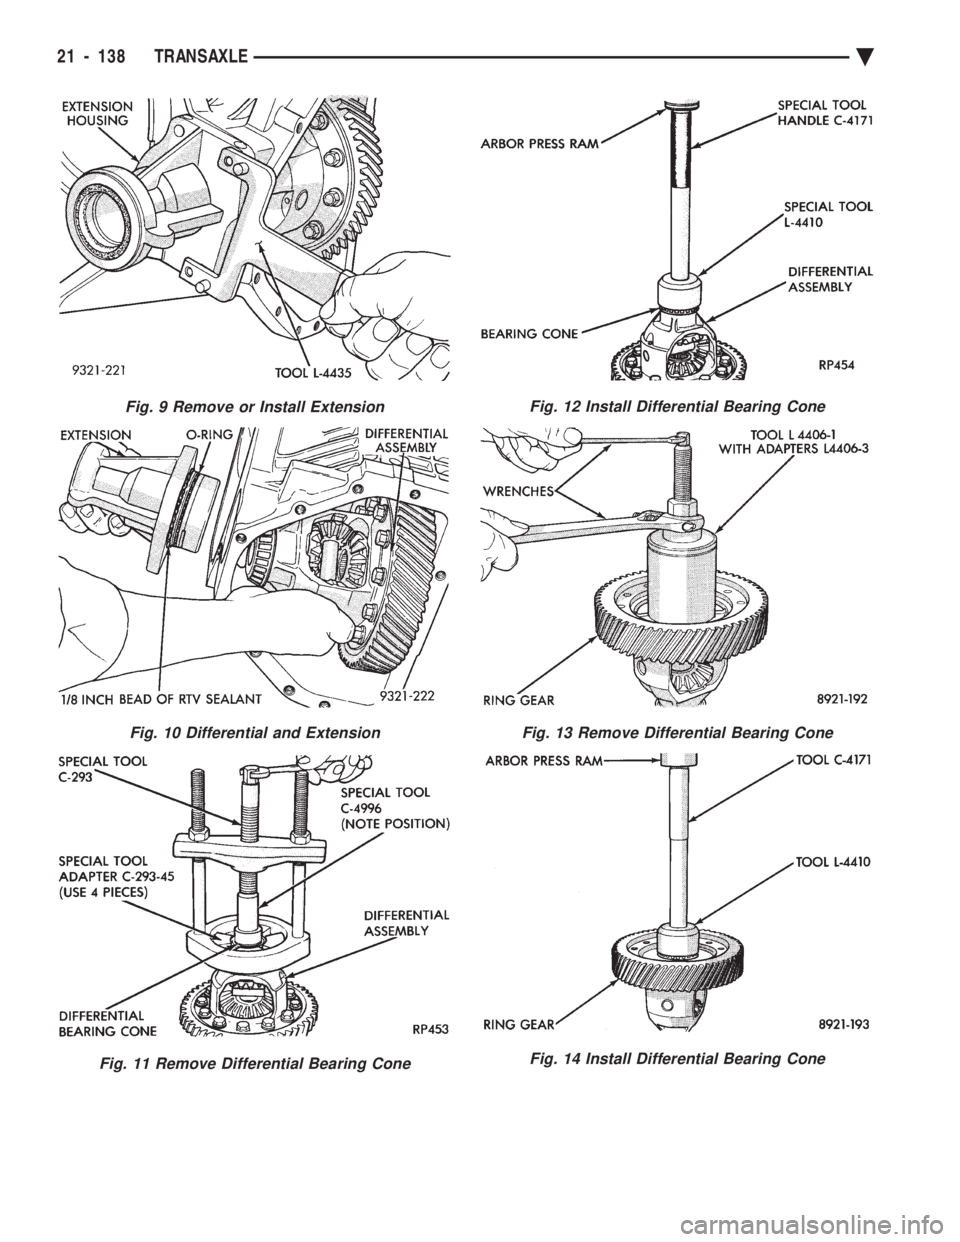
Fig. 9 Remove or Install Extension
Fig. 10 Differential and Extension
Fig. 11 Remove Differential Bearing Cone
Fig. 12 Install Differential Bearing Cone
Fig. 13 Remove Differential Bearing Cone
Fig. 14 Install Differential Bearing Cone
21 - 138 TRANSAXLE Ä
Page 2099 of 2438
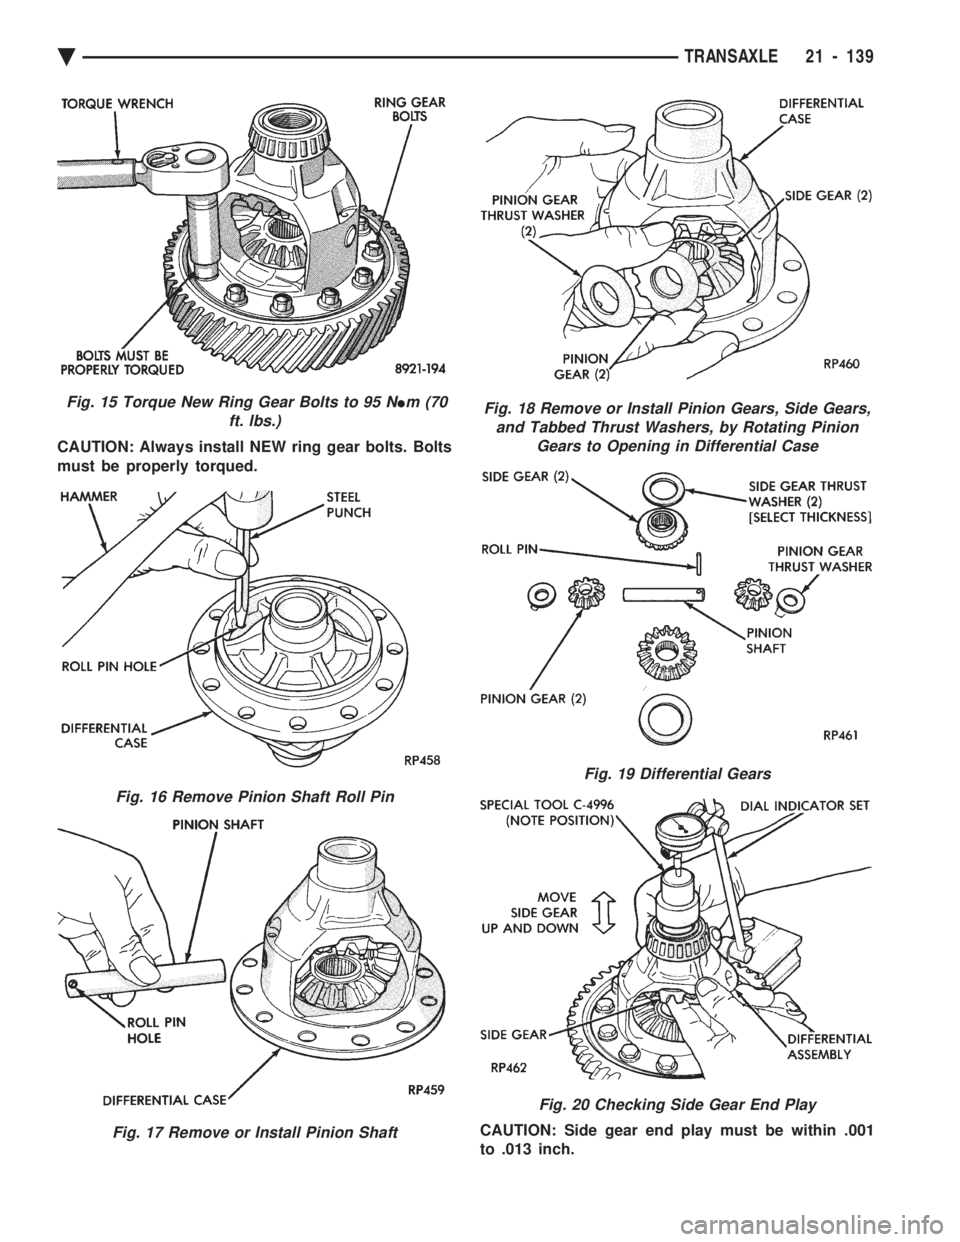
CAUTION: Always install NEW ring gear bolts. Bolts
must be properly torqued. CAUTION: Side gear end play must be within .001
to .013 inch.
Fig. 15 Torque New Ring Gear Bolts to 95 NIm (70
ft. lbs.)
Fig. 16 Remove Pinion Shaft Roll Pin
Fig. 17 Remove or Install Pinion Shaft
Fig. 18 Remove or Install Pinion Gears, Side Gears, and Tabbed Thrust Washers, by Rotating Pinion Gears to Opening in Differential Case
Fig. 19 Differential Gears
Fig. 20 Checking Side Gear End Play
Ä TRANSAXLE 21 - 139
Page 2100 of 2438
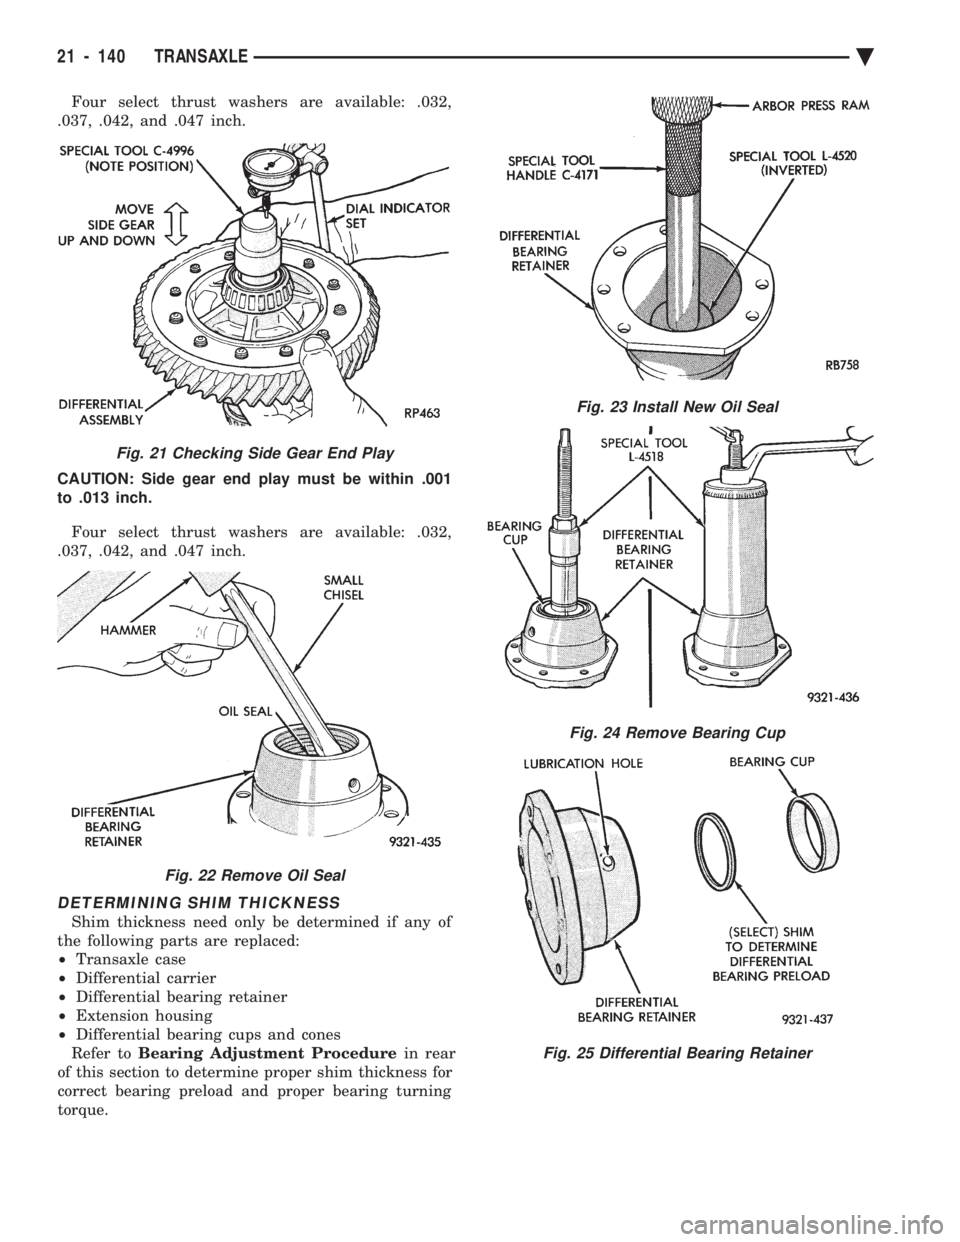
Four select thrust washers are available: .032,
.037, .042, and .047 inch.
CAUTION: Side gear end play must be within .001
to .013 inch.
Four select thrust washers are available: .032,
.037, .042, and .047 inch.
DETERMINING SHIM THICKNESS
Shim thickness need only be determined if any of
the following parts are replaced:
² Transaxle case
² Differential carrier
² Differential bearing retainer
² Extension housing
² Differential bearing cups and cones
Refer to Bearing Adjustment Procedure in rear
of this section to determine proper shim thickness for
correct bearing preload and proper bearing turning
torque.
Fig. 21 Checking Side Gear End Play
Fig. 22 Remove Oil Seal
Fig. 23 Install New Oil Seal
Fig. 24 Remove Bearing Cup
Fig. 25 Differential Bearing Retainer
21 - 140 TRANSAXLE Ä
Trending: ESP inoperative, oil dipstick, Wheel bearing, trunk release, air suspension, roof rack, brake rotor
