fig. 78 CHRYSLER CARAVAN 2002 Service Manual
[x] Cancel search | Manufacturer: CHRYSLER, Model Year: 2002, Model line: CARAVAN, Model: CHRYSLER CARAVAN 2002Pages: 2399, PDF Size: 57.96 MB
Page 455 of 2399

The electrically heated Rear Window Defogger (Fig.
1), Heated Power Side View Mirrors, and Heated
Windshield Wiper De-icer (Fig. 2)is available on
select models.
OPERATION
The Rear Window Defogger(Refer to 8 - ELECTRI-
CAL/HEATED GLASS - DESCRIPTION) system con-
sists of two vertical bus bars linked by a series of
grid lines on the inside surface of the rear window.
The electrical circuit consists of the rear defogger
switch in the HVAC control assembly and a relay
with timer switch to turn OFF the system after ten
minutes. The main feed circuit is protected by fuse
13 (40 amp) in the Power Distribution Center (PDC)
which is connected directly to the front control mod-
ule (FCM) to form an integrated unit called an Inte-
grated Power Module (IPM). The rear defogger
switch and relay also activates the heated power side
view mirrors. The rear defogger switch also activates
the heated windshield wiper de-icer which is powered
by the RUN/ACC relay in the IPM and feed thru fuse
#11 (20 amp) in the PDC. The heated mirror circuit
is protected by a non-servicable Positive Temperature
Coefficient (PTC) located inside the PDC. The heated
windshield wiper de-icer circuit is protected by fuse
11 (20 amp) in the PDC.
The Heated Windshield Wiper Deicer is also acti-
vated when the DEFROST mode is selected on the
HVAC. In the DEFROST mode the rear defogger
timout is bypassed, the heated windshield wiper de-
icer will stay ON until the another mode is selected.
For circuit information and component location refer
to appropriate section for Wiring Diagrams.
CAUTION:
Since grid lines can be damaged or scraped off
with sharp instruments, care should be taken in
cleaning the glass or removing foreign materials,
decals or stickers. Normal glass cleaning solvents
or hot water used with rags or toweling is recom-
mended.
DEFOGGER RELAY
DESCRIPTION
There is no heated windshield wiper de-icer relay.
The grid is powered directly from fuse #11 in the
PDC and is controlled directly from the HVAC con-
trol assembly.
REAR WINDOW DEFOGGER
GRID
STANDARD PROCEDURE - GRID LINE REPAIR
REAR
For Grid repair procedure for the rear window
defogger (Refer to 8 - ELECTRICAL/HEATED
GLASS/WINDSHIELD GRID - STANDARD PROCE-
DURE).
REAR WINDOW DEFOGGER
SWITCH
DESCRIPTION
The rear window defogger switch is integrated into
the HVAC control panel assembly (Fig. 3)
OPERATION
A LED indicator will illuminate when the switch is
activated. The switch energizes the HVAC control
assembly when it requests the Front Control Module
(FCM) to activate the rear window defogger relay.
The relay controls the current to flow to the grids of
the rear window defogger, heated power side view
mirrors and the heated windshield wiper de-icer. The
defogger relay will be on for approximately 10 min-
utes or until the control switch or ignition is turned
off.
Fig. 3 HVAC CONTROL PANEL
1 - TRIM BEZEL
2 - ACT SENSOR
3 - A/C REQUEST SWITCH
4 - REAR WINDOW DEFOGGER/HEATED MIRRORS SWITCH
COMBO
5 - FRONT WINDOW DEFROSTER MODE SELECTOR
8G - 2 HEATED GLASSRS
HEATED GLASS (Continued)
ProCarManuals.com
Page 456 of 2399

WINDSHIELD GRID
DIAGNOSIS AND TESTING - SYSTEM TEST
Electrically heated rear window defogger or the
heated windshield wiper deicer operation can be
checked on the vehicle in the following manner:
(1) Turn the ignition switch to the ON position.
(2) Using a ammeter on the battery, turn the rear
defogger control switch to the ON position, a distinct
increase in amperage draw should be noted.
(3) The rear window defogger or the heated wind-
shield wiper deicer operation can be checked by feel-
ing the glass. A distinct difference in temperature
between the grid lines and adjacent clear glass can
be detected in 3 to 4 minutes of operation.
(4) Using a DC voltmeter (Fig. 4) contact terminal
B with the negative lead, and terminal A with the
positive lead. The voltmeter should read 10-14 volts.
(5) Indicator light illumination means that there is
power available at the switch only and does not nec-
essarily verify system operation.
(6) If turning the defogger switch ON, no distinct
current draw on the ammeter the problem should be
isolated in the following manner:
²Confirm that ignition switch is ON.
²Ensure that the heated rear window or the
heated windshield wiper deicer feed pigtail is con-
nected to the wiring harness and that the ground
pigtail is in fact grounded.
²Ensure that the proper fuse in the PDC is OK.
(7) When the above steps have been completed and
the system is still inoperative it may be necessary to
connect a DRBIII scan tool and refer to the Diagnos-
tic Service Manual, you may also check for the fol-
lowing being defective:
²HVAC control assembly
²Rear window defogger relay in the PDC portion
of the IPM.
²Rear window defogger relay control circuity in
the FCM portion of the IPM.
²Check for loose connector or a wire pushed out
of connector.
²Rear window or the windshield grid lines (all
grid lines would have to be broken, or one of the feed
pigtails not connected to the bus bar, for no ammeter
deflection).
(8) If turning the switch ON produces severe volt-
meter deflection, the circuit should be closely checked
for a shorting condition.
(9) If the system operation has been verified but
indicator LED does not light, replace the HVAC con-
trol assembly.
(10) For detailed wiring information, refer to the
appropriate section for Wiring Diagrams.
STANDARD PROCEDURE - GRID LINE AND
TERMINAL REPAIR
WARNING:
REPAIR KIT MAY CAUSE SKIN OR EYE IRRITATION.
CONTAINS EPOXY RESIN AND AMINE TYPE HARD-
ENER, HARMFUL IF SWALLOWED. AVOID CON-
TACT WITH SKIN AND EYES. FOR SKIN, WASH
AFFECTED AREAS WITH SOAP AND WATER. DO
NOT TAKE INTERNALLY. IF TAKEN INTERNALLY,
INDUCE VOMITING; CALL A PHYSICIAN IMMEDI-
ATELY. IF IN CONTACT WITH EYES, FLUSH WITH
PLENTY OF WATER. USE WITH ADEQUATE VENTI-
LATION. DO NOT USE NEAR FIRE OR FLAME. CON-
TENTS CONTAINS 3% FLAMMABLE SOLVENTS.
KEEP OUT OF REACH OF CHILDREN.
The repair for the front windshield or the rear win-
dow grids are the same.
The repair of grid lines and replacement of the ter-
minal is possible using the MopartRepair Package
or equivalent.
(1) Clean area surrounding grid line or terminal
by gently rubbing area with steel wool.
(2) Wipe area with clean cloth soaked in alcohol or
similar solvent. It is necessary that all contaminants
be removed from repair area.
(3) Remove package separator clamp and mix plas-
tic conductive epoxy thoroughly.
Fig. 4 Grid Line Test
1 - VOLTMETER
2 - TERMINAL B
3 - FEED WIRE
4 - MID-POINT C (TYPICAL)
5 - HEATED REAR WINDOW GRIDS
6 - GROUND WIRE
7 - TERMINAL A
RSHEATED GLASS8G-3
ProCarManuals.com
Page 457 of 2399

(4) For grid line, mark off area to be repaired with
masking tape (Fig. 5).
(5) Apply conductive epoxy through slit in masking
tape. Overlap both ends of the break.
(6) For a terminal replacement, apply a thin layer
of epoxy to area where terminal was fastened.
(7) Apply a thin layer of epoxy on terminal and
place terminal on desired location. To prevent termi-
nal from falling off use a wooden wedge to secure it.
(8) Carefully remove masking tape from grid line.
CAUTION:
Do not allow the laminated windshield glass surface
to exceed 82É C (180É F) or the glass may fracture.
The rear window glass surface should not exceed
204É C (400É F).
(9) Allow epoxy to cure 24 hours at room tempera-
ture.(10) After epoxy is properly cured remove wedge
from terminal and check the operation of the rear
window defogger.
Fig. 5 Grid Line Repair
1 - BREAK
2 - GRID LINE
3 - MASKING TAPE
8G - 4 HEATED GLASSRS
WINDSHIELD GRID (Continued)
ProCarManuals.com
Page 458 of 2399

HEATED MIRRORS
TABLE OF CONTENTS
page page
HEATED MIRRORS
DESCRIPTION..........................5
OPERATION............................5
DIAGNOSIS AND TESTING - HEATED
MIRROR TEST........................5
MIRROR SWITCH
DESCRIPTION..........................5OPERATION............................6
HEATED MIRROR GRID
STANDARD PROCEDURE - HEATED MIRROR . . 6
RELAY
DESCRIPTION..........................6
HEATED MIRRORS
DESCRIPTION
Heated mirrors are available on models with
Power Mirrors and Rear Window Defogger only.
OPERATION
The heated mirror is controlled by the rear window
defogger switch. The heated mirror is ON when the
rear window defogger is ON (Fig. 1).
DIAGNOSIS AND TESTING - HEATED MIRROR
TEST
Heated mirrors are available on models with
Power Mirrors and Rear Window Defogger only. The
heated mirror is controlled by the rear window defog-
ger switch. The heated mirror is ON when the rear
window defogger is ON.
(1) The mirror glass should be warm to the touch.
(2) If not, check the 20 amp fuse (11) in the Power
Distribution Center (PDC) part of the Integrated
Power Module (IPM) in the engine compartment.
(3) Test voltage at rear window defogger switch.
²If no voltage repair wire.
²Remove mirror glass and test the wires for con-
tinuity. If no continuity repair wires.
²If wires are OK, replace mirror glass.
²To test defogger switch refer to the appropriate
section in Electrical.
MIRROR SWITCH
DESCRIPTION
The heated mirror switch is integrated into the
rear window defogger switch located in the HVAC
control panel (Fig. 1).
Fig. 1 HVAC CONTROL PANEL
1 - TRIM BEZEL
2 - ACT SENSOR
3 - A/C REQUEST SWITCH
4 - REAR WINDOW DEFOGGER/HEATED MIRRORS SWITCH
COMBO
5 - FRONT WINDOW DEFROSTER MODE SELECTOR
RSHEATED MIRRORS8G-5
ProCarManuals.com
Page 460 of 2399

HEATED SEAT SYSTEM
TABLE OF CONTENTS
page page
HEATED SEAT SYSTEM
DESCRIPTION..........................7
OPERATION............................8
DIAGNOSIS AND TESTING - HEATED SEAT
SYSTEM.............................8
DRIVER HEATED SEAT SWITCH
DESCRIPTION..........................9
OPERATION............................9
DIAGNOSIS AND TESTING - DRIVER HEATED
SEAT SWITCH.........................9
REMOVAL.............................10
INSTALLATION.........................10
HEATED SEAT ELEMENT
DESCRIPTION.........................11
OPERATION...........................11
DIAGNOSIS AND TESTING - HEATED SEAT
ELEMENTS..........................11REMOVAL.............................12
INSTALLATION.........................12
HEATED SEAT SENSOR
DESCRIPTION.........................12
OPERATION...........................12
DIAGNOSIS AND TESTING - HEATED SEAT
SENSOR............................12
PASSENGER HEATED SEAT SWITCH
DESCRIPTION.........................13
OPERATION...........................13
DIAGNOSIS AND TESTING - PASSENGER
HEATED SEAT SWITCH.................13
REMOVAL.............................14
INSTALLATION.........................15
HEATED SEAT SYSTEM
DESCRIPTION
Vehicles with the heated seat option can be visu-
ally identified by the two separate heated seat
switches located in the instrument panel center
stack, just above the radio (Fig. 1). The heated seat
system allows the front seat driver and passenger to
select from two different levels of supplemental elec-
trical seat heating (HI/LO), or no seat heating to suit
their individual comfort requirements. The heated
seat system for this vehicle includes the following
major components, which are described in further
detail later in this section:
²Heated Seat Elements- Four heated seat ele-
ments are used per vehicle, two for each front seat.
One heated seat element is integral to each front
seat trim cover, one in the seat back and one in the
seat bottom (cushion). Service replacement heating
elements are available, refer to heated seat elements
later in this section for additional information.
²Heated Seat Modules- Two heated seat mod-
ules are used per vehicle. One module is mounted to
each of the seat cushion pans, located under the for-
ward edge of each front seat. Refer to heated seat
module in the electronic control modules section of
the service manual for additional information.
²Heated Seat Sensors- Two heated seat sen-
sors are used per vehicle, one for each front seat. The
heated seat sensors are integral to each of the heated
seat bottoms (cushions).
Fig. 1 HEATED SEAT SWITCH LOCATIONS
1 - HEATED SEAT SWITCHES
RSHEATED SEAT SYSTEM8G-7
ProCarManuals.com
Page 462 of 2399
DRIVER HEATED SEAT
SWITCH
DESCRIPTION
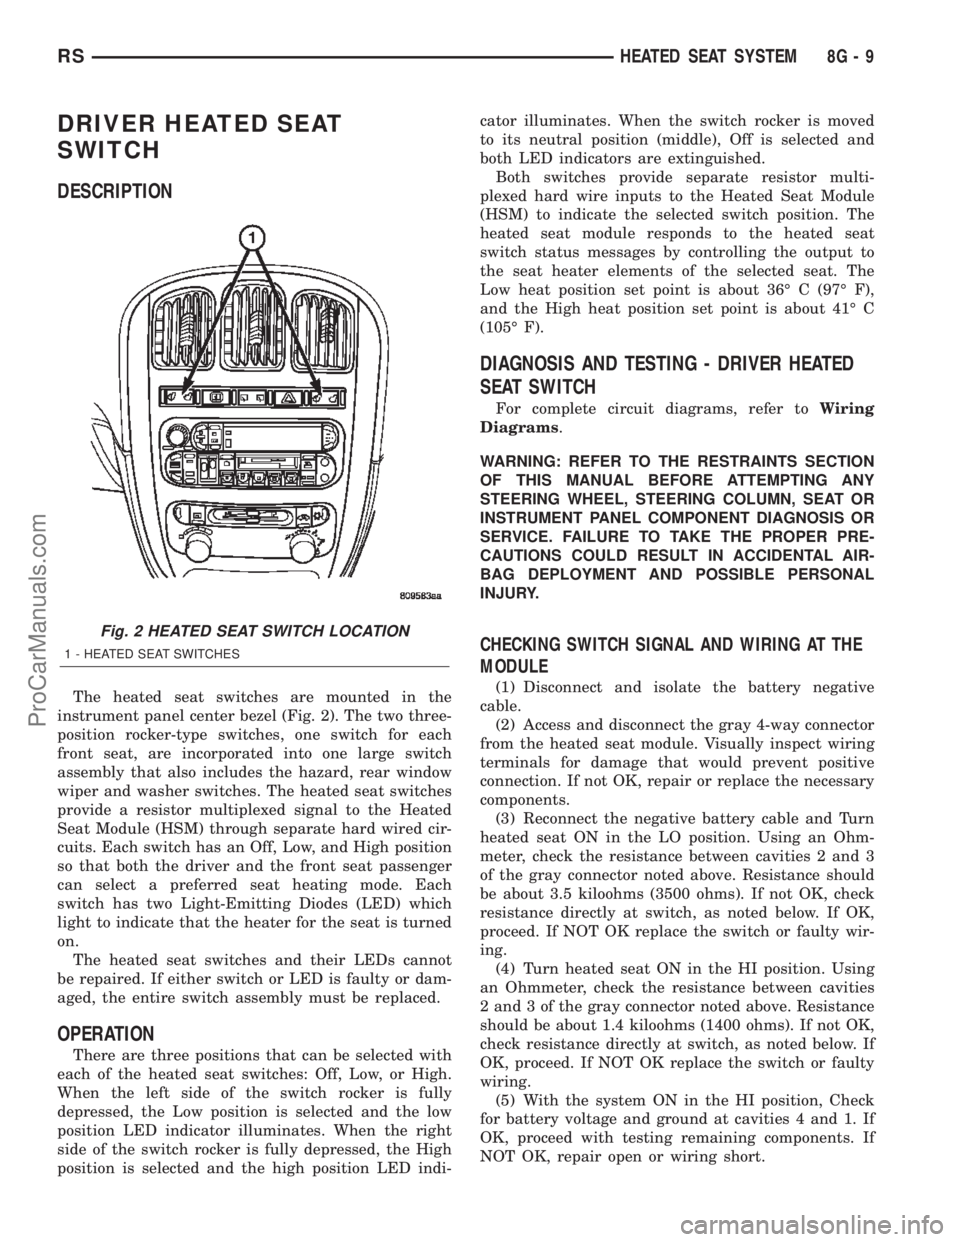
The heated seat switches are mounted in the
instrument panel center bezel (Fig. 2). The two three-
position rocker-type switches, one switch for each
front seat, are incorporated into one large switch
assembly that also includes the hazard, rear window
wiper and washer switches. The heated seat switches
provide a resistor multiplexed signal to the Heated
Seat Module (HSM) through separate hard wired cir-
cuits. Each switch has an Off, Low, and High position
so that both the driver and the front seat passenger
can select a preferred seat heating mode. Each
switch has two Light-Emitting Diodes (LED) which
light to indicate that the heater for the seat is turned
on.
The heated seat switches and their LEDs cannot
be repaired. If either switch or LED is faulty or dam-
aged, the entire switch assembly must be replaced.
OPERATION
There are three positions that can be selected with
each of the heated seat switches: Off, Low, or High.
When the left side of the switch rocker is fully
depressed, the Low position is selected and the low
position LED indicator illuminates. When the right
side of the switch rocker is fully depressed, the High
position is selected and the high position LED indi-cator illuminates. When the switch rocker is moved
to its neutral position (middle), Off is selected and
both LED indicators are extinguished.
Both switches provide separate resistor multi-
plexed hard wire inputs to the Heated Seat Module
(HSM) to indicate the selected switch position. The
heated seat module responds to the heated seat
switch status messages by controlling the output to
the seat heater elements of the selected seat. The
Low heat position set point is about 36É C (97É F),
and the High heat position set point is about 41É C
(105É F).
DIAGNOSIS AND TESTING - DRIVER HEATED
SEAT SWITCH
For complete circuit diagrams, refer toWiring
Diagrams.
WARNING: REFER TO THE RESTRAINTS SECTION
OF THIS MANUAL BEFORE ATTEMPTING ANY
STEERING WHEEL, STEERING COLUMN, SEAT OR
INSTRUMENT PANEL COMPONENT DIAGNOSIS OR
SERVICE. FAILURE TO TAKE THE PROPER PRE-
CAUTIONS COULD RESULT IN ACCIDENTAL AIR-
BAG DEPLOYMENT AND POSSIBLE PERSONAL
INJURY.
CHECKING SWITCH SIGNAL AND WIRING AT THE
MODULE
(1) Disconnect and isolate the battery negative
cable.
(2) Access and disconnect the gray 4-way connector
from the heated seat module. Visually inspect wiring
terminals for damage that would prevent positive
connection. If not OK, repair or replace the necessary
components.
(3) Reconnect the negative battery cable and Turn
heated seat ON in the LO position. Using an Ohm-
meter, check the resistance between cavities 2 and 3
of the gray connector noted above. Resistance should
be about 3.5 kiloohms (3500 ohms). If not OK, check
resistance directly at switch, as noted below. If OK,
proceed. If NOT OK replace the switch or faulty wir-
ing.
(4) Turn heated seat ON in the HI position. Using
an Ohmmeter, check the resistance between cavities
2 and 3 of the gray connector noted above. Resistance
should be about 1.4 kiloohms (1400 ohms). If not OK,
check resistance directly at switch, as noted below. If
OK, proceed. If NOT OK replace the switch or faulty
wiring.
(5) With the system ON in the HI position, Check
for battery voltage and ground at cavities 4 and 1. If
OK, proceed with testing remaining components. If
NOT OK, repair open or wiring short.
Fig. 2 HEATED SEAT SWITCH LOCATION
1 - HEATED SEAT SWITCHES
RSHEATED SEAT SYSTEM8G-9
ProCarManuals.com
Page 463 of 2399
CHECKING SWITCH ONLY
(1) Disconnect and isolate the battery negative
cable. Remove the center bezel from the instrument
panel (Refer to 23 - BODY/INSTRUMENT PANEL/
INSTRUMENT PANEL CENTER BEZEL - REMOV-
AL). Check for continuity between the ground circuit
cavity (#10) of the instrument panel switch bank
electrical connector and a good ground. There should
be continuity. If OK, go to Step 2. If not OK, repair
the open ground circuit to ground as required.
(2) Reconnect the battery negative cable. Turn the
ignition switch to the On position. Check for battery
voltage at the fused ignition switch output (run) cir-
cuit cavity of the instrument panel switch bank con-
nector (#4). If OK, turn the ignition switch to the Off
position, and go to Step 3. If not OK, repair the open
fused ignition switch output (run) circuit as required.
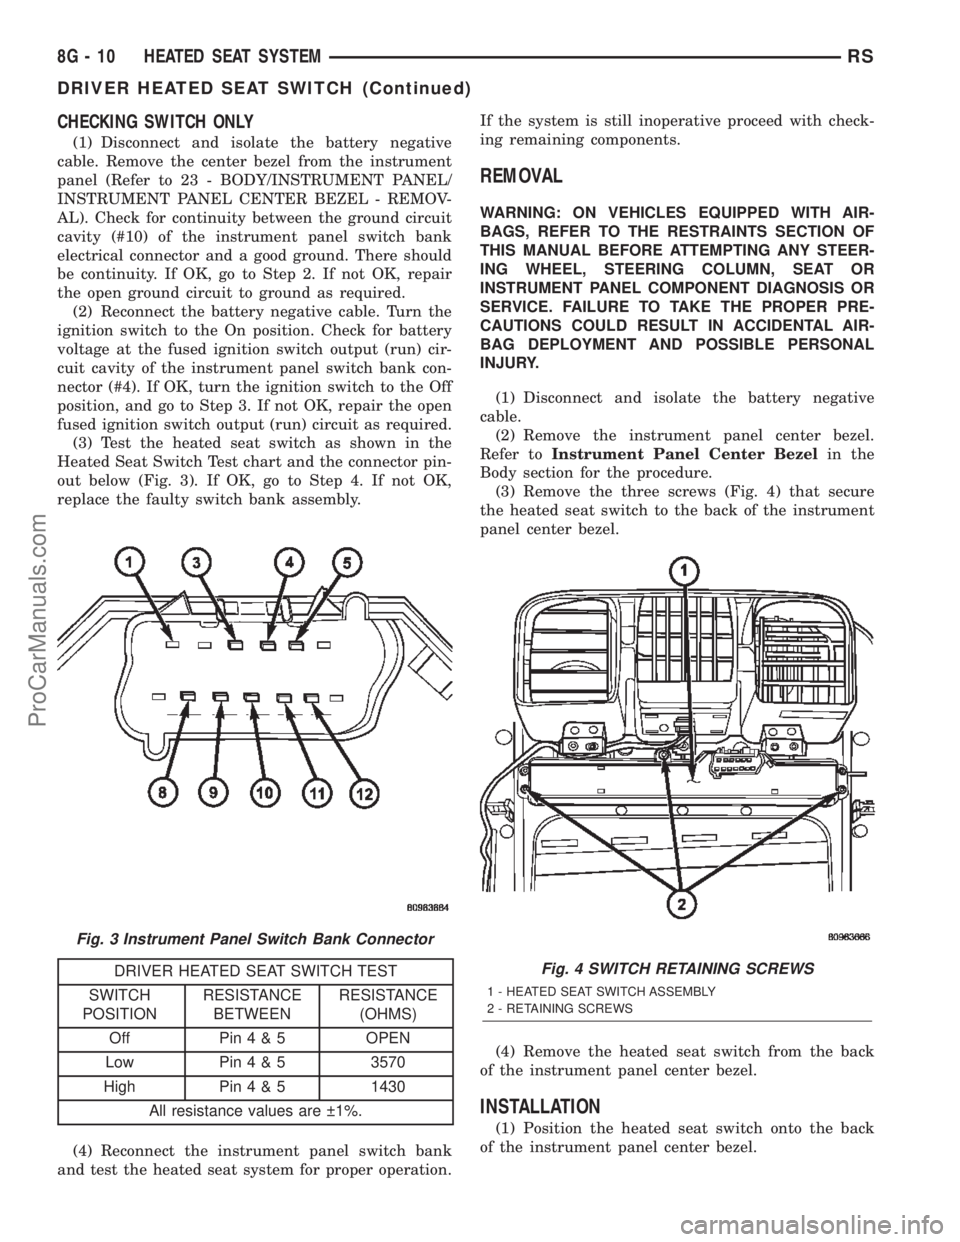
(3) Test the heated seat switch as shown in the
Heated Seat Switch Test chart and the connector pin-
out below (Fig. 3). If OK, go to Step 4. If not OK,
replace the faulty switch bank assembly.
DRIVER HEATED SEAT SWITCH TEST
SWITCH
POSITIONRESISTANCE
BETWEENRESISTANCE
(OHMS)
Off Pin4&5OPEN
Low Pin4&53570
High Pin4&51430
All resistance values are 1%.
(4) Reconnect the instrument panel switch bank
and test the heated seat system for proper operation.If the system is still inoperative proceed with check-
ing remaining components.
REMOVAL
WARNING: ON VEHICLES EQUIPPED WITH AIR-
BAGS, REFER TO THE RESTRAINTS SECTION OF
THIS MANUAL BEFORE ATTEMPTING ANY STEER-
ING WHEEL, STEERING COLUMN, SEAT OR
INSTRUMENT PANEL COMPONENT DIAGNOSIS OR
SERVICE. FAILURE TO TAKE THE PROPER PRE-
CAUTIONS COULD RESULT IN ACCIDENTAL AIR-
BAG DEPLOYMENT AND POSSIBLE PERSONAL
INJURY.
(1) Disconnect and isolate the battery negative
cable.
(2) Remove the instrument panel center bezel.
Refer toInstrument Panel Center Bezelin the
Body section for the procedure.
(3) Remove the three screws (Fig. 4) that secure
the heated seat switch to the back of the instrument
panel center bezel.
(4) Remove the heated seat switch from the back
of the instrument panel center bezel.
INSTALLATION
(1) Position the heated seat switch onto the back
of the instrument panel center bezel.
Fig. 3 Instrument Panel Switch Bank Connector
Fig. 4 SWITCH RETAINING SCREWS
1 - HEATED SEAT SWITCH ASSEMBLY
2 - RETAINING SCREWS
8G - 10 HEATED SEAT SYSTEMRS
DRIVER HEATED SEAT SWITCH (Continued)
ProCarManuals.com
Page 464 of 2399
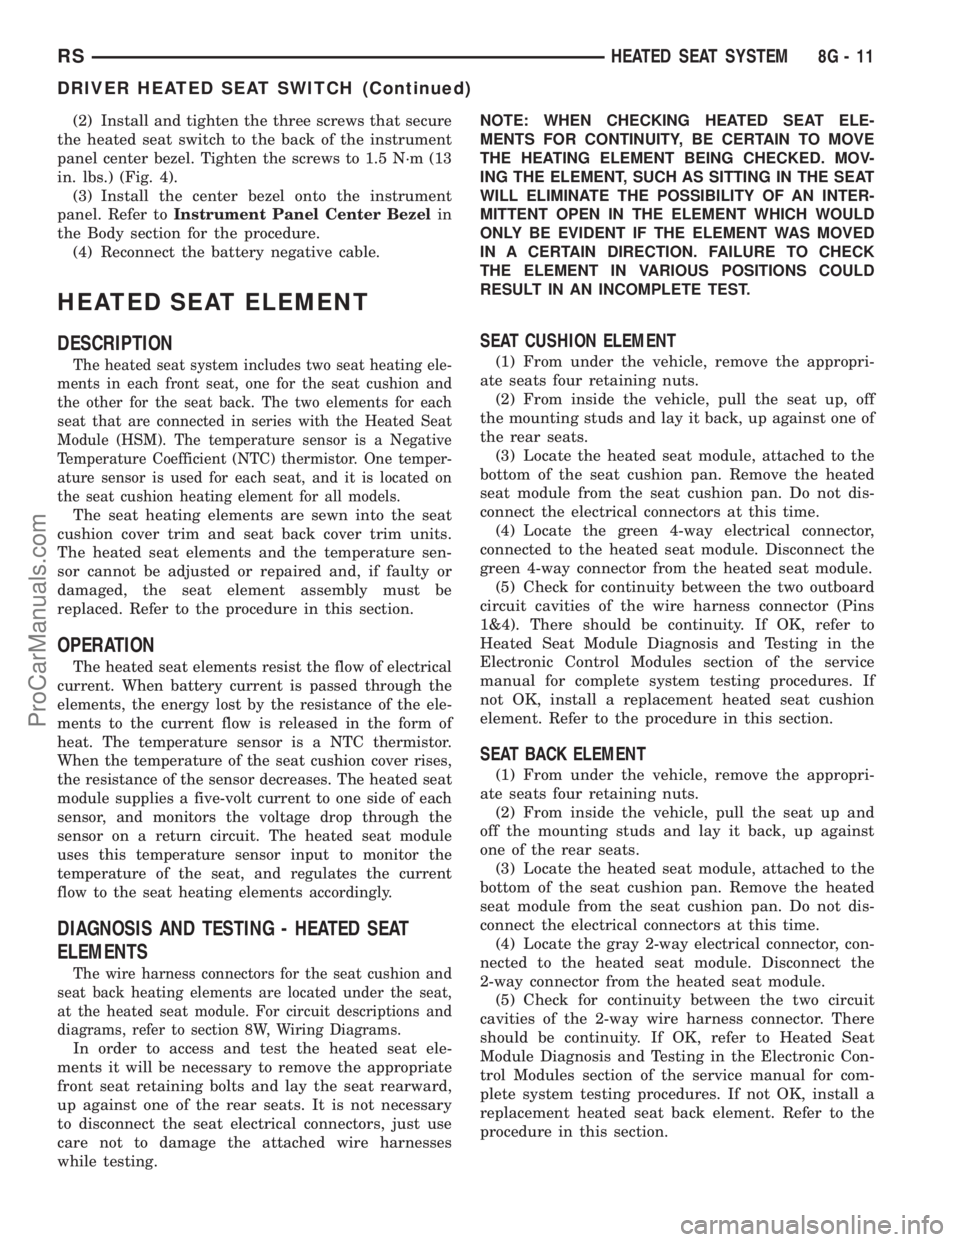
(2) Install and tighten the three screws that secure
the heated seat switch to the back of the instrument
panel center bezel. Tighten the screws to 1.5 N´m (13
in. lbs.) (Fig. 4).
(3) Install the center bezel onto the instrument
panel. Refer toInstrument Panel Center Bezelin
the Body section for the procedure.
(4) Reconnect the battery negative cable.
HEATED SEAT ELEMENT
DESCRIPTION
The heated seat system includes two seat heating ele-
ments in each front seat, one for the seat cushion and
the other for the seat back. The two elements for each
seat that are connected in series with the Heated Seat
Module (HSM). The temperature sensor is a Negative
Temperature Coefficient (NTC) thermistor. One temper-
ature sensor is used for each seat, and it is located on
the seat cushion heating element for all models.
The seat heating elements are sewn into the seat
cushion cover trim and seat back cover trim units.
The heated seat elements and the temperature sen-
sor cannot be adjusted or repaired and, if faulty or
damaged, the seat element assembly must be
replaced. Refer to the procedure in this section.
OPERATION
The heated seat elements resist the flow of electrical
current. When battery current is passed through the
elements, the energy lost by the resistance of the ele-
ments to the current flow is released in the form of
heat. The temperature sensor is a NTC thermistor.
When the temperature of the seat cushion cover rises,
the resistance of the sensor decreases. The heated seat
module supplies a five-volt current to one side of each
sensor, and monitors the voltage drop through the
sensor on a return circuit. The heated seat module
uses this temperature sensor input to monitor the
temperature of the seat, and regulates the current
flow to the seat heating elements accordingly.
DIAGNOSIS AND TESTING - HEATED SEAT
ELEMENTS
The wire harness connectors for the seat cushion and
seat back heating elements are located under the seat,
at the heated seat module. For circuit descriptions and
diagrams, refer to section 8W, Wiring Diagrams.
In order to access and test the heated seat ele-
ments it will be necessary to remove the appropriate
front seat retaining bolts and lay the seat rearward,
up against one of the rear seats. It is not necessary
to disconnect the seat electrical connectors, just use
care not to damage the attached wire harnesses
while testing.NOTE: WHEN CHECKING HEATED SEAT ELE-
MENTS FOR CONTINUITY, BE CERTAIN TO MOVE
THE HEATING ELEMENT BEING CHECKED. MOV-
ING THE ELEMENT, SUCH AS SITTING IN THE SEAT
WILL ELIMINATE THE POSSIBILITY OF AN INTER-
MITTENT OPEN IN THE ELEMENT WHICH WOULD
ONLY BE EVIDENT IF THE ELEMENT WAS MOVED
IN A CERTAIN DIRECTION. FAILURE TO CHECK
THE ELEMENT IN VARIOUS POSITIONS COULD
RESULT IN AN INCOMPLETE TEST.
SEAT CUSHION ELEMENT
(1) From under the vehicle, remove the appropri-
ate seats four retaining nuts.
(2) From inside the vehicle, pull the seat up, off
the mounting studs and lay it back, up against one of
the rear seats.
(3) Locate the heated seat module, attached to the
bottom of the seat cushion pan. Remove the heated
seat module from the seat cushion pan. Do not dis-
connect the electrical connectors at this time.
(4) Locate the green 4-way electrical connector,
connected to the heated seat module. Disconnect the
green 4-way connector from the heated seat module.
(5) Check for continuity between the two outboard
circuit cavities of the wire harness connector (Pins
1&4). There should be continuity. If OK, refer to
Heated Seat Module Diagnosis and Testing in the
Electronic Control Modules section of the service
manual for complete system testing procedures. If
not OK, install a replacement heated seat cushion
element. Refer to the procedure in this section.
SEAT BACK ELEMENT
(1) From under the vehicle, remove the appropri-
ate seats four retaining nuts.
(2) From inside the vehicle, pull the seat up and
off the mounting studs and lay it back, up against
one of the rear seats.
(3) Locate the heated seat module, attached to the
bottom of the seat cushion pan. Remove the heated
seat module from the seat cushion pan. Do not dis-
connect the electrical connectors at this time.
(4) Locate the gray 2-way electrical connector, con-
nected to the heated seat module. Disconnect the
2-way connector from the heated seat module.
(5) Check for continuity between the two circuit
cavities of the 2-way wire harness connector. There
should be continuity. If OK, refer to Heated Seat
Module Diagnosis and Testing in the Electronic Con-
trol Modules section of the service manual for com-
plete system testing procedures. If not OK, install a
replacement heated seat back element. Refer to the
procedure in this section.
RSHEATED SEAT SYSTEM8G-11
DRIVER HEATED SEAT SWITCH (Continued)
ProCarManuals.com
Page 465 of 2399
REMOVAL
Do not remove the OEM heating element from the
seat or seat back cushion/trim covers. The original
element is permanently attached and cannot be
removed without permanent damage. The service
replacement heating element is designed to be
applied directly on the seat cushion.
(1) Disconnect and isolate the negative battery
cable.
(2) Remove the appropriate seat cushion or seat
back trim cover. Refer to the Body section of the ser-
vice manual for the procedures.
(3) Disconnect the inoperative heated seat cushion
or seat back element electrical connectors.
(4) Locate the wires leading from the inoperative
heating element and cut them off flush with the edge
of the original heating element.
INSTALLATION
(1) Peel off the adhesive backing on the back of the
replacement heating element and stick directly on
the foam cushion.
CAUTION: During the installation of the replace-
ment heating element, be careful not to fold or
crease the element assembly. Folds or creases will
cause premature failure.
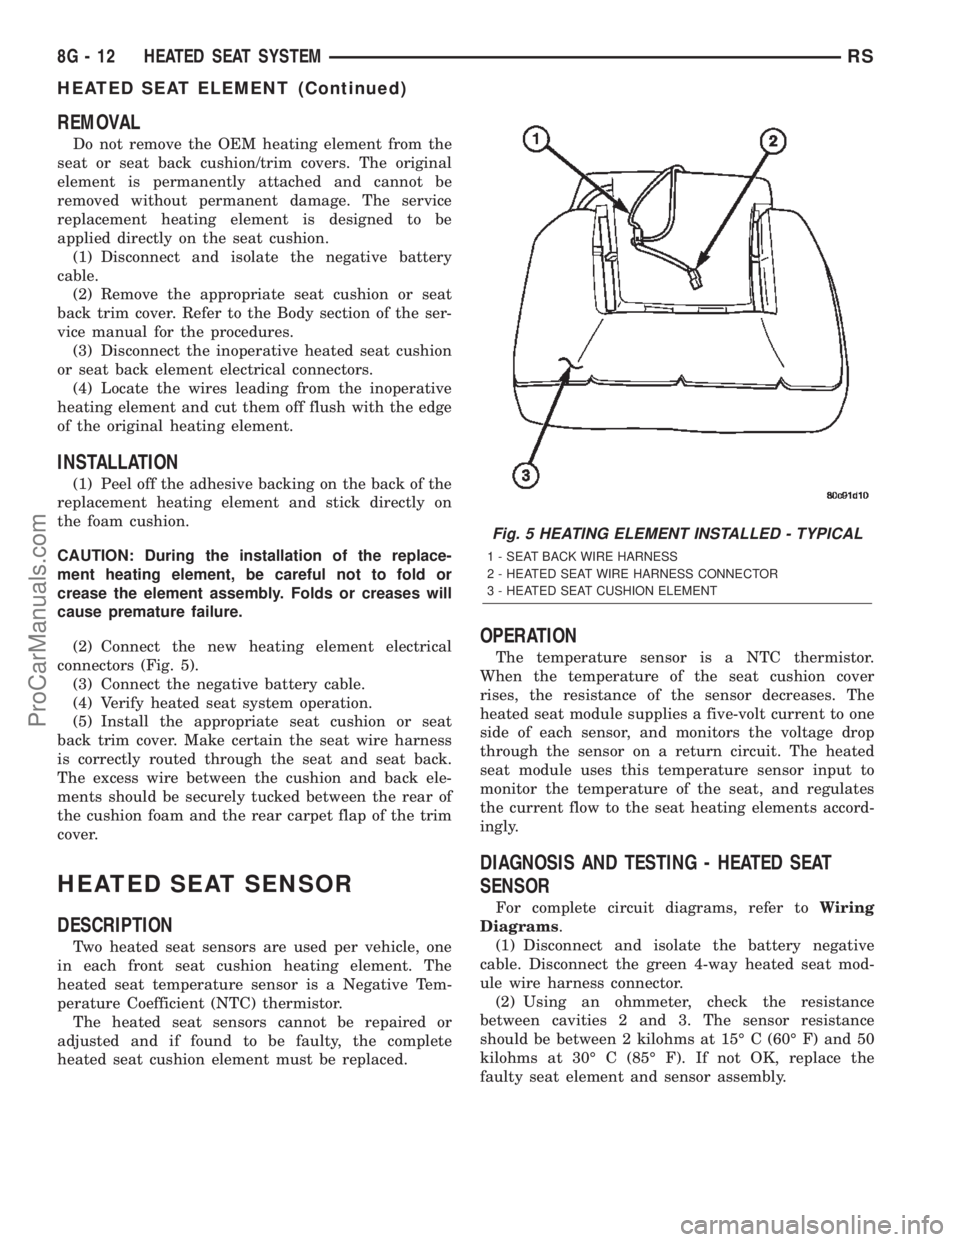
(2) Connect the new heating element electrical
connectors (Fig. 5).
(3) Connect the negative battery cable.
(4) Verify heated seat system operation.
(5) Install the appropriate seat cushion or seat
back trim cover. Make certain the seat wire harness
is correctly routed through the seat and seat back.
The excess wire between the cushion and back ele-
ments should be securely tucked between the rear of
the cushion foam and the rear carpet flap of the trim
cover.
HEATED SEAT SENSOR
DESCRIPTION
Two heated seat sensors are used per vehicle, one
in each front seat cushion heating element. The
heated seat temperature sensor is a Negative Tem-
perature Coefficient (NTC) thermistor.
The heated seat sensors cannot be repaired or
adjusted and if found to be faulty, the complete
heated seat cushion element must be replaced.
OPERATION
The temperature sensor is a NTC thermistor.
When the temperature of the seat cushion cover
rises, the resistance of the sensor decreases. The
heated seat module supplies a five-volt current to one
side of each sensor, and monitors the voltage drop
through the sensor on a return circuit. The heated
seat module uses this temperature sensor input to
monitor the temperature of the seat, and regulates
the current flow to the seat heating elements accord-
ingly.
DIAGNOSIS AND TESTING - HEATED SEAT
SENSOR
For complete circuit diagrams, refer toWiring
Diagrams.
(1) Disconnect and isolate the battery negative
cable. Disconnect the green 4-way heated seat mod-
ule wire harness connector.
(2) Using an ohmmeter, check the resistance
between cavities 2 and 3. The sensor resistance
should be between 2 kilohms at 15É C (60É F) and 50
kilohms at 30É C (85É F). If not OK, replace the
faulty seat element and sensor assembly.
Fig. 5 HEATING ELEMENT INSTALLED - TYPICAL
1 - SEAT BACK WIRE HARNESS
2 - HEATED SEAT WIRE HARNESS CONNECTOR
3 - HEATED SEAT CUSHION ELEMENT
8G - 12 HEATED SEAT SYSTEMRS
HEATED SEAT ELEMENT (Continued)
ProCarManuals.com
Page 466 of 2399
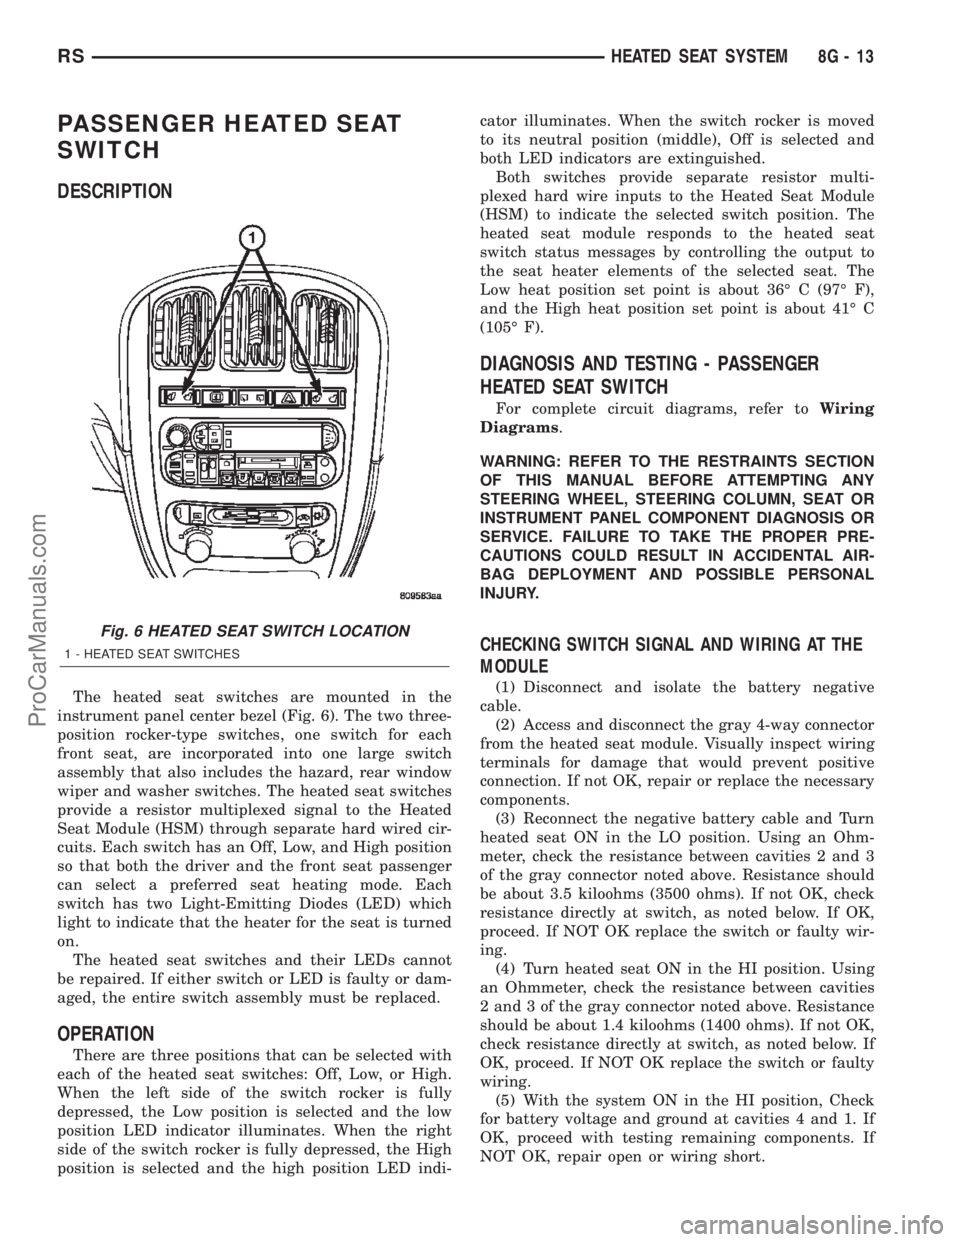
PASSENGER HEATED SEAT
SWITCH
DESCRIPTION
The heated seat switches are mounted in the
instrument panel center bezel (Fig. 6). The two three-
position rocker-type switches, one switch for each
front seat, are incorporated into one large switch
assembly that also includes the hazard, rear window
wiper and washer switches. The heated seat switches
provide a resistor multiplexed signal to the Heated
Seat Module (HSM) through separate hard wired cir-
cuits. Each switch has an Off, Low, and High position
so that both the driver and the front seat passenger
can select a preferred seat heating mode. Each
switch has two Light-Emitting Diodes (LED) which
light to indicate that the heater for the seat is turned
on.
The heated seat switches and their LEDs cannot
be repaired. If either switch or LED is faulty or dam-
aged, the entire switch assembly must be replaced.
OPERATION
There are three positions that can be selected with
each of the heated seat switches: Off, Low, or High.
When the left side of the switch rocker is fully
depressed, the Low position is selected and the low
position LED indicator illuminates. When the right
side of the switch rocker is fully depressed, the High
position is selected and the high position LED indi-cator illuminates. When the switch rocker is moved
to its neutral position (middle), Off is selected and
both LED indicators are extinguished.
Both switches provide separate resistor multi-
plexed hard wire inputs to the Heated Seat Module
(HSM) to indicate the selected switch position. The
heated seat module responds to the heated seat
switch status messages by controlling the output to
the seat heater elements of the selected seat. The
Low heat position set point is about 36É C (97É F),
and the High heat position set point is about 41É C
(105É F).
DIAGNOSIS AND TESTING - PASSENGER
HEATED SEAT SWITCH
For complete circuit diagrams, refer toWiring
Diagrams.
WARNING: REFER TO THE RESTRAINTS SECTION
OF THIS MANUAL BEFORE ATTEMPTING ANY
STEERING WHEEL, STEERING COLUMN, SEAT OR
INSTRUMENT PANEL COMPONENT DIAGNOSIS OR
SERVICE. FAILURE TO TAKE THE PROPER PRE-
CAUTIONS COULD RESULT IN ACCIDENTAL AIR-
BAG DEPLOYMENT AND POSSIBLE PERSONAL
INJURY.
CHECKING SWITCH SIGNAL AND WIRING AT THE
MODULE
(1) Disconnect and isolate the battery negative
cable.
(2) Access and disconnect the gray 4-way connector
from the heated seat module. Visually inspect wiring
terminals for damage that would prevent positive
connection. If not OK, repair or replace the necessary
components.
(3) Reconnect the negative battery cable and Turn
heated seat ON in the LO position. Using an Ohm-
meter, check the resistance between cavities 2 and 3
of the gray connector noted above. Resistance should
be about 3.5 kiloohms (3500 ohms). If not OK, check
resistance directly at switch, as noted below. If OK,
proceed. If NOT OK replace the switch or faulty wir-
ing.
(4) Turn heated seat ON in the HI position. Using
an Ohmmeter, check the resistance between cavities
2 and 3 of the gray connector noted above. Resistance
should be about 1.4 kiloohms (1400 ohms). If not OK,
check resistance directly at switch, as noted below. If
OK, proceed. If NOT OK replace the switch or faulty
wiring.
(5) With the system ON in the HI position, Check
for battery voltage and ground at cavities 4 and 1. If
OK, proceed with testing remaining components. If
NOT OK, repair open or wiring short.
Fig. 6 HEATED SEAT SWITCH LOCATION
1 - HEATED SEAT SWITCHES
RSHEATED SEAT SYSTEM8G-13
ProCarManuals.com