CHRYSLER VOYAGER 1996 Service Manual
VOYAGER 1996
CHRYSLER
CHRYSLER
https://www.carmanualsonline.info/img/25/56867/w960_56867-0.png
CHRYSLER VOYAGER 1996 Service Manual
Trending: tires, gas tank size, change key battery, charging, PTU, length, spare tire location
Page 381 of 1938
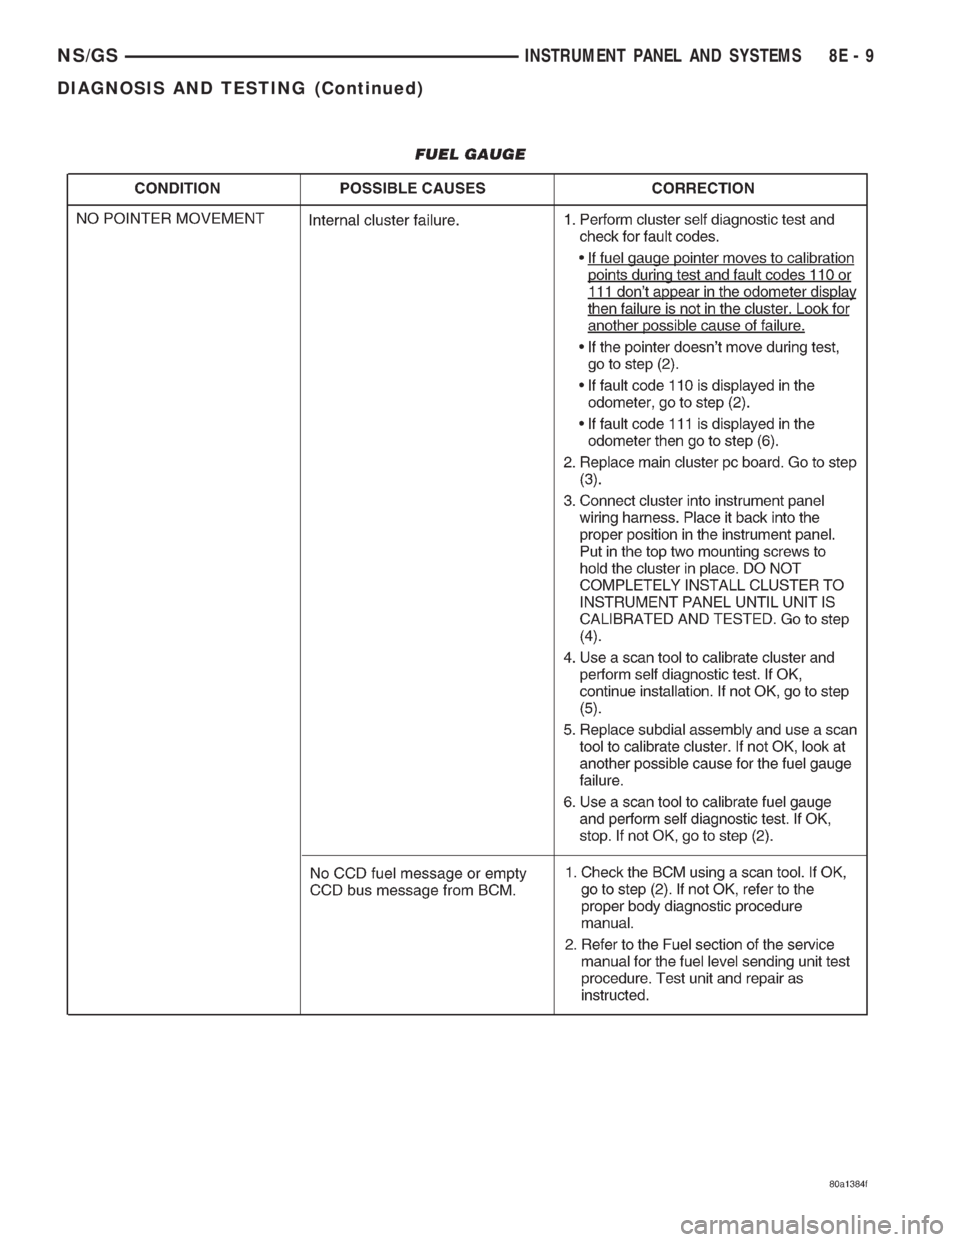
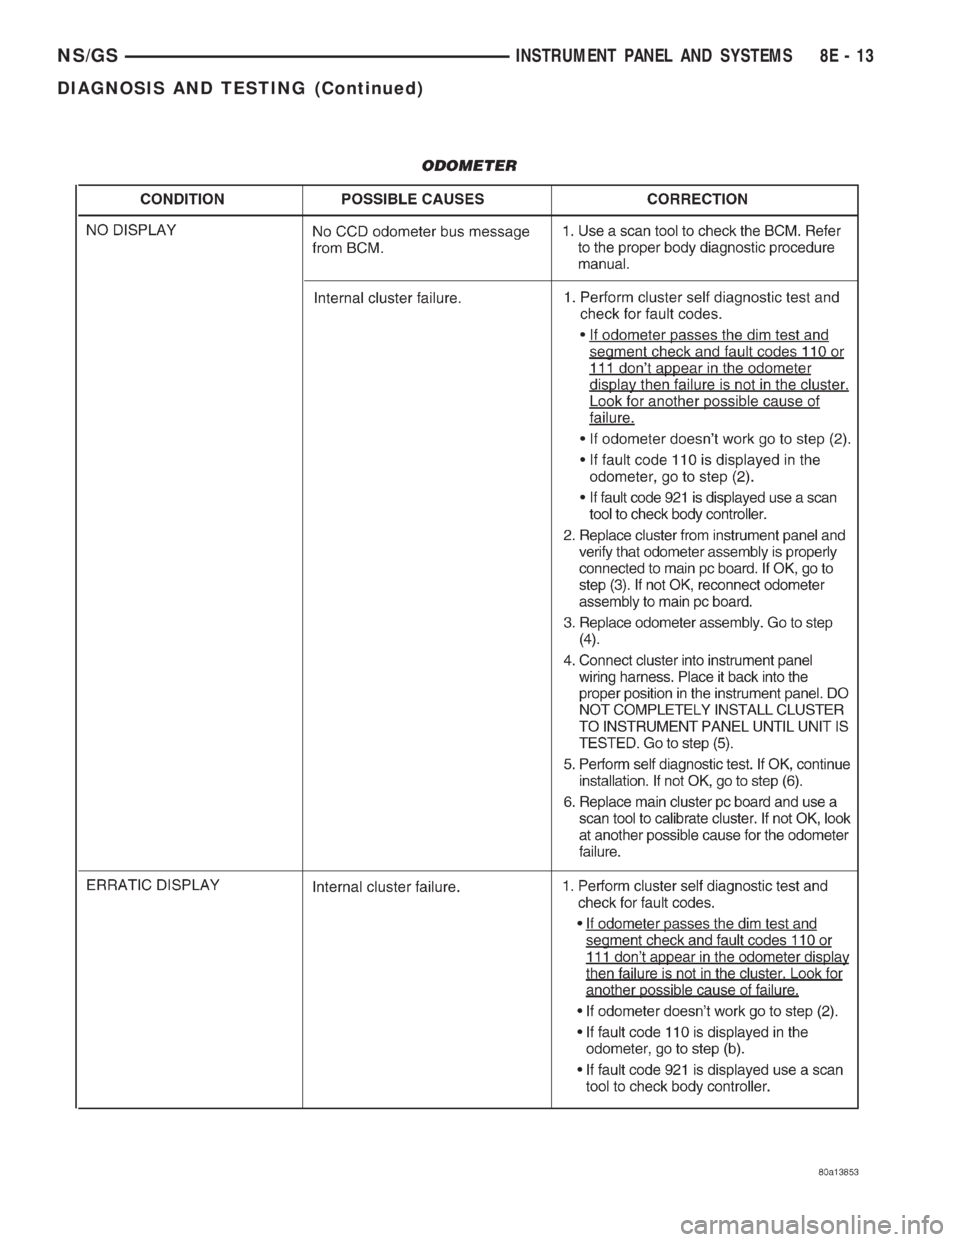
NS/GSINSTRUMENT PANEL AND SYSTEMS 8E - 9
DIAGNOSIS AND TESTING (Continued)
Page 382 of 1938
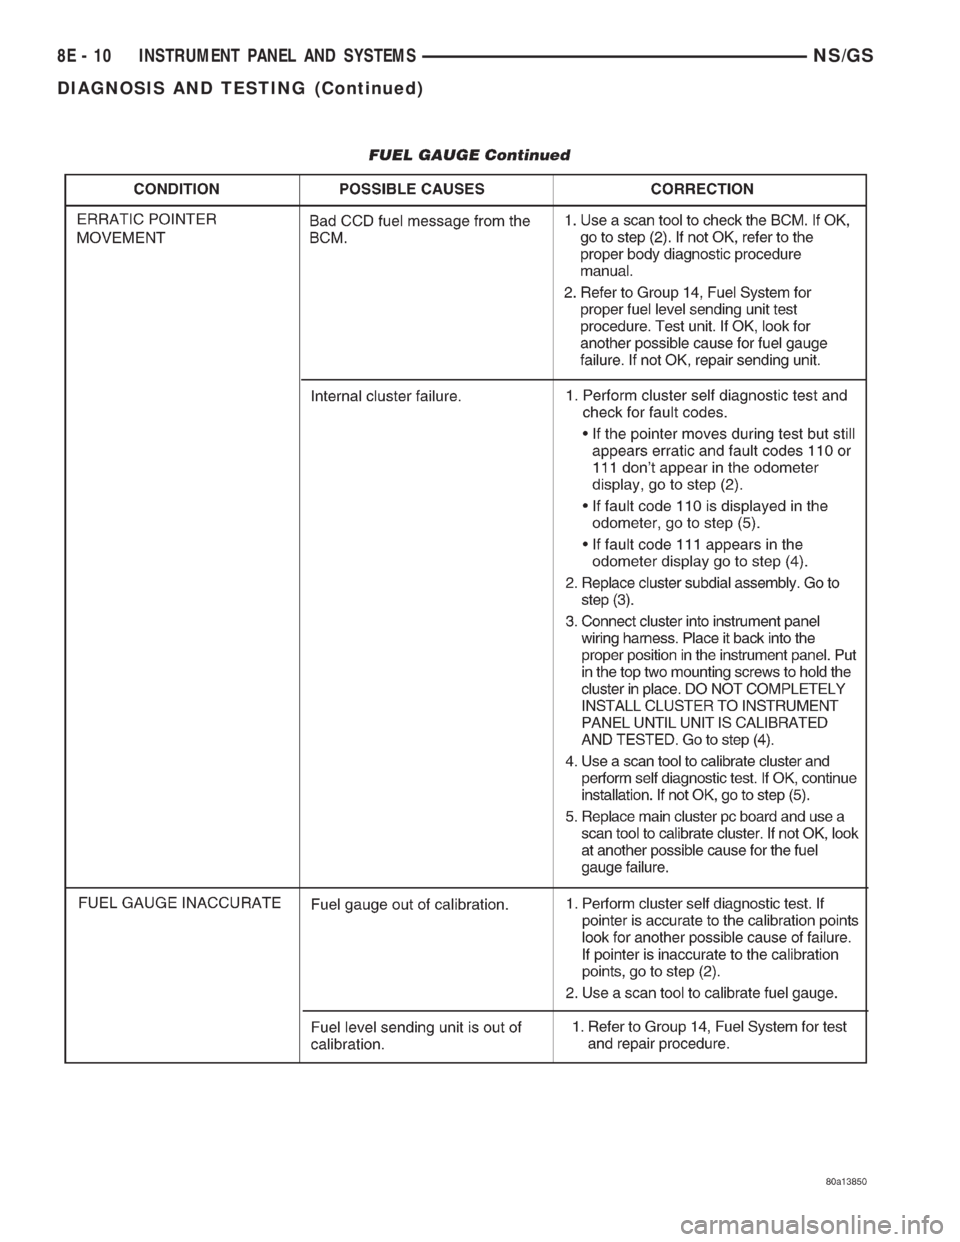
8E - 10 INSTRUMENT PANEL AND SYSTEMSNS/GS
DIAGNOSIS AND TESTING (Continued)
Page 383 of 1938
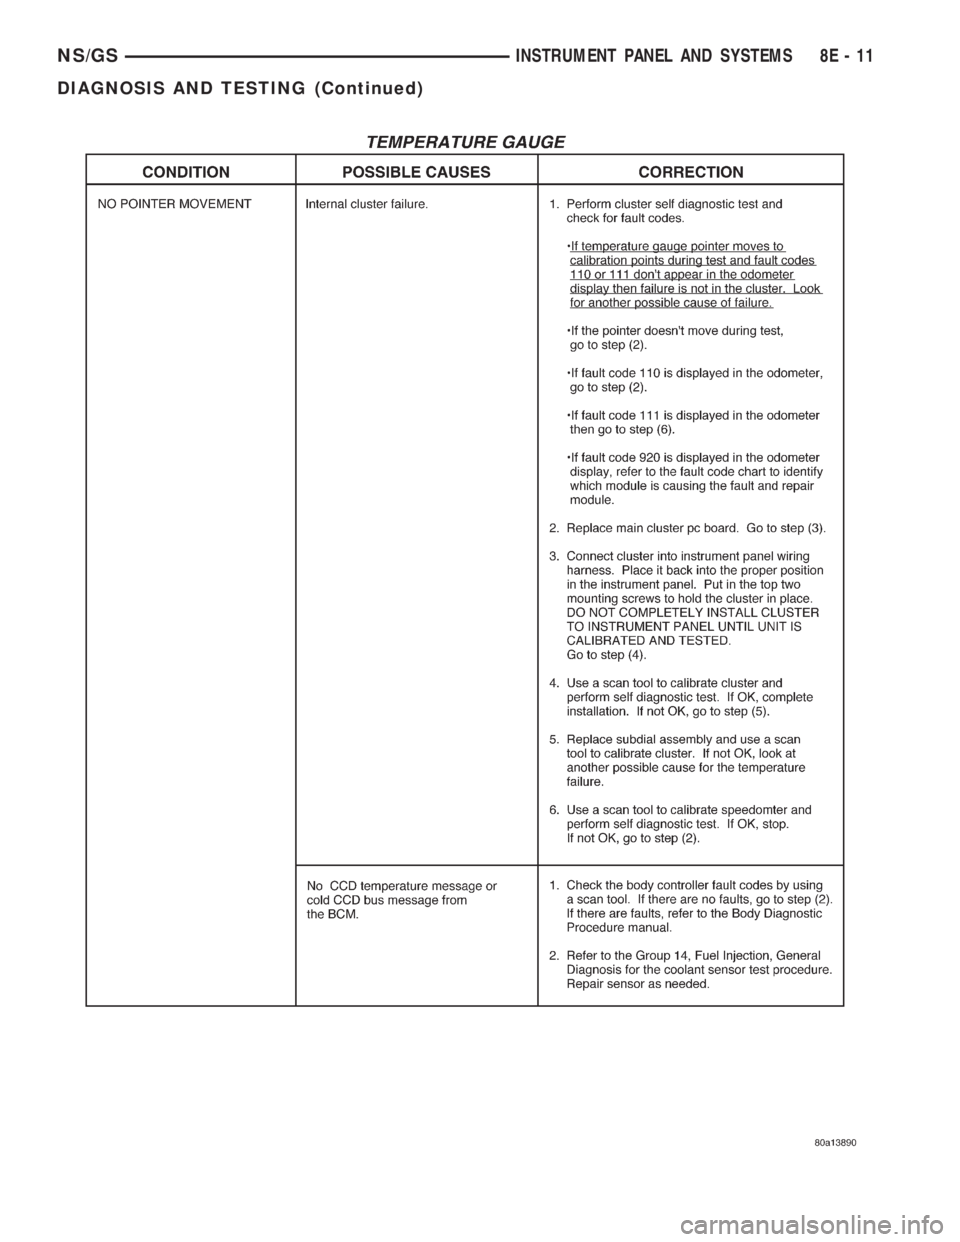
NS/GSINSTRUMENT PANEL AND SYSTEMS 8E - 11
DIAGNOSIS AND TESTING (Continued)
Page 384 of 1938
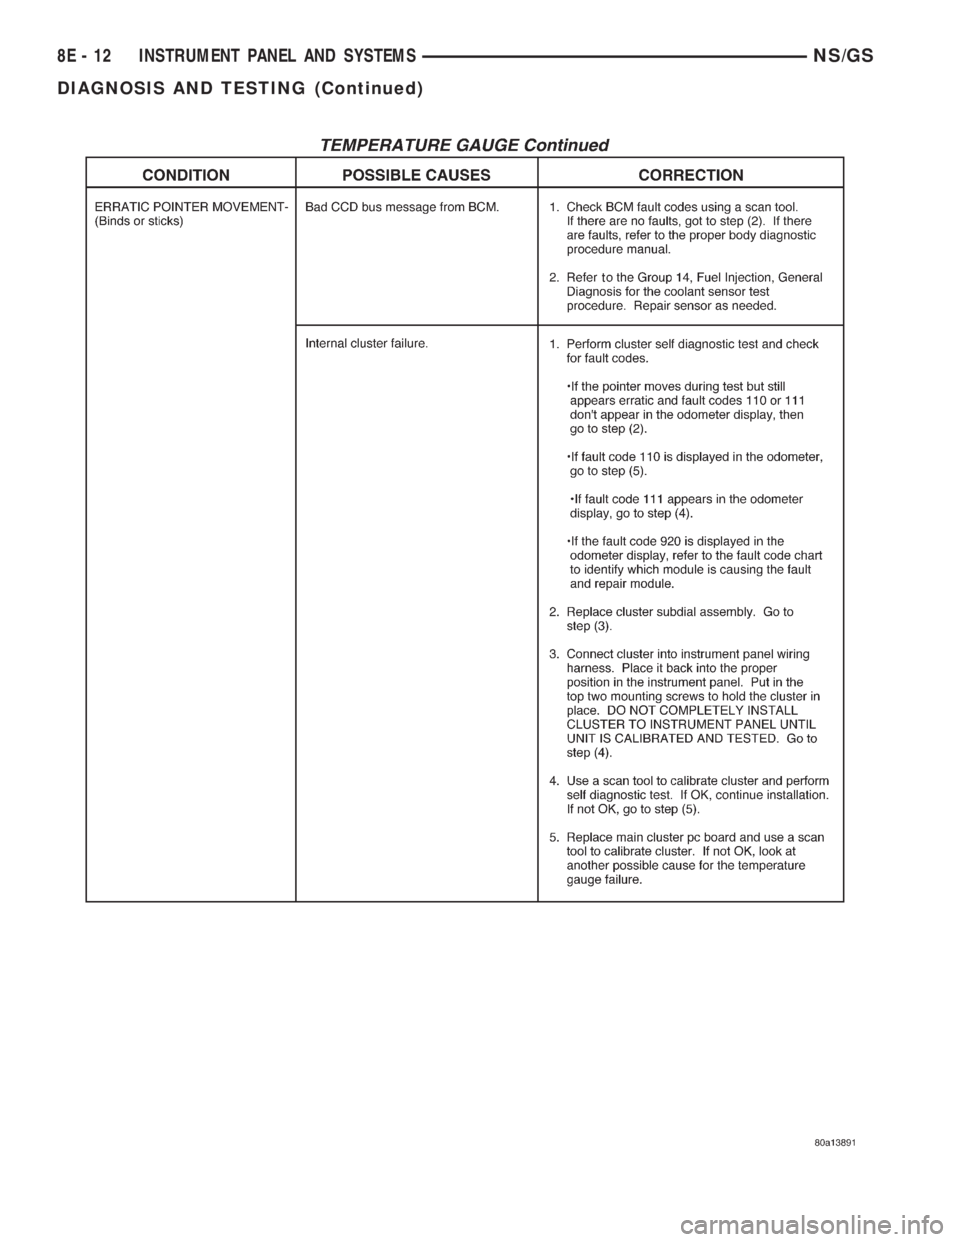
8E - 12 INSTRUMENT PANEL AND SYSTEMSNS/GS
DIAGNOSIS AND TESTING (Continued)
Page 385 of 1938
NS/GSINSTRUMENT PANEL AND SYSTEMS 8E - 13
DIAGNOSIS AND TESTING (Continued)
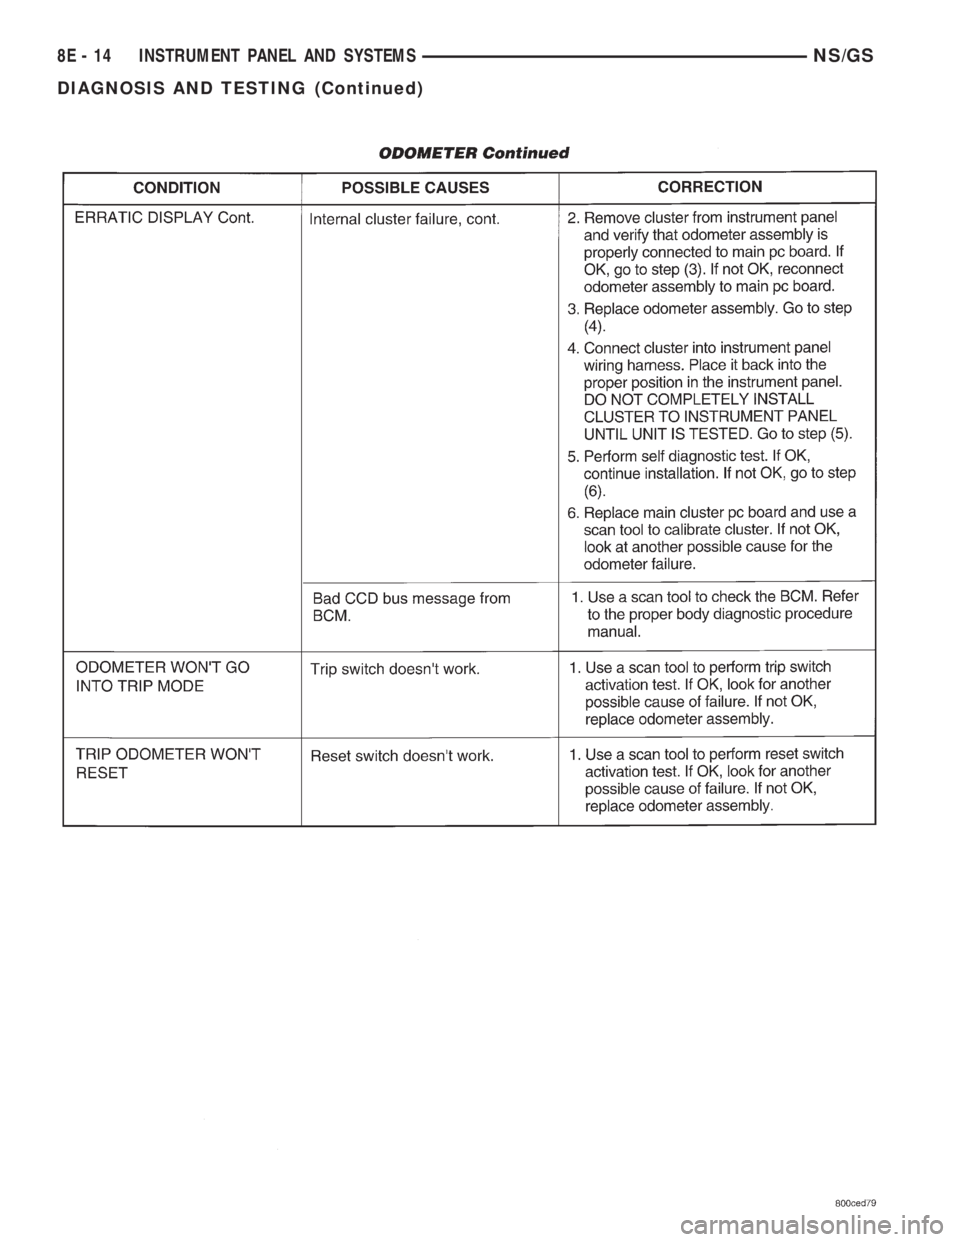
Page 386 of 1938
8E - 14 INSTRUMENT PANEL AND SYSTEMSNS/GS
DIAGNOSIS AND TESTING (Continued)
Page 387 of 1938
REMOVAL AND INSTALLATION
CONVENIENCE BIN - CUP HOLDER
REMOVAL
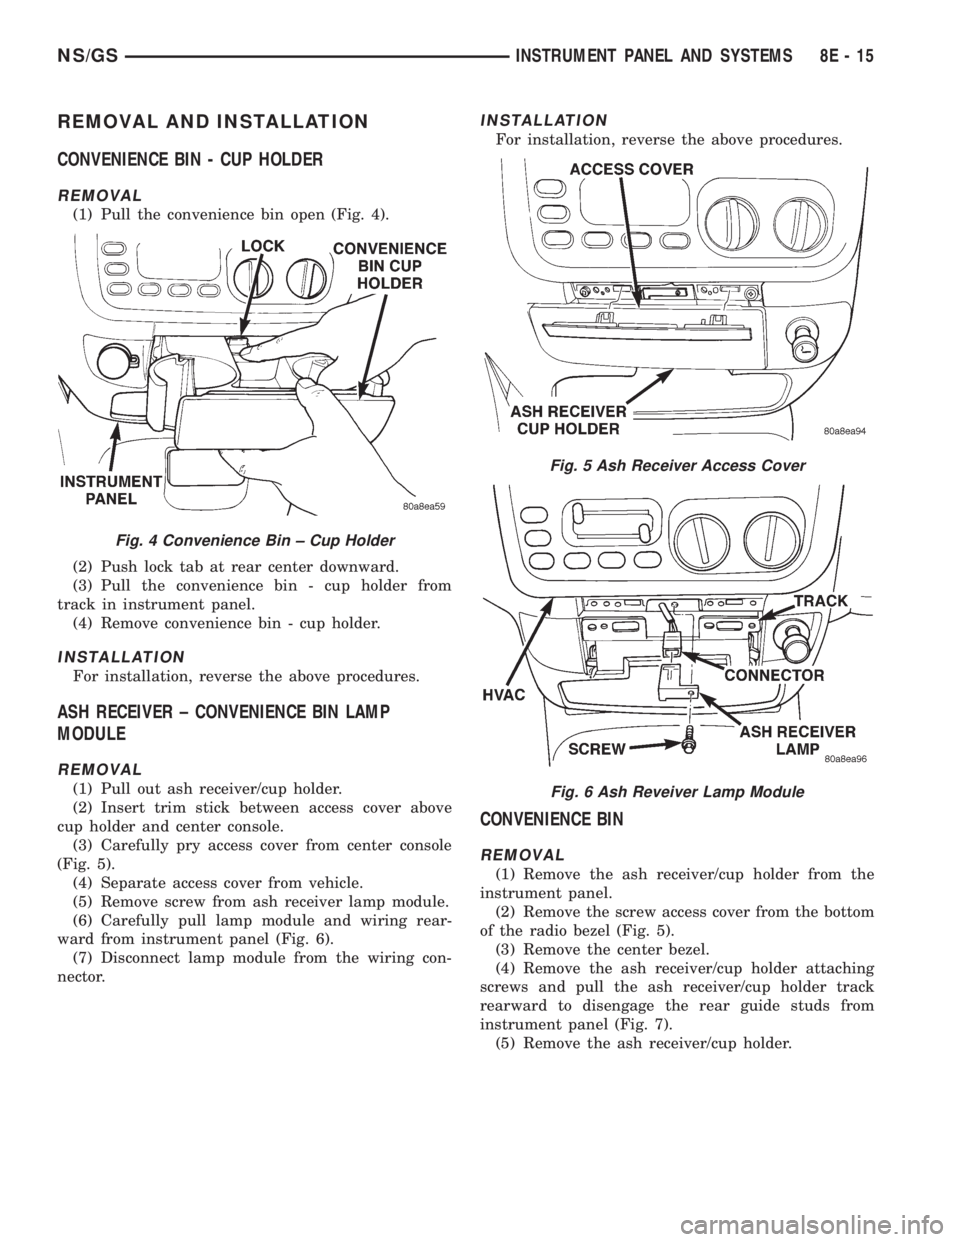
(1) Pull the convenience bin open (Fig. 4).
(2) Push lock tab at rear center downward.
(3) Pull the convenience bin - cup holder from
track in instrument panel.
(4) Remove convenience bin - cup holder.
INSTALLATION
For installation, reverse the above procedures.
ASH RECEIVER ± CONVENIENCE BIN LAMP
MODULE
REMOVAL
(1) Pull out ash receiver/cup holder.
(2) Insert trim stick between access cover above
cup holder and center console.
(3) Carefully pry access cover from center console
(Fig. 5).
(4) Separate access cover from vehicle.
(5) Remove screw from ash receiver lamp module.
(6) Carefully pull lamp module and wiring rear-
ward from instrument panel (Fig. 6).
(7) Disconnect lamp module from the wiring con-
nector.
INSTALLATION
For installation, reverse the above procedures.
CONVENIENCE BIN
REMOVAL
(1) Remove the ash receiver/cup holder from the
instrument panel.
(2) Remove the screw access cover from the bottom
of the radio bezel (Fig. 5).
(3) Remove the center bezel.
(4) Remove the ash receiver/cup holder attaching
screws and pull the ash receiver/cup holder track
rearward to disengage the rear guide studs from
instrument panel (Fig. 7).
(5) Remove the ash receiver/cup holder.
Fig. 4 Convenience Bin ± Cup Holder
Fig. 5 Ash Receiver Access Cover
Fig. 6 Ash Reveiver Lamp Module
NS/GSINSTRUMENT PANEL AND SYSTEMS 8E - 15
Page 388 of 1938
INSTALLATION
For installation, reverse the above procedures.
BODY CONTROL MODULE (BCM)
REMOVAL
(1) Disconnect battery negative cable.
(2) Remove lower steering column cover and knee
blocker reinforcement.
(3) Disconnect two wire connectors from bottom of
Body Control Module (BCM)
(4) Remove bolts holding Junction Block to dash
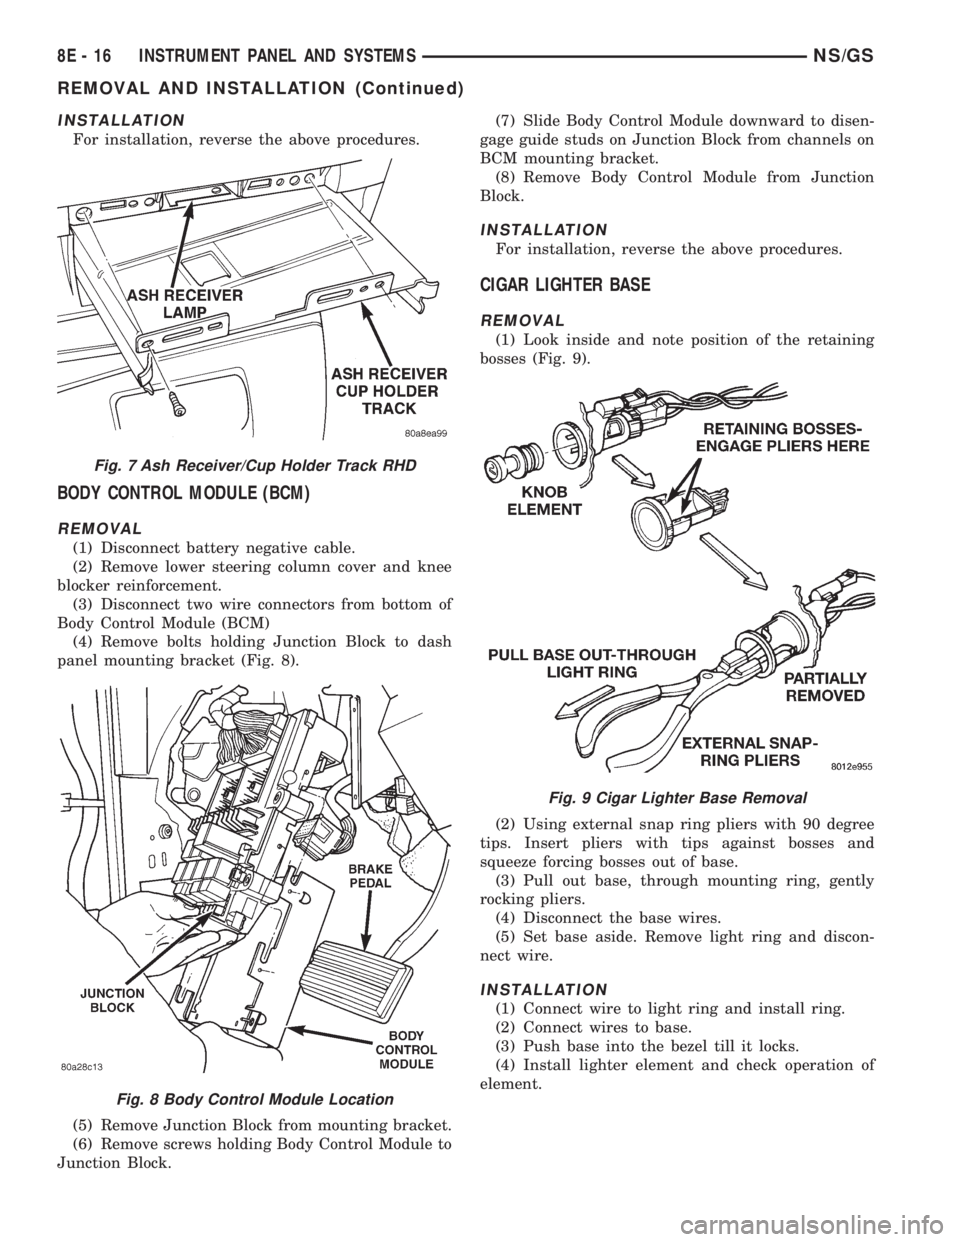
panel mounting bracket (Fig. 8).
(5) Remove Junction Block from mounting bracket.
(6) Remove screws holding Body Control Module to
Junction Block.(7) Slide Body Control Module downward to disen-
gage guide studs on Junction Block from channels on
BCM mounting bracket.
(8) Remove Body Control Module from Junction
Block.
INSTALLATION
For installation, reverse the above procedures.
CIGAR LIGHTER BASE
REMOVAL
(1) Look inside and note position of the retaining
bosses (Fig. 9).
(2) Using external snap ring pliers with 90 degree
tips. Insert pliers with tips against bosses and
squeeze forcing bosses out of base.
(3) Pull out base, through mounting ring, gently
rocking pliers.
(4) Disconnect the base wires.
(5) Set base aside. Remove light ring and discon-
nect wire.
INSTALLATION
(1) Connect wire to light ring and install ring.
(2) Connect wires to base.
(3) Push base into the bezel till it locks.
(4) Install lighter element and check operation of
element.
Fig. 7 Ash Receiver/Cup Holder Track RHD
Fig. 8 Body Control Module Location
Fig. 9 Cigar Lighter Base Removal
8E - 16 INSTRUMENT PANEL AND SYSTEMSNS/GS
REMOVAL AND INSTALLATION (Continued)
Page 389 of 1938
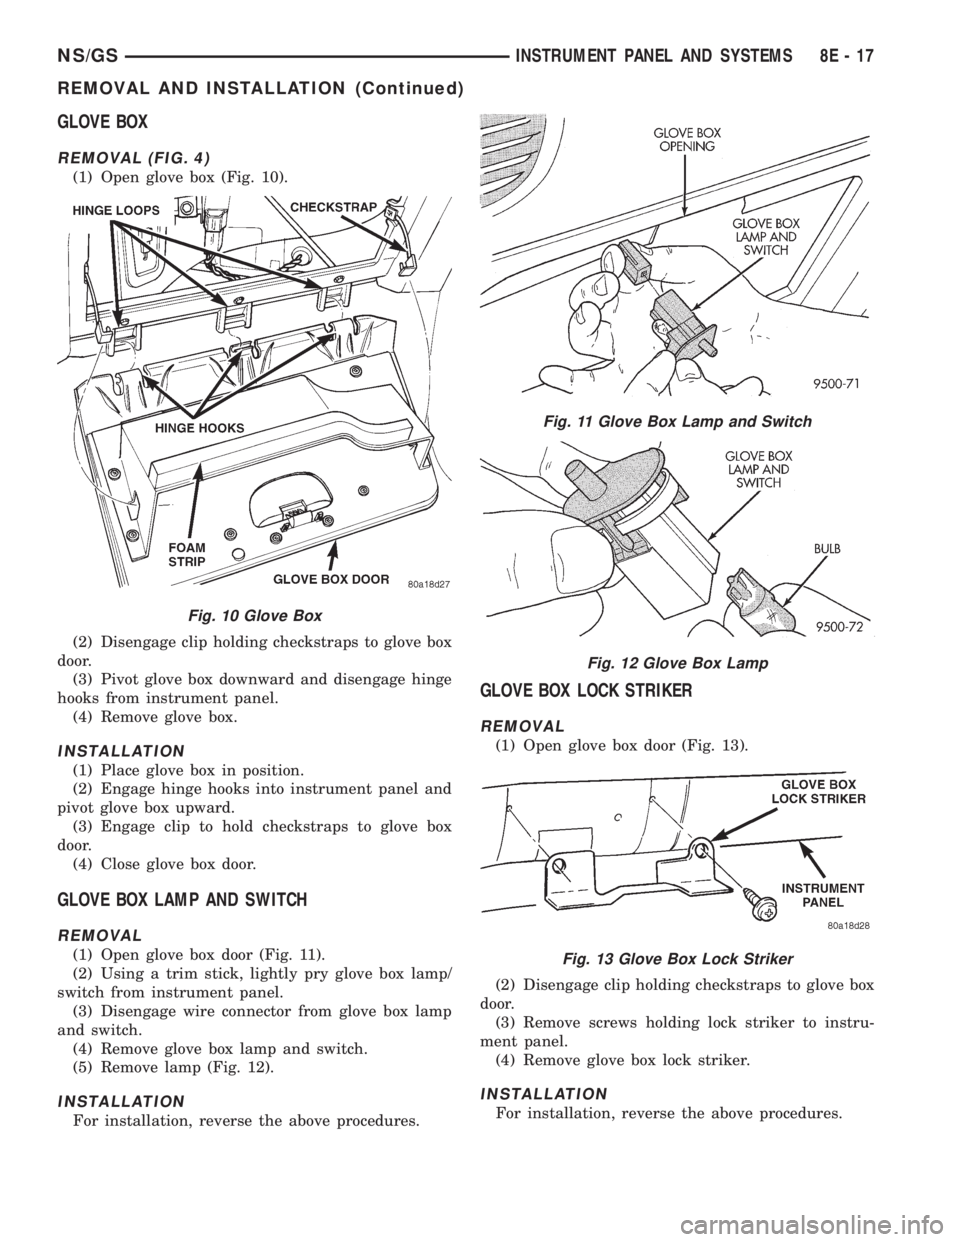
GLOVE BOX
REMOVAL (FIG. 4)
(1) Open glove box (Fig. 10).
(2) Disengage clip holding checkstraps to glove box
door.
(3) Pivot glove box downward and disengage hinge
hooks from instrument panel.
(4) Remove glove box.
INSTALLATION
(1) Place glove box in position.
(2) Engage hinge hooks into instrument panel and
pivot glove box upward.
(3) Engage clip to hold checkstraps to glove box
door.
(4) Close glove box door.
GLOVE BOX LAMP AND SWITCH
REMOVAL
(1) Open glove box door (Fig. 11).
(2) Using a trim stick, lightly pry glove box lamp/
switch from instrument panel.
(3) Disengage wire connector from glove box lamp
and switch.
(4) Remove glove box lamp and switch.
(5) Remove lamp (Fig. 12).
INSTALLATION
For installation, reverse the above procedures.
GLOVE BOX LOCK STRIKER
REMOVAL
(1) Open glove box door (Fig. 13).
(2) Disengage clip holding checkstraps to glove box
door.
(3) Remove screws holding lock striker to instru-
ment panel.
(4) Remove glove box lock striker.
INSTALLATION
For installation, reverse the above procedures.
Fig. 10 Glove Box
Fig. 11 Glove Box Lamp and Switch
Fig. 12 Glove Box Lamp
Fig. 13 Glove Box Lock Striker
NS/GSINSTRUMENT PANEL AND SYSTEMS 8E - 17
REMOVAL AND INSTALLATION (Continued)
Page 390 of 1938
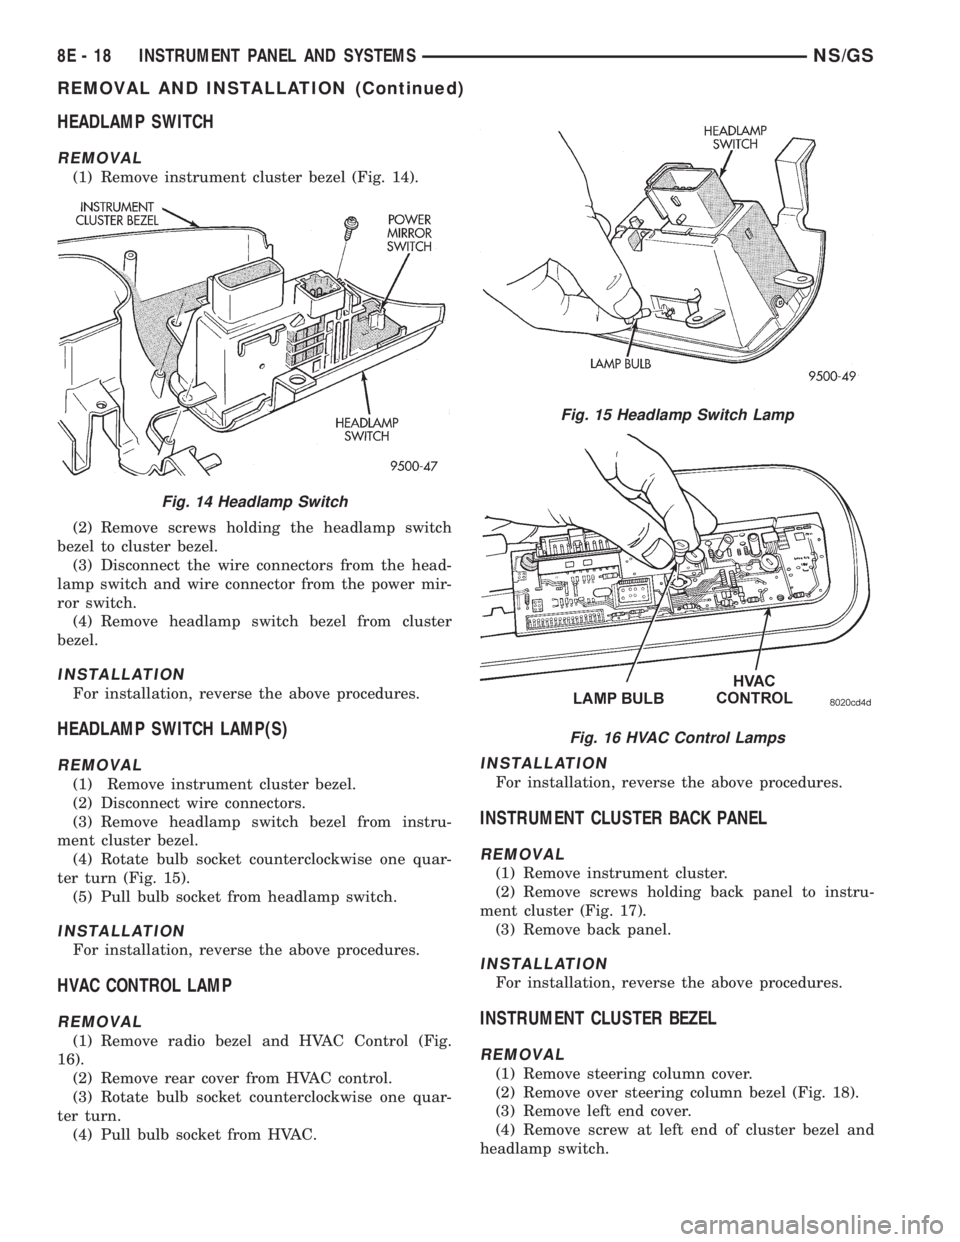
HEADLAMP SWITCH
REMOVAL
(1) Remove instrument cluster bezel (Fig. 14).
(2) Remove screws holding the headlamp switch
bezel to cluster bezel.
(3) Disconnect the wire connectors from the head-
lamp switch and wire connector from the power mir-
ror switch.
(4) Remove headlamp switch bezel from cluster
bezel.
INSTALLATION
For installation, reverse the above procedures.
HEADLAMP SWITCH LAMP(S)
REMOVAL
(1) Remove instrument cluster bezel.
(2) Disconnect wire connectors.
(3) Remove headlamp switch bezel from instru-
ment cluster bezel.
(4) Rotate bulb socket counterclockwise one quar-
ter turn (Fig. 15).
(5) Pull bulb socket from headlamp switch.
INSTALLATION
For installation, reverse the above procedures.
HVAC CONTROL LAMP
REMOVAL
(1) Remove radio bezel and HVAC Control (Fig.
16).
(2) Remove rear cover from HVAC control.
(3) Rotate bulb socket counterclockwise one quar-
ter turn.
(4) Pull bulb socket from HVAC.
INSTALLATION
For installation, reverse the above procedures.
INSTRUMENT CLUSTER BACK PANEL
REMOVAL
(1) Remove instrument cluster.
(2) Remove screws holding back panel to instru-
ment cluster (Fig. 17).
(3) Remove back panel.
INSTALLATION
For installation, reverse the above procedures.
INSTRUMENT CLUSTER BEZEL
REMOVAL
(1) Remove steering column cover.
(2) Remove over steering column bezel (Fig. 18).
(3) Remove left end cover.
(4) Remove screw at left end of cluster bezel and
headlamp switch.
Fig. 14 Headlamp Switch
Fig. 15 Headlamp Switch Lamp
Fig. 16 HVAC Control Lamps
8E - 18 INSTRUMENT PANEL AND SYSTEMSNS/GS
REMOVAL AND INSTALLATION (Continued)
Trending: Vtss, wheel bolt torque, change key battery, fuse, mileage, brake rotor, tire size
