ESP CHRYSLER VOYAGER 2001 Service Manual
[x] Cancel search | Manufacturer: CHRYSLER, Model Year: 2001, Model line: VOYAGER, Model: CHRYSLER VOYAGER 2001Pages: 4284, PDF Size: 83.53 MB
Page 448 of 4284
TEST ACTION APPLICABILITY
4NOTE: Ensure there is PCI bus communication with other modules. If not,
refer to the PCI Bus Communication Failure symptom and repair as
necessary.
WARNING: TURN THE IGNITION OFF, DISCONNECT THE BATTERY AND
WAIT TWO MINUTES BEFORE PROCEEDING.
Disconnect the Right Side Impact Airbag Control Module harness connector.
Turn the ignition on and then reconnect the Battery.
Use Scope input cable CH7058, Cable to Probe adapter CH7062, and the red and
black test probes.
Connect the scope input cable to the channel one connector on the DRB. Attach the
red and black leads and the cable to probe adapter to the scope input cable.
Select DRB Standalone.
Select lab scope.
Select Live Data.
Select 12 volt square wave.
Press F2 for Scope, then enter to select channel.
Press F2 and use the down arrow to set voltage range to 20 volts. Press F2 again
when complete.
Connect the Black lead to the chassis ground. Connect the Red lead to the PCI Bus
circuit in the Right Side Impact Airbag Control Module connector.
Observe the voltage display on the DRB Lab Scope.
Does the voltage pulse from 0 to approximately 7.5 volts?All
Ye s®Go To 5
No®Repair the PCI Bus circuit for an open.
Perform AIRBAG VERIFICATION TEST - VER 1.
5 If there are no possible causes remaining, view repair. All
Ye s®Replace the Right Side Impact Airbag Control Module (RSIACM)
in accordance with the Service Information. WARNING: Make
sure the battery is disconnected and wait 2 minutes before
proceeding.
Perform AIRBAG VERIFICATION TEST - VER 1.
419
COMMUNICATION
*NO RESPONSE FROM RIGHT SIACM ÐContinued
Page 449 of 4284

Symptom:
*NO RESPONSE FROM TRANSMISSION CONTROL MODULE
POSSIBLE CAUSES
NO RESPONSE FROM TRANSMISSION CONTROL MODULE
FCM OUTPUT (RUN/ST) CIRCUIT OPEN
IGNITION SWITCH OUTPUT (START) CIRCUIT OPEN
FUSED B(+) CIRCUIT OPEN
GROUND CIRCUIT(S) OPEN
OPEN PCI BUS CIRCUIT
TRANSMISSION CONTROL MODULE
TEST ACTION APPLICABILITY
1 Turn the ignition on.
Note: As soon as one or more module communicates with the DRB, answer
the question.
With the DRB, attempt to communicate with the Airbag Control Module (ACM).
With the DRB, attempt to communicate with the Body Control Module (BCM).
Was the DRB able to I/D or establish communications with either of the modules?All
Ye s®Go To 2
No®Refer to the Body Communication category and perform the
symptom PCI Bus Communication Failure.
Perform 41TE TRANSMISSION VERIFICATION TEST - VER 1.
2 Turn the ignition off.
Disconnect the TCM harness connector.
Turn the ignition on.
Using a 12-volt test light connected to ground, probe the FCM Output (Run/St)
circuit.
Note: The light must illuminate brightly, if it does not light, or lights dimly,
the circuit must be repaired. If there is any doubt, compare the brightness
when testing the circuit, to the brightness when connected directly to the
battery positive post.
Is the test light illuminated?All
Ye s®Go To 3
No®Repair the FCM Output (Run/St) circuit for an open. Refer to the
wiring diagrams location in the Service Information.
Perform 41TE TRANSMISSION VERIFICATION TEST - VER 1.
420
COMMUNICATION
Page 450 of 4284

TEST ACTION APPLICABILITY
3 Turn the ignition off.
Disconnect the TCM harness connector.
Remove the starter relay from the IPM.
Using a 12-volt test light connected to ground, probe the Ignition Switch Output
(Start) circuit.
Note: The light must illuminate brightly, if it does not light, or lights dimly,
the circuit must be repaired. If there is any doubt, compare the brightness
when testing the circuit, to the brightness when connected directly to the
battery positive post.
Observe the test light while momentarily turning the ignition switch to the Start
position.
Is the test light illuminated?All
Ye s®Go To 4
No®Repair the Ignition Switch Output (Start) circuit for an open.
Refer to the wiring diagrams located in the Service Information.
Perform 41TE TRANSMISSION VERIFICATION TEST - VER 1.
Note: Reinstall the original Starter Relay.
4 Turn the ignition off.
Disconnect the TCM harness connector.
Using a 12-volt test light connected to ground, probe the Fused B(+) circuit.
Note: The light must illuminate brightly, if it does not light, or lights dimly,
the circuit must be repaired. If there is any doubt, compare the brightness
when testing the circuit, to the brightness when connected directly to the
battery positive post.
Is the test light illuminated?All
Ye s®Go To 5
No®Check IPM fuse #15 for an open. If OK, repair the Fused B(+)
circuit for an open. Refer to the wiring diagrams located in the
Service Information.
Perform 41TE TRANSMISSION VERIFICATION TEST - VER 1.
5 Turn the ignition off.
Disconnect the TCM harness connector.
Using a 12-volt test light connected to 12-volts, probe each ground circuit in the TCM
connector.
NOTE: The light must illuminate brightly, if it does not light, or lights dimly,
the circuit must be repaired. If there is any doubt, compare the brightness
when testing the circuit, to the brightness when connected directly to the
battery negative post.
Is the light illuminated at all ground circuits?All
Ye s®Go To 6
No®Repair the Ground circuit(s) for an open. Check the main ground
connection to engine block and/or chassis. Refer to the wiring
diagrams located in the Service Information.
Perform 41TE TRANSMISSION VERIFICATION TEST - VER 1.
421
COMMUNICATION
*NO RESPONSE FROM TRANSMISSION CONTROL MODULE ÐContinued
Page 451 of 4284
TEST ACTION APPLICABILITY
6Note: Ensure there is PCI Bus communication with other modules on the
vehicle before proceeding. If not, refer to the symptom list from the menu
and repair as necessary.
Disconnect the TCM harness connector.
Use Scope input cable CH7058, Cable to Probe adapter CH7062, and the red and
black test probes.
Connect the scope input cable to the channel one connector on the DRB. Attach the
red and black leads and the cable to probe adapter to the scope input cable.
With the DRBIIItselect Pep Module Tools.
Select lab scope.
Select Live Data.
Select 12 volt square wave.
Press F2 for Scope.
Press F2 and use the down arrow to set voltage range to 20 volts. Press F2 again
when complete.
Connect the Black lead to the chassis ground. Connect the Red lead to the PCI Bus
circuit in the TCM connector.
Turn the ignition on.
Observe the voltage display on the DRB Lab Scope.
Does the voltage pulse from 0 to approximately 7.5 volts?All
Ye s®Go To 7
No®Repair the PCI Bus circuit for an open.
Perform 41TE TRANSMISSION VERIFICATION TEST - VER 1.
7 If there are no possible causes remaining, view repair. All
Repair
Replace the Transmission Control Module in accordance with the
Service Information.
Perform 41TE TRANSMISSION VERIFICATION TEST - VER 1.
422
COMMUNICATION
*NO RESPONSE FROM TRANSMISSION CONTROL MODULE ÐContinued
Page 452 of 4284
Symptom:
*PCI BUS COMMUNICATION FAILURE
POSSIBLE CAUSES
WITH THE DRB PERFORM A MODULE SCAN
OPEN PCI BUS CIRCUIT AT THE DATA LINK CONNECTOR
USING THE DRB, PERFORM THE PCI BUS CONTROL MODE
DISCONNECT THE MODULE(S) HARNESS CONNECTOR
PCI BUS CIRCUIT SHORTED TO VOLTAGE
DISCONNECT THE MODULE(S) HARNESS CONNECTOR
PCI BUS CIRCUIT SHORTED TO GROUND
WIRING HARNESS INTERMITTENT FAILURE
TEST ACTION APPLICABILITY
1Note: Determine which modules this vehicle is equipped with before begin-
ning.
Connect the Diagnostic Junction Port Tester #8339 to the DRB and to the Diagnostic
Junction Port.
Using the DRB, along with the Diagnostic Junction Port Tester #8339, select
Junction Port Tool then PCI Bus Module Scan and follow the instructions on the
DRB.
Was the DRB able to scan (I/D or communicate) with any modules?All
Ye s®Refer to the Communication category for the related symptom(s).
(Individual module no responses).
Perform BODY VERIFICATION TEST - VER 1.
No®Go To 2
2 Turn the ignition off.
Measure the resistance of the PCI Bus circuit between the Data Link Connector and
the Diagnostic Junction Port connector.
Is the resistance below 5.0 ohms?All
Ye s®Go To 3
No®Repair the PCI Bus circuit for an open between the DLC and the
Diagnostic Junction Port.
Perform BODY VERIFICATION TEST - VER 1.
423
COMMUNICATION
Page 453 of 4284
TEST ACTION APPLICABILITY
3Note: Determine which modules this vehicle is equipped with before begin-
ning.
Connect the Diagnostic Junction Port Tester #8339 to the DRB and to the Diagnostic
Junction Port.
Using the DRB, along with the Diagnostic Junction Port Tester #8339, select
Junction Port Tool then PCI Bus Control Mode and follow the instructions on the
DRB.
Note: Perform this function on each pin that is equipped with a PCI Bus
circuit.
Did the DRB display No Modules Responding from any of the pins that were
scanned?All
Ye s®Go To 4
No®Check the PCI Bus circuit between the DLC and the Diagnostic
Junction Port connector for a short to voltage or to ground, repair
as necessary.
Perform BODY VERIFICATION TEST - VER 1.
4 Disconnect the Diagnostic Junction Port Tester cable from the DRB. Keep the tester
connected to the Diagnostic Junction Port.
Turn the ignition on.
Measure the voltage of the PCI Bus circuit on the Diagnostic Junction Port Tester
that the DRB displayed No Modules Responding.
Is the voltage steadily above 7.0 volts?All
Ye s®Go To 5
No®Go To 6
5 Measure the voltage of the PCI Bus circuit on the Diagnostic Junction Port tester
that previously measured above 7.0 volts.
Note: Turn the ignition off before disconnecting any module harness
connector then turn the ignition on.
Disconnect the module harness connector(s). Note: If the problem occurred on pins 1,
3, 9 or 12 of the Diagnostic Junction Port tester, observe the voltmeter while
disconnecting each module connector one at a time.
Is the voltage steadily above 7.0 volts with the module(s) disconnected?All
Ye s®Repair the PCI Bus circuit that measured over 7.0 volts for a
short to voltage.
Perform BODY VERIFICATION TEST - VER 1.
No®Replace the module that when disconnected the short to voltage
was eliminated.
Perform BODY VERIFICATION TEST - VER 1.
6 Disconnect the Diagnostic Junction Port Tester cable from the DRB. Keep the tester
connected to the Diagnostic Junction Port.
Turn the ignition off.
Disconnect the negative battery cable.
Measure the resistance between ground and the PCI Bus circuit on the Diagnostic
Junction Port Tester that the DRB displayed No Modules Responding.
Is the resistance below 100.0 ohms?All
Ye s®Go To 7
No®Go To 8
424
COMMUNICATION
*PCI BUS COMMUNICATION FAILURE ÐContinued
Page 605 of 4284

Symptom:
IOD WAKEUP CLUSTER OUTPUT OPEN
When Monitored and Set Condition:
IOD WAKEUP CLUSTER OUTPUT OPEN
When Monitored: With the ignition on.
Set Condition: The BCM is active and the Instrument Cluster does not responed on the
Instrument Cluster Wake Up Sense circuit.
POSSIBLE CAUSES
INTERMITTENT CONDITION
INSTRUMENT CLUSTER WAKE UP SENSE CKT OPEN
INSTRUMENT CLUSTER WAKE UP SENSE CKT SHORT TO GROUND
INSTRUMENT CLUSTER
BODY CONTROL MODULE
TEST ACTION APPLICABILITY
1 Turn the ignition on.
With the DRBIIIt, erase DTCs.
Cycle the ignition off and on several times, leaving ignition key on for at least 15
seconds.
With the DRBIIItin Body Computer, read DTCs.
Does the DTC reset?All
Ye s®Go To 2
No®Go To 5
2 Turn the ignition off.
Disconnect the BCM C4 harness connector.
Turn the ignition on.
Measure the voltage of the Instrument Cluster Wake Up Sense circuit in the BCM C4
harness connector.
Is the voltage above 10.0 volts?All
Ye s®Replace the Body Control Module.
Perform BODY VERIFICATION TEST - VER 1.
No®Go To 3
576
INSTRUMENT CLUSTER
Page 645 of 4284
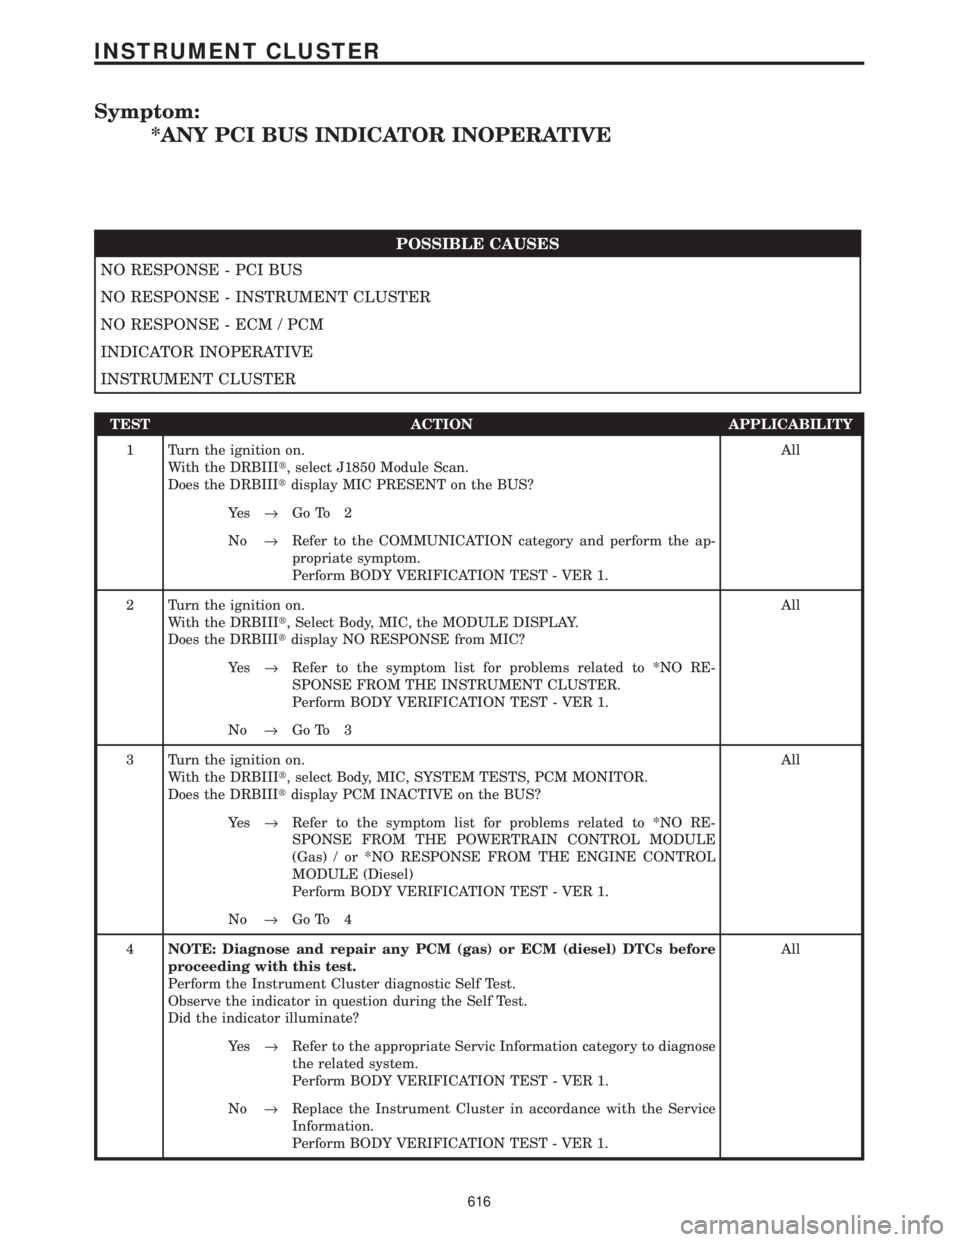
Symptom:
*ANY PCI BUS INDICATOR INOPERATIVE
POSSIBLE CAUSES
NO RESPONSE - PCI BUS
NO RESPONSE - INSTRUMENT CLUSTER
NO RESPONSE - ECM / PCM
INDICATOR INOPERATIVE
INSTRUMENT CLUSTER
TEST ACTION APPLICABILITY
1 Turn the ignition on.
With the DRBIIIt, select J1850 Module Scan.
Does the DRBIIItdisplay MIC PRESENT on the BUS?All
Ye s®Go To 2
No®Refer to the COMMUNICATION category and perform the ap-
propriate symptom.
Perform BODY VERIFICATION TEST - VER 1.
2 Turn the ignition on.
With the DRBIIIt, Select Body, MIC, the MODULE DISPLAY.
Does the DRBIIItdisplay NO RESPONSE from MIC?All
Ye s®Refer to the symptom list for problems related to *NO RE-
SPONSE FROM THE INSTRUMENT CLUSTER.
Perform BODY VERIFICATION TEST - VER 1.
No®Go To 3
3 Turn the ignition on.
With the DRBIIIt, select Body, MIC, SYSTEM TESTS, PCM MONITOR.
Does the DRBIIItdisplay PCM INACTIVE on the BUS?All
Ye s®Refer to the symptom list for problems related to *NO RE-
SPONSE FROM THE POWERTRAIN CONTROL MODULE
(Gas) / or *NO RESPONSE FROM THE ENGINE CONTROL
MODULE (Diesel)
Perform BODY VERIFICATION TEST - VER 1.
No®Go To 4
4NOTE: Diagnose and repair any PCM (gas) or ECM (diesel) DTCs before
proceeding with this test.
Perform the Instrument Cluster diagnostic Self Test.
Observe the indicator in question during the Self Test.
Did the indicator illuminate?All
Ye s®Refer to the appropriate Servic Information category to diagnose
the related system.
Perform BODY VERIFICATION TEST - VER 1.
No®Replace the Instrument Cluster in accordance with the Service
Information.
Perform BODY VERIFICATION TEST - VER 1.
616
INSTRUMENT CLUSTER
Page 671 of 4284

Symptom:
BCM MESSAGE NOT RECEIVED
When Monitored and Set Condition:
BCM MESSAGE NOT RECEIVED
When Monitored: Continuously when the PCI bus is active.
Set Condition: If the Memory Seat Mirror Module does receive this Bus message from the
BCM. Code will remain for 50 ignition cycles.
POSSIBLE CAUSES
BCM RESPONSE
STORED CODE/PCI BUS COMMUNICATION PROBLEMS
MEMORY SEAT MIRROR MODULE
INTERMITTENT PROBLEM
TEST ACTION APPLICABILITY
1 Turn ignition on.
With the DRBIIItselect Body Control Module.
Is there a response from the Body Control Module?All
Ye s®Go To 2
No®Refer to symptom *NO RESPONSE FROM BODY CONTROL
MODULE in the COMMUNICATION category
Perform MEMORY SYSTEM VERIFICATION TEST - VER 1.
2 With the DRBIIIt, erase the DTC from Memory Seat Mirror Module.
Turn the ignition switch to the Off position then start the engine and let run for one
minute.
Now be sure that there is still communication with the Body Control module, if not
repair as necessary.
With the DRB check for the same DTC to reset in the MSMM.
Did the same DTC reset?All
Ye s®Go To 3
No®Test complete.
Perform MEMORY SYSTEM VERIFICATION TEST - VER 1.
3NOTE: Visually inspect the related wiring harness including the PCI bus
wire. Look for any chafed, pierced, pinched, or partially broken wires.
Note: Visually inspect the related wiring harness connectors. Look for
broken, bent, pushed out, or corroded terminals.
Note: Refer to any technical service bulletins that may apply.
Were any problems found?All
No®Replace the Memory Seat Mirror Module.
Perform MEMORY SYSTEM VERIFICATION TEST - VER 1.
Ye s®Repair as necessary.
Perform MEMORY SYSTEM VERIFICATION TEST - VER 1.
642
MEMORY SEAT
Page 748 of 4284
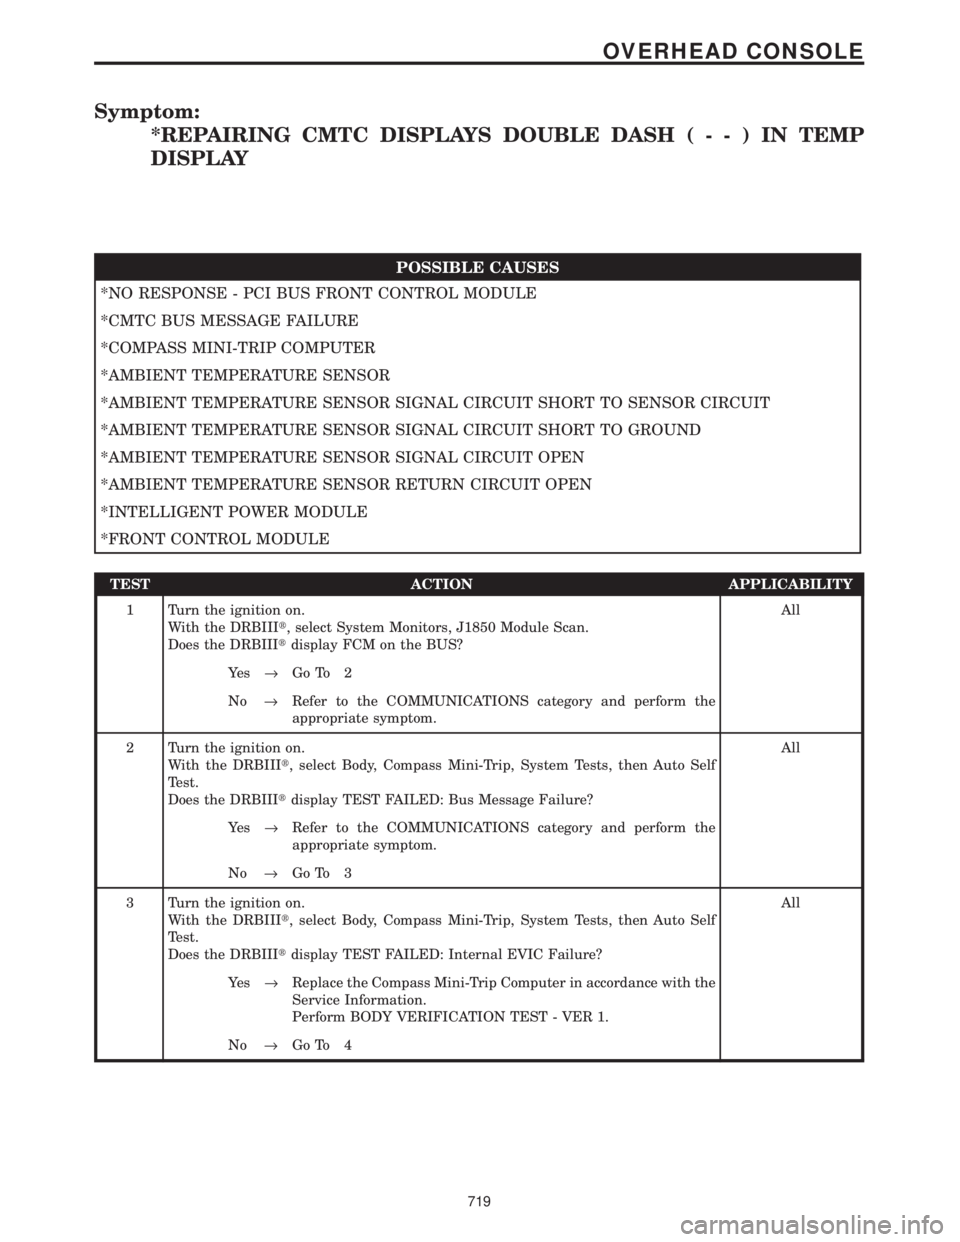
Symptom:
*REPAIRING CMTC DISPLAYS DOUBLE DASH(--)INTEMP
DISPLAY
POSSIBLE CAUSES
*NO RESPONSE - PCI BUS FRONT CONTROL MODULE
*CMTC BUS MESSAGE FAILURE
*COMPASS MINI-TRIP COMPUTER
*AMBIENT TEMPERATURE SENSOR
*AMBIENT TEMPERATURE SENSOR SIGNAL CIRCUIT SHORT TO SENSOR CIRCUIT
*AMBIENT TEMPERATURE SENSOR SIGNAL CIRCUIT SHORT TO GROUND
*AMBIENT TEMPERATURE SENSOR SIGNAL CIRCUIT OPEN
*AMBIENT TEMPERATURE SENSOR RETURN CIRCUIT OPEN
*INTELLIGENT POWER MODULE
*FRONT CONTROL MODULE
TEST ACTION APPLICABILITY
1 Turn the ignition on.
With the DRBIIIt, select System Monitors, J1850 Module Scan.
Does the DRBIIItdisplay FCM on the BUS?All
Ye s®Go To 2
No®Refer to the COMMUNICATIONS category and perform the
appropriate symptom.
2 Turn the ignition on.
With the DRBIIIt, select Body, Compass Mini-Trip, System Tests, then Auto Self
Test.
Does the DRBIIItdisplay TEST FAILED: Bus Message Failure?All
Ye s®Refer to the COMMUNICATIONS category and perform the
appropriate symptom.
No®Go To 3
3 Turn the ignition on.
With the DRBIIIt, select Body, Compass Mini-Trip, System Tests, then Auto Self
Test.
Does the DRBIIItdisplay TEST FAILED: Internal EVIC Failure?All
Ye s®Replace the Compass Mini-Trip Computer in accordance with the
Service Information.
Perform BODY VERIFICATION TEST - VER 1.
No®Go To 4
719
OVERHEAD CONSOLE