light CITROEN BERLINGO FIRST 2011 Handbook (in English)
[x] Cancel search | Manufacturer: CITROEN, Model Year: 2011, Model line: BERLINGO FIRST, Model: CITROEN BERLINGO FIRST 2011Pages: 132, PDF Size: 5.67 MB
Page 59 of 132

57 LIFE ON BOARD-
FRONT LAYOUT
4. Courtesy lights
5. Sun visors
Permanently off.
On entering the vehicle:
- they come on when the
vehicle is unlocked or
when a door is opened,
- they switch off after approxi-
mately 30 seconds with the doors
closed, or when the ignition is
switched on.
On leaving the vehicle:
- they come on when the key is re-
moved from the ignition (timing
of approximately 30 seconds) or
when a door is opened,
-
they switch off after approximately
30 seconds with all of the doors
closed, or immediately when the
vehicle is locked.
In this position, the courtesy light may
fl ash while driving if a door is not closed
correctly.
If a door is open, it will switch off auto-
matically after approximately 10 minutes
or when the ignition is switched on.
Permanently on when the
key is in the accessories po-
sition or the ignition is on.
1. Storage in the doors
A.
Bottle holder.
B.
Can holder.
C.
Storage compartment.
2. Overhead storage
Maximum load: 5 kg
.
3. Map reading lights
Turn the dial to the right or to the left
to switch them on.
Place the dial in the centre to switch
them off.
6. Glove box
7. Lighter
It permits the connection of a telephone
charger, a baby's bottle warmer, ...
8. Removable ashtray
Pull the cover to open the ashtray.
To empty, after opening, remove it by
pulling upwards.
9. Storage drawer (passenger)
To open the drawer, lift it slightly and
pull it forwards.
Page 60 of 132

LIFE ON BOARD
58 -
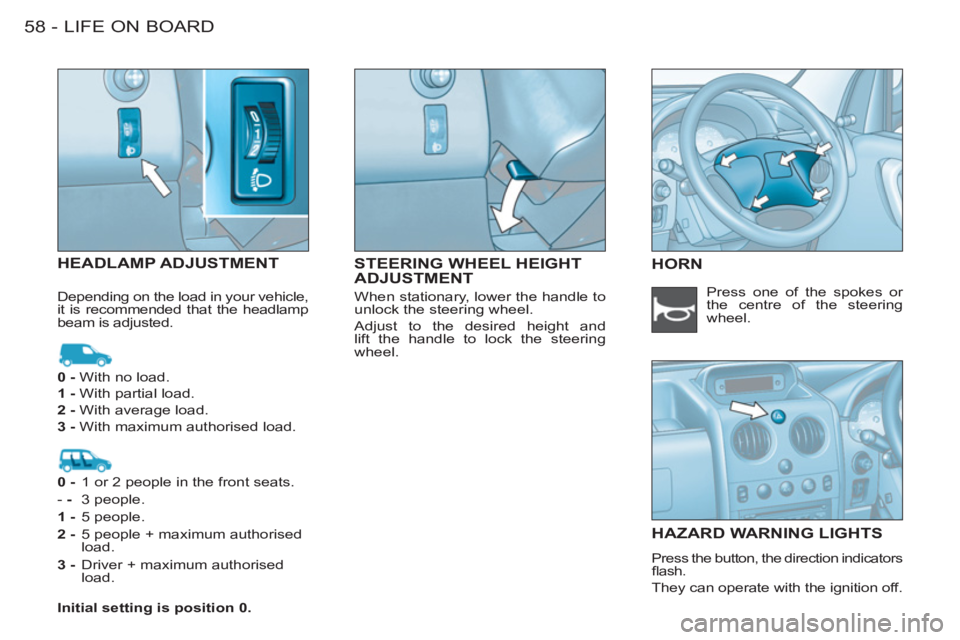
STEERING WHEEL HEIGHT
ADJUSTMENT HEADLAMP ADJUSTMENT
HORN
HAZARD WARNING LIGHT
S
Press the button, the direction indicators
fl ash.
They can operate with the ignition off. Press one of the spokes or
the centre of the steering
wheel.
0 -
With no load.
1 -
With partial load.
2 -
With average load.
3 -
With maximum authorised load.
0
- 1 or 2 people in the front seats.
- - 3 people.
1
- 5 people.
2 -
5 people + maximum authorised
load.
3 -
Driver + maximum authorised
load.
Initial setting is position 0.
Depending on the load in your vehicle,
it is recommended that the headlamp
beam is adjusted. When stationary, lower the handle to
unlock the steering wheel.
Adjust to the desired height and
lift the handle to lock the steering
wheel.
Page 64 of 132

DRIVING62 -
HANDBRAKE
Illumination of this warning
light and of the STOP
warn-
ing light, accompanied by
an audible signal (while the
vehicle is moving), indicates that the
handbrake is still applied or has not
been released fully.
ANTI-LOCK BRAKING
SYSTEM (ABS) AND THE ELECTRONIC BRAKE FORCEDISTRIBUTION (EBFD)
The ABS, in conjunction with the
electronic brake force distribution,
increases the stability and manoeu-
vrability of your vehicle on braking,
in particular on poor or slippery road
surfaces.
Note:
when changing wheels (tyres
and rims), make sure that these are
approved.
The anti-lock braking system comes
into operation automatically when
there is a risk of wheel lock.
When this warning light comes
on, connected to the STOP
and ABS
warning lights, it
indicates that there is a mal-
function of the electronic brake force
distribution, which can cause a loss of
control of the vehicle when braking.
Stop immediately.
In both cases, consult a CITROËN
dealer. When this warning light
comes on, accompanied by a
buzzer, it indicates that there
is a malfunction of the ABS,
which can cause a loss of control of
the vehicle when braking. Normal operation of the ABS may
make itself felt by slight vibrations
of the brake pedal.
In emergency braking, press
very fi rmly without releasing the
pressure.
Releasing
Pull the handle and press the button
to release the handbrake.
Applying
When parking, pull the handbrake to
immobilise your vehicle.
Page 70 of 132

DRIVING68 -
If this warning light comes on,
accompanied by an audible
signal, contact a CITROËN
dealer to have the system
checked. The airbags may
no longer be triggered in the event of
a serious impact.
Front airbag malfunction
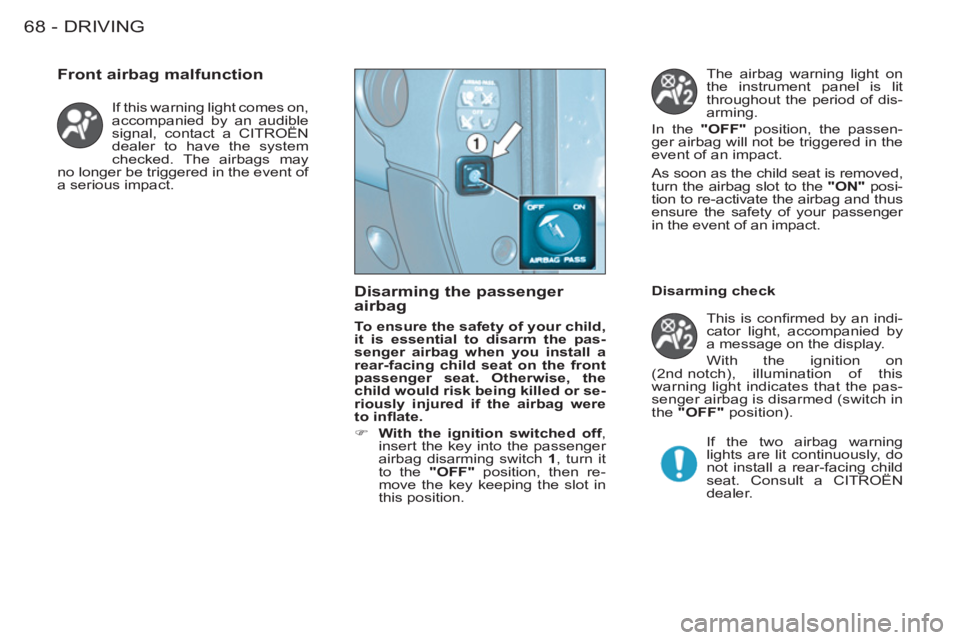
Disarming the passenger
airbag
To ensure the safety of your child,
it is essential to disarm the pas-
senger airbag when you install a
rear-facing child seat on the front
passenger seat. Otherwise, the
child would risk being killed or se-
riously injured if the airbag were
to infl ate.
�)
With the ignition switched off
,
insert the key into the passenger
airbag disarming switch 1
, turn it
to the "OFF"
position, then re-
move the key keeping the slot in
this position. The airbag warning light on
the instrument panel is lit
throughout the period of dis-
arming.
In the "OFF"
position, the passen-
ger airbag will not be triggered in the
event of an impact.
As soon as the child seat is removed,
turn the airbag slot to the "ON"
posi-
tion to re-activate the airbag and thus
ensure the safety of your passenger
in the event of an impact.
This is confi rmed by an indi-
cator light, accompanied by
a message on the display.
With the ignition on
(2nd notch), illumination of this
warning light indicates that the pas-
senger airbag is disarmed (switch in
the "OFF"
position).
If the two airbag warning
lights are lit continuously, do
not install a rear-facing child
seat. Consult a CITROËN
dealer.
Disarming check
Page 71 of 132

69 DRIVING
-
SIDE AIRBAGS *
If this warning light comes on,
accompanied by an audible
signal, contact a CITROËN
dealer to have the system
checked. The airbags may
no longer be triggered in the event of
a serious impact.
Airbags malfunction
For the front and lateral
airbags to be fully effec-
tive, observe the following
safety rules:
●
Wear a correctly adjusted seat
belt.
●
Sit in a normal upright position.
●
Do not leave anything between
the occupants and the airbags
(child, animal, object, ...).
This could hamper the operation
of the airbags or injure the occu-
pants.
●
All work on the airbag systems
is strictly prohibited unless it is
carried out by trained staff of the
CITROËN network.
●
After an accident or if the ve-
hicle has been stolen or broken
into, have the airbag systems
checked.
Front airbags
●
Do not drive holding the steer-
ing wheel by its spokes or resting
your hands on the centre part of
the wheel.
●
Passengers must not place their
feet on the dashboard.
●
Smoke as little as possible; de-
ployment of the airbags can
cause burns or the risk of injury
from a cigarette or pipe.
●
Never remove or pierce the steering
wheel or hit it violently.
Lateral airbags *
●
Only put approved covers on the
front seats. Consult a CITROËN
dealer.
●
Do not fi x or attach anything to
the front seat backs. This could
cause injury to the chest or arms
when the lateral airbag infl ates.
●
Do not sit with the upper part of
the body any nearer to the door
than necessary.
The side airbags are incorporated
into the front seat backs on the door
side.
The triggering of these airbags re-
quires a serious side impact applied
in the side impact zone B
, perpen-
dicular to the longitudinal centreline
of the vehicle, on a horizontal plane
and from the outside of the vehicle
towards the inside. The side airbag
infl ates between the front occupant
of the vehicle and the door trim pad.
It therefore limits the risk of injury to
the chest.
* According to version.
Page 80 of 132

PRACTICAL INFORMATION
78 -
For your safety, always
change a wheel:
- on level, stable and non slippery
ground,
- with the handbrake applied,
- with fi rst or reverse gear en-
gaged,
- with the vehicle chocked,
- making absolutely sure that the
occupants get out of the vehicle
and wait in a safe location.
Never go underneath the vehicle
when it is raised using the jack only.
The jack and the tool kit are specifi c
to your vehicle. Do not use them for
other purposes.
Refitting the wheel
- After positioning the wheel, lightly
pre-tighten the bolts using the
wheelbrace.
-
Compress the jack and release it.
- Fully tighten the bolts using the
wheelbrace.
- Replace the trim, starting at the
valve passage hole, and press it
on using the palm of the hand.
Replacing the wheel in the
carrier
- Replace the chock 2
in the wheel.
- Replace the wheel in the carrier.
- Lift the wheel then the carrier and
reposition the hook.
- Do not forget to fully tighten the
spare wheel carrier retaining bolt.
-
Stow the wheelbrace 1
and the jack.
After changing the wheel
- Have the tightening of the bolts
and the pressure of the spare tyre
checked as soon as possible by a
CITROËN dealer.
- Have the punctured tyre repaired
and replace it on the vehicle as
soon as possible.
Page 83 of 132

81 PRACTICAL INFORMATION
-
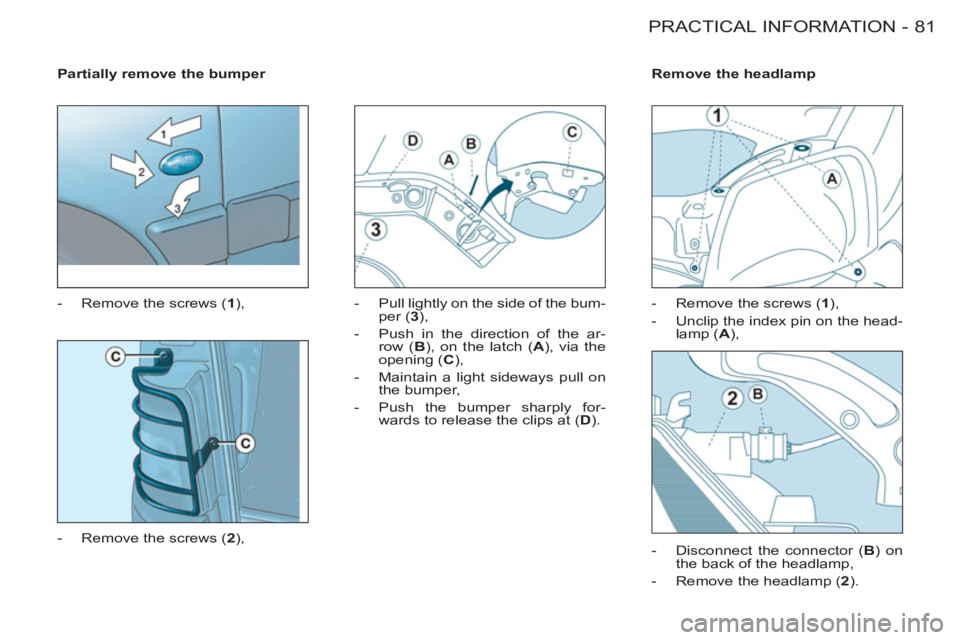
Partially remove the bumper
- Remove the screws ( 1
),
- Remove the screws ( 2
),
- Pull lightly on the side of the bum-
per ( 3
),
- Push in the direction of the ar-
row ( B
), on the latch ( A
), via the
opening ( C
),
- Maintain a light sideways pull on
the bumper,
- Push the bumper sharply for-
wards to release the clips at ( D
).
Remove the headlamp
- Remove the screws ( 1
),
- Unclip the index pin on the head-
lamp ( A
),
- Disconnect the connector ( B
) on
the back of the headlamp,
- Remove the headlamp ( 2
).
Page 85 of 132

83 PRACTICAL INFORMATION
-
Side lights (W 5 W)
After following the procedure for re-
moval of the headlamp:
- Turn and remove the protector ( 6
).
- Unclip the the bulb holder ( E
).
- Disconnect the connector ( F
).
- Remove and replace the bulb ( 1
).
Reassembly
Carry out the operations in reverse
order to reassemble. Check that the
lamps are working correctly.
Direction indicator side
repeaters (WY 5 W amber)
- Push the lens to the front or rear
and pull it out.
- Turn the bulb holder a quarter turn.
- Replace the bulb.
Amber coloured bulbs (di-
rection indicators and side
repeaters) must be replaced
by bulbs of the same rating
and colour.
Page 86 of 132

PRACTICAL INFORMATION
84 -
- Open the rear door.
- Unscrew the nut A
.
- Push the light unit gently towards
the interior of the vehicle to unclip
the two side retaining clips.
- Remove the light unit and discon-
nect it.
- Unclip the bulb holder by pressing
the tabs B
.
- Change the faulty bulb.
Number plate lights (W 5 W)
�)
Insert a thin screwdriver into one
of the external holes of the lens.
�)
Push it outwards to unclip it.
�)
Remove the lens.
�)
Change the faulty bulb.
Rear lights
1.
Fog lamp (P21 W).
2.
Direction indicators
(P21 W).
3.
Reversing lights (P21 W).
4.
Brake lights/Side lights
(P21/5 W).
High pressure washing:
when using
this type of washing on stubborn dirt,
do not persist on the headlamps, the
lights and their surround to avoid dam-
aging their coating and their seal.
Page 87 of 132

85 PRACTICAL INFORMATION
-
Third brake light (tailgate)
(W 5 W)
�)
With the tailgate open, unscrew
the two nuts.
�)
Unclip the support to gain access
to the bulbs.
�)
Change the faulty bulb.
Third brake light
(rear left door) (W 5 W)
�)
Remove the housing cover by
pressing the tab A
(round sec-
tion) at the end of the light.
�)
Pull the housing cover rearwards.
�)
Squeeze the two tabs B
to re-
move the bulb holder.
�)
Pull the faulty bulb and change it.
To refi t, proceed in the reverse order.