CITROEN BERLINGO FIRST 2011 Handbook (in English)
Manufacturer: CITROEN, Model Year: 2011, Model line: BERLINGO FIRST, Model: CITROEN BERLINGO FIRST 2011Pages: 132, PDF Size: 5.67 MB
Page 31 of 132

29COMFORT-
These settings are recommended for
cold climates.
3. Temperature adjustment
To be adjusted to your requirements.
From blue (exterior temperature) to
red (hot).
4. Air distribution adjustment
This setting is recommended for high
temperatures.
Windscreen and side win-
dows (de-icing/demisting).
To quickly demist or defrost the wind-
screen and side windows:
- position the air intake control in
the ''Exterior Air Intake" position,
- turn the temperature and air fl ow
controls to maximum,
- close the centre vents. Windscreen, side windows
and footwells.
Footwells.
Centre and side vents.
Page 32 of 132

COMFORT30 -
Press the switch to activate
the air conditioning. The indi-
cator lamp comes on.
2. Air fl ow adjustment and air
intake control
Turn the control from position 1
to position 4
to obtain an air
fl ow suffi cient to ensure your
comfort.
AIR CONDITIONING
The air conditioning does not op-
erate while the air fl ow adjustment
control is in the minimum position.
Note:
to optimise the operation of
the air conditioning, leave the vents
open.
1. Air conditioning control
The air conditioning is designed to
operate in all seasons. In summer,
it enables the temperature to be
lowered and in winter, above 0 °C,
it increases the effectiveness of the
demisting.
Page 33 of 132

31COMFORT-
Additional heater
Vehicles which are fi tted with an HDI
engine may be fi tted with automatic
additional heating to improve your
comfort.
When the engine is idling or the ve-
hicle is stationary, it is quite normal to
notice a high-pitched whistling noise
and a slight emission of smoke and
odour.
Centre and side vents.
This setting is recommended for high
temperatures. Recirculation of interior air.
This position prevents exterior odours
and smoke entering the passenger
compartment.
Used simultaneously with the air con-
ditioning, recirculation enables both
heating and cooling performance to
be improved.
Used without the air conditioning,
recirculation may result in the forma-
tion of mist on the windows.
As soon as possible, position the control
in the exterior air intake position.
3. Temperature adjustment
To be adjusted to your requirements.
From blue (cold when the air condi-
tioning is on) to red (hot).
4. Air distribution adjustment
Windscreen and side win-
dows (de-icing/demisting).
To quickly de-ice or demist the wind-
screen and side windows:
- turn the temperature and air fl ow
controls to maximum,
- close the centre vents,
- position the air intake control in
the "Outside Air" position,
- start the air conditioning.
Footwells.
These settings are recommended for
cold climates. Windscreen, side windows
and footwells. Intake of exterior air.
This is the normal operating position.
Page 34 of 132

SEATS32-
Page 35 of 132

33SEATS-
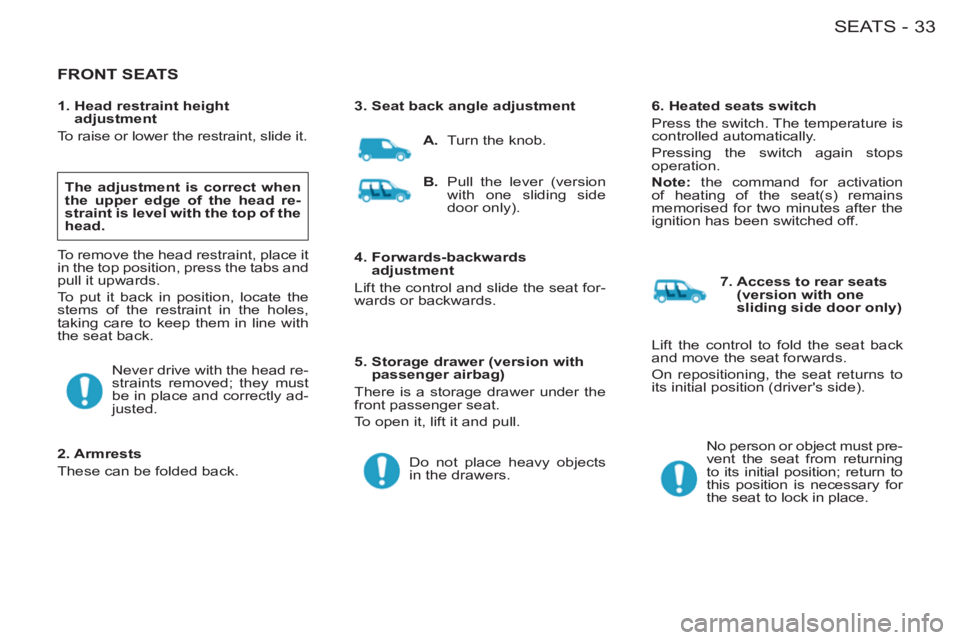
FRONT SEATS
The adjustment is correct when
the upper edge of the head re-
straint is level with the top of the
head.
To remove the head restraint, place it
in the top position, press the tabs and
pull it upwards.
To put it back in position, locate the
stems of the restraint in the holes,
taking care to keep them in line with
the seat back.
No person or object must pre-
vent the seat from returning
to its initial position; return to
this position is necessary for
the seat to lock in place.
4. Forwards-backwards
adjustment
Lift the control and slide the seat for-
wards or backwards.
1. Head restraint height
adjustment
To raise or lower the restraint, slide it.
2. Armrests
These can be folded back.
3. Seat back angle adjustment
5. Storage drawer (version with
passenger airbag)
There is a storage drawer under the
front passenger seat.
To open it, lift it and pull.
6. Heated seats switch
Press the switch. The temperature is
controlled automatically.
Pressing the switch again stops
operation.
Note:
the command for activation
of heating of the seat(s) remains
memorised for two minutes after the
ignition has been switched off.
7. Access to rear seats
(version with one
sliding side door only)
Do not place heavy objects
in the drawers.
A.
Turn the knob.
B.
Pull the lever (version
with one sliding side
door only).
Never drive with the head re-
straints removed; they must
be in place and correctly ad-
justed. Lift the control to fold the seat back
and move the seat forwards.
On repositioning, the seat returns to
its initial position (driver's side).
Page 36 of 132

SEATS34-
MULTIFUNCTION PASSENGER SEAT
To fold the seat fully:
Pull the control 2
upwards and tilt the
whole seat.
It is not necessary to remove the
head restraint.
This provides access to a box which
enables you to store objects so that
they cannot be seen from outside the
vehicle. If your vehicle is not fi tted with a load
blocking partition, it can accommo-
date long objects (up to 2.10 m).
These must be placed on the front
edge of the fl oor and secured using
the rear bar of the boot or using the
lashing rings. To fold the seat back:
Pull the control 1
upwards and tilt the
seat back.
This provides a fl at surface, recess-
es for drinks and a strap for retaining
documents.
Page 37 of 132

35SEATS-
To fold the rear bench seat:
- lower the head restraint,
- press control 1
to unlock the seat
back 2
,
- fold the seat back 2
onto the seat,
- place the seat in the "folded" po-
sition. When repositioning:
- tilt the folded seat rearwards,
- lift the seat back,
- check that the seat is locked cor-
rectly.
Take care not to trap the seat belts.
REAR BENCH SEAT(5 SEAT VERSION)
HEAD RESTRAINT
This is of the "comma" type.
High position: press the two tabs at
the same time, lift the head restraint
and raise it.
Low position: push the two tabs at
the same time and press the top to
lower the head restraint.
To remove the head restraint: place
it in the high position, lift it then re-
move it.
Store it inside the vehicle, securing
it fi rmly.
To install the head restraint: engage
the rods of the head restraint in the
holes keeping it in line with the seat
back.
Page 38 of 132

SEATS36-
GENERAL POINTS RELATINGTO CHILD SEATS
Although one of CITROËN's main
criteria when designing your vehicle,
the safety of your children also de-
pends on you.
For maximum safety, please follow
these precautions:
- all children under the age of 12
or less than one metre fi fty tall
must travel in approved child
seats suited to their weight
,
on seats fi tted with a seat belt or
ISOFIX mountings * .
- a child weighing less than 9 kg
must travel in the "rearwards-
facing" position in the front.
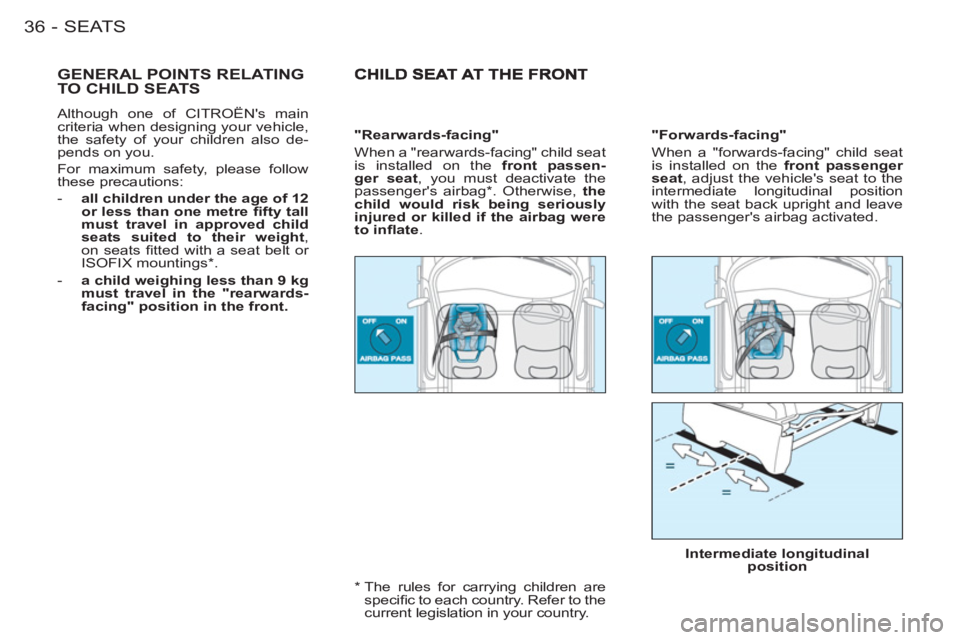
"Forwards-facing"
When a "forwards-facing" child seat
is installed on the front passenger
seat
, adjust the vehicle's seat to the
intermediate longitudinal position
with the seat back upright and leave
the passenger's airbag activated.
*
The rules for carrying children are
specifi c to each country. Refer to the
current legislation in your country.
Intermediate longitudinal
position
"Rearwards-facing"
When a "rearwards-facing" child seat
is installed on the front passen-
ger seat
, you must deactivate the
passenger's airbag * . Otherwise, the
child would risk being seriously
injured or killed if the airbag were
to infl ate
.
Page 39 of 132

37SEATS-
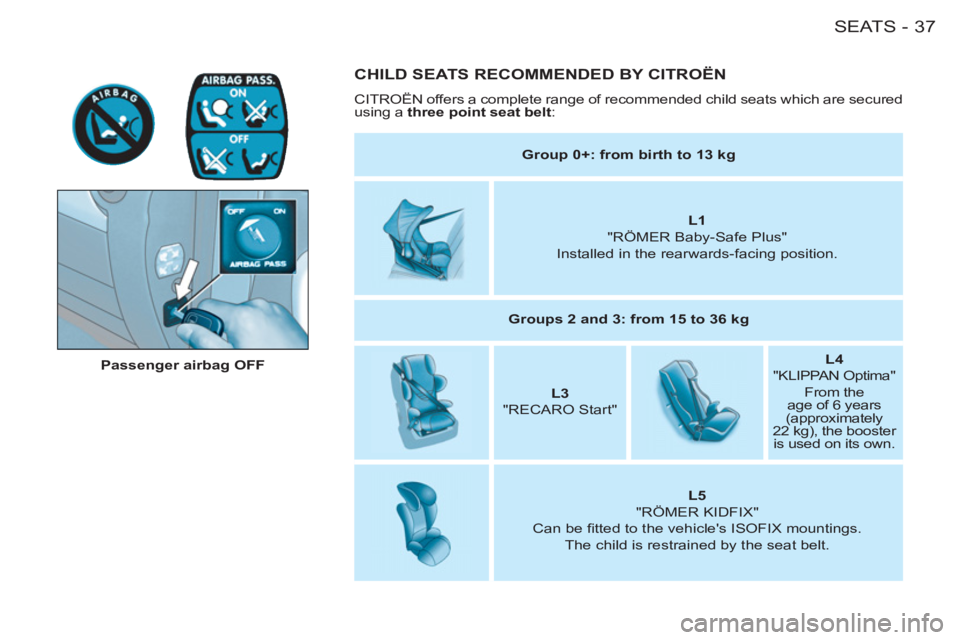
CHILD SEATS RECOMMENDED BY CITROËN
CITROËN offers a complete range of recommended child seats which are secured
using a three point seat belt
:
Passenger airbag OFF
Group 0+: from birth to 13 kg
L1
"RÖMER Baby-Safe Plus"
Installed in the rearwards-facing position.
Groups 2 and 3: from 15 to 36 kg
L3
"RECARO Start''
L4
"KLIPPAN Optima"
From the
age of 6 years
(approximately
22 kg), the booster
is used on its own.
L5
"RÖMER KIDFIX"
Can be fi tted to the vehicle's ISOFIX mountings.
The child is restrained by the seat belt.
Page 40 of 132

SEATS38-
INSTALLING CHILD SEATS SECURED USING THE SEAT BELT
In accordance with European regulations, this table indicates the options for the installation of child seats secured using the
seat belt and universally approved (a), in accordance with the weight of the child and the seat in the vehicle:
Weight of the child and indicative age
Seat
Below 13 kg
(groups 0 (b) and 0+)
Up to 1 year approx
From 9 to 18 kg
(group 1)
From 1 to 3 years approx
From 15 to 25 kg
(group 2)
From 3 to 6 years approx
From 22 to 36 kg
(group 3)
From 6 to 10 years approx
Front passenger seat (c)
U
U
U
U
Rear side seat
U
U
U
U
Rear centre seat
U
U
U
U
(a) Universal child seat: child seat
which can be installed in all vehi-
cles using the seat belt.
(b) Group 0: from birth to 10 kg. (c) Consult the legislation in force
in your country before installing
your child on this seat.
U
Seat suitable for the installation of
a child seat secured using a seat
belt and universally approved, "rear
facing" and/or "forward facing".