bonnet CITROEN C-ELYSÉE 2017 Owners Manual
[x] Cancel search | Manufacturer: CITROEN, Model Year: 2017, Model line: C-ELYSÉE, Model: CITROEN C-ELYSÉE 2017Pages: 260, PDF Size: 7.11 MB
Page 5 of 260

.
.
C-elysee_en_Chap00a_sommaire_ed01-2016
Direction indicators 100
Hazard warning lamps
1
00
Horn
10
0
Under-inflation
d
etection
1
01
Braking
assistance systems
1
05
Trajectory
control systems
1
06
Front
seat belts
1
07
Airbags
1
10
Safety
Child seats 1 14
Deactivating the passenger's front airbag
1
17
ISOFIX
mountings
1
23
Child
lock
1
28
Child safety
Fuel tank 129
Misfuel prevention (Diesel)
1
30
Running
out of fuel (Diesel)
1
32
AdBlue
® additive and SCR system
(
BlueHDi Diesel) 1 33
Temporary
puncture repair kit
1
40
Spare
wheel
1
45
Snow
chains
1
52
Changing
a bulb
1
53
Changing
a fuse
1
59
12
V
battery
1
64
Electrical
energy economy mode
1
68
Changing
a wiper blade
1
69
Towing
the vehicle
1
70
Towing
a trailer
1
72
Very
cold climate screen(s)
1
74
Advice
on care and maintenance
1
75
Accessories
1
75
M at s
17
7
Roof
bars
1
78
Practical information
Petrol engines 1 88
Petrol weights
1
89
Diesel
engines
1
90
Diesel
weights
1
91
Dimensions
1
92
Identification
ma
rkings
1
93
Technical data
Audio system / Bluetooth 1 95
Audio system
2
27
Audio and telematics
Visual search
Alphabetical
in
dex
Checks
Bonnet 18
0
Petrol engines
1
81
Diesel
engine
1
82
Checking
levels
1
83
Checks
18
6
Contents
Page 39 of 260

37
C-elysee_en_Chap02_ouvertures_ed01-2016
System which p rotects a nd p rovides a d eterrent a
gainst theft and break-ins. It provides
p
erimeter protection as well as a self-protection
f
unction.
Alarm
Perimeter protection
The system checks for opening of the vehicle.
T he alarm is triggered if anyone tries to open a
d
oor, the boot, the bonnet...
Self-protection function
The system checks for the putting out of service of its components.
The
alarm is triggered if the battery, the
c
entral control or the wires of the siren
are
put out of service or damaged.
Locking the vehicle with
alarm
Activation
F Switch off the ignition and get out of the vehicle.
F Press the locking button on the r
emote control.
The
perimeter protection is activated 5 seconds
a
fter
pressing the locking button on the remote
c
ontrol.
If
an
opening (door, boot...) is not closed
f
ully,
the
vehicle is not locked but the alarm is
a
ctivated. F
P
ress the unlocking button on
t
he remote control.
Deactivation
The alarm is deactivated: the indicator lamp goes off.
The
alarm is activated: a indicator
l
amp in the switch panel to the
left of the steering wheel flashes
o
nce per second.
For
all
work
on
the
alarm
system,
c
ontact
a
CITROËN
dealer
or
a
q
ualified
w
orkshop.
2
Access
Page 86 of 260

84
C-elysee_en_Chap05_conduite_ed01-2016
In the event of a fault with the system, the indicator lamp in the "ECO OFF" button
flashes
for a few moments, then comes on
c
ontinuously.
Have
it checked by a CITROËN dealer or a
q
ualified
w
orkshop.
In
the event of a fault in STOP mode, the
v
ehicle may stall. All of the warning lamps
i
n the instrument panel come on. It is then
n
ecessary to switch off the ignition and start
t
he engine again using the key.
Operating fault
The Stop & Start system requires
a 12 V battery with a special
s
pecification
a
nd
t
echnology.
All
work on this type of battery must be
c
arried out only by a CITROËN dealer
o
r a qualified workshop.
For
more information on the 12 V
b
attery, refer to the corresponding
s
ection.
Press
this
button
to
deactivate
the
system.
Deactivation
is
confirmed
by
illumination
of
the
i
ndicator
lamp
in
the
button
and
the
display
of
a
message.
Pressing
this
button
again
reactivates
the
s
ystem.
The
indicator
lamp
in
the
button
goes
off,
a
ccompanied
by
the
display
of
a
message.
Deactivation / Manual
reactivation
In certain cases, such as the need to maintain a comfortable temperature in the passenger
c
ompartment, it may be useful to deactivate the
S
top & Start system.
The
system can be deactivated at any time,
o
nce the ignition is on.
If
the engine is in STOP mode, it then restarts.
The
Stop & Start system is reactivated
a
utomatically every time the ignition is
switched
on.
Opening the bonnet
Before
doing anything under the
b
onnet, deactivate the Stop & Start
s
ystem to avoid the risk of injury
r
elated to an automatic change to
S
TART mode.
Driving on flooded roads
Before
driving through a flooded road,
i
t is strongly recommended that you
d
eactivate the Stop & Start system.
For
more advice on driving, particularly
o
n flooded roads, refer to the
c
orresponding
s
ection.
Driving
Page 98 of 260

96
C-elysee_en_Chap06_visibilite_ed01-2016
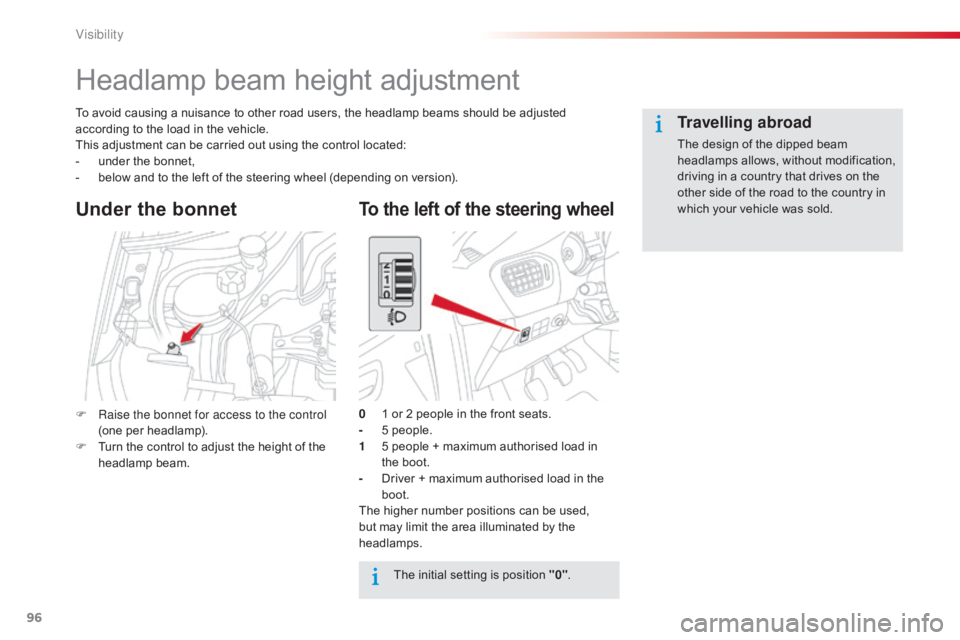
Headlamp beam height adjustment
To avoid causing a nuisance to other road users, the headlamp beams should be adjusted according to the load in the vehicle.
This
adjustment can be carried out using the control located:
-
u
nder the bonnet,
-
b
elow and to the left of the steering wheel (depending on version).
The
initial setting is position "0".
0
1
or 2 people in the front seats.
-
5
people.
1
5
people + maximum authorised load in
t
he boot.
-
D
river + maximum authorised load in the
b
oot.
The
higher number positions can be used,
b
ut may limit the area illuminated by the
h
eadlamps.
Under the bonnet
F Raise the bonnet for access to the control (one per headlamp).
F
T
urn the control to adjust the height of the
h
eadlamp
b
eam.
Travelling abroad
The design of the dipped beam headlamps allows, without modification,
d
riving in a country that drives on the
o
ther side of the road to the country in
w
hich your vehicle was sold.
To the left of the steering wheel
Visibility
Page 134 of 260

132
C-elysee_en_Chap09_info-pratiques_ed01-2016
On vehicle fitted with HDi engines, the fuel system must be primed if you run out of fuel;
r
efer to the engine compartment view on the
"
Diesel engine" section.
If
the tank on your vehicle is fitted with
a
misfuel prevention device, refer to the
c
orresponding
s
ection.
Running out of fuel (Diesel)
If the engine does not start first time, don't keep trying. Start the procedure
a
gain from the beginning.
HDi 92 engine
F Fill the fuel tank with at least five litres of d
iesel.
F
O
pen the bonnet.
F
S
queeze and release the priming pump
r
epeatedly until resistance is felt (there
m
ay be resistance at the first press).
F
O
perate the starter until the engine starts
(
if the engine does not start at the first
a
ttempt, wait around 15 seconds before
t
rying
ag
ain).
F
I
f the engine does not start after a few
a
ttempts, operate the priming pump again
t
hen start the engine.
F
C
lose the bonnet.
BlueHDi engine
F Fill the fuel tank with at least five litres of D
iesel.
F
S
witch on the ignition (without starting the
e
ngine).
F
W
ait around 6 seconds and switch off the
ig
nition.
F
R
epeat the operation 10 times.
F
O
perate the starter to run the engine.
Pr
Page 166 of 260

164
C-elysee_en_Chap09_info-pratiques_ed01-2016
12 V battery
Procedure for starting the engine using another battery or charging a discharged battery.T he battery is located under the bonnet.
To
gain access to it:
F
o
pen the bonnet using the interior release
l
ever, then the exterior safety catch,
F
s
ecure the bonnet stay,
F
r
emove the plastic cover on the (+) terminal.
Access to the battery
General points
Lead-acid starter batteries
Protect your eyes and face before h
andling the battery.
All
operations on the battery must be
c
arried out in a well ventilated area and
a
way from naked flames and sources
o
f sparks, so as to avoid the risk of
e
xplosion or fire.
Wash
your hands after wards.
Batteries
contain
harmful
substances
s
uch
as
sulphuric
acid
and
lead.
They
must
be
disposed
of
in
a
ccordance
with
regulations
and
must
n
ot,
in
any
circumstances,
be
discarded
w
ith
household
waste.
Take
used
remote
control
batteries
and
v
ehicle batteries to a special collection
point.
Versions
equipped
with
Stop
&
Start
are
f
itted
with
a
12
V
lead-acid
battery
of
s
pecific
t
echnology
a
nd
s
pecification.
Its
replacement
should
be
carried
out
o
nly
by
a
CITROËN
dealer
or
a
qualified
w
orkshop. If
you have an electronic or automatic
g
earbox, never try to start the engine by
p
ushing the vehicle. The
(-) terminal of the battery is not accessible.
A
remote earth point is located on the engine.
Practical information
Page 182 of 260

180
C-elysee_en_Chap10_verifications_ed01-2016
Bonnet
Closing
F Take the stay out of the support notch.
F C lip the stay in its housing.
F
L
ower the bonnet and release it near the
e
nd of its travel.
F
P
ull on the bonnet to check that it is fully
l
atched.
F
U
nclip the bonnet stay from its housing.
F
F
ix the stay in the notch to hold the bonnet
ope
n.
Do not open the bonnet when there is a
very
strong
wind.
When
the
engine
is
hot,
handle
the
e
xterior
safety
catch
and
the
stay
with
c
are
(risk
of
burns).
Opening
F Push
the exterior safety catch to the left a
nd raise the bonnet.
F
P
ull
towards
you
the
interior
release
lever,
l
ocated
in
the
lower
dashboard.
Because
of the presence of electrical
e
quipment under the bonnet, it is
r
ecommended that exposure to water
(
rain, washing, ...) be limited.
Checks
Page 185 of 260

183
C-elysee_en_Chap10_verifications_ed01-2016
Checking levels
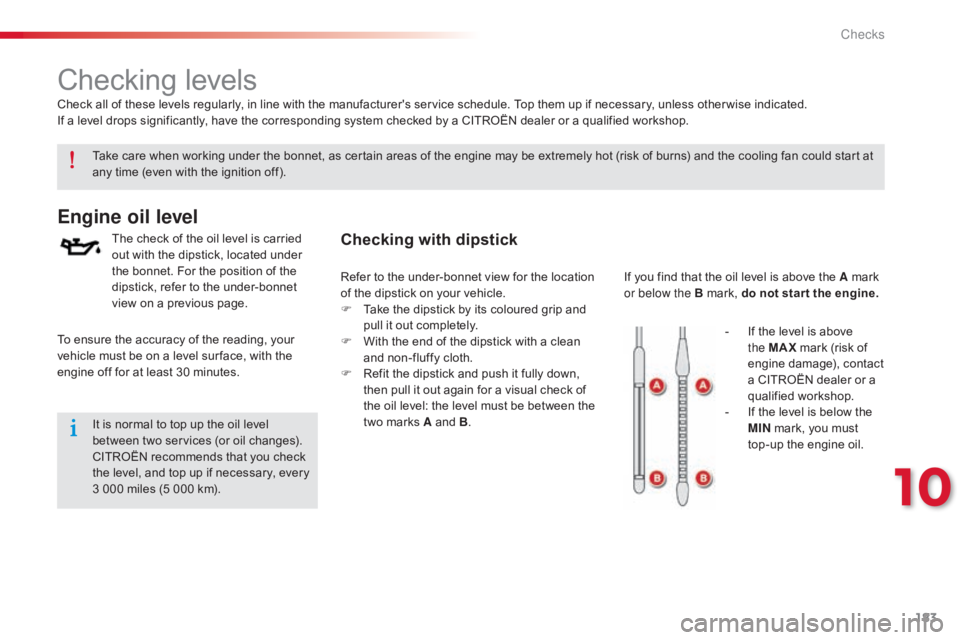
Engine oil level
The check of the oil level is carried out with the dipstick, located under
t
he bonnet. For the position of the
d
ipstick, refer to the under-bonnet
v
iew on a previous page.Checking with dipstick
If you find that the oil level is above the A mark or below the B mark, do not star t the engine.
Take
care
when
working
under
the
bonnet,
as
certain
areas
of
the
engine
may
be
extremely
hot
(risk of burns) and the cooling fan could start at
a
ny
time
(even
with
the
ignition
off).
Check
all
of
these
levels
regularly,
in
line
with
the
manufacturer's
service
schedule.
Top
them
up
if
necessary, unless other wise indicated.
If
a
level
drops
significantly,
have
the
corresponding
system
checked
by
a
CITROËN
dealer
or
a
qualified workshop.
It
is
normal
to
top
up
the
oil
level
b
etween
two
services
(or
oil
changes).
C
ITROËN
recommends
that
you
check
t
he
level,
and
top
up
if
necessary,
every
3
000
miles
(5
000
km).
To
ensure
the
accuracy
of
the
reading,
your
v
ehicle
must
be
on
a
level
sur face,
with
the
e
ngine
off
for
at
least
30
minutes. -
I
f the level is above
t
he MAX
mark (risk of
e
ngine damage), contact
a
CITROËN dealer or a
q
ualified
w
orkshop.
-
I
f the level is below the
MIN
mark, you must
top-up
the engine oil.
Refer
to
the
under-bonnet
view
for
the
location
o
f
the
dipstick
on
your
vehicle.
F
T
ake
the
dipstick
by
its
coloured
grip
and
p
ull
it
out
completely.
F
W
ith
the
end
of
the
dipstick
with
a
clean
a
nd
non-fluffy
cloth.
F
R
efit
the
dipstick
and
push
it
fully
down,
t
hen
pull
it
out
again
for
a
visual
check
of
t
he
oil
level:
the
level
must
be
between
the
t
wo
marks
A
and
B .
10
Checks
Page 186 of 260

184
C-elysee_en_Chap10_verifications_ed01-2016
The brake fluid level should be close to the "MA X" mark. If it is not, check
t
he brake pad wear.
Brake fluid level
Changing the fluid
Refer to the manufacturer's service schedule for details of the interval for this operation.
Fluid specification
The brake fluid must conform to the manufacturer's r ecommendations.
Topping-up the engine oil
Oil grade
The oil must be the correct grade for your
e
ngine and conform to the manufacturer's
r
ecommendations.
Refer
to the under-bonnet view for the location
o
f the oil filler cap on your vehicle.
F
U
nscrew the filler cap for access to the
filler
orifice.
F
P
our in the oil in small quantities, avoiding
s
pills onto the engine (risk of fire).
F
W
ait a few minutes before checking the
l
evel again using the dipstick.
F
T
op-up again if necessary.
F
A
fter checking and topping up, carefully
r
efit the oil filler cap and the dipstick to its
h
ousing.
Engine oil change
Refer to the manufacturer's service schedule for details of the interval for this operation.
In
order to maintain the reliability of the engine
a
nd emissions control system, never use
a
dditives in the engine oil.
Checks
Page 195 of 260

193
C-elysee_en_Chap11_caracteristiques-techniques_ed01-2016
Identification markings
A. Vehicle identification number (VIN)
under the bonnet.
T
his number is engraved on the bodywork
n
ear the passenger compartment filter. The
tyre pressures must be checked
w
hen the tyres are cold, at least once a
month.
Low tyre pressures introduces the risk
o
f a burst tyre and also increase fuel
c
onsumption.
B.
V
ehicle identification number on the
dashboard.
T
his number is indicated on a self-adhesive
l
abel which is visible through the windscreen.C. M
anufacturer's label. T
he VIN is indicated on a self-destroying
l
abel affixed to the lower right hand centre
p
illar.
D.
T
yre/paint label.
T
his label is affixed to the driver's side
c
entre pillar.It
bears the following information:
-
t
he tyre pressures, for unladen and laden
c
onditions,
-
t
he tyre sizes,
-
t
he spare tyre inflation pressure,
-
t
he paint colour code.
Various visible markings for the identification of your vehicle.
11
Technical data