tow Citroen C4 PICASSO 2015 2.G Service Manual
[x] Cancel search | Manufacturer: CITROEN, Model Year: 2015, Model line: C4 PICASSO, Model: Citroen C4 PICASSO 2015 2.GPages: 420, PDF Size: 10.72 MB
Page 248 of 420
246
I UF: seat suitable for the installation of an
ISoFI X Universal seat, " For ward
facing"
s
ecured using the upper strap to the top tether
o
n ISOFIX seats.
IL- SU: seat suitable for the installation of an
I sofix
Semi- Universal
sea
t
ei
ther:
-
r
ear ward facing fitted with an upper strap
o
r a support leg,
-
f
or ward facing fitted with a support leg,
-
a
sleeper cot fitted with an upper strap or a
s
upport leg.
Remove
and stow the head restraint
b
efore installing a child seat on a
p
assenger seat. Refit the head restraint
o
nce the child seat has been removed.
For
advice on securing the upper strap, refer to
t
he "Isofix Mountings" section.
X: seat not suitable for the installation of a
child
seat or sleeper cot for the weight group
i
ndicated.
Safety
Page 249 of 420
247
Child seats
The incorrect installation of a child seat in a vehicle compromises the child's protection in
t
he event of an accident.
Check
that there is no seat belt or seat belt
b
uckle under the child seat as this could
de
stabilise
i
t.
Remember
to fasten the seat belts or the
c
hild seat harnesses keeping the slack in
relation
to the child's body to a minimum,
even
for short journeys.
For
the installation of a child seat using a
s
eat belt, ensure that this is well tensioned
o
n the child seat and that it is holding the
c
hild seat firmly against the seat of your
v
ehicle. If your front passenger seat is
a
djustable, move it for ward if necessary.
at t
he rear seats, always leave sufficient
space
between the front seat and:
-
a
rear ward facing child seat,
-
t
he feet of a child seated in a for ward
f
acing child seat.
Recommendations
For this, move the front seat for ward and if necessary straighten its backrest.
For
o
ptimum
in
stallation
o
f
t
he
fo
rward
f
acing
c
hild seat, ensure that the back of the child
s
eat is as close as possible to the backrest
o
f the vehicle's seat, or in contact if possible.
The
head restraint must be removed before
i
nstalling a child seat with a backrest on the
p
assenger
sea
t.
Ensure
that the head restraint is stowed or
a
ttached securely so that it is not thrown
a
round the vehicle in the event of sharp
b
raking.
Refit
the head restraint as soon as the child
s
eat is removed.Installing a booster
cushion
As a safety precaution, do not leave:
- o ne or more children alone and
u
nsupervised in a vehicle,
-
a
child or an animal in a vehicle which
i
s exposed to the sun, with the windows
c
losed,
-
t
he keys within reach of children inside
t
he vehicle.
To
prevent accidental opening of the doors,
u
se the child lock.
Take
care not to open the rear windows by
m
ore than one third.
To
protect young children from the rays of
t
he sun, fit side blinds on the rear windows.
The
chest part of the seat belt must be
p
ositioned on the child's shoulder without
t
ouching the neck.
Ensure that the lap part of the seat belt
passes correctly over the child's thighs.
CITROËN recommends the use of a booster
s
eat which has a back, fitted with a seat belt
g
uide at shoulder level.
The
legislation
on
carrying
a
child
on
the
f
ront
passenger
seat
is
specific
to
each
c
ountry.
Refer
to
the
legislation
in
force
in
t
he
country
in
which
you
are
driving.
Deactivate
the
passenger's
front
airbag
w
hen
a
rear ward
facing
child
seat
is
installed
o
n
the
front
passenger
seat.
Other wise,
the
c
hild
would
risk
being
seriously
injured
or
k
illed
if
the
airbag
were
deployed.
Children at the front
6
Safety
Page 251 of 420

249
This kit is installed i n t he s torage b ox, u nder t he b
oot floor.
This
kit
consists
of
a
compressor
and
a
sealant
c
artridge.
It allows the temporary repair
of
a
tyre.
You
are
then
able
to
go
to
the
nearest
garage.
It
is
designed
to
repair
most
punctures
which
c
ould
affect
the
tyre,
located
on
the
tyre
tread
o
r
shoulder.
Its
compressor
can
be
used
to
check
and
a
djust
the
pressure
of
the
tyre.
Temporary pu
ncture r epair k it
Access to the kit
Depending on version, the kit is stowed under t
he front passenger's seat or in the storage
b
ox under the second row footwell.
7
Practical information
Page 252 of 420

250
List of tools
* Depending on equipment.
al
l of these tools are specific to your vehicle
and can vary according to equipment. Do not
u
se them for other purposes.
1.
1
2 V compressor.
C
ontains a sealant cartridge for the
t
emporary repair of a tyre and can also be
u
sed for adjusting tyre pressures.
2.
C
hocks* to immobilise the wheels of the
v
ehicle.
3.
B
olt cover removal tool*.
F
or removing the wheel bolt finishers
(
covers) on alloy wheels.
4.
R
emovable towing eye.
S
ee the "Towing the vehicle" section.
Practical information
Page 256 of 420
254
2. Inflation
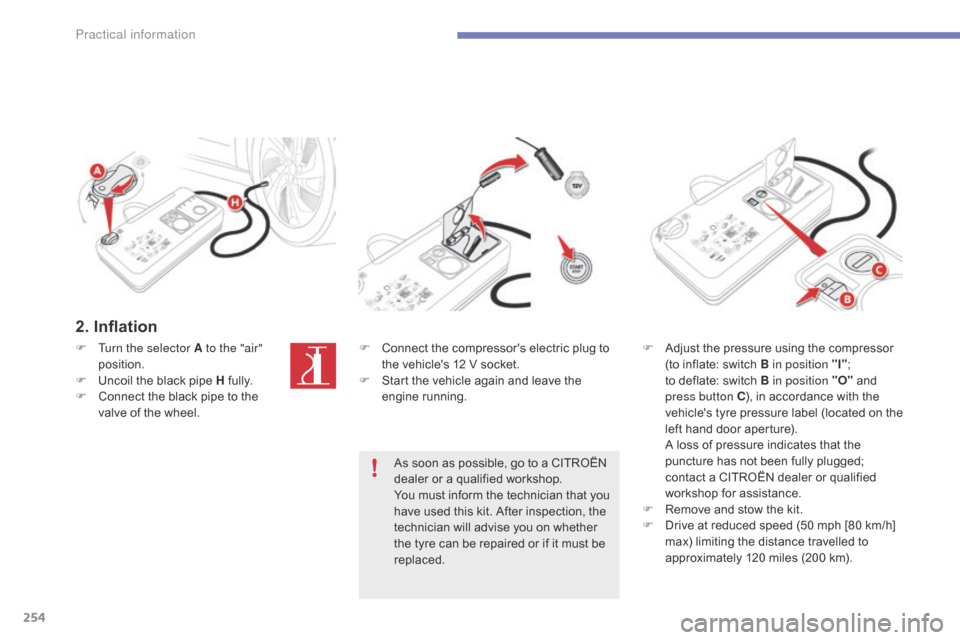
F Turn the selector A to the "air" position.
F
U
ncoil the black pipe H
f
ully.
F
C
onnect the black pipe to the
v
alve of the wheel. F
C onnect the compressor's electric plug to t
he vehicle's 12 V socket.
F
S
tart the vehicle again and leave the
e
ngine
r
unning.
As
soon as possible, go to a CITROËN
d
ealer or a qualified workshop.
You
must inform the technician that you
h
ave used this kit. After inspection, the
t
echnician will advise you on whether
t
he tyre can be repaired or if it must be
r
eplaced.F
A djust the pressure using the compressor (
to inflate: switch B in position "I";
t
o deflate: switch B in position "O"
and
p
ress button C),
in accordance with the
v
ehicle's
t
yre pressure label (located on the
l
eft hand door aperture).
A
loss of pressure indicates that the
p
uncture has not been fully plugged;
c
ontact a CITROËN dealer or qualified
w
orkshop for assistance.
F
R
emove and stow the kit.
F
D
rive at reduced speed (50 mph [80 km/h]
m
ax) limiting the distance travelled to
a
pproximately 120 miles (200 km).
Practical information
Page 257 of 420

255
Removing the cartridge
F Stow the black pipe.
F D etach the angled base from the white
p
ipe.
F
S
upport the compressor vertically.
F
U
nscrew the cartridge from the bottom.Beware
of discharges of fluid.
The
expiry date of the fluid is indicated
o
n the cartridge.
The
sealant cartridge is designed for
s
ingle use; even if only partly used,
i
t must be replaced.
After
use, do not discard the cartridge
i
nto the environment, take it to an
a
uthorised waste disposal site or a
C
ITROËN dealer.
Do
not forget to obtain a new sealant
c
artridge, available from CITROËN
d
ealers or from a qualified workshop.
7
Practical information
Page 258 of 420
256
Checking tyre pressures /
inflating accessories
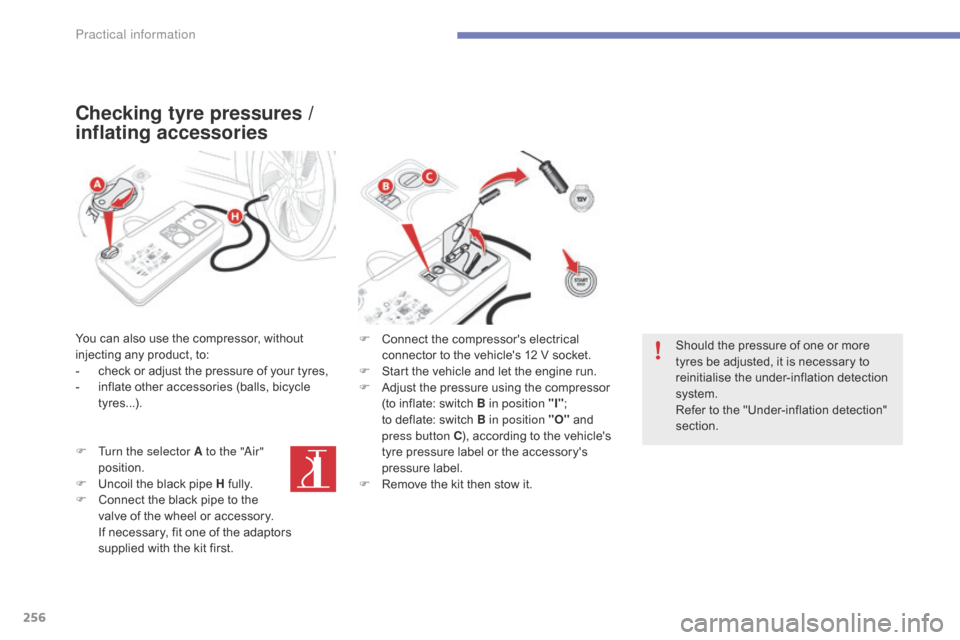
You can also use the compressor, without injecting any product, to:
-
c
heck or adjust the pressure of your tyres,
-
i
nflate other accessories (balls, bicycle
t
yres...).
F
T
urn the selector A to the "
ai
r"
position.
F
U
ncoil the black pipe H
f
ully.
F
C
onnect the black pipe to the
v
alve of the wheel or accessory.
I
f necessary, fit one of the adaptors
s
upplied with the kit first. F
C onnect the compressor's electrical
c
onnector to the vehicle's 12 V socket.
F
S
tart the vehicle and let the engine run.
F
A
djust the pressure using the compressor
(
to inflate: switch B in position "I";
t
o deflate: switch B in position "O"
and
p
ress button C),
according to the vehicle's
t
yre pressure label or the accessory's
p
ressure label.
F
R
emove the kit then stow it.Should
the pressure of one or more
t
yres be adjusted, it is necessary to
r
einitialise the under-inflation detection
s
ystem.
Refer
to the "Under-inflation detection"
s
ection.
Practical information
Page 260 of 420
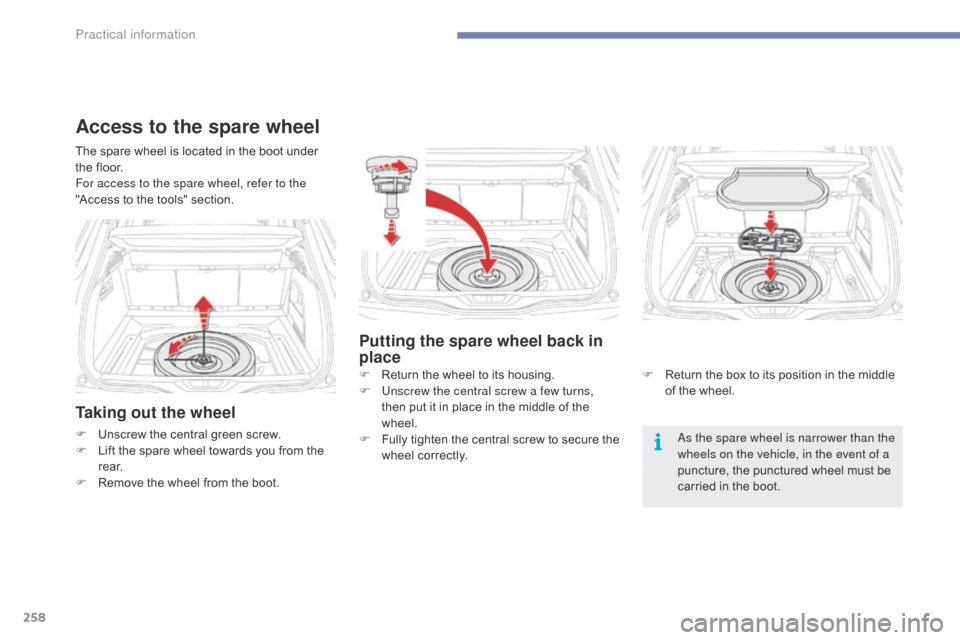
258
Taking out the wheel
F Unscrew the central green screw.
F L ift the spare wheel towards you from the
r
e a r.
F
R
emove the wheel from the boot.as t he spare wheel is narrower than the
wheels on the vehicle, in the event of a
puncture,
the punctured wheel must be
c
arried in the boot.
The
spare wheel is located in the boot under
t
he floor.
For access to the spare wheel, refer to the
"Access to the tools" section.
Access to the spare wheel
Putting the spare wheel back in
place
F Return
the wheel to its housing.
F U nscrew the central screw a few turns,
then
put it in place in the middle of the
w
heel.
F
F
ully
t
ighten
t
he
c
entral
s
crew
t
o
s
ecure
t
he
w
heel correctly. F
R eturn the box to its position in the middle o
f the wheel.
Practical information
Page 261 of 420
259
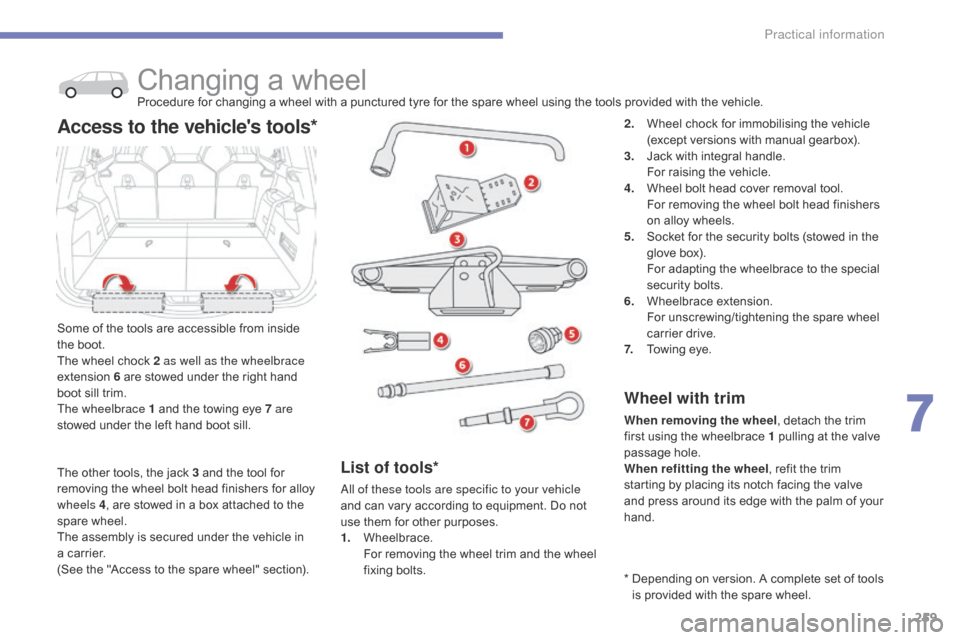
Changing a wheelProcedure for changing a wheel with a punctured tyre for the spare wheel using the tools provided with the vehicle.
S
ome
of
the
tools are accessible from inside
t
he
boot.
The
wheel
chock 2 as well as the wheelbrace
extension
6
are stowed under the right hand
b
oot
sill
trim.
The wheelbrace 1
and the towing eye 7 are
stowed
under
the left hand boot sill.
Access to the vehicle's tools*2. Wheel chock for immobilising the vehicle (
except versions with manual gearbox).
3.
J
ack with integral handle.
F
or raising the vehicle.
4.
W
heel bolt head cover removal tool.
F
or removing the wheel bolt head finishers
o
n alloy wheels.
5.
S
ocket for the security bolts (stowed in the
g
love box).
F
or adapting the wheelbrace to the special
s
ecurity bolts.
6.
W
heelbrace
e
xtension.
F
or unscrewing/tightening the spare wheel
c
arrier drive.
7.
T
owing eye.
Wheel with trim
When removing the wheel , detach the trim f
irst using the wheelbrace 1 pulling at the valve
p
assage hole.
When refitting the wheel ,
refit the trim
s
tarting by placing its notch facing the valve
a
nd press around its edge with the palm of your
han
d.
List of tools*
all of these tools are specific to your vehicle
and can vary according to equipment. Do not
u
se them for other purposes.
1.
W
heelbrace.
F
or removing the wheel trim and the wheel
f
ixing
bol
ts. *
D
epending on version. A complete set of tools
i
s provided with the spare wheel.
The
other
tools,
the
jack
3
and
the
tool
for
r
emoving
the
wheel
bolt
head
finishers
for
alloy
w
heels 4 ,
are
stowed
in
a
box
attached
to
the
spar
e
w
heel.
The
assembly
is
secured
under
the
vehicle
in
a
carrier.
(See
the
"Access
to
the
spare
wheel"
section).
7
Practical information
Page 263 of 420
261
A puncture wheel from the vehicle cannot be fitted under the vehicle. It
m
ust
b
e
c
arried
i
n
t
he
b
oot.
U
se
a
c
over
t
o protect the boot.
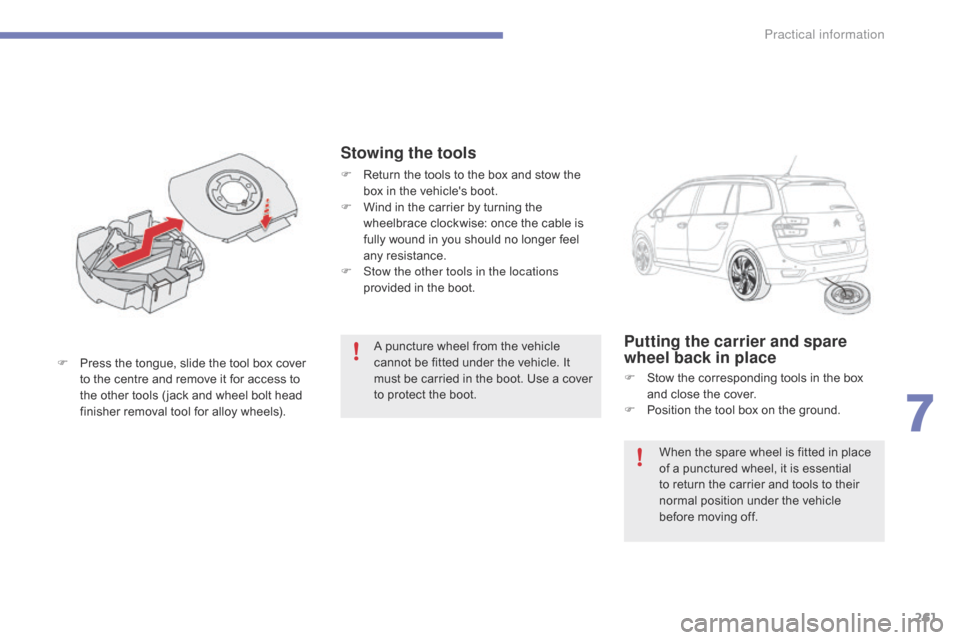
F
P
ress
the
tongue,
slide
the
tool
box
cover
t
o
the
centre
and
remove
it
for
access
to
t
he
other
tools
( jack
and
wheel
bolt
head
f
inisher
removal
tool
for
alloy
wheels).Putting the carrier and spare
wheel back in place
F Stow the corresponding tools in the box a
nd close the cover.
F
P
osition the tool box on the ground.
Stowing the tools
F Return the tools to the box and stow the b
ox in the vehicle's boot.
F
W
ind in the carrier by turning the
w
heelbrace clockwise: once the cable is
f
ully wound in you should no longer feel
an
y
r
esistance.
F
S
tow the other tools in the locations
provided
in the boot.
When
the spare wheel is fitted in place
o
f a punctured wheel, it is essential
t
o return the carrier and tools to their
n
ormal position under the vehicle
b
efore moving off.
7
Practical information