engine Citroen GRAND C4 PICASSO RHD 2016 2.G Manual Online
[x] Cancel search | Manufacturer: CITROEN, Model Year: 2016, Model line: GRAND C4 PICASSO RHD, Model: Citroen GRAND C4 PICASSO RHD 2016 2.GPages: 523, PDF Size: 13.63 MB
Page 257 of 523
255
Fuel
Capacity of the tank: approximately 57 litres (petrol) or 55 litres (Diesel).
Low fuel levelRefuelling
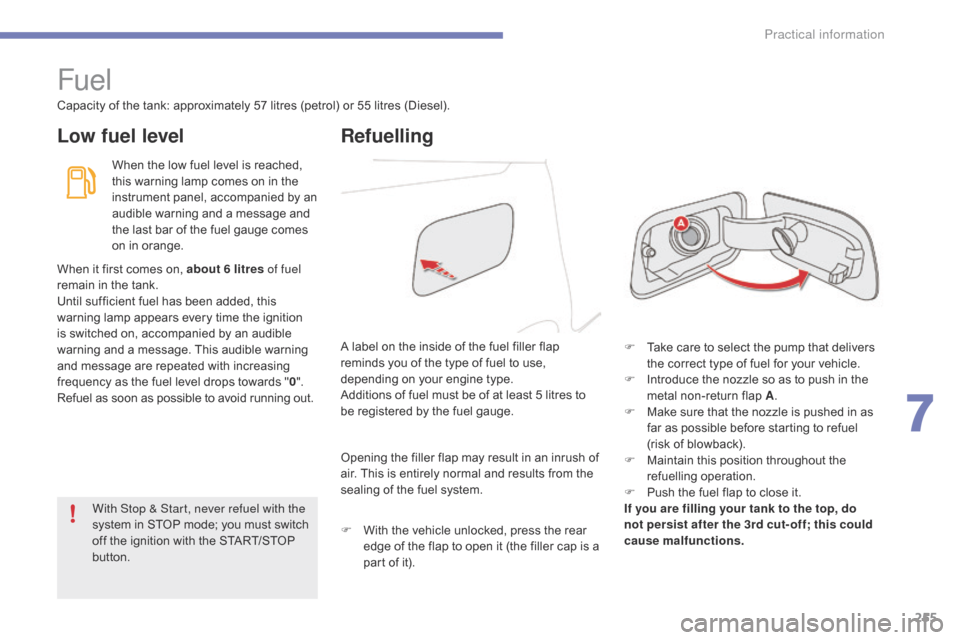
When the low fuel level is reached, t
his warning lamp comes on in the
i
nstrument panel, accompanied by an
a
udible warning and a message and
t
he last bar of the fuel gauge comes
o
n in orange.
F
T
ake care to select the pump that delivers
t
he correct type of fuel for your vehicle.
F
I
ntroduce the nozzle so as to push in the
m
etal non-return flap A.
F
M
ake sure that the nozzle is pushed in as
f
ar as possible before starting to refuel
(risk
of blowback).
F
M
aintain this position throughout the
r
efuelling
ope
ration.
F
P
ush the fuel flap to close it.
If you are filling your tank to the top, do
not persist after the 3rd cut- off; this could
cause malfunctions.
A
label on the inside of the fuel filler flap
r
eminds you of the type of fuel to use,
d
epending on your engine type.
Additions
of fuel must be of at least 5 litres to
b
e registered by the fuel gauge.
When
it
first comes on, about 6 litres of fuel
remain
in
the tank.
Until
sufficient fuel has been added, this
w
arning
lamp appears every time the ignition
i
s
switched on, accompanied by an audible
w
arning
and a message. This audible warning
a
nd
message are repeated with increasing
f
requency
as the fuel level drops towards "0 ".
Refuel
as
soon as possible to avoid running out.Opening
the filler flap may result in an inrush of
a
ir. This is entirely normal and results from the
s
ealing of the fuel system.
F
W
ith the vehicle unlocked, press the rear
e
dge of the flap to open it (the filler cap is a
p
art of it).
With Stop & Start, never refuel with the
system
in STOP mode; you must switch
o
ff
the ignition with the START/STOP
b
utton.
7
Practical information
Page 258 of 523
256
The petrol or Diesel engine of your vehicle is fitted with a catalytic converter, a device which
h
elps to reduce the level of harmful emissions
i
n the exhaust gases.
For petrol engines, you must use unleaded fuel.The filler neck is narrower, allowing only unleaded petrol nozzles to be introduced.
If you have put in the wrong fuel
for your vehicle, you must have the
fuel tank drained and filled with
the correct fuel before star ting the
engine.
Fuel cut- of f
Your vehicle is equipped with a safety device w hich cuts off the fuel supply in the event of a
collision.
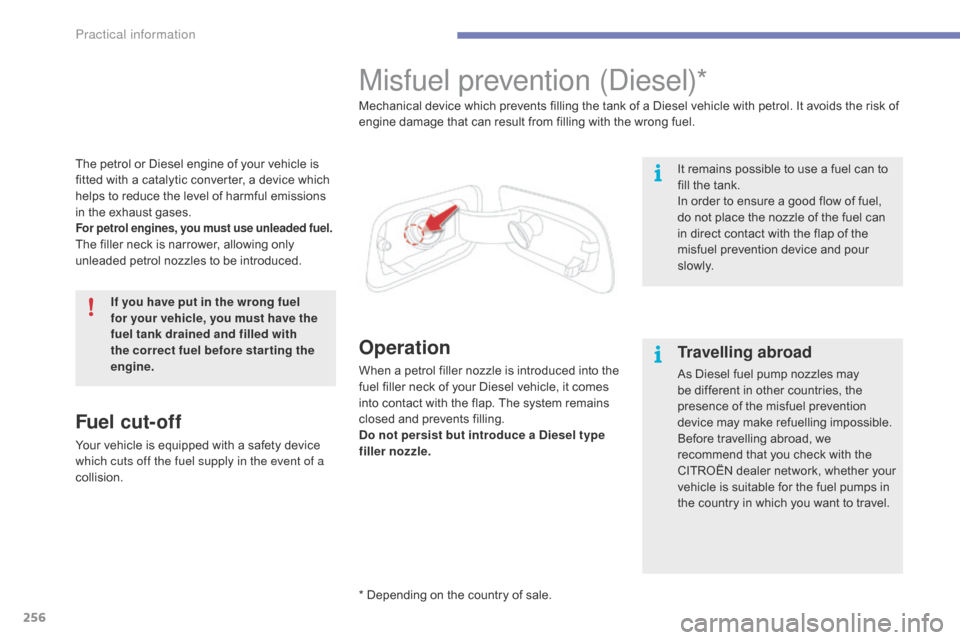
Misfuel prevention (Diesel)*
Operation
When a petrol filler nozzle is introduced into the f uel filler neck of your Diesel vehicle, it comes
i
nto contact with the flap. The system remains
c
losed and prevents filling.
Do not persist but introduce a Diesel type
filler nozzle. Mechanical device which prevents filling the tank of a Diesel vehicle with petrol. It avoids the risk of
e
ngine damage that can result from filling with the wrong fuel.
It remains possible to use a fuel can to
f
ill the tank.
In order to ensure a good flow of fuel,
d
o not place the nozzle of the fuel can
i
n direct contact with the flap of the
m
isfuel prevention device and pour
s
l ow l y.
Travelling abroad
As Diesel fuel pump nozzles may b
e different in other countries, the
p
resence of the misfuel prevention
d
evice may make refuelling impossible.
Before
travelling abroad, we
r
ecommend that you check with the
C
ITROËN dealer network, whether your
v
ehicle is suitable for the fuel pumps in
t
he country in which you want to travel.
* Depending
on
the
country
of
sale.
Practical information
Page 259 of 523
257
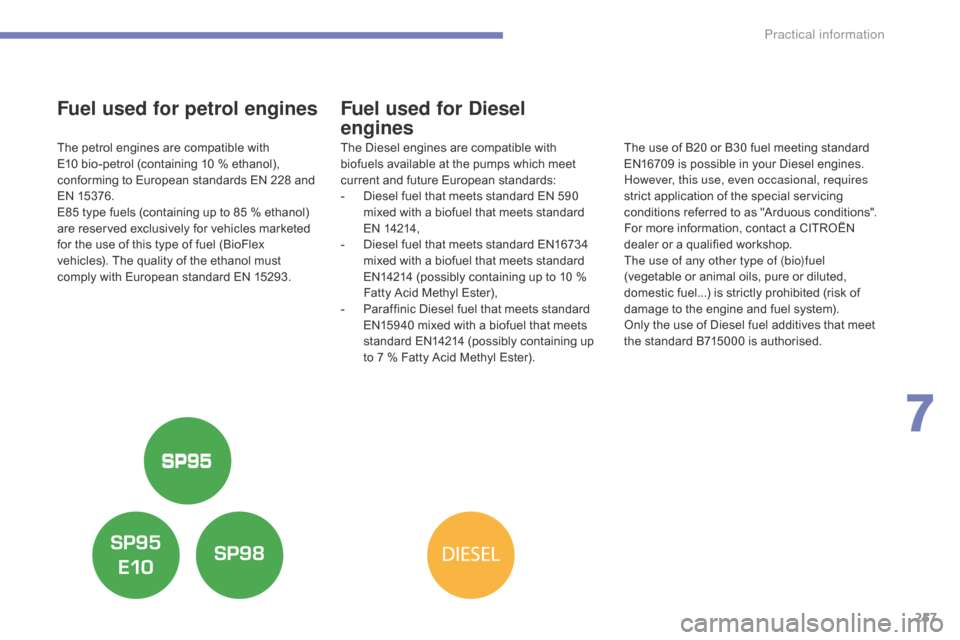
Fuel used for petrol engines
The petrol engines are compatible with E10 bio-petrol (containing 10 % ethanol),
c
onforming to European standards EN 228 and
E
N
1
5376.
E85
type fuels (containing up to 85 % ethanol)
a
re reserved exclusively for vehicles marketed
f
or the use of this type of fuel (BioFlex
v
ehicles). The quality of the ethanol must
c
omply with European standard EN 15293.
Fuel used for Diesel
engines
The Diesel engines are compatible with biofuels available at the pumps which meet
c
urrent and future European standards:
-
D
iesel fuel that meets standard EN 590
m
ixed with a biofuel that meets standard
E
N
14
214,
-
D
iesel fuel that meets standard EN16734
m
ixed with a biofuel that meets standard
E
N14214 (possibly containing up to 10 %
F
atty Acid Methyl Ester),
-
P
araffinic Diesel fuel that meets standard
E
N15940 mixed with a biofuel that meets
s
tandard EN14214 (possibly containing up
t
o 7 % Fatty Acid Methyl Ester).The
use of B20 or B30 fuel meeting standard E
N16709 is possible in your Diesel engines.
H
owever, this use, even occasional, requires
strict
application of the special servicing
c
onditions referred to as "Arduous conditions".
F
or more information, contact a CITROËN
d
ealer or a qualified workshop.
The use of any other type of (bio)fuel
(vegetable
or animal oils, pure or diluted,
d
omestic fuel...) is strictly prohibited (risk of
d
amage to the engine and fuel system).
Only
the use of Diesel fuel additives that meet
t
he standard B715000 is authorised.
7
Practical information
Page 265 of 523
263
Exiting economy mode
These functions are reactivated automatically next time the vehicle is driven.
In
order to restore the use of these functions
i
mmediately, start the engine and let it run:
-
f
or less than ten minutes, to use the
e
quipment for approximately five minutes,
-
f
or more than ten minutes, to use the
e
quipment for up to approximately
t
hirty minutes.
Let
the engine run for the duration specified to
e
nsure that the battery charge is sufficient.
Do
not repeatedly and continuously restart the
e
ngine in order to charge the battery.
A
flat battery prevents the engine from starting.
For
more information on the 12 V batter y, refer
to
the corresponding section.
Load reduction mode
System which manages the use of certain functions according to the level of charge
r
emaining in the battery.
When
the vehicle is being driven, the load
r
eduction function temporarily deactivates
c
ertain functions, such as the air conditioning,
t
he heated rear screen...
The
deactivated functions are reactivated
a
utomatically as soon as conditions permit.
Energy economy mode
Switching to economy
mode
A message appears in the instrument panel s
creen indicating that the vehicle has switched
t
o economy mode and the active functions are
p
ut on standby.
If
a telephone call is being made at this time, it
w
ill be maintained for around 10 minutes with
t
he Bluetooth hands-free system of your audio
s
ystem.
System
which manages the duration of use of certain functions to conserve a sufficient level of
c
harge in the battery.
After the engine has stopped, you can still use functions such as the audio and telematics
s
ystem, windscreen wipers, dipped beam headlamps, courtesy lamps, etc. for a maximum
c
ombined duration of about forty minutes.
7
Practical information
Page 270 of 523
268
TOTAL & CITROËN
Partners in performance and
protecting the environment
Innovation in the search for
performance
For over 40 year, the TOTAL Research and Development departments have developed lubricants
f
or CITROËN, to match the latest technical innovations
o
n CITROËN vehicles, both for competition and for
e
veryday motoring.
For you, this is an assurance that you will obtain the
best
per formance from your engine.
Optimum protection for
your engine
By having your CITROËN vehicle serviced with TOTAL lubricants, you are
c
ontributing towards improving the life
a
nd per formance of your engine, while
a
lso protecting the environment.
Practical information
Page 271 of 523
269
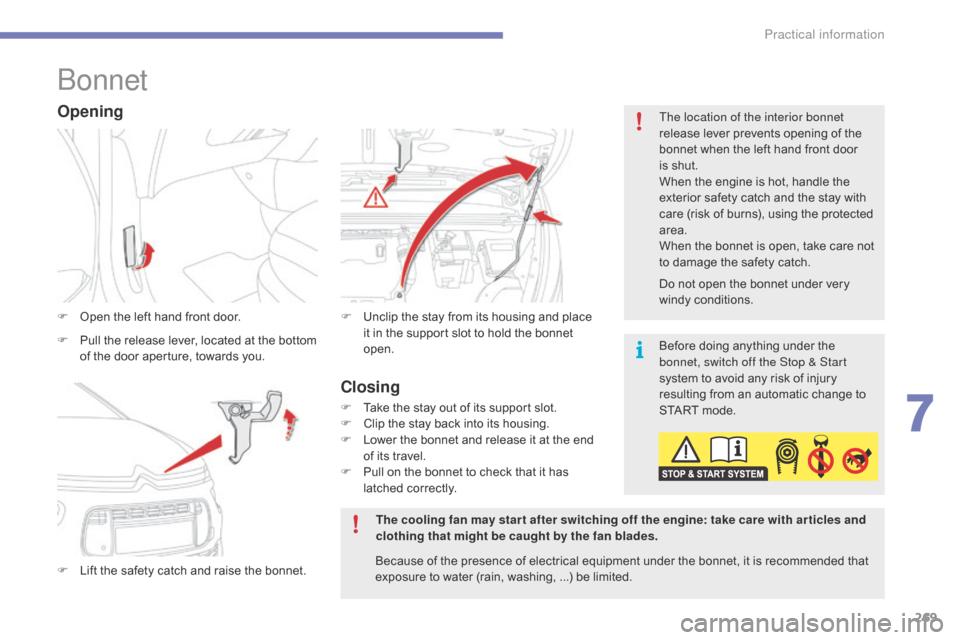
Bonnet
F Open the left hand front door.
F
L
ift the safety catch and raise the bonnet.F
U nclip the stay from its housing and place i
t in the support slot to hold the bonnet
ope
n.
Opening
F Pull the release lever, located at the bottom o
f the door aperture, towards you. Before
doing anything under the
b
onnet, switch off the Stop & Start
system
to avoid any risk of injury
r
esulting from an automatic change to
S
TART mode.
The cooling fan may star t after switching off the engine: take care with ar ticles and
clothing that might be caught by the fan blades. Do
not open the bonnet under very
wi
ndy
c
onditions.
The location of the interior bonnet
release lever prevents opening of the
b
onnet when the left hand front door
i
s shut.
When the engine is hot, handle the
e
xterior safety catch and the stay with
c
are (risk of burns), using the protected
a
rea.
When the bonnet is open, take care not
t
o damage the safety catch.
Because of the presence of electrical equipment under the bonnet, it is recommended that
e
xposure to water (rain, washing, ...) be limited.
Closing
F Take the stay out of its support slot.
F C lip the stay back into its housing.
F
L
ower the bonnet and release it at the end
o
f its travel.
F
P
ull on the bonnet to check that it has
l
atched correctly.
7
Practical information
Page 272 of 523
270
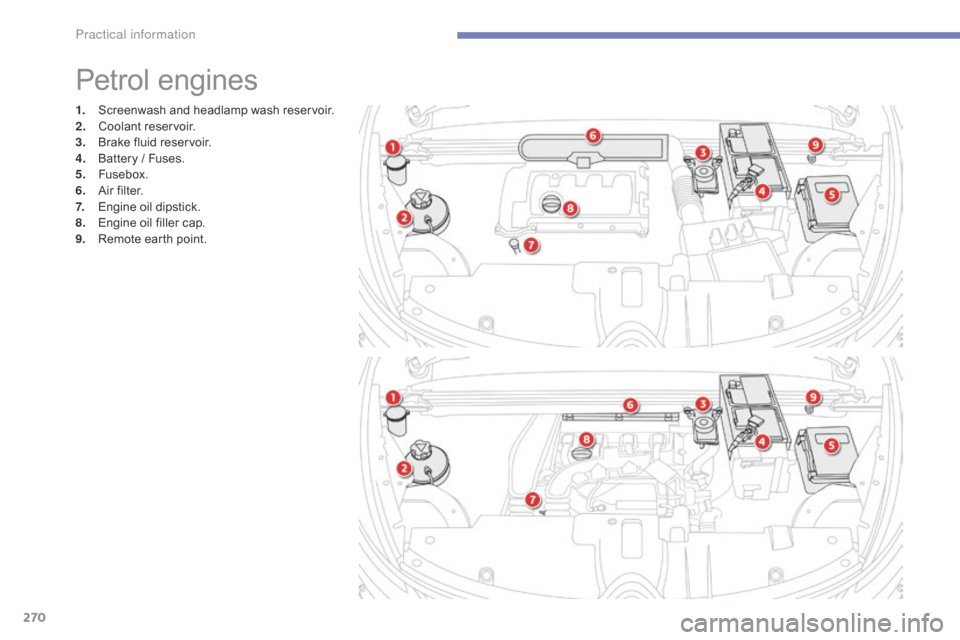
1. Screenwash and headlamp wash reservoir.
2. C oolant r eservoir.
3.
B
rake fluid reservoir.
4.
B
attery / Fuses.
5.
F
usebox.
6.
A
ir filter.
7.
E
ngine oil dipstick.
8.
E
ngine oil filler cap.
9.
R
emote earth point.
Petrol engines
Practical information
Page 273 of 523
271
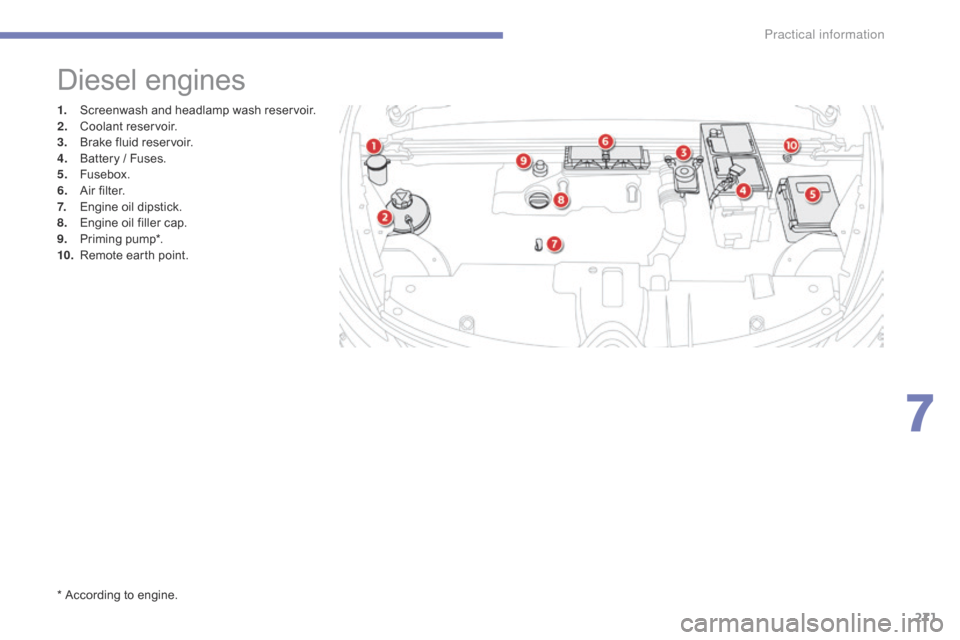
1. Screenwash and headlamp wash reservoir.
2. C oolant r eservoir.
3.
B
rake fluid reservoir.
4.
B
attery / Fuses.
5.
F
usebox.
6.
A
ir filter.
7.
E
ngine oil dipstick.
8.
E
ngine oil filler cap.
9.
P
riming
pu
mp*.
10.
R
emote earth point.
Diesel engines
* According to engine.
7
Practical information
Page 274 of 523
272
Checking levels
Take care when working under the bonnet, as certain areas of the engine may be extremely hot (risk of burns) and the cooling fan could start at any time (even with the ignition off).
Engine oil level
The check is carried out either when the ignition is switched on using the
o
il level indicator in the instrument
p
anel for vehicles so equipped, or
u
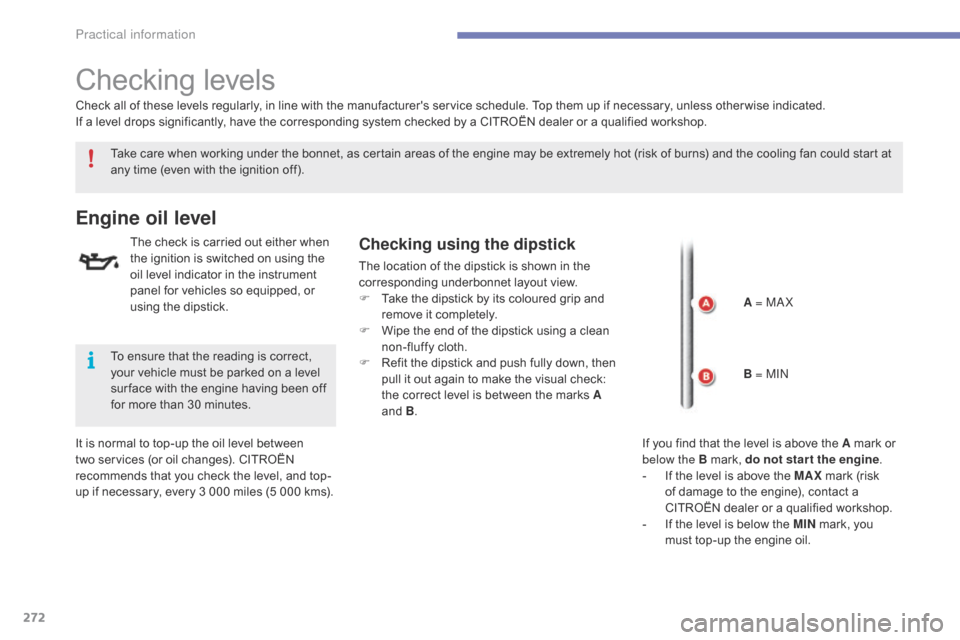
sing the dipstick.Checking using the dipstick
The location of the dipstick is shown in the corresponding underbonnet layout view.
F
T
ake the dipstick by its coloured grip and
r
emove it completely.
F
W
ipe the end of the dipstick using a clean
n
on-fluffy cloth.
F
R
efit the dipstick and push fully down, then
p
ull it out again to make the visual check:
t
he correct level is between the marks A
and
B.
It
is
normal
to
top-up
the
oil
level
between
t
wo
services
(or
oil
changes).
CITROËN
r
ecommends
that
you
check
the
level,
and
top-
up
if
necessary,
every
3
000
miles
(5
000
kms).
Check
all
of
these
levels
regularly,
in
line
with
the
manufacturer's service schedule. Top them up if necessary, unless other wise indicated.
If
a
level
drops
significantly,
have
the
corresponding system checked by a CITROËN dealer or a qualified workshop.
To
ensure
that
the
reading
is
correct,
y
our
vehicle
must
be
parked
on
a
level
s
ur face
with
the
engine
having
been
off
f
or
more
than
30
minutes. A = MA X
B = MIN
If
you find that the level is above the A mark or
belo
w the B mark, do not star t the engine.
-
I
f the level is above the MAX
mark (risk
o
f damage to the engine), contact a
C
ITROËN dealer or a qualified workshop.
-
I
f the level is below the MIN
mark, you
m
ust top-up the engine oil.
Practical information
Page 275 of 523
273
The brake fluid level should be close to the "MA X" mark. If it is not, check
t
he brake pad wear.
Brake fluid level
Changing the fluid
Refer to the manufacturer's service schedule for details of the interval for this operation.
Fluid specification
The brake fluid must conform to the manufacturer's r ecommendations.
Topping-up the engine oil level
The location of the oil filler cap is shown in the
corresponding underbonnet layout view.
F
U
nscrew the oil filler cap to reveal the filler
aperture.
F
A
dd oil in small quantities, avoiding any
s
pills on engine components (risk of fire).
F
W
ait a few minutes before checking the
l
evel again using the dipstick.
F
A
dd more oil if necessary.
F
A
fter checking the level, carefully refit the
o
il filler cap and the dipstick in its tube.
Engine oil change
Refer to the manufacturer's service schedule for details of the interval for this operation.
In
order to maintain the reliability of the engine
a
nd emission control system, never use
a
dditives in the engine oil.
After
topping-up the oil, the check when
s
witching on the ignition with the oil
l
evel indicator in the instrument panel
i
s not valid during the 30 minutes after
t
opping-up.
Oil grade
Before topping-up the oil or changing the oil, c
heck that the oil is the correct grade for your
e
ngine and conforms to the manufacturer's
r
ecommendations.
7
Practical information