torque DATSUN 210 1979 Service Manual
[x] Cancel search | Manufacturer: DATSUN, Model Year: 1979, Model line: 210, Model: DATSUN 210 1979Pages: 548, PDF Size: 28.66 MB
Page 356 of 548
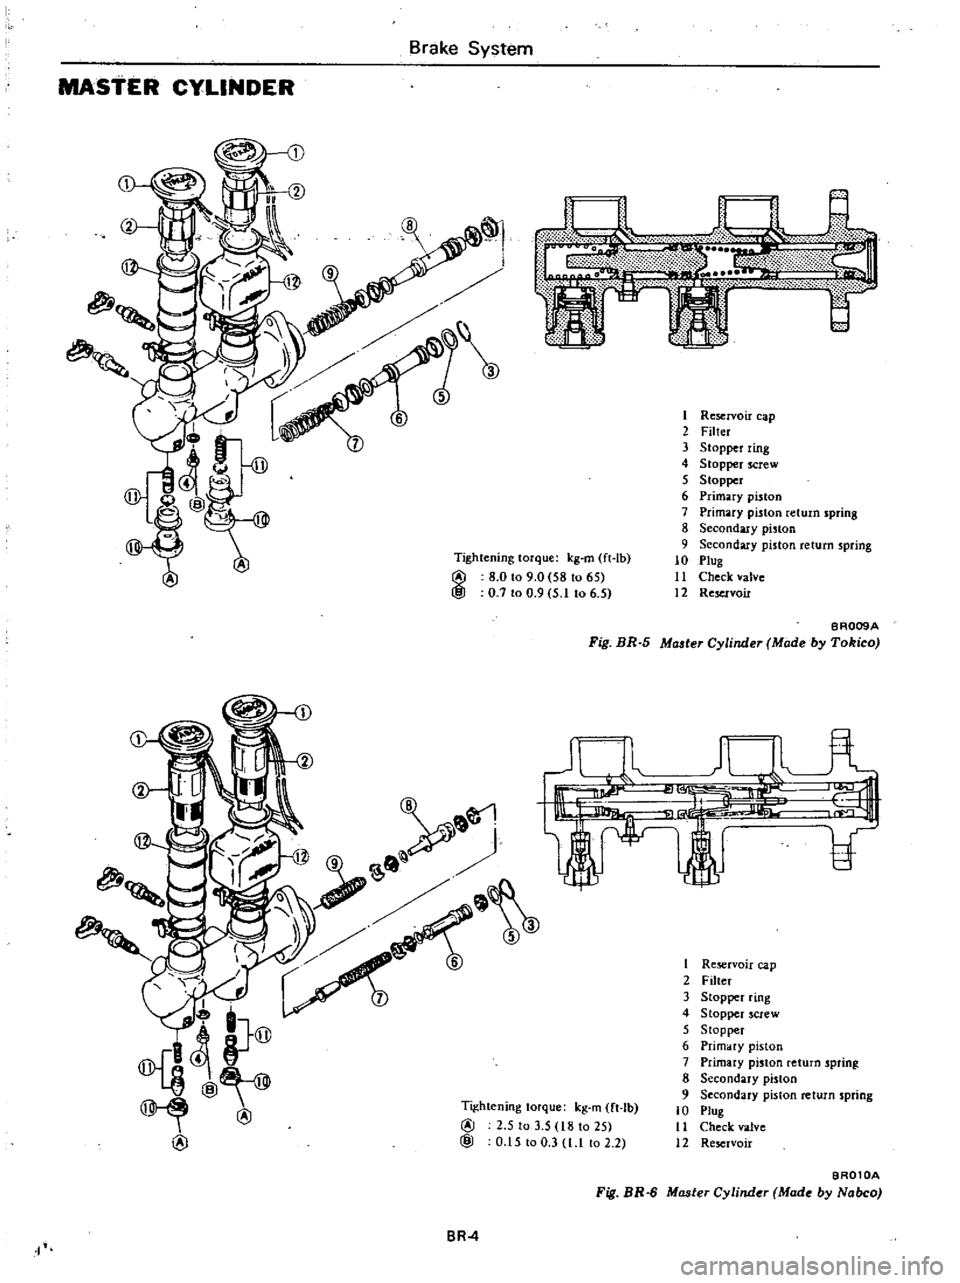
Tightening
torque
kg
m
ft
Ib
@
8
0
to
9
0
581065
@
0
7
to
0
9
5
1
to
6
5
I
Brake
System
MAstER
CYLINDER
I
Reservoir
cap
2
Filter
3
Stopper
ring
4
Stopper
Crew
5
Stopper
6
Primary
piston
7
Primary
piston
return
spring
8
Secondary
piston
9
Secondary
piston
return
spring
10
Plug
11
Check
valve
12
Reservoir
BR009A
Fig
BR
5
Ma
ler
Cylinder
Made
by
Tokico
1
Re
rvoir
cap
2
Filter
3
Stopper
ring
4
Stopper
screw
5
Stopper
6
Primary
piston
7
Primary
pinon
return
spring
8
Secondary
piston
9
Secondary
piston
return
spring
10
Plug
11
Check
valve
12
Reservoir
Tightening
torque
kg
m
ft
Ib
@
2
5
to
3
5
18
10
25
@
0
15
00
3
l
l
o
2
2
BR
4
I
BA010A
Fill
BR
6
Master
Cylinder
Made
by
Nabco
Page 357 of 548
REMOVAL
I
Disconnect
wiring
to
brake
fluid
level
gauge
2
Disconnect
front
and
rear
brake
tubes
from
master
cylinder
CAUTION
When
removing
brake
tubes
use
suitable
tube
wrench
Never
use
open
end
or
edjustllble
wrench
Note
When
disconnecting
brake
tubes
be
sure
to
use
a
container
to
receive
draining
brake
fluid
Use
of
raga
is
also
suggested
to
keep
adjacent
perts
and
area
clean
3
Remove
master
cylinder
securing
nut
Master
cylinder
can
then
be
taken
out
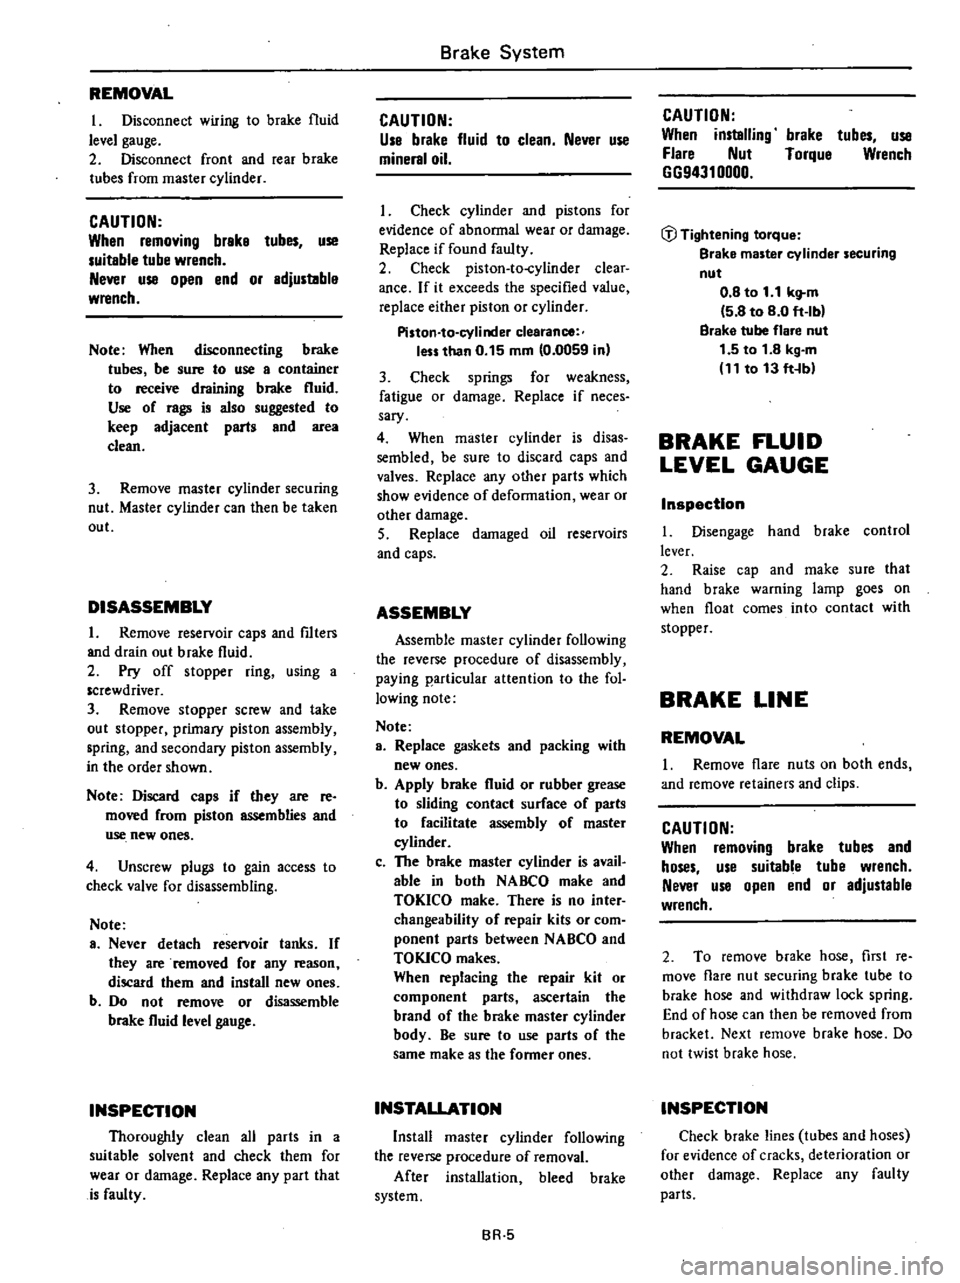
DISASSEMBLY
1
Remove
reservoir
caps
and
filtern
and
drain
out
brake
fluid
2
Pry
off
stopper
ring
using
a
screwdriver
3
Remove
stopper
screw
and
take
out
stopper
primary
piston
assembly
spring
and
secondary
piston
assembly
in
the
order
shown
Note
Discard
caps
if
they
are
reo
moved
from
piston
assemblies
and
use
new
ones
4
Unscrew
pluga
to
gain
access
to
check
valve
for
disassembling
Note
a
Never
detach
reservoir
tanks
If
they
are
removed
for
any
reason
discard
them
and
install
new
ones
b
Do
not
remove
or
disassemble
brake
fluid
level
gauge
INSPECTION
Thoroughly
clean
all
parts
in
a
suitable
solvent
and
check
them
for
wear
or
damage
Replace
any
part
that
is
faulty
Brake
System
CAUTION
Use
brake
fluid
to
clean
Never
use
mineral
oil
I
Check
cylinder
and
pistons
for
evidence
of
abnonnal
wear
or
damage
Replace
if
found
faulty
2
Check
piston
to
cylinder
clear
ance
If
it
exceeds
the
specified
value
replace
either
piston
or
cylinder
Piston
to
cylinder
clearance
less
than
0
15
mm
0
0059
in
3
Check
springs
for
weakness
fatigue
or
damage
Replace
if
neces
sary
4
When
master
cylinder
is
disas
sembled
be
sure
to
discard
caps
and
valves
Replace
any
other
parts
which
show
evidence
of
deformation
wear
or
other
damage
S
Replace
damaged
oil
reservoirs
and
caps
ASSEMBLY
Assemble
master
cylinder
following
the
reverse
procedure
of
disassembly
paying
particular
attention
to
the
fol
lowing
note
Note
a
Replace
gaskets
and
packing
with
new
ones
b
Apply
brake
fluid
or
rubber
grease
to
sliding
contact
surface
of
parts
to
facilitate
assembly
of
master
cylinder
c
The
brake
master
cylinder
is
avail
able
in
both
NABCO
make
and
TOKICO
make
There
is
no
inter
changeability
of
repair
kits
or
com
ponent
parts
between
NABCO
and
TOKlCO
makes
When
replacing
the
repair
kit
or
component
parts
ascertain
the
brand
of
the
brake
master
cylinder
body
Be
sure
to
use
parts
of
the
same
make
as
the
fonner
ones
INSTALLATION
Install
master
cylinder
following
the
reverse
procedure
of
removal
After
installation
bleed
brake
system
BR
5
CAUTION
When
installing
Flare
Nut
6694310000
brake
tubes
use
Torque
Wrench
CiJ
Tightening
torque
Brake
master
cylinder
securing
nut
0
8
to
t
1
kg
m
5
8
to
8
0
ft
lb
Brake
tube
flare
nut
1
5
to
1
8
kg
m
11
to
13
ft
b
BRAKE
FLUID
LEVEL
GAUGE
Inspection
I
Disengage
hand
brake
control
lever
2
Raise
cap
and
make
sure
that
hand
brake
warning
lamp
goes
on
when
float
comes
into
contact
with
stopper
BRAKE
LINE
REMOVAL
I
Remove
flare
nuts
on
both
ends
and
remove
retainers
and
clips
CAUTION
When
removing
brake
tubes
and
hoses
use
suitable
tube
wrench
Never
use
open
end
or
adjustable
wrench
2
To
remove
brake
hose
first
re
move
flare
nut
securing
brake
tube
to
brake
hose
and
withdraw
lock
spring
End
of
hose
can
then
be
removed
from
bracket
Next
remuve
brake
hose
Do
not
twist
brake
hose
INSPECTION
Check
brake
lines
tubes
and
hoses
for
evidence
of
cracks
deterioration
or
other
damage
Replace
any
faulty
parts
Page 358 of 548
If
leakage
oCcurs
at
end
around
joints
re
tighten
Of
if
necessary
re
place
faulty
parts
INSTALLATION
Pay
particular
attention
to
follow
ing
instructions
when
installing
brake
lines
I
Leave
a
sulfident
space
between
brake
lines
and
adjacent
parts
so
that
brake
lines
are
completely
free
from
vibration
during
driving
2
Be
careful
not
to
warp
or
twist
brake
lines
3
When
installing
brake
tube
keep
a
certain
distance
between
tube
and
adjacent
parts
as
follows
Tube
to
rotating
parts
30
mm
1
18
in
Tube
to
moving
parts
10
mm
10
39
in
Tube
to
other
palls
5
mm
10
20
in
4
Always
fasten
brake
tubes
with
mounting
clips
where
necessary
On
rear
axle
case
are
two
double
dips
which
should
be
used
to
secure
brake
tubes
in
manner
described
be
low
Bend
short
clip
straight
up
With
brake
tube
on
long
clip
bend
clip
up
and
around
tube
Finally
wrap
short
clip
around
tube
to
secure
the
in
slallation
f
J
i
2
BA141
Fig
BR
7
Fastening
Brake
Tube
Securely
with
Double
Clip
5
Do
not
tighten
brake
line
mount
ing
flare
nut
excessively
CAUTION
When
installing
Fla
e
Nut
6694310000
brake
tubes
use
Torque
Wrench
Brake
System
t
D
Tightening
torque
Brake
tube
flare
nut
1
5
to
1
8
kg
m
11
to
13
ft
lb
Brake
hose
connector
1
7
to
2
0
kg
m
112
to
14
ft
lb
J
way
connector
bolt
0
8
to
1
1
kltm
5
8
to
8
0
ft
Ib
NP
VALVE
Front
wheel
cylinder
Front
wheel
cylinder
Master
cylinder
front
jde
6
Upon
completion
of
installation
of
brake
lines
bleed
air
out
of
brake
lines
Rear
wheel
cylinder
BR114A
Master
cylinder
rear
side
Fig
BR
B
NP
Valve
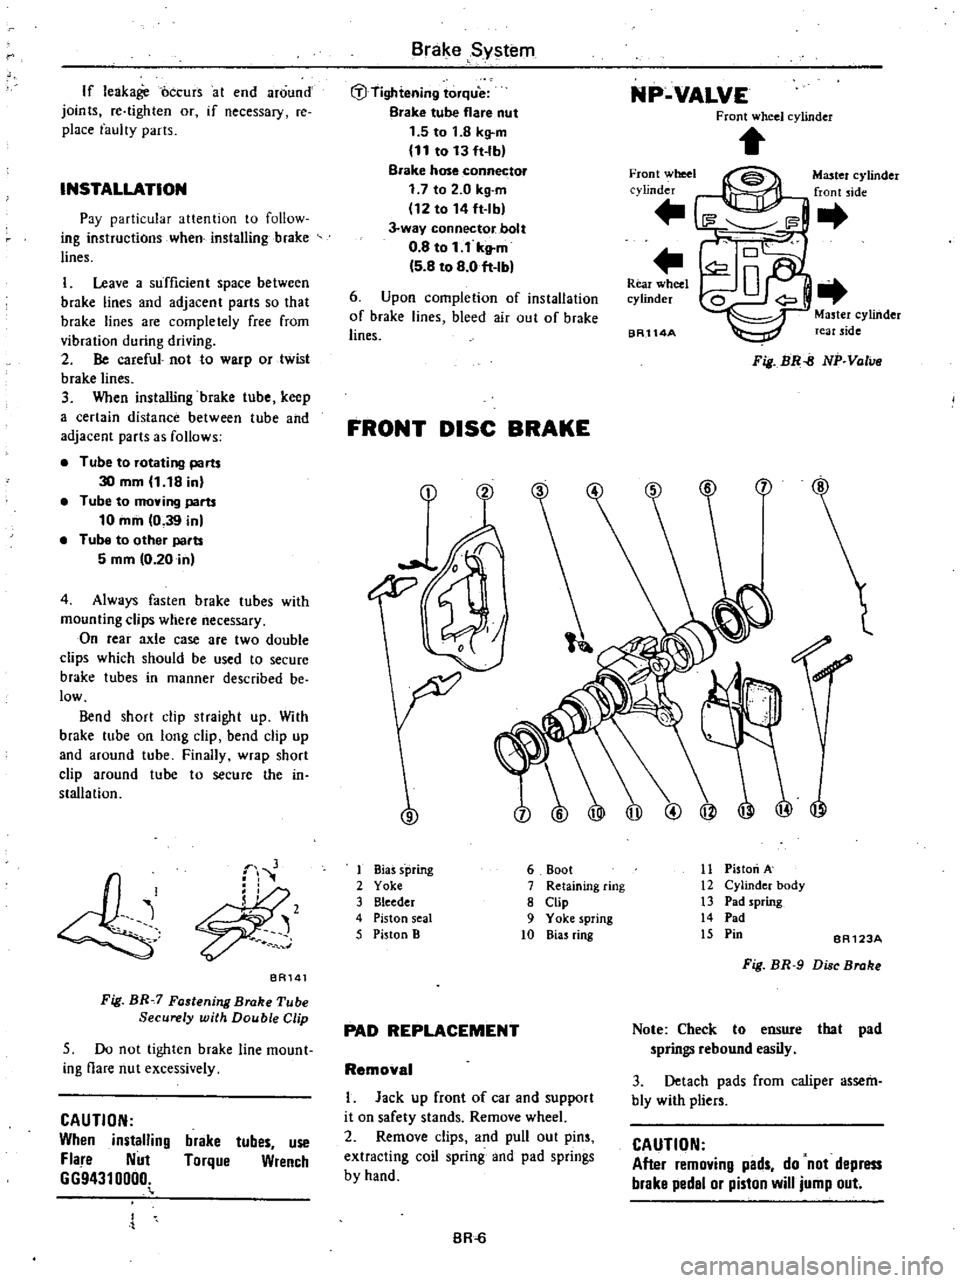
FRONT
DISC
BRAKE
9
ilJ
I
Bias
s
pring
2
Yoke
3
Bleeder
4
Piston
seal
5
Piston
B
11
Piston
A
12
Cylinder
body
13
Pad
spring
14
Pad
15
Pin
6
Boot
7
Retaining
ring
8
Clip
9
Yoke
spring
10
Bias
ring
BR123A
Fig
BR
9
Di
c
Broke
PAD
REPLACEMENT
Note
Check
to
ensure
that
pad
springs
rebound
easily
3
Detach
pads
from
caliper
assem
bly
with
pliers
Removal
I
Jack
up
front
of
car
and
support
it
on
safety
stands
Remove
wheel
2
Remove
clips
and
pull
out
pins
extracting
coil
spring
and
pad
springs
by
hand
CAUTION
After
removing
pads
do
not
depress
brake
pedal
or
piston
will
jump
out
BR
Page 363 of 548

6
Apply
P
B
C
grease
to
yoke
slid
ing
part
of
cylinder
Then
reposition
bias
ring
so
that
groove
of
bias
ring
coincides
with
yoke
7
Leaving
yoke
springs
inserted
lightly
into
cylinder
groove
assemble
cylinder
body
and
yoke
by
pushing
or
tapping
yoke
lightly
BA570
Fig
BR
19
A
embling
Yoke
and
Cylinder
8
Install
air
bleeder
valve
on
caliper
INSTAlLATION
1
Install
in
reverse
procedure
of
removal
CAUTION
When
installing
brake
tube
use
Flare
Nut
Torque
Wrench
6694310000
fJ
Tightening
tOlque
Calipel
securing
bolts
4
6
to
6
1
kll
m
33
to
44
ft
lb
Brake
tube
flere
nuts
1
5to
1
8
kg
m
11
to
13
ft
Ib
2
After
installing
pad
bleed
air
from
system
Brake
System
ROTOR
REMOVAL
Refer
to
Front
Axle
Section
FA
for
removal
Note
As
this
value
increases
wear
occurs
progressively
vibration
cor
responding
to
revolution
of
tire
may
often
be
tmnsmitted
to
in
terior
of
car
INSPECTION
Check
the
following
items
and
if
necessary
replace
Checks
can
be
made
by
removing
only
wheel
Sliding
surface
If
there
are
cracks
or
considerable
chips
replace
2
Runout
Adjust
wheel
bearing
correctly
Using
a
dial
gauge
measure
runout
at
the
center
of
rotor
pad
contact
sur
face
Runout
limit
less
than
0
12
mm
0
0047
in
Total
indicator
reading
BR025A
Fig
BR
20
Mecuuring
Runout
3
Parallelism
Measure
thickness
of
entire
periph
cry
of
rotor
using
a
micrometer
Parallelism
when
new
less
than
0
03
mm
0
0012
in
BR
9
Fig
BR
21
Measuring
Parallelism
4
Thickness
If
rotor
thickness
is
beyond
wear
limit
replace
rotor
When
correcting
thickness
be
sure
that
the
thickness
after
correction
does
not
exceed
the
limit
Standard
thickness
10
0
mm
0
394
in
Wear
limit
more
than
8
4
mm
0
331
in
INSTALLATION
Install
rotor
in
reverse
order
of
removal
Adjust
wheel
bearing
preload
correctly
Refer
to
Front
Axle
Sec
tion
FA
for
adjustment
ifl
Tightening
torque
Rotor
to
wheel
hub
3
9
to
5
3
kg
m
28
to
38
ft
rb
Page 364 of 548
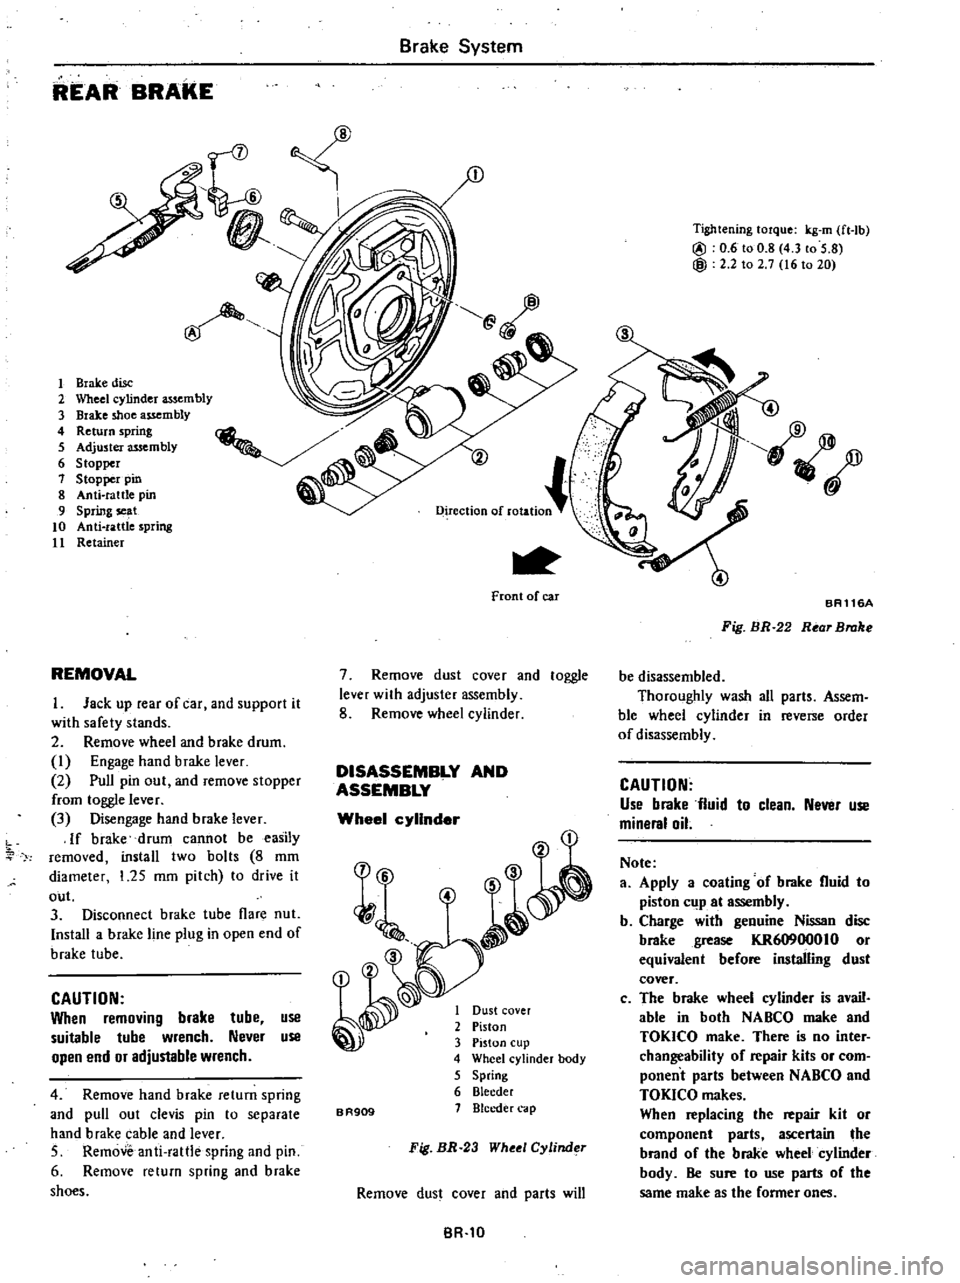
REAR
BRAKE
1
Brake
disc
2
Wheel
cylinder
assembly
3
Brake
shoe
assembly
4
Return
spring
5
Adjuster
assembly
6
Stopper
1
Stopper
pin
8
Anti
rattle
pin
9
Spring
se
t
10
Anti
rattle
spring
11
Retainer
REMOVAL
L
Jack
up
rear
of
car
and
support
it
with
safety
stands
2
Remove
wheel
and
brake
drum
I
Engage
hand
brake
lever
2
Pull
pin
out
and
remove
stopper
from
toggle
lever
3
Disengage
hand
brake
lever
If
brake
drum
cannot
be
easily
removed
install
two
baIts
8
mm
diameter
I
25
mm
pitch
to
drive
it
out
3
Disconnect
brake
tube
flare
nut
Install
a
brake
line
plug
in
open
end
of
brake
tube
CAUTION
When
removing
brake
tube
use
suitable
tube
wrench
Never
use
open
end
or
adjustable
wrench
4
Remove
hand
brake
return
spring
and
pull
out
clevis
pin
to
separate
hand
brake
cable
and
lever
5
Remove
anti
rattle
spring
and
pin
6
Remove
return
spring
and
brake
shoes
Brake
System
Dueetio
of
ro
tiO
Front
of
car
7
Remove
dust
cover
and
toggle
lever
with
adjuster
assembly
8
Remove
wheel
cylinder
DISASSEMBLY
AND
ASSEMBLY
Wheel
cylinder
BR909
I
Dust
cover
2
Piston
3
Piston
cup
4
Wheel
cylinder
body
5
Spring
6
Bleeder
1
Bleeder
cap
Fig
BR
23
Wheel
Cylinder
Remove
dust
cover
and
parts
will
BR
l0
Tightening
torque
kg
m
ft
lb
@
0
6
to
0
8
4
3
ro
5
8
@
2
2
to
2
7
16
to
20
BR116A
Fig
BR
22
Rear
Broke
be
disassembled
Thoroughly
wash
all
parts
Assem
ble
wheel
cylinder
in
reverse
order
of
disassembly
CAUTION
Use
brake
fluid
to
clean
Never
use
mineral
oil
Note
a
Apply
a
coating
of
brake
fluid
to
piston
cliP
at
assembly
b
Charge
with
genuine
Nissan
disc
brake
grease
KR60900010
or
equivalent
before
installing
dust
cover
c
The
brake
wheel
cylinder
is
avail
able
in
both
NABCO
make
and
TOKlCO
make
There
is
no
inter
changeability
of
repair
kits
or
com
ponent
parts
between
NABCO
and
TOKlCO
makes
When
replacing
the
repair
kit
or
component
parts
ascertain
the
brand
of
the
brake
wheel
cylinder
body
Be
sure
to
use
parts
of
the
same
make
as
the
fonner
ones
Page 365 of 548

INSPECTION
Brake
drum
I
Check
inner
diameter
of
brake
drum
to
make
sure
it
is
properly
round
and
tapered
If
it
is
not
repair
or
replace
brake
drum
Inner
diameter
Standard
diametel
203
2
mm
8
in
Maximum
diameter
204
5
mm
8
05
in
Out
of
loundness
ellipticity
less
than
0
02
mm
0
0008
in
Radial
runout
less
than
0
1
mm
0
004
in
Total
indicator
reading
Taper
less
than
0
02
mm
0
0008
in
Measured
at
a
point
40
mm
1
57
in
flam
inlet
2
Contact
surface
with
which
lin
ings
come
into
contact
should
be
fine
finished
with
No
120
to
150
sandpaper
3
Using
a
drum
racer
finish
brake
drum
by
machining
if
it
shows
any
sign
of
score
marks
partial
wear
or
stepped
wear
on
its
contact
surface
Note
After
brake
drum
has
been
completely
re
conditioned
or
re
placed
check
drum
and
shoes
for
proper
contact
pattern
Brake
e
embly
1
Replace
any
linings
which
are
cracked
worn
or
oil
stained
2
If
lining
is
worn
to
less
than
the
specified
value
replace
Lining
wear
limit
Minimum
thickness
1
5
mm
0
059
in
3
Replace
any
shoe
return
springs
which
are
broken
or
fatigued
4
Replace
fatigued
anti
rattle
spring
damaged
pin
and
or
retainer
Wheel
cylinder
I
Replace
any
cylinder
or
piston
which
is
scratched
scored
or
worn
on
its
sliding
contact
surface
Brake
System
2
Replace
worn
parts
if
piston
to
cylinder
clearance
is
beyond
limit
Piston
ta
cylinder
clearance
less
than
0
15
mm
0
0059
in
3
Replace
any
piston
cup
which
is
worn
or
otherwise
damaged
4
Replace
if
contacting
face
of
cyl
inder
and
shoe
is
worn
locally
or
in
step
5
Replace
any
damaged
dust
cover
fatigued
piston
spring
or
faulty
thread
ed
parts
6
Replace
any
tube
connector
which
is
worn
on
its
threaded
portion
INSTALLATION
Install
rear
brake
in
reverse
order
of
removal
closely
observing
the
follow
ing
1
Tighten
following
parts
to
speci
fied
torque
CAUTION
When
installing
brake
tube
use
Flare
Nut
Torque
Wrench
6694310000
ifl
Tightening
torque
Flared
nut
1
5
to
1
8
kg
m
11
to
13
fHb
Ail
bleedel
0
7
to
0
9
kg
m
15
1
to
6
5
ft
Ib
Wheel
cylinder
mounting
bolt
0
6
to
0
8
kg
m
4
3
to
5
8
ft
b
2
There
are
two
types
of
adjusters
which
have
right
thread
or
left
thread
R
H
brake
Right
thread
adjuster
L
H
brake
Left
thread
adjuster
3
Sparingly
apply
a
coat
of
brake
grease
to
the
following
points
Lubricating
points
e
Adjuster
nut
and
rod
threads
Mating
surfaces
between
adjuster
and
toggle
lever
and
pin
and
roller
BR
ll
0
J
o
BR
117
A
Fig
BR
24
Lubricating
Points
of
Adju
ter
4
Referring
to
Fig
BR
25
for
locations
of
lubricating
points
apply
a
coat
of
brake
grease
to
these
points
Exercise
care
not
to
allow
grease
to
come
into
contact
with
lining
or
ad
juster
screws
Lubricating
points
e
Contact
areas
between
wheel
cyl
inder
anchor
block
and
brake
shoe
e
Mating
surfaces
between
brake
shoe
and
brake
disc
Contact
areas
between
hand
brake
adjuster
and
brake
shoe
Contact
areas
between
brake
disc
brake
shoe
and
toggle
lever
Contact
areas
between
anti
rattle
pin
spring
retainer
and
brake
shoe
Fig
BR
25
Lubricating
Points
5
To
prevent
water
from
entering
brake
drum
apply
dry
sealant
to
brake
disc
mounting
surfaces
of
the
follow
ing
parts
Wheel
cylinder
Anti
rattle
spring
6
Make
sure
that
entire
brake
shoe
fits
in
place
7
Make
sure
that
adjuster
operates
properly
8
After
installation
is
completed
check
and
adjust
shoe
to
drum
clear
ance
by
operating
hand
brake
several
times
9
Bleed
brake
system
Page 367 of 548

Relationship
between
oil
pressure
and
pedal
operating
force
is
illustrated
in
Fig
BR
29
If
test
results
are
not
as
specified
in
Fig
BR
29
check
brake
booster
for
condition
in
manner
des
cribed
under
Inspection
before
re
moval
of
this
unit
REMOVAL
M60
120
1
710
AA
I
1
1
110
1
560
1
v
e
100
1
420
I
90
1
280
I
1
1
80
1
140
I
Z
I
t
70
1
000
i
60
850
I
o
50
710
d
40
570
g
i
gl
j
ll
10
140
J
0
1
0
2
0
221
441
Rod
operating
force
kg
lb
Brake
System
Also
check
brake
line
for
evidence
of
fluid
leakage
Note
Detennine
whether
source
of
problem
is
in
brake
booster
or
check
valve
Before
you
reach
a
fmal
conclusion
always
inspect
check
valve
first
o
10
20
30
40
50
22
44
66
88
110
Pedal
operating
force
kg
lb
BA121A
Fig
BR
29
Performance
Diagram
of
Brake
Booster
Remo
parts
in
numerical
order
enumerated
BR593
ti
J
Fig
BR
30
Procedures
for
Removing
Brake
Booster
ADJUSTMENT
I
Adjust
the
length
of
push
rod
to
the
value
indicated
below
Length
ad
justment
of
push
rod
is
made
at
the
tip
of
push
rod
Length
A
9
75
to
10
00
mm
0
3839
to
0
3937
in
j
f
Irl
I
l
if
L
J
BA290
Fig
BR
31
Length
A
BR
13
BR288
Fig
BR
32
Adjusting
Push
Rod
Length
2
Install
clevis
Adjust
length
of
operating
rod
to
specified
value
length
B
135
mm
5
31
in
c
f
lIJ
t
t
B
BR947
Fig
BR
33
Length
B
INSTALLATION
Install
in
the
reverse
sequence
of
removaJ
IiJ
Tightening
torque
Master
cylinder
to
brake
booster
0
8
to
1
1
kg
m
5
8
to
8
0
ft
Ib
Brake
booster
to
body
0
8
to
1
1
kg
m
5
8
to
8
0
ft
lbl
Note
After
brake
boOster
is
properly
installed
in
car
conduct
an
air
tight
and
op
rational
tests
as
previously
described
Page 372 of 548
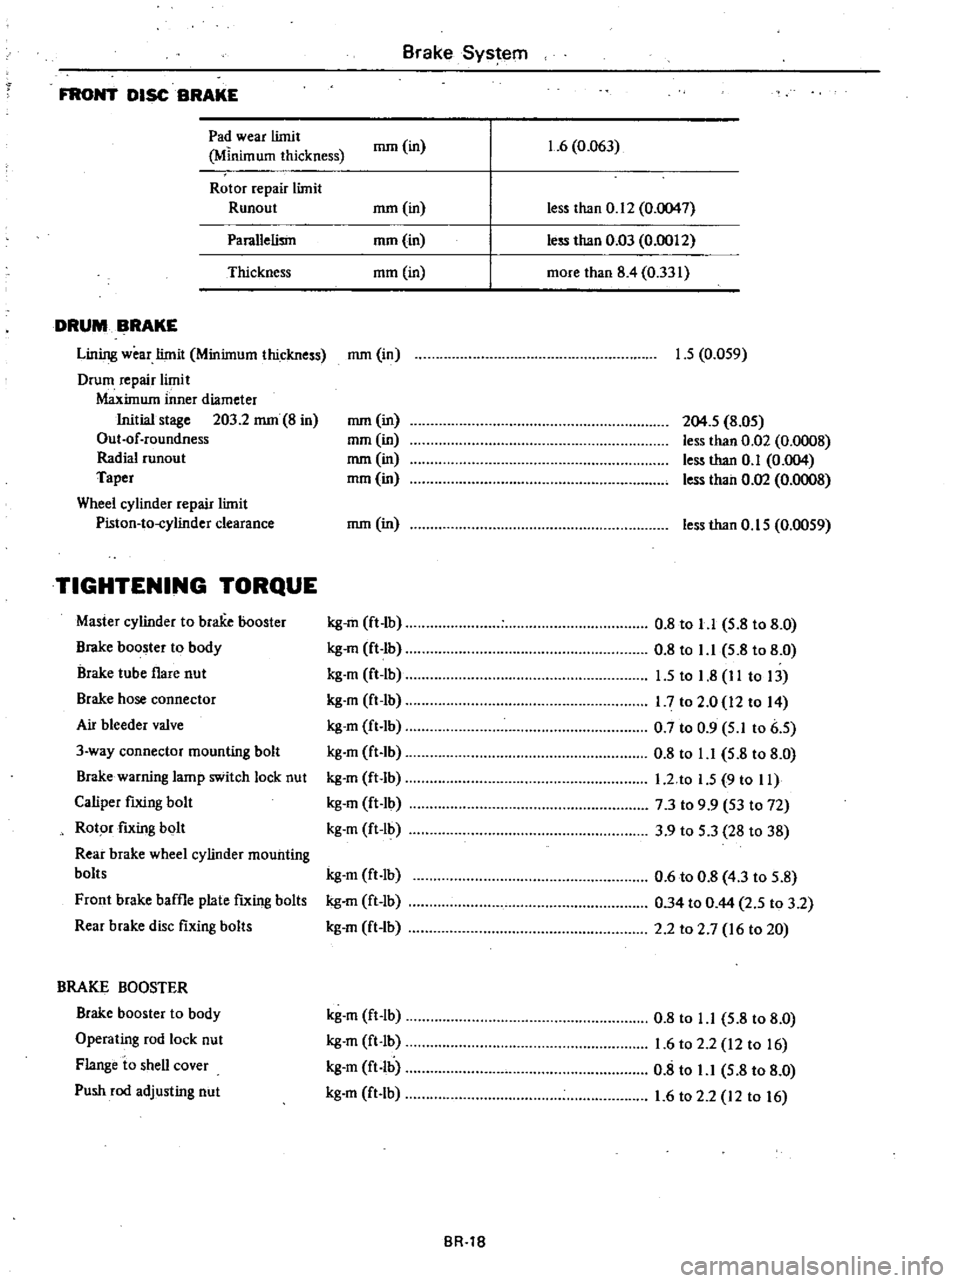
FRONT
DISC
BRAKE
Pad
wear
limit
Minim
urn
thickness
Rotor
repair
limit
Runout
Parallelism
Thickness
DRUM
BRAKE
Lining
wear
limit
Minimum
thickness
Drum
repair
limit
Maximum
inner
diameter
Initial
stage
203
2
nun
8
in
Out
of
roundness
Radial
cunout
Taper
Wheel
cylinder
repair
limit
Piston
to
cylinder
clearance
TIGHTENING
TORQUE
Master
cylinder
to
brake
booster
Brake
booster
to
body
Brake
tube
flare
nut
Brake
hose
connector
Air
bleeder
valve
3
way
connector
mounting
bolt
Brake
warning
lamp
switch
lock
nut
Caliper
fixing
bolt
Rotor
fixing
bolt
Rear
brake
wheel
cylinder
mounting
bolts
Front
brake
baffle
plate
fixing
bolts
Rear
brake
disc
fixing
bolts
BRAKE
BOOSTER
Brake
booster
to
body
Operating
rod
lock
nut
Flange
io
shell
cover
Push
rod
adjusting
nut
nun
in
nun
in
nun
in
mm
in
nun
in
nun
in
mm
in
nun
in
mm
in
nun
in
kg
m
ft
lb
kg
m
ft
lb
kg
m
ft
Ib
kg
m
ft
lb
kg
m
ft
Ib
kg
m
ft
lb
kg
m
ft
Ib
kg
m
ft
lb
kg
m
ft
Ib
kg
m
ft
lb
kg
m
ft
Ib
kg
m
ft
Ib
kg
m
ft
lb
kg
m
ft
lb
kg
m
ft
lb
kg
m
ft
lb
Brake
System
BR
1B
1
6
0
063
less
than
0
12
0
0047
less
than
0
03
0
0012
more
than
8
4
0
331
1
5
0
059
204
5
8
05
less
than
0
02
0
0008
less
than
0
1
0
004
less
than
0
02
0
0008
less
than
0
15
0
0059
0
8
to
1
1
5
8
to
8
0
0
8
to
1
1
5
8
to
8
0
1
5
to
1
8
II
to
13
1
7
to
2
0
12
to
14
0
7
to
0
9
5
1
to
6
5
0
8
to
1
1
5
8
to
8
0
l
2
to
1
5
9
to
II
7
3
to
9
9
53
to
72
3
9
to
5
3
28
to
38
0
6
to
0
8
4
3
to
5
8
0
34
to
0
44
2
5
to
3
2
2
2
to
2
7
16
to
20
0
8
to
1
1
5
8
to
8
0
1
6
to
2
2
12
to
16
0
8
to
1
1
5
8
to
8
0
1
6
to
2
2
12
to
16
Page 375 of 548
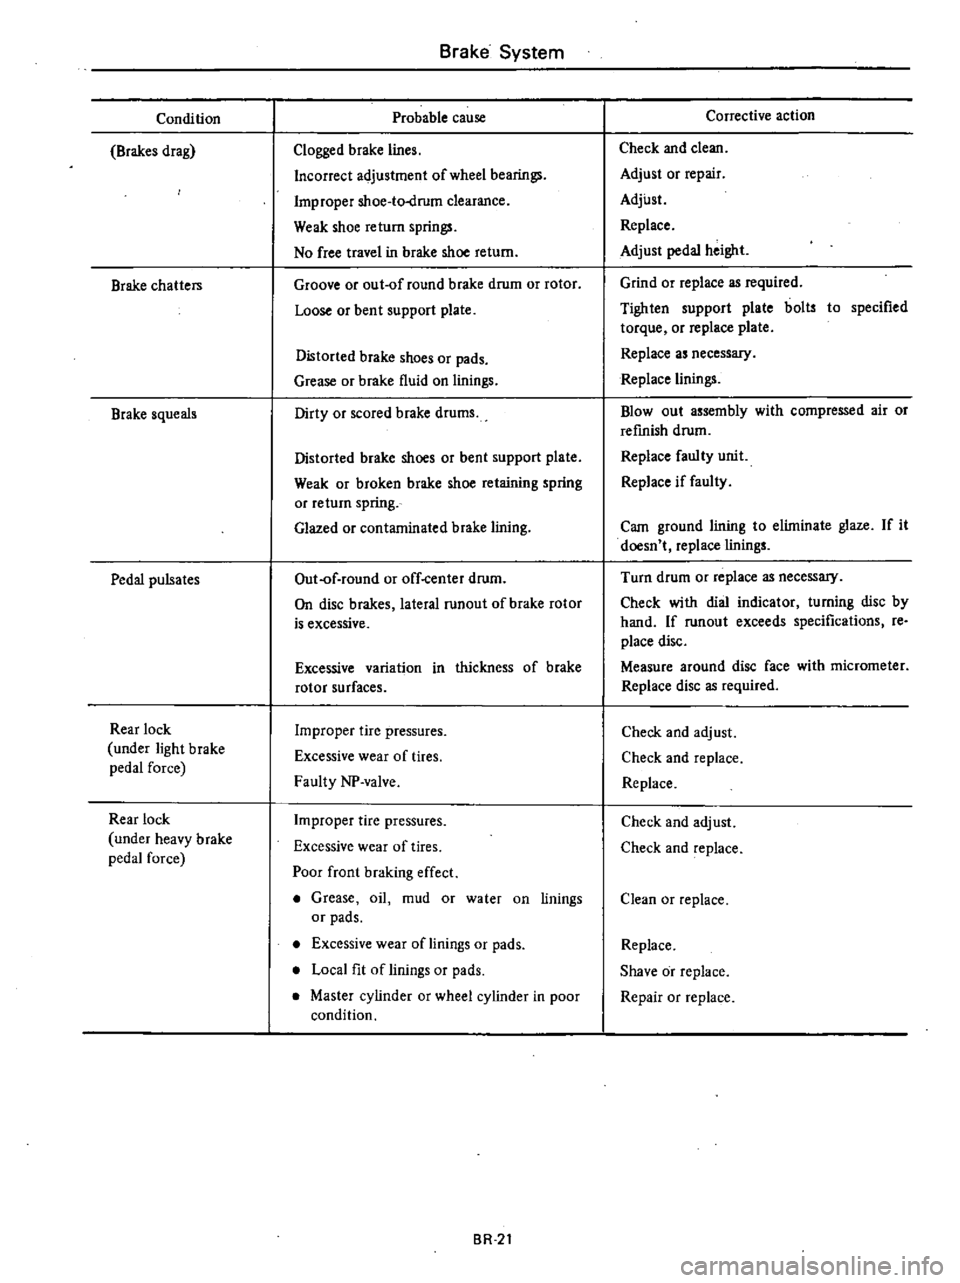
Condition
Brakes
drag
Brake
chatters
Brake
squeals
Pedal
pulsates
Rear
lock
under
light
brake
pedal
force
Rear
lock
under
heavy
brake
pedal
force
Brake
System
Probable
cause
Clogged
brake
lines
Incorrect
adjustment
of
wheel
bearings
Improper
shoe
to
drum
clearance
Weak
shoe
return
springs
No
free
travel
in
brake
shoe
return
Groove
or
out
of
round
brake
drum
or
rotor
Loose
or
bent
support
plate
Distorted
brake
shoes
or
pads
Grease
or
brake
fluid
on
linings
Dirty
or
scored
brake
drums
Distorted
brake
shoes
or
bent
support
plate
Weak
or
broken
brake
shoe
retaining
spring
or
return
spring
Glazed
or
contaminated
brake
lining
Out
of
round
or
off
center
drum
On
disc
brakes
lateral
runout
of
brake
rotor
is
excessive
Excessive
variation
in
thickness
of
brake
rotor
surfaces
Improper
tire
pressures
Excessive
wear
of
tires
Faulty
NP
valve
Improper
tire
pressures
Excessive
wear
of
tires
Poor
front
braking
effect
Grease
oil
mud
or
water
on
linings
or
pads
Excessive
wear
of
linings
or
pads
Local
fit
of
linings
or
pads
Master
cylinder
or
wheel
cylinder
in
poor
condition
BR
2t
Corrective
action
Check
and
clean
Adjust
or
repair
Adjust
Replace
Adjust
pedal
height
Grind
or
replace
as
required
Tighten
support
plate
bolts
to
specified
torque
or
replace
plate
Replace
as
necessary
Replace
linings
Blowout
assembly
with
compressed
air
or
refinish
drum
Replace
faulty
unit
Replace
if
faulty
Cam
ground
lining
to
elilninate
glaze
If
it
doesn
t
replace
linings
Turn
drum
or
replace
as
necessary
Check
with
dial
indicator
turning
disc
by
hand
If
runout
exceeds
specifications
re
place
disc
Measure
around
disc
face
with
micrometer
Replace
disc
as
required
Check
and
adjust
Check
and
replace
Replace
Check
and
adjust
Check
and
replace
Clean
or
replace
Replace
Shave
or
replace
Repair
or
replace
Page 376 of 548
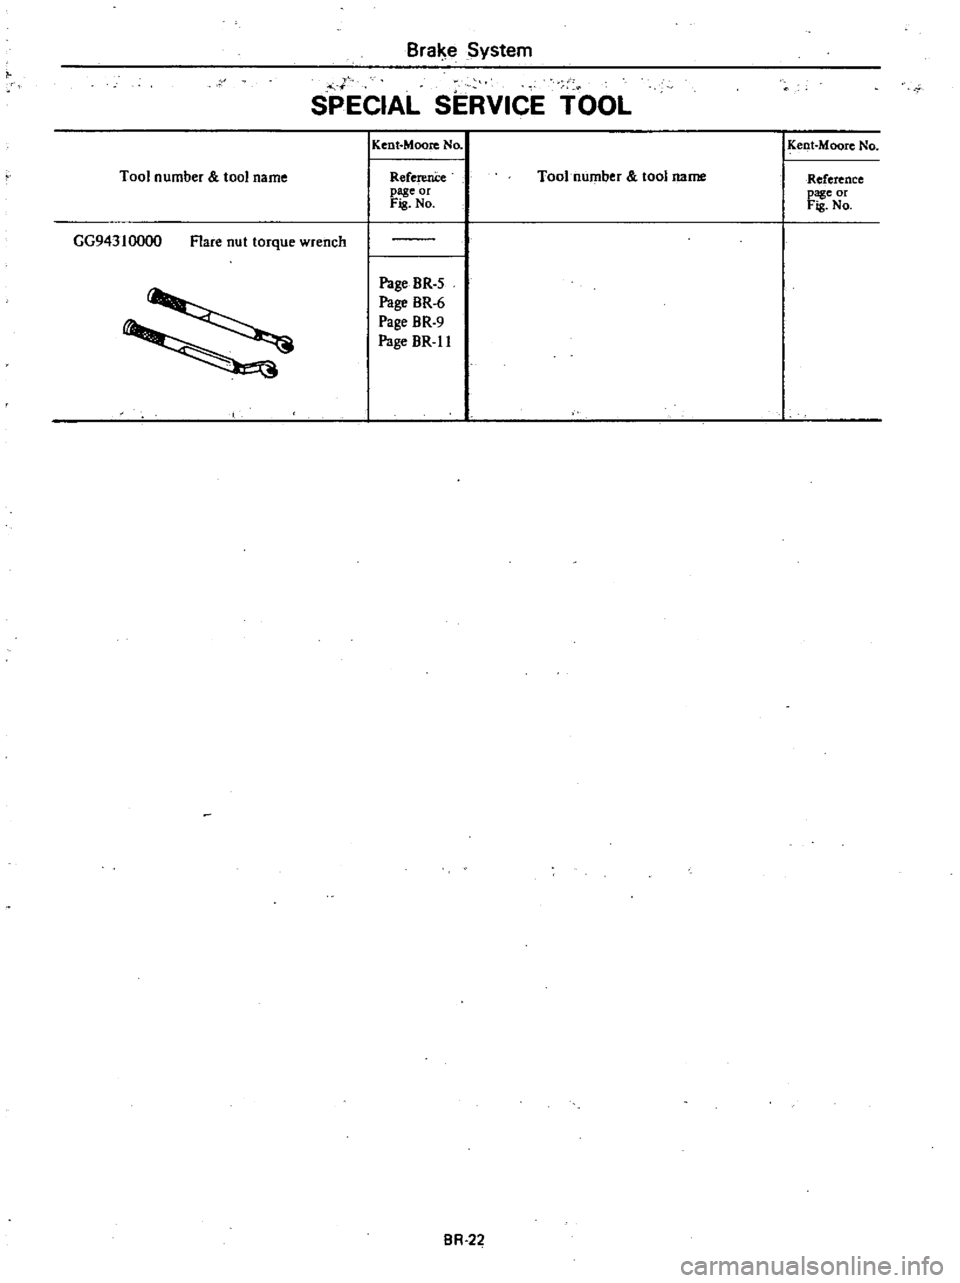
Tool
number
tool
name
Braise
System
1
1
SPECIAL
SERVICE
TOOL
GG94310000
Flare
nut
torque
wrench
Kent
Moore
No
ReferenCe
page
or
Fis
No
Page
BR
5
Page
BR
6
Page
BR
9
Page
BR
II
BR
22
Kent
Moore
No
Tool
number
tool
name
Reference
page
or
Fis
No