DATSUN 510 1968 Service Repair Manual
Manufacturer: DATSUN, Model Year: 1968, Model line: 510, Model: DATSUN 510 1968Pages: 252, PDF Size: 12.2 MB
Page 121 of 252
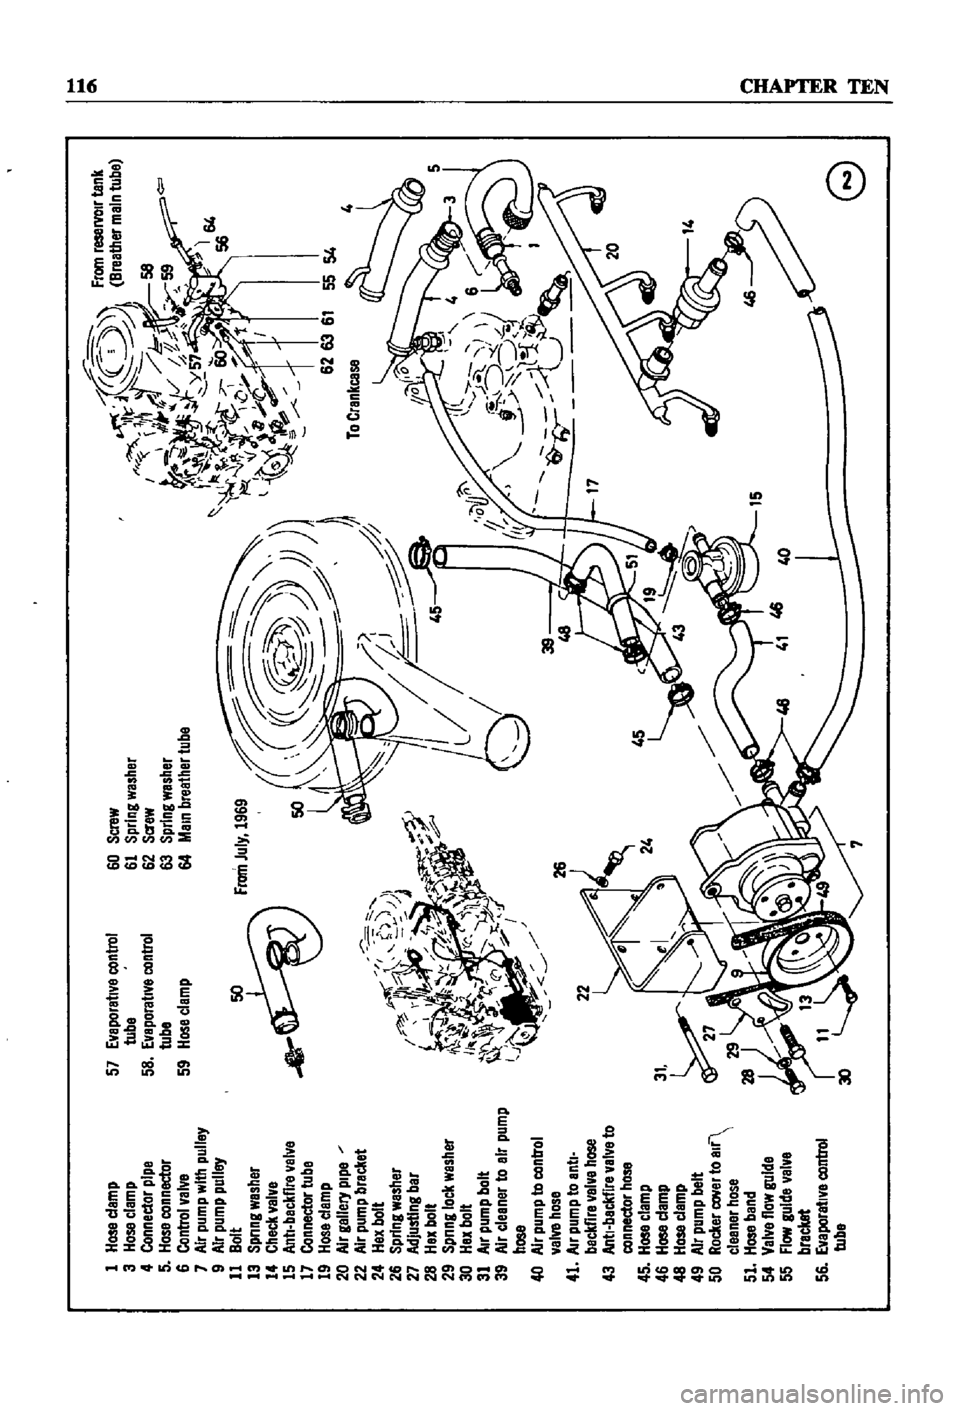
1
Hose
clemp
3
Hose
clamp
4
Connector
pipe
5
Hose
connector
6
Control
valve
7
Air
pump
with
pulley
9
Air
pump
pulley
11
Bolt
13
Spnng
washer
14
Check
valve
15
Antl
beckllre
elve
17
Connector
tube
19
Hose
c1emp
20
Air
gellery
pipe
22
Air
pum
p
bracket
24
Hex
bolt
26
Spring
washer
27
Adjusting
bar
28
Hex
bolt
29
Spnng
lock
washer
30
Hex
bolt
31
Air
pump
bolt
39
Air
c1eener
to
air
pump
hose
40
Air
pump
to
control
alve
hose
41
Air
pump
to
anti
beckllre
velve
hose
43
Antl
backllre
valve
to
connector
hose
45
Hose
clemp
46
Hose
clemp
48
Hose
c1emp
49
Air
pump
belt
50
Rocker
cover
to
alf
clBllner
hosa
51
Hose
band
54
Velve
1I0w
guide
55
Flow
gulda
valve
brackBt
56
Eveporatlve
control
tube
57
Evaporative
control
tube
58
Eveporatlve
control
tube
59
Hose
clamp
60
Screw
61
Spring
washer
62
Screw
63
Spring
washer
64
Main
breather
tube
50
15
i
Page 122 of 252
EMISSION
CONTROL
SYSTEM
117
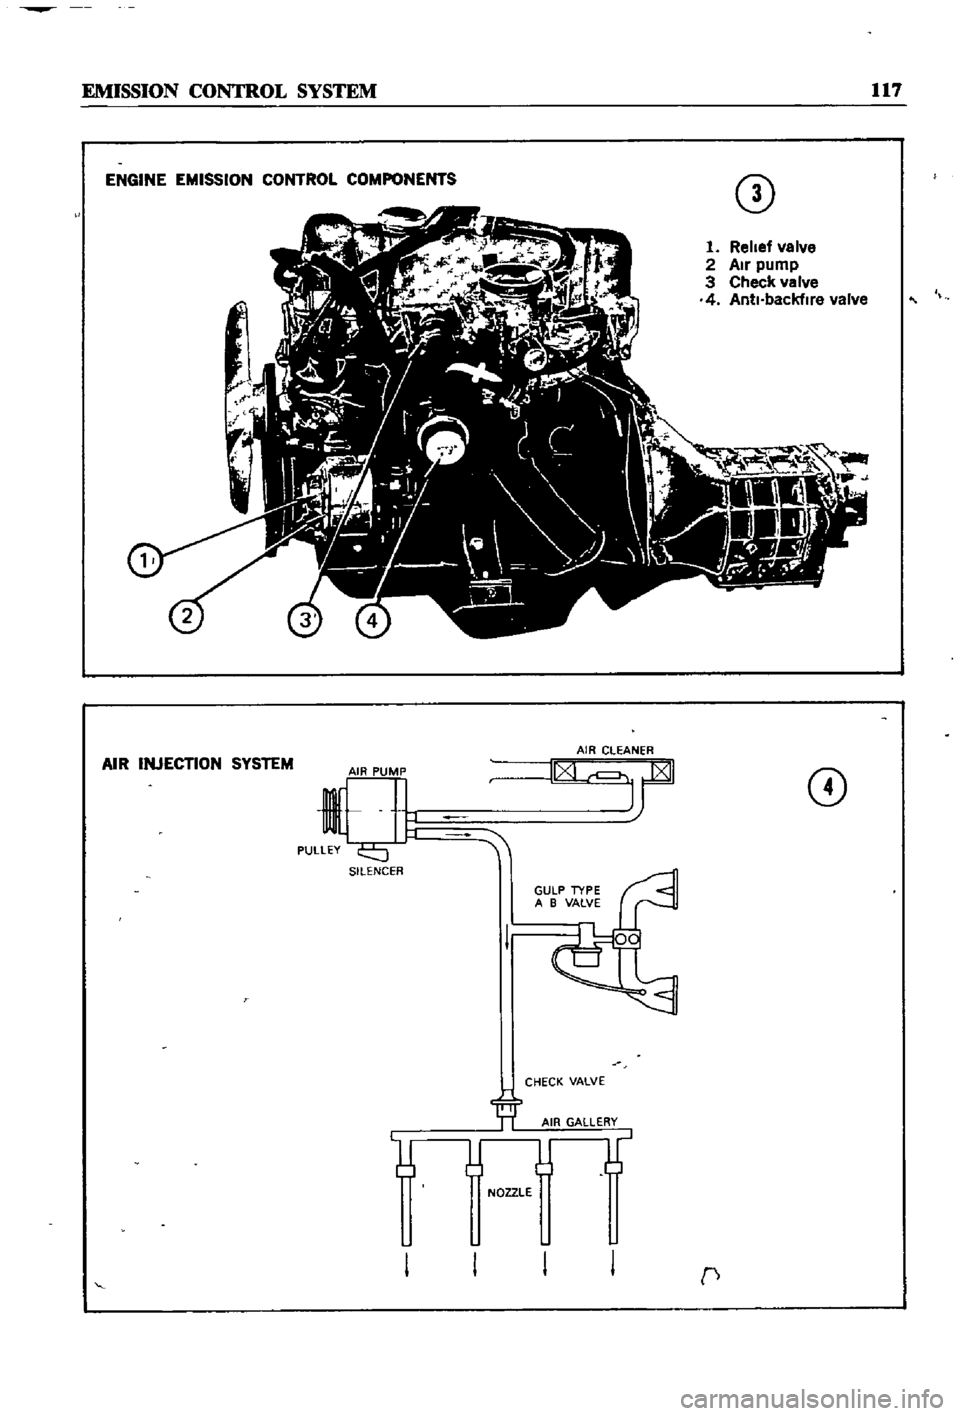
ENGINE
EMISSION
CONTROL
COMPONENTS
CD
1
Relief
valve
2
Air
pump
3
Check
valve
4
Anti
backfire
valve
AIR
INJECTION
SYSTEM
CD
SILENCER
CHECK
VALVE
NOZZLE
c
Page 123 of 252
0
COO
lL
0
W
GOtl
WITH
M
tlUA
TRt
tlSMISSIOtl
IGNlilON
E
TiE
1
B
v
r
NElli
AI
GEA
SWI1
CH
Cl
lliCH
PEDAl
1
ANSt
ISSION
CA
BllREiO
G
1
0
OIS1
IBll1
O
IGNlilON
COIl
OllAI
POINi
0lSiRI6lliOR
AO
l
ANCED
B
EA
E
REiA
OEO
r
R
SWI1
CH
AI
ACCEI
E
AiOR
PEDAl
S
Nl1C
DETEcTIOG
IDE
ll
E
T
lRO
rrLE
OS
O
1
C
cTI
O
CLOSE
RO
rrLEI
OS
O
l
t
Page 124 of 252
EMISSION
CONTROL
S
IS
TEM
SEDAN
AND
SlATION
YfAGON
Yfl
tH
AUTOMATIC
TRANSMISSION
TO
DISTRIBUTOR
IGNITION
COIL
IGNITION
SWITCH
tnE
RETARDED
BREAKER
POINT
1
SPEED
SWITCH
THROTTLE
SWITCH
SWITCH
DETECTING
WIDE
OPEN
THROTTLE
POSITION
SWITCH
DETECTING
CLOSE
THROTTLE
POS
iION
Q
Z
S
e
l
Page 125 of 252
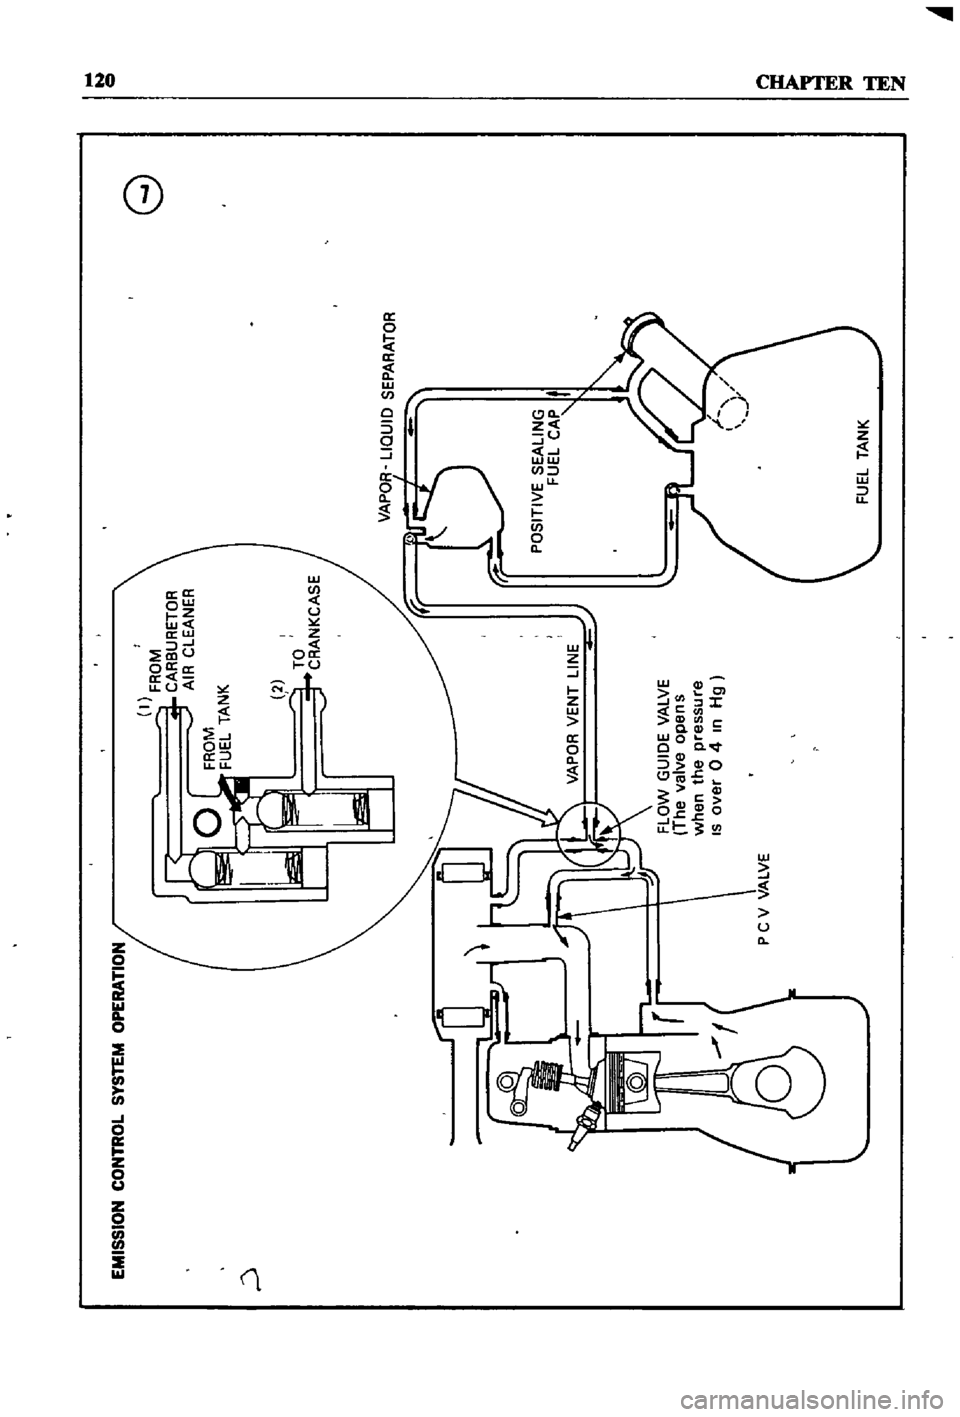
8
EtAISS
ON
CON1tt
o
SYStEtA
OrEft
A1ION
l
fflOM
C
fI
3UflEiOfl
11
1
CLE
NI
R
fROM
fUEL
i
N
lC
fLOW
GUIOE
L
E
1M
Jahre
opens
Vlhen
the
pressure
IS
o
Jer
0
4
In
t
g
fUEL
i
N
lC
s
Page 126 of 252
EMISSION
CONTROL
SYSTEM
121
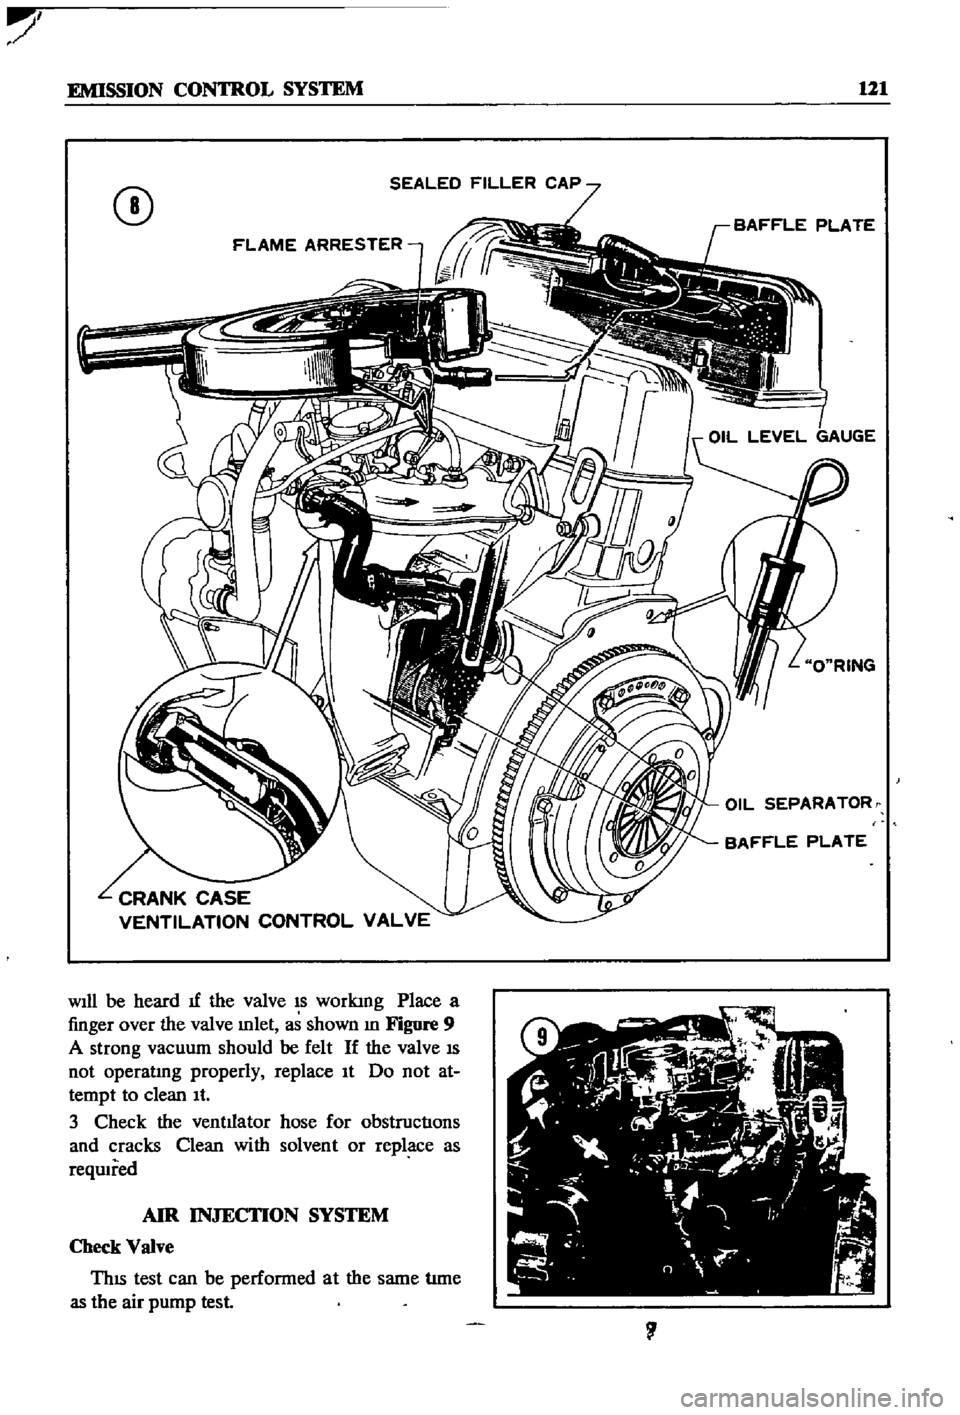
CD
FLAME
ARRESTER
CRANK
CASE
VENTILATION
CONTROL
VALVE
WIll
be
heard
1f
the
valve
IS
workIng
Place
a
finger
over
the
valve
mlet
as
shown
In
Figure
9
A
strong
vacuum
should
be
felt
If
the
valve
IS
not
operatmg
properly
replace
It
Do
not
at
tempt
to
clean
It
3
Check
the
ventilator
hose
for
obstructIons
and
cracks
Clean
with
solvent
or
replace
as
reqwred
AIR
INJECTION
SYSTEM
Check
Valve
ThIS
test
can
be
performed
at
the
same
tIme
as
the
air
pump
test
OIL
SEPARATOR
1
Page 127 of 252
122
CHAPTER
TEN
1
Start
the
engIne
and
bnng
It
up
to
normal
operatIng
temperature
2
Inspect
all
hoses
and
connectIons
for
leaks
and
detenoratIon
Shut
off
the
engme
Replace
any
defectIve
hoses
3
Remove
the
hose
attached
to
the
check
valve
4
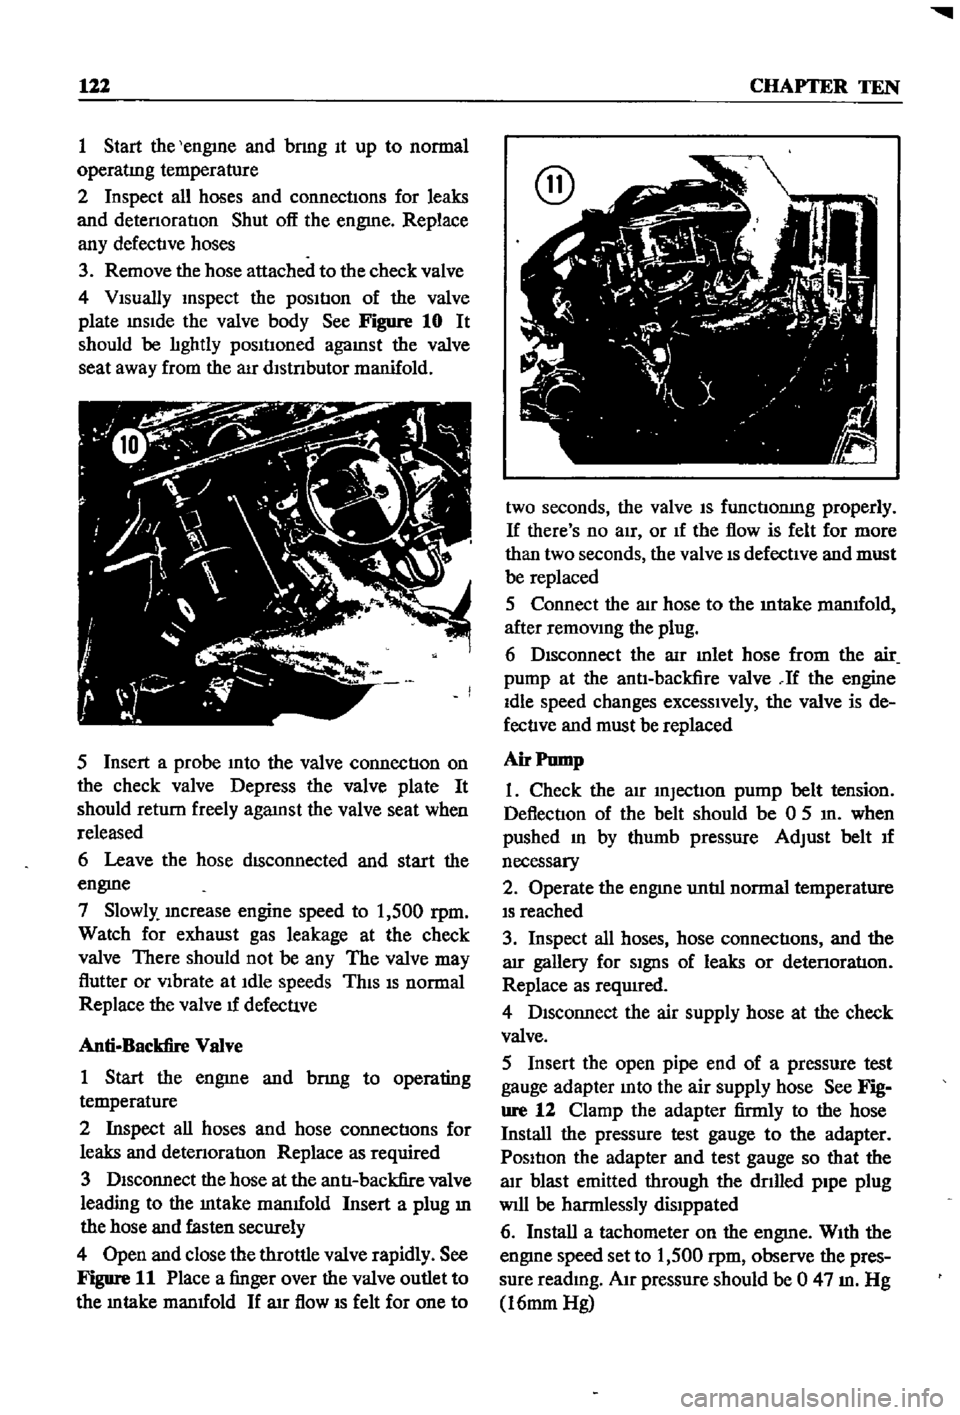
VIsually
Inspect
the
posItIon
of
the
valve
plate
InsIde
the
valve
body
See
Figure
10
It
should
be
lIghtly
posItIoned
agaInst
the
valve
seat
away
from
the
aIr
dlstnbutor
manifold
5
Insert
a
probe
Into
the
valve
connectIon
on
the
check
valve
Depress
the
valve
plate
It
should
return
freely
agaInst
the
valve
seat
when
released
6
Leave
the
hose
dISconnected
and
start
the
engme
7
Slowly
Increase
engine
speed
to
1
500
rpm
Watch
for
exhaust
gas
leakage
at
the
check
valve
There
should
not
be
any
The
valve
may
flutter
or
VIbrate
at
Idle
speeds
ThIS
IS
normal
Replace
the
valve
u
defecuve
Anti
Backfire
Valve
1
Start
the
engme
and
bnng
to
operating
temperature
2
Inspect
all
hoses
and
hose
connectIons
for
leaks
and
detenoratIon
Replace
as
required
3
DIsconnect
the
hose
at
the
antI
backfire
valve
leading
to
the
Intake
manuold
Insert
a
plug
ill
the
hose
and
fasten
securely
4
Open
and
close
the
throttle
valve
rapidly
See
Figure
11
Place
a
finger
over
the
valve
outlet
to
the
m
take
manuold
If
arr
flow
IS
felt
for
one
to
two
seconds
the
valve
IS
functIonIng
properly
If
there
s
no
aIr
or
If
the
flow
is
felt
for
more
than
two
seconds
the
valve
IS
defectIve
and
must
be
replaced
5
Connect
the
alr
hose
to
the
mtake
manuold
after
remOVIng
the
plug
6
DIsconnect
the
aIr
mlet
hose
from
the
air
pump
at
the
antI
backfire
valve
If
the
engine
Idle
speed
changes
excessIvely
the
valve
is
de
fectIve
and
must
be
replaced
Air
Pump
1
Check
the
atr
InjectIon
pump
belt
tension
DeflectIon
of
the
belt
should
be
0
5
In
when
pushed
In
by
thumb
pressure
Adjust
belt
u
necessary
2
Operate
the
engme
untIl
normal
temperature
IS
reached
3
Inspect
all
hoses
hose
connectIons
and
the
arr
gallery
for
SIgnS
of
leaks
or
detenoratIon
Replace
as
required
4
DIsconnect
the
air
supply
hose
at
the
check
valve
5
Insert
the
open
pipe
end
of
a
pressure
test
gauge
adapter
Into
the
air
supply
hose
See
Fig
ure
12
Clamp
the
adapter
firmly
to
the
hose
Install
the
pressure
test
gauge
to
the
adapter
PosItIon
the
adapter
and
test
gauge
so
that
the
alr
blast
emitted
through
the
dnlled
pipe
plug
Will
be
harmlessly
dislppated
6
Install
a
tachometer
on
the
engme
WIth
the
engIne
speed
set
to
1
500
rpm
observe
the
pres
sure
readmg
AIr
pressure
should
be
0
47
m
Hg
16mm
Hg
Page 128 of 252
EMISSION
CONTROL
SYSTEM
123
7
If
the
pressure
does
not
meet
reqwrements
dISconnect
the
aIr
supply
hose
to
the
antI
backfire
valve
Clamp
a
plug
mto
the
hose
and
repeat
the
pressure
test
8
If
the
air
mJection
pump
does
not
meet
the
pressure
specIfication
It
should
be
replaced
NOTE
Repair
of
the
air
injection
pump
is
possible
but
have
the
lob
done
by
your
dealer
9
Close
the
hole
of
the
test
gauge
by
finger
With
the
engme
runnmg
at
1
500
rpm
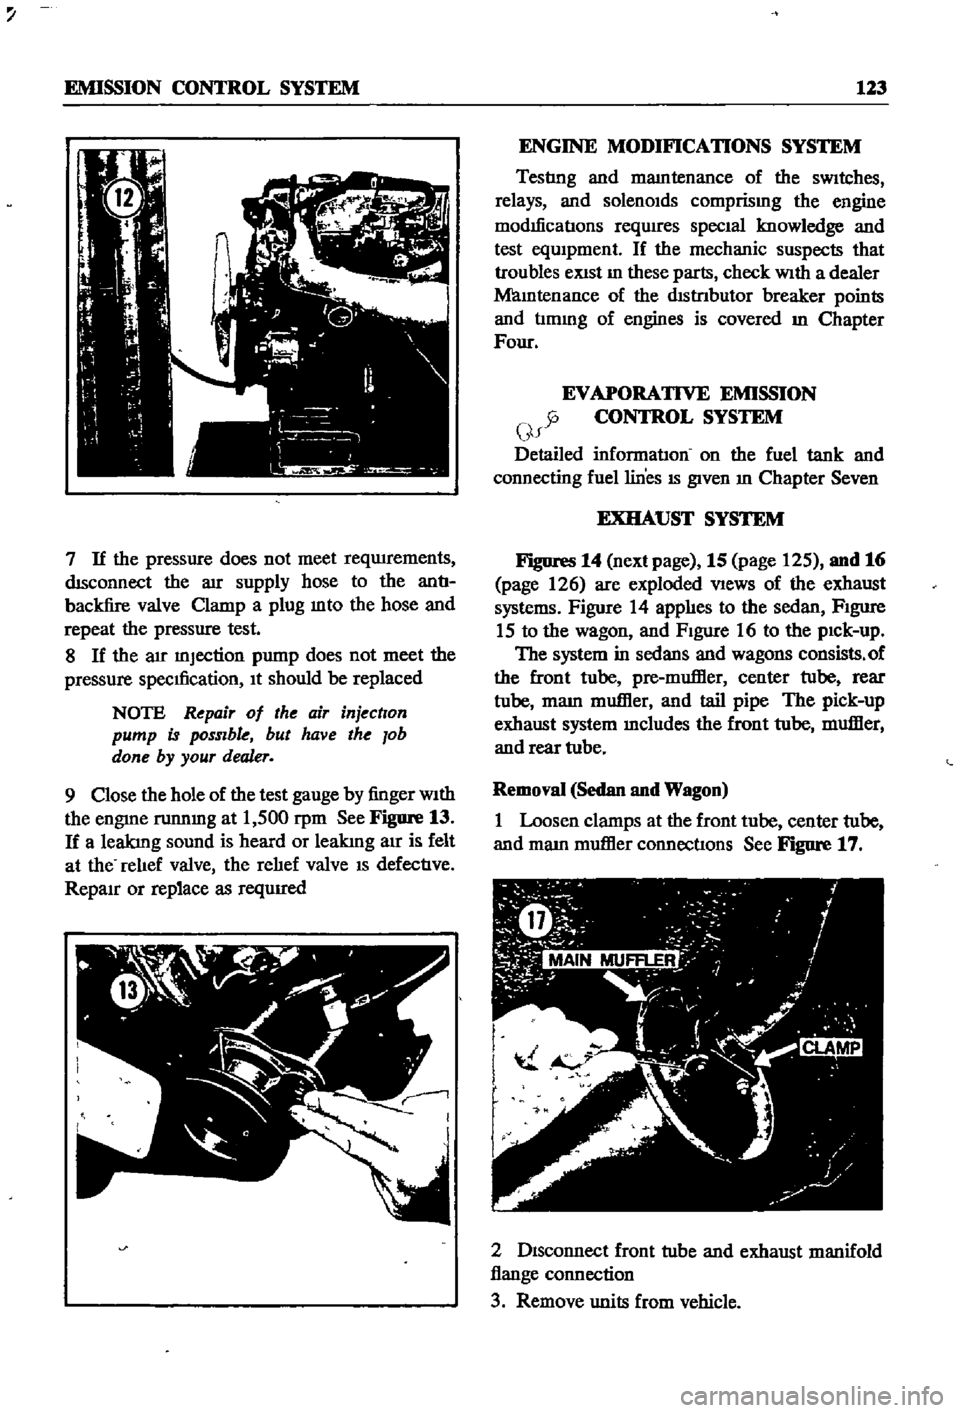
See
Figure
13
If
a
leakIng
sound
is
heard
or
leakIng
air
is
felt
at
the
relIef
valve
the
relIef
valve
IS
defectIve
RepaIr
or
replace
as
reqUIred
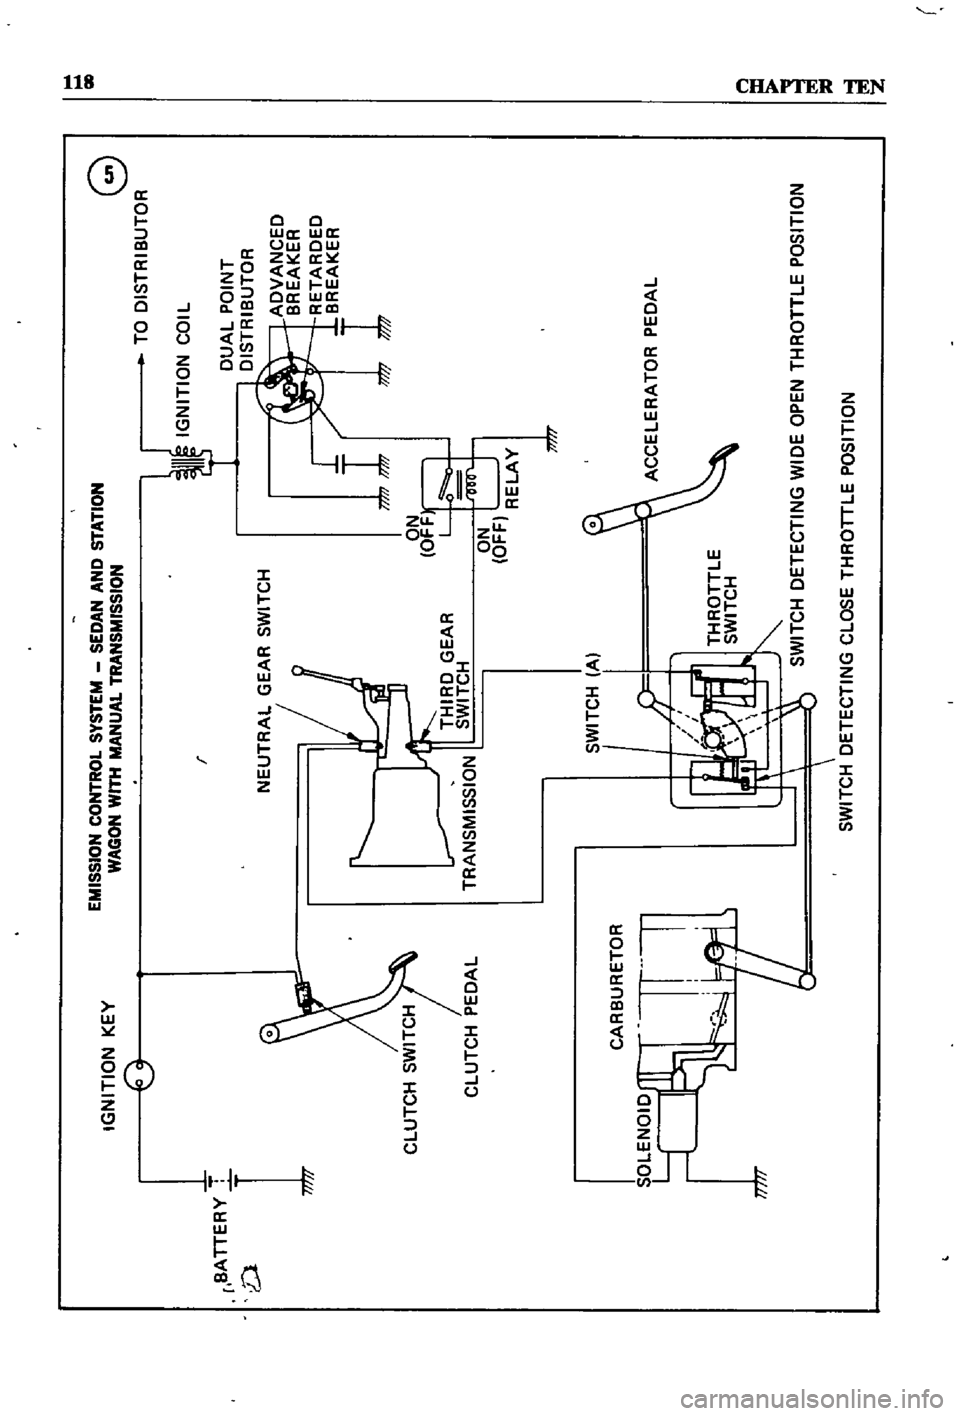
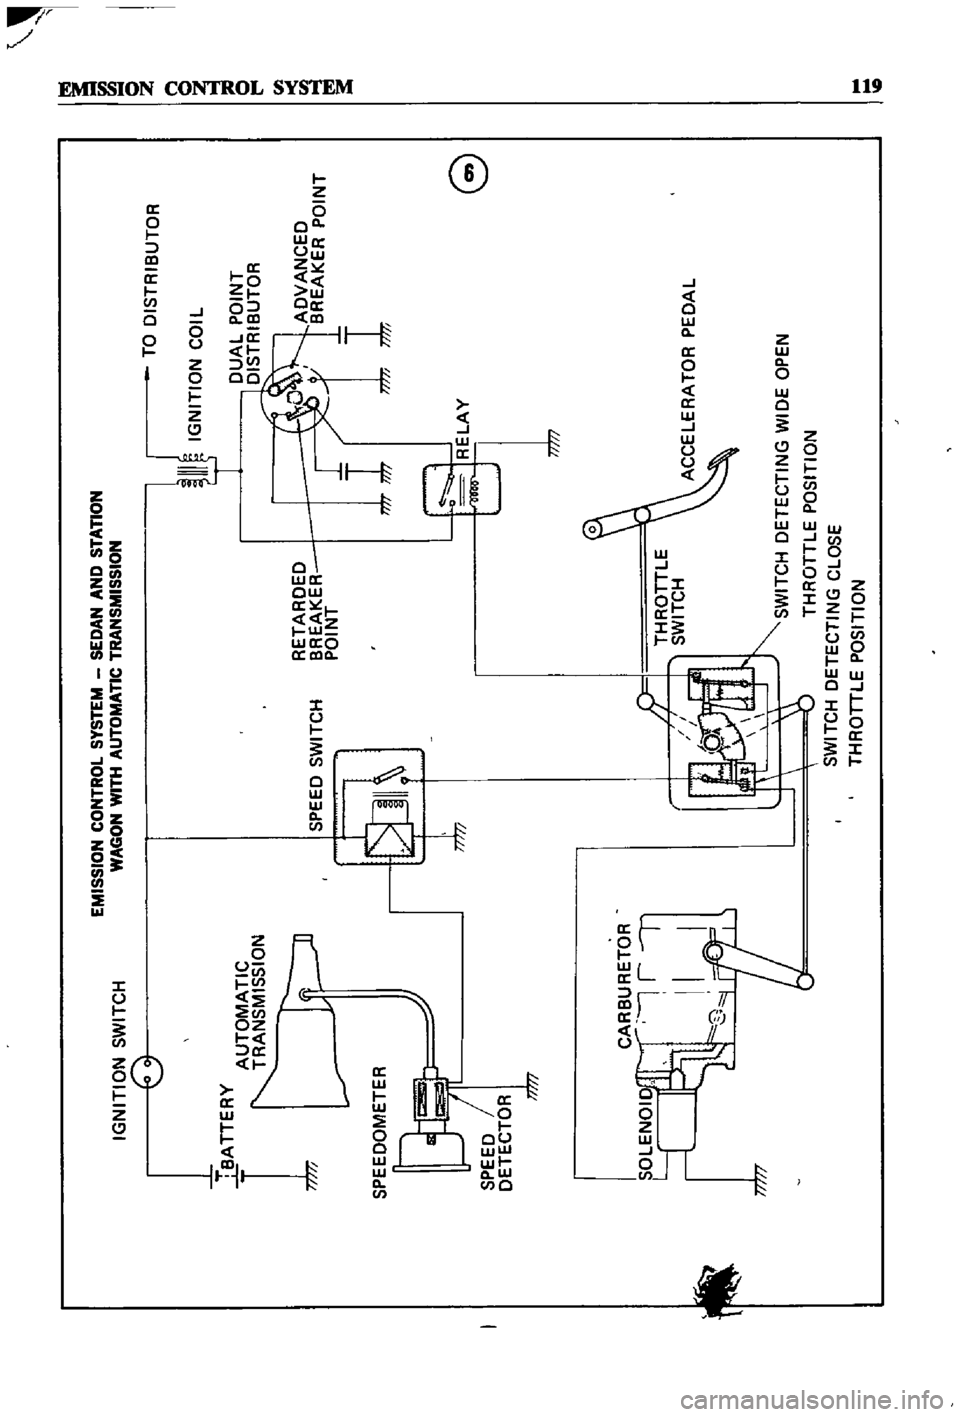
ENGINE
MODIFICATIONS
SYSTEM
Testlng
and
mamtenance
of
the
sWitches
relays
and
solenOIds
comprismg
the
engine
modIficatIons
reqwres
SpecIal
knowledge
and
test
eqUIpment
If
the
mechanic
suspects
that
troubles
eXist
In
these
parts
check
With
a
dealer
Mamtenance
of
the
dIstrIbutor
breaker
points
and
tImmg
of
engines
is
covered
m
Chapter
Four
EVAPORATIVE
EMISSION
y
CONTROL
SYSTEM
f
Detailed
informatIon
on
the
fuel
tank
and
connecting
fuel
lines
IS
given
In
Chapter
Seven
EXHAUST
SYSTEM
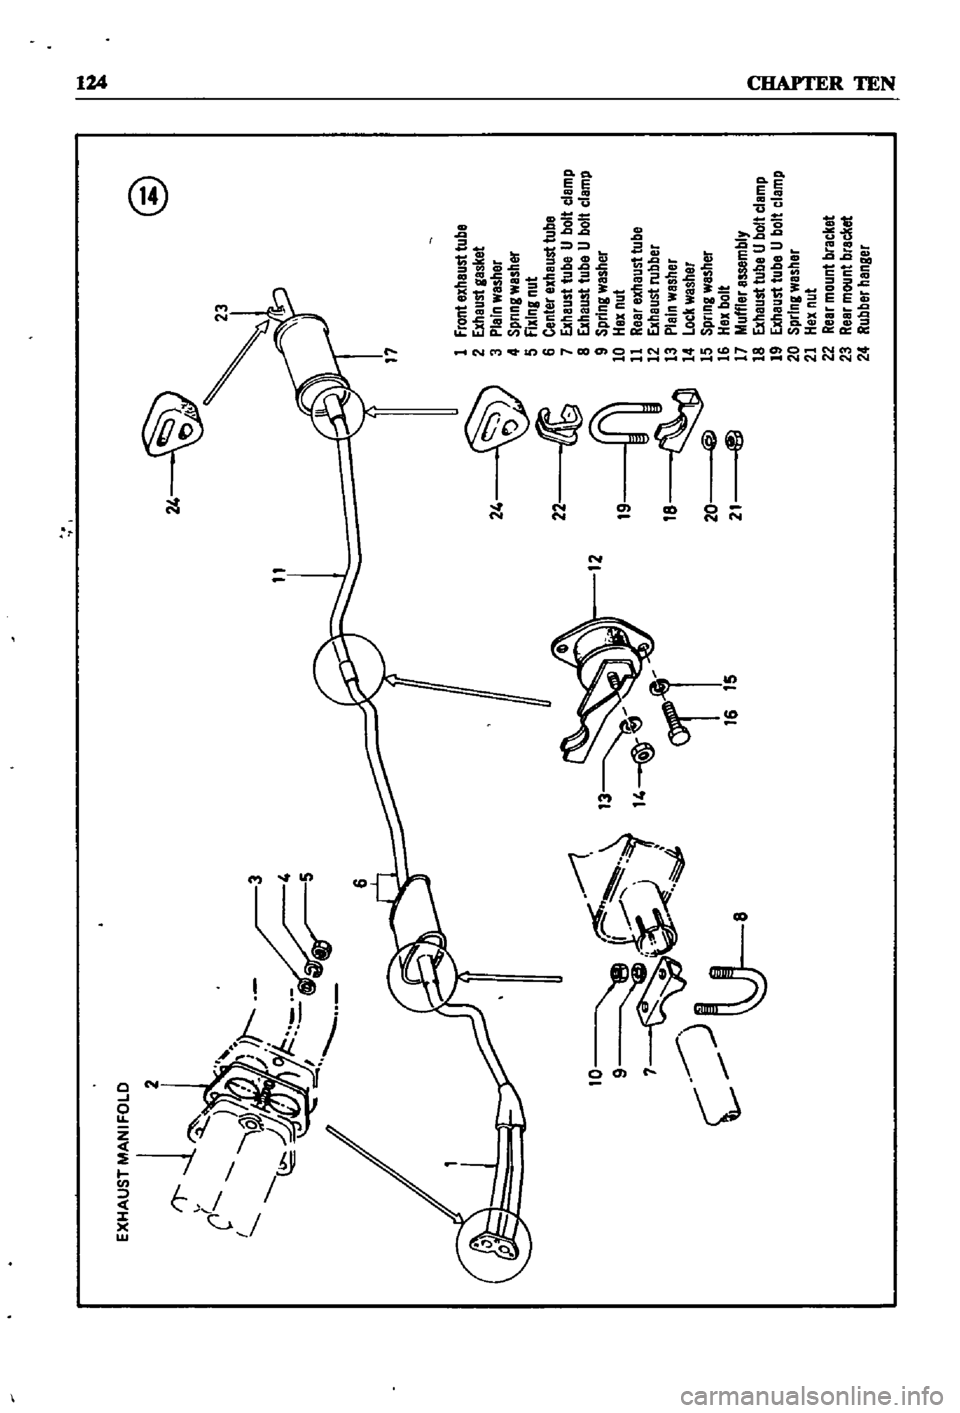
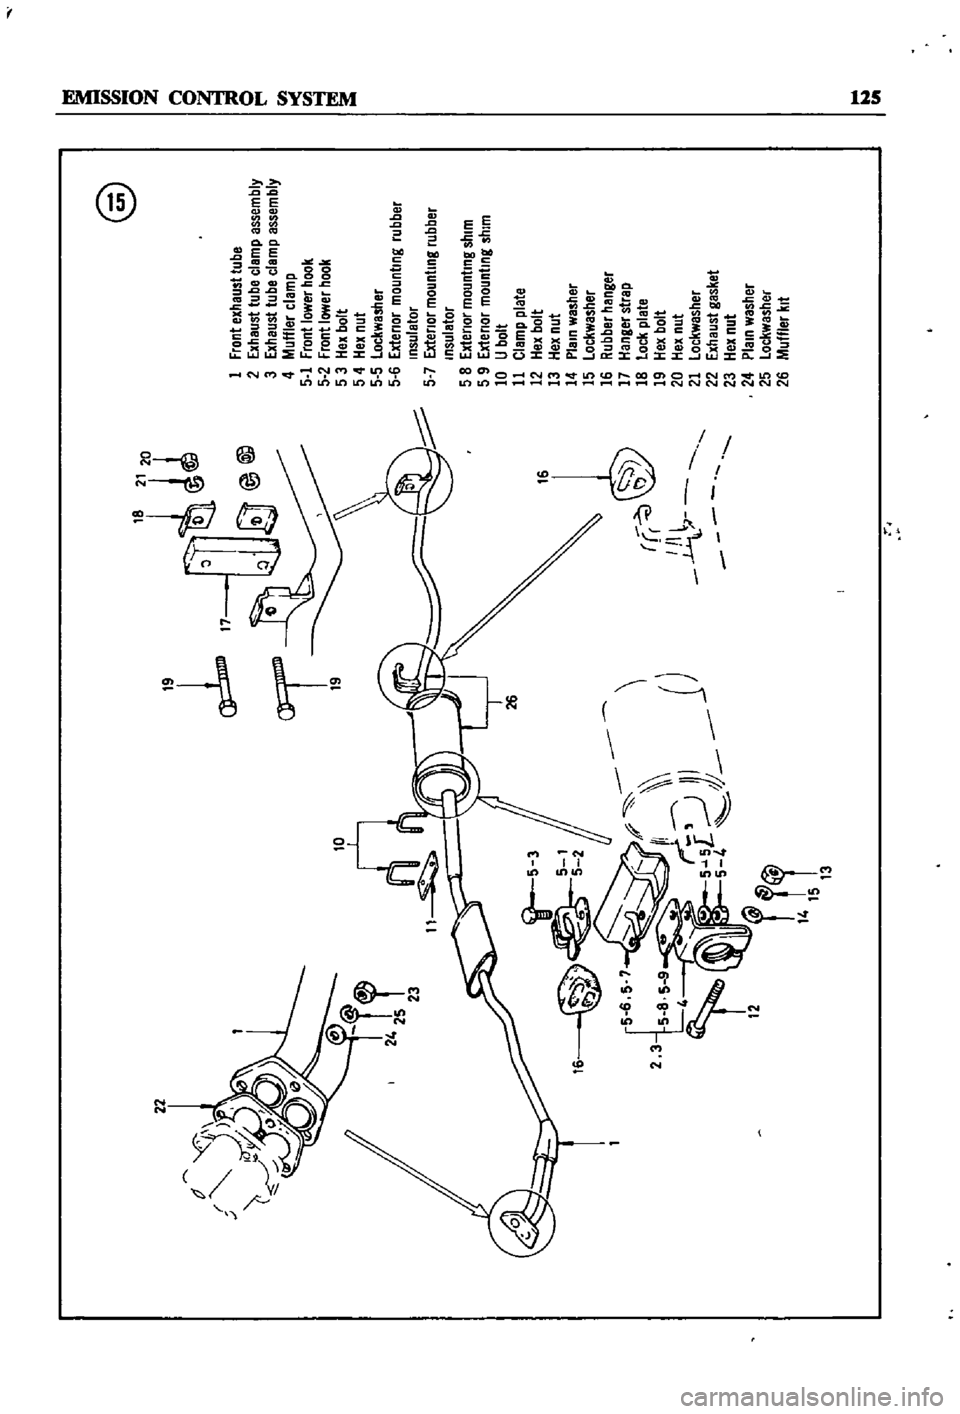
Figures
14
next
page
15
page
125
and
16
page
126
are
exploded
VIews
of
the
exhaust
systems
Figure
14
applIes
to
the
sedan
FIgure
15
to
the
wagon
and
FIgure
16
to
the
pIck
up
The
system
in
sedans
and
wagons
consists
of
the
front
tube
pre
muffier
center
tube
rear
tube
mam
muffier
and
tail
pipe
The
pick
up
exhaust
system
mcludes
the
front
tube
muffier
and
rear
tube
Removal
Sedan
and
Wagon
1
Loosen
clamps
at
the
front
tube
center
tube
and
mam
muffier
connectIons
See
Figure
17
2
DIsconnect
front
tube
and
exhaust
manifold
flange
connection
3
Remove
units
from
vehicle
Page 129 of 252
2
@
24
11
3
10
9
r
7
8
JI
4
J
c
U
12
24
22
19
18
@
20
ta
21
1
frontBxhaust
tube
2
Exheust
gasket
3
Plein
wesher
4
Spnng
wesher
5
fixing
nut
6
Center
exhaust
tube
7
Exhaust
tube
U
bolt
clamp
8
Exhaust
tube
U
bolt
clamp
9
Spring
wesher
10
Hex
nut
11
Reer
exheusttube
12
Exhaust
rubber
13
Plain
washer
14
Lock
washer
15
Spnng
washer
16
Hex
bolt
17
Muffler
essembly
18
Exhaust
tube
U
bolt
clamp
19
Exhaust
tube
U
bolt
clamp
20
spring
wesher
21
Hex
nut
22
Rear
mount
bracket
23
Rear
mount
brecket
24
Rubber
henger
i
Page 130 of 252
22
rnL
T
II
19
2
16
rr
I
II
l
r
@
1
Front
exhaust
tube
2
Exhaust
tube
clamp
assembly
3
Exhaust
tube
clemp
assembly
4
Muffler
clamp
5
1
Front
lower
hook
5
2
Front
lower
hook
5
3
Hex
bolt
5
4
Hex
nut
5
5
Lockwasher
5
6
Extenor
mounting
rubber
Insulator
5
7
Extenor
mounting
rubber
Insulator
5
8
Extenor
mounting
shim
5
9
Extenor
mounting
shim
10
U
bolt
11
Clamp
plate
12
Hex
bolt
13
Hex
nut
14
Plain
washer
15
lockwasher
16
Rubber
hanger
17
Hanger
strap
18
lock
plate
19
Hex
bolt
20
Hex
nut
21
lockwasher
22
Exhaust
gasket
23
Hex
nut
24
Plain
washer
25
lockwasher
26
Muffler
kit
l
o
o
t
I
N
III