DATSUN 510 1968 Service Repair Manual
Manufacturer: DATSUN, Model Year: 1968, Model line: 510, Model: DATSUN 510 1968Pages: 252, PDF Size: 12.2 MB
Page 111 of 252
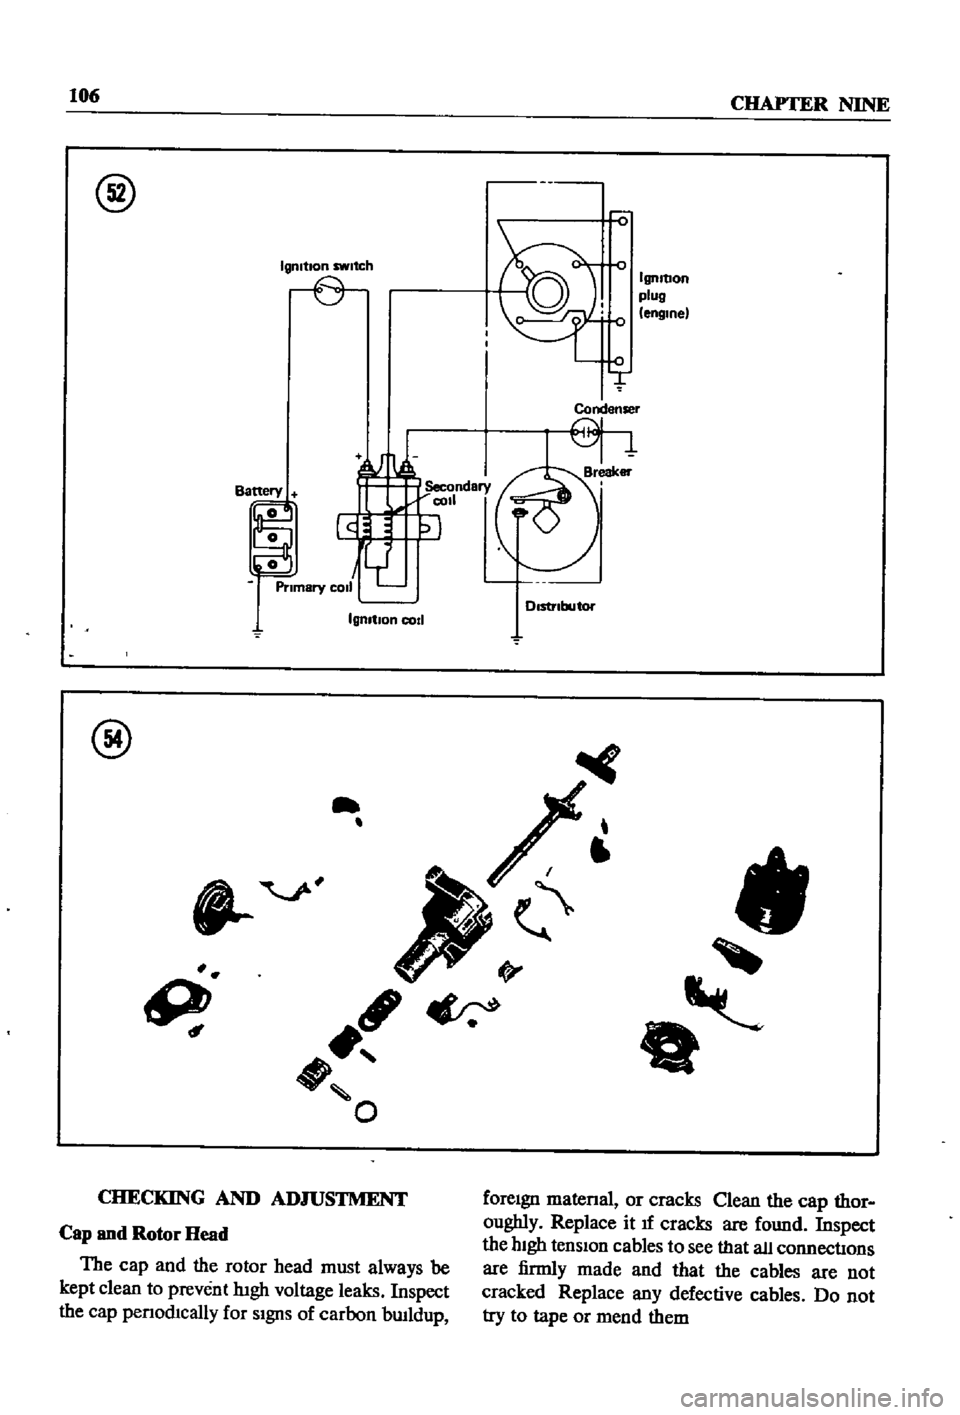
106
CHAPTER
NINE
@
Igmtlon
switch
IgnItion
plug
engine
Condenser
IgnItIon
cod
@
II
9
ft
O
CHECKING
AND
ADJUSTMENT
foreIgn
matenal
or
cracks
Qean
the
cap
thor
oughly
Replace
it
If
cracks
are
found
Inspect
the
hIgh
tensIon
cables
to
see
that
all
connectIons
are
firmly
made
and
that
the
cables
are
not
cracked
Replace
any
defective
cables
Do
not
try
to
tape
or
mend
them
Cap
and
Rotor
Head
The
cap
and
the
rotor
head
must
always
be
kept
clean
to
prevent
lugh
voltage
leaks
Inspect
the
cap
penod1cally
for
SIgnS
of
carbon
bwldup
Page 112 of 252
24
21
TO
oto
25
1
17
18
19
o
15
16
20
@
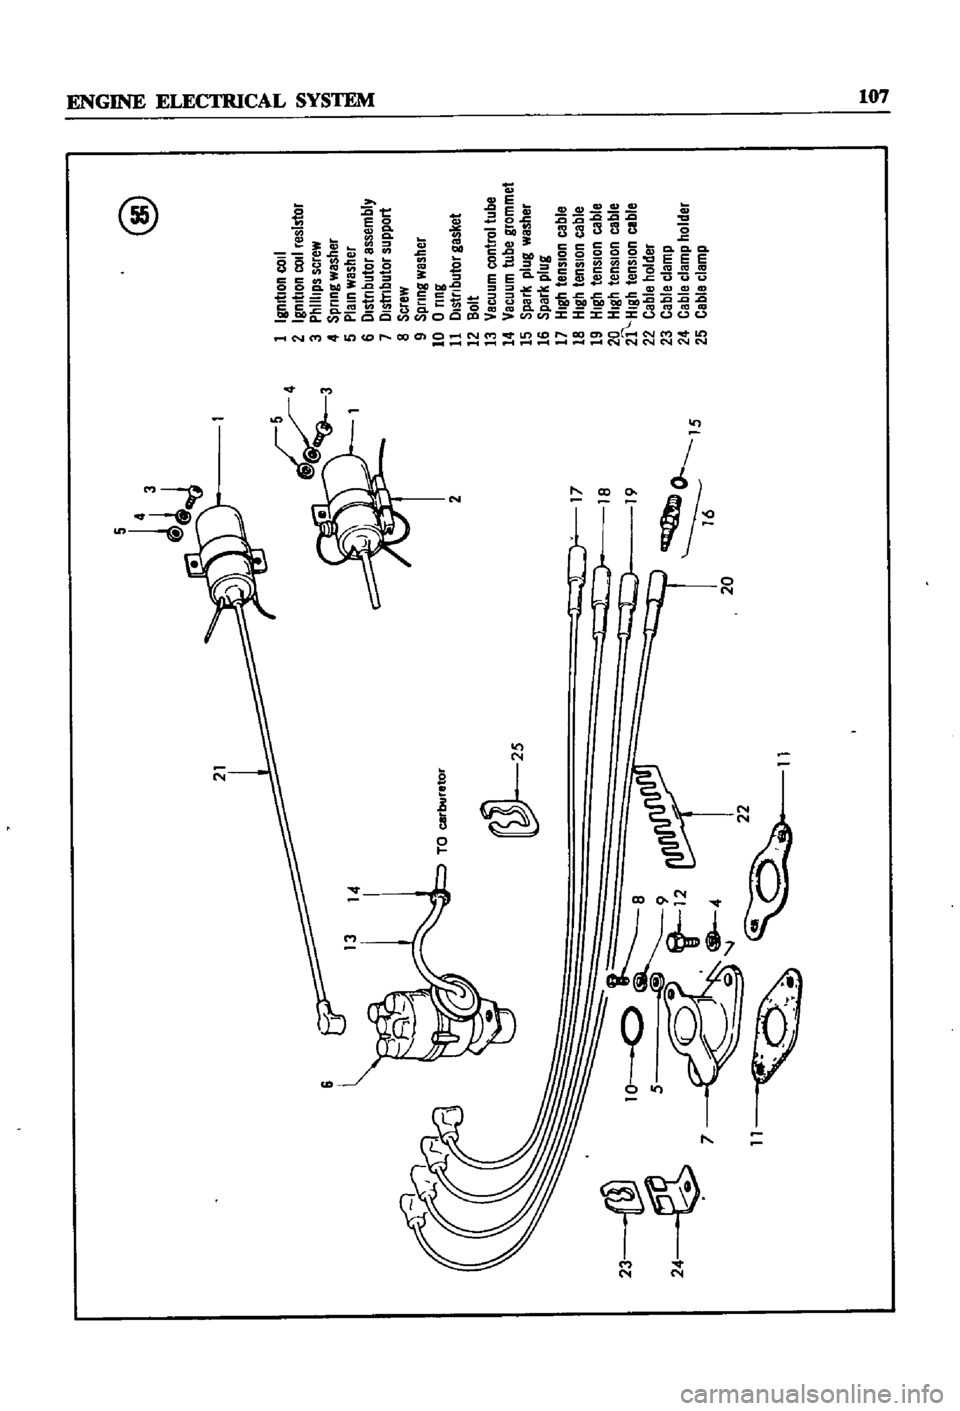
1
IgnItIon
coIl
2
Ignlllon
COIl
resls
Ol
3
p
II
lS
sere
ll
4
spnng
lles1
Br
5
PlaIn
wesner
6
illstl
OUtor
assembly
1
illstllbu
Ol
sUP
rt
II
sere
ll
9
spnng
wesner
10
0
ling
11
Ills
nbutor
gasket
12
llolt
13
VaCUum
control
tube
14
Vecuum
tube
grommet
IS
spar
plug
IIeslIer
1
sperll
plug
11
111gb
tenSIon
cable
18
IIlglllenSIOn
cable
19
lI
gll
tensIon
cable
20
IIlgII
tensIon
cable
ii
lIlgII
tenSion
cable
22
Ceble
older
23
Cable
c1emp
24
cable
clempllOlder
25
Ceble
clemp
J
Page 113 of 252
9
10
4
17
141
18
I
19
21
8
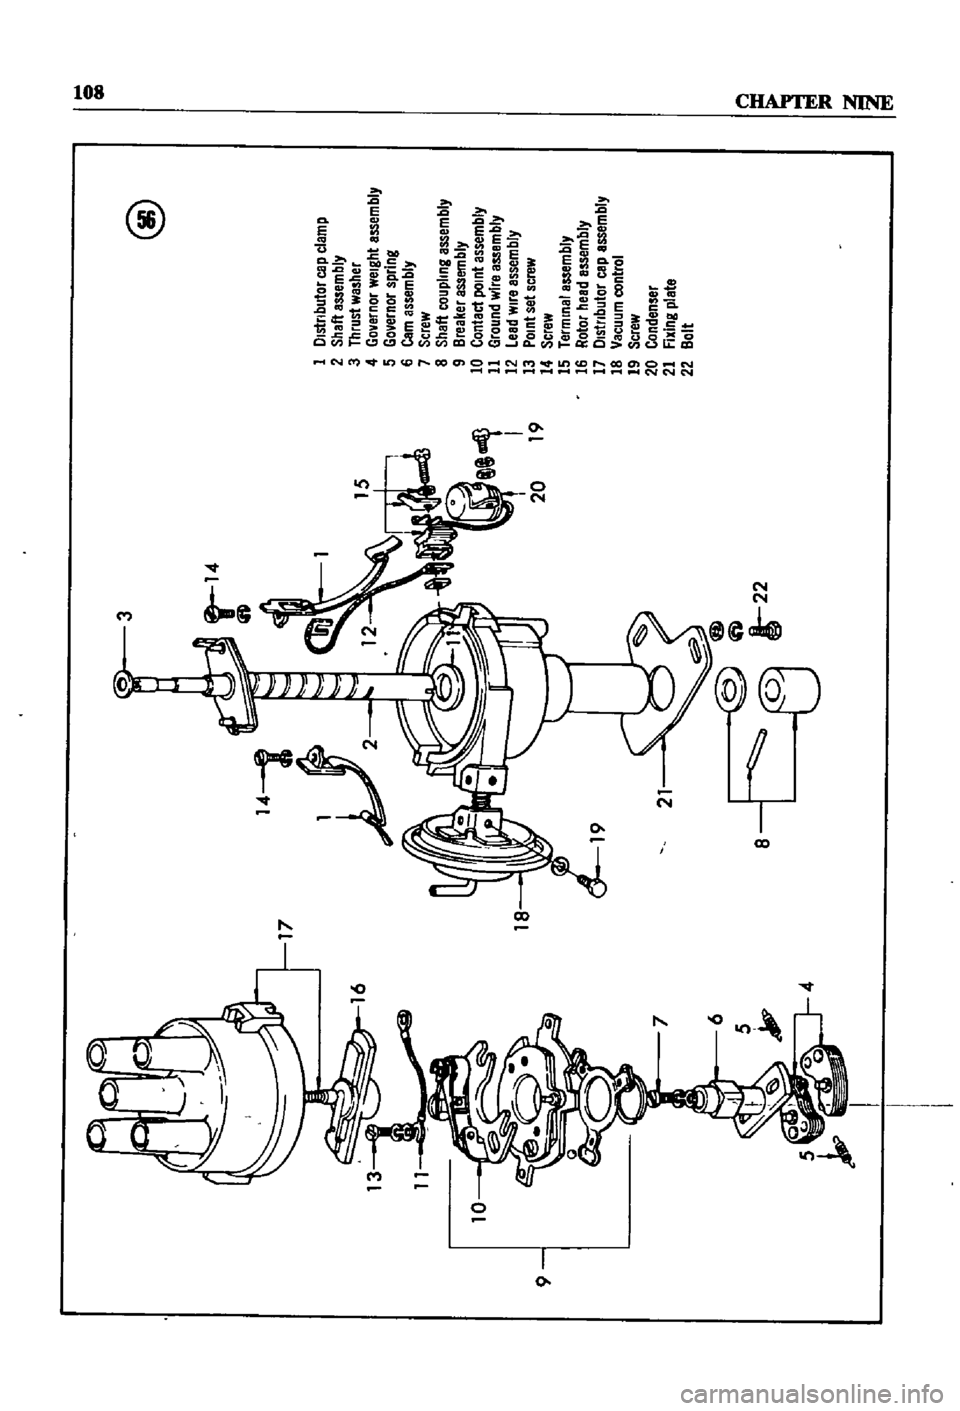
@
1
Distributor
cap
clamp
2
Shaft
assembly
3
Thrust
washer
4
Governor
weight
assembly
5
Governor
spring
6
Cam
assembly
7
Screw
8
Shaft
coupling
assembly
9
Breaker
assembly
10
Contact
POint
assembly
11
Ground
wire
assembly
12
Lead
wire
assembly
13
POlntset
screw
14
Screw
15
Terminal
assembly
16
Rotor
head
assembly
17
Dlstllbutor
cap
assambly
18
Vacuum
control
19
Screw
20
Condensar
21
fixing
plate
22
Bolt
e
OIl
Page 114 of 252
21
b
14
1
8
6
L
5
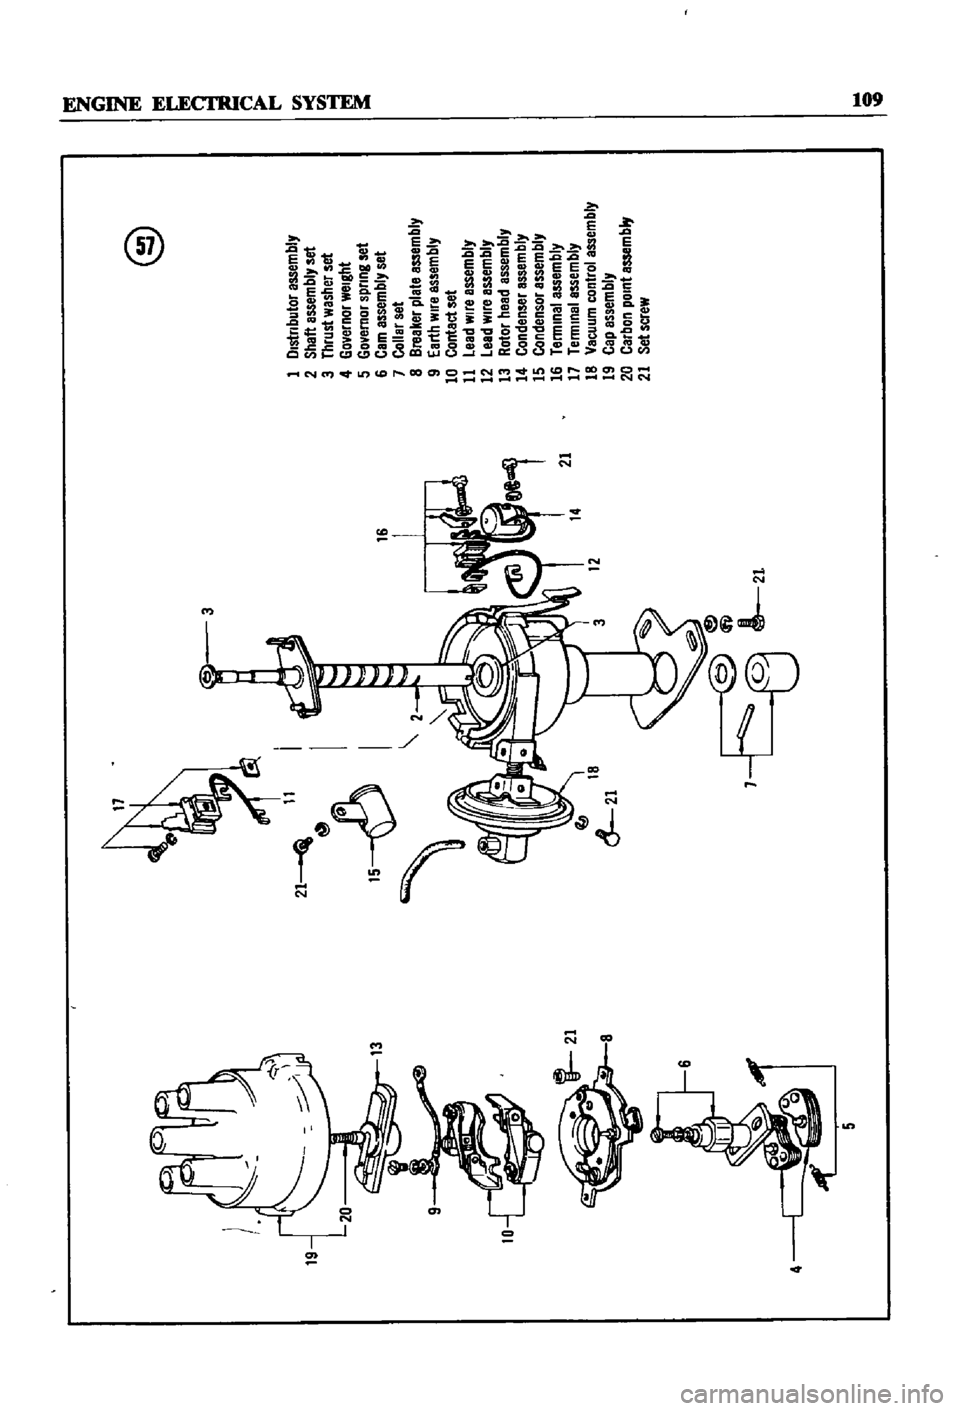
@
21
1
Dlstllbutor
assembly
2
Shaft
assemblY
set
3
tbrust
washer
set
4
Go
ernor
W81g1lt
5
Govemor
BPllng
set
6
Cem
assemblY
set
1
co
leT5at
8
Breeker
plete
essembly
9
Eartn
Wile
essembly
10
contect
set
11
lead
Wile
essemblY
12
lead
Wile
assemblY
13
Rotor
need
assembly
14
Condenser
essembly
15
Condensor
essembly
16
lemllna
BSSembly
11
lennlnel
BSSembly
18
Vacuum
control
assemblY
19
Cep
essemblY
20
Carbon
pOint
essemb
21
set
screVl
12
i
Page 115 of 252
110
CHAPTER
NINE
Points
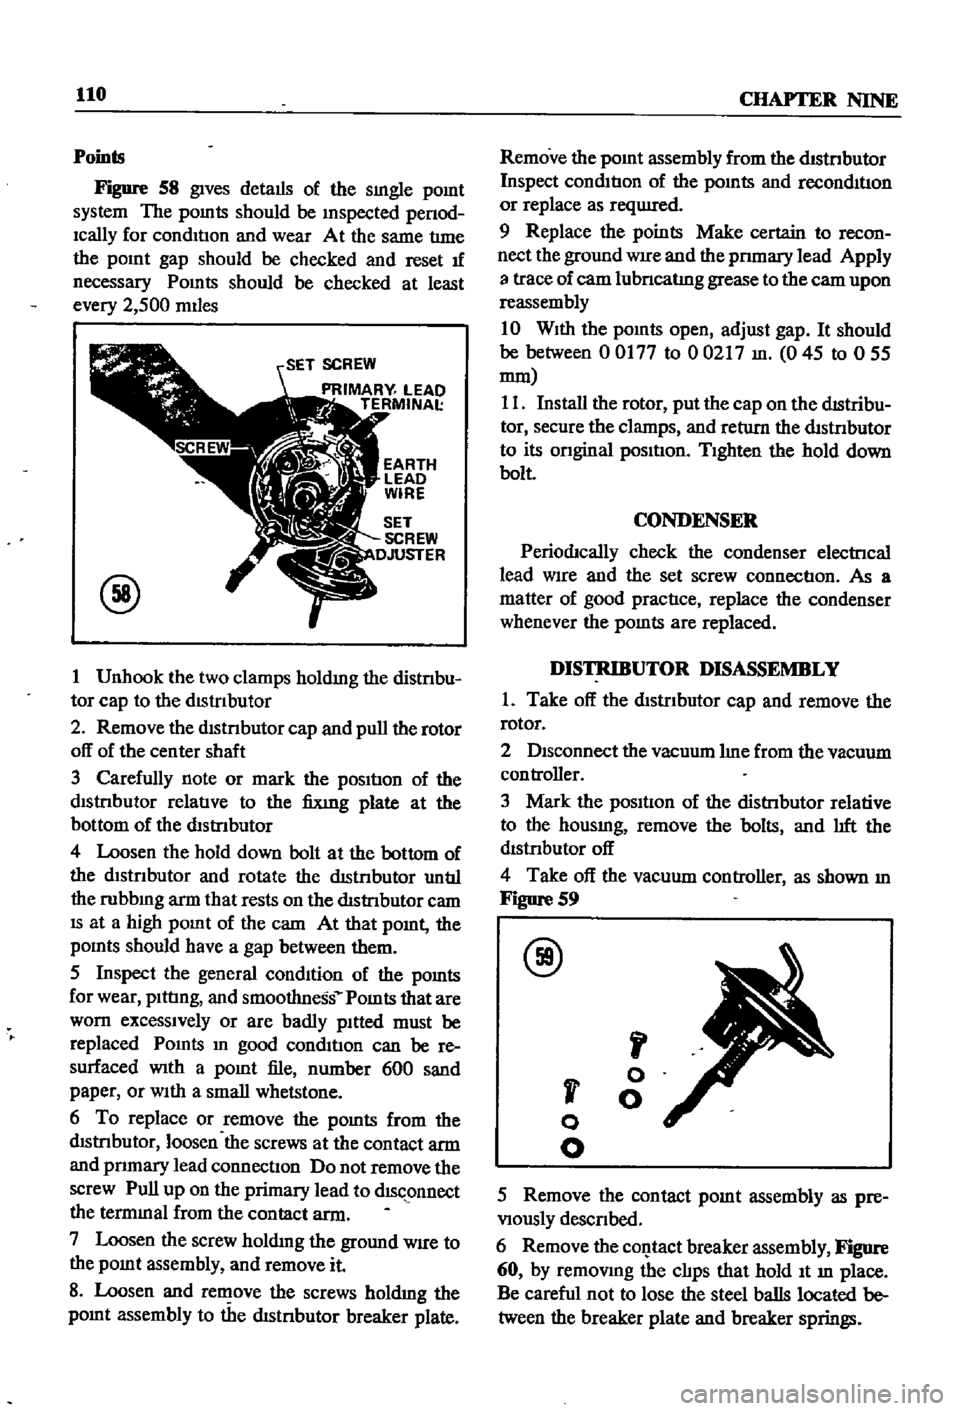
Figure
S8
gives
details
of
the
sIngle
pomt
system
The
pomts
should
be
Inspected
penod
Ically
for
condItIon
and
wear
At
the
same
tlme
the
pOInt
gap
should
be
checked
and
reset
1f
necessary
Pomts
should
be
checked
at
least
every
2
500
mIles
SET
SCREW
PRIMARY
LEAD
TERMINAl
@
1
Unhook
the
two
clamps
holdmg
the
distnbu
tor
cap
to
the
dIStrIbutor
2
Remove
the
dlstnbutor
cap
and
pull
the
rotor
off
of
the
center
shaft
3
Carefully
note
or
mark
the
pOSItIon
of
the
dIStrIbutor
relatIve
to
the
fixmg
plate
at
the
bottom
of
the
distrIbutor
4
Loosen
the
hold
down
bolt
at
the
bottom
of
the
dlstnbutor
and
rotate
the
dIStnbutor
untIl
the
rubbmg
arm
that
rests
on
the
dIStrIbutor
cam
IS
at
a
high
pomt
of
the
cam
At
that
pomt
the
pomts
should
have
a
gap
between
them
5
Inspect
the
general
condItion
of
the
pomts
for
wear
pIttIng
and
smoot1mess
Pomts
that
are
worn
excessIvely
or
are
badly
pItted
must
be
replaced
Pomts
In
good
condItIon
can
be
re
surfaced
With
a
pOInt
file
number
600
sand
paper
or
WIth
a
small
whetstone
6
To
replace
or
remove
the
pomts
from
the
dIStrIbutor
loosen
the
screws
at
the
contact
arm
and
pnmary
lead
connectIOn
Do
not
remove
the
screw
Pull
up
on
the
primary
lead
to
dISc
onnect
the
termmal
from
the
contact
arm
7
Loosen
the
screw
holdmg
the
ground
WIre
to
the
pOInt
assembly
and
remove
it
S
Loosen
and
rell
ove
the
screws
holdIng
the
pomt
assembly
to
the
dIStnbutor
breaker
plate
Remove
the
pOInt
assembly
from
the
dIStrIbutor
Inspect
condItIon
of
the
pOInts
and
reconditIon
or
replace
as
reqUIred
9
Replace
the
points
Make
certain
to
recon
nect
the
ground
WIre
and
the
pnmary
lead
Apply
3
trace
of
cam
lubncatlng
grease
to
the
cam
upon
reassembly
10
WIth
the
pOInts
open
adjust
gap
It
should
be
between
00177
to
00217
In
045
to
055
mm
11
Install
the
rotor
put
the
cap
on
the
dIStribu
tor
secure
the
clamps
and
return
the
dtstrIbutor
to
its
onginal
pOSItIon
TIghten
the
hold
down
bolt
CONDENSER
PeriodJcally
check
the
condenser
electrIcal
lead
wire
and
the
set
screw
connectIon
As
a
matter
of
good
practIce
replace
the
condenser
whenever
the
pomts
are
replaced
DISTRIBUTOR
DISASSEMBLY
1
Take
off
the
dIstrIbutor
cap
and
remove
the
rotor
2
DIsconnect
the
vacuum
me
from
the
vacuum
con
troller
3
Mark
the
pOSItIon
of
the
distrIbutor
relative
to
the
housmg
remove
the
bolts
and
lIft
the
dIstrIbutor
off
4
Take
off
the
vacuum
controller
as
shown
m
F1gDre
S9
@
J
I
v
o
o
o
o
5
Remove
the
contact
pOInt
assembly
as
pre
VIously
descnbed
6
Remove
the
c01Jtact
breaker
assembly
Figure
60
by
remOVIng
the
clIps
that
hold
It
m
place
Be
careful
not
to
lose
the
steel
balls
located
be
tween
the
breaker
plate
and
breaker
springs
Page 116 of 252
ENGINE
ELECTRICAL
SYSTEM
111
@
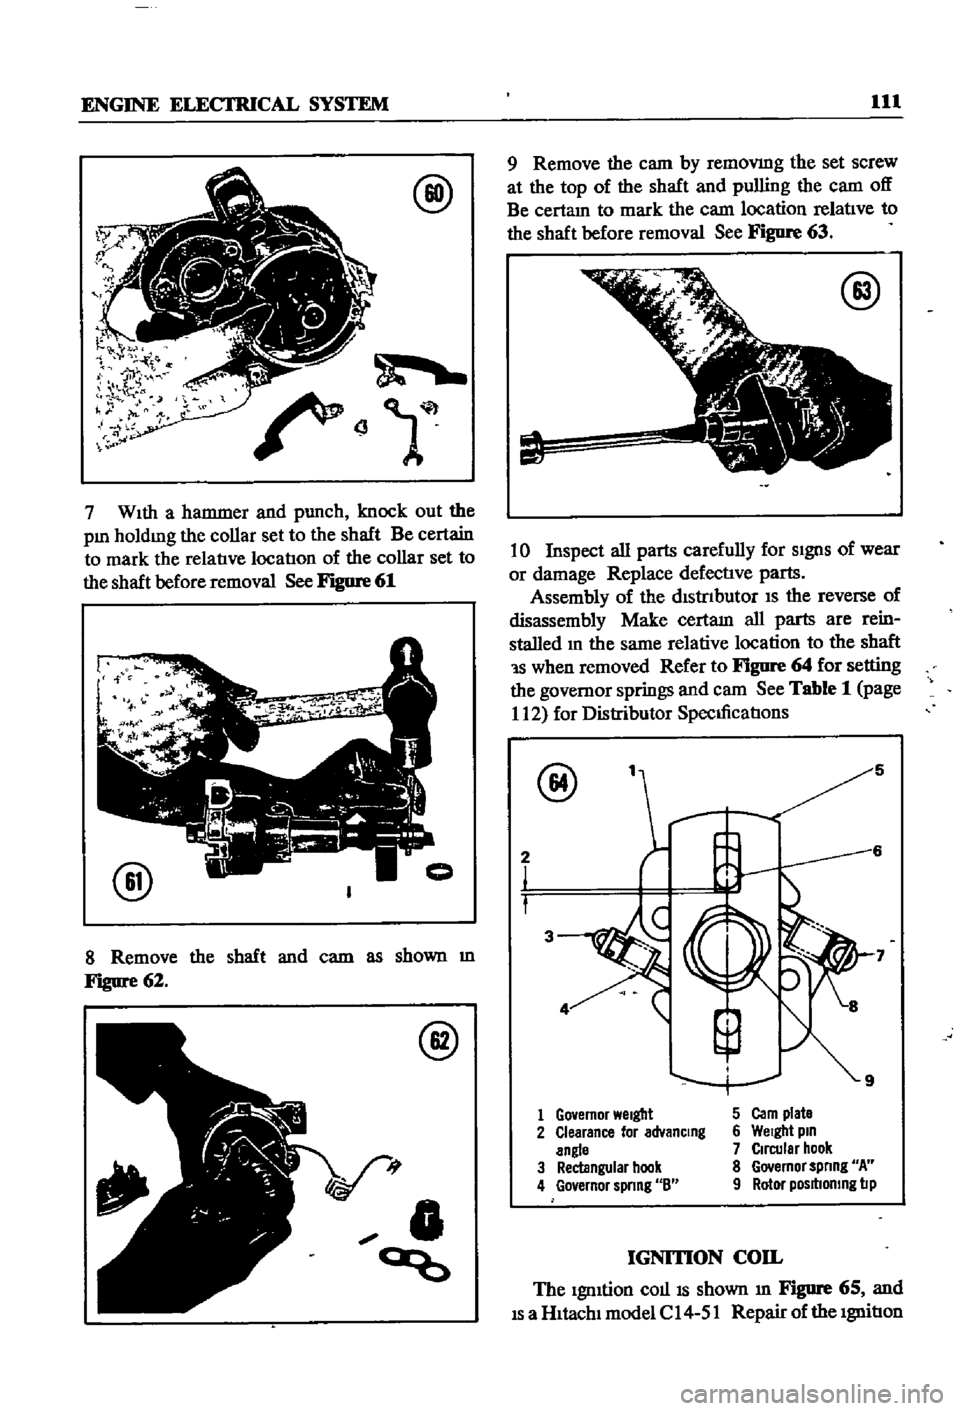
7
WIth
a
hammer
and
punch
knock
out
the
pm
holdmg
the
collar
set
to
the
shaft
Be
certain
to
mark
the
relatIve
locatIon
of
the
collar
set
to
the
shaft
before
removal
See
Figure
61
@
8
Remove
the
shaft
and
cam
as
shown
m
Figure
62
@
V
t
0
ao
9
Remove
the
cam
by
removmg
the
set
screw
at
the
top
of
the
shaft
and
pulling
the
cam
off
Be
certam
to
mark
the
cam
location
relatIve
to
the
shaft
before
removal
See
Figure
63
@
10
Inspect
all
parts
carefully
for
SIgnS
of
wear
or
damage
Replace
defectIve
parts
Assembly
of
the
dIStrIbutor
IS
the
reverse
of
disassembly
Make
certam
all
parts
are
rein
stalled
m
the
same
relative
location
to
the
shaft
1S
when
removed
Refer
to
Figure
64
for
setting
the
governor
springs
and
cam
See
Table
1
page
112
for
Distributor
SpecIficatIons
@
5
2
3
1
Go
emor
Welgbt
5
Carn
plate
2
Clearance
lor
advanCing
6
Welgbt
pin
angle
7
Circular
hook
3
Rectangular
hook
8
Governor
spnng
A
4
Go
ernor
spnng
8
9
Rotor
posltlomng
lip
IGNITION
COIL
The
IgnItion
COllIS
shown
m
Figure
65
and
IS
a
HItachI
model
C
14
51
Repair
of
the
IgnitIon
Page 117 of 252
112
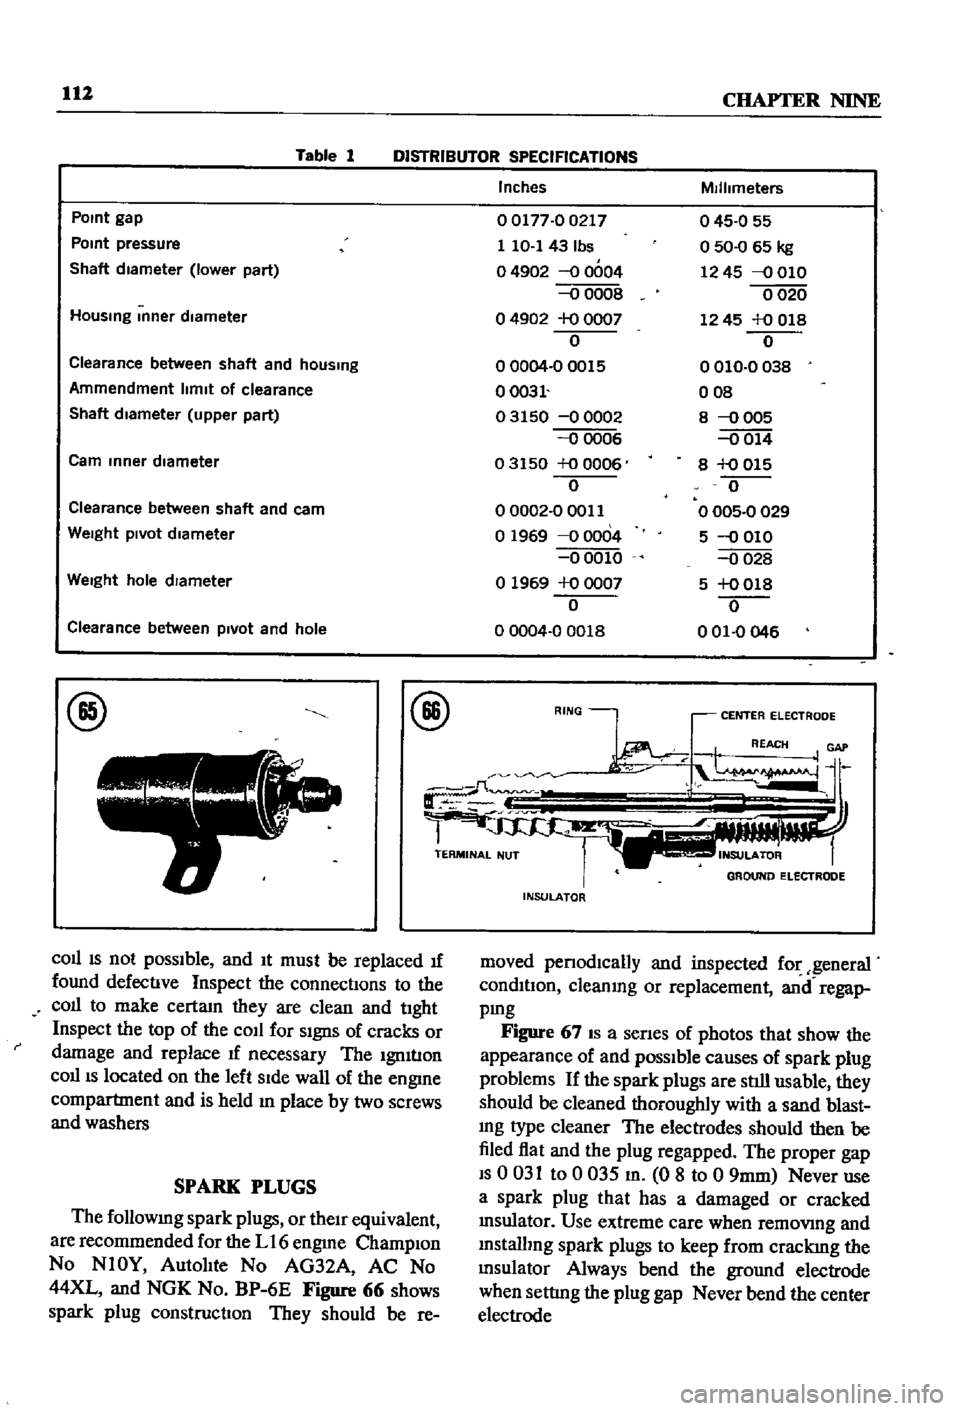
Table
1
CHAPTER
NINE
DISTRIBUTOR
SPECIFICATIONS
POint
gap
POint
pressure
Shaft
diameter
lower
part
HOUSing
Inner
diameter
Clearance
between
shaft
and
hOUSing
Ammendment
limit
ot
clearance
Shaft
diameter
upper
part
Cam
Inner
diameter
Clearance
between
shaft
and
cam
Weight
piVOt
dIameter
Weight
hole
dIameter
Clearance
between
piVOt
and
hole
Inches
Millimeters
00177
00217
1
10
143
Ibs
o
4902
0004
0008
o
4902
0
0007
o
00004
00015
00031
03150
0002
0006
03150
0
0006
o
00002
00011
o
1969
00004
00010
01969
0
0007
o
o
0004
0
0018
o
45
0
55
o
50
0
65
kg
1245
010
0020
1245
0
018
o
OlD
O
038
008
8
005
014
8
0
015
o
o
005
0
029
5
010
028
5
0
018
0
001
0046
@
@
r
COllIS
not
pOSSIble
and
It
must
be
replaced
1f
found
defectIve
Inspect
the
connectIons
to
the
coll
to
make
certaIn
they
are
clean
and
tIght
Inspect
the
top
of
the
coIl
for
SIgnS
of
cracks
or
damage
and
replace
1f
necessary
The
Ignluon
COllIS
located
on
the
left
SIde
wall
of
the
engme
compartment
and
is
held
In
place
by
two
screws
and
washers
SPARK
PLUGS
The
followmg
spark
plugs
or
then
equivalent
are
recommended
for
the
L16
engme
ChampIon
No
NlOY
AutolIte
No
AG32A
AC
No
44XL
and
NGK
No
BP
6E
Figure
66
shows
spark
plug
constroctIon
They
should
be
re
RING
CENTER
ELECTRODE
TERMINAL
NUT
IS
r
1
n
f
INSULATOR
moved
penodlcally
and
inspected
for
general
condItIon
cleanmg
or
replacement
anl
regap
pmg
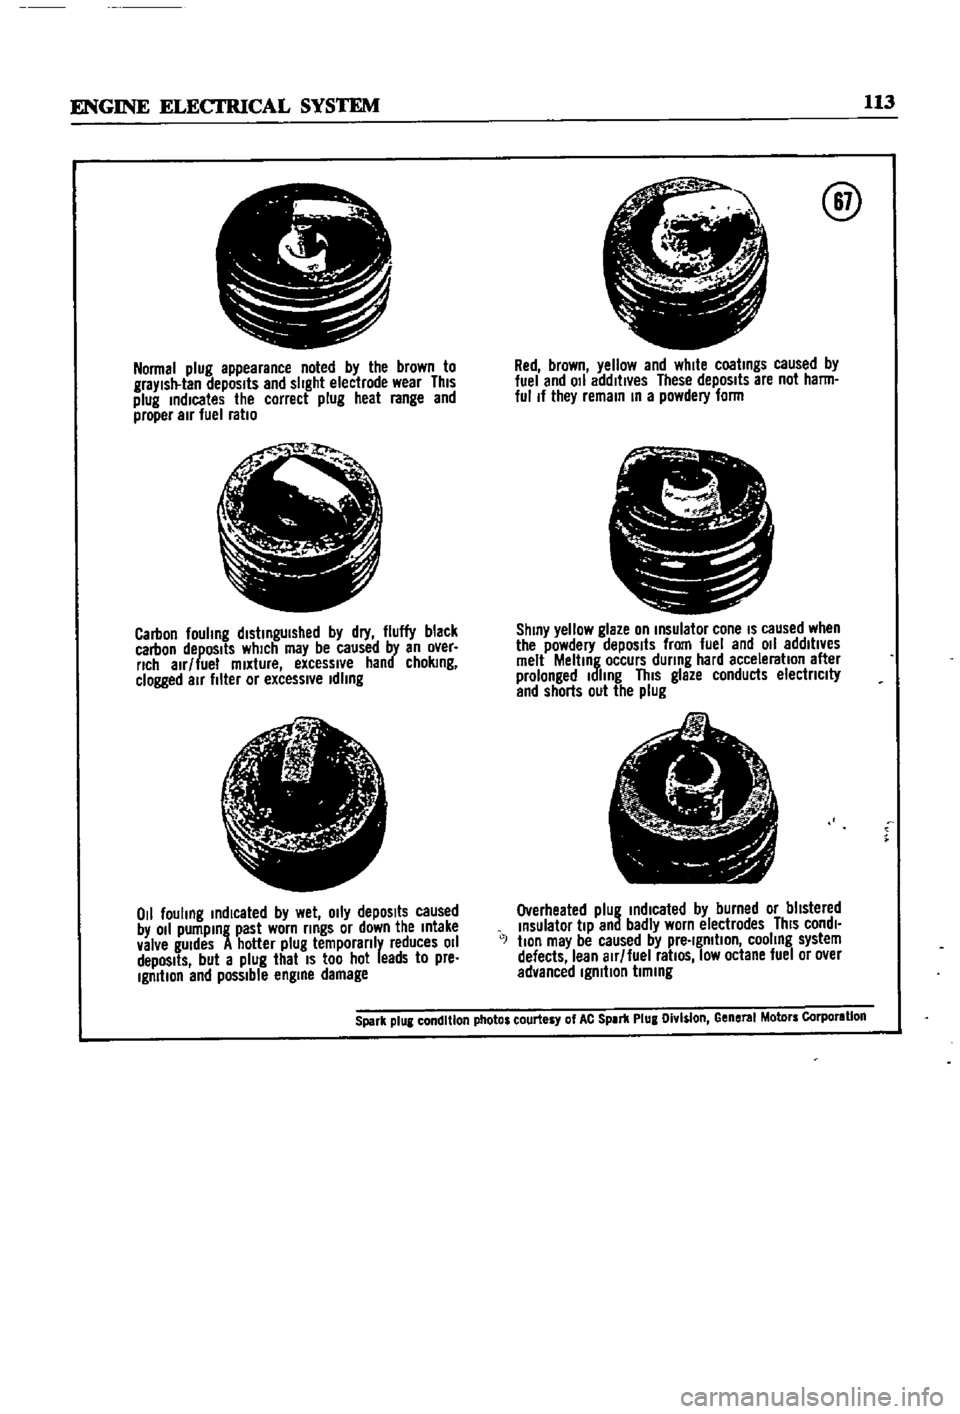
Figure
67
IS
a
senes
of
photos
that
show
the
appearance
of
and
pOSSIble
causes
of
spark
plug
problems
If
the
spark
plugs
are
still
usable
they
should
be
cleaned
thorougWy
with
a
sand
blast
Ing
type
cleaner
The
electrodes
should
then
be
filed
flat
and
the
plug
regapped
The
proper
gap
IS
0
031
to
0035
m
0
8
to
0
9mm
Never
use
a
spark
plug
that
has
a
damaged
or
cracked
msulator
Use
extreme
care
when
remOVIng
and
mstallmg
spark
plugs
to
keep
from
crackIng
the
msulator
Always
bend
the
ground
electrode
when
settmg
the
plug
gap
Never
bend
the
center
electrode
Page 118 of 252
ENGINE
ELECI
RICAL
SYSTEM
113
i
Normal
plug
appearance
noted
by
the
brown
to
graYlsll
lan
depOSits
and
slight
eleclrode
wear
This
plug
indicates
the
correct
plug
heal
range
and
proper
air
fuel
ratio
jI
Jo
t
Ql
i
Carbon
fouhng
distinguished
by
dry
fluffy
black
carbon
depOSits
which
may
be
caused
by
an
over
rich
alr
lue
mixture
excessive
hand
choking
clogged
air
filler
or
excessl
e
Idling
t
I
j
if
r
l
1
tfc
ji
0
1
fouling
indicated
by
wet
o
ly
depOSits
caused
by
011
pumping
past
worn
rings
or
down
the
Intake
valve
gUIdes
A
hotter
plug
temporanly
reduces
011
depOSits
but
a
plug
that
IS
too
hot
leads
to
pre
Ignition
end
possible
engine
damage
@
Red
brown
yellow
and
white
coatings
caused
by
luel
and
011
addltl
es
These
depOSits
are
not
harm
ful
If
they
remain
In
a
powdery
lorm
pr
11
L
J
J
S
C
ShinY
yellow
glaze
on
Insulalor
cone
IS
caused
when
the
powdery
depOSits
from
fuel
and
011
addltl
es
melt
Melting
occurs
during
hard
acceleration
alter
prolonged
Idling
This
glaze
conducts
electnclty
and
shorts
out
the
plug
e
1
A
I
A
I
7
Overheated
plug
indIcated
by
burned
or
blistered
Insulator
tiP
and
badly
worn
electrodes
ThiS
condl
J
tlon
may
be
caused
by
pre
Ignition
cooling
system
defects
lean
alr
luel
ratiOS
low
octane
luel
or
o
er
advanced
Ignition
timing
Spark
plUI
condition
photos
courtesy
of
AC
SPIr1l
Plug
Olv
s
on
Gene
MolDrs
Corporlllon
Page 119 of 252
CHAPTER
TEN
EMISSION
CONTROL
SYSTEM
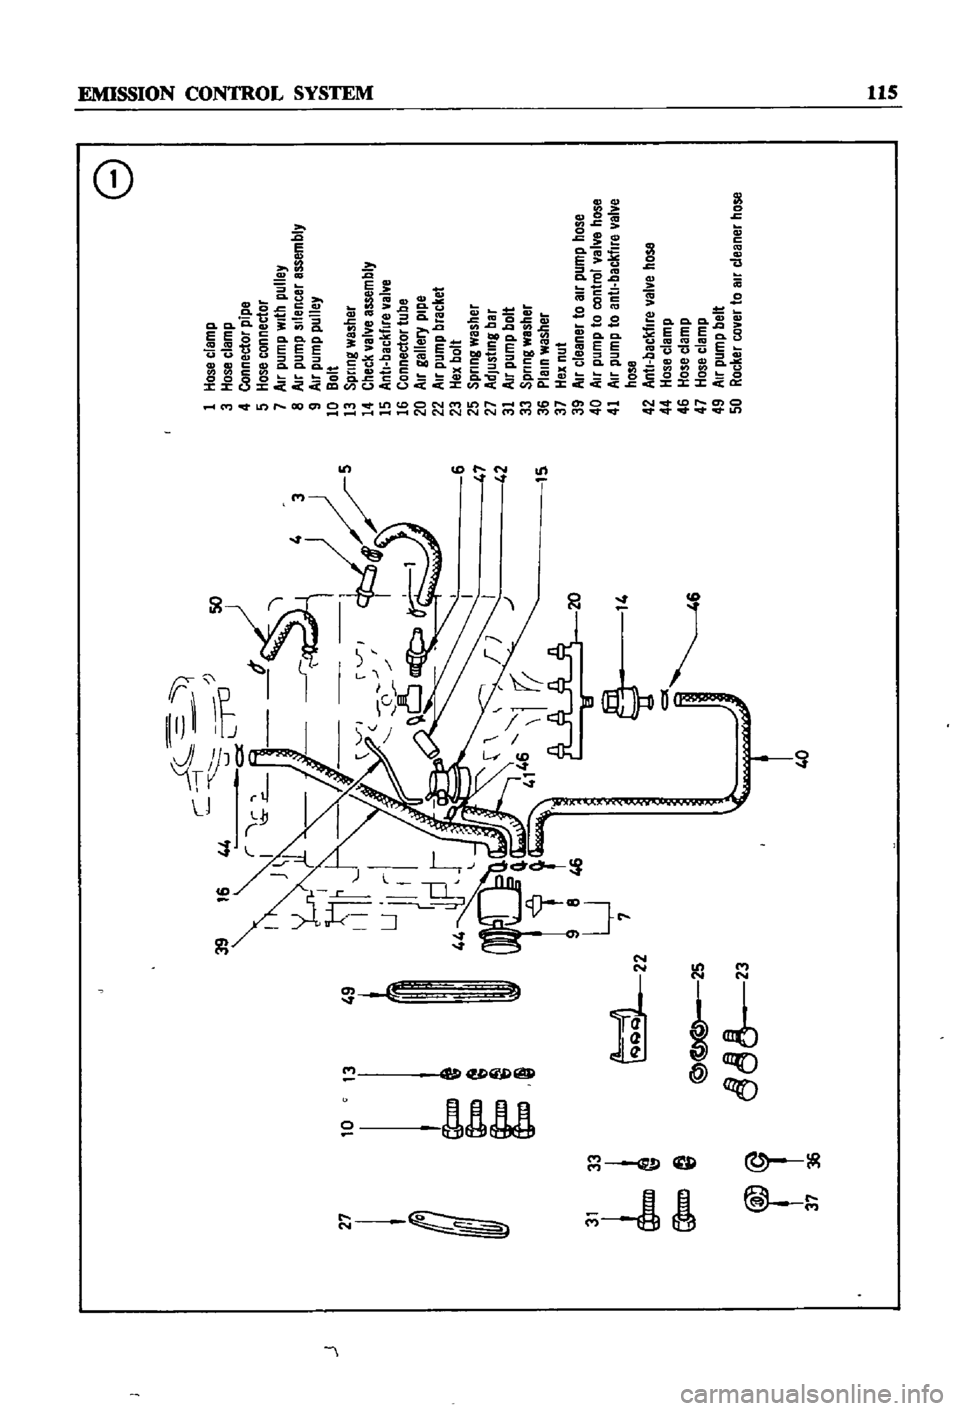
ThIs
chapter
covers
emission
control
and
exhaust
systems
The
emission
devices
used
in
clude
crankcase
ermssion
controls
an
exhaust
ermssion
system
and
evaporative
emission
con
trols
EXHAUST
EMISSION
CONTROL
SYSTEM
Two
methods
of
exhaust
emission
control
are
used
on
the
Datsun
One
is
an
aIr
injection
system
the
other
consists
of
engine
modifica
tIons
Datsuns
were
equipped
With
the
air
injec
tIon
system
only
through
1970
SInce
then
all
models
have
combined
aIr
mjection
with
engine
modIficatIons
EmisSIon
servicing
IS
complex
and
should
be
left
to
qualIfied
professionals
Figure
1
Illustrates
the
system
used
through
model
year
1969
Figure
2
IS
the
system
used
after
1970
Figures
3
through
7
offer
detaIls
of
various
emission
components
Maintenance
and
Testing
Penodlc
mspection
and
service
should
be
done
every
12
months
or
12
000
miles
The
engine
must
be
in
good
working
order
to
main
tain
a
low
level
of
harmful
emissions
There
fore
perform
a
general
tune
up
as
spec1fied
in
Chapter
Four
before
followmg
the
procedures
below
CRANKCASE
EMISSION
CONTROL
SYSTEM
The
crankcase
emission
control
system
is
shown
in
FlgDre
8
It
IS
a
closed
system
that
pre
vents
crankcase
gases
from
escaping
to
the
at
mosphere
Blowby
gases
are
dIrected
to
the
intake
manifold
through
the
ventilation
control
valve
Normally
capacity
of
the
valve
is
suffi
cient
to
handle
the
blowby
gas
plus
a
small
amount
of
ventIlating
air
drawn
from
the
air
cleaner
through
a
tube
leading
to
the
crankcase
Under
fun
throttle
condItIons
manifold
vacuum
is
Insufficient
to
draw
the
blowby
through
the
valve
When
this
happens
b10wby
flows
through
the
system
In
the
reverse
dIrection
General
1
Start
the
engine
and
bring
up
to
operating
temperature
2
Check
hoses
and
hose
connections
for
leaks
3
Examine
the
hoses
for
signs
of
cracks
or
de
terioraoon
Replace
as
required
Crankcase
Ventilation
Control
Valve
1
Start
the
engme
2
Remove
the
ventIlator
hose
from
the
crank
case
ventilatIon
control
valve
A
htssmg
nOISe
Page 120 of 252
27
10
13
49
j
l
e
1
1
31
33
22
@
@
25
f
1
d
37
36
6
40
ell
o
z
o
o
t
1
Hose
clamp
3
Hose
clamp
4
Connector
pipe
5
Hose
connector
7
Air
pump
With
pulley
8
Air
pump
silencer
assembly
9
Air
pump
pulley
10
Bolt
13
Spring
washer
14
Check
al
e
assembly
15
Anti
backfire
alve
16
Connector
tube
20
Air
gallery
pipe
22
Air
pump
bracket
23
Hex
bolt
25
Spring
washer
27
Adjusting
bar
31
Air
pump
bolt
33
Spring
washer
36
Plain
washer
37
Hex
nut
39
Air
cleaner
to
all
pump
hose
40
All
pump
to
control
al
e
hose
41
Air
pump
to
anti
backfire
val
e
hose
42
Anti
backfire
al
e
hose
44
Hose
clam
p
46
Hose
clam
p
47
Hose
clamp
49
Air
pum
p
belt
50
Rocker
co
er
to
air
cleaner
hose
VI