DATSUN 610 1969 Workshop Manual
Manufacturer: DATSUN, Model Year: 1969, Model line: 610, Model: DATSUN 610 1969Pages: 171, PDF Size: 10.63 MB
Page 151 of 171
Onter
1
2
I
J
I
I
I
r
f
r
1
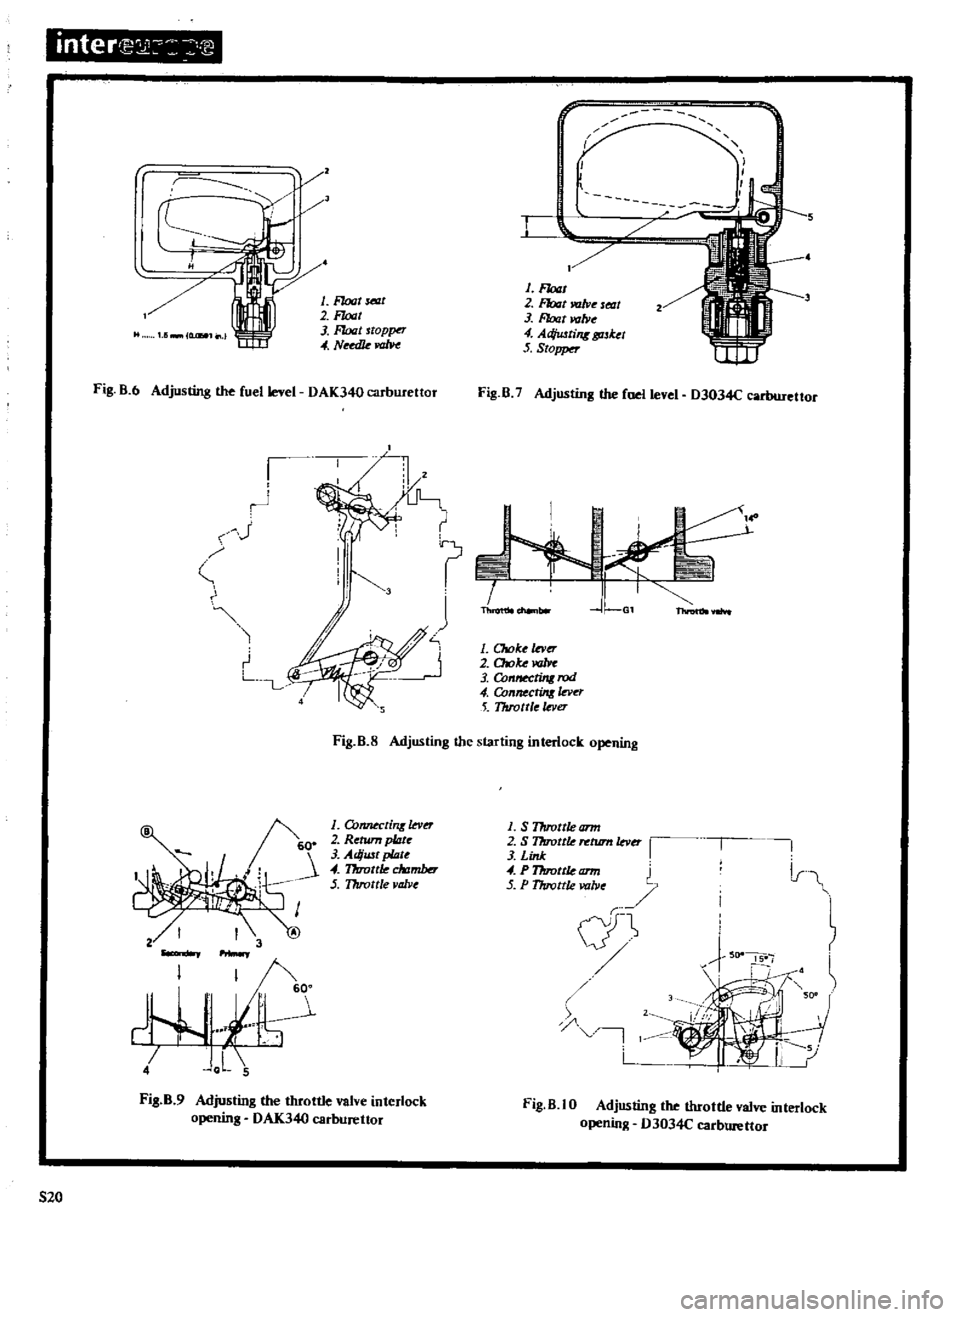
Float
SelllC
2
F10aI
3
Ffotzt
toppt
T
4
Nudk
m
1
F10at
2
Float
WJlve
ltat
3
Float
valJ1e
4
AcJiwtiflK
tpsket
5
Stopper
Fig
B
6
Adjusting
the
fuel
level
DAK340
C3tbutettor
Fig
B
7
Adjusting
the
fuel
level
D3034C
carburettor
1
11
J
Xi
I
tf
J
t
I
3
J
I
J
Th
1
Choke
mr
r
2
Otoke
m
LuL
3
Conn
ting
rod
4
Connectinlla
o
5
TIuottle
lever
Fig
B
S
Adjusting
the
starting
interlock
opening
6
O
1
Co1UJeCdrlK
lev
2
Rerum
plate
3
Adiust
pWe
4
17rrottle
clrzmber
5
Throttle
valve
1
S
Throttle
arm
2
S
Throttle
ntum
lever
3
Link
4
P1lIrortle
tml
5
P
1lIro
lle
valve
l
I
4
J
L
5
iF
l
1
L
Fig
B
9
Adjusting
the
throttle
valve
interlock
opening
OAK340
carburettor
Fig
B
lO
Adjusting
tbe
throttle
valve
interlock
opening
D3034C
carburettor
520
Page 152 of 171
between
primary
throttle
valve
and
the
wall
of
the
throttle
chamber
can
be
adjusted
if
necessary
by
carefully
bending
the
choke
connecting
rod
3
THROTILE
VALVE
INTERLOCK
OPENING
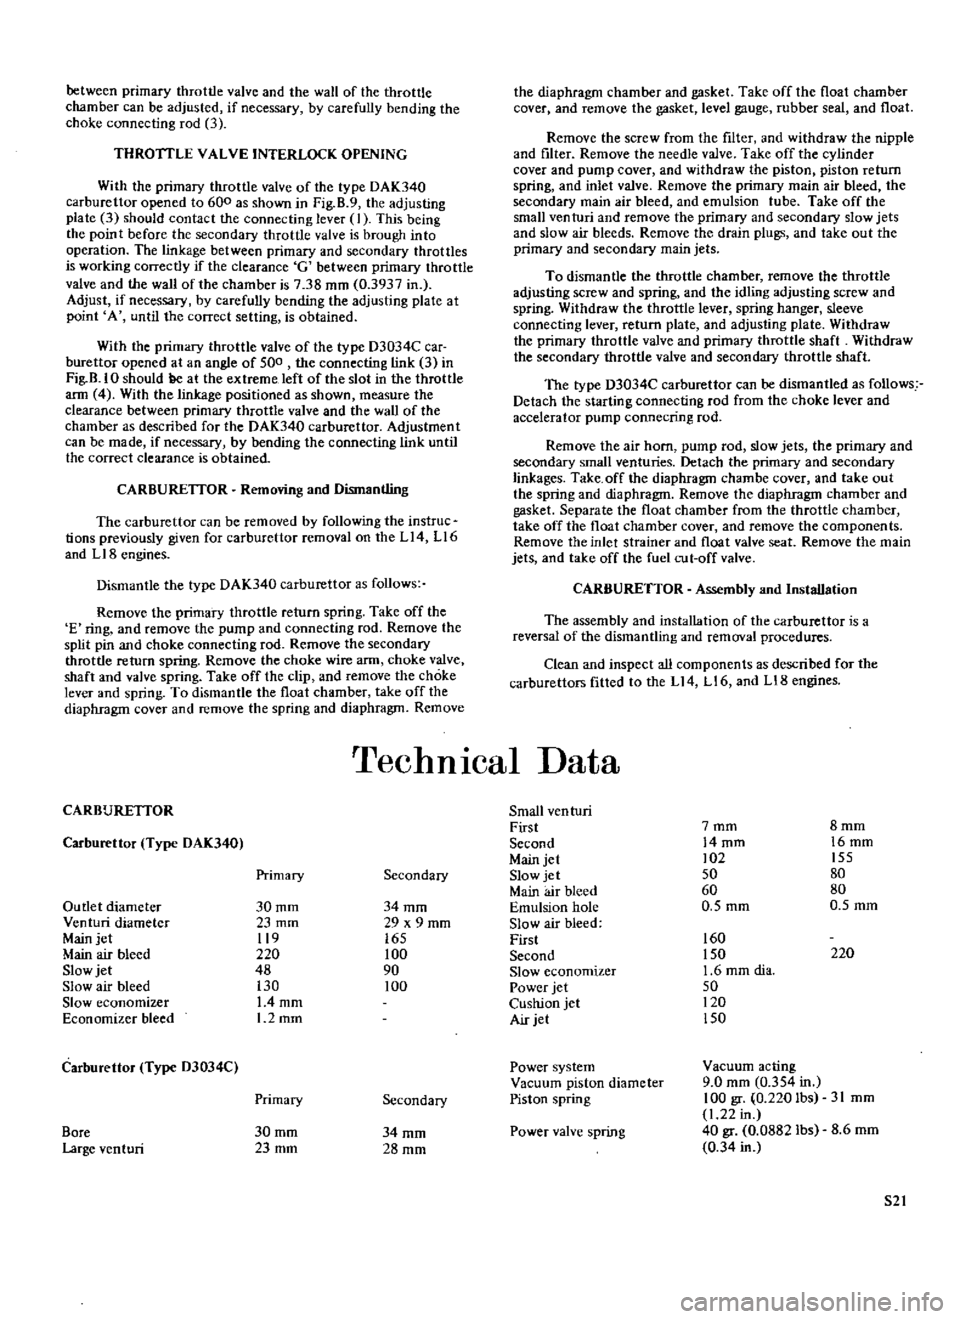
With
the
primary
throttle
valve
of
the
type
DAK340
carburettor
opened
to
600
as
shown
in
Fig
B
9
the
adjusting
plate
3
should
contact
the
connecting
lever
J
This
being
the
point
before
the
secondary
throttle
valve
is
brough
into
operation
The
linkage
between
primary
and
secondary
throttles
is
working
correctly
if
the
clearance
G
between
primary
throttle
valve
and
the
wall
of
the
chamber
is
738
mm
0
3937
in
Adjust
if
necessary
by
carefully
bending
the
adjusting
plate
at
point
A
until
the
correct
setting
is
obtained
With
the
primary
throttle
valve
of
the
type
D3034C
car
burettor
opened
at
an
angle
of
500
the
connecting
link
3
in
Fig
B
IO
should
ge
at
the
extreme
left
of
the
slot
in
the
throttle
ann
4
With
the
linkage
positioned
as
shown
measure
the
clearance
between
primary
throttle
valve
and
the
wall
of
the
chamber
as
described
for
the
DAK340
carburettor
Adjustment
can
be
made
if
necessary
by
bending
the
connecting
link
until
the
correct
clearance
is
obtained
CARBURElTOR
Removing
and
Dismantling
The
carburettor
can
be
removed
by
following
the
instruc
tions
previously
given
for
carburettor
removal
on
the
Ll4
L16
and
LIB
engines
Dismantle
the
type
DAK340
carburettor
as
follows
Remove
the
primary
throttle
return
spring
Take
off
the
E
ring
and
remove
the
pump
and
connecting
rod
Remove
the
split
pin
and
choke
connecting
rod
Remove
the
secondary
throttle
return
spring
Remove
the
choke
wire
arm
choke
valve
shaft
and
valve
spring
Take
off
the
clip
and
remove
the
choke
lever
and
spring
To
dismantle
the
float
chamber
take
off
the
diaphragm
cover
and
remove
the
spring
and
diaphragm
Remove
the
diaphragm
chamber
and
gasket
Take
off
the
float
chamber
cover
and
remove
the
gasket
level
gauge
rubber
seal
and
float
Remove
the
screw
from
the
filter
and
withdraw
the
nipple
and
filter
Remove
the
needle
valve
Take
off
the
cylinder
cover
and
pump
cover
and
withdraw
the
piston
piston
return
spring
and
inlet
valve
Remove
the
primary
main
air
bleed
the
secondary
main
air
bleed
and
emulsion
tube
Take
off
the
small
venturi
and
remove
the
primary
and
secondary
slow
jets
and
slow
air
bleeds
Remove
the
drain
plugs
and
take
out
the
primary
and
secondary
main
jets
To
dismantle
the
throttle
chamber
remove
the
throttle
adjusting
screw
and
spring
and
the
idling
adjusting
screw
and
spring
Withdraw
the
throttle
lever
spring
hanger
sleeve
connecting
lever
return
plate
and
adjusting
plate
Withdraw
the
primary
throttle
valve
and
primary
throttle
shaft
Withdraw
the
secondary
throttle
valve
and
secondary
throttle
shaft
The
type
D3034C
carburettor
can
be
dismantled
as
follows
Detach
the
starting
connecting
rod
from
the
choke
lever
and
accelerator
pump
connecting
rod
Remove
the
air
horn
pump
rod
slow
jets
the
primary
and
secondary
small
venturies
Detach
the
primary
and
secondary
linkages
Take
off
the
diaphragm
chambe
cover
and
take
out
the
spring
and
diaphragm
Remove
the
diaphragm
chamber
and
gasket
Separate
the
float
chamber
from
the
throttle
chamber
take
off
the
float
chamber
cover
and
remove
the
components
Remove
the
inlet
strainer
and
float
valve
seat
Remove
the
main
jets
and
take
off
the
fuel
cut
off
valve
CARBURETTOR
Assembly
and
Installation
The
assembly
and
installation
of
the
carburettor
is
a
reversal
of
the
dismantling
and
removal
procedures
Clean
and
inspect
all
components
as
described
for
the
carburettors
fitted
to
the
Ll4
Ll6
and
LI8
engines
TechnIcal
Data
CARBURETIOR
Small
ven
turi
First
7mm
8mm
Carburettor
Type
DAK340
Second
14mm
16mm
Main
jet
02
155
Primary
Secondary
Slow
jet
50
80
Main
air
bleed
60
80
Outlet
diameter
30mm
34mm
Emulsion
hole
0
5
mm
O
5mm
Venturi
diameter
23
mm
29
x
9
mm
Slow
air
bleed
Main
jet
119
165
First
160
Main
air
bleed
220
100
Second
150
220
Slow
jet
48
90
Slow
economizer
1
6
mm
dia
Slow
air
bleed
130
100
Power
jet
50
Slow
economizer
L4mm
Cushion
jet
120
Economizer
bleed
1
2mm
Air
jet
150
Carburettor
Type
D3034C
Power
system
Vacllum
acting
Vacuum
piston
diameter
9
0
mm
0
354
in
Primary
Secondary
Piston
spring
100
gr
0
220
Ibs
31
mm
1
22
in
Bore
30mm
34mm
Power
valve
spring
40
gr
0
0882
lbs
8
6mm
Large
venturi
23mm
28mm
0
34
in
52
Page 153 of 171
inter
M
j
@W
J
1
i
I
r
p
@
2
1
Strut
mounting
inzulDtor
Thruu
b
aring
J
Coil
prins
4
rubber
j
Sl1ut
mbly
6
Compression
rod
Z
Bal
joint
8
T
1ink
9
Stabi
iur
10
ODS
rnt
r
i
L
St
Ting
wheel
2
Steering
column
maft
J
Rubb
rCOfl
linK
4
Sturing
lower
joint
5
St
rinuotlr
IwusUr8
6
Sid
rod
XlI
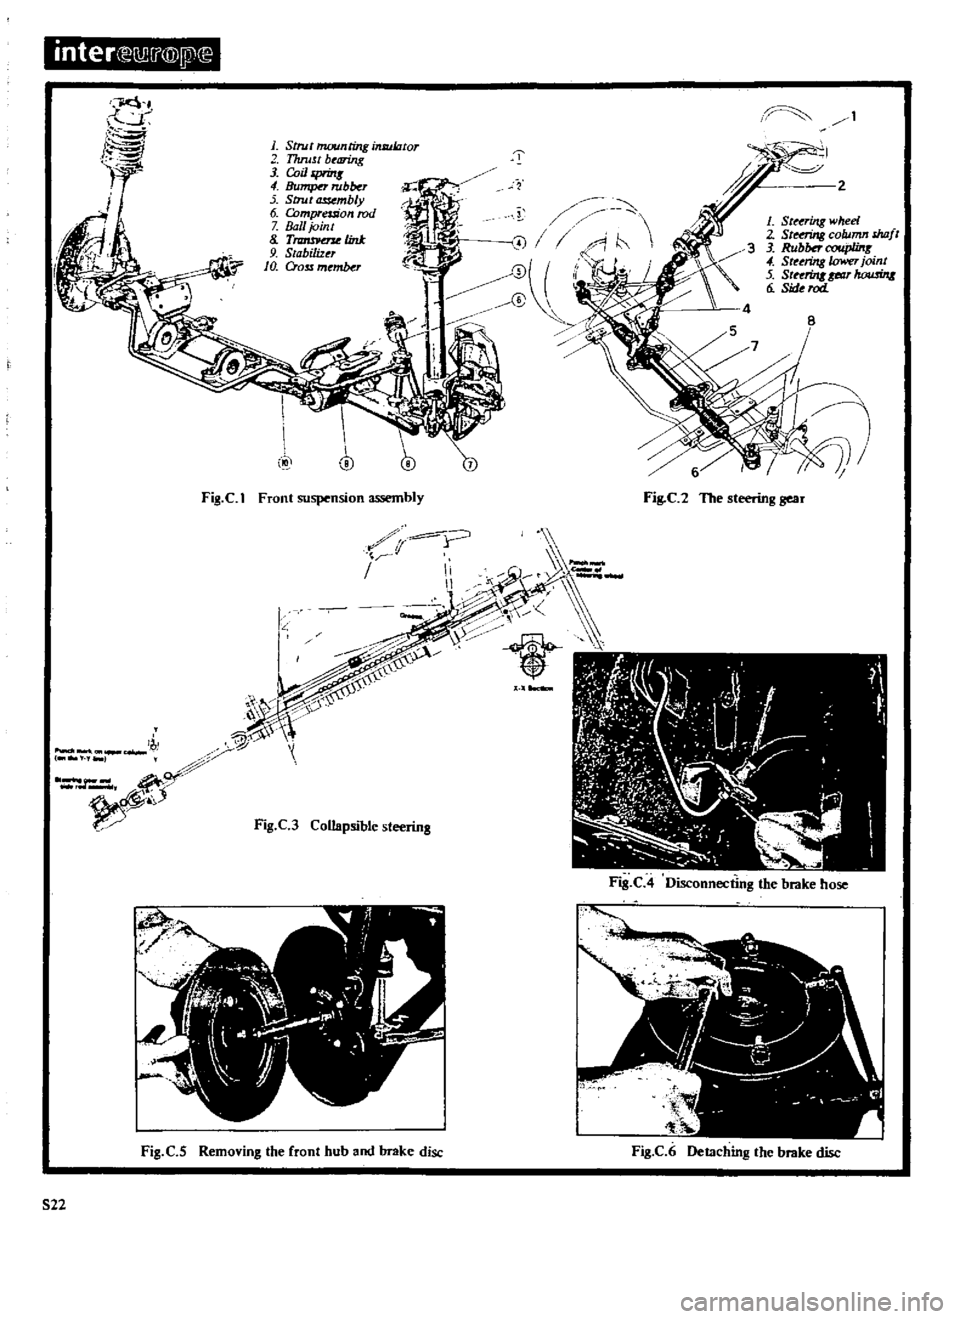
Fig
C
1
Front
suspension
assembly
Fig
C
2
The
steering
gear
iQ
r
y
y
v
I
Ii
1
1
Fig
C
3
Collapsible
steering
Fig
C
4
Disconnecting
the
brake
hose
I
f41
I
I
t
h
I
t
t
Il
t
k
I
Fig
C
5
Removing
the
front
hub
and
brake
disc
Fig
C
6
Detaching
the
brake
disc
522
Page 154 of 171
Accelerator
pump
Piston
diameter
Pump
discharge
Outer
hole
position
Middle
hole
position
Inner
hole
position
Pump
nozzle
diameter
Main
nozzle
diameter
Primary
Secondary
14
0
mm
0
551
in
0
2
cc
per
stroke
0
4
cc
per
stroke
0
6
cc
per
stroke
0
5
mm
0
020
in
2
3
mm
0
0906
in
2
8
mm
0
110
in
Throttle
valve
fully
closed
angle
Primary
10
degrees
Secondary
20
degrees
Idling
opening
5
degrees
approx
Choke
valve
fully
closed
angle
10
degrees
Throttle
opening
at
full
choke
13
5
degrees
FUEL
PUMP
Type
Delivery
Electric
1400
cc
in
one
minute
Emission
control
system
Air
pump
bracket
to
cylinder
head
nut
Adjusting
bar
to
bracket
bolt
Air
pump
to
bracket
bolt
Air
pump
to
adjusting
bar
nut
Anti
backfrre
bracket
to
rocker
cover
0
4Q
0
65
kgm
2
94
7
lb
ft
Anti
backfire
valve
to
bracket
0
4Q
O
65
kgm
2
94
7
lb
ft
Sensing
hose
clamp
to
rocker
cover
0
4Q
0
65
kgm
2
M
7
Ib
ft
Air
gallery
to
exhaust
manifold
plug
5
Q
6
0
kgm
36
243
4lb
ft
Check
valve
to
air
gallery
9
0
10
5
kgm
65
1
75
9Ib
ft
1
6
2
4
kgm
I
1
6
17
4Ib
ft
1
6
2
4
kgm
I
1
6
17
4Ib
ft
1
6
2
4
kgm
I
1
6
17
4
lb
ft
1
6
2
4
kgm
11
6
17
4Ib
ft
Front
SuspensIon
SteerIng
Description
Steering
Maintenance
Wheel
hub
and
bearing
Stabilizer
Spring
and
strut
assembly
Transverse
link
and
lower
ball
joint
Suspension
member
Front
wheel
alignment
Steering
wheel
and
column
Rack
and
pinion
and
tie
rod
Collapsible
steering
DESCRIPTION
The
front
suspension
is
of
the
strut
type
with
the
coil
spring
and
hydraulic
damper
units
mounted
on
the
crossmember
and
transverse
link
assembly
See
Fig
C
I
Vertical
movement
of
the
suspension
is
controlled
by
the
strut
assembly
Forward
and
rearward
movement
is
absorbed
by
compression
rods
6
and
side
movement
controlled
by
the
transverse
links
Front
suspension
servicing
procedures
are
similar
to
those
given
for
vehicle
fitted
with
L14
Ll6
and
LIB
engines
and
can
be
carried
out
by
reference
to
the
instructions
given
in
the
appropriate
section
Camber
and
castor
angles
are
preset
and
cannot
be
adjusted
and
a
check
must
be
made
for
signs
of
damage
to
the
suspension
system
if
the
angles
do
not
confonn
to
the
figures
given
in
Technical
Data
The
steering
is
of
the
direct
acting
rack
and
pinion
type
See
Fig
C
2
A
rubber
coupling
which
absorbs
vibration
and
two
universal
join
ts
are
incorpora
ted
between
the
steering
wheel
and
gear
assembly
The
collapsible
type
of
steering
column
assembly
Fig
C3
is
an
optional
fitting
A
full
description
of
this
type
of
assembly
i
given
in
the
Steering
section
for
L14
L16
and
L18
engines
STEERING
Maintenance
The
steering
system
should
be
lubricated
every
two
years
or
50
000
km
30
000
miles
whichever
comes
fIrst
A
lithium
base
multipurpose
grease
must
be
used
for
the
rack
and
pinion
and
rack
and
tie
rod
joints
The
plug
on
the
steering
gear
housing
should
be
removed
and
a
grease
nipple
fitted
so
that
the
recommended
quantity
of
10
to
15
gram
0
35
to
0
53
oz
of
grease
can
be
injected
Remove
the
grease
nipple
and
replace
the
plug
when
lubrication
is
completed
The
grease
reservoir
on
the
tube
side
should
be
replenished
when
the
level
of
grease
falls
to
approximately
one
third
ofits
capacity
WHEEL
HUB
AND
BEARING
Removal
and
Installation
Wheel
hub
and
bearing
servicing
procedures
are
similar
to
those
previously
given
for
vehicles
fitted
with
L14
LI6
and
LIB
engines
S23
Page 155 of 171
inter
l
m
@
j1l
i
Iii
il
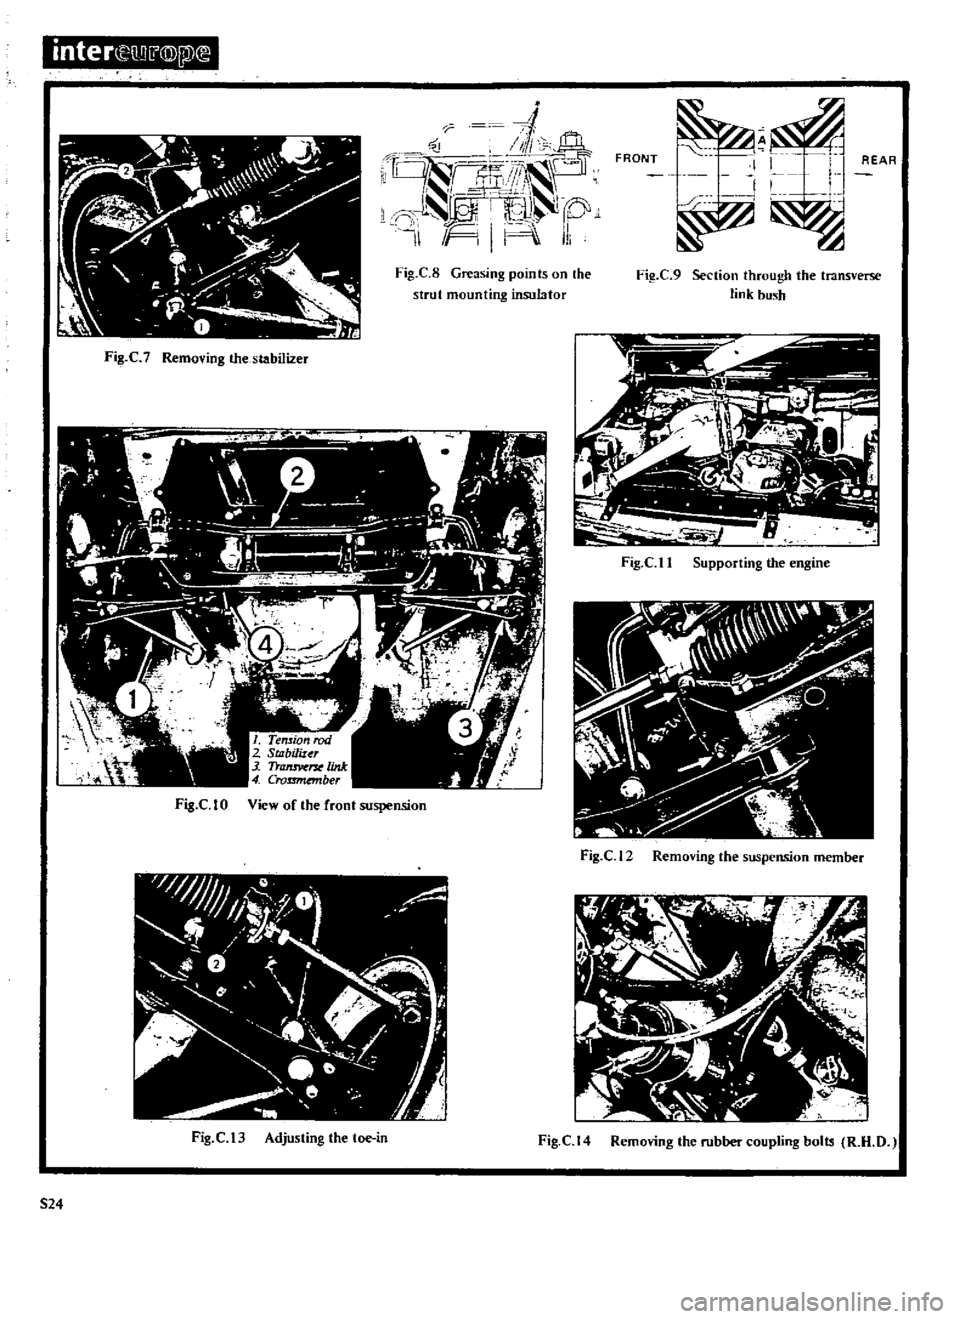
Fig
C
8
Greasing
points
on
the
strut
mounting
insulator
Fig
C
7
Remofing
the
stabilizer
Fig
C
t
0
View
of
the
front
sospension
Fig
C
13
Adjusting
the
toe
in
524
FRONT
l
I
I
I
REAR
Fig
C
9
Section
through
the
transverse
link
bush
r
I
r
Fig
C
t
1
Supporting
the
engine
fig
el2
Removing
the
suspension
member
Fig
C
14
Removing
the
rubber
coupling
bolts
R
H
D
Page 156 of 171
Remove
the
road
wheel
and
disconnect
the
brake
hose
at
the
connector
as
shown
in
Fig
C
4
of
this
section
Remove
the
brake
calliper
assembly
and
hub
cap
Withdraw
the
cotter
pin
and
remove
the
wheel
bearing
locknut
Remove
the
wheel
bearing
washer
and
take
off
the
hub
and
brake
disc
Fig
C
5
Remove
the
bearing
collar
take
out
the
outer
bearing
cage
and
prise
out
the
hub
grease
seal
Remove
the
inner
bearing
cage
and
drive
out
the
outer
races
of
the
inner
and
outer
bearings
using
the
special
drift
ST49120000
if
avail
able
Separate
the
brake
disc
from
the
hub
by
taking
out
the
retaining
bolts
as
shown
in
Fig
C
6
Installation
is
a
reversal
of
the
removal
procedure
Adjust
the
wheel
bearings
as
previously
described
taking
care
to
tighten
the
wheel
bearing
locknut
to
the
specified
torque
read
ing
of
3
0
to
3
5
kgm
21
7
to
25
3lb
ft
Turn
the
hub
several
times
to
settle
the
bearing
then
retighten
the
nut
to
the
same
figure
Slacken
the
locknut
by
a
quarter
turn
900
and
insert
the
cotter
pin
when
the
hole
in
the
spindle
is
aligned
with
the
hole
in
the
nut
Check
that
the
force
required
to
turn
the
hub
is
less
than
7
0
kg
cm
97
2
in
oz
STABILIZER
Removal
and
Installation
Remove
the
splash
board
and
take
off
the
bolts
I
in
Fig
C
7
which
attach
the
stabilizer
at
the
transverse
link
sides
Remove
the
bolts
attaching
the
stabilizer
bracket
2
to
the
frame
then
withdraw
the
stabilizer
Check
the
bar
and
rubber
components
for
signs
of
deforma
tion
or
damage
and
renew
as
necessary
Installation
is
a
reversal
of
the
removal
procedures
Tighten
the
fixing
bolts
to
a
torque
reading
of
1
2
to
I
7
kgm
8
7
to
12
3
lb
ft
at
the
transverse
link
side
and
1
9
to
2
5
kgm
13
7
to
18
llb
ft
at
the
frame
bracket
SPRING
AND
STRUT
ASSEMBLY
The
spring
and
strut
assembly
can
be
serviced
by
following
the
instructions
previously
given
for
the
assemblies
on
vehicles
fitted
with
the
L14
L16
and
Ll8engines
When
reassembling
make
sure
that
the
parts
shown
in
Fig
C
8
are
thomughly
greased
Installation
of
the
assembly
will
be
accomplished
more
easily
if
the
dust
cover
on
the
bonnet
ledge
is
removed
Tighten
the
nuts
and
bolts
to
a
torque
figures
given
in
TIGHTENING
TORQUES
TRANSVERSE
LINK
AND
LOWER
BALL
JOINT
The
transverse
link
and
lower
ball
joint
can
be
removed
in
a
similar
manner
to
the
parts
on
vehicles
fitted
with
L
14
L
16
and
L
18
engines
Renew
the
link
if
cracked
or
damaged
in
any
way
Check
the
measurement
A
in
Fig
C
9
The
measurement
between
front
and
rear
transverse
link
bushes
should
be
less
than
1
0
mm
0
039
in
Replace
the
bushes
if
necessary
The
lower
ball
joint
should
be
replaced
if
the
axial
play
of
the
joint
exceeds
0
03
to
0
6
mm
0
0012
to
0
0136
in
A
grease
nipple
must
be
installed
in
place
of
the
ball
joint
plug
so
that
the
joint
can
be
lubricated
with
multi
purpose
grease
as
previously
described
SUSPENSION
MEMBER
Removing
and
Installing
Jack
up
the
vehicle
and
support
it
on
stands
2
Remove
the
splash
board
Refer
to
Fig
C
I
0
and
detach
the
compression
rod
I
the
stabilizer
2
from
the
trans
verse
link
3
Detach
the
steering
linkage
from
the
suspen
sion
crossmember
4
3
Take
out
the
nuts
attaching
the
transverse
links
and
remove
the
links
at
both
sides
of
the
vehicle
4
Support
the
engine
with
a
hoist
as
shown
in
Fig
C
II
taking
care
not
to
damage
the
throttle
and
remote
control
linkages
and
then
remove
the
engine
mounting
bolts
at
both
sides
5
Remove
the
bolts
shown
arrowed
in
Fig
C
12
and
lift
the
suspension
member
away
Renew
the
suspension
member
if
it
is
cracked
or
deformed
in
any
way
Installation
is
a
reversal
of
the
removal
procedure
FRONT
WHEEL
ALIGNMENT
As
previously
stated
the
castor
and
camber
angles
are
preset
and
cannot
be
adjusted
A
thorough
check
should
be
made
of
the
steering
and
suspension
system
and
all
defective
parts
renewed
if
the
angles
are
incorrect
See
Technical
Data
The
front
wheels
should
toe
in
12
to
15
mm
0
4
7
to
0
59
in
Adjustment
can
be
carried
out
by
slackening
the
locknuts
1
in
Fig
C
13
and
then
turning
the
tie
rods
by
an
equal
amount
until
the
correct
toe
in
is
achieved
A
toe
in
gauge
will
of
course
be
required
for
this
operation
STEERING
WHEEL
AND
COLUMN
Removal
Disconnect
the
horn
wire
and
remove
the
horn
bar
Remove
the
steering
wheel
nut
and
pull
off
the
steering
wheel
2
Remove
the
turn
signal
and
lighting
switch
assembly
followed
by
the
steering
column
shell
covers
3
Remove
the
bolts
from
the
rubber
coupling
to
disconnect
the
lower
joint
See
Figs
C
14
and
C
I
5
if
the
car
is
fitted
with
right
hand
drive
The
lower
joint
upper
bolt
should
be
removed
to
disconnect
the
joint
if
the
car
is
fitted
with
left
hand
drive
4
Remove
the
cotter
pin
from
the
trunnion
and
disconnect
the
gearchange
rod
and
selector
rod
5
Remove
the
steering
column
upper
clamp
and
take
out
the
bolts
securing
the
lower
plate
STEERING
COLUMN
Dismantling
and
Assembling
Remove
the
C
washer
socket
screw
and
upper
bracket
bolt
Remove
the
lower
bracket
bolts
and
detach
the
remote
control
linkage
from
the
column
assembly
Remove
the
snap
ring
at
the
top
of
the
column
and
extract
the
column
shaft
from
the
jacket
Disconnect
the
rubber
coupling
from
the
lower
joint
then
remove
the
snap
ring
and
dismantle
the
lower
joint
S25
Page 157 of 171
inter
Il
l
@
l
10
9
8
7
6
3
5
4
I
i
I
I
I
I
I
I
I
I
1
Snap
ring
I
2
P
antwashor
I
3
St
ng
column
bNring
4
S
eerinK
column
shaft
5
Str
nUIx
column
jacket
6
St
riJrg
column
spring
7
Dust
covu
I
8
Rubber
coupling
9
Rubber
coupling
f10nre
I
10
Str
t
rin8lcwer
joint
mbly
I
I
1
Z
I
1
J
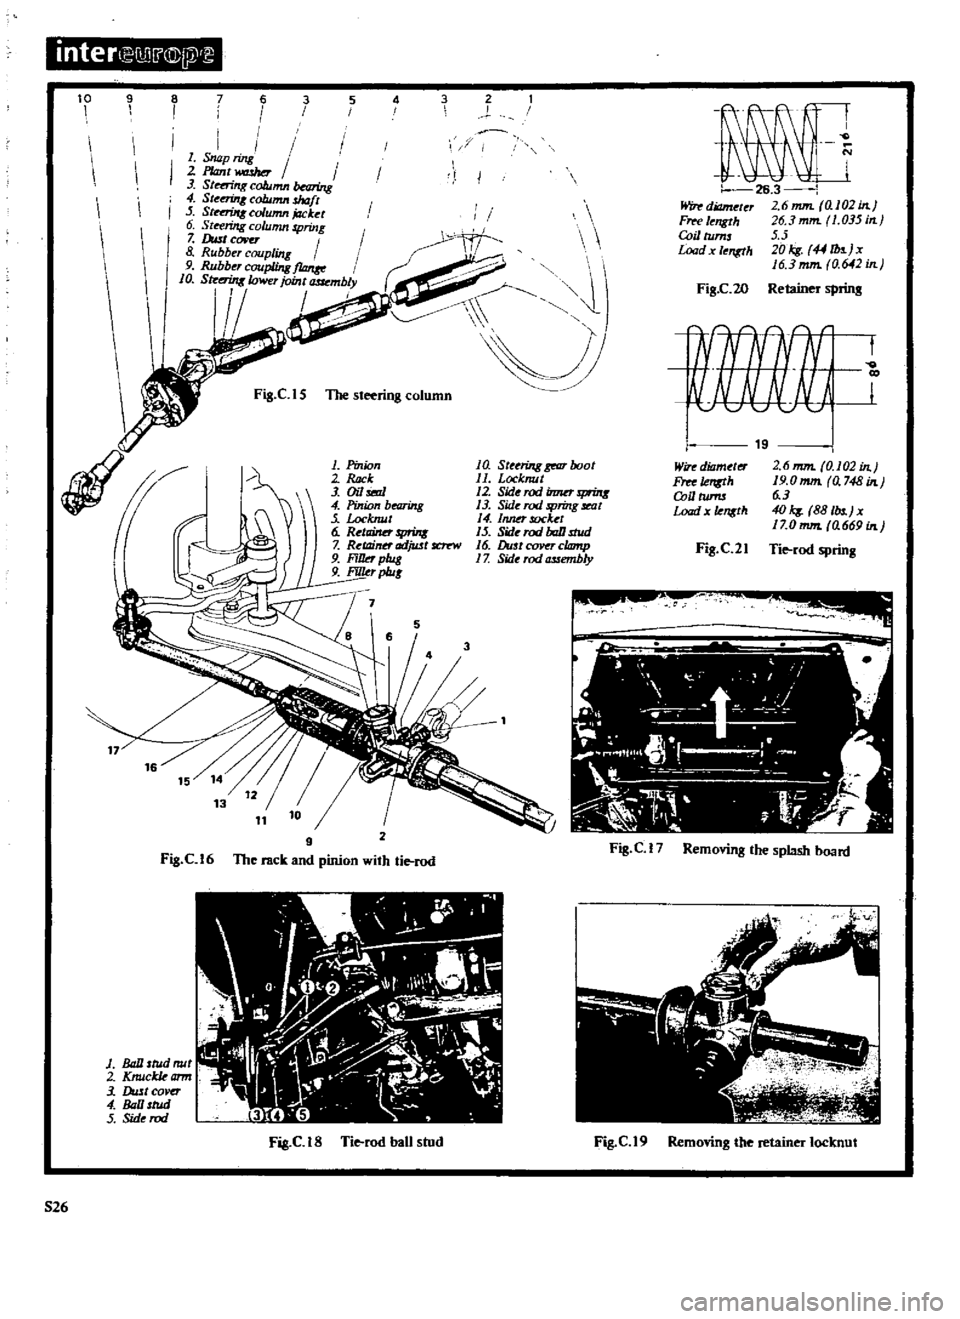
Fig
ClS
1be
steering
column
lfj
II
J
1
Pinion
2
ck
3
Oil
i6d
4
Pinion
bearing
Locknut
6
RetlliMr
print
7
Ret11inn
adjwt
fC1
r
W
9
FiIJd
plug
9
FiJILr
p1u
1
a
Steering
gear
boot
11
Locknut
12
Sid
rodinmr
f1fUtl
13
Side
rod
5
Jring
seat
4
Inner
socket
15
Sid
rod
baD
stud
16
DustceJVqclomp
1
Z
Side
rod
assembly
7
5
2
Fig
Cl6
9
The
rack
and
pinion
with
tie
rod
I
1
il
1
W
y
o
Ol
l
r
I
J
I
t4
I
J
Z
i
I
i
r
t
I
1
Ball
stud
mil
2
Knuckkamr
3
DultCOver
4
lll
tud
5
Sid
rod
Fig
C
IS
Tie
rod
ban
stud
526
J
1
26
3
Windiameler
2
6mm
al02in
Fffl
I
ngth
J6
3
mm
1
035
in
CoillUms
5
5
Load
I
ngth
JOkg
44
b
jx
16
3
mm
0
642
in
FiS
C
20
Retainer
sprins
t
Wire
diameter
Free
Ie
Q
U
tums
Load
x
1ensth
Fig
C
21
Fig
C
17
Removing
the
splash
board
Fig
C
19
Removing
the
retainer
locknut
Page 158 of 171
Gean
all
parts
thoroughly
and
renew
if
damaged
If
the
column
shaft
or
jacket
is
excessively
damaged
the
steering
gear
housing
must
be
checked
A
damaged
bearing
must
be
replaced
together
with
the
column
jacket
assembly
Assembly
is
a
reversal
of
the
dismantling
procedures
The
column
shaft
journal
should
be
lubricated
with
multipurpose
grease
which
can
also
be
used
to
fill
up
the
dust
cover
Grease
the
needle
bearing
when
assembling
the
universal
joint
Use
the
tightest
snap
ring
available
when
fitting
the
needle
bearing
Snap
rings
are
supplied
in
oversizes
of
0
95
mm
05
mm
and
1
5
mm
0
0374
0
0413
and
0
0453
in
Installation
of
the
column
assembly
is
a
reversal
of
the
removal
procedures
Tighten
the
rubber
coupling
bolts
to
a
torque
reading
of
I
S
to
1
8
kgm
I
0
8
to
13
0
Ib
ft
Refit
the
steering
wheel
and
tighten
the
nut
to
a
reading
of
4
0
to
5
0
kgm
28
9
to
36
2Ib
ft
RACK
AND
PINION
AND
TIE
ROD
Removing
and
Dismantling
1
Jack
up
the
vehicle
and
support
it
on
stands
Remove
the
road
wheels
2
Slacken
the
bolts
connecting
the
pinion
to
the
steering
lower
joint
See
Figs
C
16
3
Remove
the
bolts
from
the
steering
column
rubber
coupl
ing
See
Fig
C
15
and
remove
the
splash
board
Fig
C
17
4
Remove
the
tie
rod
ball
stud
nut
and
disconnect
the
tie
rod
from
the
knuckle
arm
Fig
C
I8
5
Lift
the
engine
slightly
with
suitable
tackle
but
take
care
not
to
damage
the
accelerator
or
remote
control
linkage
Remove
the
bolts
securing
the
steering
gear
housing
to
the
suspension
member
Withdraw
the
rack
and
pinion
assem
bly
Dismantle
as
follows
Detach
the
steering
lower
joint
from
the
rack
and
pinion
assembly
Clamp
the
unit
in
a
vice
taking
care
not
to
damage
the
steering
gear
housing
Refer
to
Fig
C
16
and
take
off
the
dust
cover
and
boot
clamps
at
both
sides
Slacken
the
stopper
nut
remove
the
tie
rod
inner
socket
and
disconnect
the
tie
rods
from
the
rack
Withdraw
the
spring
seat
and
tie
rod
spring
Take
off
the
steering
gear
boots
at
both
sides
Slacken
the
locknut
and
disconnect
the
tie
rod
outer
socket
from
the
ball
Slacken
the
locknut
remove
the
retainer
adjusting
screw
and
withdraw
the
steering
gear
retainer
See
Fig
C
19
Take
off
the
oil
seal
remove
the
snap
ring
and
withdraw
the
pinion
Remove
the
snap
ring
and
withdraw
the
bearing
from
the
pinion
Remove
the
filler
plug
and
take
out
the
rack
Remove
the
grease
reservoir
Clcan
all
parts
thoroughly
and
replace
any
which
show
signs
of
wear
or
damage
Check
the
axial
play
of
the
inner
and
outer
ball
joints
The
play
should
be
0
06
mm
0
0024
in
for
the
inner
ball
joint
and
from
0
1
to
0
5
mm
0
0039
to
0
0197
in
for
the
outer
joints
Use
a
spring
balance
to
check
the
force
required
to
swing
the
ball
joints
this
should
be
between
0
8
to
LS
kgm
5
8
to
10
8Ib
ft
Renew
the
oil
seal
Examine
the
retainer
and
tie
rod
springs
and
compare
them
with
the
values
given
in
Figs
C
20
and
c
n
RACK
AND
PINION
AND
TIE
ROD
Assembling
and
Adjusting
Press
the
bearing
on
to
the
pinion
gear
and
fi
t
the
tigh
test
snap
ring
available
Snap
rings
are
supplied
in
the
following
over
sizes
Snap
Ring
Thicknesses
1
04
to
1
09
mm
0
0409
to
0
0429
in
1
09
to
I
14
mm
0
0429
to
0
0449
in
1
14toI19mm
0
0449toO
0469in
Ll9
to
1
24
mm
0
0469
to
0
0488
in
1
24
to
1
29
mm
0
0488
to
0
0502
in
Clamp
the
steering
gear
housing
in
a
vice
Grease
the
teeth
and
friction
surfaces
of
the
rack
with
multipurpose
grease
Lubricate
the
gear
housing
from
the
pinion
housing
side
Ensure
that
the
rack
projects
by
an
equal
amount
of
96
mm
3
8
in
in
both
ends
of
the
housing
with
the
rack
teeth
directed
towards
the
pinion
shaft
Grease
the
pinion
teeth
end
bushing
and
pinion
bearing
Engage
the
tccth
of
the
pinion
with
the
rack
and
insert
the
pinion
Make
sure
that
the
bushing
does
not
become
damaged
The
rack
must
project
from
the
housing
by
an
equal
amount
at
each
side
with
the
groove
on
the
pinion
serration
facing
upwards
Fit
the
snap
ring
into
the
housing
groove
to
hold
the
bearing
outer
race
in
position
The
snap
ring
must
fit
tightly
and
can
be
selected
from
the
following
oversizes
Snap
Ring
Thicknesses
LS5
to
1
60
mm
0
0610
to
0
0630
in
1
60
to
1
65
mm
0
0630
to
0
0650
in
1
65
to
I
70
mm
0
0650
to
0
0669
in
1
70
to
I
75
mm
0
0669
to
0
0689
in
Fit
the
oil
seal
Use
a
dial
gauge
as
shown
in
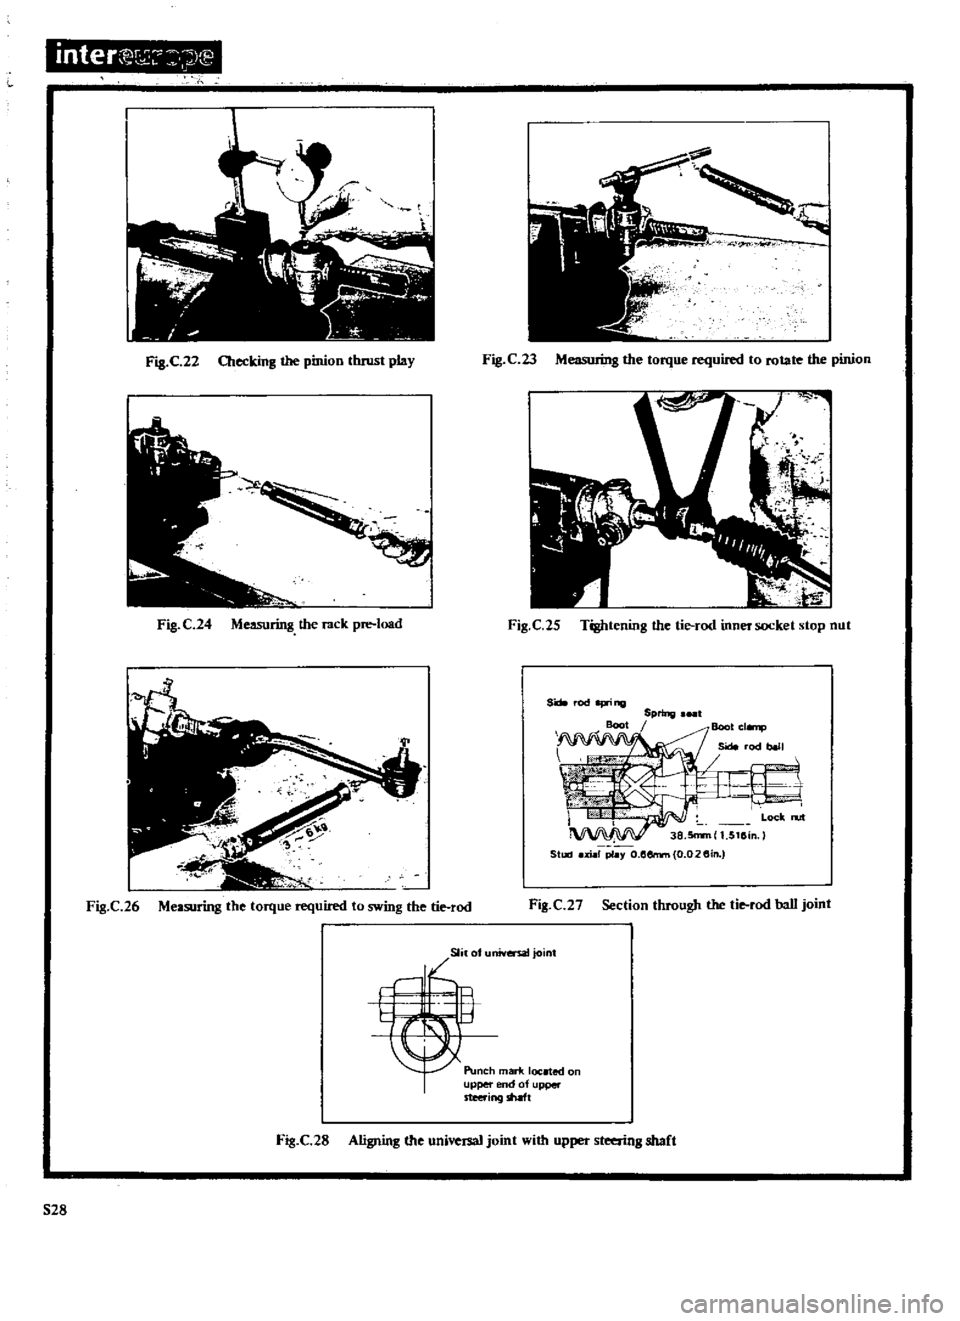
Fig
C
22
to
check
the
thrust
play
of
the
pinion
The
play
should
be
less
than
0
09mm
0
0035
in
Grease
the
retainer
and
insert
it
with
the
spring
Tighten
the
retainer
adjusting
screw
fully
then
back
it
off
by
20
to
25
degrees
Tighten
the
locknut
to
a
torque
reading
of
4
0
to
6
0
kgm
28
9
to
43
4lb
ft
Coat
the
locknut
with
liquid
pack
ing
Three
Bond
When
the
rack
and
pinion
is
assembled
measure
the
force
required
to
rotate
the
pinion
and
also
the
preload
of
the
rack
Use
a
spring
balance
as
shown
in
Figs
C
23
and
C
24
and
check
that
the
pinion
torque
is
8
to
20
kg
cm
7
to
17
Ib
in
and
the
rack
preload
is
from
8
to
18
kg
17
6
to
39
7Ibs
Take
care
to
slide
the
assembly
over
the
complete
range
of
the
stroke
Fit
a
dust
cover
clamp
at
each
end
of
the
housing
Install
the
stop
nut
on
the
threads
of
the
rack
Liberally
grease
the
ball
joint
friction
area
of
the
tie
rod
assembly
Assemble
the
spring
and
ball
seat
and
fit
the
inner
socket
part
of
the
tie
rod
assembly
to
the
rack
Make
sure
the
boot
is
positioned
at
the
ball
stud
end
Note
that
the
left
hand
tie
rod
is
marked
with
an
L
the
right
hand
rod
is
not
marked
527
Page 159 of 171
inter
C
7
j
l
l
IJ
Fig
C
22
Checking
the
pinion
tluust
play
Fig
C23
ML
Io
b
the
torque
required
to
rotate
the
pinion
Fig
C
24
Measuring
the
rack
pre
load
Fig
C
25
Tightening
the
tie
rod
inner
socket
stop
nut
S
rod
I
p
ing
Boot
Spring
I
Boot
cl
np
Side
rod
1
t
I
I
Lock
n
rt
38
5n
m
1
5115in
Staaj
xial
p1
Y
o
l5errm
0
02
5in
Fig
C
26
Measuring
the
torque
required
to
swing
the
tie
rod
Fig
C
2
Section
through
the
tie
rod
ball
joint
Slila
niversatjoint
Punch
marif
located
on
upper
nd
of
upper
steering
shaft
Fig
C
28
Aligning
the
universal
joint
with
upper
steering
shaft
528
Page 160 of 171
Tighten
the
inner
socket
until
the
ball
seat
is
at
the
rack
end
then
back
off
the
socket
by
30
to
40
degrees
and
tighten
the
stop
nut
to
a
torque
reading
of
8
0
to
10
0
kgm
57
8
to
72
3
Ib
ft
as
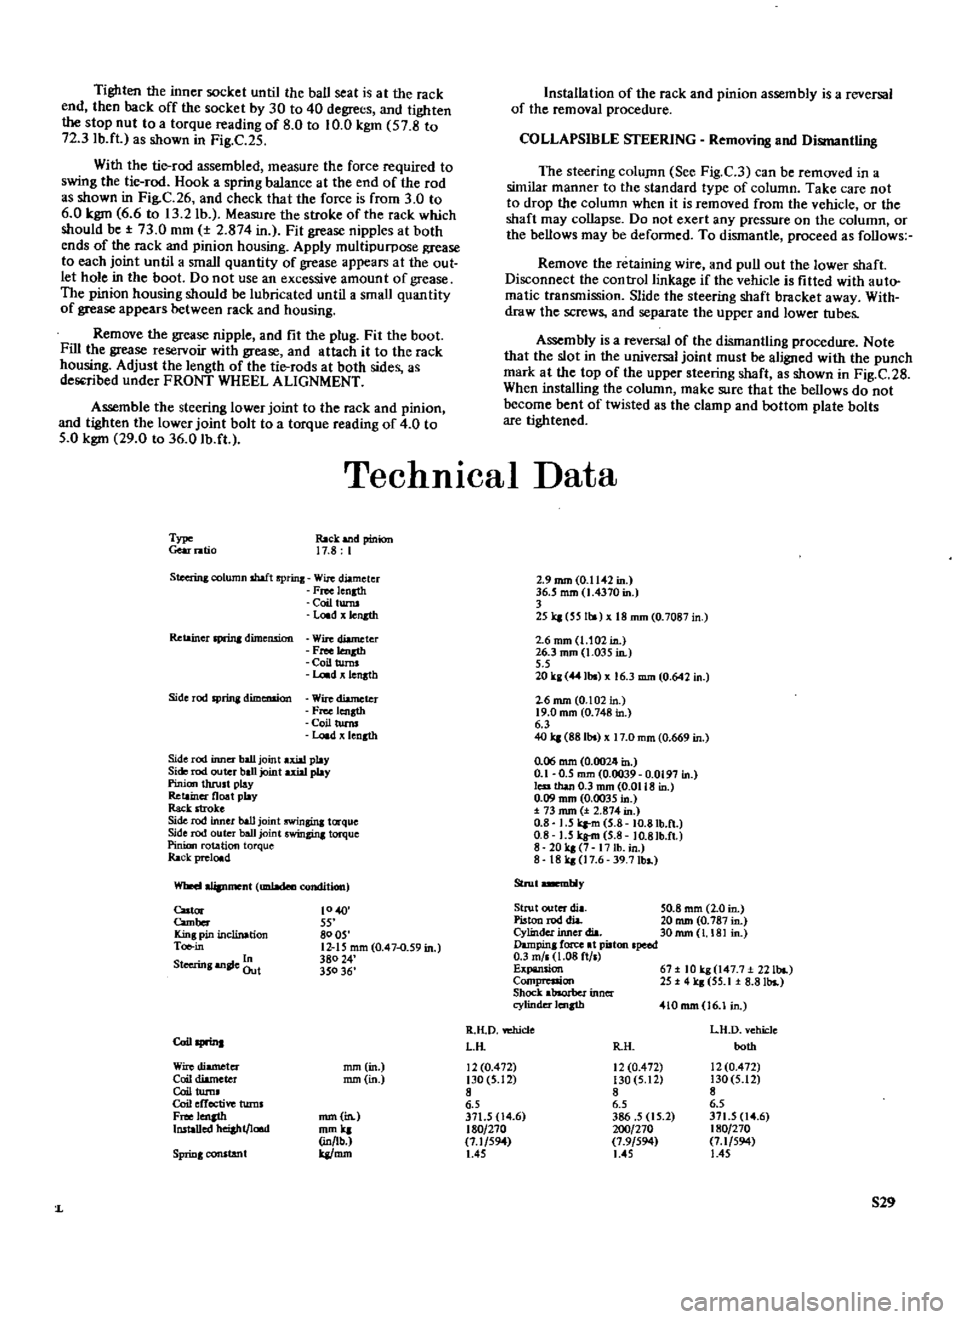
shown
in
Fig
C
25
With
the
tie
rod
assembled
measure
the
force
required
to
swing
the
tie
rod
Hook
a
spring
balance
at
the
end
of
the
rod
as
shown
in
Fig
C
26
and
check
that
the
force
is
from
3
0
to
6
0
kgm
6
6
to
13
2
lb
Measure
the
stroke
of
the
rack
which
should
be
73
0
mm
2
874
in
Fit
grease
nipples
at
both
ends
of
the
rack
and
pinion
housing
Apply
multipurpose
ase
to
each
joint
until
a
small
quantity
of
grease
appears
at
the
out
let
hole
in
the
boot
Do
not
use
an
excessive
amount
of
grease
The
pinion
housing
should
be
lubricated
until
a
small
quantity
of
grease
appears
between
rack
and
housing
Remove
the
grease
nipple
and
fit
the
plug
Fit
the
boot
Fill
the
grease
reseIVoir
with
grease
and
attach
it
to
the
rack
housing
Adjust
the
length
of
the
tie
rods
at
both
sides
as
des
ribed
under
FRONT
WHEEL
ALIGNMENT
Assemble
the
steering
lower
joint
to
the
rack
and
pinion
and
tighten
the
lower
joint
bolt
to
a
torque
reading
of
4
0
to
5
0
kgm
29
0
to
36
0
Ib
ft
Installation
of
the
rack
and
pinion
assembly
is
a
reversal
of
the
removal
procedure
COLLAPSIBLE
STEERING
Removi
8
and
Dismantti
8
The
steering
coluJllfl
See
Fig
C
3
can
be
removed
in
a
similar
manner
to
the
standard
type
of
column
Take
care
not
to
drop
the
column
when
it
is
removed
from
the
vehicle
or
the
shaft
may
collapse
Do
not
exert
any
pressure
on
the
column
or
the
bellows
may
be
defonned
To
dismantle
proceed
as
follows
Remove
the
retaining
wire
and
pull
out
the
lower
shaft
Disconnect
the
control
linkage
if
the
vehicle
is
fitted
with
auto
matic
transmission
Slide
the
steering
shaft
bracket
away
With
draw
the
screws
and
separate
the
upper
and
lower
tubes
Assembly
is
a
reversal
of
the
dismantling
procedure
Note
that
the
slot
in
the
universal
joint
must
be
aligned
with
the
punch
mark
at
the
top
of
the
upper
steering
shaft
as
shown
in
Fig
C
28
When
installing
the
column
make
sure
that
the
bellows
do
not
become
bent
of
twisted
as
the
clamp
and
bottom
plate
bolts
are
tightened
TechnICal
Data
TYP
Gear
I1ltio
Rack
and
pinion
17
8
I
Steerin
column
shaft
spring
Wire
diameter
Freelenath
CoiltW
llJ
Load
length
Retainer
sprinJ
dimension
Wire
diameter
F
CoilturnJ
l
oadxlensth
Side
rod
SPrina
dimeruion
Wire
diameter
Fn
elenath
Coil
turns
Load
x
lensth
Side
rod
inner
ball
joint
ax
ia
I
play
Side
rod
outer
ball
joint
uiaJ
play
Pinion
thrultplay
Retainer
float
play
Rack
moke
Side
rod
inner
ball
joint
swinsinl
torque
Side
rod
uter
ball
joint
swingina
torque
Pinion
oration
torque
Rack
pre1
d
Wheel
alipment
1IIl1a
a
ondition
Cut
c
m
Kinl
pin
inclination
Toe
in
S
In
teerinlan
eOut
10
40
8005
12
15
mm
0
47
0
59
in
38024
35036
2
9
mm
0
11
2
in
36
5
mm
1
4370
in
3
25q
551
18mm
0
7087
2
6
mm
1
102in
26
3
mm
1
035
in
5
5
20
kl
lbs
16
3
mm
0
642
in
26
mm
0
102
in
19
0
mm
0
748
in
6
3
40
q
88Ibs
17
0
mm
0
669
in
0
06
mm
0
002
m
0
1
0
5
mm
0
0039
0
0197
in
less
than
0
3
mm
0
0118
in
0
09
mm
0
0035
in
73
mm
t
2
87
in
0
8
1
5
q
m
5
8
10
8Ib
n
0
8
J
S
kg
m
5
8
JO
8Ib
ft
8
20q
7
17
lb
in
8
18
q
l7
6
39
7Ibs
Strut
DlelDbly
Strut
outer
Ilia
50
8
mm
2
0
in
Piston
rod
di
a
20
mm
0
787
in
Cylinder
inner
dia
30mm
I
181
in
Dampinl
force
at
pistonlpeed
0
3
m
I
1
08
ft
I
Expansion
67
IOq
I47
7
221bs
Compression
25
4kl
55
1
8
81bs
Shock
absorber
inner
cylinderlcngth
IOmm
16
1
in
R
IlD
vchicle
LH
D
ehide
CoiIsprina
LIi
IlIi
OOIh
Wire
diameter
mm
in
12
0
472
12
0
472
12
0
472
Coil
diameter
mm
in
130
5
12
130
5
12
130
5
12
Coil
Ium
S
Coil
effective
turnl
6
5
6
5
6
5
Free
lenJth
mm
in
371
5
14
6
386
5
15
2
371
5
14
6
Installed
hei
ht
load
mmq
180
270
200
270
180
270
in
lb
7
1
594
7
9
594
7
1
594
SpriDgCOfl
ltant
ka
mm
1
45
US
1
45
529
1