engine DATSUN B110 1973 Service Repair Manual
[x] Cancel search | Manufacturer: DATSUN, Model Year: 1973, Model line: B110, Model: DATSUN B110 1973Pages: 513, PDF Size: 28.74 MB
Page 458 of 513
ENGINE
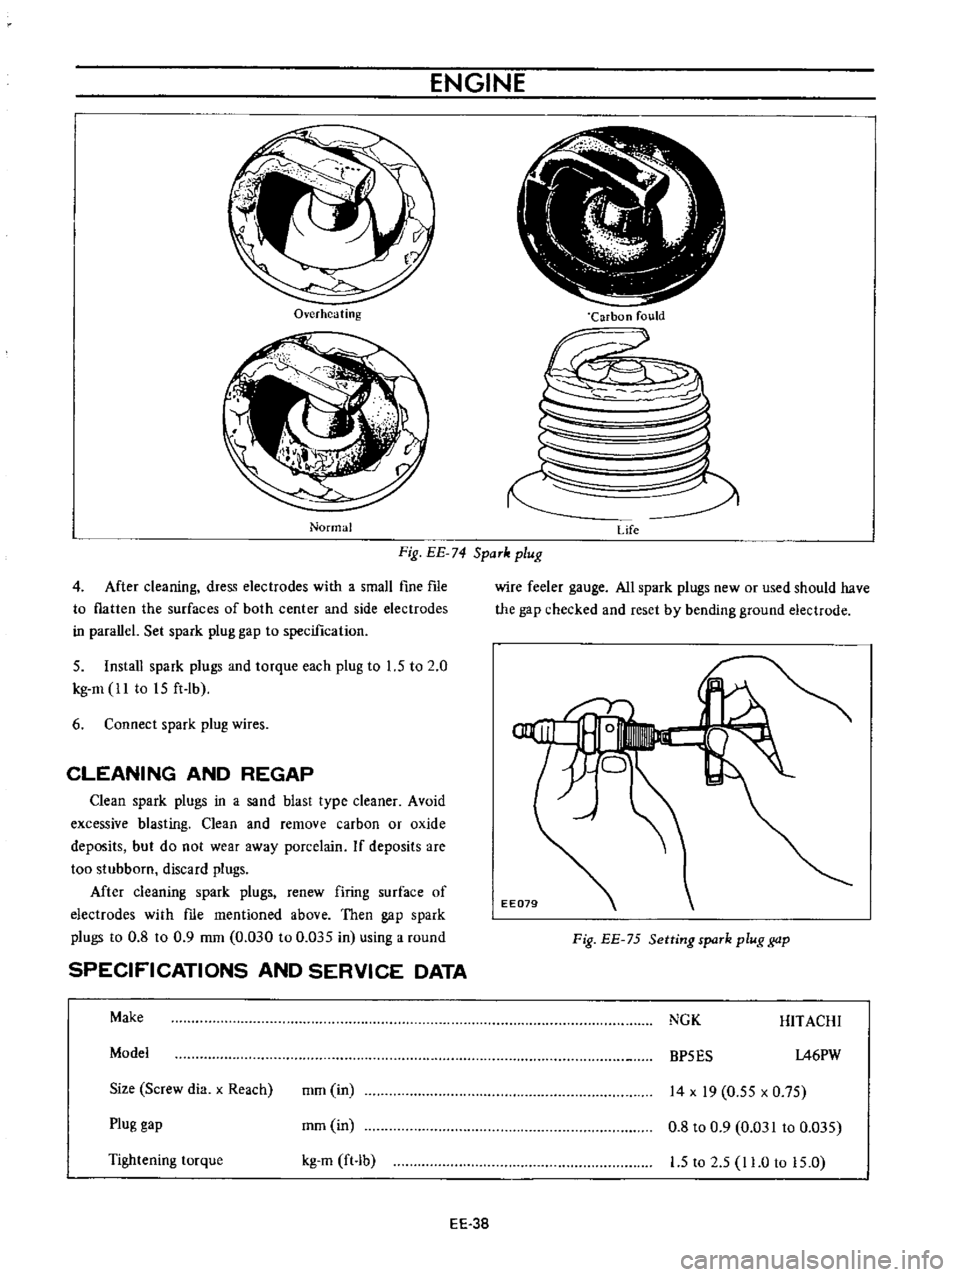
Overheating
Normal
Carbon
fould
Fig
EE
74
SpaTk
plug
Life
4
After
cleaning
dress
electrodes
with
a
small
fine
fIle
to
flatten
the
surfaces
of
both
center
and
side
electrodes
in
parallel
Set
spark
plug
gap
to
specification
5
Install
spark
plugs
and
torque
each
plug
to
1
5
to
2
0
kg
m
ll
to
15
ft
lb
6
Connect
spark
plug
wires
CLEANING
AND
REGAP
Clean
spark
plugs
in
a
sand
blast
type
cleaner
Avoid
excessive
blasting
Clean
and
remove
carbon
or
oxide
deposits
but
do
not
wear
away
porcelain
If
deposits
are
too
stubborn
discard
plugs
Mter
cleaning
spark
plugs
renew
firing
surface
of
electrodes
with
me
mentioned
above
Then
gap
spark
plugs
to
0
8
to
0
9
mm
0
030
to
0
035
in
using
a
round
SPECIFICATIONS
AND
SERVICE
DATA
Make
Model
Size
Screw
dia
x
Reach
mm
in
Plug
gap
mm
in
Tightening
torque
kg
m
ft
b
EE
38
wire
feeler
gauge
All
spark
plugs
new
or
used
should
have
the
gap
checked
and
reset
by
bending
ground
electrode
Fig
EE
75
Setting
spaTk
plug
gap
NGK
HITACHI
BP5ES
1A6PW
14
x
19
0
55
x
0
75
0
8
to
0
9
0
031
to
0
035
1
5
to
2
5
11
0
to
15
0
Page 459 of 513
ENGINE
ELECTRICAL
SYSTEM
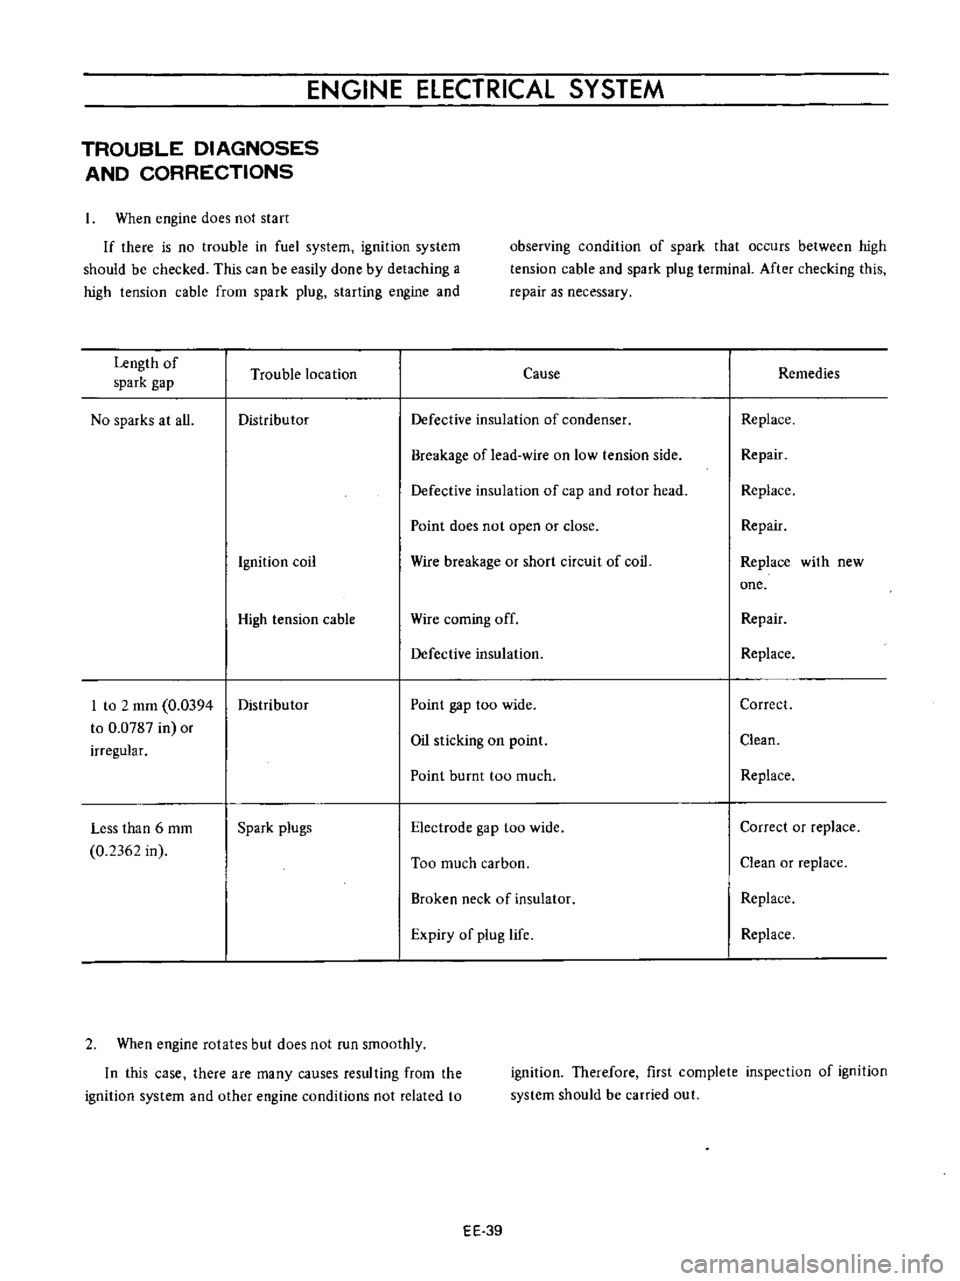
TROUBLE
DIAGNOSES
AND
CORRECTIONS
When
engine
does
not
start
If
there
is
no
trouble
in
fuel
system
ignition
system
should
be
checked
This
can
be
easily
done
by
detaching
a
high
tension
cable
from
spark
plug
starting
engine
and
observing
condition
of
spark
that
occurs
between
high
tension
cable
and
spark
plug
terminal
After
checking
this
repair
as
necessary
Length
of
Trouble
location
Cause
Remedies
spark
gap
No
sparks
at
all
Distributor
Defective
insulation
of
condenser
Replace
Breakage
of
lead
wire
on
low
tension
side
Repair
Defective
insulation
of
cap
and
rotor
head
Replace
Point
does
not
open
or
close
Repair
Ignition
coil
Wire
breakage
or
short
circuit
of
coil
Replace
with
new
one
High
tension
cable
Wire
coming
off
Repair
Defective
insulation
Replace
I
to
2
mm
0
0394
Distributor
Point
gap
too
wide
Correct
to
0
0787
in
or
Oil
sticking
on
point
Clean
irregular
Point
burnt
too
much
Replace
Less
than
6
mm
Spark
plugs
Electrode
gap
too
wide
Correct
or
replace
0
2362
in
Too
much
carbon
Clean
or
replace
Broken
neck
of
insulator
Replace
Expiry
of
plug
life
Replace
2
When
engine
rotates
but
does
not
run
smoothly
In
this
case
there
are
many
causes
resulting
from
the
ignition
system
and
other
engine
conditions
not
related
to
ignition
Therefore
first
complete
inspection
of
ignition
system
should
be
carried
out
EE
39
Page 460 of 513
Troubles
Engine
misses
Engine
causes
knocking
very
often
Engine
does
not
give
enough
power
Trouble
location
Distributor
Ignition
coil
High
tension
code
Spark
plugs
Distributor
Spark
plugs
Distributor
Spark
plugs
ENGINE
Causes
Dirty
point
Improper
point
gap
Leak
of
electricity
of
cap
and
rotor
head
Defective
insulation
of
condenser
Defective
arm
Defective
spring
of
arm
Breakage
oflead
wire
Worn
out
or
shaky
breaker
plate
Worn
out
or
shaky
distributor
shaft
Layer
short
circuit
or
use
of
inferior
quality
Deterioration
of
insulation
and
leak
of
electricity
Dirty
Leak
of
electricity
at
upper
porcelain
insu
lator
Improper
and
advance
timing
Coming
off
or
breakage
of
governor
spring
A
pin
or
a
hole
of
governor
portion
worn
out
Burnt
too
much
Improper
and
retarded
timing
Defedive
function
of
governor
Dirty
point
Point
gap
too
narrow
Dirty
EE
40
Remedies
Clean
Correct
Repair
or
replace
Replace
Oil
shaft
Replace
assembly
Replace
Replace
assembly
Replace
assembly
Replace
with
good
one
Replace
Clean
Repair
or
replace
Correct
the
fitting
Correct
or
replace
Replace
Replace
Correct
the
fitting
Replace
assembly
Clean
Correct
Clean
Page 461 of 513
DATE
ENGINE
ElECTRICAL
SYSTEM
SERVICE
JOURNAL
OR
BUl
LETIN
REFE
RENCE
JOURNAL
or
BULLETIN
No
PAGE
No
SUBJECT
EE
41
Page 462 of 513
ENGINE
i
1
H
t
RI
1
JOURNAL
or
DATE
BULLETIN
No
PAGE
No
SUBJECT
I
I
I
I
I
I
I
I
I
I
I
I
I
I
I
I
I
I
I
I
I
I
I
I
I
I
I
I
I
I
I
I
I
I
I
I
I
1
1111
1
EE
42
Page 463 of 513
DATSUN
1200
MODEL
B
110
SERIES
I
NISSAN
I
NISSAN
MOTOR
CO
LTD
TOKYO
JAPAN
SECTION
ER
ENGINE
REMOVAL
INSTAllATION
It
ENGINE
MOUNTING
ENGINE
REMOVAL
AND
INSTALLATION
ER
1
ER
4
Page 464 of 513
ENGINE
REMOVAL
INSTAllATION
ENGINE
MOUNTING
CONTENTS
FRONT
ENGINE
MOUNTING
Removal
Reinstallation
ER
1
ER
1
ER
2
REAR
ENGINE
MOUNTING
Removal
Reinstallation
ER
2
ER
2
ER
3
r
0
iQ
@
q
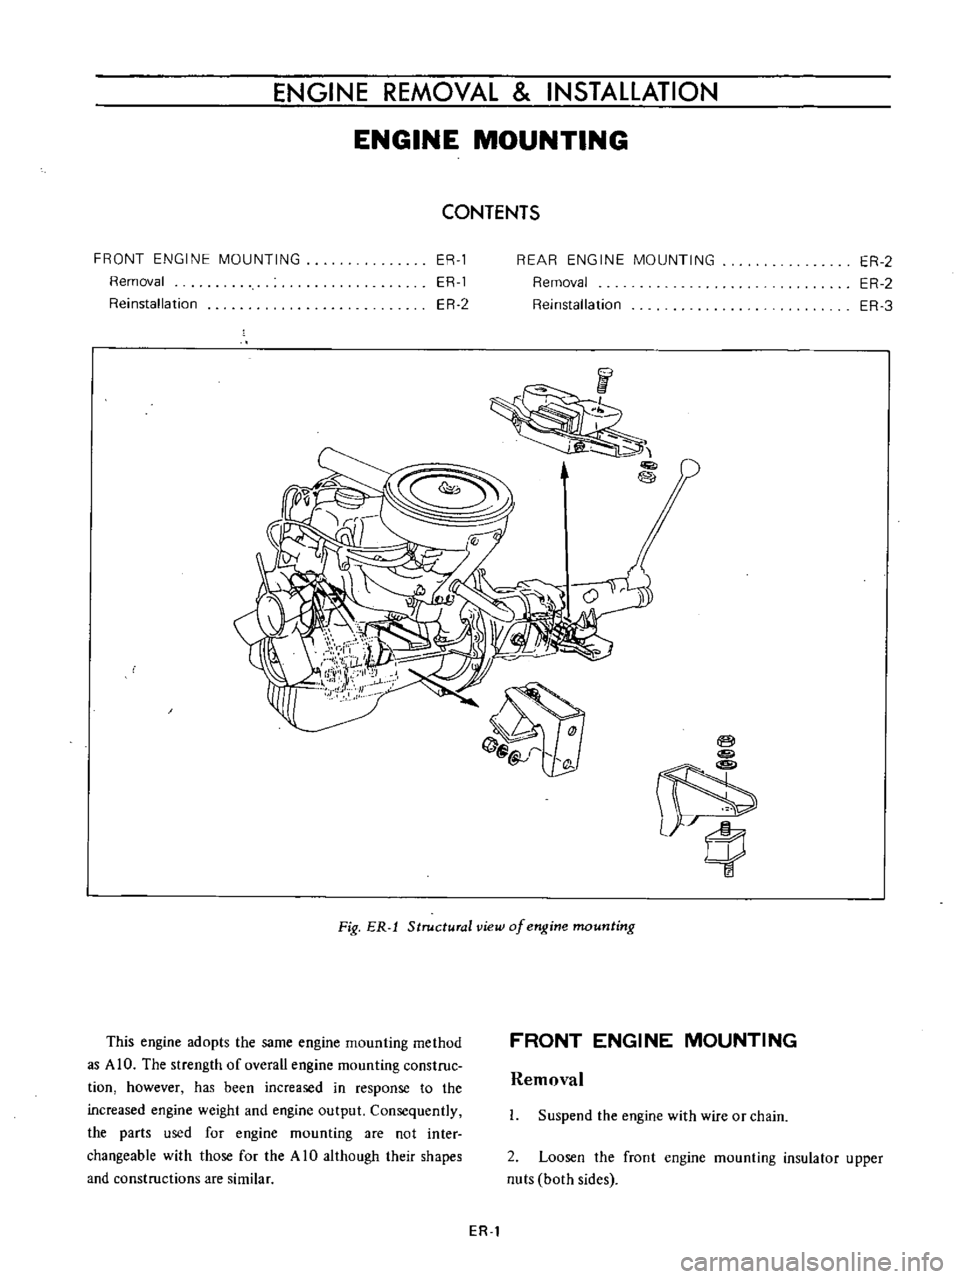
Fig
ER
1
Structural
view
of
engine
mounting
This
engine
adopts
the
same
engine
mounting
method
as
AIO
The
strength
of
overall
engine
mounting
construc
tion
however
has
been
increased
in
response
to
the
increased
engine
weight
and
engine
output
Consequently
the
parts
used
for
engine
mounting
arc
not
inter
changeable
with
those
for
the
A
10
although
their
shapes
and
constructions
are
similar
FRONT
ENGINE
MOUNTING
Removal
I
Suspend
the
engine
with
wire
or
chain
2
Loosen
the
front
engine
mounting
insulator
upper
nuts
both
sides
ER
1
Page 465 of 513
CHASSIS
3
Make
sure
that
the
wire
or
chain
used
to
suspend
the
engine
is
positioned
properly
so
that
no
load
is
applied
to
the
insulators
and
remove
the
nuts
completely
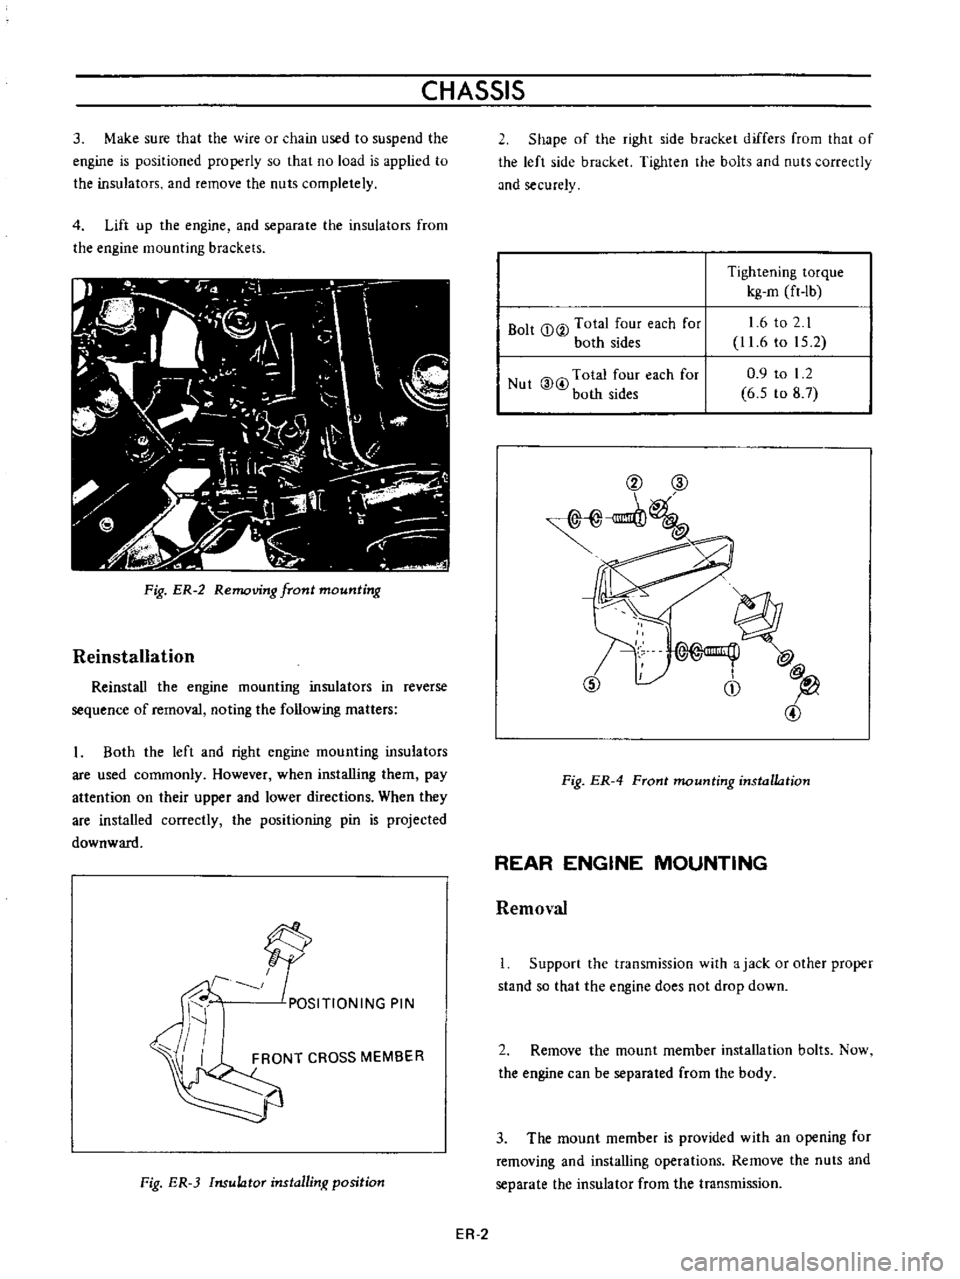
4
Lift
up
the
engine
and
separate
the
insulators
from
the
engine
mounting
brackets
l
J
o
II
f
T
io
I
t
i
1
A
t
t
I
21
u
I
1
Qj
1
It
I
j
fi
I
I
lt
y
Ii
Fig
ER
2
Removing
front
mounting
Reinstallation
Reinstall
the
engine
mounting
insulators
in
reverse
sequence
of
removal
noting
the
following
matters
Both
the
left
and
right
engine
mounting
insulators
are
used
commonly
However
when
installing
them
pay
attention
on
their
upper
and
lower
directions
When
they
are
installed
correctly
the
positioning
pin
is
projected
downward
f
9
POSITIONING
PIN
I
FRONT
CROSS
MEMBER
Fig
ER
3
Insulator
installinx
position
2
Shape
of
the
right
side
bracket
differs
from
that
of
the
left
side
bracket
Tighten
the
bolts
and
nuts
correctly
md
securely
Bolt
CD
V
Total
four
each
for
both
sides
Tightening
torque
kg
m
ft
Ib
1
6
to
2
1
11
6
to
15
2
0
9
to
I
2
6
5
to
8
7
Nut
@
i
Total
four
each
for
both
sides
@
CID
1
@
CD
l
Fig
ER
4
Front
mounting
installation
REAR
ENGINE
MOUNTING
Removal
Support
the
transmission
with
ajack
or
other
proper
stand
so
that
the
engine
does
not
drop
down
2
Remove
the
mount
member
installation
bolts
Now
the
engine
can
be
separated
from
the
body
3
The
mount
member
is
provided
with
an
opening
for
removing
and
installing
operations
Remove
the
nuts
and
separate
the
insulator
from
the
transmission
ER
2
Page 466 of 513
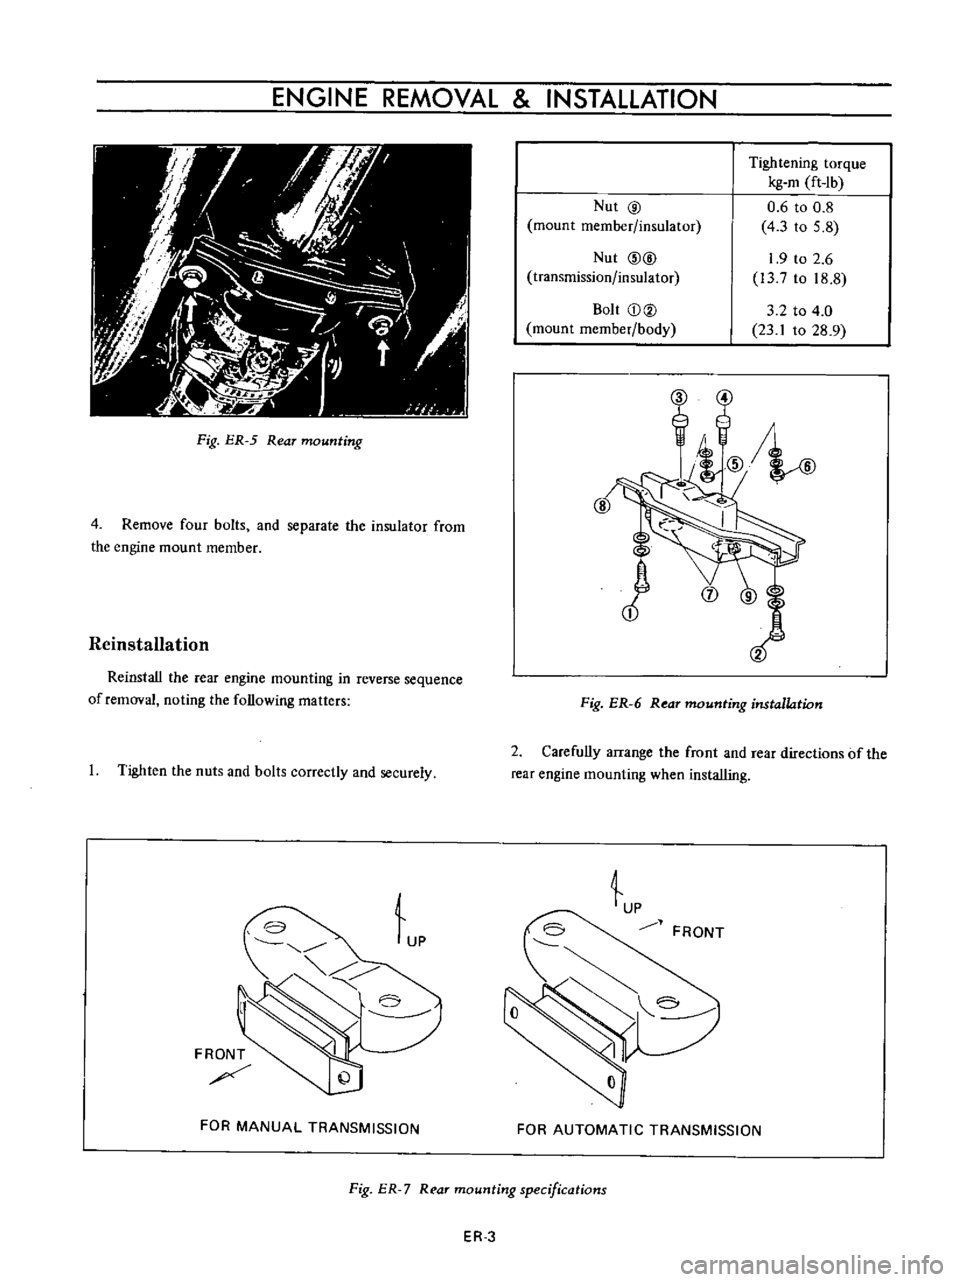
ENGINE
REMOVAL
INSTAllATION
Fig
ER
5
Rear
mounting
4
Remove
four
bolts
and
separate
the
insulator
from
the
engine
mount
member
Reinstallation
Reinstall
the
rear
engine
mounting
in
reverse
sequence
of
removal
noting
the
following
matters
I
Tighten
the
nuts
and
bolts
correctly
and
securely
Lp
FRONT
FOR
MANUAL
TRANSMISSION
Nut
@
mount
member
insulator
Nut
@@
transmission
insulator
Bolt
CD@
mount
member
body
Tightening
torque
kg
m
ft
Ib
0
6
to
0
8
4
3
to
5
8
1
9
to
2
6
l3
to
18
8
3
2
to
4
0
23
1
to
28
9
Fig
ER
6
Rear
mounting
installation
2
Carefully
arrange
the
front
and
rear
directions
of
the
rear
engine
mounting
when
installing
tp
FRONT
FOR
AUTOMATIC
TRANSMISSION
Fig
ER
7
R
ar
mounting
specifications
ER
3
Page 467 of 513
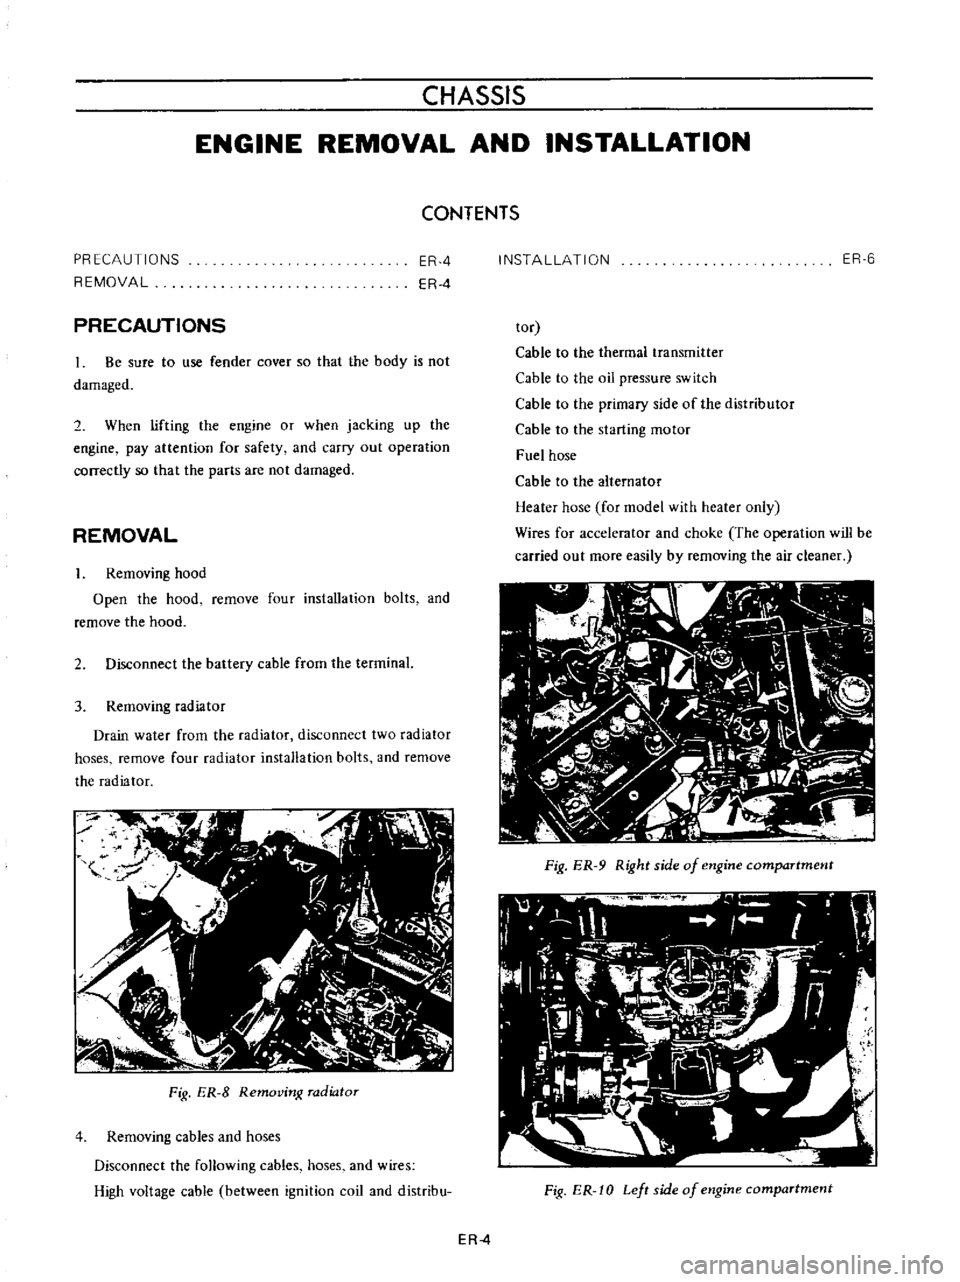
CHASSIS
ENGINE
REMOVAL
AND
INSTALLATION
CONTENTS
PR
ECAUTIONS
REMOVAL
ERA
ERA
PRECAUTIONS
Be
sure
to
use
fender
cover
so
that
the
body
is
not
damaged
2
When
lifting
the
engine
or
when
jacking
up
the
engine
pay
attention
for
safety
and
carry
out
operation
correctly
so
that
the
parts
are
not
damaged
REMOVAL
I
Removing
hood
Open
the
hood
remove
four
installation
bolts
and
remove
the
hood
2
Disconnect
the
battery
cable
from
the
terminal
3
Removing
radiator
Drain
water
from
the
radiator
disconnect
two
radiator
hoses
remove
four
radiator
installation
bolts
and
remove
the
radiator
Fig
ER
8
Removin
radiator
4
Removing
cables
and
hoses
Disconnect
the
following
cables
hoses
and
wires
High
voltage
cable
between
ignition
coil
and
distribu
INSTAllATION
ER
6
tor
Cable
to
the
thermal
transmitter
Cable
to
the
oil
pressure
switch
Cable
to
the
primary
side
of
the
distributor
Cable
to
the
starting
motor
Fuel
hose
Cable
to
the
alternator
Heater
hose
for
model
with
heater
only
Wires
for
accelerator
and
choke
The
operation
will
be
carried
out
more
easily
by
removing
the
air
cleaner
Fig
ER
9
Right
side
of
engine
compartment
Fig
ER
10
Left
side
of
engine
compartment
ERA