check engine DATSUN B110 1973 Service Manual Online
[x] Cancel search | Manufacturer: DATSUN, Model Year: 1973, Model line: B110, Model: DATSUN B110 1973Pages: 513, PDF Size: 28.74 MB
Page 428 of 513
ENGINE
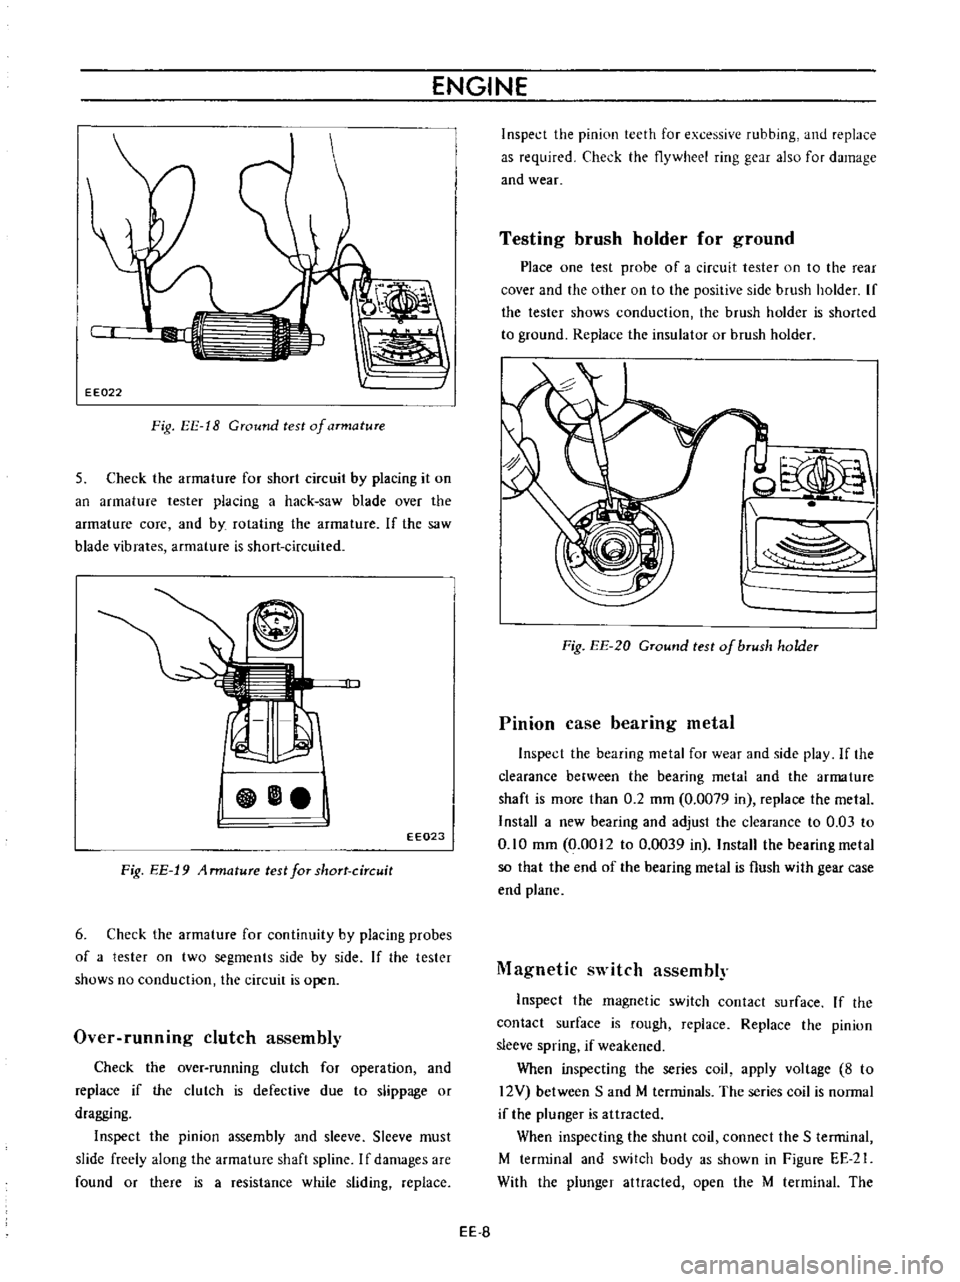
EE022
Fig
EE
18
Ground
test
of
armature
5
Check
the
armature
for
short
circuit
by
placing
it
on
an
armature
tester
placing
a
hack
saw
blade
over
the
armature
core
and
by
rotating
the
armature
If
the
saw
blade
vibrates
armature
is
short
circuited
EE023
Fig
EE
19
4
rmature
test
for
short
circuit
6
Check
the
armature
for
continuity
by
placing
probes
of
a
tester
on
two
segments
side
by
side
If
the
tester
shows
no
conduction
the
circuit
is
open
Over
runnmg
clutch
assembly
Check
the
over
running
clutch
for
operation
and
replace
if
the
clutch
is
defective
due
to
slippage
or
dragging
Inspect
the
pinion
assembly
and
sleeve
Slceve
must
slide
freely
along
the
armature
shaft
spline
I
f
damages
are
found
or
there
is
a
resistance
while
sliding
replace
Inspect
the
pinion
teeth
for
excessive
rubbing
and
replace
as
required
Check
the
flywheel
ring
gear
also
for
damage
and
wear
Testing
brush
holder
for
ground
Place
one
test
probe
of
a
circuit
tester
on
to
the
rear
cover
and
the
other
on
to
the
positive
side
brush
holder
If
the
tester
shows
conduction
the
brush
holdcr
is
shorted
to
ground
Replace
the
insulator
or
brush
holder
od
l
Fig
EE
20
GTound
test
of
bTush
holder
Pinion
case
bearing
metal
Inspect
the
bearing
metal
for
wear
and
sidc
play
If
the
clearance
between
the
bearing
metal
and
the
arma
ture
shaft
is
mOTe
than
0
2
mm
0
0079
in
replace
the
metal
Install
a
new
bearing
and
adjust
the
clearance
to
0
03
to
0
10
mm
0
0012
to
0
0039
in
Install
the
bearing
metal
so
that
the
end
of
the
bearing
metal
is
flush
with
gear
case
end
plane
Magnetic
switch
assembly
Inspect
the
magnetic
switch
contact
surface
If
the
contact
surface
is
rough
replace
Replace
the
pinion
sleeve
spring
if
weakened
When
inspecting
the
series
coil
apply
voltagc
8
to
12V
between
Sand
M
terminals
The
series
coil
is
normal
if
the
plunger
is
attracted
When
inspecting
the
shunt
coil
connect
the
S
terminal
M
terminal
and
switch
body
as
shown
in
Figure
EE
21
With
the
plunger
attracted
open
the
M
terminal
The
EE
S
Page 430 of 513
ENGINE
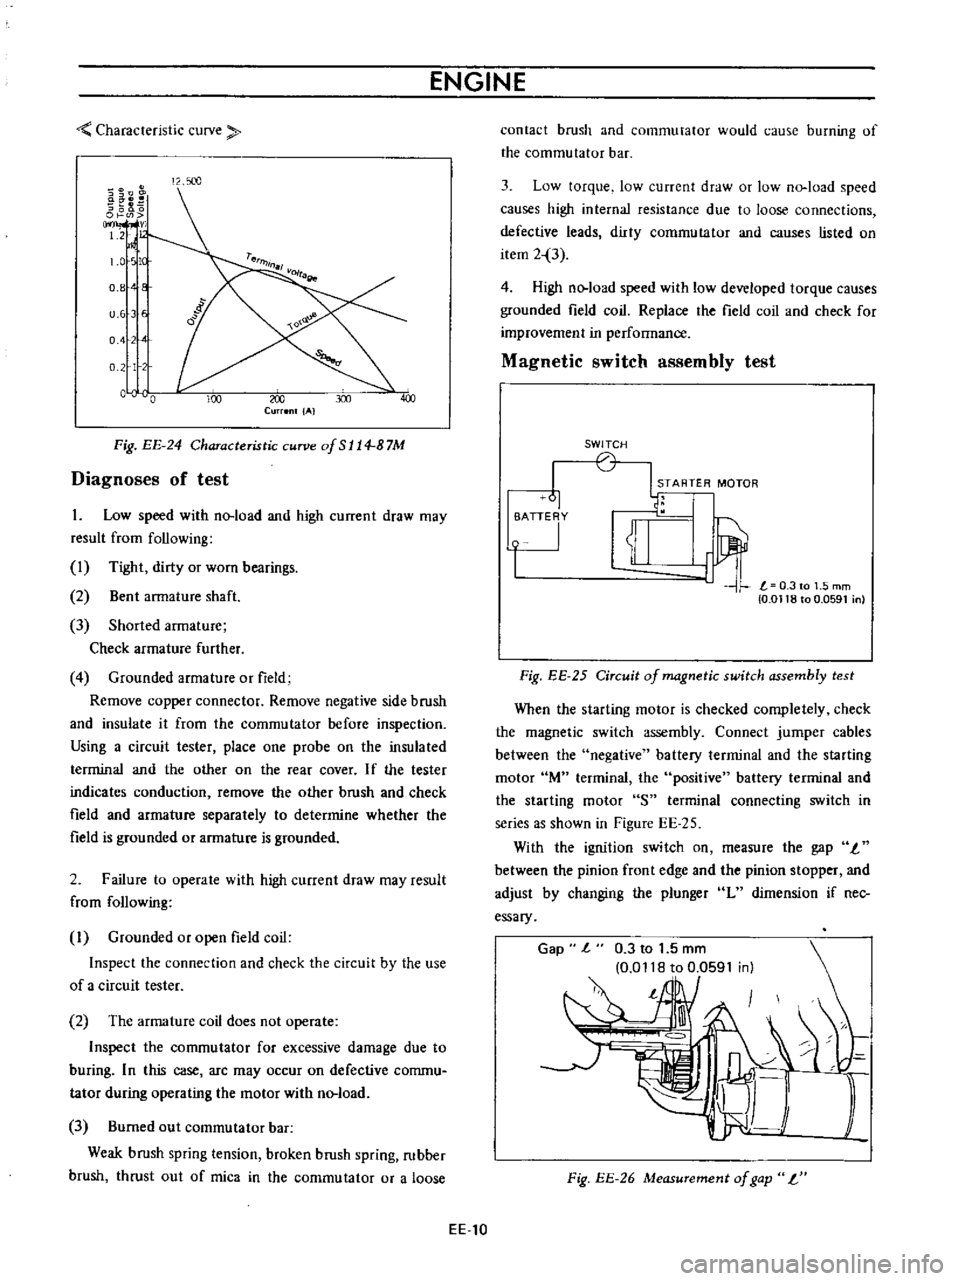
Characteristic
curve
i
8
s
l00
0
OJ
m
v
1
2
1
0
tc
0
8
E
u
6
E
o
4
0
2
L
c
0
00
J
300
Current
IAI
Fig
EE
24
Characteristic
curve
of
S
114
B
7M
Diagnoses
of
test
1
Low
speed
with
no
load
and
high
current
draw
may
result
from
following
1
Tight
dirty
or
worn
bearings
2
Bent
armature
shaft
3
Shorted
armature
Check
armature
further
4
Grounded
armature
or
field
Remove
copper
connector
Remove
negative
side
brush
and
insulate
it
from
the
commutator
before
inspection
Using
a
circuit
tester
place
one
probe
on
the
insulated
terminal
and
the
other
on
the
rear
cover
If
the
tester
indicates
conduction
remove
the
other
brush
and
check
field
and
armature
separately
to
determine
whether
the
field
is
grounded
or
armature
is
grounded
2
Failure
to
operate
with
high
current
draw
may
result
from
following
I
Grounded
or
open
field
coil
Inspect
the
connection
and
check
the
circuit
by
the
use
of
a
circuit
tester
2
The
armature
coil
does
not
operate
Inspect
the
commutator
for
excessive
damage
due
to
buring
In
this
case
arc
may
occur
on
defective
commu
tator
during
operating
the
motor
with
no
load
3
Burned
out
commutator
bar
Weak
brush
spring
tension
broken
brush
spring
rubber
brush
thrust
out
of
mica
in
the
commutator
or
a
loose
EE
10
contact
brush
and
commutator
would
cause
burning
of
the
commutator
bar
3
Low
torque
low
current
draw
or
low
no
load
speed
causes
high
internal
resistance
due
to
loose
connections
defective
leads
dirty
commutator
and
causes
listed
on
item
2
3
4
High
no
load
speed
with
low
developed
torque
causes
grounded
field
coil
Replace
the
field
coil
and
check
for
improvement
in
performance
Magnetic
switch
assembly
test
SWITCH
STARTER
MOTOR
61
1u
i
T
0
0118
to
0
0591
n
Fig
EE
25
Circuit
of
magnetic
switch
assembly
test
When
the
starting
motor
is
checked
completely
check
the
magnetic
switch
assembly
Connect
jumper
cables
between
the
negative
battery
terminal
and
the
starting
motor
lM
terminal
the
positive
battery
terminal
and
the
starting
motor
S
terminal
connecting
switch
in
series
as
shown
in
Figure
EE
25
With
the
ignition
switch
on
measure
the
gap
I
between
the
pinion
front
edge
and
the
pinion
stopper
and
adjust
by
changing
the
plunger
L
dimension
if
nec
essary
Gap
l
0
3
to
1
5
mm
0
0118
to
0
0591
in
l
Fig
EE
26
Measurement
of
gap
L
Page 439 of 513
ENGINE
ELECTRICAL
SYSTEM
Note
Use
care
in
handling
diode
assembly
to
prevent
an
undue
stress
on
it
INSPECTION
AND
REPAIR
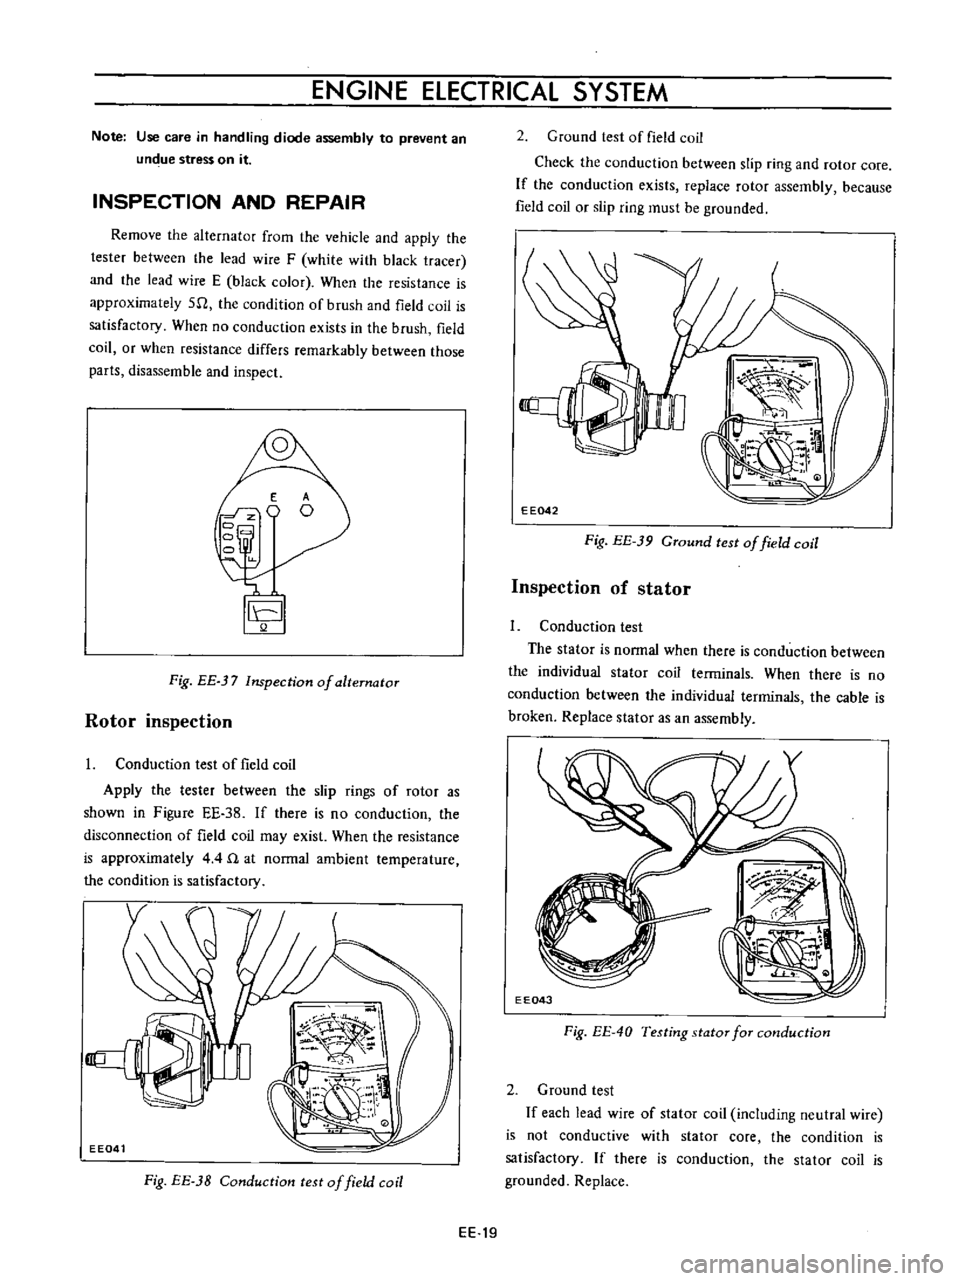
Remove
the
alternator
from
the
vehicle
and
apply
the
tester
between
the
lead
wire
F
white
with
black
tracer
and
the
lead
wire
E
black
color
When
the
resistance
is
approximately
511
the
condition
of
brush
and
field
coil
is
satisfactory
When
no
conduction
exists
in
the
brush
field
coil
or
when
resistance
differs
remarkably
between
those
parts
disassemble
and
inspect
E
o
Fig
BE
37
Inspection
of
alternator
Rotor
inspection
I
Conduction
test
of
field
coil
Apply
the
tester
between
the
slip
rings
of
rotor
as
shown
in
Figure
EE
38
If
there
is
no
conduction
the
disconnection
of
field
coil
may
exist
When
the
resistance
is
approximately
4
4
n
at
normal
ambient
temperature
the
condition
is
satisfactory
Fig
EE
3B
Conduction
test
of
field
coil
2
Ground
test
of
field
coil
Check
the
conduction
between
slip
ring
and
rotor
core
If
the
conduction
exists
replace
rotor
assembly
because
field
coil
or
slip
ring
must
be
grounded
EE042
Fig
EE
39
GTound
test
of
field
coil
Inspection
of
stator
1
Conduction
test
The
stator
is
normal
when
there
is
conduction
between
the
individual
stator
coil
terminals
When
there
is
no
conduction
between
the
individual
terminals
the
cable
is
broken
Replace
stator
as
an
assembly
EE043
Fig
EE
40
Testing
stator
for
cmlduction
2
Ground
test
If
each
lead
wire
of
stator
coil
including
neutral
wire
is
not
conductive
with
stator
core
the
condition
is
satisfactory
If
there
is
conduction
the
stator
coil
is
grounded
Replace
EE
19
Page 440 of 513
ENGINE
Stator
core
EE044
Fig
EE
41
Testing
stator
for
ground
Inspection
of
diode
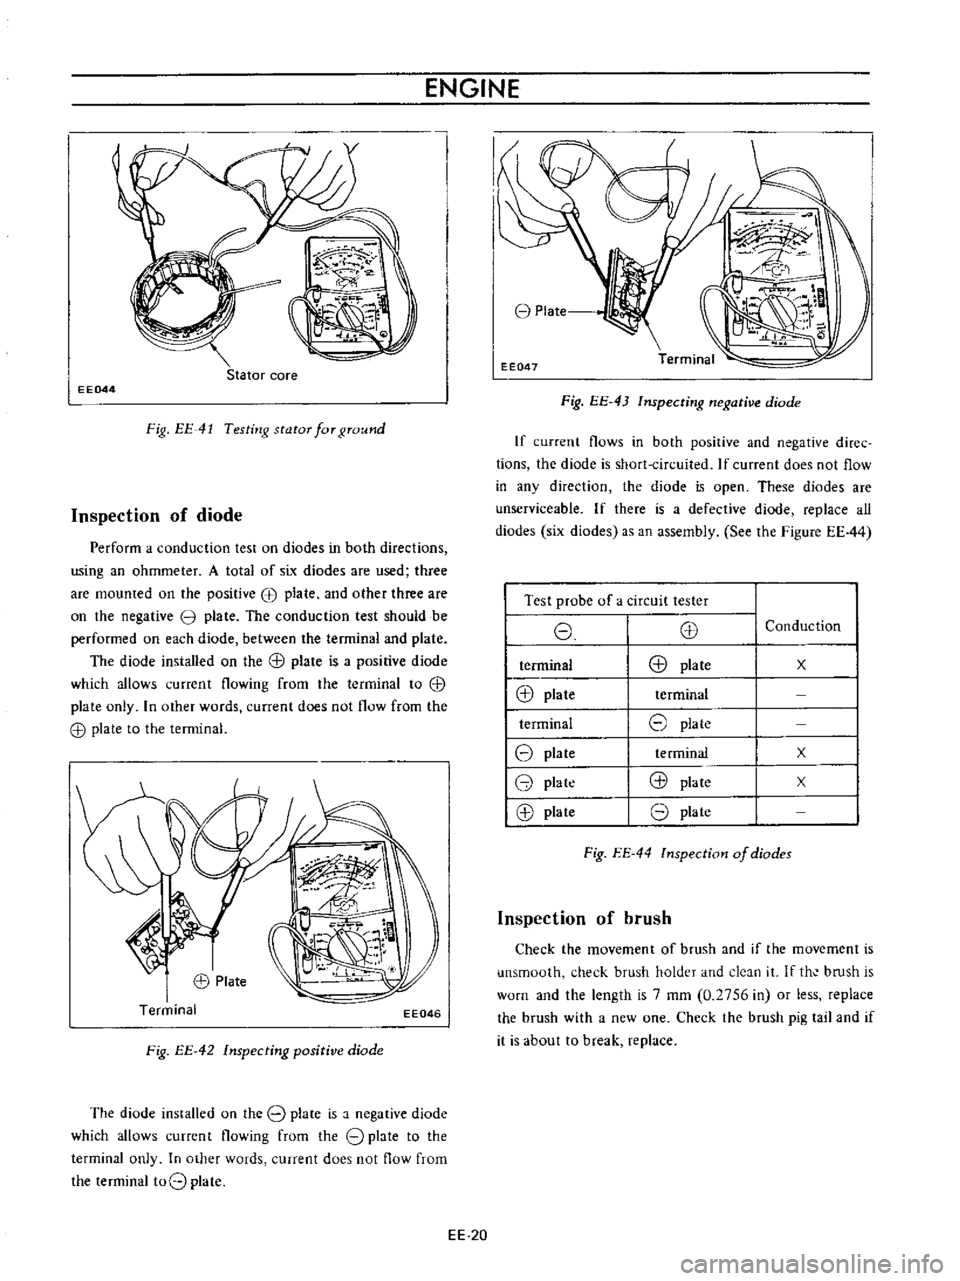
Perform
a
conduction
test
on
diodes
in
both
directions
using
an
ohmmeter
A
total
of
six
diodes
are
used
three
are
mounted
on
the
positive
EB
plate
and
other
three
are
on
the
negative
3
plate
The
conduction
test
should
be
performed
on
each
diode
between
the
terminal
and
plate
The
diode
installed
on
the
G
l
plate
is
a
positive
diode
which
allows
current
flowing
from
the
terminal
to
G
l
plate
only
In
other
words
current
does
not
flow
from
the
G
l
plate
to
the
terminal
EE046
Fig
EE
42
Inspecting
positive
diode
The
diode
installed
on
the
8
plate
is
a
negative
diode
which
allows
current
flowing
from
the
8
plate
to
the
terminal
only
In
other
words
current
does
not
flow
from
the
terminal
t08
plate
EE
20
8
Plate
EE047
Fig
EE
43
Inspecting
negative
diode
If
current
flows
in
both
positive
and
negative
diree
tions
the
diode
is
short
circuited
If
current
does
not
flow
in
any
direction
the
diode
is
open
These
diodes
are
unserviceable
If
there
is
a
defective
diode
replace
all
diodes
six
diodes
as
an
assembly
See
the
Figure
EE44
I
Test
probe
of
a
circuit
tester
I
8
E8
I
terminal
E8
plate
I
@
plate
terminal
I
terminal
8
plate
18
plate
te
rminal
18
plate
@
plate
18
plate
8
plate
Conduction
x
x
x
Fig
EE
44
lnspection
of
diodes
Inspection
of
brush
Check
the
movement
of
brush
and
if
the
movement
is
unsmooth
check
brush
holder
and
deJn
it
If
th
bmsh
is
worn
and
the
length
is
7
mm
0
2756
in
or
less
replace
the
brush
with
a
new
one
Check
the
brush
pig
tail
and
if
it
is
about
to
break
replace
Page 442 of 513
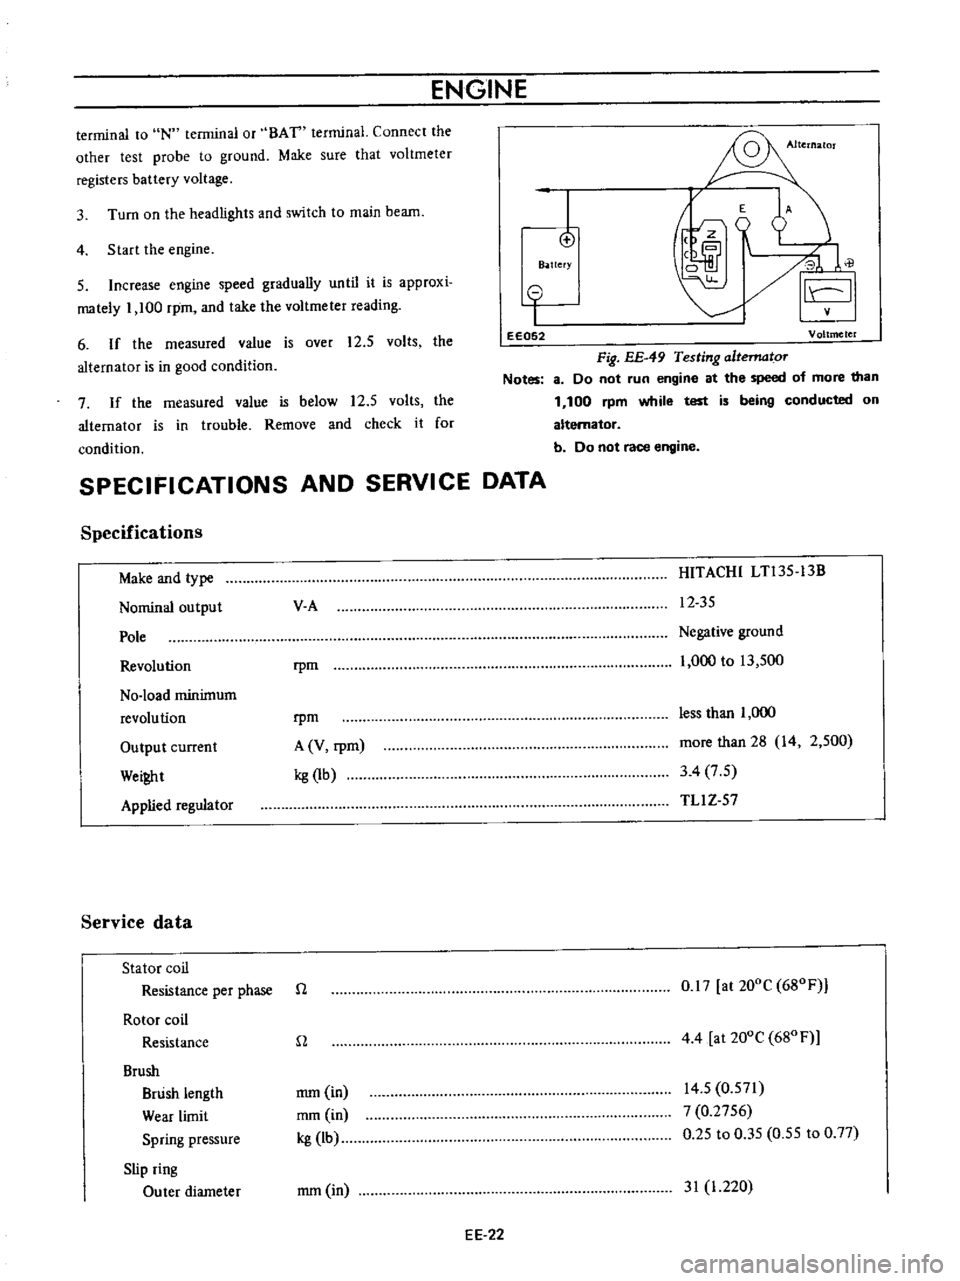
ENGINE
terminal
to
IN
terminal
or
BAT
terminal
Connect
the
other
test
probe
to
ground
Make
sure
that
voltmeter
registers
battery
voltage
4
Start
the
engine
3
Turn
on
the
headlights
and
switch
to
main
beam
I
o
B
ttefY
E
A
J
0
il
I
5
Increase
engine
speed
gradually
until
it
is
approxi
mately
1
100
rpm
and
take
the
voltmeter
reading
6
If
the
measured
value
is
over
12
5
volts
the
alternator
is
in
good
condition
o
I
eE052
Voltmeter
Fig
EE
49
Testing
altematoT
Notes
8
Do
not
run
engine
at
the
speed
of
more
than
1
100
rpm
while
test
is
being
conducted
on
alternator
b
Do
not
race
engine
7
If
the
measured
value
is
below
12
5
volts
the
alternator
is
in
trouble
Remove
and
check
it
for
condition
SPECIFICATIONS
AND
SERVICE
DATA
Specifications
Make
and
type
Nominal
output
Pole
Revolution
No
load
minimum
revolution
Output
current
Wei
t
Applied
regulator
Service
data
Stator
coil
Resistance
per
phase
Rotor
coil
Resistance
Brush
Brush
length
Wear
limit
Spring
pressure
Slip
ring
Outer
diameter
V
A
HITACHI
LTl35
13B
12
35
rpm
Negative
ground
1
000
to
13
500
rpm
A
V
rpm
kg
1b
less
than
1
000
more
than
28
14
2
500
3
4
7
5
TLl
Z
57
n
0
17
at
200C
680F
n
4
4
at
200e
680
F
mm
in
mm
in
kg
lb
14
5
0
571
7
0
2756
0
25
to
0
35
0
55
to
0
77
mm
in
31
1
220
EE
22
Page 444 of 513
ENGINE
MEASUREMENT
OF
REGULATING
VOLTAGE
The
regulator
voltage
is
measured
with
the
alternator
When
measuring
voltage
with
regulator
mounted
on
vehicle
it
is
necessary
to
rotate
engine
at
high
speed
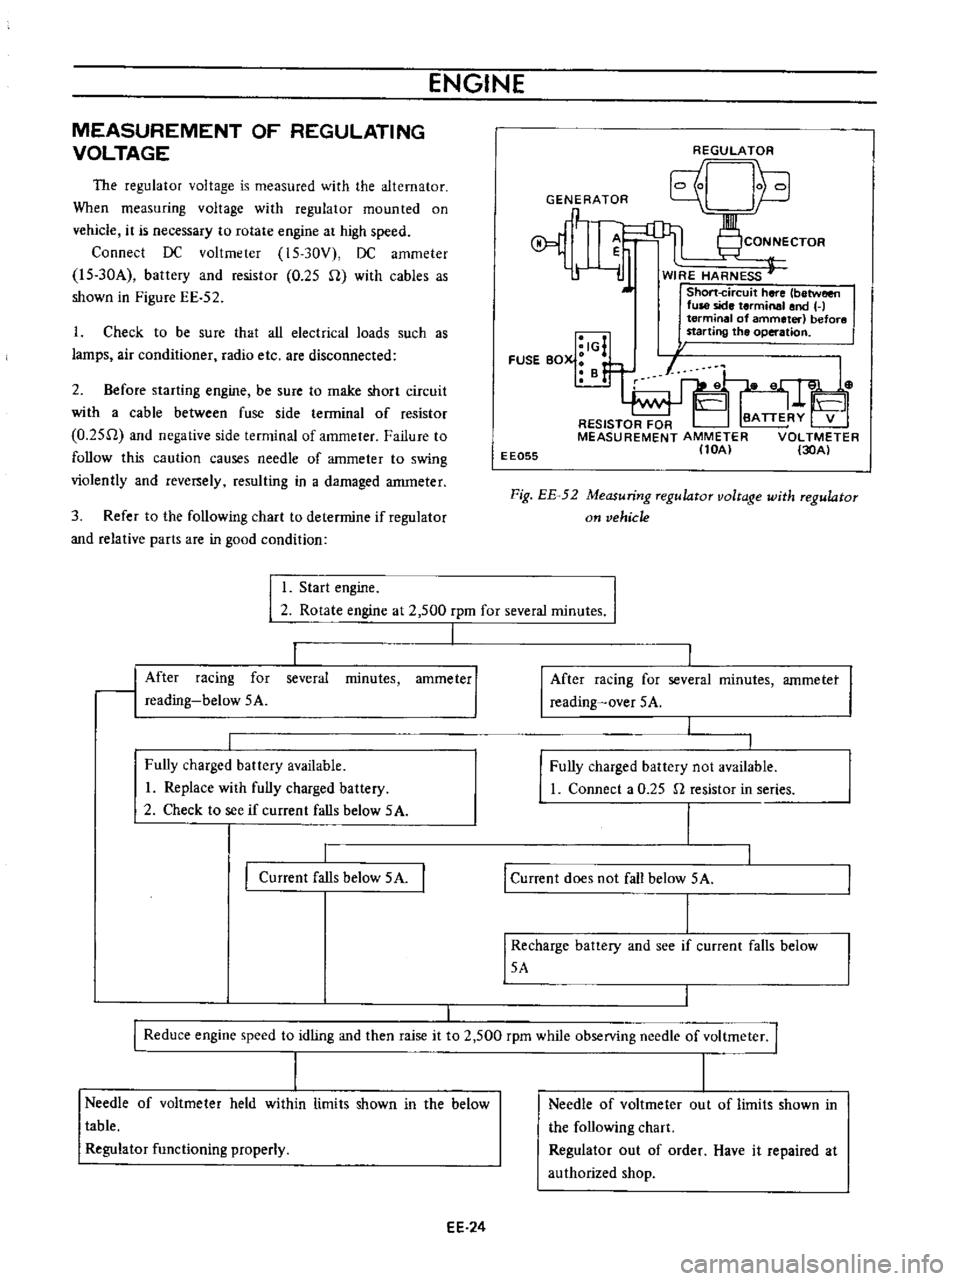
Connect
DC
voltmeter
15
30V
DC
ammeter
l5
30A
battery
and
resistor
0
25
U
with
cables
as
shown
in
Figure
EE
52
1
Check
to
be
sure
that
all
electrical
loads
such
as
lamps
air
conditioner
radio
etc
are
disconnected
2
Before
starting
engine
be
sure
to
make
short
circuit
with
a
cable
between
fuse
side
terminal
of
resistor
O
25U
and
negative
sIde
terminal
of
ammeter
Failure
to
follow
this
caution
causes
needle
of
ammeter
to
swing
violently
and
rever
ely
resulting
in
a
damaged
anuneter
3
Refer
to
the
following
chart
to
determine
if
regulator
and
relative
parts
are
in
good
condition
REGULATOR
Unh
GENERATOR
q
P
1
CONNECTOR
r
l
ij
WIRE
HARNESS
J
Short
circuit
here
between
fuse
side
terminal
and
H
terminal
of
ammeter
before
starting
the
operation
I
I
I
IG
FUSE
BOX
B
f
EE055
Fig
EE
52
Measuring
regulator
voltage
with
regulator
on
vehicle
I
Start
engine
I
2
Rotate
engine
at
2
500
rpm
for
several
minutes
I
1
minutes
ammeter
I
After
racing
for
reading
below
5A
several
Fully
charged
battery
available
I
Replace
with
fully
charged
battery
2
Check
to
see
if
current
falls
below
5A
Current
falls
below
5A
I
After
racing
for
several
reading
over
5A
minutes
ammetet
I
Fully
charged
battery
not
available
1
Connect
a
0
25
n
resistor
in
series
I
Current
does
not
fall
below
5A
I
Recharge
battery
and
see
if
current
falls
below
5A
I
I
Reduce
engine
speed
to
idling
and
then
raise
it
to
2
500
rpm
while
observing
needle
of
voltmeter
I
I
I
Needle
of
voltmeter
held
within
limits
shown
in
the
below
table
Regulator
functioning
properly
EE
24
Needle
of
voltmeter
out
of
limits
shown
in
the
following
chart
Regulator
out
of
order
Have
it
repaired
at
authorized
shop
Page 446 of 513
ENGINE
at
4
to
5
V
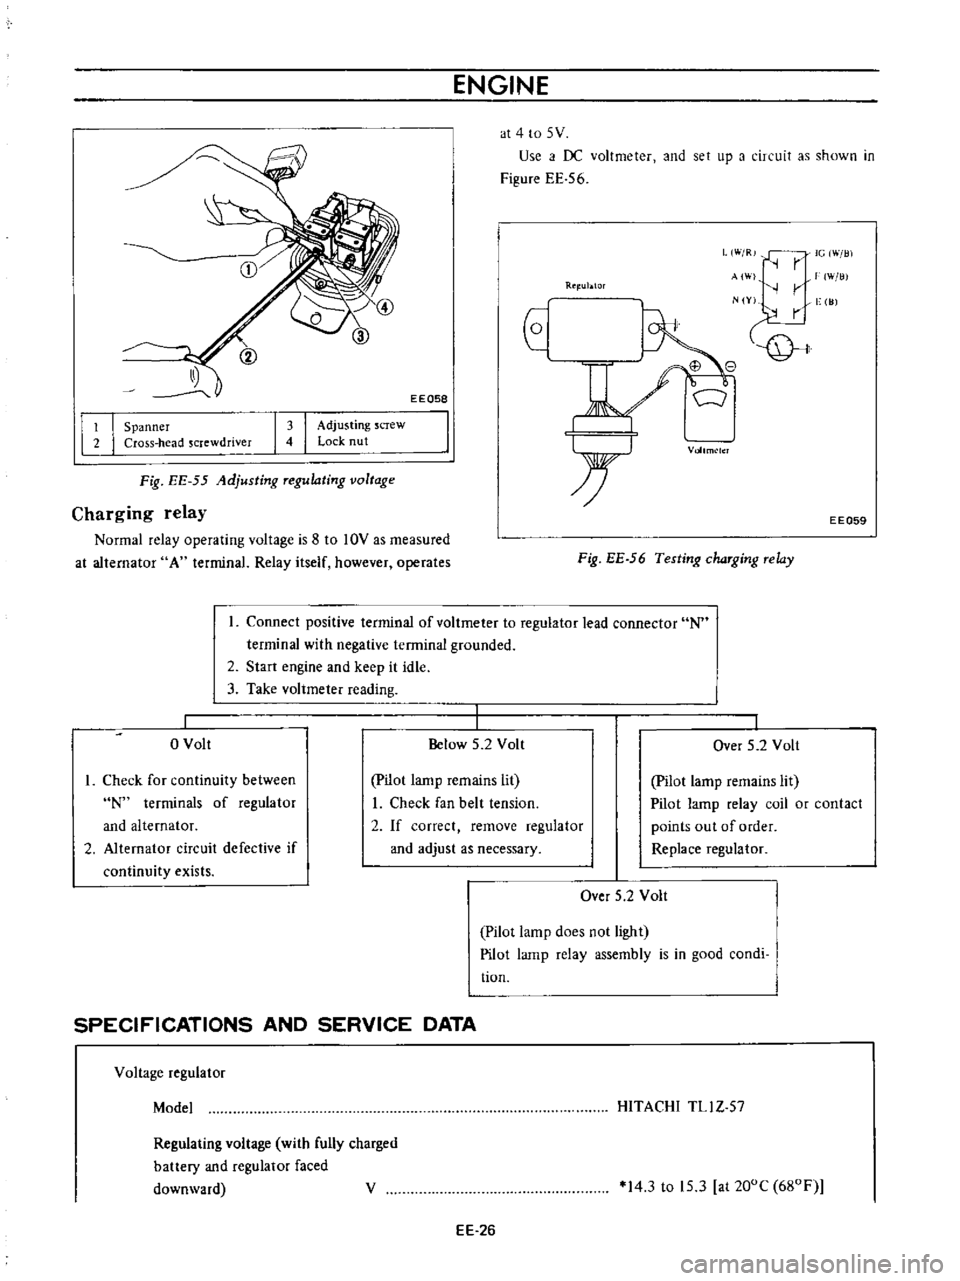
Use
i
f
DC
voltmeter
and
set
up
a
circuit
as
shown
in
Figure
EE
56
EEQ58
L
W
R
IG
Will
r
AI
W
lli
r
N
Y
vge
I
JJ
Rtl
ublOr
I
I
Spanner
Cross
head
screwdriver
I
I
Adjusting
screw
Lock
nut
Vollm
lcl
Fig
EE
55
Adjusting
Tegulating
voltage
Charging
relay
Normal
relay
operating
voltage
is
8
to
10V
as
measured
at
alternator
A
terminal
Relay
itself
however
operates
EE059
Fig
EE
56
Testing
chaTging
Telay
Connect
positive
terminal
of
voltmeter
to
regulator
lead
connector
N
terminal
with
negative
terminal
grounded
2
Start
engine
and
keep
it
idle
3
Take
voltmeter
reading
o
Volt
Below
5
2
Volt
I
Over
5
2
Volt
I
Check
for
continuity
between
N
terminals
of
regulator
and
alternator
2
Alternator
circuit
defective
if
continuity
exists
pilot
lamp
remains
lit
I
Check
fan
belt
tension
2
If
correct
remove
regulator
and
adjust
as
necessary
Pilot
lamp
remains
lit
Pilot
lamp
relay
coil
or
contact
points
out
of
order
Replace
regulator
Over
5
2
Volt
Pilot
lamp
does
not
light
Pilot
lamp
relay
assembly
is
in
good
condi
tion
SPECIFICATIONS
AND
SERVICE
DATA
Voltage
regulator
Model
HITACHI
TLl
Z
57
Regulating
voltage
with
fully
charged
battery
and
regulator
faced
downward
V
14
3
to
15
3
at
200C
680F
EE
26
Page 448 of 513
Low
output
Excessive
output
Regulator
Wiring
Alternator
Regula
tor
Wiring
Alternator
Regulatur
ENGINE
Faulty
voltage
regulator
point
con
tact
Broken
cable
or
disconnection
of
charging
cireui
t
Sticking
brushes
Low
brush
spring
tension
Dirty
slip
rings
Partially
shorted
ground
or
open
stator
coil
Partially
shorted
or
grounded
rotor
coil
Defective
diode
Loose
or
worn
fan
belt
Improper
voltage
regulator
adjust
ment
Faulty
voltage
regulator
point
con
tact
Defective
operation
Faulty
charging
circuit
lead
wire
connection
Loose
battery
terminal
Short
circuited
or
broken
neutral
wire
Improper
voltage
regulator
adjust
ment
Defective
operation
Improper
charge
relav
adjustment
detective
operation
and
or
faulty
point
contact
EE
28
Repair
or
replace
the
regulatur
Repair
or
replace
Correct
or
replace
brushes
if
neces
sary
Correct
or
replace
brush
Clean
Replace
the
stator
Replace
the
rotor
Replace
the
diode
assembly
Retighten
or
replace
the
belt
Check
the
voltage
regulator
op
eration
and
repair
or
replace
as
required
Repair
or
replace
the
regulator
Repair
or
replace
Retighten
Replace
the
wire
Check
the
voltage
regulator
op
eration
and
repair
or
replace
as
required
Check
the
charge
relay
operation
and
repair
or
replace
as
required
Page 449 of 513
ENGINE
ElECTRICAL
SYSTEM
IGNITION
CIRCUIT
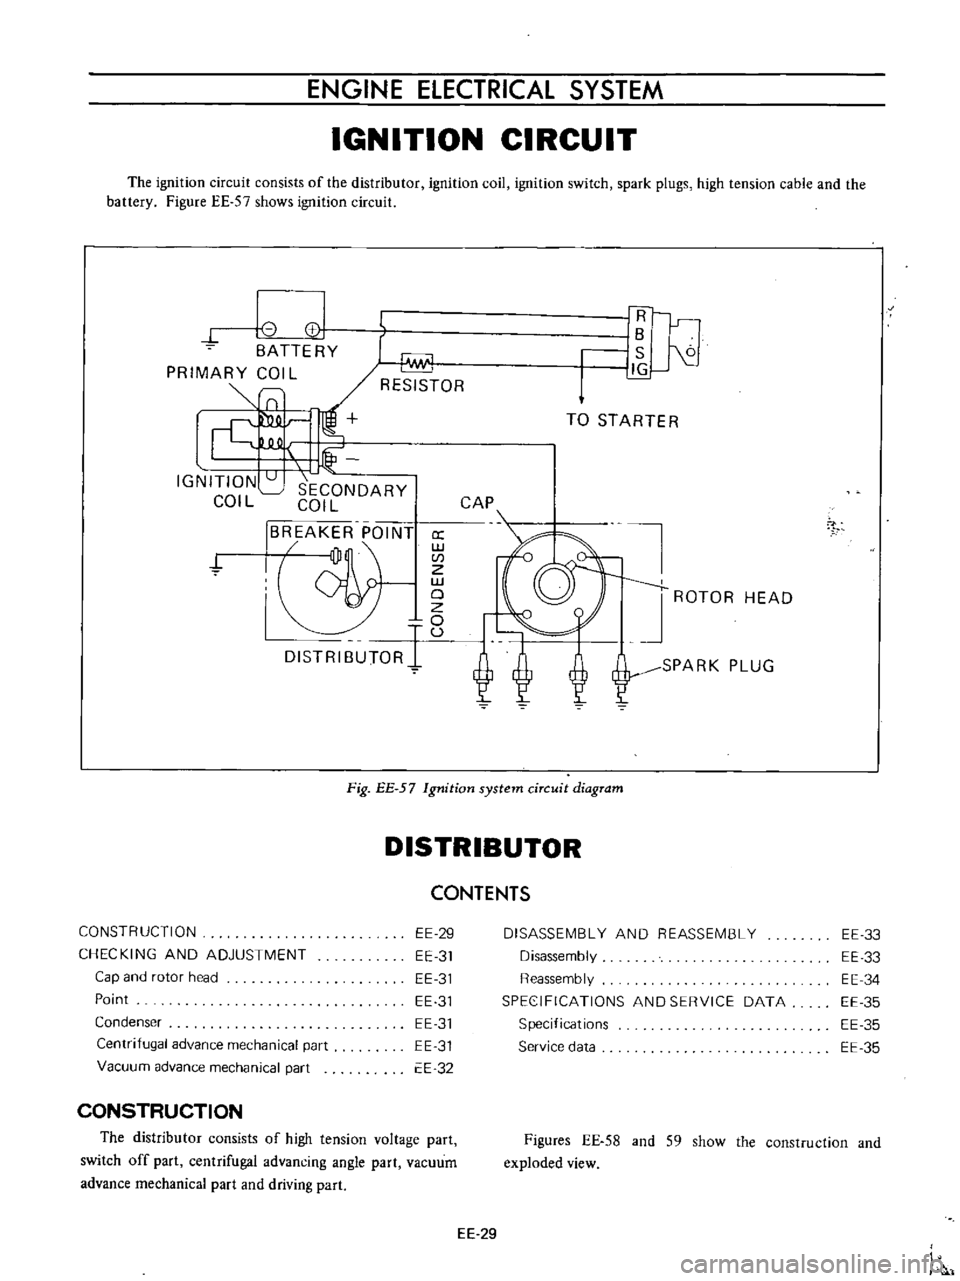
The
ignition
circuit
consists
of
the
distributor
ignition
coil
ignition
switch
spark
plugs
high
tension
cable
and
the
battery
Figure
EE
57
shows
ignition
circuit
8
I
CC
BATTERY
PRIMARY
COIL
SlO
Lf
IGNITION
SECONDARY
COIL
COIL
BREAKER
POINT
jJ
a
w
CI
Z
w
19
DISTRIBUTORI
U
1Fl
r
lB
S
J1G
TO
STARTER
CAP
ROTOR
HEAD
SPARK
PLUG
7
Fig
EE
57
Ignition
system
circuit
diagram
DISTRIBUTOR
CONSTRUCTION
CHECKING
AND
ADJUSTMENT
Cap
and
rotor
head
Point
Condenser
Centrifugal
advance
mechanical
part
Vacuum
advance
mechanical
part
EE
29
EE
31
EE
31
EE
31
EE
31
EE
31
EE
32
CONSTRUCTION
The
distributor
consists
of
high
tension
voltage
part
switch
off
part
centrifugal
advancing
angle
part
vacuum
advance
mechanical
part
and
driving
part
CONTENTS
DISASSEMBLY
AND
REASSEMBLY
Disassembly
Reassembly
SPEC
IFICATIONS
AND
SERVICE
DATA
Specifications
Service
data
EE
33
EE
33
EE
34
EE
35
EE
35
EE
35
Figures
EE
58
and
S9
show
the
construction
and
exploded
view
EE
29
Page 451 of 513
ENGINE
ElECTRICAL
SYSTEM
CHECKING
AND
ADJUSTMENT
Cap
and
rotor
head
Cap
and
rotor
head
must
always
be
kept
clean
to
maintain
good
insulation
durability
since
high
tension
voltage
from
ignition
coil
is
imposed
on
them
Sometimes
inside
of
the
cap
and
rotor
head
is
covered
with
fine
carbon
particles
and
dust
Whenever
crack
or
trace
of
leakage
is
found
on
the
cap
replace
with
a
new
one
Recommend
the
rotor
head
also
be
replaced
with
a
new
one
if
excessively
damaged
Point
When
point
surface
is
roughened
due
to
burning
polish
with
a
fine
emery
paper
No
500
or
600
or
oil
stone
When
the
point
is
worn
excessively
replace
When
the
point
is
replaced
with
a
new
one
apply
grease
to
the
arm
pivot
receiver
and
earn
surface
For
causes
of
damaged
burnt
point
improper
point
contact
insufficient
point
gap
and
defective
condenser
are
considered
The
standard
point
gap
is
0
45
to
0
55
mm
0
0177
to
0
0217
in
When
gap
is
deviated
from
the
standard
gap
adjust
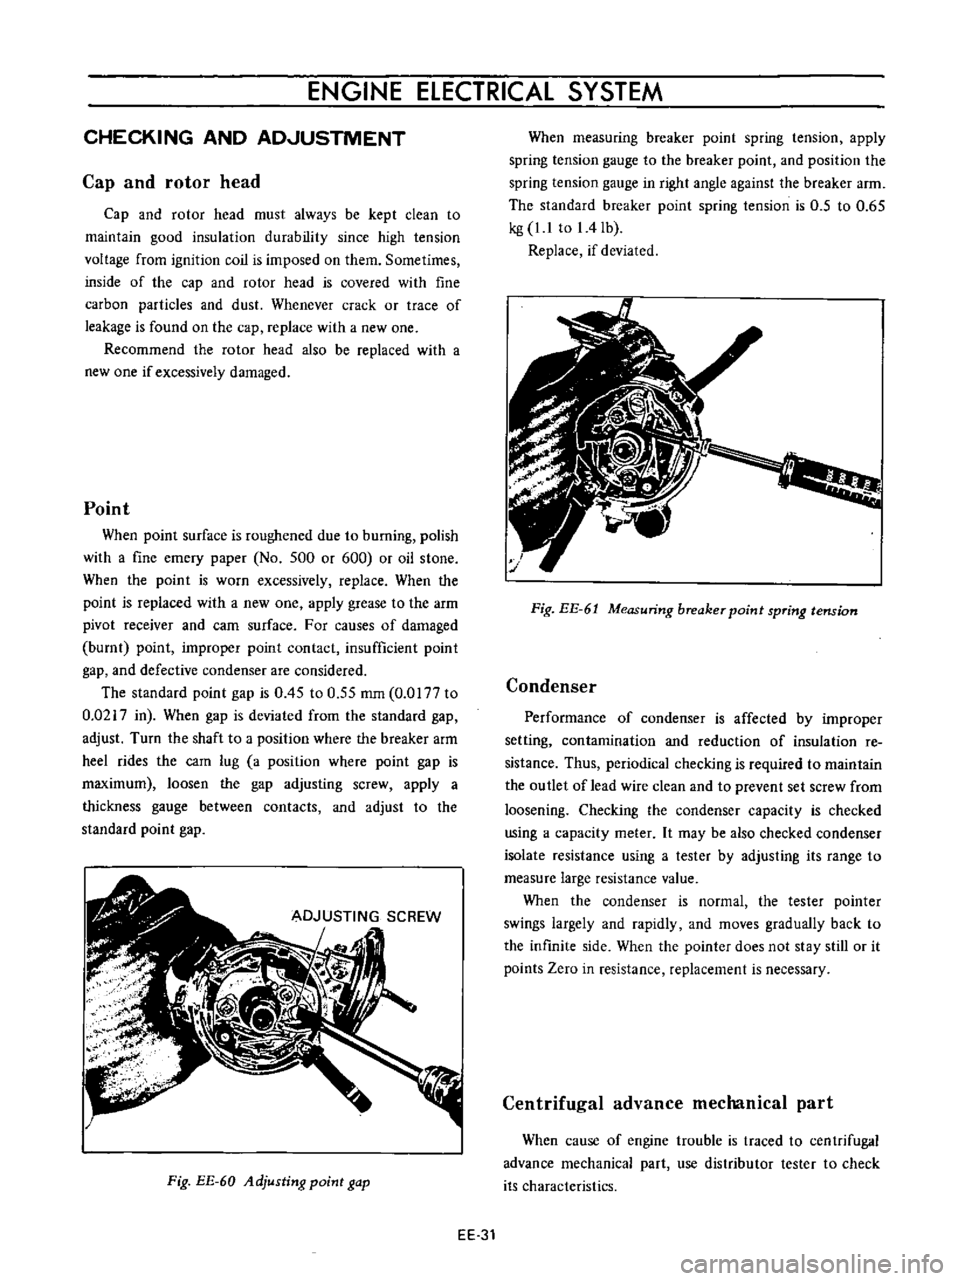
Turn
the
shaft
to
a
position
where
the
breaker
arm
heel
rides
the
com
lug
a
position
where
point
gap
is
maximum
loosen
the
gap
adjusting
screw
apply
a
thickness
gauge
between
contacts
and
adjust
to
the
standard
point
gap
Fig
EE
60
Adjusting
point
gap
When
measuring
breaker
point
spring
tension
apply
spring
tension
gauge
to
the
breaker
point
and
position
the
spring
tension
gauge
in
right
angle
against
the
breaker
arm
The
standard
breaker
point
spring
tension
is
0
5
to
0
65
kg
1
1
to
I
4Ib
Replace
if
deviated
Fig
EE
61
Measuring
breaker
point
spring
tension
Condenser
Performance
of
condenser
is
affected
by
improper
setting
contamination
and
reduction
of
insulation
re
sistance
Thus
periodical
checking
is
required
to
maintain
the
outlet
of
lead
wire
clean
and
to
prevent
set
screw
from
loosening
Checking
the
condenser
capacity
is
checked
using
a
capacity
meter
It
may
be
also
checked
condenser
isolate
resistance
using
a
tester
by
adjusting
its
range
to
measure
large
resistance
value
When
the
condenser
is
normal
the
tester
pointer
swings
largely
and
rapidly
and
moves
gradually
back
to
the
infinite
side
When
the
pointer
does
not
stay
still
or
it
points
Zero
in
resistance
replacement
is
necessary
Centrifugal
advance
mechanical
part
When
cause
of
engine
trouble
is
traced
to
centrifugal
advance
mechanical
part
use
distributor
tester
to
check
its
characteristics
EE
31