check DATSUN PICK-UP 1977 Service Manual
[x] Cancel search | Manufacturer: DATSUN, Model Year: 1977, Model line: PICK-UP, Model: DATSUN PICK-UP 1977Pages: 537, PDF Size: 35.48 MB
Page 215 of 537
Engine
Electrical
System
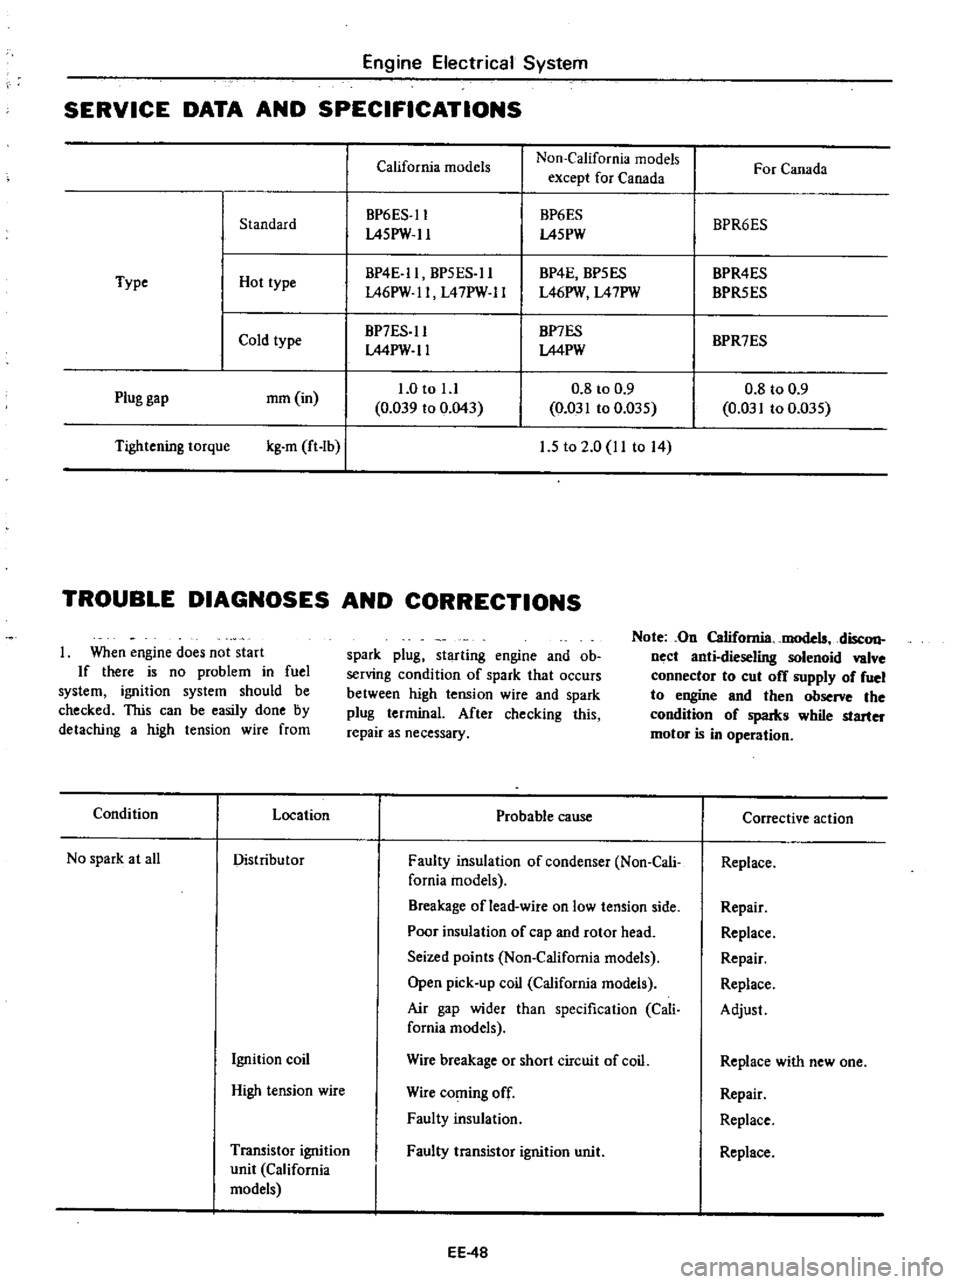
SERVICE
DATA
AND
SPECIFICATIONS
California
models
Non
California
models
For
Canada
except
for
Canada
BP6ES
ll
BP6ES
BPR6ES
Standard
L45PW
ll
L45PW
BP4E
ll
BP5ES
ll
BP4E
BP5ES
BPR4ES
Type
Hot
type
L46PW
ll
L47PW
ll
L46PW
L47PW
BPR5ES
Cold
type
BP7ES
ll
BP7ES
BPR7ES
LMPW
ll
LMPW
1
0
to
l
l
0
8
to
0
9
0
8
to
0
9
Plug
gap
mm
in
0
039
to
0
043
0
031
to
0
D35
0
031
to
0
035
Tightening
torque
kg
m
ft
Ib
I
1
5
to
2
0
11
to
14
TROUBLE
DIAGNOSES
AND
CORRECTIONS
When
engine
does
not
start
If
there
is
no
problem
in
fuel
system
ignition
system
should
be
checked
This
can
be
easily
done
by
detaching
a
high
tension
wire
from
spark
plug
starting
engine
and
ob
serving
condition
of
spark
that
occurs
between
high
tension
wire
and
spark
plug
terminal
After
checking
this
repair
as
necessary
Note
On
California
models
disc
on
nect
anti
dieseling
solenoid
valve
connector
to
cut
off
supply
of
fuel
to
engine
and
then
observe
the
condition
of
spaIks
while
starter
motor
is
in
operation
Condition
Location
Probable
cause
Corrective
action
No
spark
at
all
Distributor
Faulty
insulation
of
condenser
Non
Cali
Replace
fomia
models
Breakage
of
lead
wire
on
low
tension
side
Repair
Poor
insulation
of
cap
and
rotor
head
Replace
Seized
points
Non
California
models
Repair
Open
pick
up
coil
California
models
Replace
Air
gap
wider
than
specification
Cali
Adjust
fornia
models
Ignition
coil
Wire
breakage
or
short
circuit
of
coil
Replace
with
new
one
High
tension
wire
Wire
coming
off
Repair
Faulty
insulation
Replace
Transistor
ignition
Faulty
transistor
ignition
unit
Replace
unit
California
models
EE
4B
Page 225 of 537
l
t
tJ
I
P
o
CUll
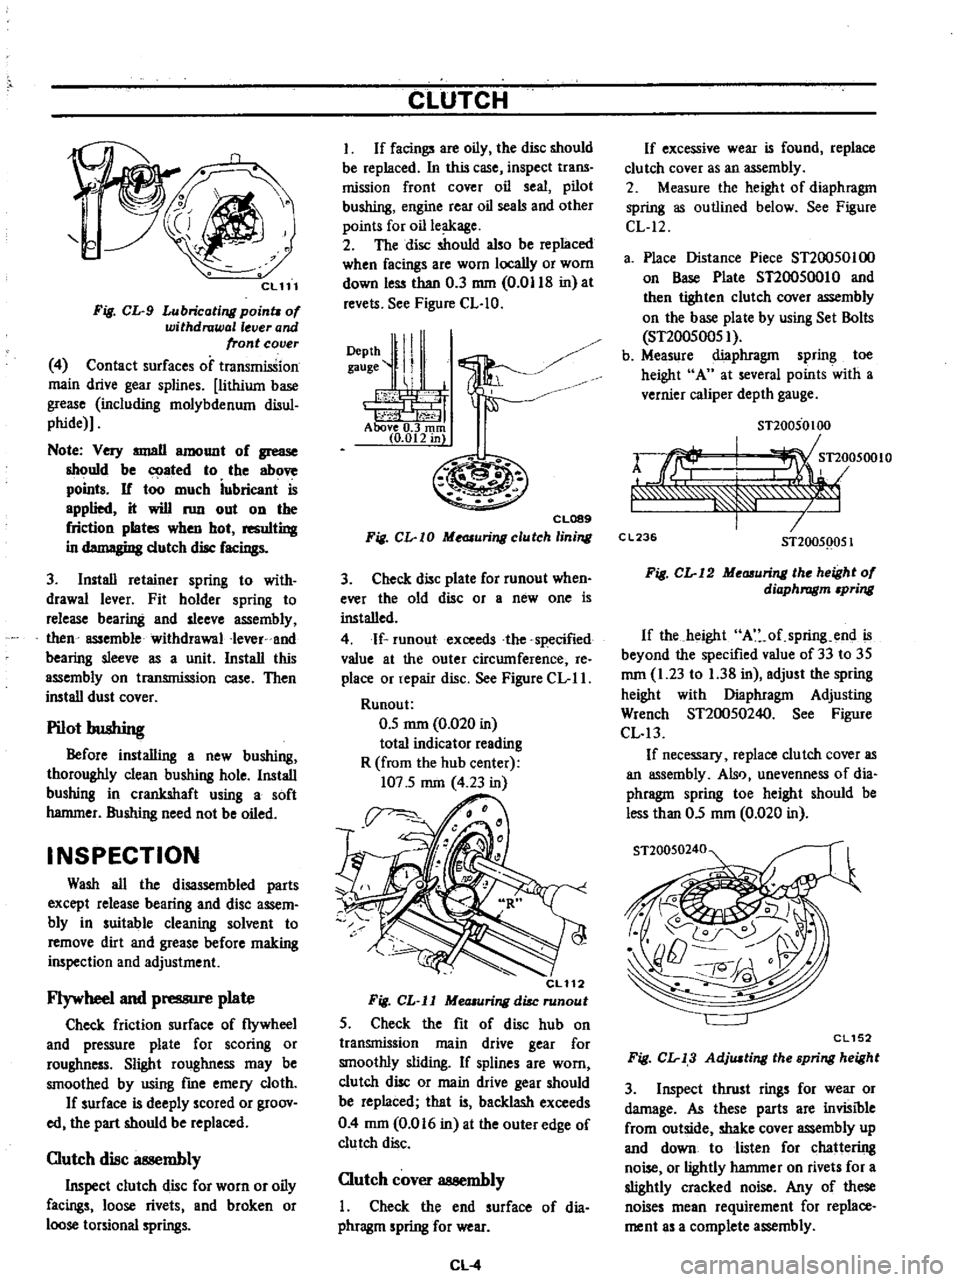
Fig
CL
9
Lubricating
poinu
of
withdrawal
lever
and
front
cover
4
Contact
surfaces
of
transmission
main
drive
gear
splines
lithium
base
grease
including
molybdenum
disul
phide
Note
Very
IIIIJllII
amount
of
grease
should
be
ated
to
the
above
points
If
too
much
iubricant
is
applied
it
will
run
out
on
the
friction
plates
when
hot
resulting
in
d
gi
dutch
disc
facings
3
Install
retainer
spring
to
with
drawal
lever
Fit
holder
spring
to
release
bearing
and
sleeve
assembly
then
assemble
withdrawal
Iever
and
bearing
sleeve
as
a
unit
Install
this
assembly
on
transmission
case
Then
install
dust
cover
Pilot
bushing
Before
installing
a
new
bushing
thoroughly
clean
bushing
hole
Install
bushing
in
crankshaft
using
a
soft
hammer
Bushing
need
not
be
oiled
INSPECTION
Wash
all
the
disassembled
parts
except
release
bearing
and
disc
assem
bly
in
suitable
cleaning
solvent
to
remove
dirt
and
grease
before
making
inspection
and
adjustment
Flywheel
and
pressure
plate
Check
friction
surface
of
flywheel
and
pressure
plate
for
scoring
or
roughness
Slight
roughness
may
be
smoothed
by
using
fme
emery
cloth
If
surface
is
deeply
scored
or
groov
ed
the
part
should
be
replaced
Clutch
disc
at
llembly
Inspect
clutch
disc
for
worn
or
oily
facings
loose
rivets
and
broken
or
loose
torsional
springs
CLUTCH
I
If
facings
are
oily
the
disc
should
be
replaced
In
this
case
inspect
trans
mission
front
cover
oil
seal
pilot
bushing
engine
rear
oil
seals
and
other
points
for
oil
leakage
2
The
disc
should
also
be
replaced
when
facings
are
worn
locally
or
worn
down
less
than
0
3
mm
0
0118
in
at
revels
See
Figure
CL
IO
DePth
ll
I
gauge
II
1
i
h
1
j1
t
f
Above
0
3
rom
10
012
in
CL089
Fig
CL
I0
Me
JIuringclutch
lining
3
Check
disc
plate
for
runout
when
ever
the
old
disc
or
a
new
one
is
installed
4
If
runoutexceeds
the
specified
value
at
the
outer
circumference
Ie
place
or
repair
disc
See
Figure
CL
II
Runou
t
0
5
mm
0
020
in
total
indicator
reading
R
from
the
hub
center
107
5
mm
4
23
in
CL112
Fig
CL
ll
MeOlUring
disc
runout
5
Check
the
fit
of
disc
hub
on
transmission
main
drive
gear
for
smoothly
sliding
If
splines
are
worn
clutch
disc
or
main
drive
gear
should
be
replaced
that
is
backlash
exceeds
0
4
mm
0
016
in
at
the
outer
edge
of
clutch
disc
Clutch
cover
assembly
I
Check
the
end
surface
of
dia
phragm
spring
for
wear
CL
4
If
excessive
wear
is
found
replace
clu
tch
cover
as
an
assembly
2
Measure
the
height
of
diaphragm
spring
as
outlined
below
See
Figure
CL
12
a
Place
Distance
Piece
ST20050100
on
Base
Plate
ST20050010
and
then
tighten
clutch
cover
assembly
on
the
base
plate
by
using
Set
Bolls
ST20050051
b
Measure
diaphragm
spring
toe
height
A
at
several
points
with
a
vernier
caliper
depth
gauge
STl0050100
rJrf
I
Tl
05001O
f
7
C
L23
STl005Q051
Fig
CL
12
Me
uring
the
height
of
diaphragm
pring
If
the
height
A
of
spring
end
is
beyond
the
specified
value
of
33
to
35
mm
1
23
to
1
38
in
adjust
the
spring
height
with
Diaphragm
Adjusting
Wrench
ST20050240
See
Figure
CL
13
If
necessary
replace
clutch
cover
as
an
assembly
Also
unevenness
of
dia
phragm
spring
toe
height
should
be
less
than
05
mm
0
020
in
ST20050240
CL152
Fig
CL
13
AdjlUting
the
spring
height
3
Inspect
thrust
rings
for
wear
or
damage
As
these
parts
are
invisible
from
outside
shake
cover
assembly
up
and
down
to
listen
for
chattering
noise
or
lightly
hammer
on
rivets
for
a
slightly
cracked
noise
Any
of
these
noises
mean
requirement
for
replace
ment
as
a
complete
assembly
Page 226 of 537
Release
bearing
and
sleeve
Check
for
abnormal
wear
on
con
tact
surface
of
withdrawal
lever
ball
pin
and
bearing
sleeve
DESCRIPTION
CLUTCH
PEDAL
Removal
and
installation
I
nspection
and
adjustment
CLUTCH
MASTER
CYLINDER
Removal
and
installation
Disassembly
and
assembly
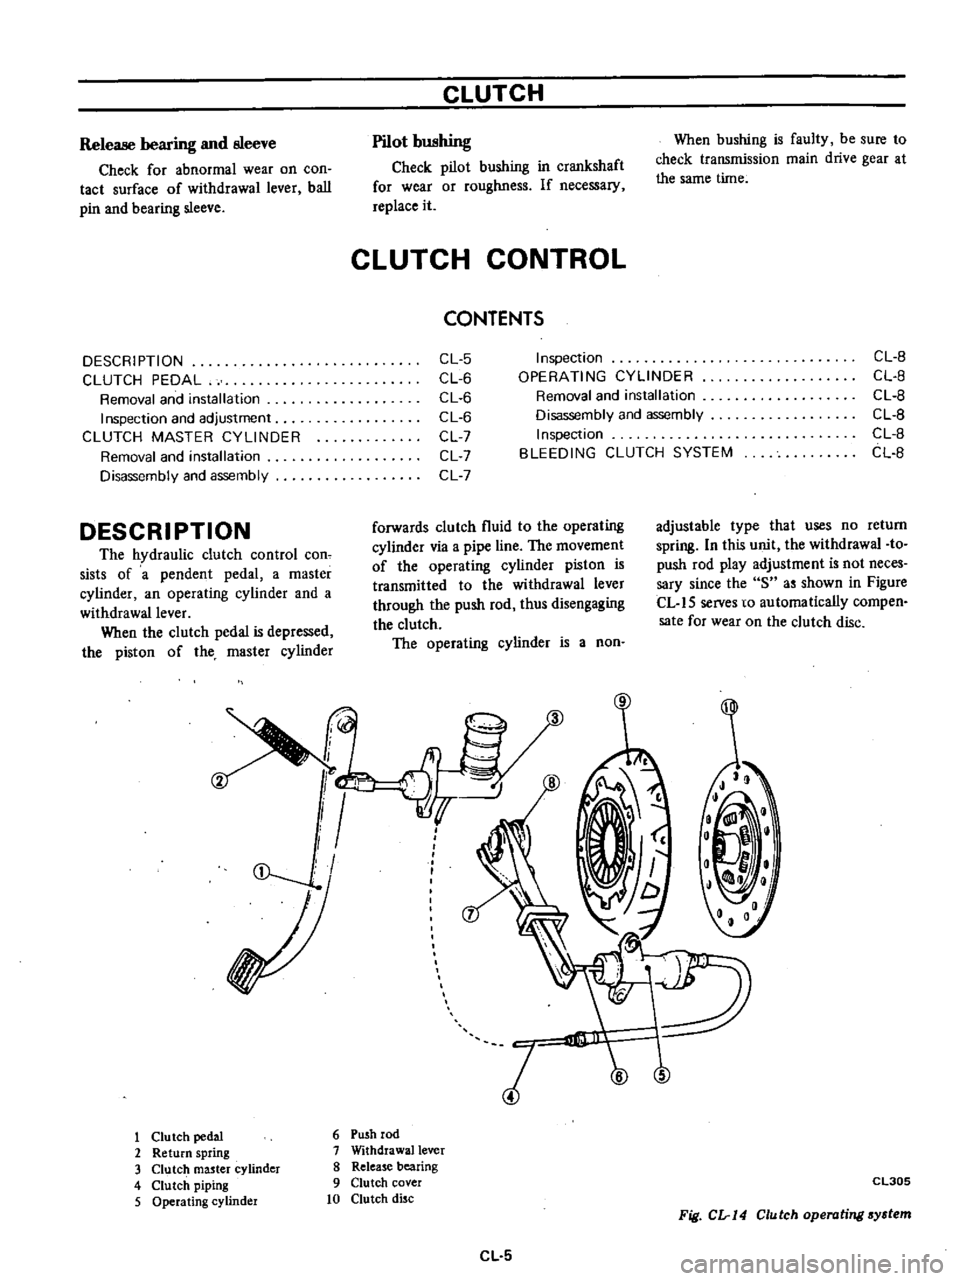
DESCRIPTION
The
hydraulic
clutch
control
con
sists
of
a
pendent
pedal
a
master
cylinder
an
operating
cylinder
and
a
withdrawal
lever
When
the
clutch
pedal
is
depressed
the
piston
of
the
master
cylinder
CLUTCH
Pilot
bushing
Check
pilot
bushing
in
crankshaft
for
wear
or
roughness
If
necessary
replace
it
CLUTCH
CONTROL
CONTENTS
When
bushing
is
faulty
be
sure
to
check
transmission
main
drive
gear
at
the
same
time
CL
5
CL
6
CL
6
CL
6
CL
7
CL
7
CL
7
Inspection
OPERATING
CYLINDER
Removal
and
installation
Disassembly
and
assembly
Inspection
BLEEDING
CLUTCH
SYSTEM
CL
B
CL
B
CL
B
CL
B
CL
B
CL
B
forwards
clutch
fluid
to
the
operating
cylinder
via
a
pipe
line
The
movement
of
the
operating
cylinder
piston
is
transmitted
to
the
withdrawal
lever
through
the
push
rod
thus
disengaging
the
clutch
The
operating
cylinder
is
a
non
adjustable
type
that
uses
no
return
spring
In
this
unit
the
withdrawal
to
push
rod
play
adjustment
is
not
neces
sary
since
the
8
as
shown
in
Figure
CL
15
serves
to
automatically
compen
sate
for
wear
on
the
clutch
disc
2
I
l
1
Clu
tch
pedal
6
Push
rod
2
Return
spring
7
Withdrawal
lever
3
Clutch
master
cylinder
8
Release
bearing
4
Clutch
piping
9
Clutch
cover
5
Operating
cylinder
10
Clutch
disc
CL
5
5
Cl305
Fig
CL
14
Clutch
operating
system
Page 227 of 537
Stroke
30
mm
Jt
i
I
1
18
in
Sj
1
i
J
o
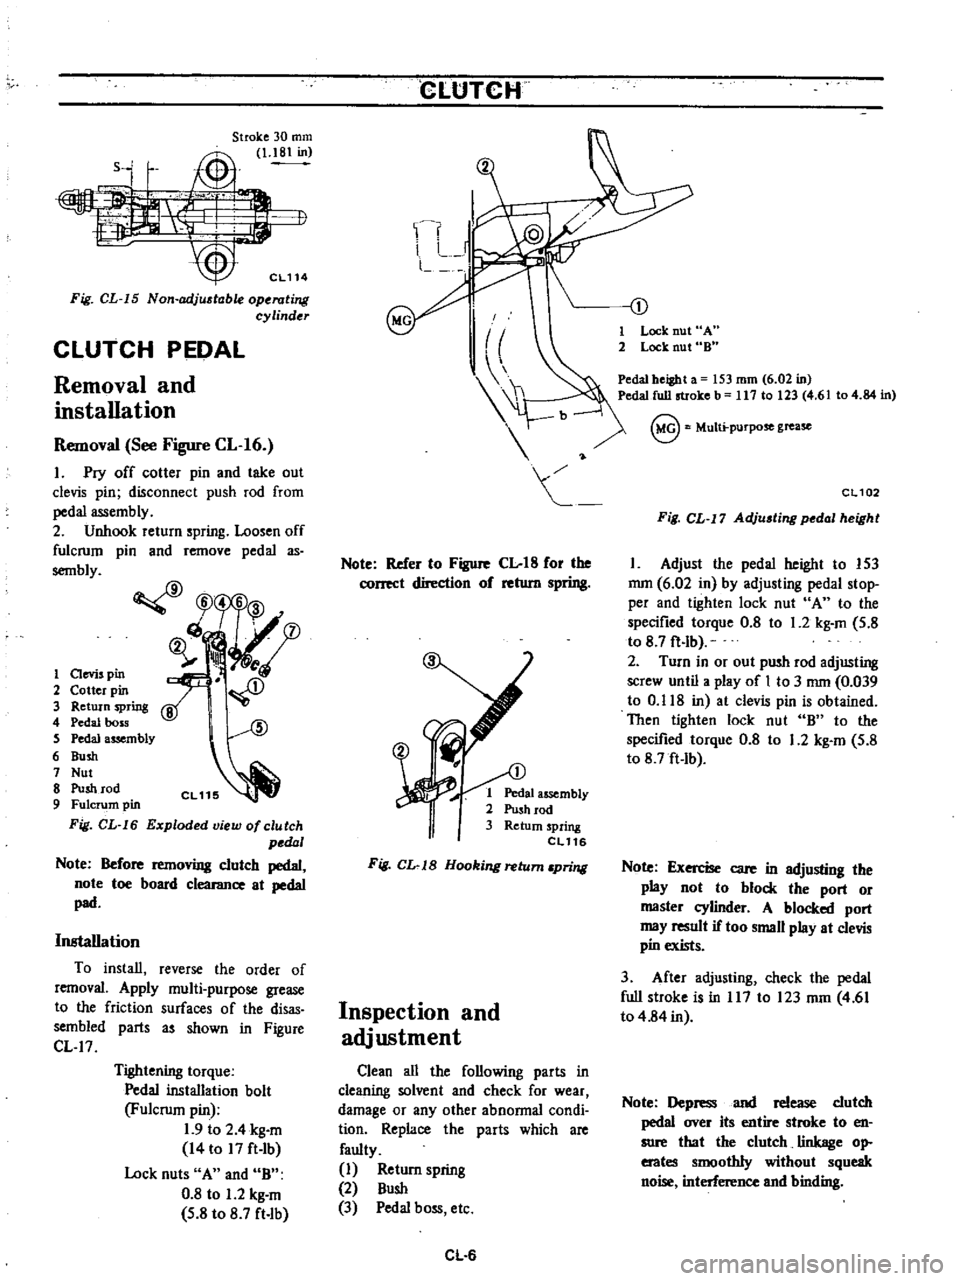
Fig
CL
15
Non
adj
table
operating
cylinder
CLUTCH
PEDAL
Removal
and
installation
Removal
See
Figure
CL
16
1
Pry
off
cotter
pin
and
take
out
clevis
pin
disconnect
push
rod
from
pedal
assembly
2
Unhook
return
spring
Loosen
off
fulcrum
pin
and
remove
pedal
as
sembly
CfJ
W5
6
3
ch
fD
ij
ll
i
A
1
aevis
pin
2
Cotter
pin
3
Return
spring
4
Pedal
boss
S
Pedal
assembly
6
Bush
7
Nut
8
Push
rod
9
Fulcrum
pin
Fig
CL
16
Exploded
view
of
clutch
pedal
Note
Before
removing
clutch
pedal
note
toe
board
clearance
at
pedal
pad
Installation
To
install
reverse
the
order
of
removal
Apply
multi
purpose
grease
to
the
friction
surfaces
of
the
disas
sembled
parts
as
shown
in
Figure
CL
17
Tightening
torque
Pedal
installation
bolt
Fulcrum
pin
1
9
to
2
4
kg
m
14
to
17
ft
Ib
Lock
nuts
A
and
B
0
8
to
1
2
kg
m
5
8
to
8
7
ft
lb
CLtJTCH
Note
Refer
to
Figure
Clot8
for
the
correct
direction
of
return
spring
1
Pedal
assembly
2
Push
rod
3
Return
spring
eL116
Fig
CL
1B
Hooking
return
pring
Inspection
and
adjustment
Clean
all
the
following
parts
in
cleaning
solvent
and
check
for
wear
damage
or
any
other
abnormal
condi
tion
Replace
the
parts
which
are
faulty
1
Return
spring
2
Bush
3
Pedal
boss
etc
CL
6
1
Lock
nut
A
2
Lock
nut
8
Pedal
beiBht
a
53
mm
6
02
in
Pedal
full
stroke
b
117
10
23
4
6
104
84
in
@
Multi
purpose
grease
CL102
Fig
CL
17
Adju
ting
pedal
height
1
Adjust
the
pedal
height
to
153
mm
6
02
in
by
adjusting
pedal
stop
per
and
tighten
lock
nut
A
to
the
specified
torque
0
8
to
1
2
kg
m
5
8
to
8
7
ft
lb
2
Turn
in
or
out
push
rod
adjusting
screw
until
a
play
of
I
to
3
mm
0
039
to
0
118
in
at
clevis
pin
is
obtained
Then
tighten
lock
nut
B
to
the
specified
torque
0
8
to
1
2
kg
m
5
8
to
8
7ft
Ib
Note
Exercise
care
in
adjusting
the
play
not
to
block
the
port
or
master
cylinder
A
blocked
port
may
result
if
too
small
play
at
clevis
pin
exists
3
After
adjusting
check
the
pedal
full
stroke
is
in
117
to
123
mm
4
61
to
4
84
in
Note
Depress
and
release
clutch
pedal
over
its
entire
stroke
to
en
sure
that
the
clutch
linkage
op
erates
smoothly
without
squeak
noise
interference
and
binding
Page 229 of 537
Inspection
Note
To
clean
or
wash
all
parts
of
master
cylinder
operating
cylinder
and
piping
clean
brake
fluid
must
be
used
Never
use
minera10ils
llUch
as
gasoline
and
kerosene
It
will
ruin
the
rubber
parts
of
the
hydrau
lic
system
I
Check
cylinder
and
piston
for
uneven
wear
or
damage
and
if
neces
sary
replace
2
If
the
clearance
between
cylinder
and
piston
is
more
than
0
15
mm
0
0059
in
replace
cylinder
3
Renew
piston
cup
when
dis
assembled
It
must
also
be
replaced
when
wear
or
deformation
due
to
fatigue
or
damage
is
found
4
Damaged
dust
cover
oil
reservoir
or
cap
should
be
replaced
Return
spring
and
valve
spring
must
also
be
replaced
when
they
are
broken
or
weak
5
Replace
clutch
hose
and
tube
if
any
abnormal
sign
of
damage
or
de
fro
ti
n
is
found
OPERATING
CYLINDER
Removal
and
installation
Removal
1
Detach
clutch
hose
from
operat
ing
cylinder
2
Remove
two
bolts
securing
op
erating
cylinder
to
clutch
housing
Installation
Install
in
the
reverse
order
of
re
moval
Observe
the
following
instructions
Bleed
air
thoroughly
from
clutch
hydraulic
system
2
Do
not
install
return
spring
or
clutch
will
not
be
disengaged
properly
Tightening
torque
Operating
cylinder
securing
bolt
2
5
to
3
5
kg
m
18
to
25
ft
lb
Bleeder
screw
0
7
to
0
9
kg
m
5
1
to
6
5
ft
Ib
Clutch
hose
connector
1
7
to
2
0
kg
m
12
to
14
ft
b
CLUTCH
Disassembly
and
assembly
Disassembly
1
Remove
push
rod
with
dust
cover
2
Remove
piston
assembly
and
pis
ton
spring
3
Remove
bleeder
screw
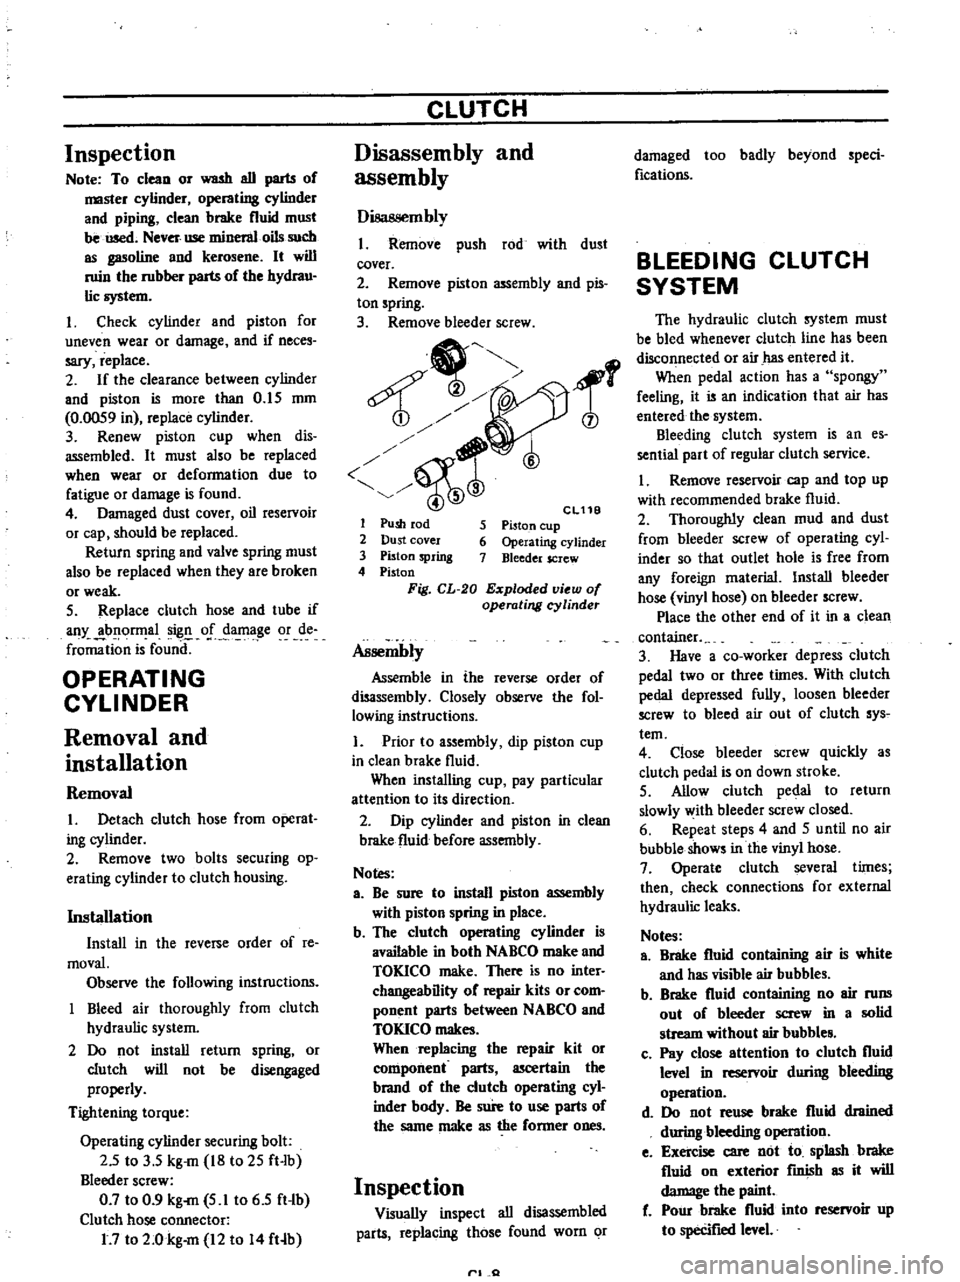
1
6
Cl11B
5
Piston
cup
6
Operating
cylinder
7
Bleeder
screw
1
Push
rod
2
Dust
cover
3
Piston
spring
4
Piston
Fig
CL
20
Exploded
view
of
operating
cyUnder
Assembly
Assemble
in
the
reverse
order
of
disassembly
Closely
observe
the
fol
lowing
instructions
1
Prior
to
assembly
dip
piston
cup
in
clean
brake
fluid
When
installing
cup
pay
particular
attention
to
its
direction
2
Dip
cylinder
and
piston
in
clean
brake
fluid
before
assembly
Notes
a
Be
sure
to
install
piston
assembly
with
piston
spring
in
place
b
The
clutch
operating
cylinder
is
available
in
both
NABCO
make
and
TOKICO
make
There
is
no
inter
changeability
of
repair
kits
or
com
ponent
parts
between
NABCO
and
TOKICO
makes
When
replacing
the
repair
kit
or
component
parts
ascertain
the
brand
of
the
clutch
operating
cyl
inder
bndy
Be
sure
to
use
parts
of
the
same
make
as
the
former
ones
Inspection
Visually
inspect
all
disassembled
parts
replacing
those
found
worn
or
rl
Q
damaged
too
badly
beyond
speci
fications
BLEEDING
CLUTCH
SYSTEM
The
hydraulic
clutch
system
must
be
bled
whenever
clutch
line
has
been
disconnected
or
air
has
entered
it
When
pedal
action
has
a
spongy
feeling
it
is
an
indication
that
air
has
entered
the
system
Bleeding
clutch
system
is
an
es
sential
part
of
regular
clutch
service
I
Remove
reservoir
cap
and
top
up
with
recommended
brake
fluid
2
Thoroughly
clean
mud
and
dust
from
bleeder
screw
of
operating
cyl
inder
so
that
outlet
hole
is
free
from
any
foreign
rnaterial
Install
bleeder
hose
vinyl
hose
on
bleeder
screw
Place
the
other
end
of
it
in
a
clean
container
3
Have
a
co
worker
depress
clutch
pedal
two
or
three
times
With
clu
tch
pedal
depressed
fully
loosen
bleeder
screw
to
bleed
air
out
of
clutch
sys
tern
4
Close
bleeder
screw
quickly
as
clutch
pedal
is
on
down
stroke
5
Allow
clutch
pedal
to
return
slowly
with
bleeder
screw
closed
6
Repeat
steps
4
and
5
until
no
air
bubble
shows
in
the
vinyl
hose
7
Operate
clutch
several
times
then
check
connections
for
external
hydraulic
leaks
Notes
a
Brake
fluid
containing
air
is
white
and
has
visible
air
bubbles
b
Brake
fluid
containing
no
air
runs
out
of
bleeder
screw
in
a
solid
stream
without
air
bubble
c
Pay
close
attention
to
clutch
fluid
level
in
reservoir
during
bleeding
operation
d
Do
not
reuse
brake
fluid
drained
during
bleeding
operation
e
Exercise
care
not
to
splash
brake
fluid
on
exterior
fInish
as
it
will
damage
the
paint
f
Pour
brake
fluid
into
reservoir
up
to
specifIed
level
Page 231 of 537
CLUTCH
TROUBLE
DIAGNOSES
AND
CORRECTIONS
Condition
Probable
cause
and
testing
Clutch
slips
Corrective
action
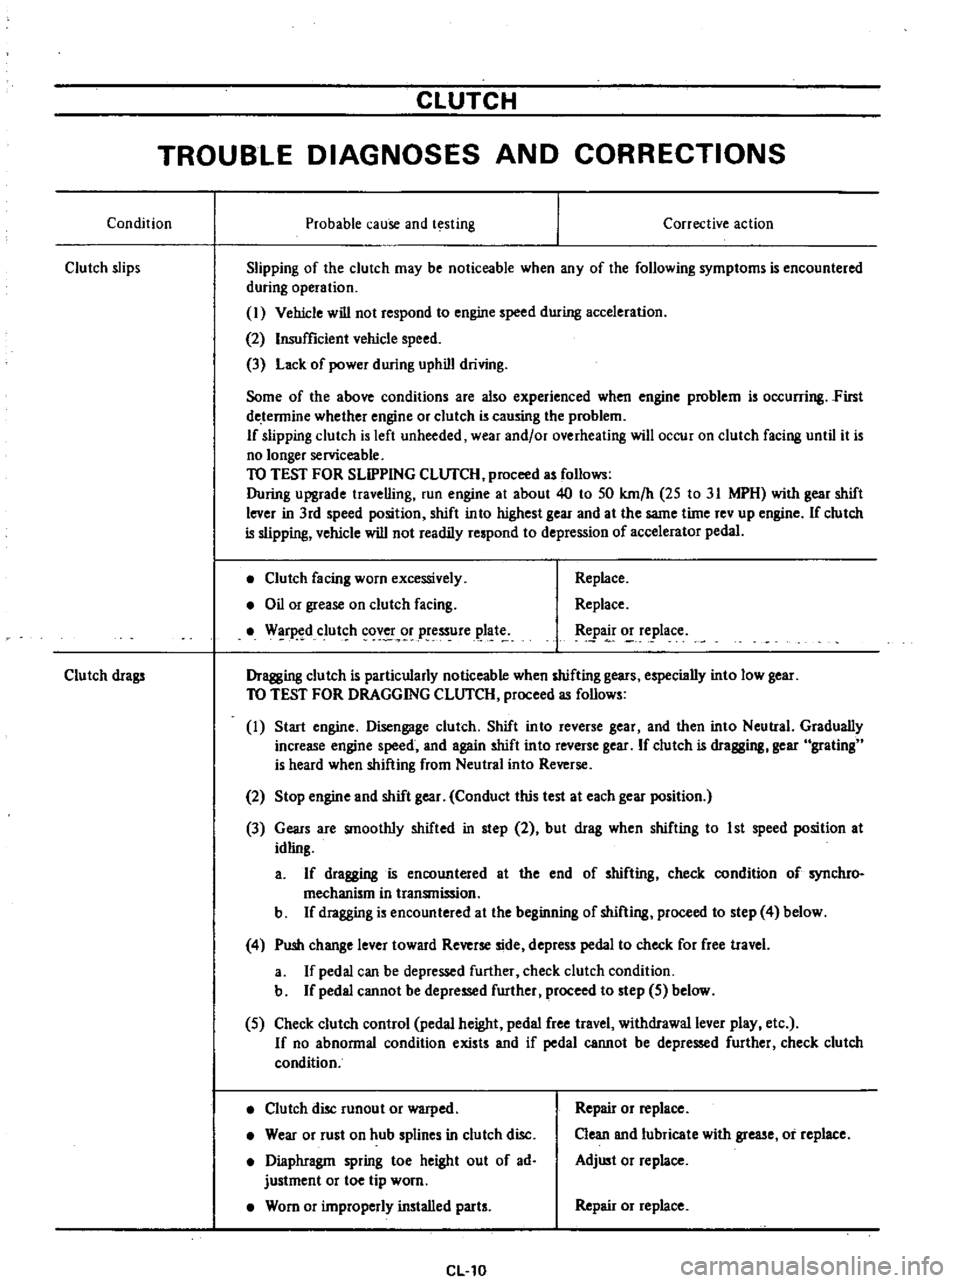
Slipping
of
the
clutch
may
be
noticeable
when
any
of
the
following
symptoms
is
encountered
during
operation
I
Vehicle
will
not
respond
to
engine
speed
during
acceleration
2
Insufficient
vehicle
speed
3
Lack
of
power
during
uphill
driving
Some
of
the
above
conditions
are
also
experienced
when
engine
problem
is
oc
urring
First
de
tennine
whether
engine
or
clutch
is
causing
the
problem
If
slipping
clutch
is
left
unheeded
wear
and
or
overheating
will
occur
on
clutch
facing
until
it
is
no
longer
serviceable
TO
TEST
FOR
SLIPPING
CLlJfCH
proceed
as
follows
During
upgrade
travelling
run
engine
at
about
40
to
50
km
h
25
to
31
MPH
with
gear
shift
lever
in
3rd
speed
position
shift
into
highest
gear
and
at
the
same
time
rev
up
engine
If
clutch
is
slipping
vehicle
will
not
readily
respond
to
depression
of
accelerator
pedal
Clutch
facing
worn
excessively
Oil
or
grease
on
clutch
facing
W
r
d
clut
h
cov
r
pressure
plat
Replace
Replace
tpa
o
e
lace
Dragging
clutch
is
particularly
noticeable
when
shifting
gears
especially
into
low
gear
TO
TEST
FOR
DRAGGING
CLlJfCH
proceed
as
follows
I
Start
engine
Disengage
clutch
Shift
into
reverse
gear
and
then
into
Neutral
Gradually
increase
engine
speed
and
again
shift
into
reverse
gear
If
clutch
is
dragging
gear
grating
is
heard
when
shifting
from
Neutral
into
Reverse
Clutch
drags
2
Stop
engine
and
shift
gear
Conduct
this
test
at
each
gear
position
3
Gears
are
smoothly
shifted
in
step
2
but
drag
when
shifting
to
1st
speed
position
at
idling
a
If
dragging
is
encountered
at
the
end
of
shifting
check
condition
of
synchro
mechanism
in
transmission
b
If
dragging
is
encountered
at
the
beginning
of
shifting
proceed
to
step
4
below
4
Push
change
lever
toward
Reverse
side
depress
pedal
to
check
for
free
travel
a
If
pedal
can
be
depressed
further
check
clutch
condition
b
If
pedal
cannot
be
depressed
further
proceed
to
step
5
below
5
Check
clutch
control
pedal
height
pedal
free
travel
withdrawal
lever
play
etc
If
no
abnonnal
condition
exists
and
if
pedal
cannot
be
depressed
further
check
clutch
condition
Clutch
disc
runout
or
warped
Wear
or
rust
on
hub
splines
in
clutch
disc
Diaphragm
spring
toe
height
out
of
ad
justment
or
toe
tip
worn
Worn
or
improperly
installed
parts
CL10
Repair
or
replace
Clean
and
lubricate
with
grease
or
replace
Adjust
or
replace
Repair
or
replace
Page 237 of 537
Manual
Transmission
o
cCl
4
@
@
fl
t
o
@
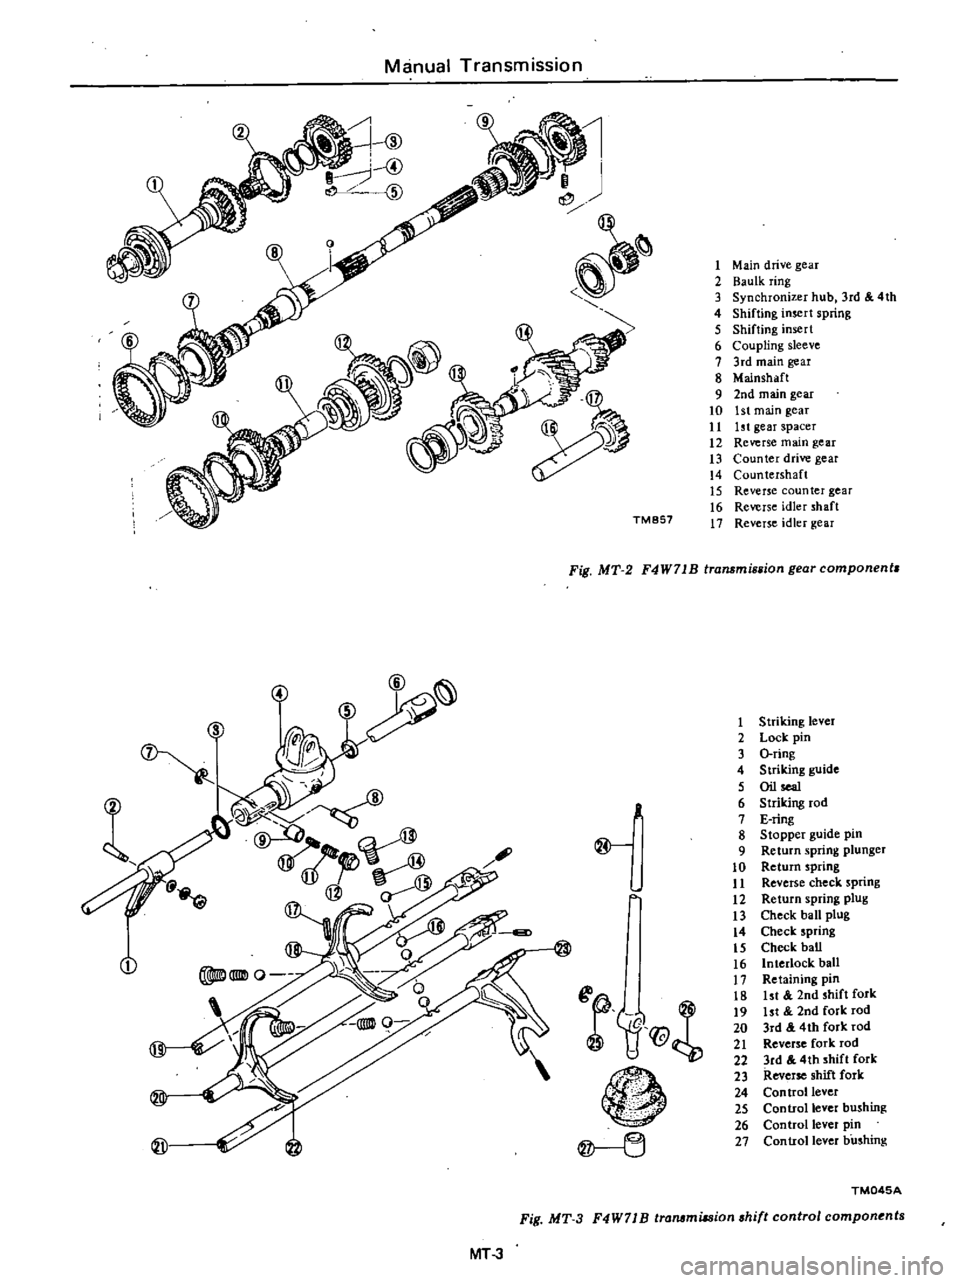
Fig
MT
3
MT
3
TM857
1
Main
drive
gear
2
Baulk
ring
3
d
4th
3
Synchronizer
hub
r
4
Shifting
insert
spnng
5
Shifting
insert
6
Coupling
sleeve
7
3rd
main
gear
8
Mainshaft
9
2nd
main
gear
10
1st
main
gear
11
ht
gear
spacer
12
Reverse
main
gear
13
Counter
drive
gear
14
Countershaft
15
Reverse
counter
gear
16
Reverse
idler
shaft
17
Reverse
idler
gear
Fig
MT
2
n
ear
component
F4W71B
transmlsBIO
g
@
f1f@
n
1
2
3
4
5
6
7
8
9
10
11
12
13
14
15
16
17
18
19
20
21
22
23
24
25
26
27
Striking
lever
Lock
pin
O
ring
Striking
guide
Oil
sea1
Striking
rod
E
ring
Stopper
guide
pm
Return
spring
plunger
Return
spring
Reverse
check
spnng
Return
spring
plug
Check
ball
plug
Check
spring
Check
baD
Interlock
ball
Retaining
pin
k
1st
2nd
shift
or
ht
2nd
fork
rod
3rd
4th
fork
rod
Reverse
fork
rod
3rd
4th
shift
fork
Reverse
shift
fork
Con
trollever
Control
lever
b
shmg
Control
lever
p
n
Control
lever
bushmg
TM045A
I
ponents
shift
contro
com
F4W71
B
transmuswn
Page 239 of 537
8
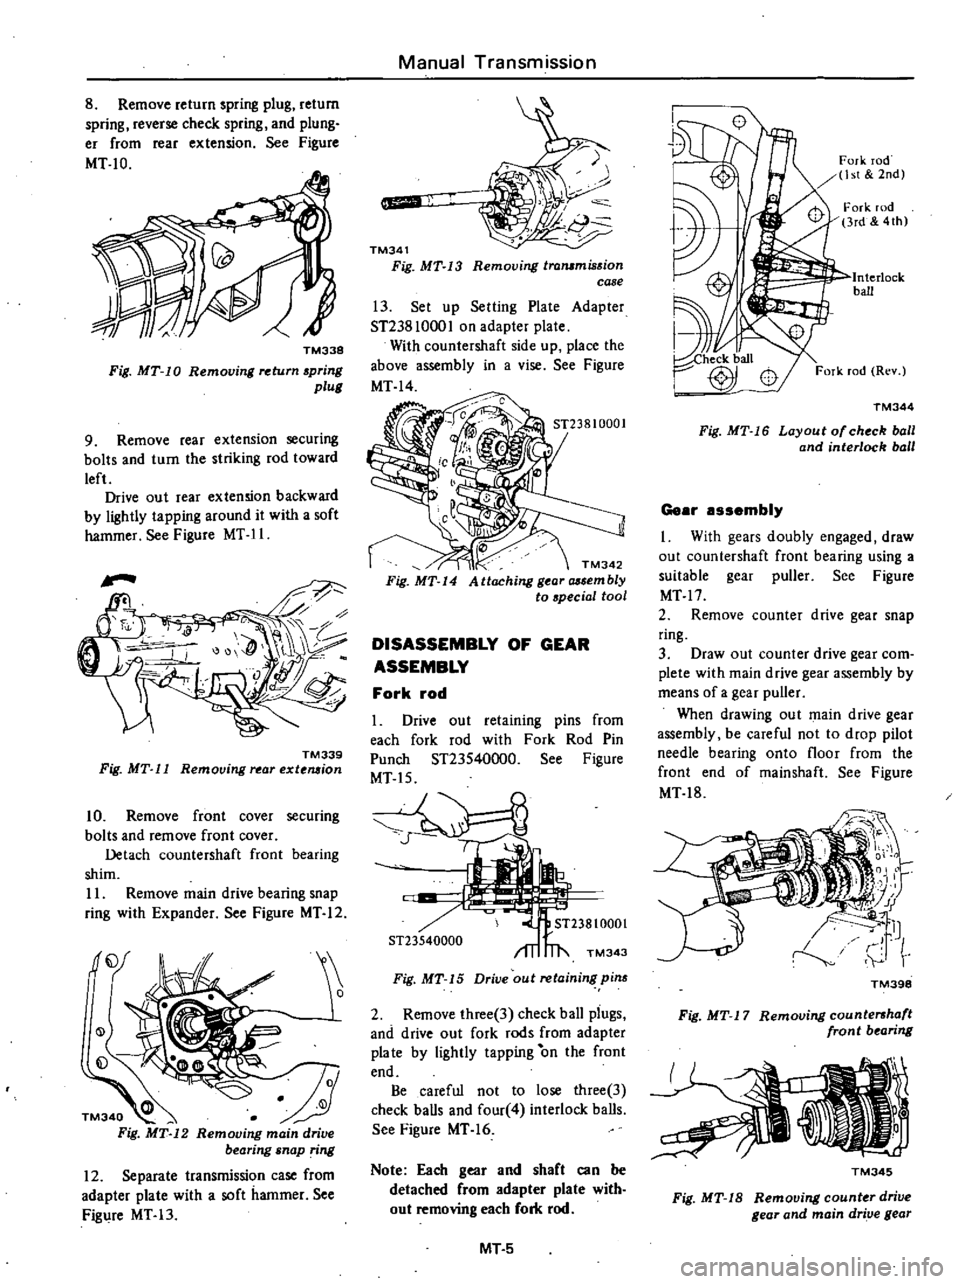
Remove
return
spring
plug
return
spring
reverse
check
spring
and
plung
er
from
rear
extension
See
Figure
MT
10
TM338
Fig
MT
10
Removing
return
spring
plull
9
Remove
rear
extension
securing
bolts
and
turn
the
striking
rod
toward
left
Drive
out
rear
extension
backward
by
lightly
tapping
around
it
with
a
soft
hammer
See
Figure
MT
11
TM339
Fig
MT
11
Removing
rear
extension
10
Remove
front
cover
securing
bolts
and
remove
front
cover
Detach
countershaft
front
bearing
shim
II
Remove
main
drive
bearing
snap
ring
with
Expander
See
Figure
MT
12
j
12
Separate
transmission
case
from
adapter
plate
with
a
soft
hammer
See
Figure
MT
13
Manual
Transmission
qJiiiiiI
TM341
Fig
MT
13
Removing
trammission
case
13
Set
up
Setting
Plate
Adapter
ST238
1000
I
on
adapter
plate
With
countershaft
side
up
place
the
above
assembly
in
a
vise
See
Figure
MT
14
TM342
Fig
MT
14
Attaching
l
or
mbly
to
special
tool
DISASSEMBLY
OF
GEAR
ASSEMBLY
Fork
rod
Drive
out
retaining
pins
from
each
fork
rod
with
Fork
Rod
Pin
Punch
ST23540000
See
Figure
MT
15
S
ST23540000
TM343
Fig
MT
15
Drive
out
retaining
pim
2
Remove
three
3
check
ball
piugs
and
drive
out
fork
rods
from
adapter
pia
te
by
lightly
tapping
on
the
front
end
Be
careful
not
to
lose
three
3
check
balls
and
four
4
interlock
balls
See
Figure
MT
16
Note
Each
gear
and
shaft
can
be
detached
from
adapter
plate
with
out
removing
each
fork
rod
MT
5
Fork
rod
ht
2nd
Interlock
ball
TM344
Fig
MT
16
Layout
o
ch
ck
boll
and
interlock
ball
Gear
assembly
I
With
gears
doubly
engaged
draw
out
countershaft
front
bearing
using
a
suitable
gear
puller
See
Figure
MT
17
2
Remove
counter
drive
gear
snap
ring
3
Draw
out
counter
drive
gear
com
plete
with
main
drive
gear
assembly
by
means
of
a
gear
puller
When
drawing
out
main
drive
gear
assembly
be
careful
not
to
drop
pilot
needle
bearing
onto
floor
from
the
front
end
of
mainshaft
See
Figure
MT
18
TM398
Fig
MT
17
Removing
countershaft
front
b
aring
TM345
Fig
MT
18
Removing
count
r
drive
gear
and
main
drive
gear
Page 242 of 537
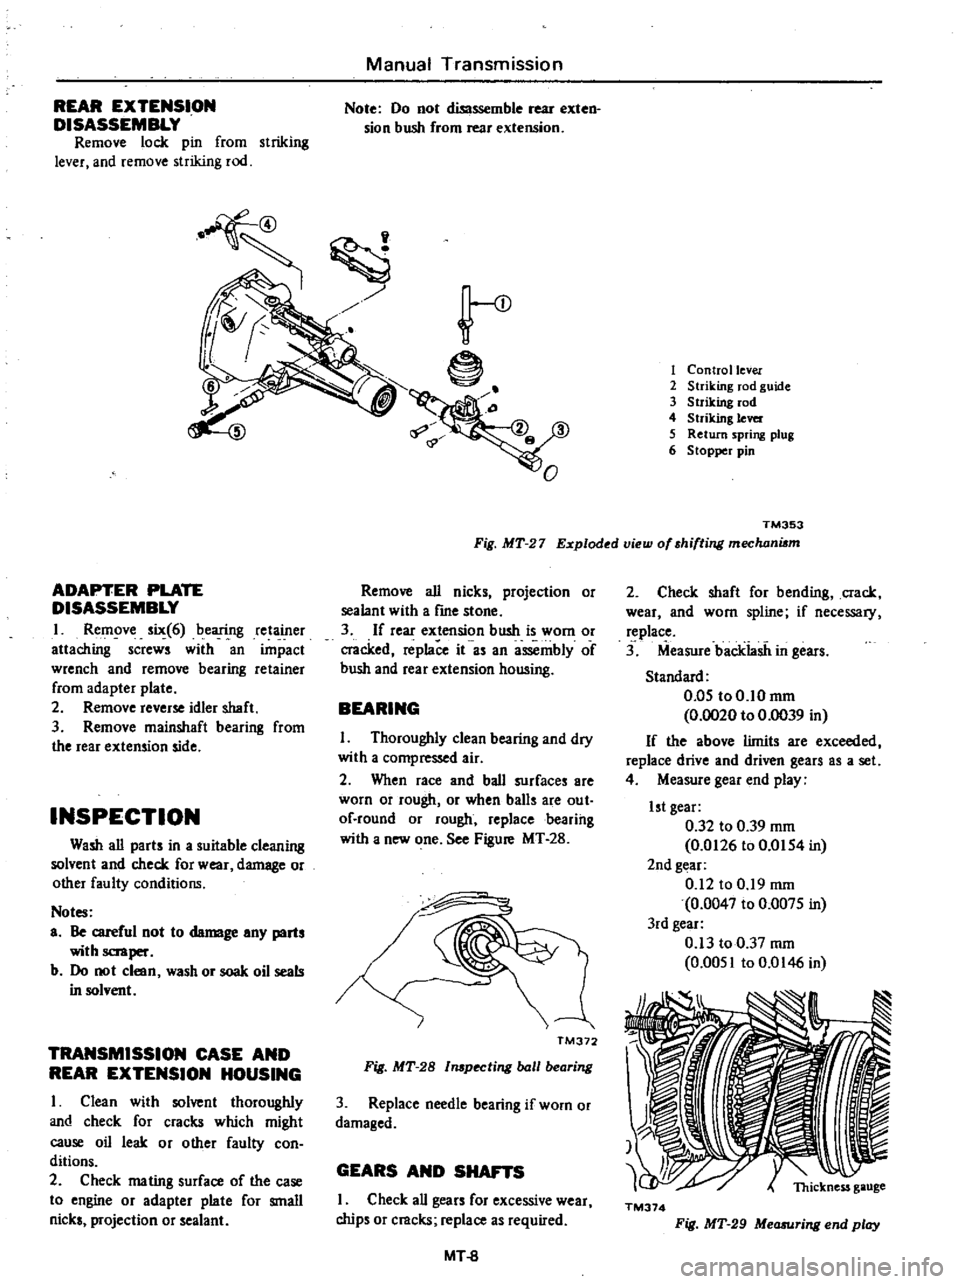
REAR
EXTENSION
DISASSEMBLY
Remove
lock
pin
from
striking
lever
and
remove
striking
rod
Manual
Transmission
Note
00
not
diSlssemble
rear
exten
sion
bush
from
rear
extension
ADAPTER
PLATE
DISASSEMBLY
I
Remove
six
6
bearing
retainer
attaching
screws
with
an
impact
wrench
and
remove
bearing
retainer
from
adapter
plate
2
Remove
reverse
idler
shaft
3
Remove
mainshaft
bearing
from
the
rear
extension
side
INSPECTION
Wash
all
parts
in
a
suitable
cleaning
solvent
and
check
for
wear
damage
or
other
faulty
conditions
Notes
a
Be
careful
not
to
damage
any
parts
with
scraper
b
00
not
clean
wash
or
soak
oil
seals
in
solvent
TRANSMISSION
CASE
AND
REAR
EXTENSION
HOUSING
I
Clean
with
solvent
thoroughly
and
check
for
cracks
which
might
cause
oil
leak
or
other
faulty
con
ditions
2
Check
mating
surface
of
the
case
to
engine
or
adapter
plate
for
small
nicks
projection
or
sealant
e
1
Control
lever
2
Striking
rod
guide
3
Striking
rod
4
Striking
lever
5
Return
spring
plug
6
Stopper
pin
TM353
Fig
MT
27
Exploded
view
of
shifting
mechani6m
Remove
all
nicks
projection
or
sealant
with
a
frne
stone
3
If
rear
extension
bush
is
worn
or
cracked
replace
it
as
an
assembly
of
bush
and
rear
extension
housing
BEARING
I
Thoroughly
clean
bearing
and
dry
with
a
compressed
air
2
When
race
and
ball
surfaces
are
worn
or
rough
or
when
balls
are
out
of
round
or
rough
replacebearihg
with
a
new
one
See
Figure
MT
28
I
TM372
Fig
MT
28
l
pecting
ball
bearing
3
Replace
needle
bearing
if
worn
or
damaged
GEARS
AND
SHAFTS
I
Check
all
gears
for
excessive
wear
chips
or
cracks
replace
as
required
MT
8
2
Check
shaft
for
bending
crack
wear
and
worn
spline
if
necessary
replace
3
Measure
backiasii
in
gears
Standard
0
05
to0
10mm
0
0020
to
0
0039
in
If
the
above
limits
are
exceeded
replace
drive
and
driven
gears
as
a
set
4
Measure
gear
end
play
1st
gear
0
32
to
0
39
mm
0
0126
to
0
0154
in
2nd
gear
0
12
to
0
19
mm
0
0047
to
0
0075
in
3rd
gear
0
13
to
0
37
mm
0
0051
to
0
0146
in
TM374
Fig
MT
29
Measuring
end
play
Page 243 of 537
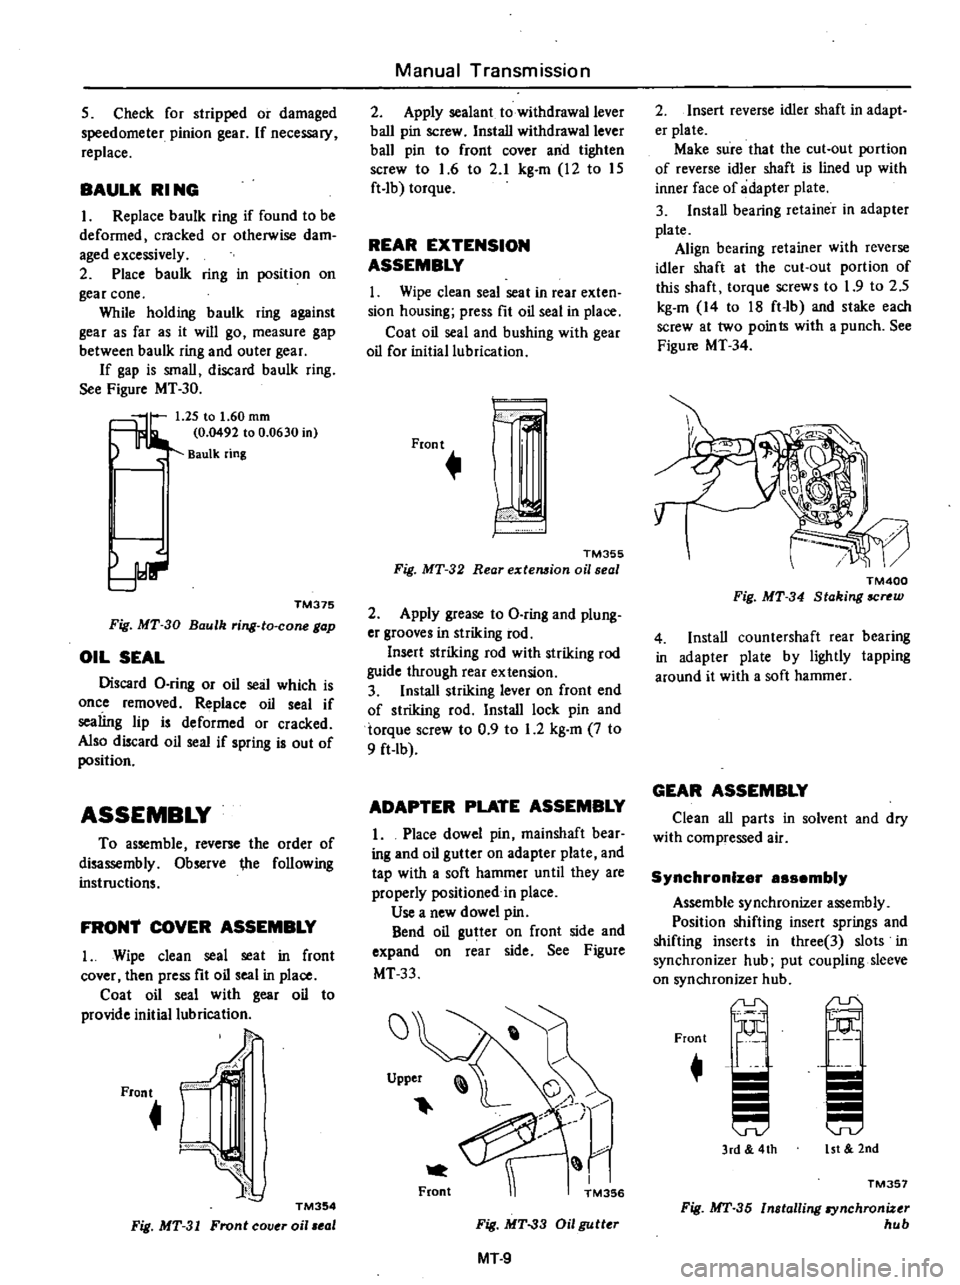
5
Check
for
stripped
or
damaged
speedometer
pinion
gear
If
necessary
replace
BAULK
RI
NG
I
Replace
baulk
ring
if
found
to
be
deformed
cracked
or
otherwise
dam
aged
excessively
2
Place
baulk
ring
in
position
on
gear
cone
While
holding
baulk
ring
against
gear
as
far
as
it
will
go
measure
gap
between
baulk
ring
and
outer
gear
If
gap
is
small
discard
baulk
ring
See
Figure
MT
30
5
lr
1
25
to
1
60
rom
0
0492
to
0
0630
in
Baulk
ring
TM375
Fig
MT
30
Baulk
ring
to
cone
gap
OIL
SEAL
Discard
O
ring
or
oil
seal
which
is
once
removed
Replace
oil
seal
if
sealing
lip
is
deformed
or
cracked
Also
discard
oil
seal
if
spring
is
out
of
position
ASSEMBLY
To
assemble
reverse
the
order
of
disassembly
Observe
ihe
following
instructions
FRON1
COVER
ASSEMBLY
I
Wipe
clean
seal
seat
in
front
cover
then
press
fit
oil
seal
in
place
Coat
oil
seal
with
gear
oil
to
provide
initial
lubrication
Front
J
f
C
J
TM354
Fig
MT
31
Front
cov
oil
eol
Manual
Transmission
2
Apply
sealant
to
withdrawal
lever
ball
pin
screw
Install
withdrawal
lever
ball
pin
to
front
cover
and
tighten
screw
to
1
6
to
2
1
kg
m
12
to
15
ft
lb
torque
REAR
EXTENSION
ASSEMBLY
1
Wipe
clean
seal
seat
in
rear
exten
sion
housing
press
fit
oil
seal
in
place
Coat
oil
seal
and
bushing
with
gear
oil
for
initial
lubrication
Front
h
TM355
Fig
MT
32
Rear
extemion
oil
seal
2
Apply
grease
to
O
ring
and
plung
er
grooves
in
striking
rod
Insert
striking
rod
with
striking
rod
guide
through
rear
extension
3
Install
striking
lever
on
front
end
of
striking
rod
Install
lock
pin
and
torque
screw
to
0
9
to
1
2
kg
m
7
to
9
ft
Ib
ADAPTER
PLATE
ASSEMBLY
1
Place
dowel
pin
mainshaft
bear
ing
and
oil
gutter
on
adapter
plate
and
tap
with
a
soft
hammer
until
they
are
properly
positioned
in
place
Use
a
new
dowel
pin
Bend
oil
gutter
on
front
side
and
expand
on
rear
side
See
Figure
MT33
J
7
r
M356
Upper
Front
Fig
MT
33
Oil
gutter
MT
9
2
Insert
reverse
idler
shaft
in
adapt
er
plate
Make
sure
that
the
cut
out
portion
of
reverse
idler
shaft
is
lined
up
with
inner
face
of
adapter
plate
3
Install
bearing
retainer
in
adapter
plate
Align
bearing
retainer
with
reverse
idler
shaft
at
the
cut
out
portion
of
this
shaft
torque
screws
to
1
9
to
2
5
kg
m
14
to
18
ft
lb
and
stake
each
screw
at
two
poin
Is
with
a
punch
See
Figure
MT
34
TM400
Fig
MT
34
Staking
SCN
W
4
Install
countershaft
rear
bearing
in
adapter
plate
by
lightly
tapping
around
it
with
a
soft
hammer
GEAR
ASSEMBLY
Clean
all
parts
in
solvent
and
dry
with
compressed
air
Synchronizer
888embly
Assemble
synchronizer
assembly
Position
shifting
insert
springs
and
shifting
inserts
in
three
3
slots
in
synchronizer
hub
put
coupling
sleeve
on
synchronizer
hub
r
Front
3rd
4th
15t
2nd
TM351
Fig
MT
35
Installing
synchronizer
hub