lock DATSUN PICK-UP 1977 Service Manual
[x] Cancel search | Manufacturer: DATSUN, Model Year: 1977, Model line: PICK-UP, Model: DATSUN PICK-UP 1977Pages: 537, PDF Size: 35.48 MB
Page 385 of 537
Ibove
mentioned
st
is
available
when
op
the
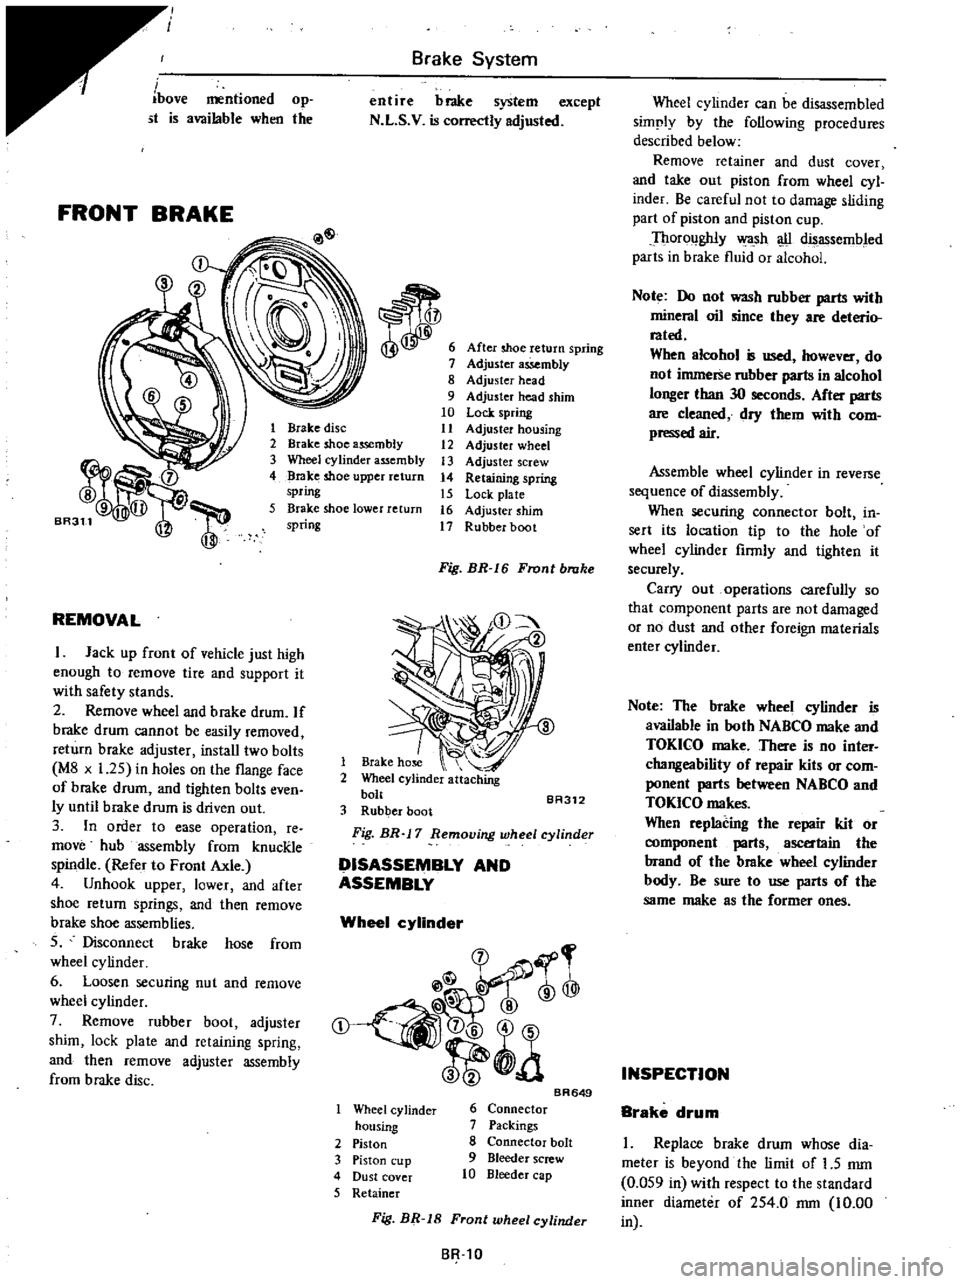
FRONT
BRAKE
Brake
System
entire
brake
system
except
N
L
S
V
is
correctly
adjusted
After
shoe
return
spring
Adjuster
assembly
8
Adjuster
head
9
Adjuster
head
shim
10
Lock
spring
11
Adjuster
housing
12
Adjuster
wheel
13
Adjuster
screw
14
Retaining
spring
15
Lock
plate
16
Adjuster
shim
17
Rubber
boot
1
Brake
disc
2
Brake
shoe
assembly
3
Wheel
cylinder
assembly
4
Brake
shoe
upper
return
spring
5
Brake
shoe
lower
return
spring
REMOVAL
I
Jack
up
front
of
vehicle
just
high
enough
to
remove
tire
and
support
it
with
safety
stands
2
Remove
wheel
and
brake
drum
If
brake
drum
cannot
be
easily
removed
return
brake
adjuster
install
two
bolts
M8
x
1
25
in
holes
on
the
flange
face
of
brake
drum
and
tighten
bolts
even
ly
until
brake
drum
is
driven
out
3
In
order
to
ease
operation
re
move
hub
assembly
from
knucRle
spindle
Refer
to
Front
Axle
4
Unhook
upper
lower
and
after
shoe
return
springs
and
then
remove
brake
shoe
assemblies
S
Disconnect
brake
hose
from
wheel
cy
linder
6
Loosen
securing
nut
and
remove
wheel
cylinder
7
Remove
rubber
boot
adjuster
shim
lock
plate
and
retaining
spring
and
then
remove
adjuster
assembly
from
brake
disc
Fig
BR
I
6
Front
brake
1
Brake
hose
2
Wheel
cylinder
attaching
bolt
BA312
3
Rubber
boot
Fig
BR
17
Removing
wheel
cylinder
DISASSEMBLY
AND
ASSEMBLY
Wheel
cylinder
@
rr
l
@
t
a
Wheel
cy
linder
housing
2
Piston
3
Piston
cup
4
Dust
cover
5
Retainer
BR649
6
Connector
7
Packings
8
Connector
bolt
9
Bleeder
screw
10
Bleeder
cap
Wheel
cylinder
can
be
disassembled
simply
by
the
following
procedures
described
below
Remove
retainer
and
dust
cover
and
take
out
piston
from
wheel
cyl
inder
Be
careful
not
to
damage
sliding
part
of
piston
and
piston
cup
Thoroughly
wa
sh
u
disassembled
parts
in
brake
fluid
or
alcohol
Note
Do
not
wash
rubber
parts
with
mineral
oil
since
they
are
deterio
rated
When
alcohol
is
used
however
do
not
immerse
rubber
parts
in
alcohol
longer
than
30
seconds
After
parts
are
cleaned
dry
them
with
com
pressed
air
Assemble
wheel
cylinder
in
reverse
sequence
of
diassembly
When
securing
connector
bolt
in
sert
its
location
tip
to
the
hole
of
wheel
cylinder
firmly
and
tighten
it
securely
Carry
out
operations
carefully
so
that
component
parts
are
not
damaged
or
no
dust
and
other
foreign
materials
enter
cylinder
Note
The
brake
wheel
cylinder
is
available
in
both
NABCO
make
and
TOKICO
make
There
is
no
inter
changeability
of
repair
kits
or
com
ponent
parts
between
NABCO
and
TOKICO
makes
When
replacing
the
repair
kit
or
ent
parts
ascertain
the
brand
of
the
brake
wheel
cylinder
body
Be
sure
to
use
parts
of
the
same
make
as
the
former
ones
INSPECTION
Brake
drum
I
Replace
brake
drum
whose
dia
meter
is
beyond
the
limit
of
1
5
mm
0
OS9
in
with
respect
to
the
standard
inner
diameter
of
2S4
0
rom
10
00
SR
tO
Fig
BR
18
Front
wheel
cylinder
in
Page 387 of 537
BA313
Fig
BR
19
Greasing
points
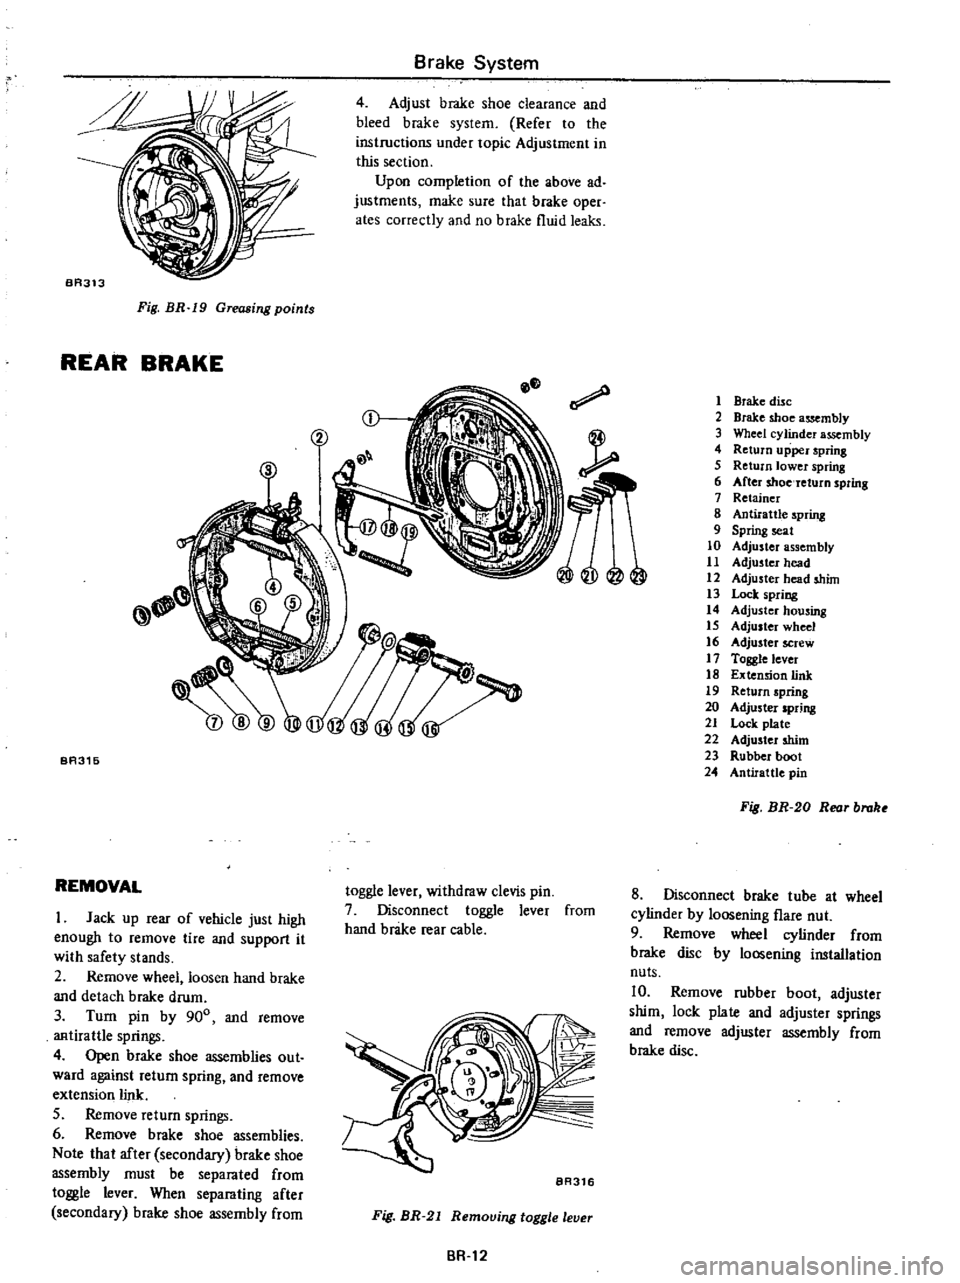
REAR
BRAKE
Brake
System
4
Adjust
brake
shoe
clearance
and
bleed
brake
system
Refer
to
the
instructions
under
topic
Adjustment
in
this
section
Upon
completion
of
the
above
ad
justments
make
sure
that
brake
oper
ates
correctly
and
no
brake
fluid
leaks
BA315
REMOVAL
I
Jack
up
rear
of
vehicle
just
high
enough
to
remove
lire
and
support
it
with
safety
stands
2
Remove
wheel
loosen
hand
brake
and
detach
brake
drum
3
Turn
pin
by
900
and
remove
antirattle
springs
4
Open
brake
shoe
assemblies
out
ward
against
return
spring
and
remove
extension
link
S
Remove
return
springs
6
Remove
brake
shoe
assemblies
Note
that
after
secondary
brake
shoe
assembly
must
be
separated
from
toggle
lever
When
separating
after
secondary
brake
shoe
assembly
from
toggle
lever
withdraw
clevis
pin
7
Disconnect
toggle
lever
from
hand
brake
rear
cable
BR316
Fig
BR
21
Remouing
toggle
leuer
BR
12
1
Brake
disc
2
Brake
shoe
assembly
3
Wheel
cylinder
assembly
4
Return
upper
spring
5
Return
lower
spring
6
After
shoe
return
spring
7
Retainer
8
Antirattle
spring
9
Spring
seat
10
Adjuster
assembly
11
Adjuster
head
12
Adjuster
head
shim
13
Lock
spring
14
Adjuster
housing
15
Adjuster
wheel
16
Adjuster
screW
17
Toggle
lever
18
Extension
link
19
Return
spring
20
Adjuster
spring
21
Lock
plate
22
Adjuster
shim
23
Rubber
boot
24
Antirattlc
pin
Fig
BR
20
Reor
brake
8
Disconnect
brake
tube
at
wheel
cylinder
by
loosening
flare
nut
9
Remove
wheel
cylinder
from
brake
disc
by
loosening
installation
nuts
10
Remove
rubber
boot
adjuster
shim
lock
plate
and
adjuster
springs
and
remove
adjuster
assembly
from
brake
disc
Page 391 of 537

REMOVAL
Referring
to
Figure
BR
29
remove
parts
in
numerical
order
enumerated
1
cD
2
BR17S
Fig
BR
29
Removal
method
of
Mcuter
Vae
DISASSEMBLY
When
disassembling
Master
Vac
ob
serve
the
following
instructions
a
Thoroughly
clean
mud
or
dust
from
Master
Vac
b
Extreme
care
should
be
taken
not
to
allow
dirt
dust
water
or
any
other
foreign
matter
into
any
com
ponent
parts
Be
sure
to
select
a
clean
place
before
disassembly
or
assembly
c
Mark
mating
joints
so
that
they
may
be
installed
exactly
in
their
original
positions
d
Keep
all
disassembled
parts
arranged
properly
so
that
they
may
readily
be
assembled
at
any
time
e
Clean
rubber
parts
and
synthetic
resin
parts
in
alcohol
f
Mter
all
disassembled
parts
are
cleaned
in
a
suitable
clean
solvent
place
on
a
clean
work
bench
Use
care
not
to
allow
dirt
and
dust
to
come
into
contact
with
these
parts
1
Install
spacer
on
rear
shell
spacer
temporarily
Place
Master
Vac
in
a
vise
Use
soft
jaws
2
Remove
clevis
and
lock
nut
De
tach
valve
body
guard
rW
ID
1
Clevis
2
Lock
nut
3
Valve
body
guard
BRD7S
Fig
BR
30
Removing
rear
hell
Brake
System
3
Identify
front
shell
and
rear
shell
clearly
so
that
they
may
be
reassem
bled
in
their
original
positions
from
which
they
were
withdrawn
Bolts
attached
on
dashboard
are
not
the
same
in
pitch
4
Using
Master
Vac
Wrench
ST08080000
remove
rear
shell
seal
assembly
and
disassemble
diaphragm
plate
assembly
front
shell
assembly
diaphragm
spring
and
push
rod
assem
bly
f
Q
BA076
Fig
BR
31
Removing
reor
shell
Rear
shell
seal
Pry
off
retainer
with
use
of
screw
driver
as
shown
and
detach
bearing
and
seal
Note
Do
not
disassemble
seal
assem
bly
unless
absolutely
necessary
Whenever
this
is
to
be
removed
use
care
not
to
damage
it
BRD7S
Fig
BR
32
Removing
retainer
Diaphragm
plate
Place
diaphragm
plate
assembly
on
a
clean
work
bench
Detach
dia
phragm
from
groove
in
plate
as
shown
BR
16
BA079
FlIf
BR
33
Separating
diaphragm
2
Using
a
screwdriver
as
shown
evenly
pry
air
silencer
retainer
until
it
is
detached
from
diaphragm
plate
as
sembly
Note
Never
use
a
hammer
to
remove
this
retainer
since
this
win
be
the
sure
y
of
damaging
it
BA322
Fig
BR
34
Removing
air
silencer
retainer
3
Pull
out
valve
plunger
stop
key
and
withdraw
silencer
and
plunger
assembly
Note
To
remove
valve
plunger
stop
key
properly
proceed
as
follows
With
key
hole
facing
down
lightly
push
valve
operating
rod
simulta
neously
while
applying
vibration
to
it
BA180
Fig
BR
35
Pulling
out
top
key
Page 393 of 537
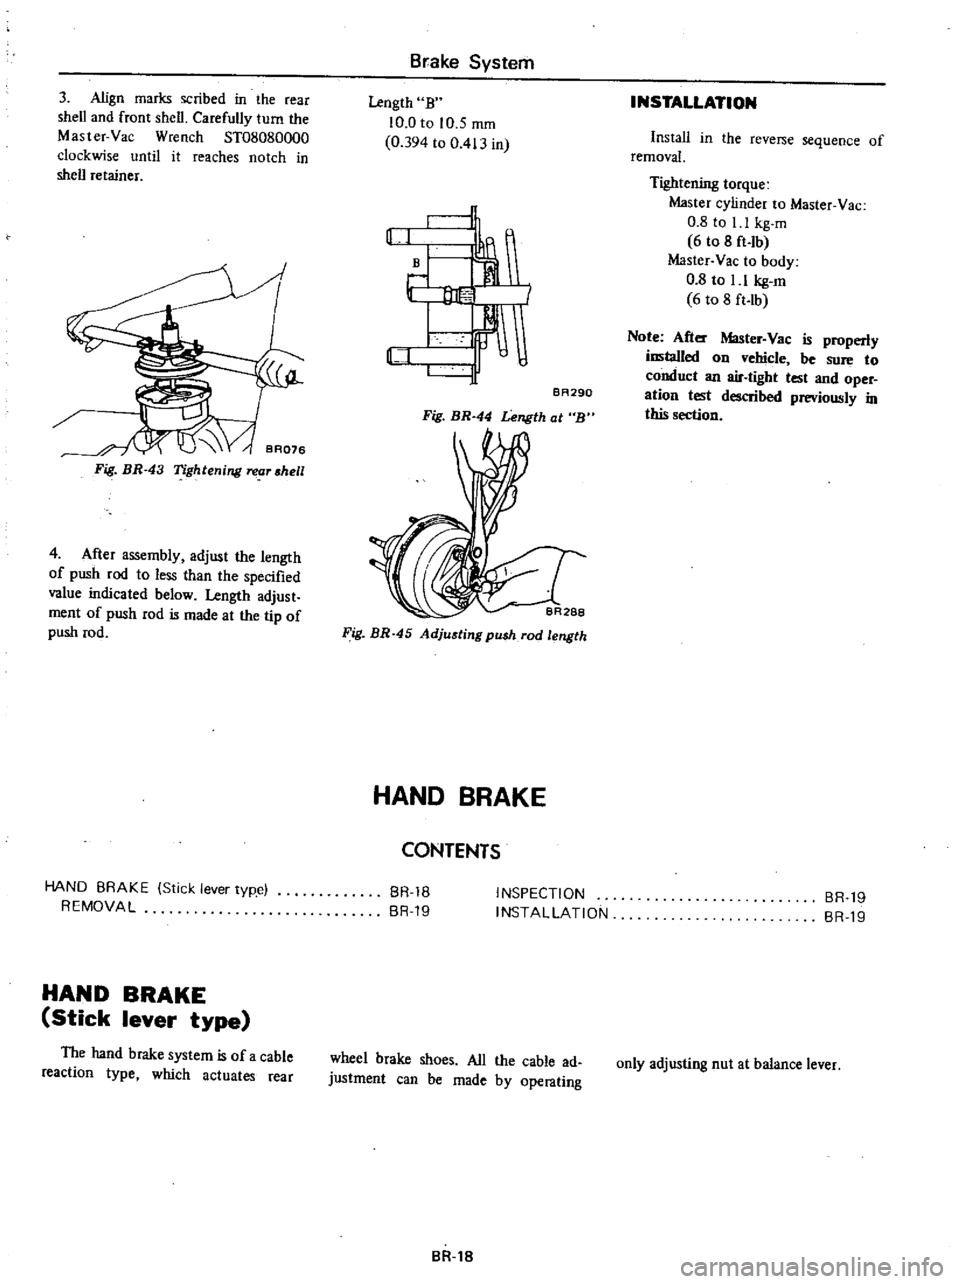
3
Align
marks
scribed
in
the
rear
shell
and
front
shell
Carefully
turn
the
Master
Vac
Wrench
ST08080000
clockwise
until
it
reaches
notch
in
shell
retainer
Fig
BR
43
Tightenilll
reor
shell
4
After
assembly
adjust
the
length
of
push
rod
to
less
than
the
specified
value
indicated
below
Length
adjust
ment
of
push
rod
is
made
at
the
tip
of
push
rod
HAND
BRAKE
Stick
lever
typ
e
REMOVAL
HAND
BRAKE
Stick
lever
type
The
hand
brake
system
is
of
a
cable
reaction
type
which
actuates
rear
Brake
System
Length
B
10
0
to
10
5
mID
0
394
to
0
413
in
rl
J
BA290
Fig
BR
44
Lelll
th
at
B
Fig
BR
45
Adjusting
push
rod
length
HAND
BRAKE
CONTENTS
BR
18
BR
19
INSPECTION
INSTALLATION
wheel
brake
shoes
All
the
cable
ad
justment
can
be
made
by
operating
BR
18
INSTALLATION
Install
in
the
reverse
sequence
of
removal
Tightening
torque
Master
cylinder
to
Master
Vac
0
8
to
I
1
kg
m
6
to
8
ft
lb
Master
Vac
to
body
0
8
to
1
1
kg
m
6
to
8
ft
Ib
Note
After
Master
Vac
is
properly
installed
on
vehicle
be
sure
to
conduct
an
air
tight
test
and
oper
ation
test
described
previously
in
this
section
BR
19
BR
19
only
adjusting
nut
at
balance
lever
Page 394 of 537
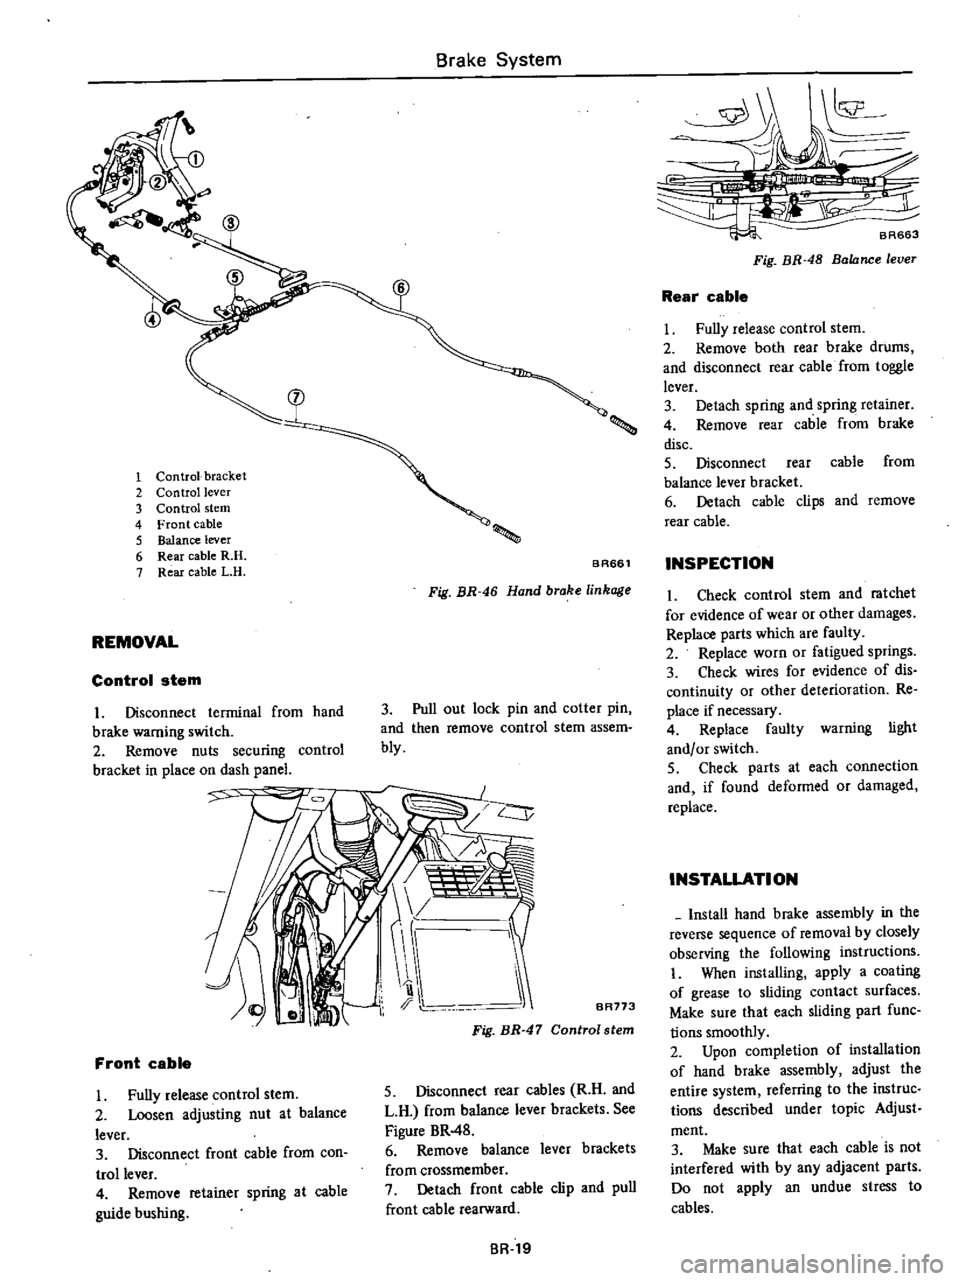
1
Control
bracket
2
Control
lever
3
Control
stem
4
Front
cable
5
Balance
lever
6
Rear
cable
R
H
7
Rear
cable
L
H
REMOVAL
Control
stem
I
Disconnect
terminal
from
hand
brake
warning
switch
2
Remove
nuts
securing
control
bracket
in
place
on
dash
panel
Brake
System
BAS6l
Fig
BR
46
Hand
brake
linkage
3
Pull
out
lock
pin
and
colter
pin
and
then
remove
control
stem
assem
bly
y
J
b
i1
I
I
1
II
i
l
I
BR773
Front
cable
Fully
release
control
stem
2
Loosen
adjusting
nut
at
balance
lever
3
Disconnect
front
cable
from
con
trollever
4
Remove
retainer
spring
at
cable
guide
bushing
Fig
BR
47
Control
stem
5
Disconnect
rear
cables
R
H
and
L
H
from
balance
lever
brackets
See
Figure
BR
48
6
Remove
balance
lever
brackets
from
crossmember
7
Detach
front
cable
clip
and
pull
front
cable
rearward
BR
19
k
1
BR663
Fig
BR
48
Balance
lever
Rear
cable
Fully
release
control
stem
2
Remove
both
rear
brake
drums
and
disconnect
rear
cable
from
toggle
lever
3
Detach
spring
and
spring
retainer
4
Remove
rear
cable
from
brake
disc
5
Disconnect
rear
cable
from
balance
lever
bracket
6
Detach
cable
clips
and
remove
rear
cable
INSPECTION
1
Check
control
stem
and
ratchet
for
evidence
of
wear
or
other
damages
Replace
parts
which
are
faulty
2
Replace
worn
or
fatigued
springs
3
Check
wires
for
evidence
of
dis
continuity
or
other
deterioration
Re
place
if
necessary
4
Replace
faulty
warning
light
and
or
switch
S
Check
parts
at
each
connection
and
if
found
deformed
or
damaged
replace
INSTALLATION
Install
hand
brake
assembly
in
the
reverse
sequence
of
removal
by
closely
observing
the
following
instructions
When
installing
apply
a
coating
of
grease
to
sliding
contact
surfaces
Make
Sure
that
each
sliding
part
func
lions
smoothly
2
Upon
completion
of
installation
of
hand
brake
assembly
adjust
the
entire
system
referring
to
the
instruc
lions
described
under
topic
Adjust
ment
3
Make
sure
that
each
cable
is
not
interfered
with
by
any
adjacent
parts
Do
not
apply
an
undue
stress
to
cables
Page 396 of 537

Brake
System
Tightening
torque
Master
cylinder
to
Master
Vac
kg
m
ft
Ib
0
8
to
l
l
6
to
8
Brake
tube
flare
nut
kg
m
ft
Ib
I
S
to
1
8
II
to
13
Brake
hose
connector
kg
m
ft
lb
1
8
to
2
1
13
to
IS
Air
bleeder
valve
kg
m
ft
lb
0
7
to
0
9
S
to
7
Fulcrum
pin
of
brake
pedal
kg
m
ft
Ib
1
2
to
1
5
9
to
II
Connector
and
clip
fIXing
bolt
kg
m
ft
lb
0
35
to
O
4S
2
5
to
3
3
3
way
connector
fIXing
bolt
kg
m
ft
Ib
0
8
to
l
l
6
to
8
on
rear
axle
case
Brake
pedal
stopper
lock
nut
kg
m
ft
Ib
1
2
to
1
5
9
to
II
N
L
S
V
to
body
kg
m
ft
Ib
0
8
to
l
l
6
to
8
Wheel
cylinder
mounting
nut
Front
kg
m
ft
Ib
S
4
to
6
6
39
to
48
Rear
kg
m
ft
Ib
1
5
to
1
8
II
to
13
Wheel
cylinder
connector
bolt
kg
m
ft
lb
1
9
to
2
5
14
to
18
Brake
disc
Back
plate
nut
Front
kg
m
ft
Ib
4
2
to
S
O
30
to
36
Rear
kg
m
ft
Ib
S
4
to
6
4
39
to
46
Master
Vac
Master
Vac
to
body
nut
kg
m
ft
lb
0
8
to
l
l
6
to
8
Flange
to
shell
cover
nut
kg
m
ft
lb
0
8
to
1
1
6
to
8
Operating
rod
lock
nut
kg
m
ft
Ib
1
6
to
2
2
12
to
16
Push
rod
adjusting
nut
kg
m
ft
Ib
1
9
to
2
4
14
to
17
BR
21
Page 403 of 537
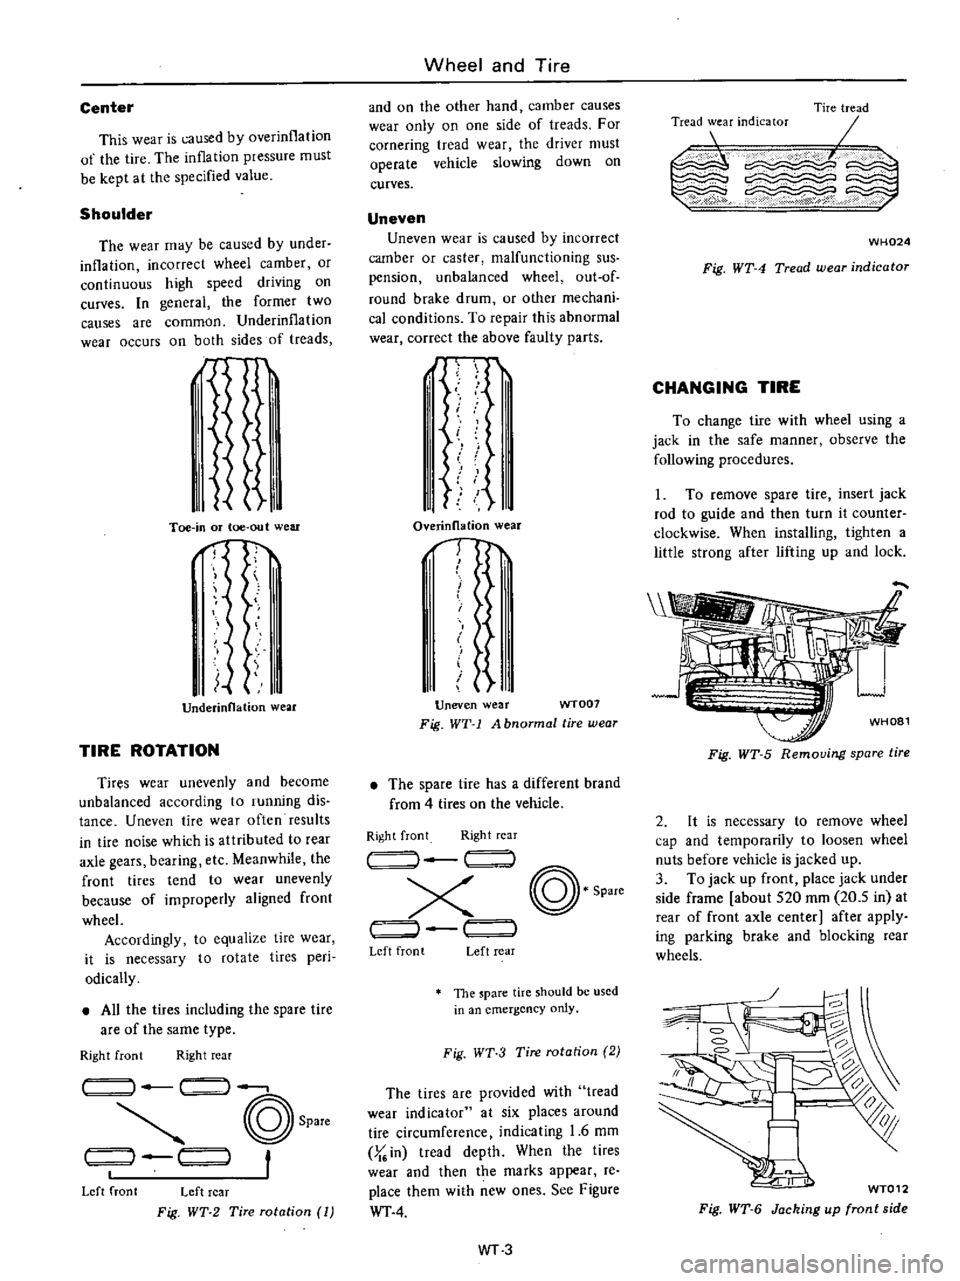
Center
This
wear
is
caused
by
overinflation
of
the
tire
The
inflation
pressure
must
be
kept
at
the
specified
value
Shoulder
The
wear
may
be
caused
by
under
inflation
incorrect
wheel
camber
or
continuous
high
speed
driving
on
curves
In
general
the
former
two
causes
are
common
Underinflation
wear
occurs
on
both
sides
of
treads
d
I
Ii
Toe
in
or
toe
out
wear
nf
I
Underinnation
wear
TIRE
ROTATION
Tires
wear
unevenly
and
become
unbalanced
according
to
running
dis
tance
Uneven
tire
wear
often
results
in
tire
noise
which
is
attributed
to
rear
axle
gears
bearing
etc
Meanwhile
the
front
tires
tend
to
wear
unevenly
because
of
improperly
aligned
front
wheel
Accordingly
to
equalize
tire
wear
it
is
necessary
to
rotate
tires
peri
odically
All
the
tires
including
the
spare
tire
are
of
the
same
type
Right
front
Right
rear
14
1
I
@
Spare
t
t
1
1
Left
front
Left
rear
Fig
WT
2
Tire
rotation
1
Wheel
and
Tire
and
on
the
other
hand
camber
causes
wear
only
on
one
side
of
treads
For
cornering
tread
wear
the
driver
must
operate
vehicle
slowing
down
on
curves
Uneven
Uneven
wear
is
caused
by
incorrect
camber
or
caster
malfunctioning
sus
pension
unbalanced
wheel
out
of
round
brake
drum
or
other
mechani
cal
conditions
To
repair
this
abnormal
wear
correct
the
above
faulty
parts
J
I
II
i
11
I
1
Overinllation
wear
1
I
I
t
Uneven
wear
WT007
Fig
WT
1
A
bnormal
tire
wear
The
spare
lire
has
a
different
brand
from
4
tires
on
the
vehicle
Right
front
Right
rear
I
@
Spare
x
J
r
Left
front
Left
rear
The
pare
tire
should
be
used
in
an
emergency
only
Fig
WT
3
Tire
rotation
2
The
tires
are
provided
with
tread
wear
indicator
at
six
places
around
tire
circumference
indicating
1
6
mm
J
in
tread
depth
When
the
tires
wear
and
then
the
marks
appear
re
place
them
with
new
ones
See
Figure
WT
4
WT3
Tire
tread
0E
I
Tread
wear
indicator
c
WH024
Fig
WT
4
Tread
wear
indicator
CHANGING
TIRE
To
change
tire
with
wheel
using
a
jack
in
the
safe
manner
observe
the
following
procedures
1
To
remove
spare
tire
insert
jack
rod
to
guide
and
then
turn
it
counter
clockwise
When
installing
lighten
a
little
strong
after
lifting
up
and
lock
Fig
WT
5
Removing
spare
tire
2
It
is
necessary
to
remove
wheel
cap
and
temporarily
to
loosen
wheel
nuts
before
vehicle
is
jacked
up
3
To
jack
up
front
place
jack
under
side
frame
about
S20
mOl
20
5
in
at
rear
of
front
axle
center
after
apply
ing
parking
brake
and
blocking
rear
wheels
g
1
WT012
Fig
WT
6
Jacking
up
front
side
Page 404 of 537
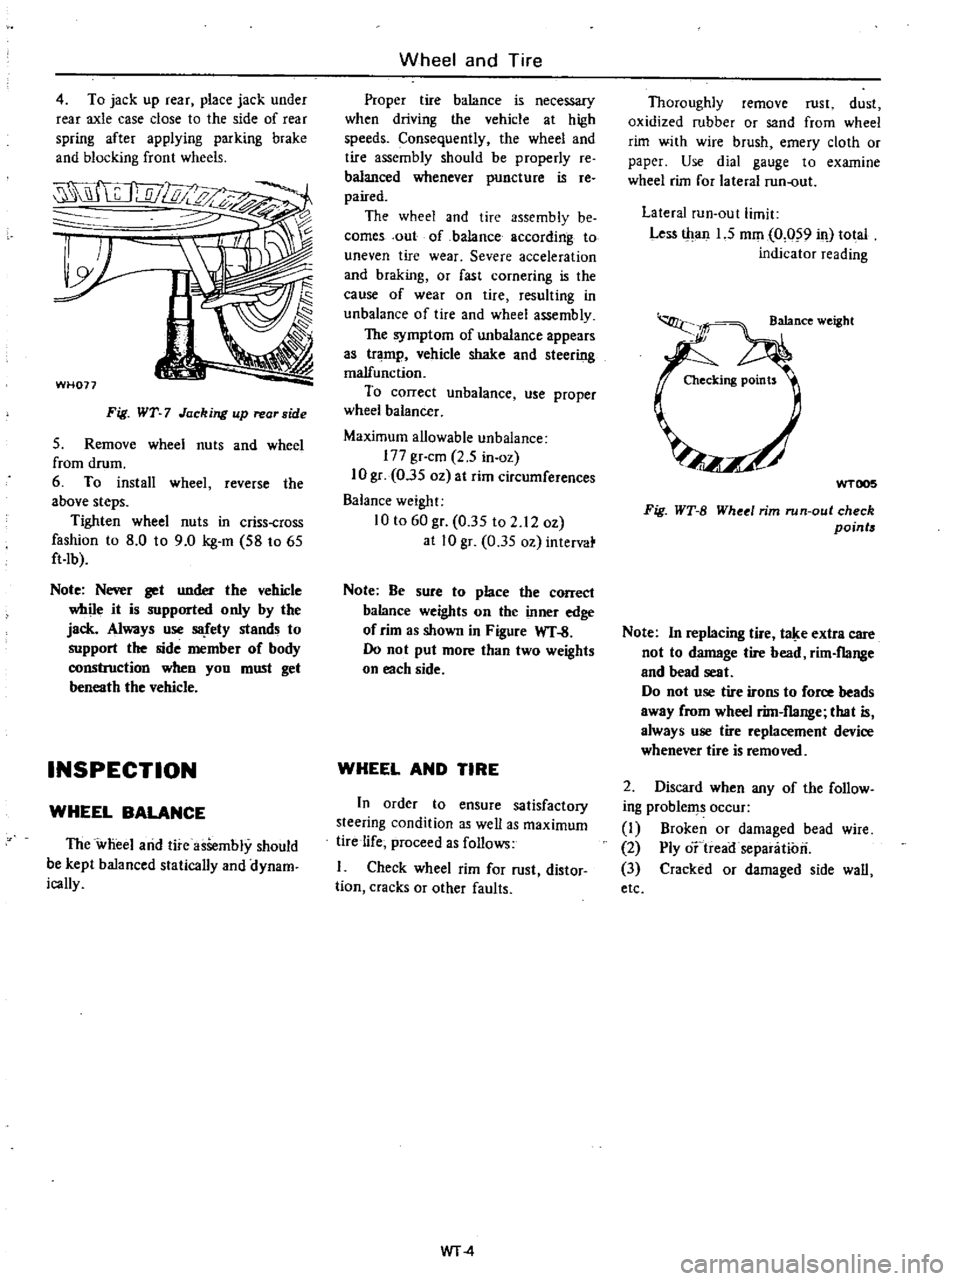
4
To
jack
up
rear
place
jack
under
rear
axle
case
close
to
the
side
of
rear
spring
after
applying
parking
brake
and
blocking
front
wheels
WH077
Fig
WT
7
Jacking
up
rear
side
S
Remove
wheel
nuts
and
wheel
from
drum
6
To
install
wheel
reverse
the
above
steps
Tighten
wheel
nuts
in
criss
cross
fashion
to
8
0
to
9
0
kg
m
S8
to
6S
ft
Ib
Note
Nerer
get
under
the
vehicle
while
it
is
supported
only
by
the
jack
Always
use
S8
fety
stands
to
support
the
side
member
of
body
construction
when
you
must
get
beneath
the
vehicle
INSPECTION
WHEEL
BALANCE
The
wheel
arid
tire
asSembly
should
be
kept
balanced
statically
and
dynam
ically
Wheel
and
Tire
Proper
tire
balance
is
necessary
when
driving
the
vehicle
at
high
speeds
Consequently
the
wheel
and
tire
assembly
should
be
properly
re
balanced
whenever
puncture
is
re
paired
The
wheel
and
tire
assembly
be
comes
out
of
ba1ance
according
to
uneven
tire
wear
Severe
acceleration
and
braking
or
fast
cornering
is
the
cause
of
wear
on
tire
resulting
in
unbalance
of
tire
and
wheel
assembly
The
symptom
of
unbalance
appears
as
tramp
vehicle
shake
and
steering
malfunction
To
correct
unbalance
use
proper
wheel
balancer
Maximum
allowable
unbalance
177
gr
cm
2
5
in
oz
10
gr
O
3S
oz
at
rim
circumferences
Balance
weight
10
to
60
gr
O
3S
to
2
12
oz
at
10
gr
0
3S
oz
intervat
Note
Be
sure
to
place
the
correct
balance
weights
on
the
inner
edge
of
rim
as
shown
in
Figure
WT
S
00
not
put
more
than
two
weights
on
each
side
WHEEL
AND
TIRE
In
order
to
ensure
satisfactory
steering
condition
as
well
as
maximum
tire
life
proceed
as
follows
Check
wheel
rim
for
rust
distor
tion
cracks
or
other
faults
WT
4
Thoroughly
remove
rust
dust
oxidized
rubber
or
sand
from
wheel
rim
with
wire
brush
emery
cloth
or
paper
Use
dial
gauge
to
examine
wheel
rim
for
lateral
run
out
Lateral
run
Qut
limit
Less
tltan
1
5
mOl
0
059
il
total
indicator
reading
WTOO5
Fig
WT
B
Whetl
rim
run
out
check
points
Note
In
replacing
tire
t
e
extra
care
not
to
damage
tire
bead
rim
flange
and
bead
seat
Do
not
use
tire
irons
to
force
beads
away
from
wheel
rim
flange
that
is
always
use
tire
replacement
device
whenever
tire
is
removed
2
Discard
when
any
of
the
follow
ing
problems
occur
1
Broken
or
damaged
bead
wire
2
Ply
o
treairsepanitiori
3
Cracked
or
damaged
side
wall
etc
Page 409 of 537
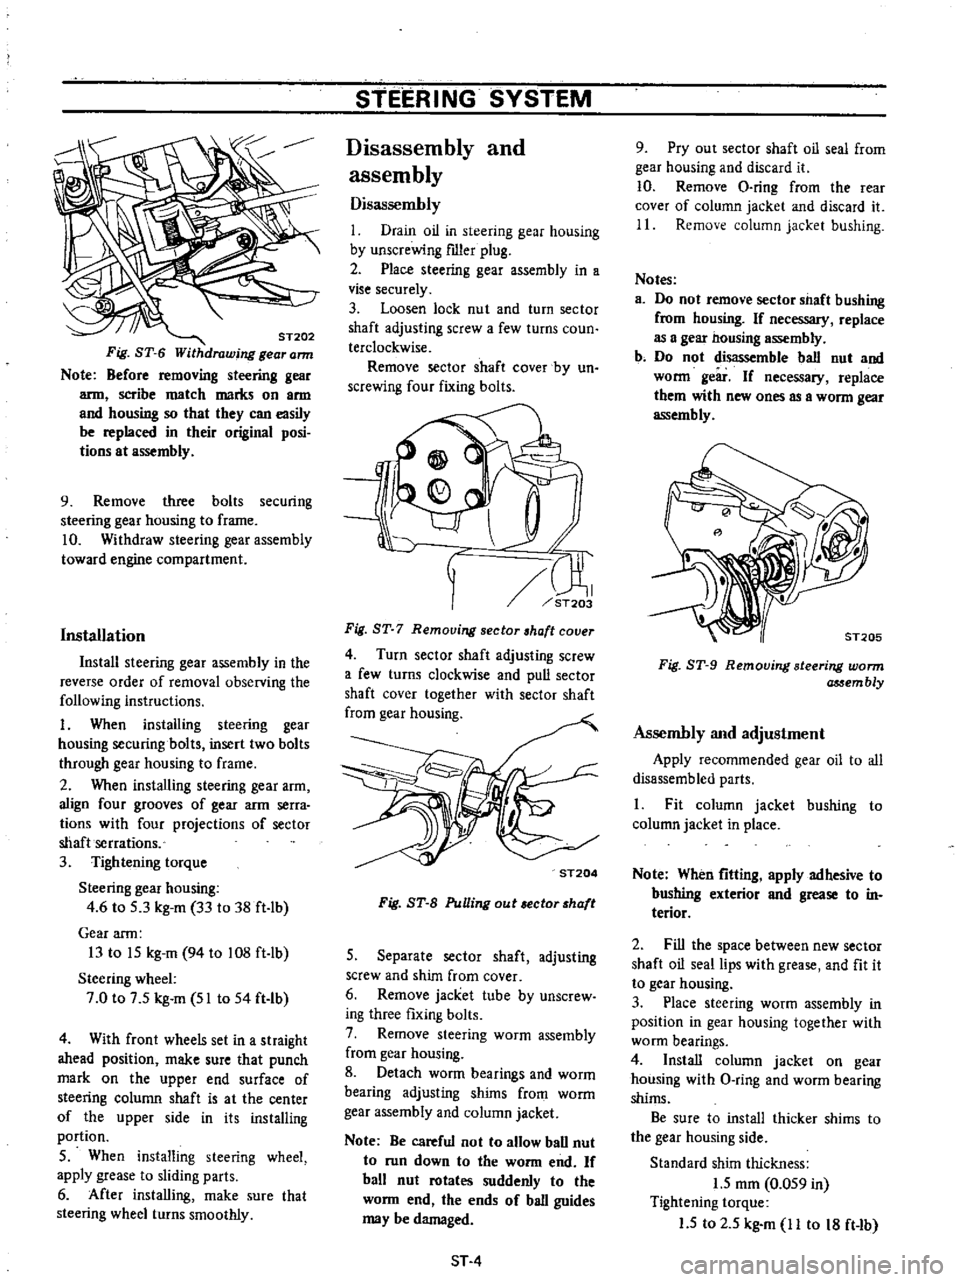
ST202
Fig
ST
6
Withdrawing
gear
ann
Note
Before
removing
steering
gear
arm
scribe
match
marks
on
arm
and
housing
so
that
they
can
easily
be
replaced
in
their
original
posi
tions
at
assembly
9
Remove
three
bolts
securing
steering
gear
housing
to
frame
10
Withdraw
steering
gear
assembly
toward
engine
compartment
Installation
Install
steering
gear
assembly
in
the
reverse
order
of
removal
observing
the
following
instructions
I
When
installing
steering
gear
housing
securing
bolts
insert
two
bolts
through
gear
housing
to
frame
2
When
installing
steering
gear
arm
align
four
grooves
of
gear
arm
serra
tions
with
four
projections
of
sector
shaft
serrations
3
Tightening
torque
Steering
gear
housing
4
6
to
S
3
kg
m
33
to
38
ft
lb
Gear
arm
13
to
IS
kg
m
94
to
108
ft
lb
Steering
wheel
7
0
to
7
S
kg
m
51
to
54
ft
Ib
4
With
front
wheels
set
in
a
straight
ahead
position
make
sure
that
punch
mark
on
the
upper
end
surface
of
steering
column
shaft
is
at
the
center
of
the
upper
side
in
its
installing
portion
S
When
installing
steering
wheel
apply
grease
to
sliding
parts
6
After
installing
make
sure
that
steering
wheel
turns
smoothly
STEERING
SYSTEM
Disassembly
and
assembly
Disassembly
I
Drain
oil
in
steering
gear
housing
by
unscrewing
fIller
plug
2
Place
steering
gear
assembly
in
a
vise
securely
3
Loosen
lock
nut
and
turn
sector
shaft
adjusting
screw
a
few
turns
coun
terclockwise
Remove
sector
shaft
cover
by
un
screwing
four
fixing
bolts
rn
ST203
Fig
ST
7
Remouing
sector
haft
couer
4
Turn
sector
shaft
adjusting
screw
a
few
turns
clockwise
and
pull
sector
shaft
cover
together
with
sector
shaft
from
gear
housing
ST204
Fig
ST
B
PuUing
out
ector
haft
S
Separate
sector
shaft
adjusting
screw
and
shim
from
cover
6
Remove
jacket
tube
by
unscrew
ing
three
fixing
bolts
7
Remove
steering
worm
assembly
from
gear
housing
8
Detach
worm
bearings
and
worm
bearing
adjusting
shims
from
worm
gear
assembly
and
column
jacket
Note
Be
careful
not
to
allow
ball
nut
to
run
down
to
the
worm
end
If
ball
nut
rotates
suddenly
to
the
worm
end
the
ends
of
ball
guides
may
be
damaged
ST
4
9
Pry
out
sector
shaft
oil
seal
from
gear
housing
and
discard
it
10
Remove
O
ring
from
the
rear
cover
of
column
jacket
and
discard
it
11
Remove
column
jacket
bushing
Notes
a
Do
not
remove
sector
shaft
bushing
from
housing
If
necessary
replace
as
a
gea2
nousing
assembly
b
Do
not
disassemble
ball
nut
and
worm
geir
If
necessary
replace
them
with
new
ones
as
a
worm
gear
assembly
Fig
ST
9
Removing
steering
worm
assem
bly
Assembly
and
adjustment
Apply
recommended
gear
oil
to
all
disassembled
parts
1
Fit
column
jacket
bushing
to
column
jacket
in
place
Note
When
fitting
apply
adhesive
to
bushing
exterior
and
grease
to
in
terior
2
Fill
the
space
between
new
sector
shaft
oil
seal
lips
with
grease
and
fit
it
to
gear
housing
3
Place
steering
worm
assembly
in
position
in
gear
housing
together
with
worm
bearings
4
Install
column
jacket
on
gear
housing
with
O
ring
and
worm
bearing
shims
Be
sure
to
install
thicker
shims
to
the
gear
housing
side
Standard
shim
thickness
1
5
mOl
0
OS9
in
Tightening
torque
1
5
to
2
S
kg
m
11
to
18
ft
Ib
Page 410 of 537
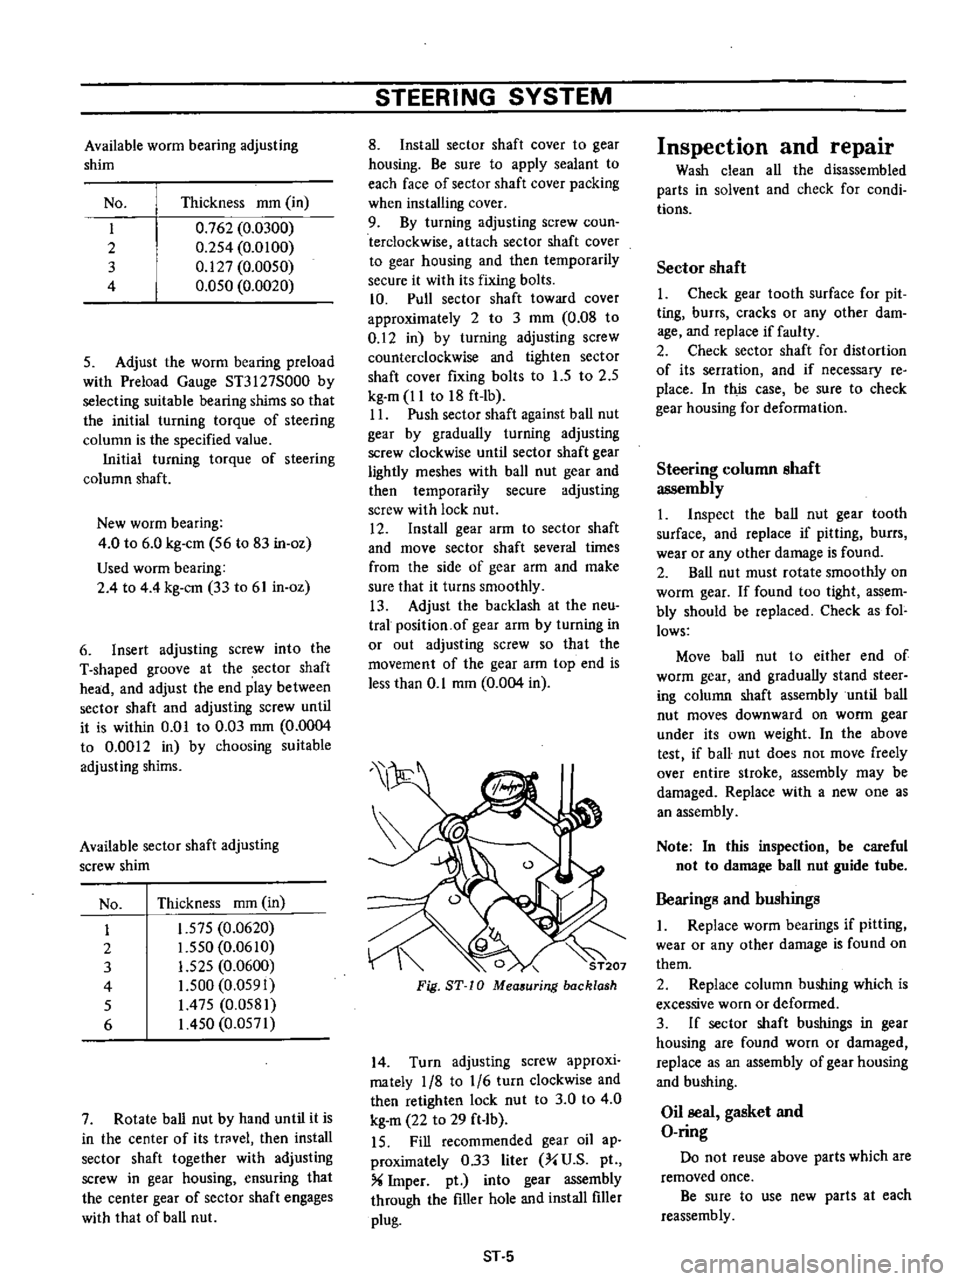
Available
worm
bearing
adjusting
shim
No
Thickness
mOl
in
I
0
762
0
0300
2
0
2S4
0
0100
3
0
127
0
0050
4
O
OSO
0
0020
5
Adjust
the
worm
bearing
preload
with
Preload
Gauge
ST3127S000
by
selecting
suitable
bearing
shims
so
that
the
initial
turning
torque
of
steering
column
is
the
specified
value
Initial
turning
torque
of
steering
column
shaft
New
worm
bearing
4
0
to
6
0
kg
em
S6
to
83
in
oz
Used
worm
bearing
2
4
to
4
4
kg
em
33
to
61
in
oz
6
Insert
adjusting
screw
into
the
T
shaped
groove
at
the
sector
shaft
head
and
adjust
the
end
play
between
sector
shaft
and
adjusting
screw
until
it
is
within
0
01
to
0
03
mm
0
0004
to
0
0012
in
by
choosing
suitable
adjusting
shims
Available
sector
shaft
adjusting
screw
shim
No
Thickness
mOl
in
I
1
57S
0
0620
2
1
550
0
0610
3
1
525
0
0600
4
I
S00
0
OS91
S
1
475
0
0581
6
I
4S0
0
0571
7
Rotate
ball
nut
by
hand
until
it
is
in
the
center
of
its
trovel
then
install
sector
shaft
together
with
adjusting
screw
in
gear
housing
ensuring
that
the
center
gear
of
sector
shaft
engages
with
that
of
ball
nut
STEERING
SYSTEM
8
Install
sector
shaft
cover
to
gear
housing
Be
sure
to
apply
sealant
to
each
face
of
sector
shaft
cover
packing
when
installing
cover
9
By
turning
adjusting
screw
coun
terclockwise
attach
sector
shaft
cover
to
gear
housing
and
then
temporarily
secure
it
with
its
fixing
bolts
10
Pull
sector
shaft
toward
cover
approximately
2
to
3
mOl
0
08
to
0
12
in
by
turning
adjusting
screw
counterclockwise
and
tighten
sector
shaft
cover
fixing
bolts
to
l
S
to
2
5
kg
m
11
to
18
ft
Ib
II
Push
sector
shaft
against
ball
nut
gear
by
gradually
turning
adjusting
screw
clockwise
until
sector
shaft
gear
lightly
meshes
with
ball
nut
gear
and
then
temporarily
secure
adjusting
screw
with
lock
nut
12
Install
gear
arm
to
sector
shaft
and
move
sector
shaft
several
times
from
the
side
of
gear
arm
and
make
sure
that
it
turns
smoothly
13
Adjust
the
backlash
at
the
neu
tral
position
of
gear
arm
by
turning
in
or
out
adjusting
screw
so
that
the
movement
of
the
gear
arm
top
end
is
less
than
0
1
mOl
0
004
in
0
ST207
Fig
ST
10
Mea
uring
backlash
14
Turn
adjusting
screw
approxi
mately
1
8
to
1
6
turn
clockwise
and
then
retighten
lock
nut
to
3
0
to
4
0
kg
m
22
to
29
ft
Ib
IS
Fill
recommended
gear
oil
ap
proximately
0
33
liter
X
U
S
pI
X
Imper
pt
into
gear
assembly
through
the
filler
hole
and
install
filler
plug
ST
5
Inspection
and
repair
Wash
clean
all
the
disassembled
parts
in
solvent
and
check
for
condi
tions
Sector
shaft
1
Check
gear
tooth
surface
for
pit
ting
burrs
cracks
or
any
other
dam
age
and
replace
if
faulty
2
Check
sector
shaft
for
distortion
of
its
serration
and
if
necessary
re
place
In
this
case
be
sure
to
check
gear
housing
for
deformation
Steering
column
shaft
assembly
1
Inspect
the
ball
nut
gear
tooth
surface
and
replace
if
pitting
burrs
wear
or
any
other
damage
is
found
2
Ball
nut
must
rotate
smootWy
on
worm
gear
If
found
too
tight
assem
bly
should
be
replaced
Check
as
fol
lows
Move
ball
nut
to
either
end
of
worm
gear
and
gradually
stand
steer
ing
column
shaft
assembly
until
ball
nut
moves
downward
on
worm
gear
under
its
own
weight
In
the
above
test
if
ball
nut
does
no
move
freely
over
entire
stroke
assembly
may
be
damaged
Replace
with
a
new
one
as
an
assembly
Note
In
this
inspection
be
careful
not
to
dama
e
ball
nut
guide
tube
Bearings
and
bushings
I
Replace
worm
bearings
if
pitting
wear
or
any
other
damage
is
found
on
them
2
Repiace
column
bushing
which
is
excessive
worn
or
deformed
3
If
sector
shaft
bushings
in
gear
housing
are
found
worn
or
damaged
replace
as
an
assembly
of
gear
housing
and
bushing
Oil
seal
gasket
and
O
ring
Do
not
reuse
above
parts
which
are
removed
once
Be
sure
to
use
new
parts
at
each
reassembly