service DATSUN PICK-UP 1977 Owner's Guide
[x] Cancel search | Manufacturer: DATSUN, Model Year: 1977, Model line: PICK-UP, Model: DATSUN PICK-UP 1977Pages: 537, PDF Size: 35.48 MB
Page 182 of 537
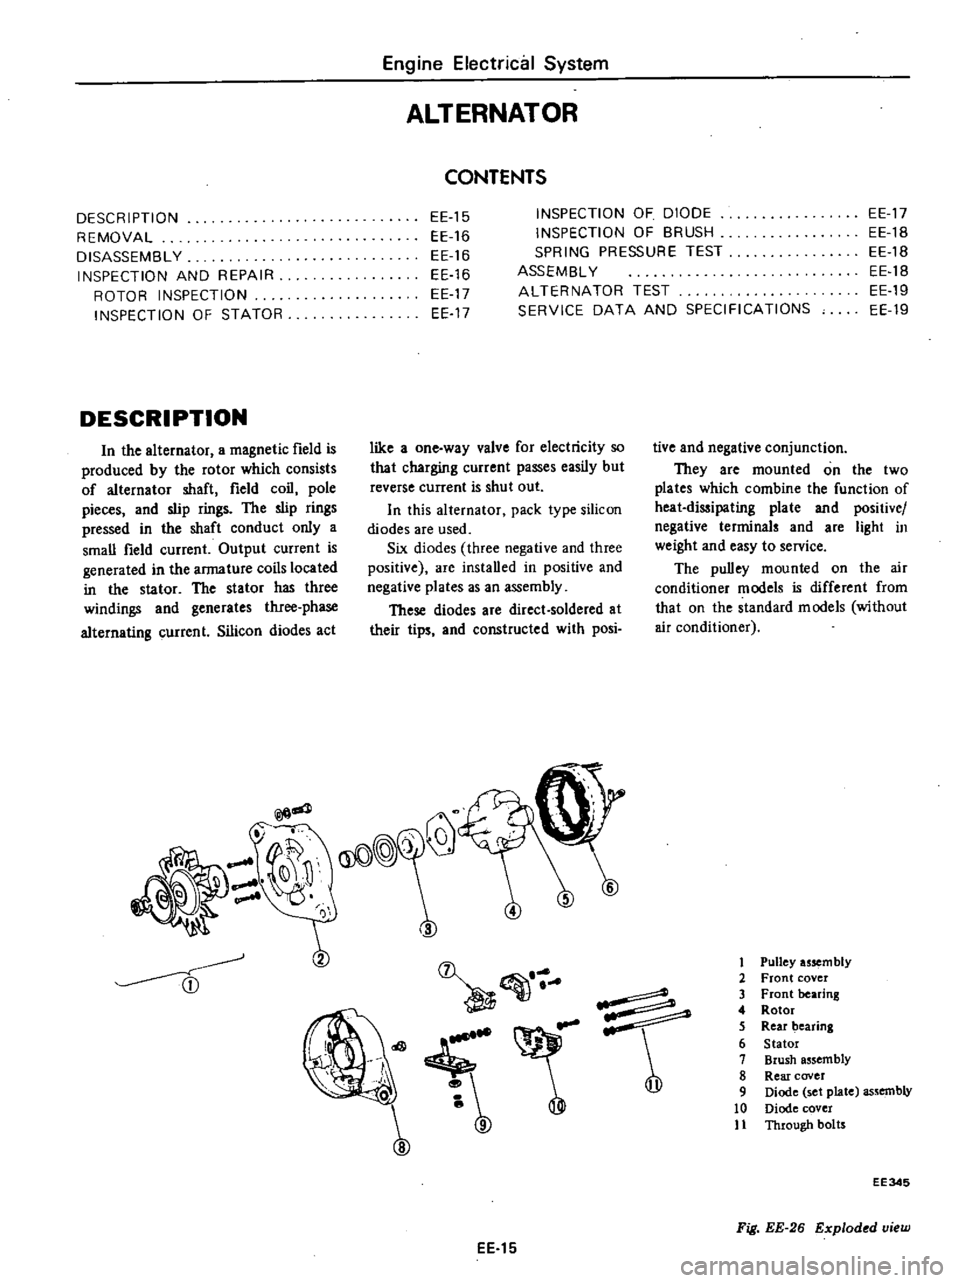
DESCRIPTION
REMOVAL
DISASSEMBLY
INSPECTION
AND
REPAIR
ROTOR
INSPECTION
INSPECTION
OF
STATOR
DESCRIPTION
In
the
alternator
a
magnetic
field
is
produced
by
the
rotor
which
consists
of
alternator
shaft
field
coil
pole
pieces
and
slip
rings
The
slip
rings
pressed
in
the
shaft
conduct
only
a
small
field
current
Output
current
is
generated
in
the
armature
coils
located
in
the
stator
The
stator
has
three
windings
and
generates
three
phase
alternating
current
Silicon
diodes
act
@God
A
tfff
Engine
Electrical
System
ALTERNATOR
CONTENTS
EE
15
EE
16
EE
16
EE
16
EE
17
EE
17
INSPECTION
OF
DIODE
INSPECTION
OF
BRUSH
SPRING
PRESSURE
TEST
ASSEMBL
Y
ALTERNATOR
TEST
SERVICE
DATA
AND
SPECIFICATIONS
EE
17
EE
1B
EE1B
EE
1B
EE19
EE
19
like
a
one
way
valve
for
electricity
so
that
charging
current
passes
easily
but
reverse
current
is
shut
out
In
this
alternator
pack
type
silicon
di
odes
are
used
Six
diodes
three
negative
and
three
positive
are
installed
in
positive
and
negative
plates
as
an
assembly
These
diodes
are
direct
soldered
at
their
tips
and
constructed
with
posi
3
2
I
4
e
o
e
9
tive
and
negative
conjunction
They
are
mounted
on
the
two
plates
which
combine
the
function
of
heat
dissipating
plate
and
positive
negative
terminals
and
are
light
in
weight
and
easy
to
service
The
pulley
mounted
on
the
air
conditioner
models
is
different
from
that
on
the
standard
models
without
air
conditioner
1
Pulley
usem
bly
2
Front
cover
3
Front
bearing
4
Rotor
5
Rear
bearing
6
Stator
7
Brush
assembly
8
Rear
cover
9
Diode
set
plate
assembly
10
Diode
cover
11
Through
botrs
EE
15
EE345
Fig
EE
26
Exploded
view
Page 185 of 537

If
current
flows
in
both
positive
and
negative
directions
diode
is
short
circuited
If
current
flows
in
one
direc
tion
only
diode
is
in
good
condition
Test
probe
of
a
circuit
t
ter
e
Gl
terminal
EEl
plate
EJ
plate
terminal
terminal
e
plate
e
plate
terminal
e
plate
@
plate
Xl
plate
e
plate
INSPECTION
OF
BRUSH
Check
movement
of
brush
and
if
movement
is
not
smooth
check
brush
holder
and
clean
if
necessary
Check
brush
for
wear
If
it
is
worn
down
to
less
than
the
specified
limit
replace
brush
assembly
Check
brush
pig
tail
and
if
dam
aged
replace
Brush
wear
limiting
line
EE127
Fig
EE
41
Bnlsh
wear
limil
Engine
Electrical
System
If
there
is
a
faulty
diode
replace
all
diodes
ix
diode
as
an
assembly
See
table
below
These
diodes
are
unserviceable
Conduction
o
o
o
SPRING
PRESSURE
TEST
With
brush
projected
approximate
ly
2
mm
0
079
in
from
brush
holder
measure
brush
spring
pressure
by
the
use
of
a
pring
balance
Normally
the
rated
pressure
of
a
new
brush
spring
is
255
to
345
gr
9
0
to
12
202
Morevover
when
brush
is
worn
pressure
decrease
approximately
20
g
0
7
02
per
1
mm
0
0039
in
wear
t
m
0
079
in
or
f
EEO
9
Fig
EE
42
M
CJ
uring
pring
preaure
EE
lB
ASSEMBLY
Reassemble
alternator
in
the
reverse
sequence
of
disassembly
noting
the
following
I
When
soldering
each
stator
coil
lead
wire
to
diode
assembly
terminal
carry
out
the
operation
as
fast
as
pas
sible
2
When
installing
diode
A
terminal
install
insulating
bush
correctly
1
Imulating
bush
2
A
terminal
bolt
3
Diode
cover
4
Rear
cover
5
Diode
a
sembly
EE347
Fig
EE
43
Sectional
view
of
diode
and
A
term
inal
3
Tighten
pulley
nut
with
tighten
ing
torque
of
3
5
to
4
0
kg
m
25
3
to
29
0
ft
Ib
When
pulley
is
tightened
make
sure
that
deflection
of
V
groove
is
less
than
0
3
mm
0
01
IS
in
q
ffl
t
EE051
Fig
EE
44
Tightening
pulley
nut
Page 186 of 537

Engine
Electrical
System
ALTERNATOR
TEST
Before
conducting
an
alternator
test
make
sure
th
tthe
battery
is
fully
charged
A
30
V
olt
voltmeter
and
suitable
test
probes
3re
necessary
for
the
test
Set
up
a
test
circuit
as
shown
in
Figure
EE45
and
test
auernator
in
the
manner
indica
ted
in
the
flow
chart
below
1
Disconnect
connectors
at
alternator
2
Connect
A
terminal
to
F
terminal
3
Connect
one
test
probe
from
voltmeter
positive
terminal
to
A
terminal
Connect
the
other
test
probe
to
ground
Make
sure
that
voltmeter
registers
battery
voltage
4
Turn
on
headlights
and
switch
to
High
Beam
5
Start
engine
6
Increase
engine
speed
gradually
until
it
is
approximately
1
100
rpm
and
take
the
voltmeter
reading
Measured
value
Below
12
5
Volts
Alternator
is
in
trouble
remove
and
check
it
for
condition
Measured
value
Over
12
5
Volts
Alternator
is
in
good
condition
Notes
a
Do
Dot
run
engine
at
the
speed
of
more
than
1
100
rpm
while
test
is
being
conducted
on
alternator
b
Do
not
race
engine
i
9
l
IV
I
Battery
EE052
Voltmeter
Fig
EE
45
Testing
alternator
SERVICE
DATA
AND
SPECIFICATIONS
Nominal
rating
V
A
LT138
IB
LTl35
36B
For
air
conditioner
1235
12
38
Negative
Negative
1
000
1
000
28
2
500
30
2
500
35
5
000
38
5
000
2
25
2
25
More
than
7
5
0
295
More
than
7
5
0
295
255
to
345
255
to
345
9
0
to
12
2
9
0
to
12
2
More
than
30
1
181
More
than
30
1
181
EE
19
Type
Ground
polarity
Minimum
revolution
when
generating
14V
with
no
load
rpm
Hot
output
current
Nrpm
Pulley
ratio
Brush
Length
Spring
pressure
mm
in
gr
oz
Slip
ring
outer
diameter
mm
in
Page 187 of 537

DESCRIPTION
MEASUREMENT
OF
REGULATOR
VOLTAGE
ADJUSTMENT
VOLTAGE
REGULATOR
DESCRIPTION
The
regulator
consists
basically
of
a
voltage
regulator
and
a
charge
relay
The
voltage
regulator
has
two
sets
of
contact
points
a
lower
set
and
an
upper
set
to
control
alternator
volt
age
An
armature
plate
placed
between
the
two
sets
of
contacts
moves
upward
or
downward
or
vibrates
The
lower
contacts
when
closed
complete
the
jCV
ID@
@
GJ
I
@
@
@
Engine
Electrical
System
REGULATOR
CONTENTS
EE
20
CHARGING
RELAY
SERVICE
DATA
AND
SPECIFICATIONS
TROUBLE
DIAGNOSES
AND
CORRECTIONS
Including
alternatorl
EE
25
EE
23
EE
24
EE
20
EE
23
EE
23
field
circuit
direct
to
ground
and
the
upper
contacts
when
closed
complete
the
field
circuit
to
ground
through
a
resistance
field
coil
and
produce
alternator
output
The
charge
relay
i
similar
in
construction
to
the
voltage
regulator
When
the
upper
contacts
are
closed
charge
warning
lamp
goes
on
v
1
Charge
relay
2
Voltage
regulator
EE285
Fig
EE
46
View
of
removing
cover
As
regards
the
construction
the
voltage
regulator
is
very
similar
to
the
charge
relay
as
shown
in
Figure
EE47
@
r
J
CD
@
@
@
Q
@
ID@
ID@
J
t
L
T
@
r
b
r
CD
L
@
j
1
g
f
@
@
EEJ97
J
I1Jlccting
spring
2
Y
kt
g
p
3
Armaturc
4
Core
go
5
Low
Sllccd
lnlacl
h
Point
ap
7
High
speed
conlat
t
8
Contact
c
9
3111111
0
118
ill
di
10
41l1I11W
157in
c1ia
few
II
Cuil
12
lock
nut
J3
Adjllslin
screw
14
Adjll
sting
sprin
15
Yoke
9
Adjusting
screw
10
Lock
nut
11
Coil
12
4mm
0
157
in
dia
screw
13
3mm
0
118
in
dla
crew
14
Contact
iet
15
Voltage
cgulatm
contact
a
Cnl1
Tlll
tion
f
lltagl
l
j
llIOltllT
I
Point
gilp
2
Charge
relay
contllct
3
Core
gap
4
ArlllatlJre
5
Connecting
sprin
6
Yoke
gap
7
Yoh
B
Adjusting
pring
b
Construction
of
charge
relay
Fig
EE
47
Structural
vi
w
EE
20
Page 191 of 537

Engine
Electrical
System
RegulatoI
r
Yellow
terminal
A
W
L
WR
IG
WL
N
Y
E
B
F
WB
Voltmeter
Fig
EE
52
Tuting
charging
re
Qy
EE348
SERVICE
DATA
AND
SPECIFICATIONS
Voltage
legulator
Type
Regulating
voltage
with
fully
charged
battery
Voltage
coil
resistance
RotOI
coil
inserting
resistance
Voltage
coil
series
resistance
Smoothing
resistance
COle
gap
Point
gap
Ch
uge
lay
Release
voltage
Voltage
coil
resistance
Core
gap
Point
gap
v
fl
nun
in
nun
in
V
fl
nun
in
mID
in
TLl
Z
S5C
14
3
to
15
3
at
200C
680F
10
5
at
200C
680F
10
31
40
0
6
to
1
0
0
024
to
0
039
0
35
to
0
45
0
014
to
O
OIS
4
2
to
5
2
at
N
terminal
37
S
at
200C
680F
0
8
to
1
0
0
031
to
0
039
0
4
to
0
6
0
016
to
0
024
Standard
tempelatUIe
gIlIdient
O
OISV
oC
EE
24
Page 197 of 537
Engine
Electrical
System
DISTRIBUTOR
Non
California
models
CONTENTS
CONSTRUCTION
CHECKING
AND
ADJUSTMENT
CAP
AND
ROTOR
HEAD
CONTACT
POINT
CONOENSER
EE
30
EE
31
EE
31
EE
31
EE
31
ADVANCE
MECHANISMS
DISASSEMBL
Y
ASSEMBLY
SERVICE
DATA
AND
SPECIFICATIONS
EE
31
EE
32
EE
32
EE
33
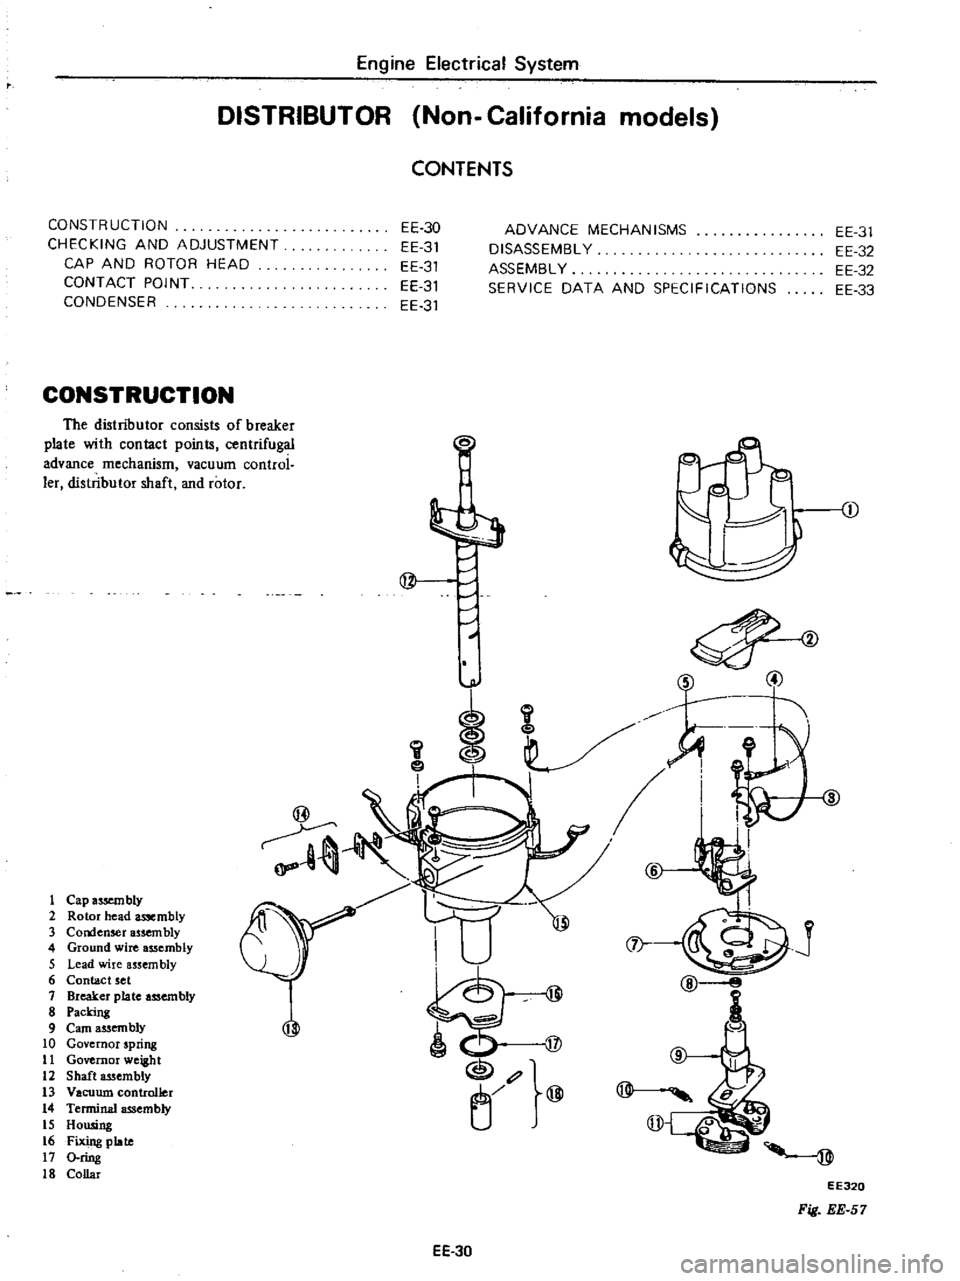
CONSTRUCTION
The
distributor
consists
of
breaker
plate
with
contact
points
centrifugal
advance
mechanism
vacuum
control
ler
distributor
shaft
and
rotor
D
@
t
Cap
assembly
2
Rotor
head
assembly
3
Condenser
assembly
4
Ground
wire
assembly
5
Lead
wire
assem
bly
6
Contact
set
7
Breaker
plate
assembly
8
Packing
9
earn
assembly
10
Governor
spring
11
GoVernor
weight
12
Shaft
assembly
13
Vacuum
controller
14
Terminal
assembly
IS
Housing
16
Fixing
plate
17
O
ring
IS
Collar
v
i
@
D
@
EE32Q
Fig
EE
57
EE
30
Page 200 of 537
Engine
Electrical
System
SERVICE
DATA
AND
SPECIFICATIONS
D4A4
06
D4A4
07
Type
D4A6
07
D4A6
08
Firing
order
1
3
4
2
13
4
2
Rotating
direction
Counterclockwise
Counterclockwise
Owen
angle
degree
490
to
550
490
to
550
Point
gap
mm
in
0
45
to
0
55
0
45
to
0
55
0
018
to
0
022
0
018
to
0
022
Point
pressure
kg
lb
0
40
to
0
55
0
40
to
0
55
0
88
to
1
21
0
88
to
1
21
Condenser
capacity
JlF
0
20
to
0
24
0
20
to
0
24
Condenser
isolate
resistance
Mrl
5
5
Cap
isolate
resistance
Mrl
50
50
Rotor
head
isolate
resistance
Mrl
50
50
Cap
carbon
point
length
mm
in
10
0
39
10
0
39
For
Canada
DISTRIBUTOR
California
models
CONSTRUCTION
CHECKING
AND
ADJUSTMENT
CAP
AND
ROTOR
HEAD
AIR
GAP
CONSTRUCTION
In
the
conventional
distributor
the
ignition
liming
is
detected
by
the
cam
and
breaker
arm
while
in
this
transis
tor
ignition
unit
it
is
detected
by
the
reluctor
on
the
shaft
and
the
pick
up
coil
provided
in
place
of
the
breaker
The
pick
up
coil
consists
of
a
magnet
coil
etc
The
amount
of
magnetic
flux
passing
through
the
pole
piece
in
the
coil
is
changed
at
the
moment
the
pole
CONTENTS
EE
33
EE
33
EE
33
EE
33
ADVANCE
MECHANISMS
DISASSEMBLY
ASSEMBLY
SERVICE
DATA
AND
SPECIFICATIONS
EE
33
EE
35
EE
35
EE
36
piece
faces
the
protrusion
of
the
re
luctor
and
then
the
electrical
signal
is
genera
ted
in
the
pick
up
coil
This
electric
signal
is
conducted
into
the
transistor
ignition
unit
which
in
turn
breaks
tI
e
primary
coil
current
running
through
the
ignition
coil
and
generates
high
voltage
in
the
secondary
winding
Also
this
transistor
ignition
EE
33
unit
utilizes
this
electric
signal
to
restore
the
primary
coil
to
the
original
state
after
cutting
off
the
primary
current
for
a
fIXed
time
The
centrifugal
and
vacuum
ad
vance
mechanisms
employ
the
con
ventional
mechanical
type
The
con
tactor
is
used
to
eliminate
vacuum
and
centrifugal
advance
hysteresis
I
Page 203 of 537
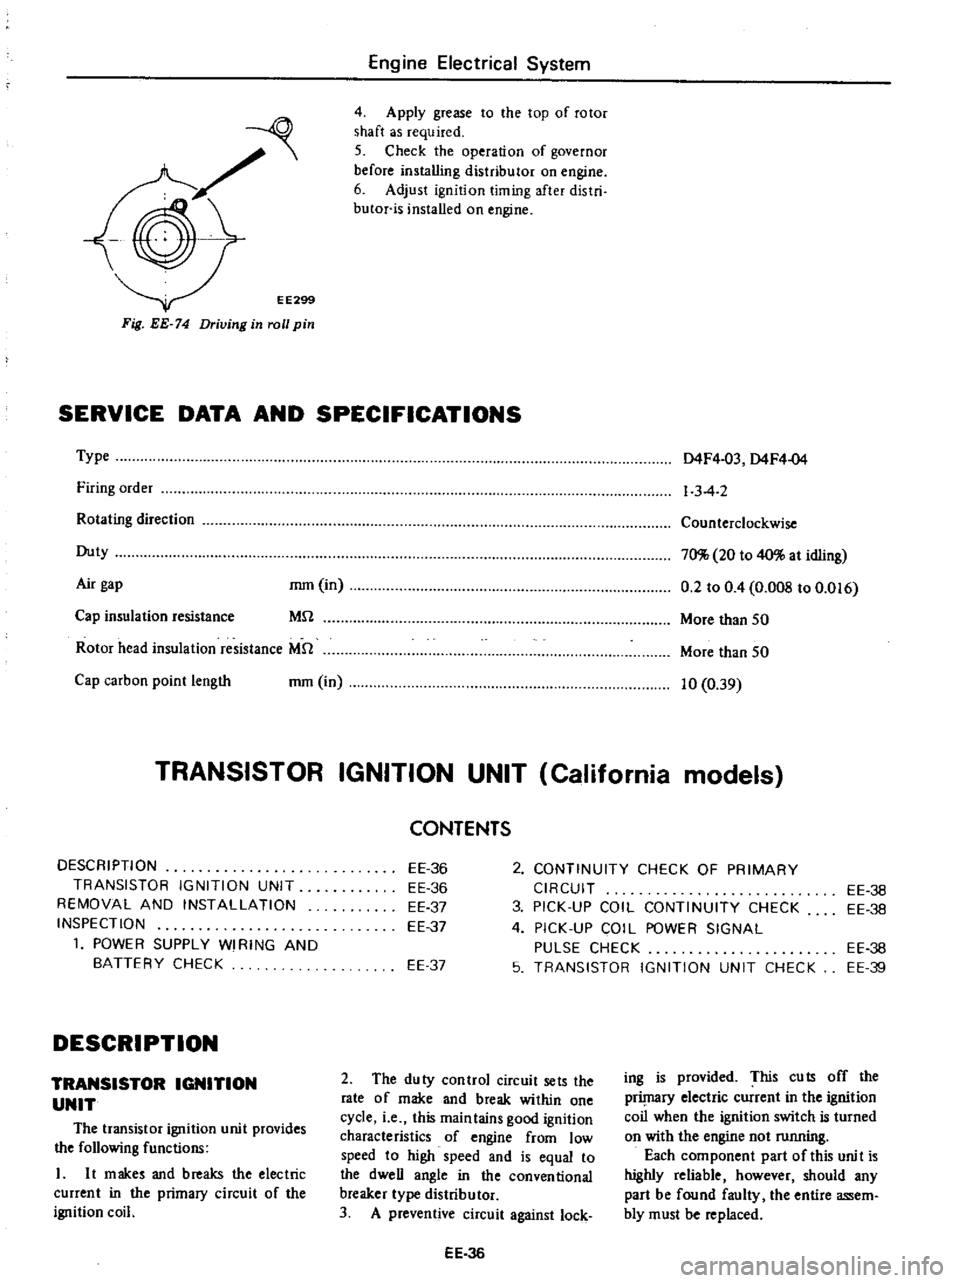
EE299
Fig
EE
74
Driving
in
roll
pin
Engine
Electrical
System
4
Apply
grease
to
the
top
of
rotor
shaft
as
required
5
Check
the
operation
of
governor
before
installing
distributor
on
engine
6
Adjust
ignition
timing
after
distri
butor
is
installed
on
engine
SERVICE
DATA
AND
SPECIFICATIONS
Type
Firing
order
Rotating
direction
Duty
Air
gap
mm
in
MU
Cap
insulation
resistance
Rotor
head
insulation
resistance
MU
Cap
carbon
point
length
mm
in
D4F4
03
D4F4
04
1
3
4
2
Counterclockwise
70
20
to
40
at
idling
0
2
to
0
4
O
OOS
to
0
016
More
than
50
More
than
50
10
0
39
TRANSISTOR
IGNITION
UNIT
California
models
DESCRIPTION
TRANSISTOR
IGNITION
UNIT
REMOVAL
AND
INSTALLATION
INSPECTION
1
POWER
SUPPLY
WI
RING
AND
BATTERY
CHECK
DESCRIPTION
TRANSISTOR
IGNITION
UNIT
The
transistor
ignition
unit
provides
the
following
functions
L
It
makes
and
breaks
the
electric
current
in
the
primacy
circuit
of
the
ignition
coil
2
CONTINUITY
CHECK
OF
PRIMARY
CIRCUIT
3
PICK
UP
COIL
CONTINUITY
CHECK
4
PICK
UP
COIL
POWER
SIGNAL
PULSE
CHECK
5
TRANSISTOR
IGNITION
UNIT
CHECK
CONTENTS
EE
36
EE
36
EE
37
EE
37
EE
37
2
The
duty
control
circuit
sets
the
rate
of
make
and
break
within
one
cycle
i
e
this
maintains
good
ignition
characteristics
of
engine
from
low
speed
to
high
speed
and
is
equal
to
the
dweU
angle
in
the
conventional
breaker
type
distributor
3
A
preventive
circuit
against
lock
EE
36
EE
36
EE
38
EE
38
EE
39
ing
is
provided
This
cuts
off
the
prilnaCY
electric
current
in
the
ignition
coil
when
the
ignition
switch
is
turned
on
with
the
engine
not
running
Each
component
part
of
this
unit
is
highly
reliable
however
should
any
part
be
found
faulty
the
entire
assem
bly
must
be
replaced
Page 214 of 537
DESCRIPTION
INSPECTION
CLEANING
AND
REGAP
DESCRIPTION
The
spark
plugs
are
of
the
conven
tional
type
having
14
mm
0
551
in
threads
The
spark
plug
gaps
are
1
0
to
1
1
mm
0
039
to
0
043
in
on
Cali
fomia
models
and
0
8
to
0
9
mm
0
031
to
0
035
in
on
non
California
models
The
inspection
and
cleaning
should
be
made
every
suitable
mainte
nance
period
If
necessary
replace
Note
All
spark
plugs
installed
on
an
engine
must
be
of
the
same
brand
and
the
same
number
of
heat
range
INSPECTION
L
Remove
spark
plug
wire
by
pulling
on
boot
not
on
wire
itself
2
Remove
spark
plugs
3
Check
electrodes
and
inner
and
outer
porcelains
of
plugs
noting
the
type
of
deposits
and
the
degree
of
electrode
erosion
Refer
to
Figure
EE
96
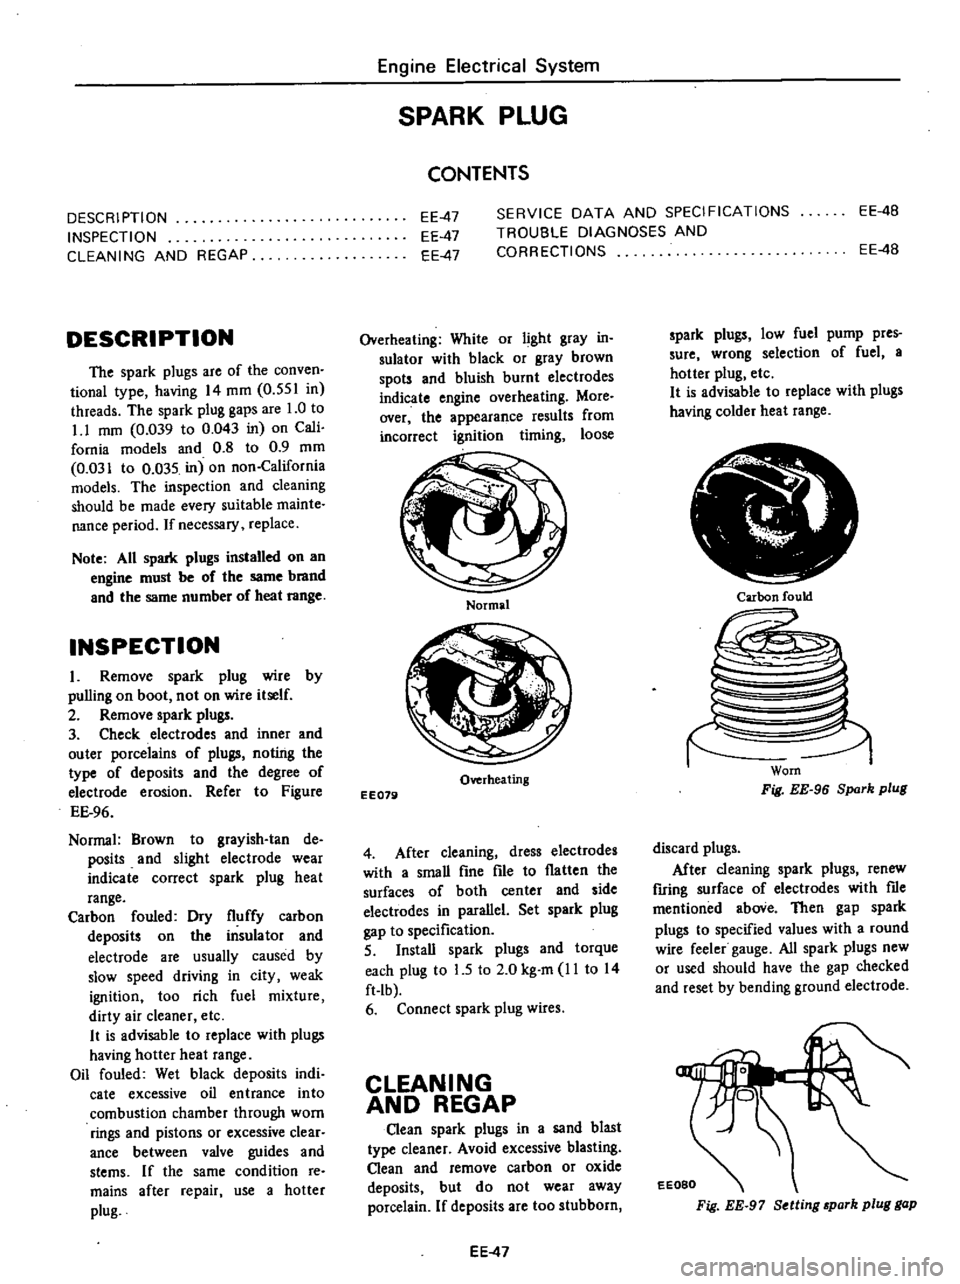
Normal
Brown
to
grayish
tan
de
posits
and
slight
electrode
wear
indicate
correct
spark
plug
heat
range
Carbon
fouled
Dry
fluffy
carbon
deposits
on
the
insulator
and
electrode
are
usually
caused
by
slow
speed
driving
in
city
weak
ignition
too
rich
fuel
mixture
dirty
air
cleaner
etc
It
is
advisable
to
replace
with
plugs
having
hotter
heat
range
Oil
fouled
Wet
black
deposits
indi
cate
excessive
oil
entrance
into
combustion
chamber
through
worn
rings
and
pistons
or
excessive
clear
ance
between
valve
guides
and
stems
If
the
same
condition
re
mains
after
repair
use
a
hotter
plug
Engine
Electrical
System
SPARK
PLUG
CONTENTS
EE
4B
EE
47
EE
47
EE
47
SERVICE
DATA
AND
SPECIFICATIONS
TROUBLE
DIAGNOSES
AND
CORRECTIONS
EE
4B
Overheating
White
or
light
gray
in
sulator
with
black
or
gray
brown
spots
and
bluish
burnt
electrodes
indicate
engine
overheating
More
over
the
appearance
results
from
incorrect
ignition
timing
loose
Normal
Overheating
EE079
4
After
cleaning
dress
electrodes
with
a
smaU
fine
file
to
flatten
the
surfaces
of
both
center
and
side
electwdes
in
parallel
Set
spark
plug
gap
to
specification
5
InstaU
spark
plugs
and
torque
each
plug
to
L5
to
2
0
kg
m
11
to
14
ft
Ib
6
Connect
spark
plug
wires
CLEANING
AND
REGAP
Clean
spark
plugs
in
a
sand
blast
type
cleaner
Avoid
excessive
blasting
Clean
and
remove
carbon
or
oxide
deposits
but
do
not
wear
away
porcelain
If
deposits
are
too
stubborn
EE
47
spark
plugs
low
fuel
pump
pres
sure
wrong
selection
of
fuel
a
hotter
plug
etc
It
is
advisable
to
replace
with
plugs
having
colder
heat
range
Ir
i
Carbon
fould
Worn
Fig
EE
96
Spark
plug
discard
plugs
After
cleaning
spark
plugs
renew
firing
surface
of
electrodes
with
me
mentioned
aboVe
Then
gap
spark
plugs
to
specified
values
with
a
round
wire
feeler
gauge
All
spark
plugs
new
or
used
should
have
the
gap
checked
and
reset
by
bending
ground
electrode
EEOBO
Fig
EE
97
Setting
park
plug
gap
Page 215 of 537
Engine
Electrical
System
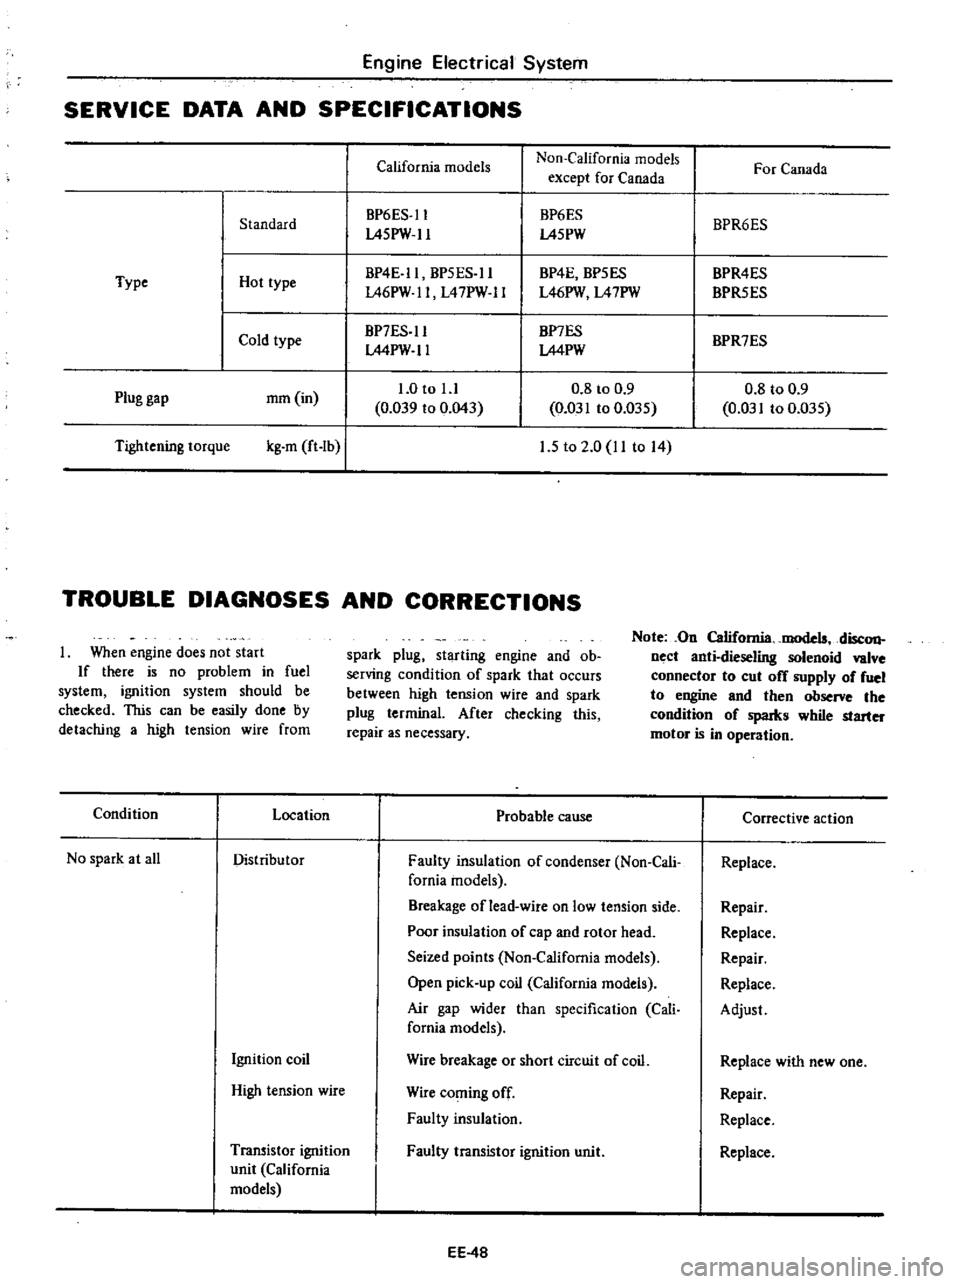
SERVICE
DATA
AND
SPECIFICATIONS
California
models
Non
California
models
For
Canada
except
for
Canada
BP6ES
ll
BP6ES
BPR6ES
Standard
L45PW
ll
L45PW
BP4E
ll
BP5ES
ll
BP4E
BP5ES
BPR4ES
Type
Hot
type
L46PW
ll
L47PW
ll
L46PW
L47PW
BPR5ES
Cold
type
BP7ES
ll
BP7ES
BPR7ES
LMPW
ll
LMPW
1
0
to
l
l
0
8
to
0
9
0
8
to
0
9
Plug
gap
mm
in
0
039
to
0
043
0
031
to
0
D35
0
031
to
0
035
Tightening
torque
kg
m
ft
Ib
I
1
5
to
2
0
11
to
14
TROUBLE
DIAGNOSES
AND
CORRECTIONS
When
engine
does
not
start
If
there
is
no
problem
in
fuel
system
ignition
system
should
be
checked
This
can
be
easily
done
by
detaching
a
high
tension
wire
from
spark
plug
starting
engine
and
ob
serving
condition
of
spark
that
occurs
between
high
tension
wire
and
spark
plug
terminal
After
checking
this
repair
as
necessary
Note
On
California
models
disc
on
nect
anti
dieseling
solenoid
valve
connector
to
cut
off
supply
of
fuel
to
engine
and
then
observe
the
condition
of
spaIks
while
starter
motor
is
in
operation
Condition
Location
Probable
cause
Corrective
action
No
spark
at
all
Distributor
Faulty
insulation
of
condenser
Non
Cali
Replace
fomia
models
Breakage
of
lead
wire
on
low
tension
side
Repair
Poor
insulation
of
cap
and
rotor
head
Replace
Seized
points
Non
California
models
Repair
Open
pick
up
coil
California
models
Replace
Air
gap
wider
than
specification
Cali
Adjust
fornia
models
Ignition
coil
Wire
breakage
or
short
circuit
of
coil
Replace
with
new
one
High
tension
wire
Wire
coming
off
Repair
Faulty
insulation
Replace
Transistor
ignition
Faulty
transistor
ignition
unit
Replace
unit
California
models
EE
4B