automatic transmission DATSUN PICK-UP 1977 Repair Manual
[x] Cancel search | Manufacturer: DATSUN, Model Year: 1977, Model line: PICK-UP, Model: DATSUN PICK-UP 1977Pages: 537, PDF Size: 35.48 MB
Page 289 of 537

Automatic
Transmission
0
range
Top
gear
Low
A
lI
eke
B
e
I
mf
D
J
J
V
va
I
011
COO
VK
Thro
V
o
Ot
al
oi
v
L
R
Lubfkatlon
y
Front
Lubric
1
n
Oriliu
Check
1
1
O
nV
Th
onla
O
eln
Vah
2
P
M
lflM
V
I
5
22
x
i2J
3
1n
2nd
Shift
v
1Ye
5
Manue
Val
PRND2
j
Pr
R
I
Of
1
1
5
Nota
Marked
r
Dr
ln
rs
ond
y
l
y
G
nor
Val
Goy
rnor
Val
1
1
IOo
no
feold
P
Oo
no
p
Torq
c
on
n
p
Th
onl
pr
Fig
A
T
38
Oil
pressure
circuit
diagram
uD
J
range
Top
gear
AT
25
Page 290 of 537
0
RANGE
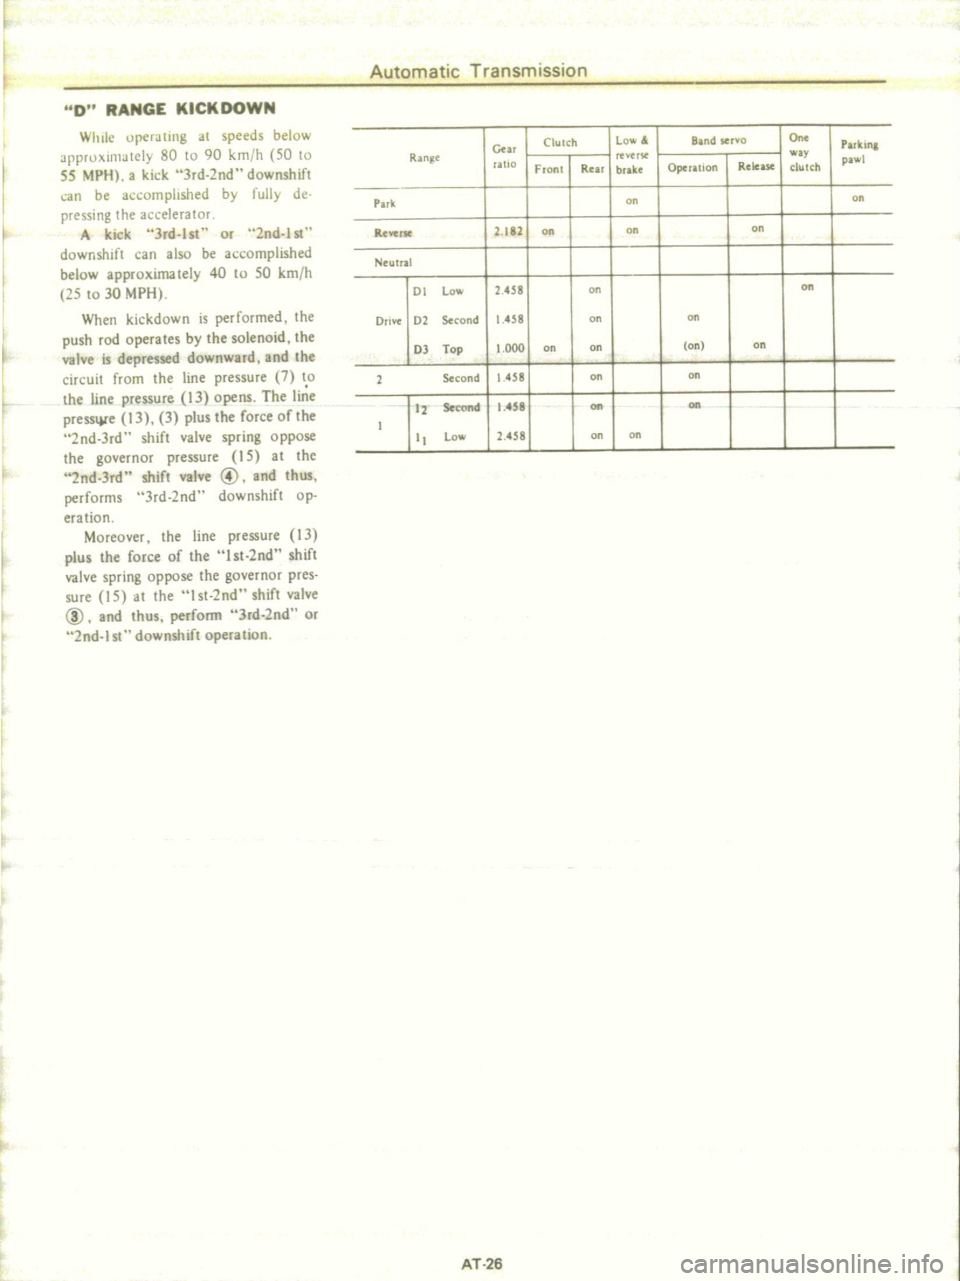
KICKOOWN
Automatic
Transmission
f
r
t
While
operating
at
speeds
below
appruximately
80
to
90
kmfh
50
to
55
MPII
a
kick
3rd
2nd
downshift
an
be
accomplished
by
fully
de
pressing
the
accelerator
A
kick
3rd
lst
or
2nd
lst
downshift
can
also
be
accomplished
below
approximately
40
to
50
kmfh
25
to
30
MPII
When
kickdown
is
performed
the
push
rod
operates
by
the
solenoid
the
valve
is
depressed
downward
and
the
circuit
from
the
hne
pressure
7
to
the
hne
pressure
13
opens
The
h
e
press
e
13
3
plus
the
force
of
the
2nd
3rd
shift
valve
spring
oppose
the
governor
pressure
15
at
thc
2nd
3rd
shift
valve
@
and
thus
performs
3rd
2nd
downshift
op
eration
Moreover
the
hne
pressure
13
plus
the
force
of
the
lst
2nd
shift
valve
spring
oppose
the
governor
pres
sure
15
at
the
I
st
2nd
shift
valve
ID
and
thus
perform
3rd
2nd
or
2nd
st
downshift
operation
f
Cur
Clutch
La
Band
servo
On
Parll
lnl
Ran
e
rf
ltr5e
w
pawl
nUo
Fronl
Rear
brake
Opcullon
Release
clutch
Park
on
on
Reverse
2
82
on
on
on
Neutral
Dt
low
2458
on
on
Drive
02
cond
1
458
on
on
D
Top
t
ooo
on
on
on
on
2
Second
1458
on
on
12
Second
1
458
on
on
t
tl
low
2
4
8
on
on
AT
26
Page 291 of 537

Automatic
Transmission
I
M
nual
f4fL
J
0
I
1
r
PR
0
range
kickdown
Shift
valves
In
2nd
gear
position
To
queeO
t
Front
Clutch
Low
a
A
8
8
e
e
a
o
14
0
Oil
COO
R
L
ubrication
n
0
Drain
1
4
j
v
I
Front
Lub
icet
p
n
o
I
Thron
p
ain
V
I
j
R
gu
ato
V
I
Not
Ma
ked
X
r
p
n
Li
pr
IGo
no
f
d
p
l
Governor
p
c
Torque
CO
I
1
p
ThrOWepr
VK
Th
o
V
lv
7
1
iftV
8
Throttle
BKk
up
V
hl
ID
So
e
COw
P
Ifk
Check
V
I
1
24
5
Mod
Yo
I
@2nCl
3rdSl
lilr
V
12
3
ht
2nd
Shih
V
5
L
I
X
S
COnd
Primary
G
rw
Va
Gov
nor
Valve
AT
27
Fig
AT
39
Oil
pressure
circuit
diagram
D
ronge
kickdown
shift
values
in
2nd
gear
position
Page 292 of 537
2
RANGE
2ND
GEAR
Automatic
Transmission
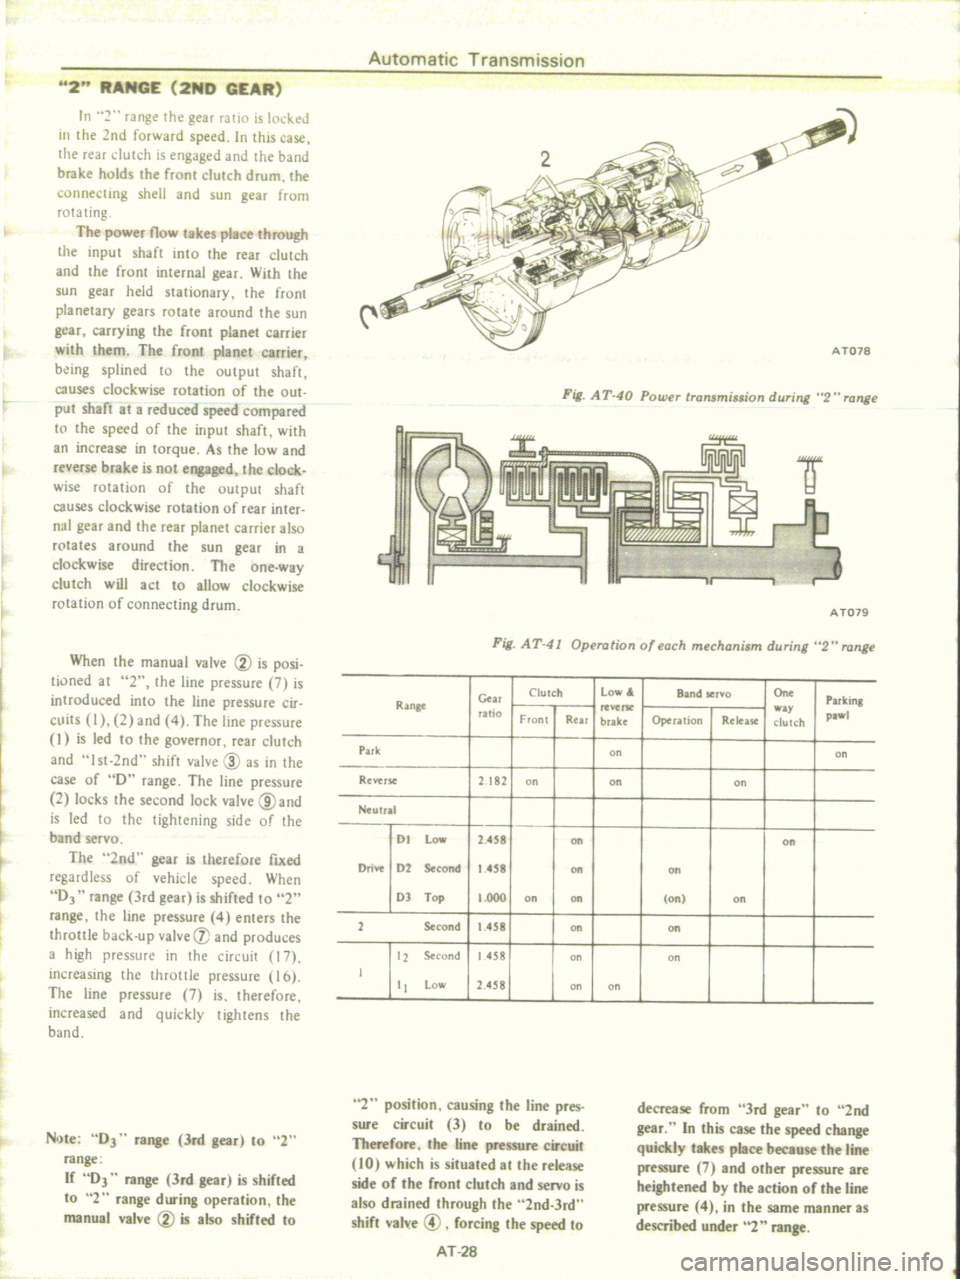
In
2
range
the
gear
rario
is
IOI
keJ
III
the
2nd
forward
speed
In
this
case
the
rear
dutch
is
engaged
and
the
band
brake
holds
the
front
clutch
drum
the
connecting
shell
and
sun
gear
from
rotating
The
power
flow
takes
place
through
the
input
shaft
inlo
the
rear
clutch
and
the
front
internal
gear
With
Ihe
sun
gear
held
stationary
the
front
planetary
gears
rotate
around
the
sun
gear
carrying
the
front
planet
carrier
with
them
The
front
planet
carrier
being
splined
to
the
output
shaft
causes
clockwise
rotation
of
the
OUI
put
shaft
at
a
reduced
speed
compared
to
the
speed
of
the
input
shaft
with
an
increase
in
torque
As
the
low
and
reverse
brake
is
not
engaged
the
clock
wise
rotation
of
the
output
shaft
causes
clockwise
rotation
of
fear
inter
nal
gear
and
the
rear
planet
carrier
also
rotates
around
the
sun
gear
in
a
clockwise
direction
The
one
way
clutch
will
act
to
allow
clockwise
rotation
of
connecting
drum
When
the
manual
valve
V
is
posi
tioned
at
2
the
line
pressure
7
is
introduced
into
the
line
pressure
cir
cuits
I
2
and
4
The
line
pressure
I
is
led
to
the
governor
rear
clutch
and
I
st
2nd
shift
valve
CID
as
in
the
case
of
D
range
The
line
pressure
2
locks
the
second
lock
valve
@and
is
led
to
thc
tightening
side
of
Ihe
band
servo
The
2nd
gear
is
therefore
fixed
regardless
of
vehicle
speed
When
DJ
range
3rd
gear
is
shifted
to
2
range
the
line
pressure
4
enters
Ihe
throttle
back
up
valve
V
and
produces
a
high
pressure
in
the
circuit
17
increasing
thc
throttle
pressure
li
6
The
line
pressure
7
is
therefore
increased
and
quickly
tightens
the
band
N
e
DJ
range
3rd
gear
to
2
range
If
DJ
range
3rd
gear
is
shifled
to
2
range
during
operation
the
manual
valve
V
is
also
shifted
to
A
T078
Fig
AT
40
Powu
tTansminion
during
2
H
range
A
1079
Fig
AT
41
Operation
of
each
mechanism
during
2
range
Clutch
Low
Band
ser
o
On
Parking
Gw
Ran8t
utio
w
pa
Front
Rear
brake
Operalion
Release
dutch
Pui
on
on
Revtrs
e
2
182
on
on
on
Neutral
01
Low
2
458
on
on
Drive
02
Second
1
458
Oft
Oft
OJ
Top
1
000
on
on
on
on
1
Second
1
458
on
Oft
12
tocond
1458
on
on
J
tt
Low
2
458
on
on
2
position
causing
the
line
pres
sure
circuit
3
to
be
drained
Therefore
the
line
pressure
circuit
10
which
is
situated
at
the
release
side
of
the
front
clutch
and
servo
is
also
drained
through
the
2nd
3rd
shift
val
e
@
forcing
the
speed
to
AT
28
decrease
from
3rd
gear
to
2nd
gear
In
this
case
the
speed
change
quickly
takes
place
because
the
line
pressure
7
and
other
pressure
are
heightened
by
the
action
of
the
line
pressure
4
in
the
same
manner
as
described
under
2
range
Page 293 of 537

Automatic
Transmission
2
range
2nd
gear
Torqu
Con
Fron
Clutch
l
ow
A
B
ke
Br
I
12
011
Cool
i
IL
12
ID
v
Th
ot
Valve
7
T
onl
Beck
up
V
ID
So
0
Id
1ft
v
Front
Lubric
t
Orltic
Check
Va
Or
lnVal
e
Throttle
Dr
in
V
l
P
Modif
Va
15
BJl
@
2nct
3rd
Tim
If
Ve
12
3
1
2nd
Stolt
21
Se
onc
l
Lock
Va
3
I
PR
02
1
s
I
Jl
J
I
r
A
ul
Gr
v
2
w
Valve
Note
Merltedl
D
a
n
I
G
v
Line
p
IOo
nOf
f
d
pr
G
no
p
r
c
o
Torque
con
pr
Thron
p
re
ond
a
nor
v
Fig
A
T
42
Oil
pressure
circuit
diagram
2
range
2nd
gear
AT
29
Page 294 of 537
1
RANGE
LOW
GEAR
Automatic
Transmission
f
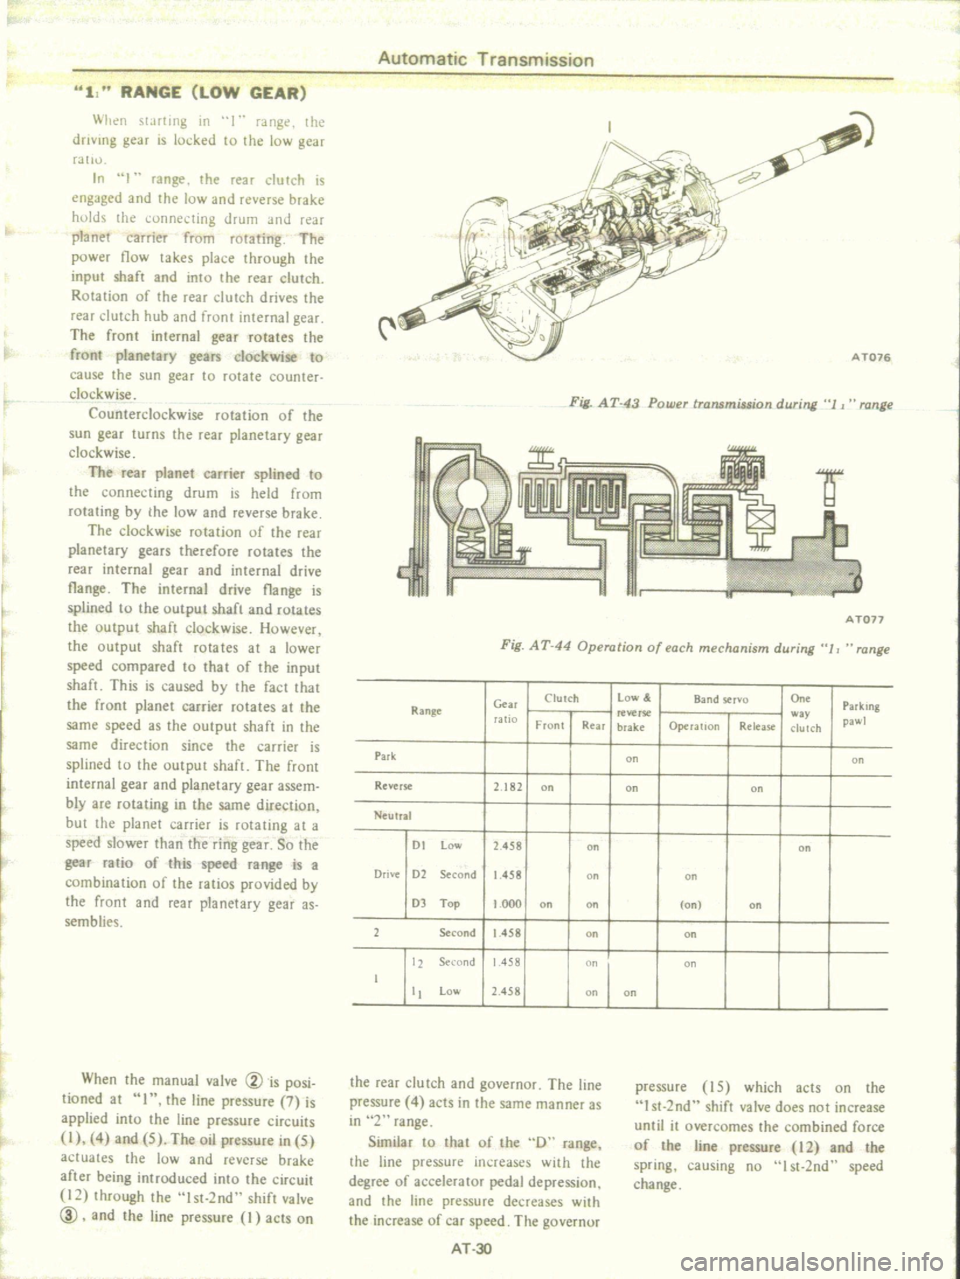
Wilen
slJrting
in
I
range
the
drlvlIlg
gear
is
IOl
ked
to
the
low
gear
fJIIIJ
In
H
range
the
rear
clutch
is
engJged
and
the
low
and
reverse
brake
hulds
he
onnecting
drum
and
feac
planet
carrier
from
rotating
The
power
tlow
lakes
place
through
the
input
shaft
and
into
lhe
rear
clutch
ROlalion
of
the
rear
clutch
drives
lhe
rear
dutch
hub
and
front
internal
gear
The
front
internal
gear
rotates
the
front
planetary
gears
clockwise
to
cause
the
sun
gear
to
rotate
counter
clockwise
Counterclockwise
rotation
of
the
sun
gear
turns
the
rear
planetary
gear
clockwise
The
rear
planet
carrier
splined
to
the
connecting
drum
is
held
from
rotating
by
the
low
and
reverse
brake
The
clockwise
rotation
of
the
rear
planetary
gears
therefore
rotates
the
rear
internal
gear
and
internal
drive
tlange
The
internal
drive
tlange
is
splined
to
the
output
shaft
and
rotates
the
uutput
shaft
clockwise
However
the
output
shaft
rotates
at
a
lower
speed
compared
to
that
of
the
input
shaft
This
is
caused
by
the
fact
Ihat
the
front
planet
carrier
rotates
at
the
same
speed
as
Ihe
OUlput
shaft
in
the
same
direction
since
the
carrier
is
splined
to
the
output
shaft
The
front
internal
gear
and
planetary
gear
assem
bly
are
rotating
in
the
same
direction
but
the
planet
carrier
is
rotating
at
a
speed
slower
than
the
ring
gear
So
the
gear
ralio
of
this
speed
range
is
a
combination
of
the
ratios
provided
by
the
front
and
rear
planetary
gear
as
semblies
When
the
manual
valve
Vis
posi
tioned
at
I
the
line
pressure
7
is
applied
into
the
line
pressure
circuits
I
4
and
5
The
oil
pressure
in
5
actuates
the
luw
and
reverse
brake
after
being
introduced
into
the
circuit
12
through
Ihe
1st
2nd
shift
valve
ID
and
the
line
pressure
I
acts
on
C
A
T076
Fig
AT
43
Power
transmission
during
1
J
range
Fai1
A
TOn
Fig
AT
44
Operation
of
each
mechanism
during
JJ
range
Clutch
Low
Band
servo
On
Parking
Gm
Range
reverse
w
pawl
ratIO
Front
Rur
brake
Operatlon
Release
clulCh
Park
on
on
Reverse
2
182
on
on
on
Neutral
01
low
2
458
on
on
Drive
02
Second
1
458
on
on
03
Top
1000
on
on
on
on
2
Second
1
458
on
on
2
Second
IAS8
on
on
I
1
low
2
458
on
on
the
rear
clutch
and
governor
The
line
pressure
4
acts
in
the
same
manner
as
in
2
range
Similar
to
that
of
the
D
range
the
line
pressure
inr
reases
with
the
degree
of
accelerator
pedal
depression
and
the
line
pressure
decreases
with
the
increase
of
car
speed
The
governor
pressure
15
which
acts
on
the
I
st
2nd
shift
valve
does
not
increase
until
it
overcomes
the
combined
force
of
the
line
pressure
12
and
the
spring
causing
no
st
2nd
speed
cha
nge
AT
30
Page 295 of 537

Automatic
Transmission
1
range
Low
gear
14
Down
ift
llll
Oid
VK
@50
I
10
Th
o
D
IttV
v
il
Dr
in
14
I
Front
Lubrlc
t
Oritlc
O
mV
I
i
ChKk
V
Th
on
P
Modif
t
0
11
1
IS
V
g
M
nu
V
l
PR
NOI
M
keel
X
Ir
0
11
1
1
1
P
IOov
nOt
tMod
P
O
no
p
Torqul
con
pr
Tn
ont
pr
AT
31
1M
2nd
hlf
23
6
J
s
ond
O
V
i
I
I
V
Oov
1
Of
v
Fig
A
T
45
Oil
pressure
circuit
diagram
II
II
range
Low
gear
Page 296 of 537

Automatic
Transmission
1
ran
2nd
ar
L
l
l
ak
v
u
Co
nro
0
O
h
So
OId
ou
Coo
r
L
UIIoft
fi
v
Th
o
V
we
IhV
O
ein
iv
Lubo
lcat
OtHIc
CO
v
0
v
1
0
V
joy
Tlwont
Q
in
v
MOdIf
h1
ll
v
iJl
N
8I1l
0
1
lli
Onct
Y
a
nor
v
0
V
L1
p
10011
0
f
d
P
a
no
Torq
conv
Th
on
pt
Fig
A
T
46
Oil
pr
ure
circuit
diagram
1
z
range
2nd
gear
AT
J2
Page 297 of 537
Automatic
Transmission
REMOVAL
AND
INSTALLATION
TRANSMISSION
ASSEMBLY
REMOVAL
INSTALLATION
TRANSMISSION
ASSEMBLY
When
dismounting
the
automatic
transmission
from
a
vehicle
pay
at
tention
to
the
following
points
1
Before
dismounting
the
trans
mission
rigidly
inspecl
it
by
aid
of
the
Troubleshooting
Chart
and
dis
mount
it
only
when
considered
to
be
necessary
2
Dismount
the
transmission
with
utmost
care
and
when
mounting
observe
the
tightening
torque
indi
cated
on
another
table
not
to
exert
excessive
force
REMOVAL
In
dismounting
automatic
transmis
sion
from
vehicle
proceed
as
follows
I
Disconnect
battery
ground
cable
from
terminal
2
Disengage
torsion
shaft
from
ac
celerator
linkage
3
Jack
up
vehicle
and
support
its
weight
on
safety
stands
Recommend
a
hydraulic
hoist
or
open
pit
be
utilized
if
available
Make
sure
that
safety
is
insured
4
Remove
propeller
shaft
Note
Plug
up
the
opening
in
the
rear
extension
to
prevent
oil
from
flowing
out
5
Disconnect
front
exhaust
tube
6
Disconnect
selector
range
lever
from
manual
shaft
7
Disconnect
wire
connections
at
inhibitor
switch
CONTENTS
AT
33
AT
33
AT
33
TRANSMISSION
CONTROL
LINKAGE
REMOVAL
AND
INSTALLATION
ADJUSTMENT
AT
35
AT
35
AT
35
8
Disconnect
vacuum
tube
from
vacuum
diaphragm
and
wire
connee
lions
at
downshift
solenoid
9
Disconnect
speedometer
cable
from
rear
extension
10
Disconnect
oil
charging
pipe
II
Disconnect
oil
cooler
inlet
and
outlet
tubes
at
transmission
case
12
Support
engine
by
locating
a
jack
under
oil
pan
with
a
wooden
block
used
between
oil
pan
and
jack
Support
transmission
by
means
of
a
transmission
jack
13
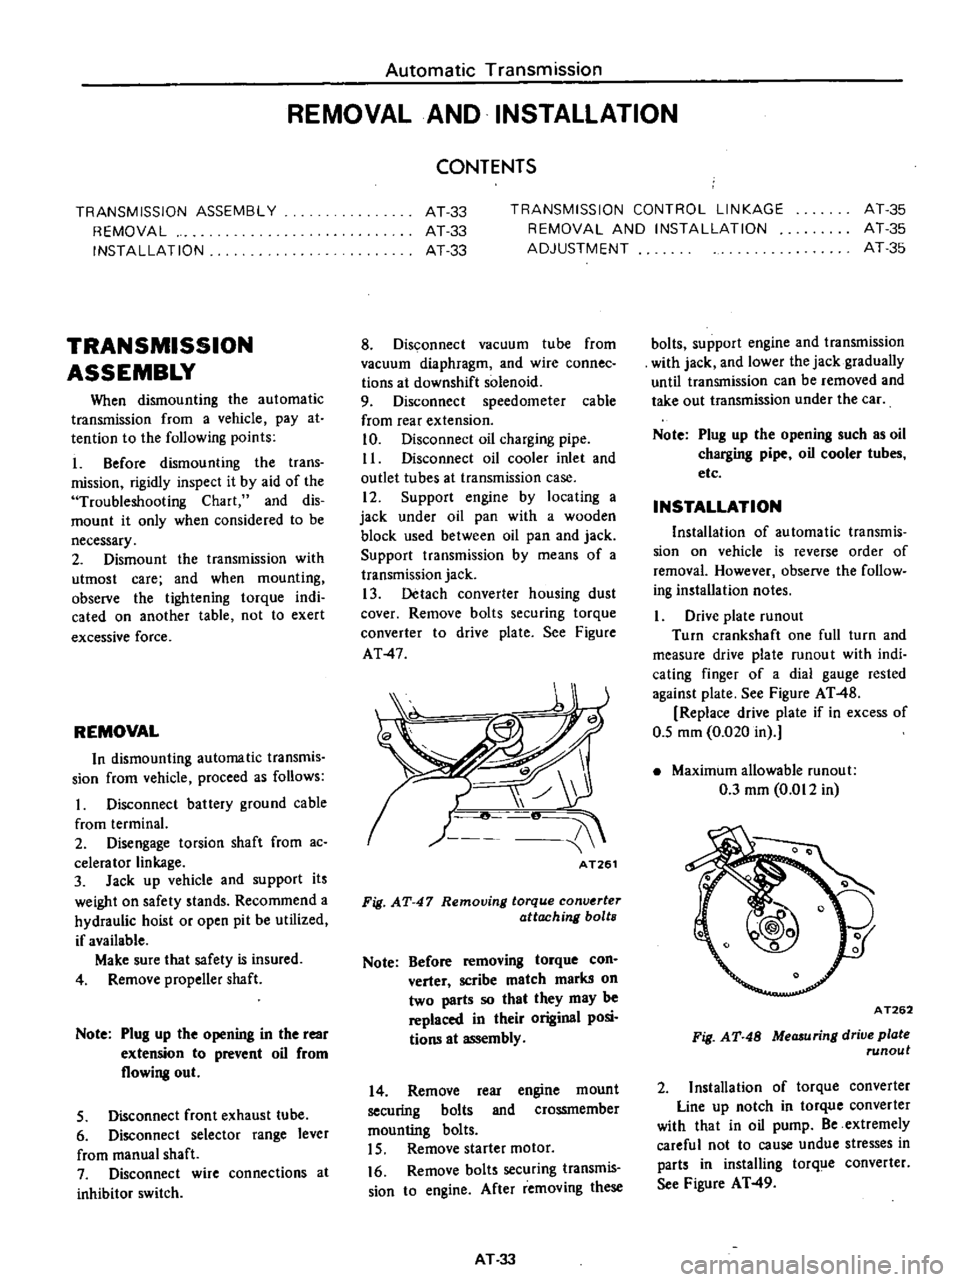
Detach
converter
housing
dust
cover
Remove
bolts
securing
torque
converter
to
drive
plate
See
Figure
AT
4
AT261
Fig
AT
47
Removing
torque
conv
rter
attaching
bolts
Note
Before
removing
torque
con
verter
scribe
match
marks
on
two
parts
so
that
they
may
be
replaced
in
their
original
posi
tions
at
assembly
14
Remove
rear
engine
mount
securing
bolts
and
crossmember
mounting
bolts
15
Remove
starter
motor
16
Remove
bolts
securing
transmis
sion
to
engine
After
removing
these
AT
33
bolts
support
engine
and
transmission
with
jack
and
lower
the
jack
gradually
until
transmission
can
be
removed
and
take
out
transmission
under
the
car
Note
Plug
up
the
opening
such
as
oil
charging
pipe
oil
cooler
tubes
etc
INSTALLATION
Installation
of
automatic
transmis
sion
on
vehicle
is
reverse
order
of
removal
However
observe
the
follow
ing
installation
notes
Drive
plate
runout
Turn
crankshaft
one
full
turn
and
measure
drive
plate
mnou
t
with
indi
cating
finger
of
a
dial
gauge
rested
against
plate
See
Figure
AT
48
Replace
drive
plate
if
in
excess
of
0
5
mm
0
020
in
Maximum
allowable
mnout
0
3
mm
0
012
in
A
T262
Fig
AT
48
MeCJ
uring
drive
plate
runout
2
Installation
of
torque
converter
Line
up
notch
in
torque
converter
with
that
in
oil
pump
Be
extremely
careful
not
to
cause
undue
stresses
in
parts
in
installing
torq
e
converter
See
Figure
AT
49
Page 298 of 537
Starter
should
be
brought
into
op
eration
only
when
selector
lever
is
in
P
and
N
positions
it
should
not
be
started
when
lever
is
in
D
2
I
and
R
positions
Back
up
lamp
should
also
light
when
selector
lever
is
placed
in
R
position
S
After
converter
is
installed
rotate
10
Check
level
of
oil
in
transmis
crankshaft
several
turns
and
check
to
be
sure
that
transmission
rotates
freely
sion
For
detailed
procedure
see
page
AT48
without
binding
6
Pour
recommended
automatic
II
Move
selector
lever
through
aU
positions
to
be
sure
that
transmission
transmission
fluid
up
to
correct
level
operates
correctly
through
oil
charge
pipe
verter
to
transmission
measure
dis
With
hand
brake
applied
rotate
tan
A
to
be
certain
that
they
are
7
Connect
manual
lever
to
shift
engine
at
idling
Without
disturbing
correctly
mbi
d
S
F
rod
Opeiationsliould
oecaTrie
f
bue
the
above
sclUng
ffiovTSelector
lever
AT
50
with
manual
and
selector
levers
in
through
N
to
D
to
2
to
I
Distance
A
N
and
to
R
A
slight
shock
should
be
More
than
21
5
mm
0
846
in
8
Connect
inhibitor
switch
wires
felt
by
hand
gripping
selector
each
time
transmission
is
shifted
Automatic
Transmission
4
Bolt
converter
to
drive
plate
Note
Align
chalk
marks
painted
a
cross
both
parts
during
disas
sembling
processes
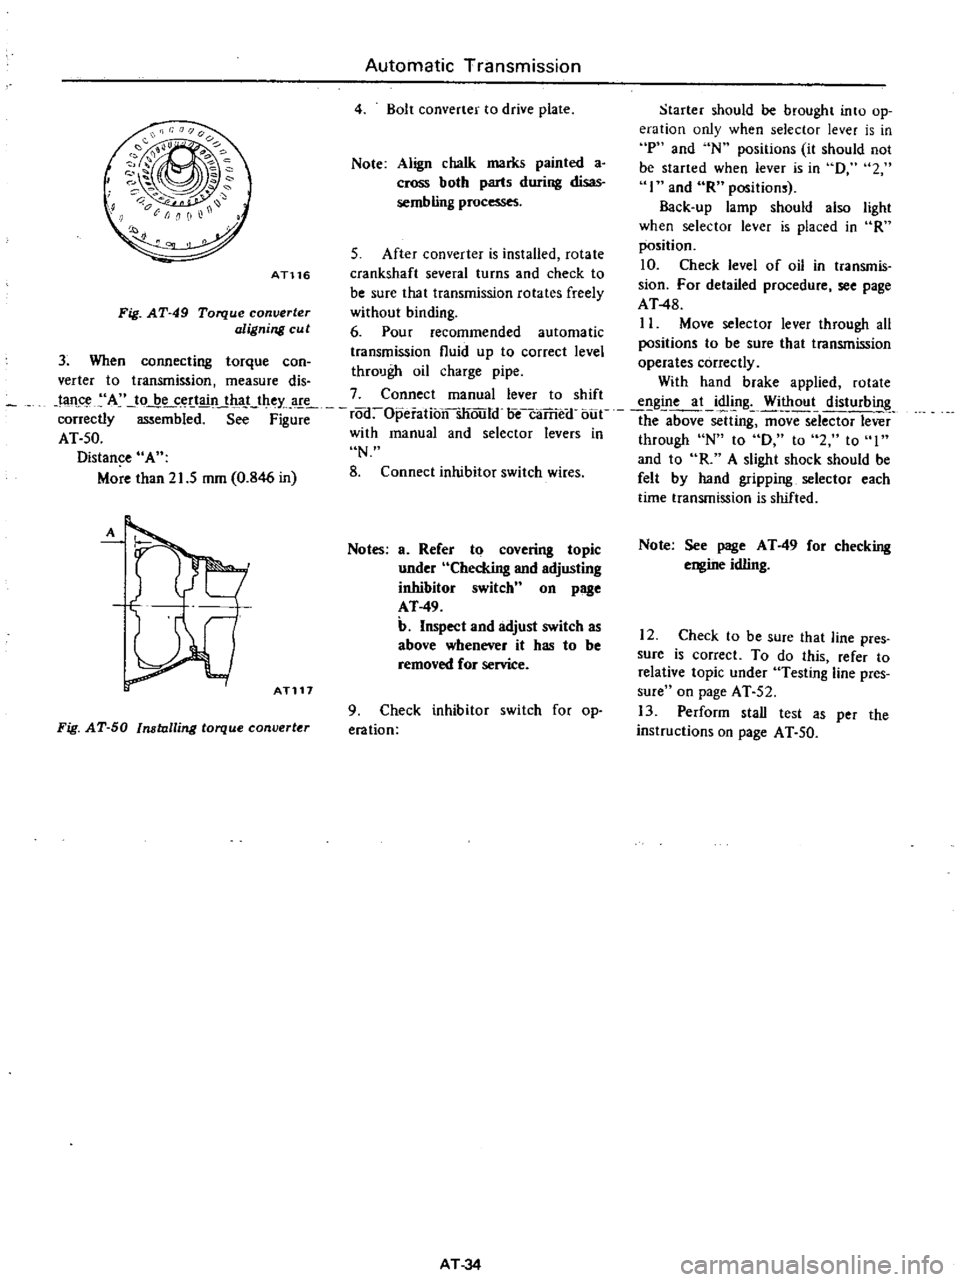
AT116
Fig
AT
49
Torque
converter
aligning
cu
t
3
When
connecting
torque
can
A
ATl17
Notes
a
Refer
to
covering
topic
under
Checking
and
adjusting
inhibitor
switch
n
on
page
AT
49
b
Inspect
and
adjust
switch
as
above
whenever
it
has
to
be
removed
for
service
Fig
AT
50
Installing
torque
converter
9
Check
inhibitor
switch
for
op
eration
AT
34
Note
See
page
AT
49
for
checking
engine
idling
12
Check
to
be
sure
that
line
pres
sure
is
correct
To
do
this
refer
to
relative
topic
under
Testing
line
pres
sure
on
page
AT
52
13
Perform
stall
test
as
per
the
instructions
on
page
AT
50