torque DATSUN PICK-UP 1977 Manual Online
[x] Cancel search | Manufacturer: DATSUN, Model Year: 1977, Model line: PICK-UP, Model: DATSUN PICK-UP 1977Pages: 537, PDF Size: 35.48 MB
Page 325 of 537
Automatic
Transmission
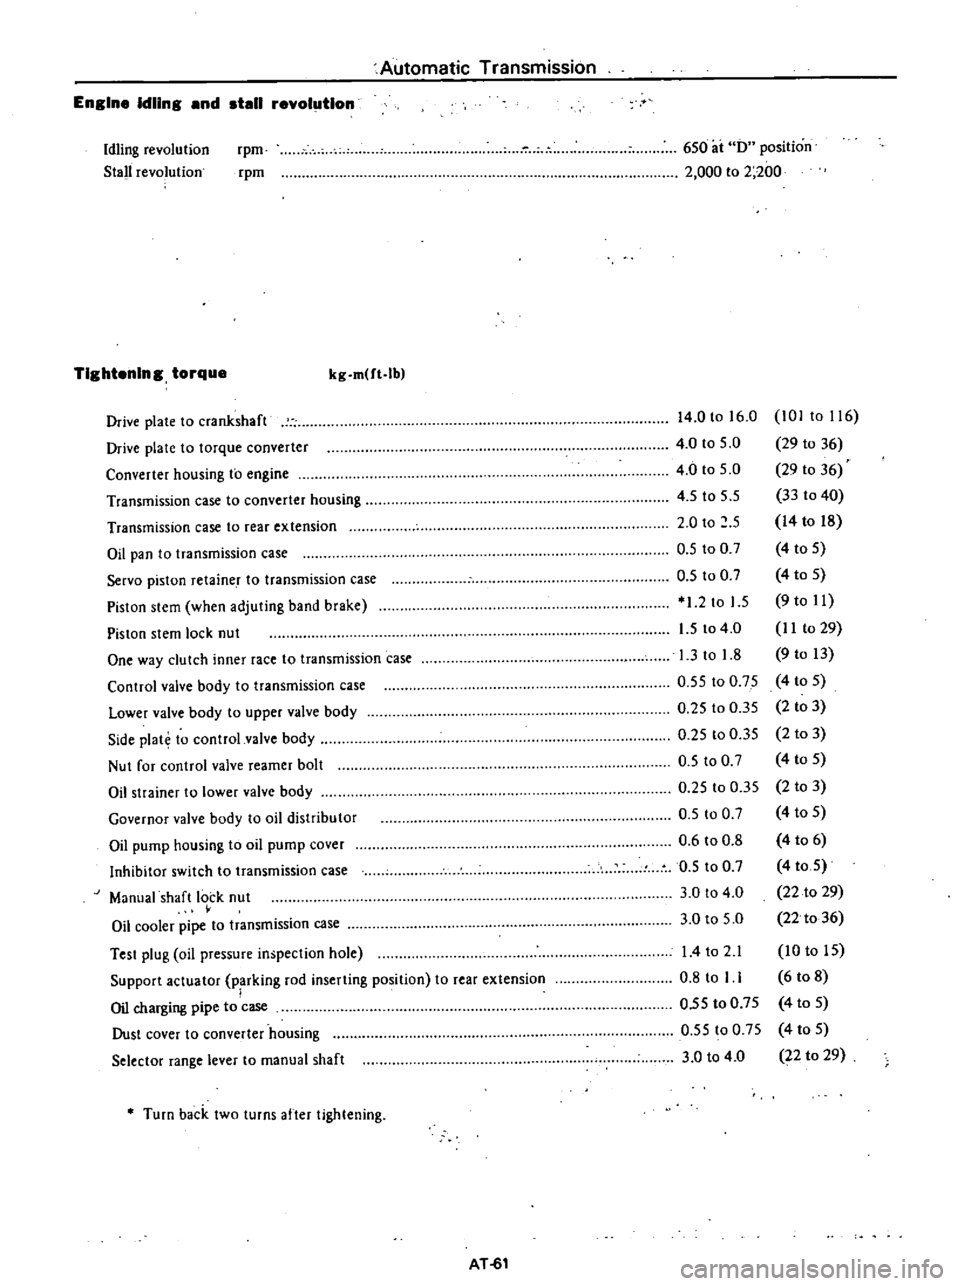
Engine
Idling
and
stall
revolution
Idling
revolution
Stall
revolution
rpm
rpm
6S0
ai
0
position
2
000
to
2
200
TIghtening
torque
kg
m
ft
lb
Drive
plate
to
crankshaft
Drive
plate
to
torque
converter
Converter
housing
to
engine
Transmission
case
to
converter
housing
Transmission
case
to
rear
extension
Oil
pan
to
transmission
case
Servo
piston
retaine
T
to
transmission
case
Pislon
slem
when
adjuting
band
brake
Piston
stem
lock
nut
One
way
clutch
inner
race
to
transmission
case
Control
valve
body
to
transmission
case
Lower
valve
body
to
upper
valve
body
Side
plat
to
control
valve
body
Nut
for
control
valve
reamer
bolt
Oil
strainer
to
lower
valve
body
Governor
valve
body
to
oil
distribu
tor
Oil
pump
housing
to
oil
pump
cover
Inhibitor
switch
to
transmission
case
Manual
shaft
lock
nut
Oil
cooler
pipe
to
transmission
case
Test
plug
oil
pressure
inspection
hole
Support
actuator
parking
rod
inserting
position
to
rear
extension
I
Oil
charging
pipe
to
case
Dust
cover
to
converter
housing
Selector
range
lever
to
manual
shaft
14
0
to
16
0
101
to
116
4
0
to
5
0
29
to
36
4
0
to
S
O
29
10
36
4
S
to
5
5
33
to
40
2
0
to
S
14
to
18
O
S
to
0
7
4
to
S
O
S
to
0
7
4
to
S
1
2
to
1
5
9
to
11
1
5
to
4
0
I
I
to
29
1
3
to
1
8
9
to
13
0
5S
to
0
75
4
to
S
0
25
to
O
3S
2
to
3
0
25
to
0
35
2
to
3
O
S
to
0
7
4
to
S
0
25
to
0
35
2
to
3
D
S
100
7
4
to
5
0
6
to
0
8
4
to
6
0
5
to
0
7
4
toS
3
0
to
4
0
22
to
29
3
0
to
S
O
22
to
36
I
4to
2
1
10
to
IS
0
8
to
I
1
6
to
8
O
5S
to
0
7S
4
to
S
O
5S
to
0
75
4
to
S
3
0
to
4
0
22
to
29
Turn
back
two
turns
after
tightening
AT
61
Page 326 of 537
Automatic
Transmission
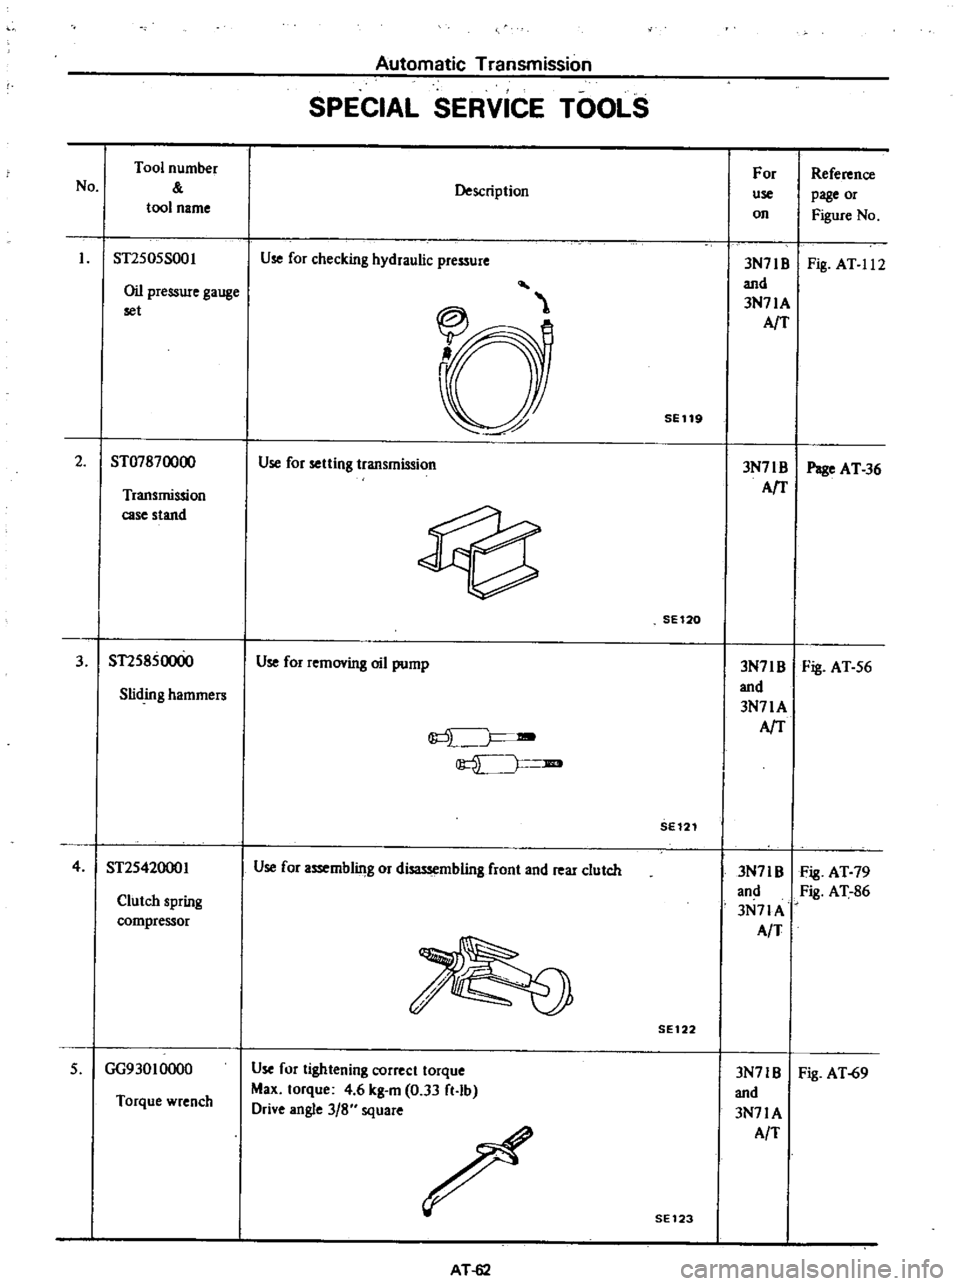
SPECIAL
SERVICE
TOOLS
No
Tool
number
tool
name
Description
For
use
on
Reference
page
or
Figure
No
Oil
pressure
gauge
set
3N71B
Fig
AT
11
2
and
3N71A
AfT
ST2S0SS001
Use
for
checking
hydraulic
pressure
SE119
2
ST07870000
Use
for
setting
transmission
3N71
B
Page
AT
36
AfT
Transmission
case
stand
SE120
3
ST2S850000
Use
for
removing
oil
pump
3N7IB
Fig
AT
S6
and
Sliding
hammers
3N71A
J
AfT
JIB
SE121
4
ST2S42000I
Use
for
assemblilJg
or
disassembling
front
and
rear
clutch
3N71B
Fig
AT
79
and
Fig
AT
86
Clutch
spring
3N7lA
compressor
AIT
SE
122
3N71B
Fig
AT
69
and
3N71A
AlT
Torque
wrench
Use
for
tightening
correct
torque
Max
torque
4
6
kg
m
0
33
ft
lb
Drive
angle
3
8
square
S
GG93010000
SE123
AT
62
Page 327 of 537
Automatic
Transmission
Tool
number
For
Reference
No
Description
use
page
or
tool
name
on
Figure
No
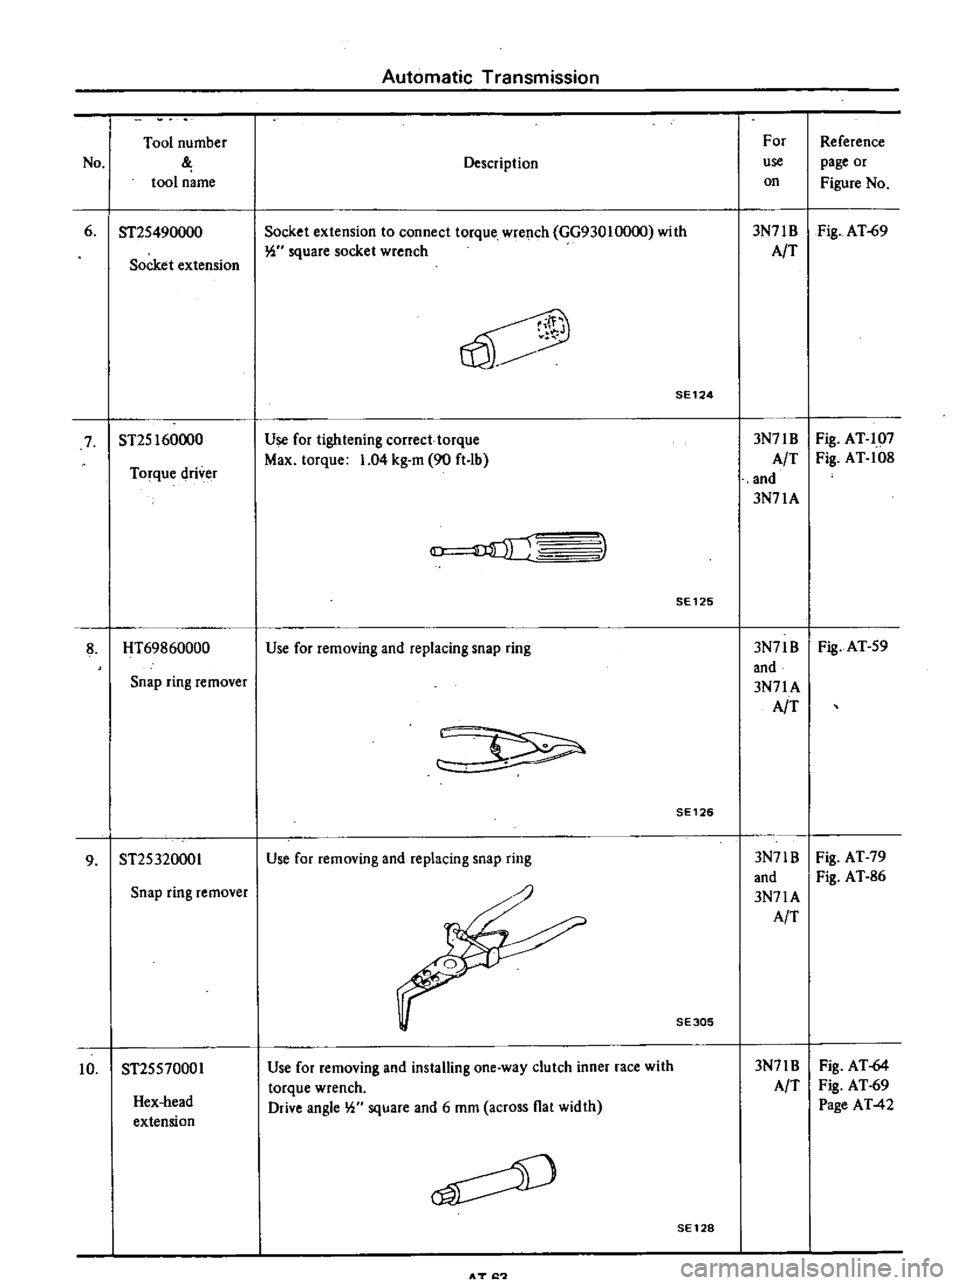
6
ST2S490000
Socket
extension
to
connect
torque
wrench
GG93010000
with
3N71B
Fig
AT
69
Socket
extension
W
square
socket
wrench
AIT
V
SE124
7
ST2S160000
Use
for
tightening
correct
torque
3N71B
Fig
AT
107
Torque
driver
Max
torque
1
04
kg
m
90
ft
lb
A
T
Fig
AT
108
and
3N71A
3
SE125
8
HT69860000
Use
for
removing
and
replacing
snap
ring
3N71B
Fig
AT
S9
and
Snap
ring
remover
3N71A
AIT
SE126
9
ST2S320001
Use
for
removing
and
replacing
snap
ring
3N71B
Fig
AT
79
and
Fig
AT
86
Snap
ring
remover
3N71A
AIT
SE305
Hex
head
extension
Use
for
removing
and
installing
one
way
clutch
inner
race
with
torque
wrench
Drive
angle
W
square
and
6
mOl
across
flat
width
3N71B
AIT
Fig
AT
64
Fig
AT
69
Page
AT
42
10
ST2SS70001
SE128
AT
I
Page 331 of 537
PROPELLER
SHAFT
DIFFERENTIAL
CARRIER
Watch
for
oil
leakage
from
trans
mission
end
Notes
a
Remove
propeller
shaft
carefully
so
as
not
to
damage
spline
sleeve
yoke
and
rear
oil
seal
b
Plug
up
the
opening
in
the
rear
of
rear
extension
housing
to
prevent
oil
from
flowing
out
To
install
reverse
the
foregoing
removal
procedure
1
Align
propeller
shaft
with
com
panion
flange
using
reference
marks
prescribed
in
removal
procedure
and
assemble
with
bolts
Tightening
torque
2
4
to
3
3
kg
m
17
to
24
ft
Ib
2
Insert
bolts
through
the
holes
of
center
beariug
bracket
and
torque
nuts
to
retain
center
bearing
on
cross
member
Tightening
torque
1
6
to
2
2
kg
m
12
to
16
ft
Ib
DISASSEMBLY
AND
ASSEMBLY
Primarily
do
not
disassemble
pro
peller
shaft
because
it
is
balanced
as
an
assembly
However
check
propeller
shaft
with
journal
for
movement
When
journal
does
not
move
smoothly
dis
assemble
1
Mark
propeller
shaft
and
journal
so
that
the
original
combination
can
be
restored
at
assembly
2
Remove
snap
ring
with
a
standard
screwdriver
3
Lightly
tap
base
of
yoke
with
a
hammer
and
withdraw
bearing
race
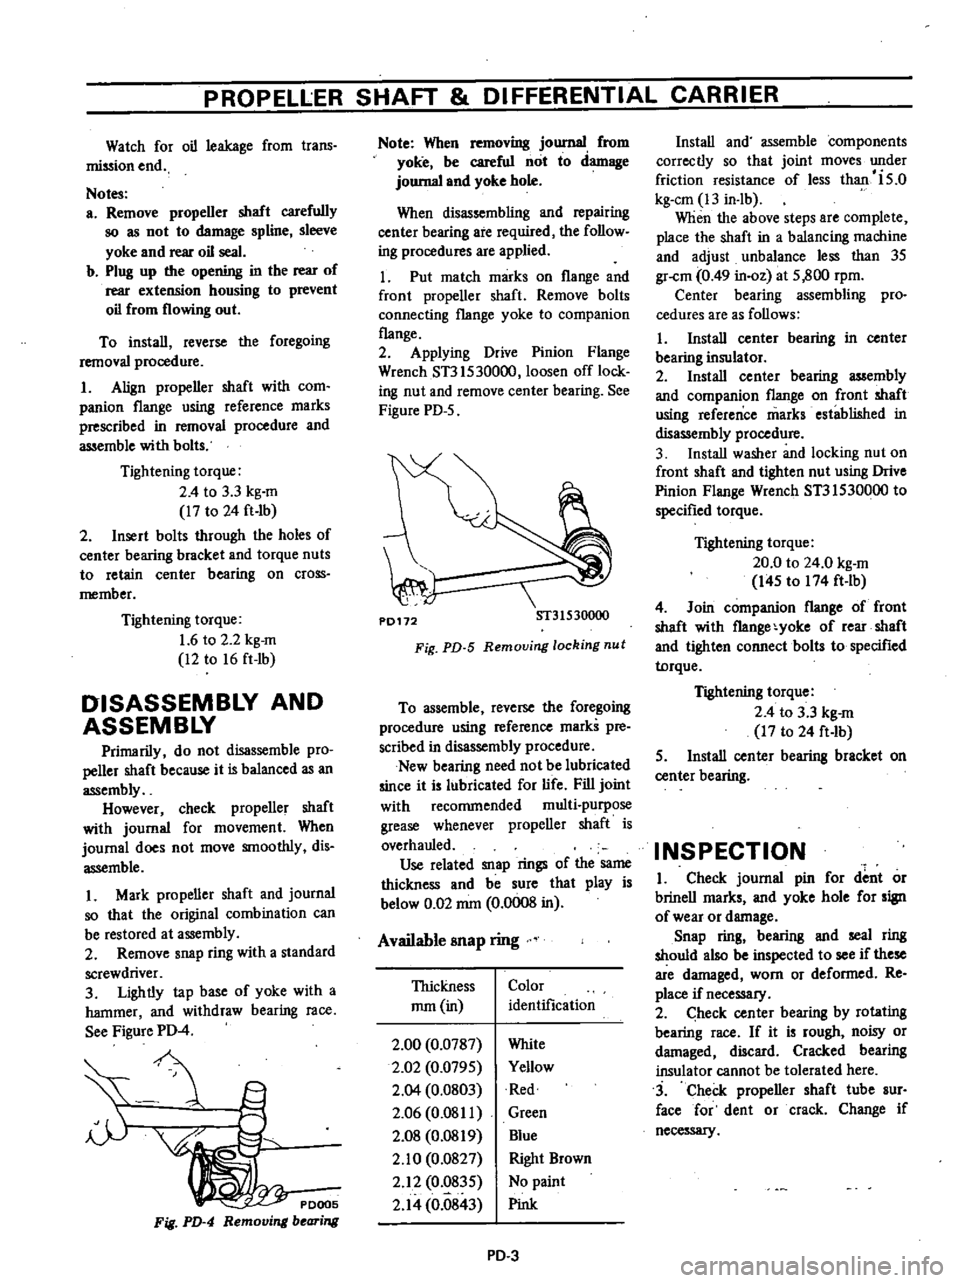
See
Figure
PD
4
PDOO5
Fig
PD
4
Remo
i
bearing
Note
When
removing
journal
from
yoke
be
careful
not
to
damage
journal
and
yoke
bole
When
disassembling
and
repairing
center
bearing
are
required
the
follow
ing
procedures
are
applied
1
Put
match
marks
on
flange
and
front
propeller
shaft
Remove
bolts
connecting
flange
yoke
to
companion
flange
2
Applying
Drive
Pinion
Flange
Wrench
ST3lS30000
loosen
off
lock
ing
nut
and
remove
center
bearing
See
Figure
PD
5
P0172
ST31530000
Fig
PD
5
Remouing
locking
nut
To
assemble
reverse
the
foregoing
procedure
using
reference
marks
pre
scribed
in
disassembly
procedure
New
bearing
need
not
be
lubricated
since
it
is
lubricated
for
life
Fill
joint
with
recommended
multi
purpose
grease
whenever
propeller
shaft
is
overhauled
Use
related
snap
rings
of
the
same
thickness
and
be
sure
that
play
is
below
0
02
mm
0
0008
in
Available
snap
ring
Thickness
mm
in
Color
identification
2
00
0
0787
2
02
0
079S
2
Q4
0
0803
2
06
0
08
II
2
08
0
0819
2
10
0
0827
2
12
0
83S
2
14
0
0843
White
Yellow
Red
Green
Blue
Right
Brown
No
paint
Pink
PD
3
Install
and
assemble
components
correctly
so
that
joint
moves
under
friction
resistance
of
less
than
is
o
kg
em
13
in
lb
When
the
above
steps
are
complete
place
the
shaft
in
a
balancing
machine
and
adjust
unbalance
less
than
3S
gr
cm
0
49
in
oz
at
S
800
rpm
Center
bearing
assembling
pro
cedures
are
as
follows
I
Install
center
bearing
in
center
bearing
insulator
2
Install
center
bearing
assembly
and
companion
flange
on
front
shaft
usiug
reference
marks
established
in
disassembly
procedure
3
Install
washer
and
locking
nut
on
front
shaft
and
tighten
nut
using
Drive
Pinion
Flange
Wrench
ST3IS30000
to
specified
torque
Tightening
torque
20
0
to
24
0
kg
m
I4S
to
174
ft
lb
4
Join
companion
flange
of
front
shaft
with
f1ange
yoke
of
rear
shaft
and
tighten
connect
bolts
to
specified
torque
Tightening
torque
2
4
to
3
3
kg
m
17
to
24
ft
Ib
S
Install
center
bearing
bracket
on
center
bearing
INSPECTION
I
Check
journal
pin
for
dent
or
brinell
marks
and
yoke
hole
for
sign
of
wear
or
damage
Snap
ring
bearing
and
seal
ring
should
also
be
inspected
to
see
if
these
are
damaged
worn
or
deformed
Re
place
if
necessary
2
heck
center
bearing
by
rotating
bearing
race
If
it
is
rough
noisy
or
damaged
discard
Cracked
bearing
insulator
cannot
be
tolerated
here
3
Check
propeller
shaft
tube
sur
face
for
dent
or
crack
Change
if
necessary
Page 332 of 537
PROPELLER
SHAFT
8l
DIFFERENTIALCAAR
ER
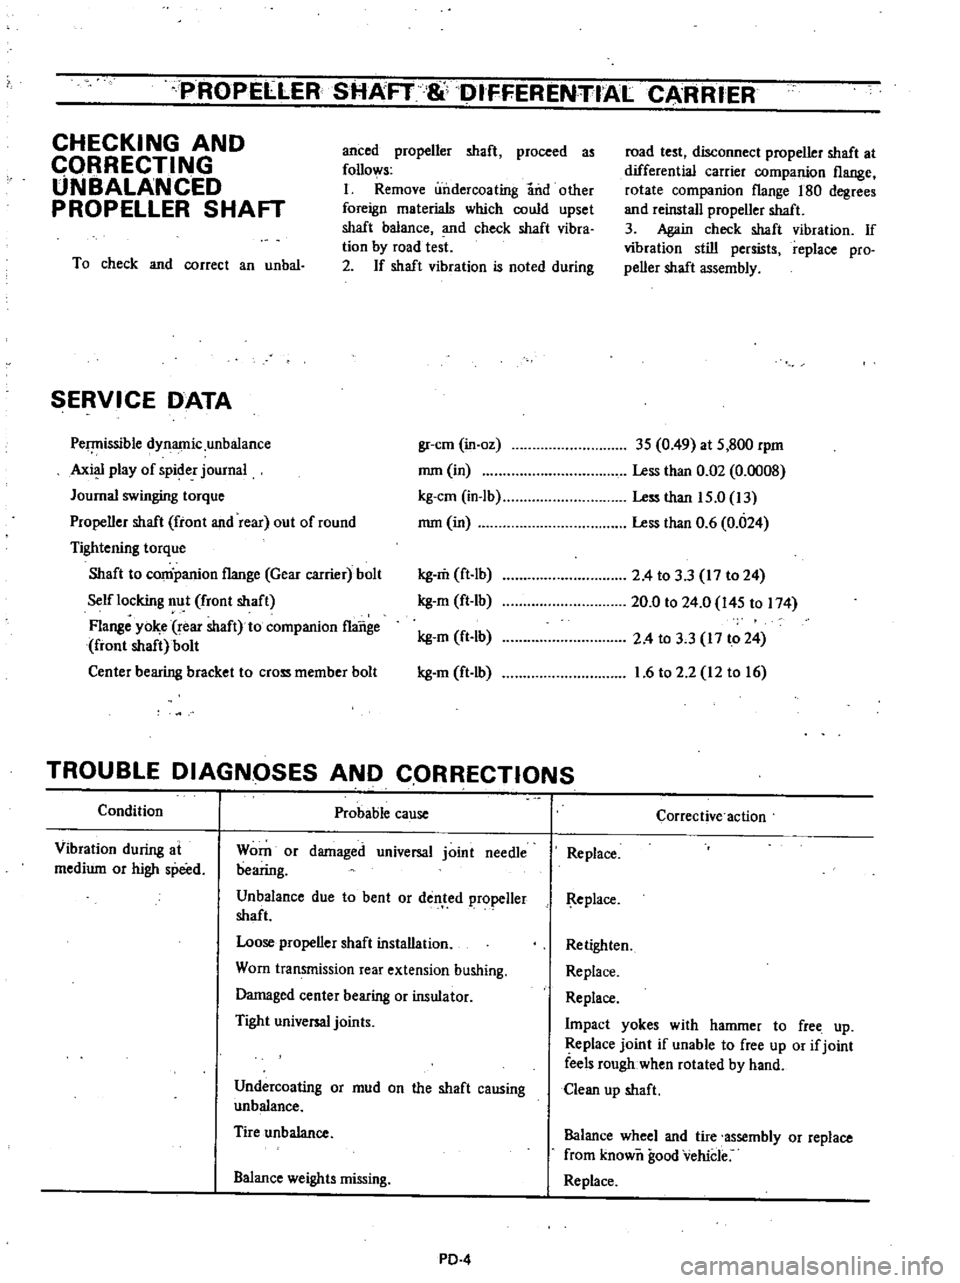
CHECKING
AND
CQRRECTING
UNBALANCED
PROPELLER
SHAFT
anced
propeller
shaft
proceed
as
follows
I
Remove
undercoating
and
other
foreign
materials
which
could
upset
shaft
balance
and
check
shaft
vibra
tion
by
road
test
2
If
shaft
vibration
is
noted
during
To
check
and
correct
an
unbal
SERVICE
DATA
Pe
issible
dynamic
unbalance
Axi
play
of
spider
journal
Journal
swinging
torque
Propeller
shaft
front
and
rear
out
of
round
Tightening
torque
Shaft
to
conipanion
flange
Gear
carrier
bolt
Self
locking
nut
front
shaft
Flange
yo
e
rear
shaft
to
companion
flange
front
shaft
bolt
Center
bearing
bracket
to
cross
member
bolt
road
test
disconnect
propeller
shaft
at
differential
carrier
companion
flange
rotate
companion
flange
180
degrees
and
reinstall
propeller
shaft
3
Again
check
shaft
vibration
If
vibration
still
persists
replace
pro
peller
shaft
assembly
gr
cm
in
oz
3S
0
49
at
S
800
rpm
mm
in
Less
than
0
02
0
0008
kg
em
in
Ib
Less
than
IS
O
13
mm
in
Less
than
0
6
0
024
kg
m
ft
lb
kg
m
ft
Ib
kg
m
ft
lb
kg
m
ft
lb
2
4
to
3
3
17
to
24
20
0
to
24
0
l4S
to
174
2
4
to
3
3
17
to
24
1
6
to
2
2
12
to
16
TROUBLE
DIAGNOSES
AND
CQRRECTIONS
Condition
Probable
cause
Vibration
during
at
medium
or
high
speed
Worn
or
damaged
universal
joint
needle
bearing
Unbalance
due
to
bent
or
dented
propeller
shaft
Loose
propeller
shaft
installation
Worn
transmission
rear
extension
bushing
Damaged
center
bearing
or
insulator
Tight
universal
joints
Undercoating
or
mud
on
the
shaft
causing
unbalance
Tire
unbalance
Balance
weights
missing
PD
4
Corrective
action
Replace
I
l
eplace
Retighten
Replace
Replace
Impact
yokes
with
hammer
to
free
up
Replace
joint
if
unable
to
free
up
or
if
joint
feels
rough
when
rotated
by
hand
Clean
up
shaft
Balance
wheel
and
tire
assembly
or
replace
from
known
good
vehicle
Replace
Page 334 of 537
PROPEllEff
SAAFT
8
DifFERENTIAL
CARRIER
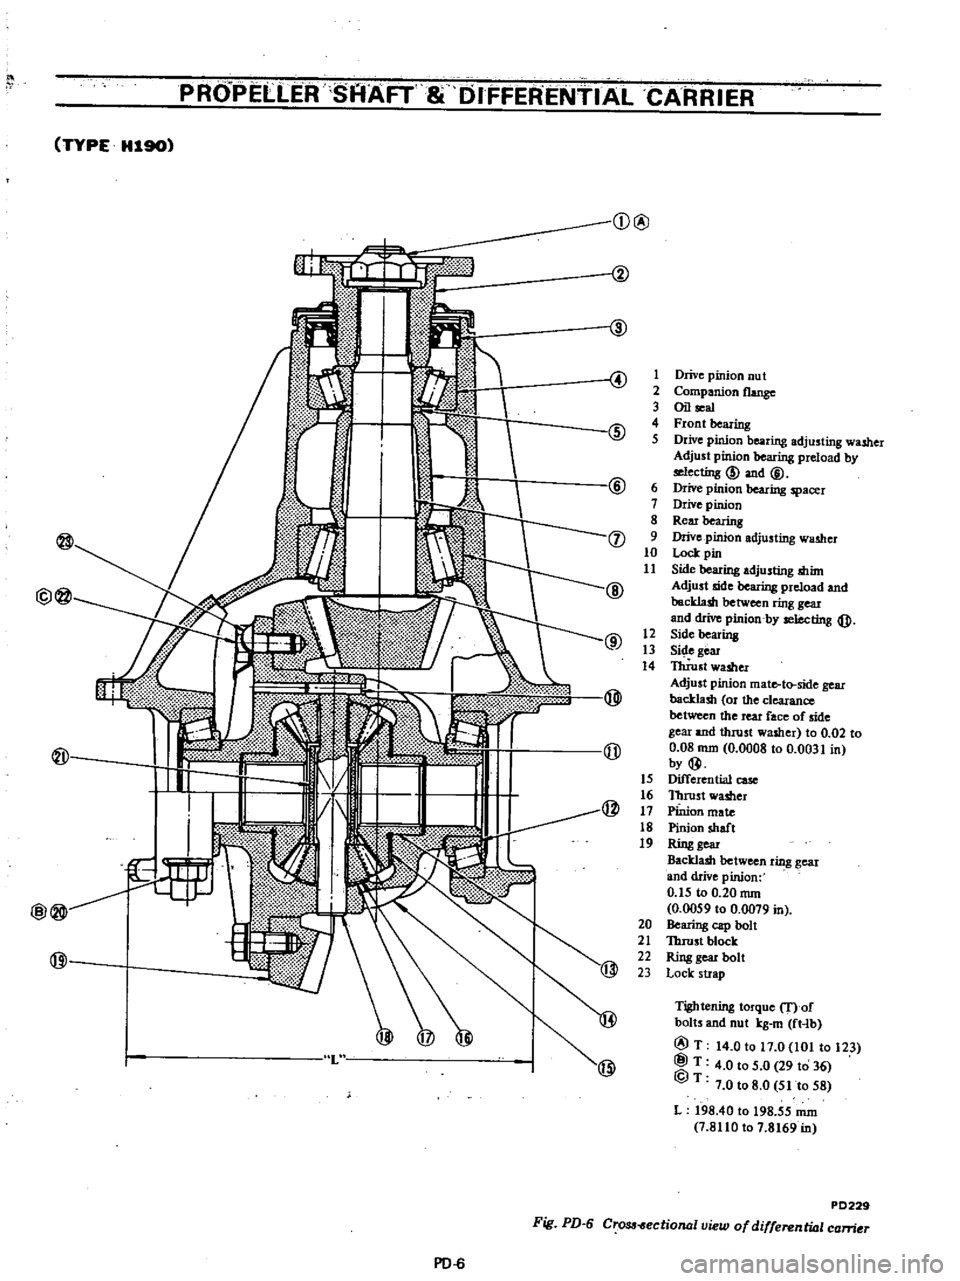
TYPE
H19O
Q
@
4
1
Drive
pinion
nu
t
2
Companion
flange
3
Oil
al
@
4
Front
bearing
5
DIive
pinion
bearing
adjusting
washer
Adjust
pinion
bearing
preload
by
@
ecting
@
and
@
6
Drive
pinion
beating
spacer
1
Drive
pinion
8
Rem
bearing
@
9
Drive
pinion
adjusting
wamer
10
loci
pin
11
Side
bearing
adjusting
mint
@
Adjust
side
bearing
preload
and
@@
backlash
betwam
ring
geu
and
cIrive
pinion
by
ting
@
@
12
Side
bearing
13
Side
gear
14
nUust
washer
Adjust
pinion
mate
to
side
gear
backlash
Of
the
clearance
between
the
teat
face
of
side
gear
and
ttuust
washer
to
0
02
to
@
0
08
nun
0
0008
10
0
0031
in
by@
15
Differential
cast
16
Thrust
washer
@
17
Pinion
mate
18
Pinion
sbaft
19
Ring
gear
Backlam
between
ring
gear
and
drive
pinion
0
t5
to
0
20
nun
0
0059
10
0
0079
in
20
Bearing
cap
boll
21
Thrust
block
22
Ring
gear
bolt
23
Lock
strap
Tightening
torque
f
of
@
bollS
and
nut
kg
m
ft
lb
@T
14
0
to
t7
0
101
to
123
L
@T
4
0
to
5
0
29
10
36
@T
7
0108
0
5110
58
L
198
4010
198
55
nun
1
8110107
8169
in
P0229
Fig
PD
6
cro
ectional
uiew
of
differenwl
carner
PD
6
Page 336 of 537
PROPElli
ER
SHAfT
DIFFERENTIAL
G
ARRIERf
Notes
a
PUller
should
be
handled
with
care
in
catchins
the
edge
of
bearing
inner
race
b
Be
careful
not
to
confuse
left
and
right
hand
parts
2
Remove
ring
gear
by
spreading
out
lock
strap
and
loosening
ring
gear
bolts
in
diagonally
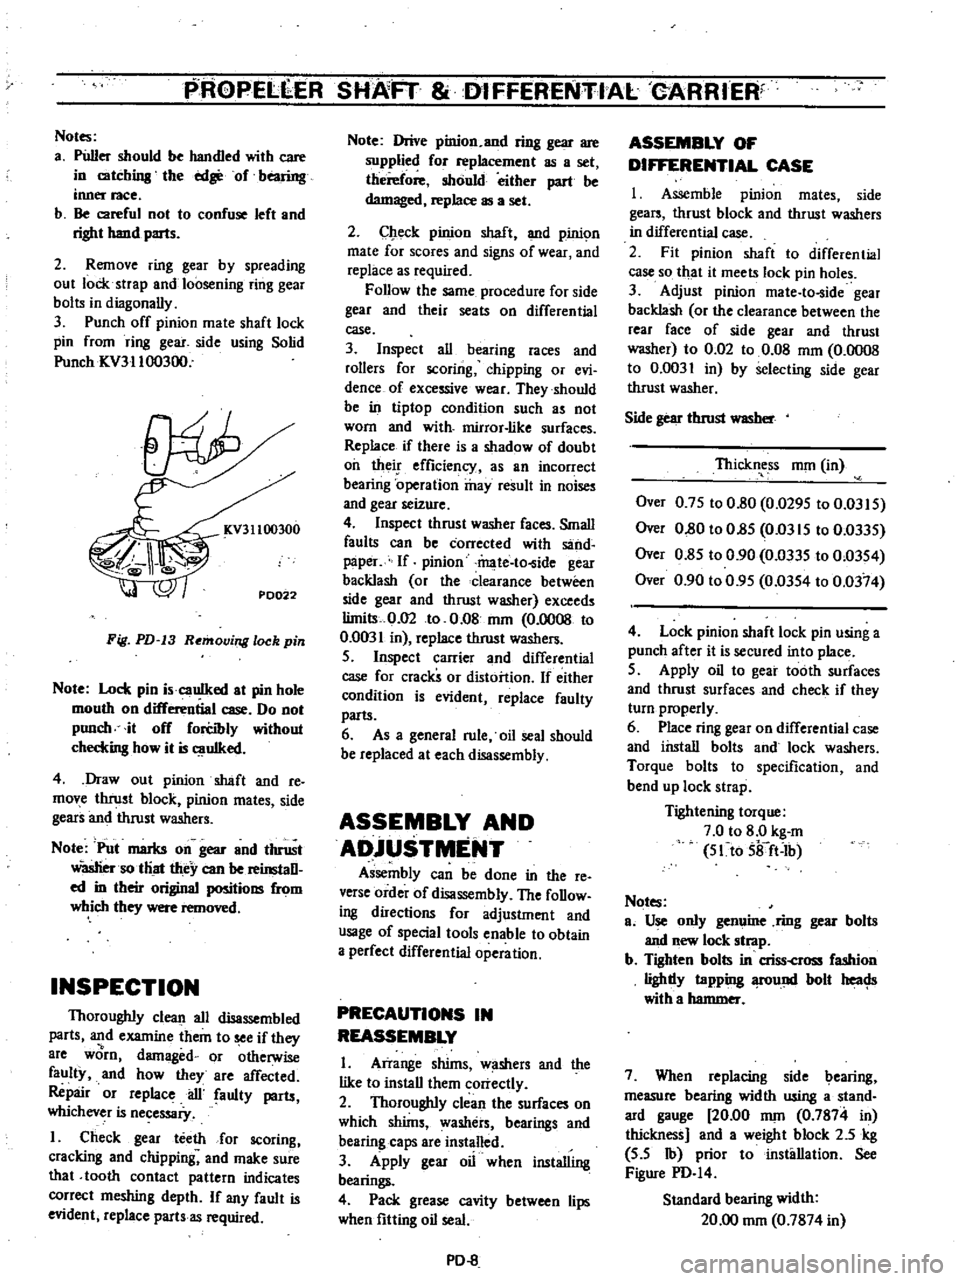
3
Punch
off
pinion
mate
shaft
lock
pin
from
ring
gear
side
using
Solid
Punch
ICV31100300
KV31100300
PD022
Fig
PD
13
Removing
lock
pin
Note
Lock
pin
i
cauIked
at
pin
hole
mouth
on
differential
case
Do
not
punch
it
off
forCibly
without
checkins
how
it
is
uIked
4
Draw
out
pinion
shaft
and
re
move
thrust
block
pinion
mates
side
gears
and
thrust
washers
Note
Put
marks
on
gear
and
thrust
Wasliersotliat
they
can
be
reinstaD
ed
in
their
original
positions
from
which
they
were
removed
INSPECTION
Thoroughly
clean
all
disassembled
parts
and
examine
them
to
see
if
they
8re
worn
damaged
or
otherwise
faulty
and
how
they
are
affected
Repair
or
replace
ail
faulty
parts
whichever
is
necessaiy
I
Check
gear
teeth
for
scoring
cracking
and
chipping
and
make
sure
that
tooth
contact
pattern
indicates
correct
meshing
depth
If
any
fault
is
evident
replace
parts
as
required
Note
Drive
pinion
and
ring
gear
are
supplied
for
replacement
as
a
set
therefore
should
either
part
be
damaged
replace
as
a
set
2
Check
pinion
shaft
and
pinic
m
mate
for
scores
and
signs
of
wear
and
replace
as
required
Follow
the
same
procedure
for
side
gear
and
their
seats
on
differential
case
3
Inspect
all
bearing
races
and
rollers
for
scoring
chipping
or
evi
dence
of
excessive
wear
They
should
be
in
tiptop
condition
such
as
not
worn
and
with
mirror
like
surfaces
Replace
if
there
is
a
shadow
of
doubt
oil
their
efficiency
as
an
incorrect
bearing
operation
may
result
in
noises
and
gear
seizure
4
Inspect
thrust
washer
faces
Small
faults
can
be
corrected
with
sand
paper
If
pinion
mate
to
ide
gear
backlash
or
the
clearance
between
side
gear
and
thrust
washer
exceeds
limits
0
02
to
0
08
nun
0
0008
to
0
0031
in
replace
thrust
washers
S
Inspect
carrier
and
differential
case
for
cracks
or
distortion
If
either
condition
is
evident
replace
faulty
parts
6
As
a
general
rule
oil
seal
should
be
replaced
at
each
disassembly
ASSEMBLY
AND
ADjUSTMENT
Assembly
can
be
done
in
the
reo
verse
order
of
disassembly
The
foDow
ing
directions
for
adjustment
and
usage
of
special
tools
enable
to
obtain
a
perfect
differential
operation
PRECAUTIONS
IN
REASSEMBLY
I
Arrange
shims
w
shers
and
the
like
to
install
them
correctly
2
Thoroughly
clean
the
surfaces
on
which
shims
washers
bearings
and
bearing
caps
are
installed
3
Apply
gear
oil
when
installing
bearings
4
Pack
grease
cavity
between
lips
when
fitting
oil
seal
PD
8
ASSEMBLY
OF
DIFFERENTIAL
CASE
I
Assemble
pinion
mates
side
gears
thrust
block
and
thrust
washers
in
differential
case
2
Fit
pinion
shaft
to
differential
case
so
that
it
meets
lock
pin
holes
3
Adjust
pinion
mate
to
ide
gear
backlash
or
the
clearance
between
the
rear
face
of
side
gear
and
thrust
washer
to
0
02
to
0
08
mOl
0
0008
to
0
0031
in
by
selecting
side
gear
thrust
washer
Side
gear
thrust
WlISber
Thickness
nun
in
Over
0
7S
to
0
80
0
029S
to
0
03IS
Over
0
80
to
O
8S
Om
IS
to
0
033S
Over
0
8S
to
0
90
0
033S
to
0
03S4
Over
0
90
to
0
9S
0
03S4
to
0
0374
4
Lock
pinion
shaft
lock
pin
using
a
punch
after
it
is
secured
into
place
S
Apply
oil
to
gear
tooth
surfaces
and
thrust
surfaces
and
check
if
they
turn
properly
6
Place
ring
gear
on
differential
case
and
install
bolts
and
lock
washers
Torque
bolts
to
specification
and
bend
up
lock
strap
Tightening
torque
7
0
to
8
0
kg
m
S1to
Sifft
Ib
Notes
ao
Use
only
genuine
ring
gear
bolts
and
new
lock
strap
b
Tighten
bolts
in
criss
cross
fashion
lighdy
tapping
fOund
bolt
heac
Js
with
a
hammer
7
When
replacing
side
bearing
measure
bearing
width
using
a
stand
ard
gauge
20
00
nun
0
7874
in
thickness
and
a
weight
block
2
5
kg
S
S
Ib
prior
to
installation
See
Figure
PD
I4
Standard
bearing
width
20
00
nun
0
7874
in
Page 338 of 537
PROPELLER
SHAFT
DIFFERENTIAL
CARRIER
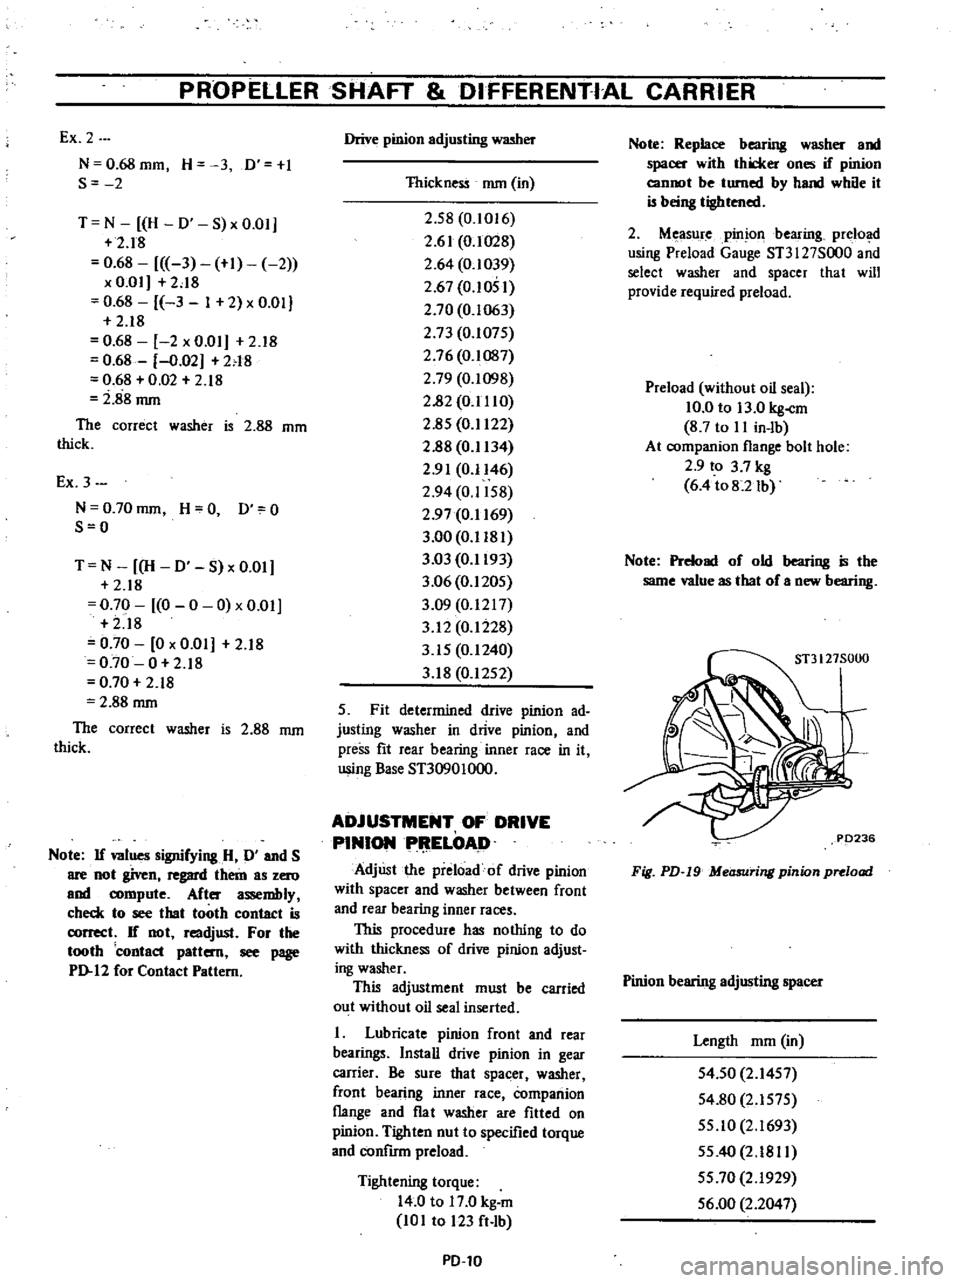
Ex
2
N
O
68mm
H
3
D
I
S
2
T
N
H
0
S
x
0
01
2
18
0
68
3
1
2
x
Om
2
18
0
68
3
1
2
x
0
01
2
18
0
68
2
x
0
01
2
18
0
68
0
02
N8
0
68
0
02
2
18
i
88
mm
The
correct
washer
is
2
88
mm
thick
Ex
3
N
0
70mm
H
O
0
0
S
O
T
N
H
0
S
x
0
01
2
18
0
70
0
0
0
x
0
01
2
18
0
70
0
x
0
01
2
18
0
70
0
2
18
0
70
2
18
2
88
mm
The
correct
washer
is
2
88
mm
thick
Note
If
lues
signifying
H
D
and
S
are
not
given
regard
them
as
zero
and
n
C
r
e
After
assembly
check
to
see
that
tooth
contact
is
correct
If
not
readjust
For
the
tooth
contact
pattern
see
page
PJ
12
for
Contact
Pattern
Drive
pinion
adjusting
washer
Thickness
mm
in
2
58
0
1016
2
61
0
1028
2
64
0
1039
2
67
0
1051
2
70
0
1063
2
73
0
107S
2
76
0
1087
2
79
0
1098
2
82
0
1110
2
85
OJ
122
2
88
OJ
134
2
91
0
1146
2
94
0
1IS8
2
97
0
1169
3
00
0
1181
3
03
0
1
193
3
06
0
1205
3
09
0
1217
3
12
0
1228
3
IS
0
1240
3
18
0
I2S2
S
Fit
determined
drive
pinion
ad
justing
washer
in
drive
pinion
and
preSs
fit
rear
bearing
inner
race
in
it
using
Base
ST30901000
ADJUSTMENT
OF
DRIVE
PINIONPI
IELOAD
AdjUst
the
preload
of
drive
pinion
with
spacer
and
washer
between
front
and
rear
bearing
inner
races
This
procedure
has
nothing
to
do
with
thickness
of
drive
pinion
adjust
ing
washer
This
adjustment
must
be
carried
out
without
oil
seal
inserted
I
Lubricate
pinion
front
and
rear
bearings
Install
drive
pinion
in
gear
carrier
Be
sure
that
spacer
t
washer
front
bearing
inner
race
Companion
flange
and
flat
washer
are
fitted
on
pinion
Tighten
nut
to
specified
torque
and
confum
preload
Tightening
torque
14
0
to
17
0
kg
m
101
to
123
ft
lb
PD
l0
Note
Replace
bearing
washer
and
spacer
with
thicker
ones
if
pinion
cannot
be
turned
by
hand
while
it
is
heing
tightened
2
Measure
pinion
bearing
prelo
d
using
Preload
Gauge
ST3I
27S000
and
select
washer
and
spacer
that
will
provide
required
preload
Preload
without
oil
seal
10
0
to
13
0
kg
cm
8
7
to
II
in
lb
At
companion
flange
bolt
hole
2
9
to
3
7
kg
6
4
to8
2Ib
Note
Preload
of
old
bearing
is
the
same
value
as
that
of
a
new
bearing
Fig
PD
19
Measuring
pinion
preload
Pinion
bearing
adjusting
spacer
Length
mOl
in
S4
50
2
14S7
S4
80
2
IS7S
SS
IO
2
1693
5S
40
2
1811
SS
70
2
1929
S6
00
2
2047
Page 339 of 537
PROPELLER
SHAFT
DIFFERENTIAL
CARRIER
Drive
pinion
bearing
adjusting
washer
Thickness
mm
in
over
3
80
to
3
82
0
1496
to
O
lS04
over
3
82
to
3
84
O
lS04
to
0
ISI2
over
3
84
to
3
86
O
lSI2
to
0
IS20
over
3
86
to
3
88
O
lS20
to
O
IS28
over
3
88
to
3
90
O
lS28
to
0
IS3S
over
3
90
to
3
92
0
IS3S
to
O
IS43
over
3
92
to
3
94
0
IS43
to
O
lSS
I
over
3
94
to
3
96
O
lSSI
to
O
lS59
over
3
96
to
3
98
O
lSS9
to
0
IS67
over
3
98
to
4
00
O
lS67
to
O
lS7S
over
4
00
to
4
02
0
S7S
to
O
lS83
over
4
02
to
4
04
O
lS83
to
0
IS91
over
4
04
to
4
06
O
lS9I
to
0
IS98
over
4
06
to
4
08
O
lS98
to
0
1606
over
4
08
to
4
10
0
1606
to
0
1614
3
Check
and
adjust
tooth
contact
pattern
when
former
adjustment
of
bearing
preload
is
completed
Unless
anything
wrong
is
found
remove
drive
pinion
nut
and
companion
flange
and
press
n
oil
seal
into
gear
carrier
using
Oil
Seal
Fitting
Tool
KV38I02SS0
Apply
grease
cavity
be
tween
seal
lips
4
Again
install
companion
flange
and
washer
and
tighteh
nut
to
speci
fied
torque
14
0
to
17
0
kg
m
IO
to
123
ft
lb
S
Measure
preload
again
Preload
with
oil
seal
I
1
0
to
14
0
kg
cm
9
S
to
12
in
lb
At
companion
flange
bolt
hole
3
1
to
4
0
kg
6
8
to
8
81b
ADJUSTMENT
OF
SIDE
BEARING
SHIMS
I
If
hypoid
gear
set
carrier
dif
ferential
case
or
side
bearing
has
been
replaced
with
new
one
adjust
the
side
bearing
preload
with
adjusting
shim
The
required
thickness
of
adjusting
shim
can
be
calculated
by
the
follow
ing
formulas
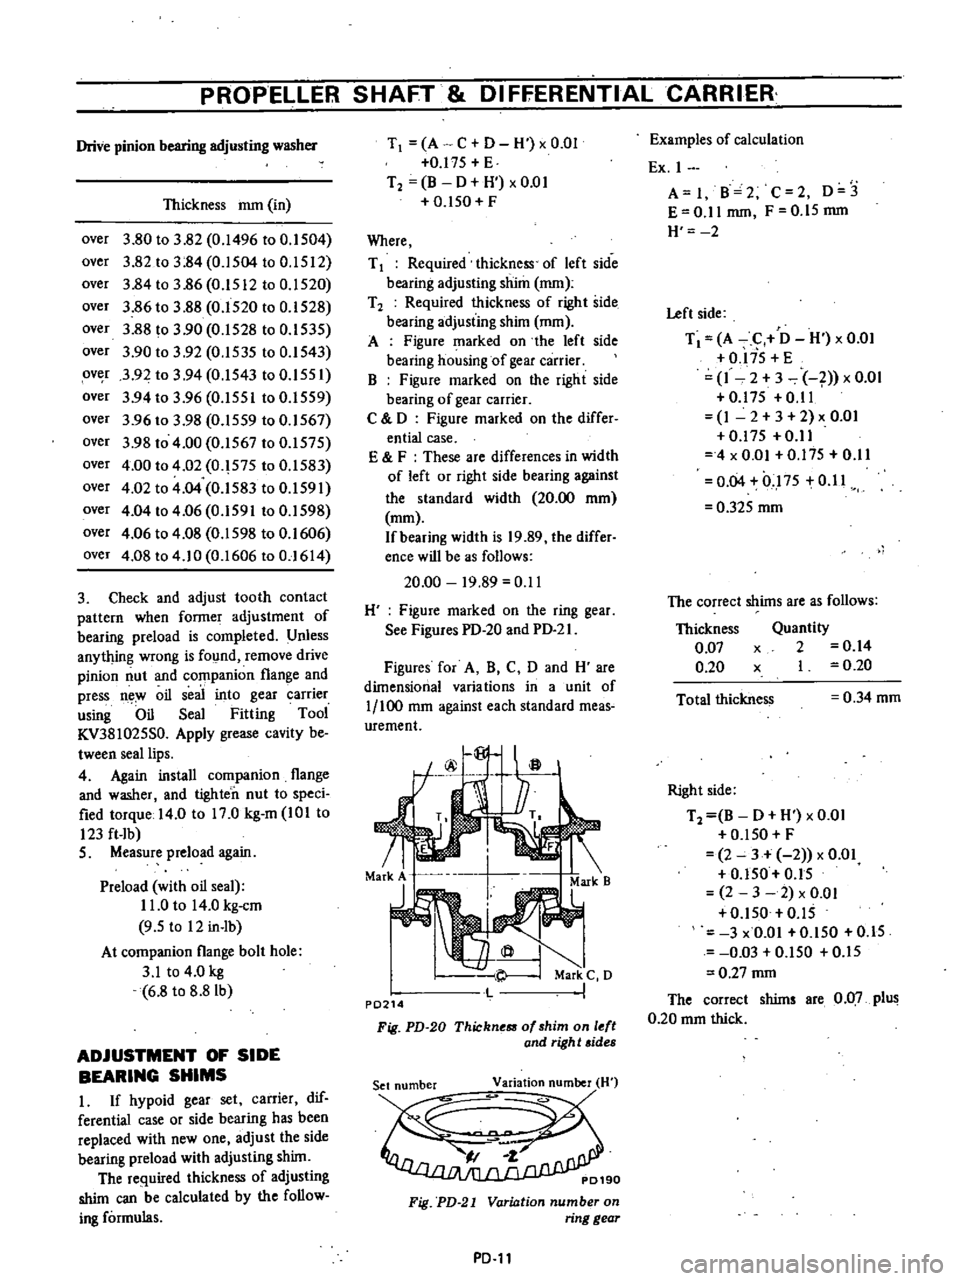
T
A
C
D
H
xO
OI
O
l7S
E
T2
B
D
H
xO
OI
O
ISO
F
Where
T
1
Required
thickness
of
left
side
bearing
adjusting
shim
mm
T
2
Required
thickness
of
right
side
bearing
adjusting
shim
mm
A
Figure
marked
on
the
left
side
bearing
housing
of
gear
carrier
B
Figure
marked
on
the
right
side
bearing
of
gear
carrier
C
0
Figure
marked
on
the
differ
entia
case
E
F
These
are
differences
in
width
of
left
or
right
side
bearing
against
the
standard
width
20
00
mOl
mOl
If
bearing
width
is
19
89
the
differ
ence
will
be
as
follows
20
00
19
89
0
11
H
Figure
marked
on
the
ring
gear
See
Figures
PD
20
and
PD
2
I
Figures
for
A
B
C
0
and
H
are
dimensional
varia
tions
in
a
unit
of
1
100
mm
against
each
standard
meas
urement
f
@
a
rj
71
Markj
Mark
B
Mark
C
0
P0214
Fig
PD
20
Thickn
of
shim
on
l
ft
and
righ
t
sides
Fig
PD
21
Variation
number
on
ring
gear
PD
ll
Examples
of
calculation
Ex
I
A
I
B
2
C
2
0
3
E
0
11
mm
F
O
IS
mm
H
2
Left
side
T
A
C
0
H
x
0
01
O
liS
E
1
2
3
1
x
0
01
0
17S
0
11
1
2
3
2
x
O
O
O
l7S
0
11
4
x
0
01
0
175
0
11
0
04
0
1
7S
0
11
0
32S
mOl
The
correct
shims
are
as
follows
Thickness
0
07
0
20
Quantity
x
2
0
14
x
I
0
20
Total
thickness
0
34
mOl
Right
side
T2
B
0
H
x
0
01
O
lSO
F
2
3
2
x
0
01
O
ISO
0
15
2
3
2
x
0
01
O
ISO
0
15
3
x
O
OI
O
ISO
O
IS
0
03
O
lSO
O
lS
0
27
mm
The
correct
shims
are
0
07
plus
0
20
mm
thick
Page 340 of 537
PROPELLER
SHAFf
DIFFERENTIAL
CARR
IER
Ex
2
A
0
B
3
C
I
0
0
E
0
20
mOl
F
0
17
mOl
H
2
Left
side
T
I
A
C
D
H
x
om
0
17S
E
0
I
0
2
x
0
01
0
I7S
0
20
0
I
0
2
x
0
01
0
17S
0
20
3
Om
0
17S
0
20
0
03
0
17S
0
20
O
34S
mrn
The
correct
shinjs
are
O
OS
plus
0
10
plus
0
20
mrn
thick
Right
side
T2
B
D
H
xO
0l
O
ISO
F
3
0
2
x
om
O
ISO
0
17
3
0
2
x
om
0
150
0
17
S
x
0
01
0
ISO
0
I7
O
OS
0
1S0
0
17
0
37
mrn
The
correct
shims
are
0
07
plus
0
1
0
plus
0
20
mm
thick
Note
If
w1ues
signifying
A
B
C
0
and
H
are
not
given
regard
them
as
zero
and
compute
Aft
assembly
check
to
see
that
preload
and
backlash
are
correct
If
not
readjust
Side
bearing
adjusting
shim
Thickness
mm
in
O
OS
0
0020
0
07
0
0028
0
1
0
0
0039
0
20
0
0079
0
50
0
0197
2
Fit
determined
side
bearing
adjusting
shim
on
differential
case
and
press
fit
left
and
right
side
bearing
inner
races
on
it
using
Side
Bearing
Drift
ST33230000
and
Adapter
ST33061000
3
Install
differential
case
assembly
into
gear
carrie
tapping
with
a
rubber
mallet
4
Align
mark
on
bearing
cap
with
that
on
gear
carrier
and
install
bearing
cap
on
carrier
And
tight
n
bolts
to
specified
torque
Tightening
torque
4
0
to
S
O
kg
m
29
to
36
fHb
S
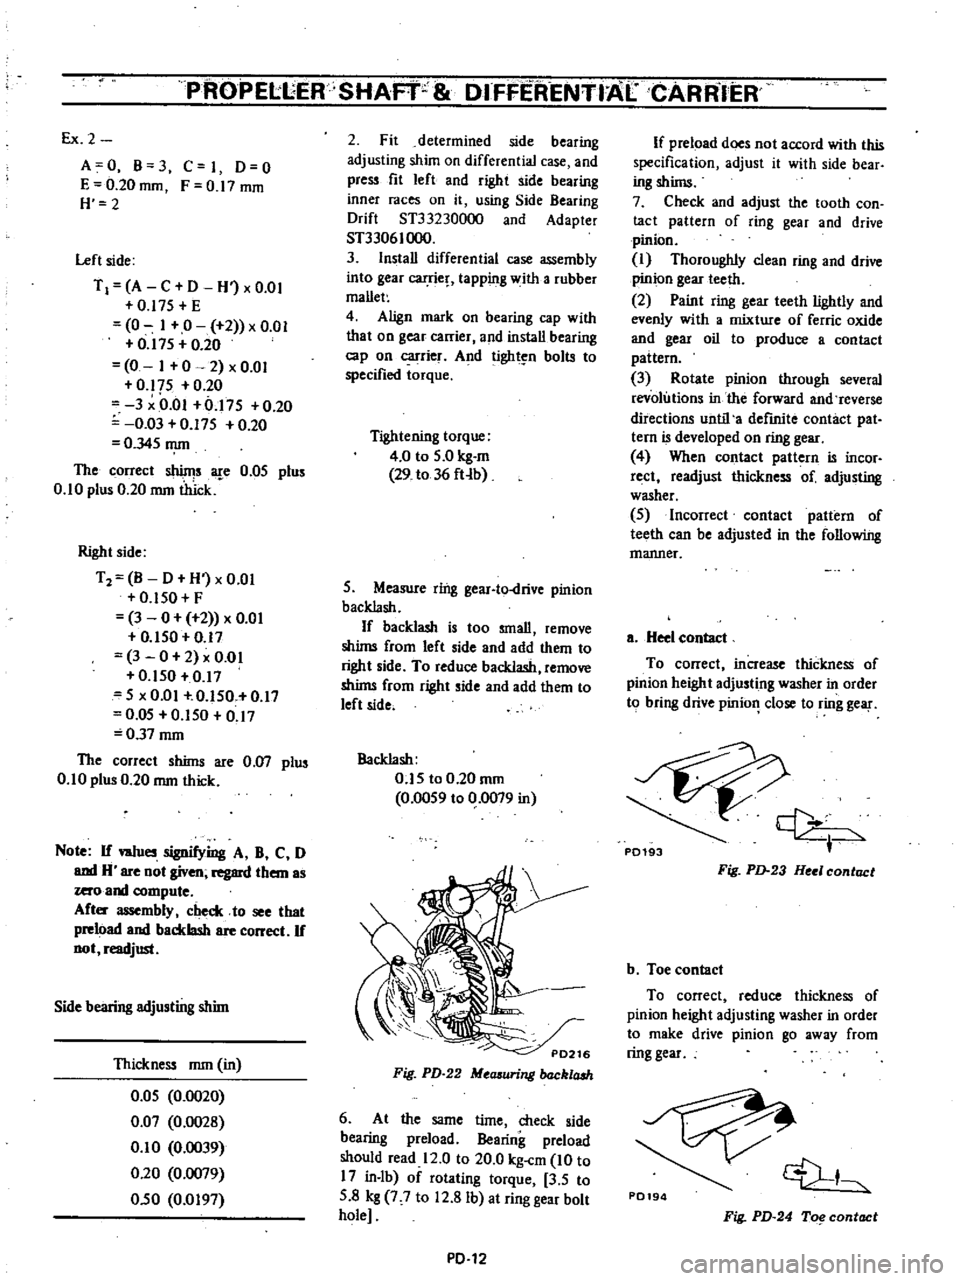
Measure
ring
gear
to
drive
pinion
backlash
If
backlash
is
too
small
remove
shims
from
left
side
and
add
them
to
right
side
To
reduce
backlash
remove
shims
from
right
side
and
add
them
to
left
side
Backlash
O
1S
to
0
20
mrn
0
00S9
to
0
0079
in
Fig
PD
22
Mccuuring
back1aah
6
At
the
same
time
check
side
bearing
preload
Bearing
preload
should
read
12
0
to
20
0
kg
cm
10
to
17
in
lb
of
rotating
torque
3
S
to
S
8
kg
7
7
to
12
8
Ib
at
ring
gear
bolt
hole
PD
12
If
preload
does
not
accord
with
this
specification
adjust
it
with
side
bear
ing
shims
7
Check
and
adjust
the
tooth
con
tact
pattern
of
ring
gear
and
drive
pinion
I
Thoroughly
clean
ring
and
drive
pinion
gear
teeth
2
Paint
ring
gear
teeth
lightly
and
evenly
with
a
mixture
of
ferric
oxide
and
gear
oil
to
produce
a
contact
pattern
3
Rotate
pinion
through
several
revolutions
in
the
forward
and
reverse
directions
until
a
defmite
contact
pat
tern
is
developed
on
ring
gear
4
When
contact
pattern
is
incor
rect
readjust
thickness
of
adjusting
washer
S
Incorrect
contact
pattern
of
teeth
can
be
adjusted
in
the
following
manner
a
Heel
contact
To
correct
increase
thickness
of
pinion
height
adjusting
washer
in
order
to
bring
drive
pinio
close
to
ring
gear
P0193
Fig
PD
23
Hul
contact
b
Toe
contact
To
correct
reduce
thickness
of
pinion
height
adjusting
washer
in
order
to
make
drive
pinion
go
away
from
ring
gear
P0194
1
Fig
PD
24
To
contact