DODGE NEON 1999 Service Repair Manual
Manufacturer: DODGE, Model Year: 1999, Model line: NEON, Model: DODGE NEON 1999Pages: 1200, PDF Size: 35.29 MB
Page 231 of 1200
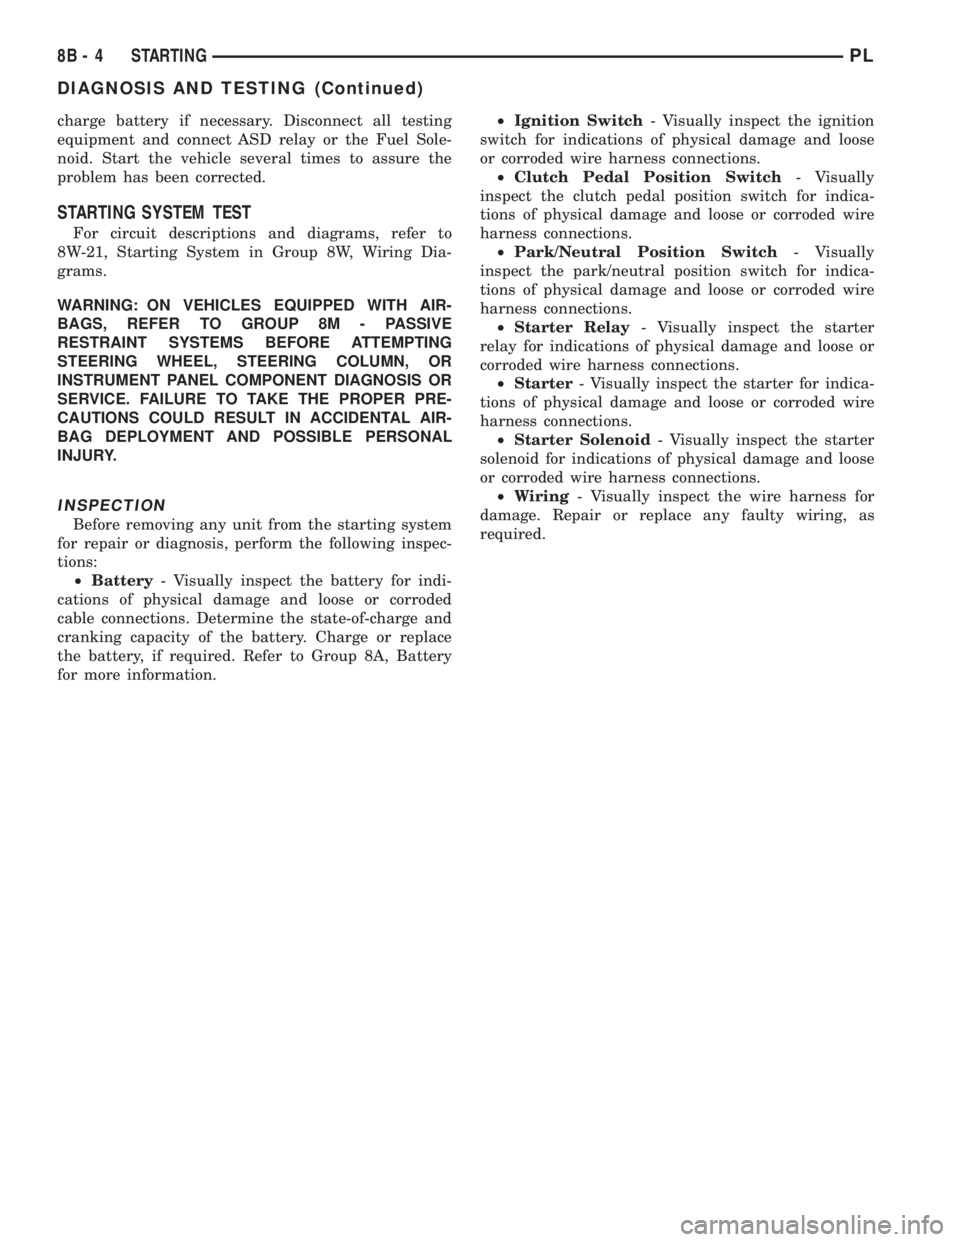
charge battery if necessary. Disconnect all testing
equipment and connect ASD relay or the Fuel Sole-
noid. Start the vehicle several times to assure the
problem has been corrected.
STARTING SYSTEM TEST
For circuit descriptions and diagrams, refer to
8W-21, Starting System in Group 8W, Wiring Dia-
grams.
WARNING: ON VEHICLES EQUIPPED WITH AIR-
BAGS, REFER TO GROUP 8M - PASSIVE
RESTRAINT SYSTEMS BEFORE ATTEMPTING
STEERING WHEEL, STEERING COLUMN, OR
INSTRUMENT PANEL COMPONENT DIAGNOSIS OR
SERVICE. FAILURE TO TAKE THE PROPER PRE-
CAUTIONS COULD RESULT IN ACCIDENTAL AIR-
BAG DEPLOYMENT AND POSSIBLE PERSONAL
INJURY.
INSPECTION
Before removing any unit from the starting system
for repair or diagnosis, perform the following inspec-
tions:
²Battery- Visually inspect the battery for indi-
cations of physical damage and loose or corroded
cable connections. Determine the state-of-charge and
cranking capacity of the battery. Charge or replace
the battery, if required. Refer to Group 8A, Battery
for more information.²Ignition Switch- Visually inspect the ignition
switch for indications of physical damage and loose
or corroded wire harness connections.
²Clutch Pedal Position Switch- Visually
inspect the clutch pedal position switch for indica-
tions of physical damage and loose or corroded wire
harness connections.
²Park/Neutral Position Switch- Visually
inspect the park/neutral position switch for indica-
tions of physical damage and loose or corroded wire
harness connections.
²Starter Relay- Visually inspect the starter
relay for indications of physical damage and loose or
corroded wire harness connections.
²Starter- Visually inspect the starter for indica-
tions of physical damage and loose or corroded wire
harness connections.
²Starter Solenoid- Visually inspect the starter
solenoid for indications of physical damage and loose
or corroded wire harness connections.
²Wiring- Visually inspect the wire harness for
damage. Repair or replace any faulty wiring, as
required.
8B - 4 STARTINGPL
DIAGNOSIS AND TESTING (Continued)
Page 232 of 1200
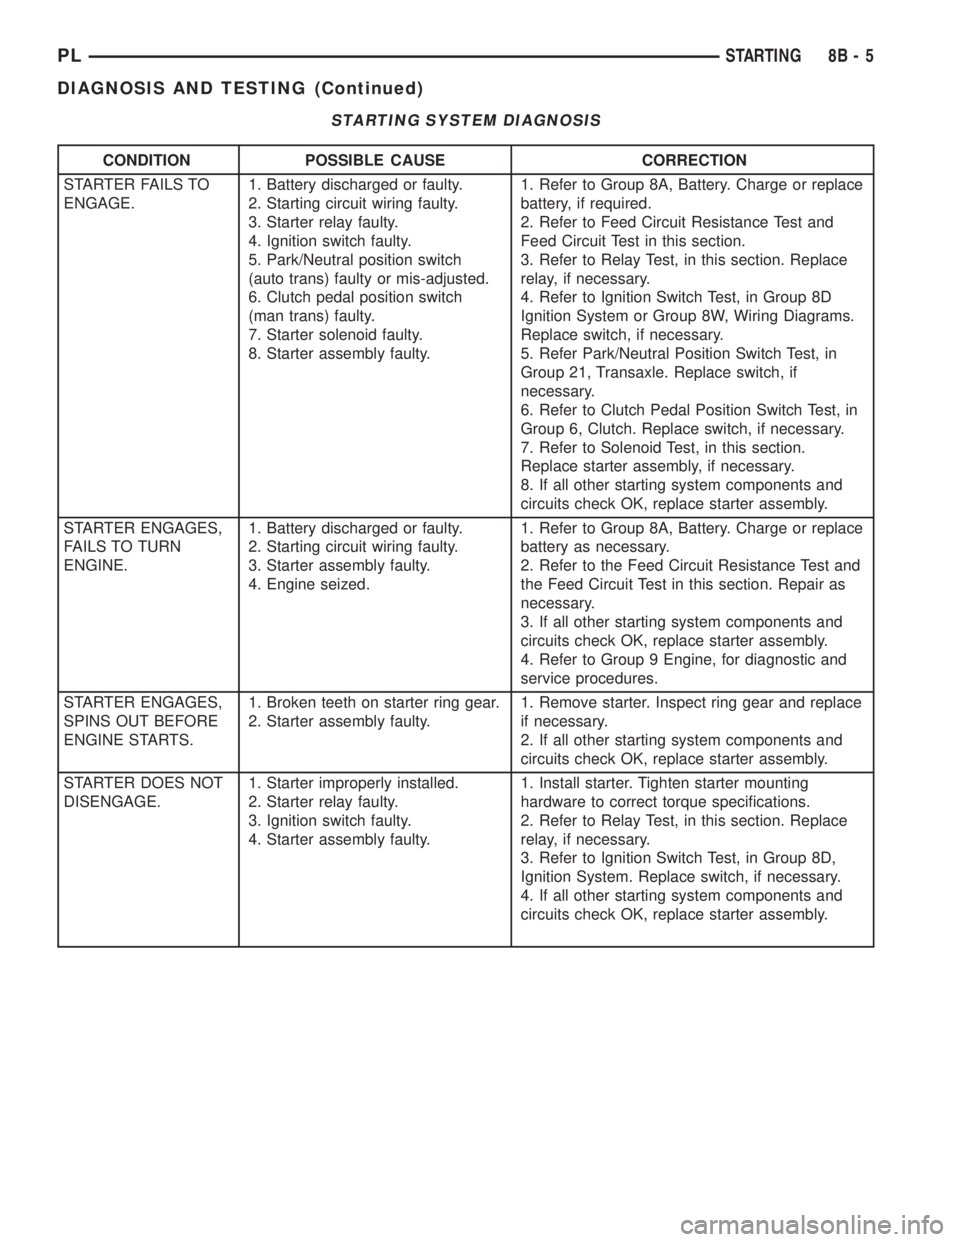
STARTING SYSTEM DIAGNOSIS
CONDITION POSSIBLE CAUSE CORRECTION
STARTER FAILS TO
ENGAGE.1. Battery discharged or faulty.
2. Starting circuit wiring faulty.
3. Starter relay faulty.
4. Ignition switch faulty.
5. Park/Neutral position switch
(auto trans) faulty or mis-adjusted.
6. Clutch pedal position switch
(man trans) faulty.
7. Starter solenoid faulty.
8. Starter assembly faulty.1. Refer to Group 8A, Battery. Charge or replace
battery, if required.
2. Refer to Feed Circuit Resistance Test and
Feed Circuit Test in this section.
3. Refer to Relay Test, in this section. Replace
relay, if necessary.
4. Refer to Ignition Switch Test, in Group 8D
Ignition System or Group 8W, Wiring Diagrams.
Replace switch, if necessary.
5. Refer Park/Neutral Position Switch Test, in
Group 21, Transaxle. Replace switch, if
necessary.
6. Refer to Clutch Pedal Position Switch Test, in
Group 6, Clutch. Replace switch, if necessary.
7. Refer to Solenoid Test, in this section.
Replace starter assembly, if necessary.
8. If all other starting system components and
circuits check OK, replace starter assembly.
STARTER ENGAGES,
FAILS TO TURN
ENGINE.1. Battery discharged or faulty.
2. Starting circuit wiring faulty.
3. Starter assembly faulty.
4. Engine seized.1. Refer to Group 8A, Battery. Charge or replace
battery as necessary.
2. Refer to the Feed Circuit Resistance Test and
the Feed Circuit Test in this section. Repair as
necessary.
3. If all other starting system components and
circuits check OK, replace starter assembly.
4. Refer to Group 9 Engine, for diagnostic and
service procedures.
STARTER ENGAGES,
SPINS OUT BEFORE
ENGINE STARTS.1. Broken teeth on starter ring gear.
2. Starter assembly faulty.1. Remove starter. Inspect ring gear and replace
if necessary.
2. If all other starting system components and
circuits check OK, replace starter assembly.
STARTER DOES NOT
DISENGAGE.1. Starter improperly installed.
2. Starter relay faulty.
3. Ignition switch faulty.
4. Starter assembly faulty.1. Install starter. Tighten starter mounting
hardware to correct torque specifications.
2. Refer to Relay Test, in this section. Replace
relay, if necessary.
3. Refer to Ignition Switch Test, in Group 8D,
Ignition System. Replace switch, if necessary.
4. If all other starting system components and
circuits check OK, replace starter assembly.
PLSTARTING 8B - 5
DIAGNOSIS AND TESTING (Continued)
Page 233 of 1200
REMOVAL AND INSTALLATION
SAFETY SWITCHES
For Removal and Installation of the:
²Clutch Position Switch, refer to Group 6, Clutch.
²Park/Neutral Switch, refer to Group 21, Tran-
saxle.
STARTER
REMOVAL
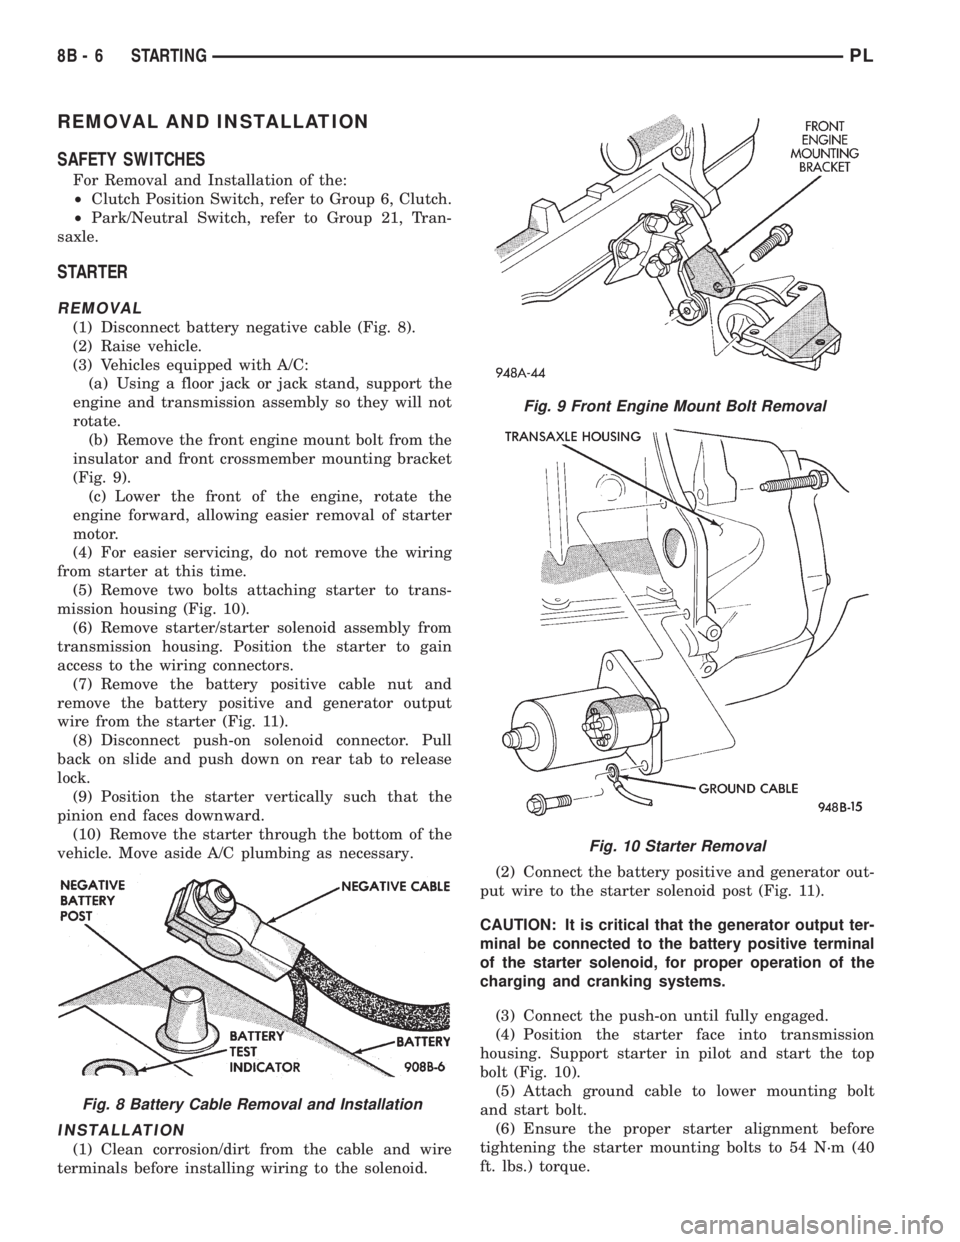
(1) Disconnect battery negative cable (Fig. 8).
(2) Raise vehicle.
(3) Vehicles equipped with A/C:
(a) Using a floor jack or jack stand, support the
engine and transmission assembly so they will not
rotate.
(b) Remove the front engine mount bolt from the
insulator and front crossmember mounting bracket
(Fig. 9).
(c) Lower the front of the engine, rotate the
engine forward, allowing easier removal of starter
motor.
(4) For easier servicing, do not remove the wiring
from starter at this time.
(5) Remove two bolts attaching starter to trans-
mission housing (Fig. 10).
(6) Remove starter/starter solenoid assembly from
transmission housing. Position the starter to gain
access to the wiring connectors.
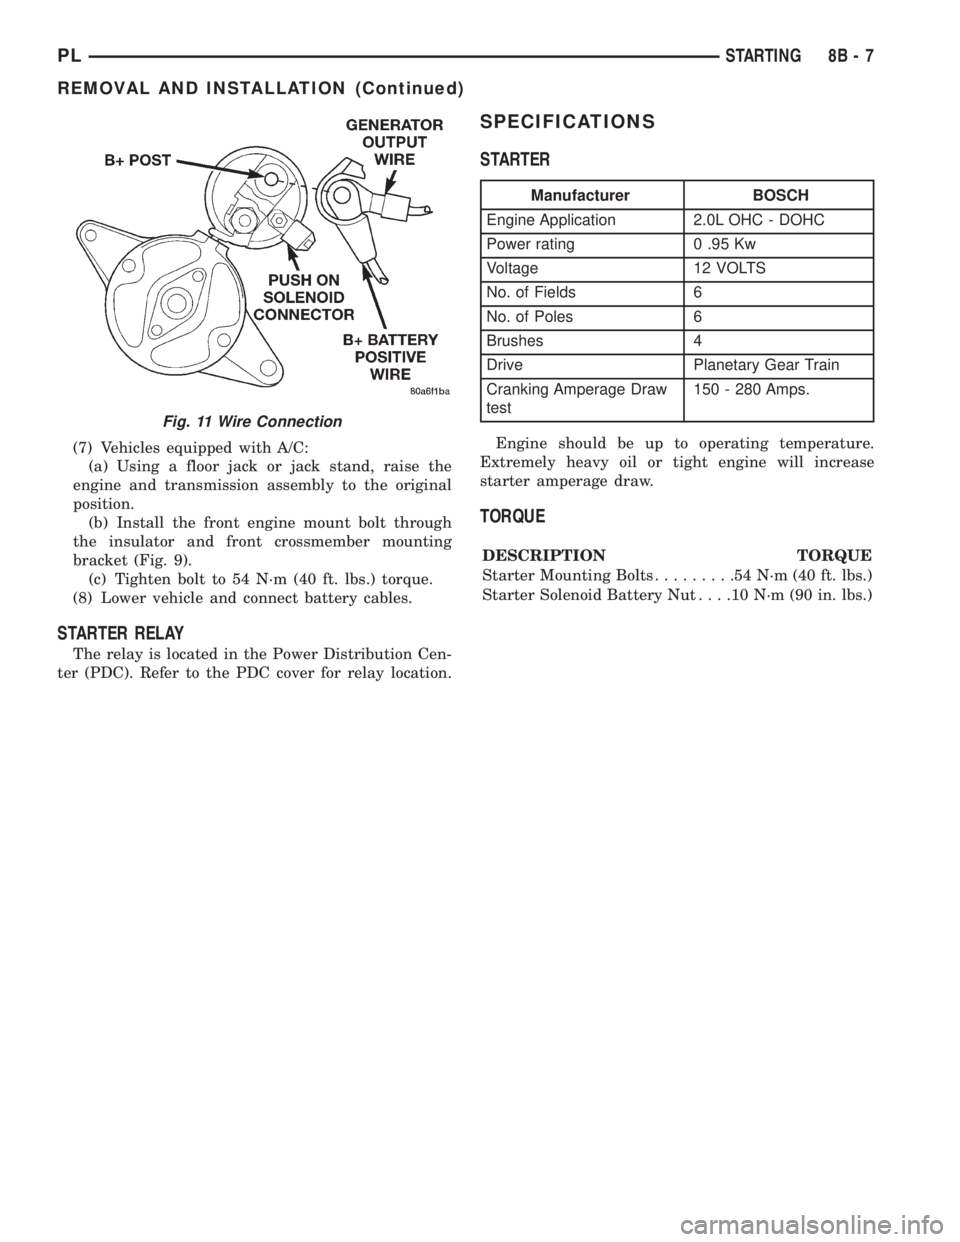
(7) Remove the battery positive cable nut and
remove the battery positive and generator output
wire from the starter (Fig. 11).
(8) Disconnect push-on solenoid connector. Pull
back on slide and push down on rear tab to release
lock.
(9) Position the starter vertically such that the
pinion end faces downward.
(10) Remove the starter through the bottom of the
vehicle. Move aside A/C plumbing as necessary.
INSTALLATION
(1) Clean corrosion/dirt from the cable and wire
terminals before installing wiring to the solenoid.(2) Connect the battery positive and generator out-
put wire to the starter solenoid post (Fig. 11).
CAUTION: It is critical that the generator output ter-
minal be connected to the battery positive terminal
of the starter solenoid, for proper operation of the
charging and cranking systems.
(3) Connect the push-on until fully engaged.
(4) Position the starter face into transmission
housing. Support starter in pilot and start the top
bolt (Fig. 10).
(5) Attach ground cable to lower mounting bolt
and start bolt.
(6) Ensure the proper starter alignment before
tightening the starter mounting bolts to 54 N´m (40
ft. lbs.) torque.
Fig. 9 Front Engine Mount Bolt Removal
Fig. 10 Starter Removal
Fig. 8 Battery Cable Removal and Installation
8B - 6 STARTINGPL
Page 234 of 1200
(7) Vehicles equipped with A/C:
(a) Using a floor jack or jack stand, raise the
engine and transmission assembly to the original
position.
(b) Install the front engine mount bolt through
the insulator and front crossmember mounting
bracket (Fig. 9).
(c) Tighten bolt to 54 N´m (40 ft. lbs.) torque.
(8) Lower vehicle and connect battery cables.
STARTER RELAY
The relay is located in the Power Distribution Cen-
ter (PDC). Refer to the PDC cover for relay location.
SPECIFICATIONS
STARTER
Engine should be up to operating temperature.
Extremely heavy oil or tight engine will increase
starter amperage draw.
TORQUE
DESCRIPTION TORQUE
Starter Mounting Bolts.........54N´m(40ft.lbs.)
Starter Solenoid Battery Nut. . . .10 N´m (90 in. lbs.)
Fig. 11 Wire Connection
Manufacturer BOSCH
Engine Application 2.0L OHC - DOHC
Power rating 0 .95 Kw
Voltage 12 VOLTS
No. of Fields 6
No. of Poles 6
Brushes 4
Drive Planetary Gear Train
Cranking Amperage Draw
test150 - 280 Amps.
PLSTARTING 8B - 7
REMOVAL AND INSTALLATION (Continued)
Page 235 of 1200

Page 236 of 1200
CHARGING SYSTEM
CONTENTS
page page
GENERAL INFORMATION
OVERVIEW............................. 1
DESCRIPTION AND OPERATION
BATTERY TEMPERATURE SENSOR.......... 2
CHARGING SYSTEM OPERATION........... 1
ELECTRONIC VOLTAGE REGULATOR......... 2
GENERATOR............................ 2
DIAGNOSIS AND TESTING
BATTERY TEMPERATURE SENSOR.......... 8
CHARGING SYSTEM RESISTANCE TESTS..... 5CHARGING SYSTEM...................... 2
CURRENT OUTPUT TEST.................. 8
ON-BOARD DIAGNOSTIC SYSTEM TEST..... 10
REMOVAL AND INSTALLATION
BATTERY TEMPERATURE SENSOR......... 11
GENERATOR........................... 10
SPECIFICATIONS
GENERATOR RATINGS................... 12
TORQUE.............................. 12
GENERAL INFORMATION
OVERVIEW
The battery, starting, and charging systems oper-
ate with one another, and must be tested as a com-
plete system. In order for the vehicle to start and
charge properly, all of the components involved in
these systems must perform within specifications.
Group 8A covers the battery, Group 8B covers the
starting system, and Group 8C covers the charging
system. Refer to Group 8W - Wiring Diagrams for
complete circuit descriptions and diagrams. We have
separated these systems to make it easier to locate
the information you are seeking within this Service
Manual. However, when attempting to diagnose any
of these systems, it is important that you keep their
interdependency in mind.
The diagnostic procedures used in these groups
include the most basic conventional diagnostic meth-
ods to the more sophisticated On-Board Diagnostics
(OBD) built into the Powertrain Control Module
(PCM). Use of an induction ammeter, volt/ohmmeter,
battery charger, carbon pile rheostat (load tester),
and 12-volt test lamp may be required.
All OBD-sensed systems are monitored by the
PCM. Each monitored circuit is assigned a Diagnos-
tic Trouble Code (DTC). The PCM will store a DTC in
electronic memory for any failure it detects. See the
On-Board Diagnostics Test in Group 8C - Charging
System for more information.
DESCRIPTION AND OPERATION
CHARGING SYSTEM OPERATION
The charging system consists of:
²Generator
²Electronic Voltage Regulator (EVR) circuitry
within the Powertrain Control Module (PCM)
²Ignition switch (refer to Group 8D, Ignition Sys-
tem for information)
²Battery (refer to Group 8A, Battery for informa-
tion)
²Battery temperature sensor
²Voltmeter (refer to Group 8E, Instrument Panel
and Gauges for information)
²Wiring harness and connections (refer to Group
8W, Wiring for information)
The charging system is turned on and off with the
ignition switch. When the ignition switch is turned to
the ON position, battery voltage is applied to the
generator rotor through one of the two field termi-
nals to produce a magnetic field. The generator is
driven by the engine through a serpentine belt and
pulley arrangement.
The amount of DC current produced by the gener-
ator is controlled by the EVR (field control) circuitry,
contained within the PCM. This circuitry is con-
nected in series with the second rotor field terminal
and ground.
PLCHARGING SYSTEM 8C - 1
Page 237 of 1200
A battery temperature sensor located on the front
bumper beam is used to sense battery temperature.
This temperature data, along with data from moni-
tored line voltage, is used by the PCM to vary the
battery charging rate. This is done by cycling the
ground path to control the strength of the rotor mag-
netic field. The PCM then compensates and regulates
generator current output accordingly and to maintain
the proper voltage depending on battery tempera-
ture.
All vehicles are equipped with On-Board Diagnos-
tics (OBD). All OBD-sensed systems, including the
EVR (field control) circuitry, are monitored by the
PCM. Each monitored circuit is assigned a Diagnos-
tic Trouble Code (DTC). The PCM will store a DTC in
electronic memory for any failure it detects. See On-
Board Diagnostic System Test in this group for more
information.
GENERATOR
The generator is belt-driven by the engine. It is
serviced only as a complete assembly. If the genera-
tor fails for any reason, the entire assembly must be
replaced.
As the energized rotor begins to rotate within the
generator, the spinning magnetic field induces a cur-
rent into the windings of the stator coil. Once the
generator begins producing sufficient current, it also
provides the current needed to energize the rotor.
The Y type stator winding connections deliver the
induced AC current to 3 positive and 3 negative
diodes for rectification. From the diodes, rectified DC
current is delivered to the vehicle electrical system
through the generator, battery, and ground terminals.
Noise emitting from the generator may be caused
by:
²Worn, loose or defective bearings
²Loose or defective drive pulley
²Incorrect, worn, damaged or misadjusted drive
belt
²Loose mounting bolts
²Misaligned drive pulley
²Defective stator or diode
BATTERY TEMPERATURE SENSOR
The battery temperature sensor is used to deter-
mine the battery temperature. This temperature
data, along with data from monitored line voltage, is
used by the PCM to vary the battery charging rate.
System voltage will be higher at colder temperatures
and is gradually reduced at warmer temperatures.
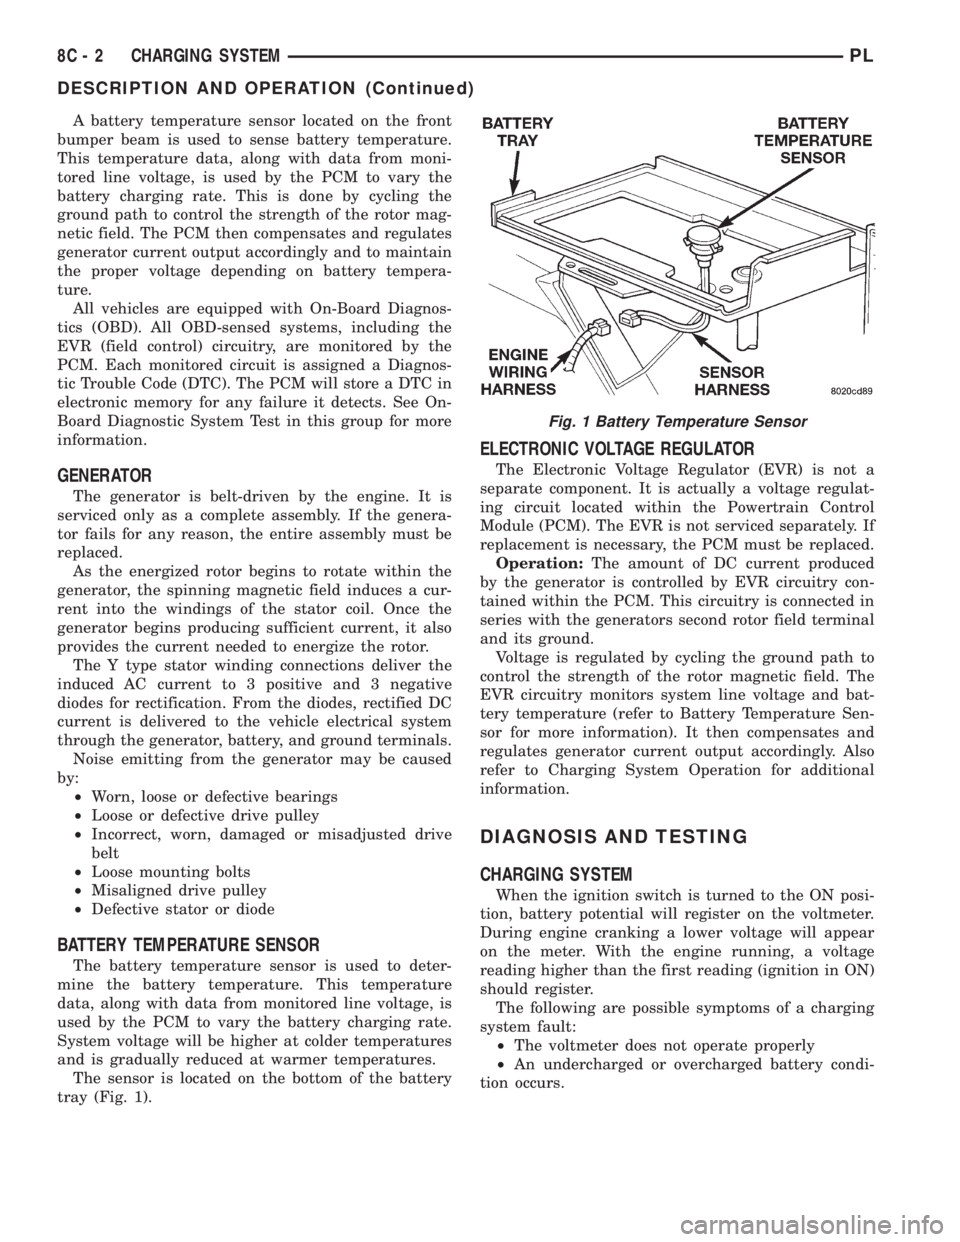
The sensor is located on the bottom of the battery
tray (Fig. 1).
ELECTRONIC VOLTAGE REGULATOR
The Electronic Voltage Regulator (EVR) is not a
separate component. It is actually a voltage regulat-
ing circuit located within the Powertrain Control
Module (PCM). The EVR is not serviced separately. If
replacement is necessary, the PCM must be replaced.
Operation:The amount of DC current produced
by the generator is controlled by EVR circuitry con-
tained within the PCM. This circuitry is connected in
series with the generators second rotor field terminal
and its ground.
Voltage is regulated by cycling the ground path to
control the strength of the rotor magnetic field. The
EVR circuitry monitors system line voltage and bat-
tery temperature (refer to Battery Temperature Sen-
sor for more information). It then compensates and
regulates generator current output accordingly. Also
refer to Charging System Operation for additional
information.
DIAGNOSIS AND TESTING
CHARGING SYSTEM
When the ignition switch is turned to the ON posi-
tion, battery potential will register on the voltmeter.
During engine cranking a lower voltage will appear
on the meter. With the engine running, a voltage
reading higher than the first reading (ignition in ON)
should register.
The following are possible symptoms of a charging
system fault:
²The voltmeter does not operate properly
²An undercharged or overcharged battery condi-
tion occurs.
Fig. 1 Battery Temperature Sensor
8C - 2 CHARGING SYSTEMPL
DESCRIPTION AND OPERATION (Continued)
Page 238 of 1200
Remember that an undercharged battery is often
caused by:
²Accessories being left on with the engine not
running
²A faulty or improperly adjusted switch that
allows a lamp to stay on. See Ignition-Off Draw Test
in Group 8A, Battery for more information.
The following procedures may be used to correct a
problem diagnosed as a charging system fault.
INSPECTION
(1) Inspect condition of battery cable terminals,
battery posts, connections at engine block, starter
solenoid and relay. They should be clean and tight.
Repair as required.
(2) Inspect all fuses in the fuseblock module and
Power Distribution Center (PDC) for tightness in
receptacles. They should be properly installed and
tight. Repair or replace as required.(3) Inspect the electrolyte level in the battery.
Replace battery if electrolyte level is low.
(4) Inspect generator mounting bolts for tightness.
Replace or tighten bolts if required. Refer to the Gen-
erator Removal/Installation section of this group for
torque specifications.
(5) Inspect generator drive belt condition and ten-
sion. Tighten or replace belt as required. Refer to
Belt Tension Specifications in Group 7, Cooling Sys-
tem.
(6) Inspect automatic belt tensioner (if equipped).
Refer to Group 7, Cooling System for information.
(7) Inspect connections at generator field, battery
output, and ground terminals. Also check ground con-
nection at engine. They should all be clean and tight.
Repair as required.
PLCHARGING SYSTEM 8C - 3
DIAGNOSIS AND TESTING (Continued)
Page 239 of 1200
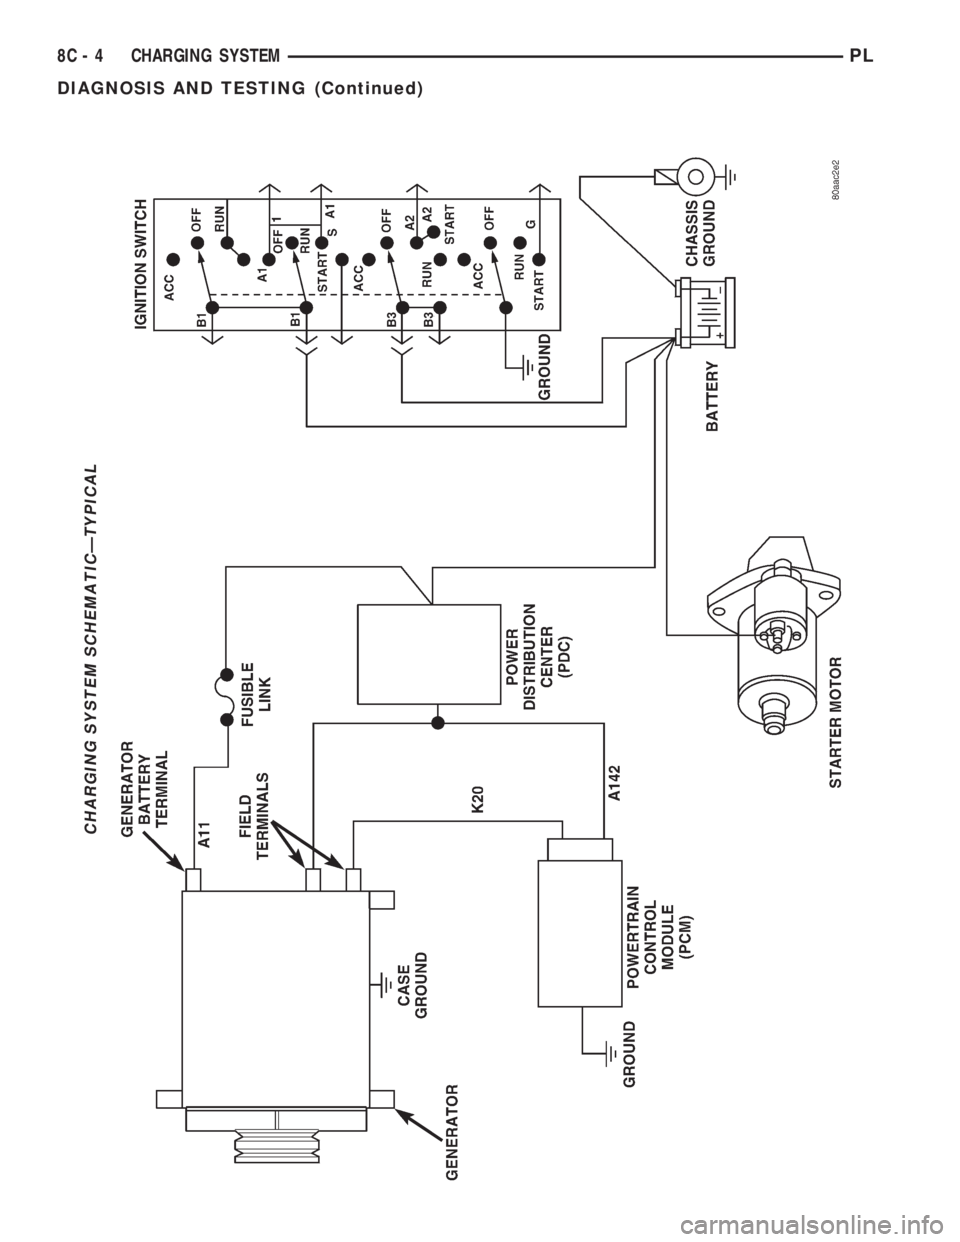
CHARGING SYSTEM SCHEMATICÐTYPICAL
8C - 4 CHARGING SYSTEMPL
DIAGNOSIS AND TESTING (Continued)
Page 240 of 1200
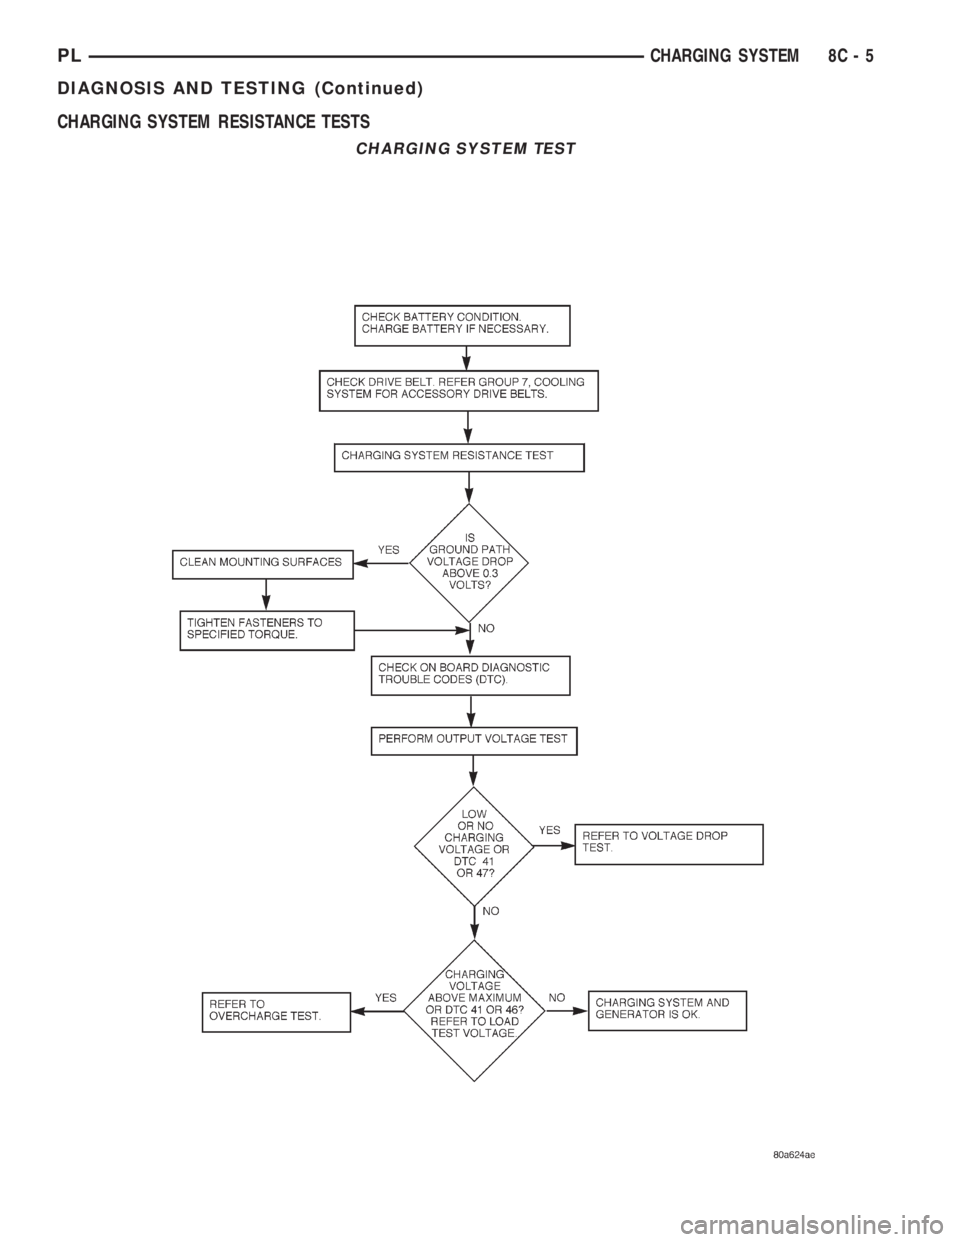
CHARGING SYSTEM RESISTANCE TESTS
CHARGING SYSTEM TEST
PLCHARGING SYSTEM 8C - 5
DIAGNOSIS AND TESTING (Continued)