DODGE RAM 2001 Service Repair Manual
Manufacturer: DODGE, Model Year: 2001, Model line: RAM, Model: DODGE RAM 2001Pages: 2889, PDF Size: 68.07 MB
Page 2461 of 2889
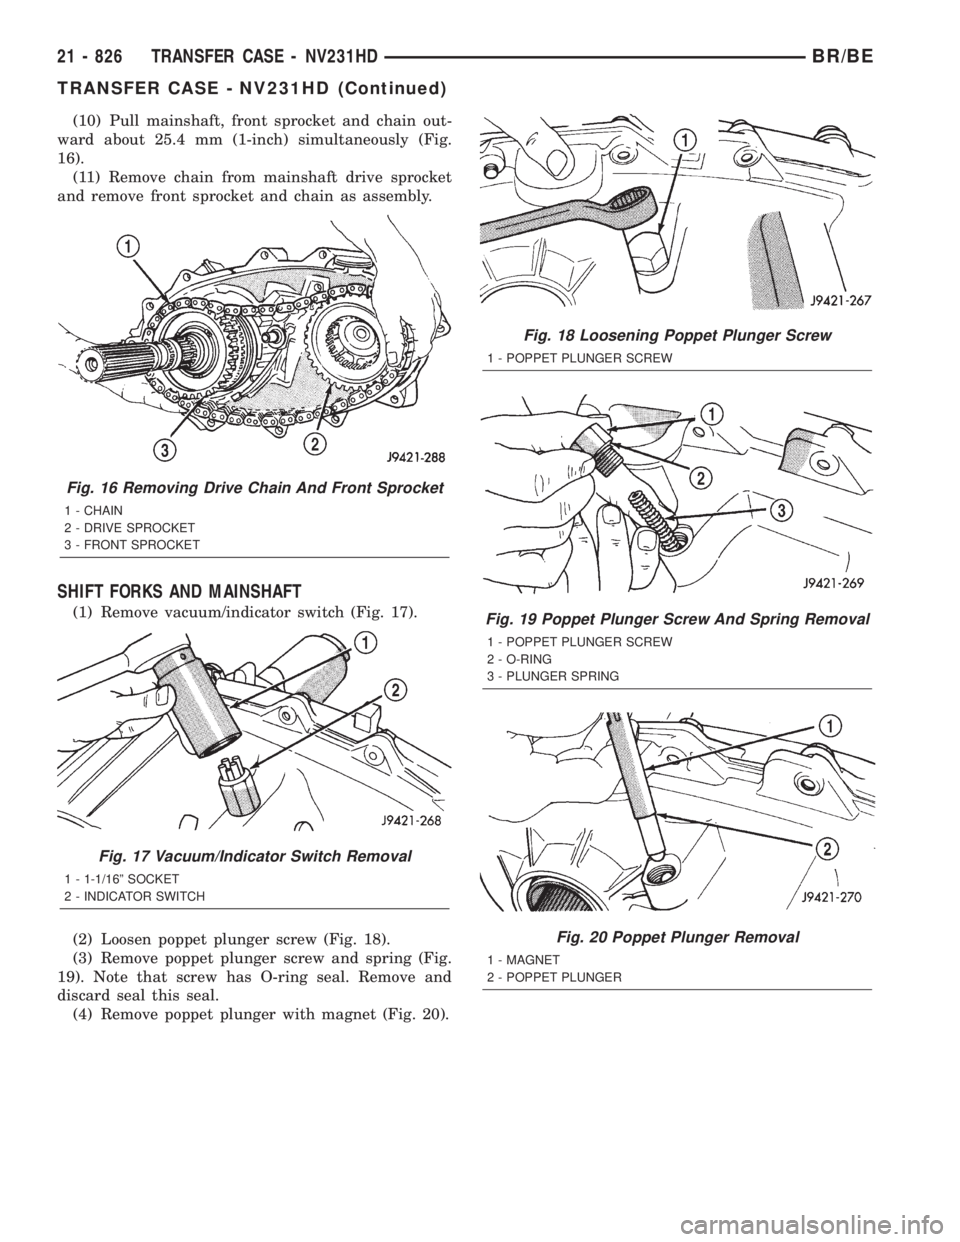
(10) Pull mainshaft, front sprocket and chain out-
ward about 25.4 mm (1-inch) simultaneously (Fig.
16).
(11) Remove chain from mainshaft drive sprocket
and remove front sprocket and chain as assembly.
SHIFT FORKS AND MAINSHAFT
(1) Remove vacuum/indicator switch (Fig. 17).
(2) Loosen poppet plunger screw (Fig. 18).
(3) Remove poppet plunger screw and spring (Fig.
19). Note that screw has O-ring seal. Remove and
discard seal this seal.
(4) Remove poppet plunger with magnet (Fig. 20).
Fig. 16 Removing Drive Chain And Front Sprocket
1 - CHAIN
2 - DRIVE SPROCKET
3 - FRONT SPROCKET
Fig. 17 Vacuum/Indicator Switch Removal
1 - 1-1/16º SOCKET
2 - INDICATOR SWITCH
Fig. 18 Loosening Poppet Plunger Screw
1 - POPPET PLUNGER SCREW
Fig. 19 Poppet Plunger Screw And Spring Removal
1 - POPPET PLUNGER SCREW
2 - O-RING
3 - PLUNGER SPRING
Fig. 20 Poppet Plunger Removal
1 - MAGNET
2 - POPPET PLUNGER
21 - 826 TRANSFER CASE - NV231HDBR/BE
TRANSFER CASE - NV231HD (Continued)
Page 2462 of 2889
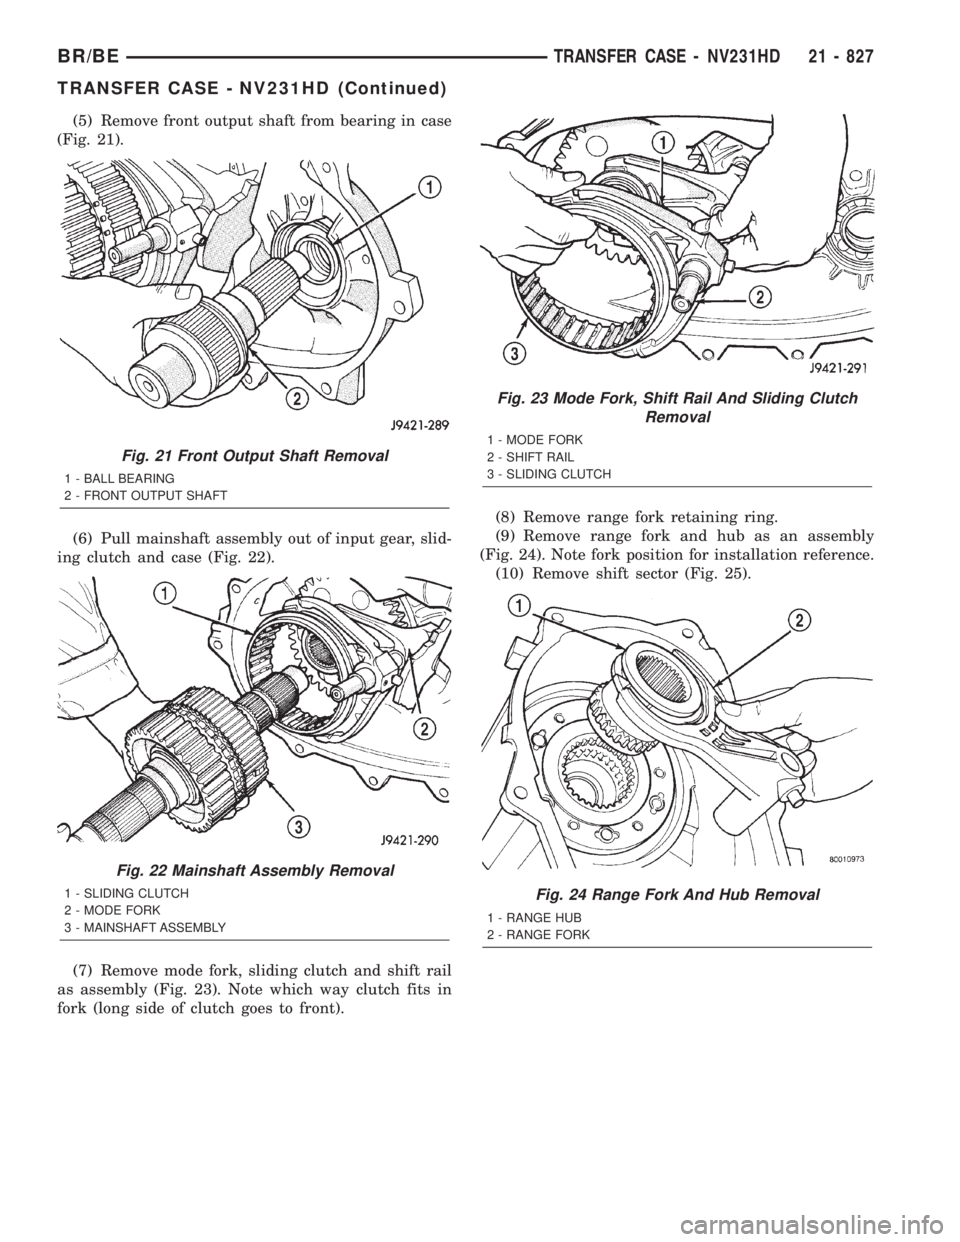
(5) Remove front output shaft from bearing in case
(Fig. 21).
(6) Pull mainshaft assembly out of input gear, slid-
ing clutch and case (Fig. 22).
(7) Remove mode fork, sliding clutch and shift rail
as assembly (Fig. 23). Note which way clutch fits in
fork (long side of clutch goes to front).(8) Remove range fork retaining ring.
(9) Remove range fork and hub as an assembly
(Fig. 24). Note fork position for installation reference.
(10) Remove shift sector (Fig. 25).
Fig. 21 Front Output Shaft Removal
1 - BALL BEARING
2 - FRONT OUTPUT SHAFT
Fig. 22 Mainshaft Assembly Removal
1 - SLIDING CLUTCH
2 - MODE FORK
3 - MAINSHAFT ASSEMBLY
Fig. 23 Mode Fork, Shift Rail And Sliding Clutch
Removal
1 - MODE FORK
2 - SHIFT RAIL
3 - SLIDING CLUTCH
Fig. 24 Range Fork And Hub Removal
1 - RANGE HUB
2 - RANGE FORK
BR/BETRANSFER CASE - NV231HD 21 - 827
TRANSFER CASE - NV231HD (Continued)
Page 2463 of 2889
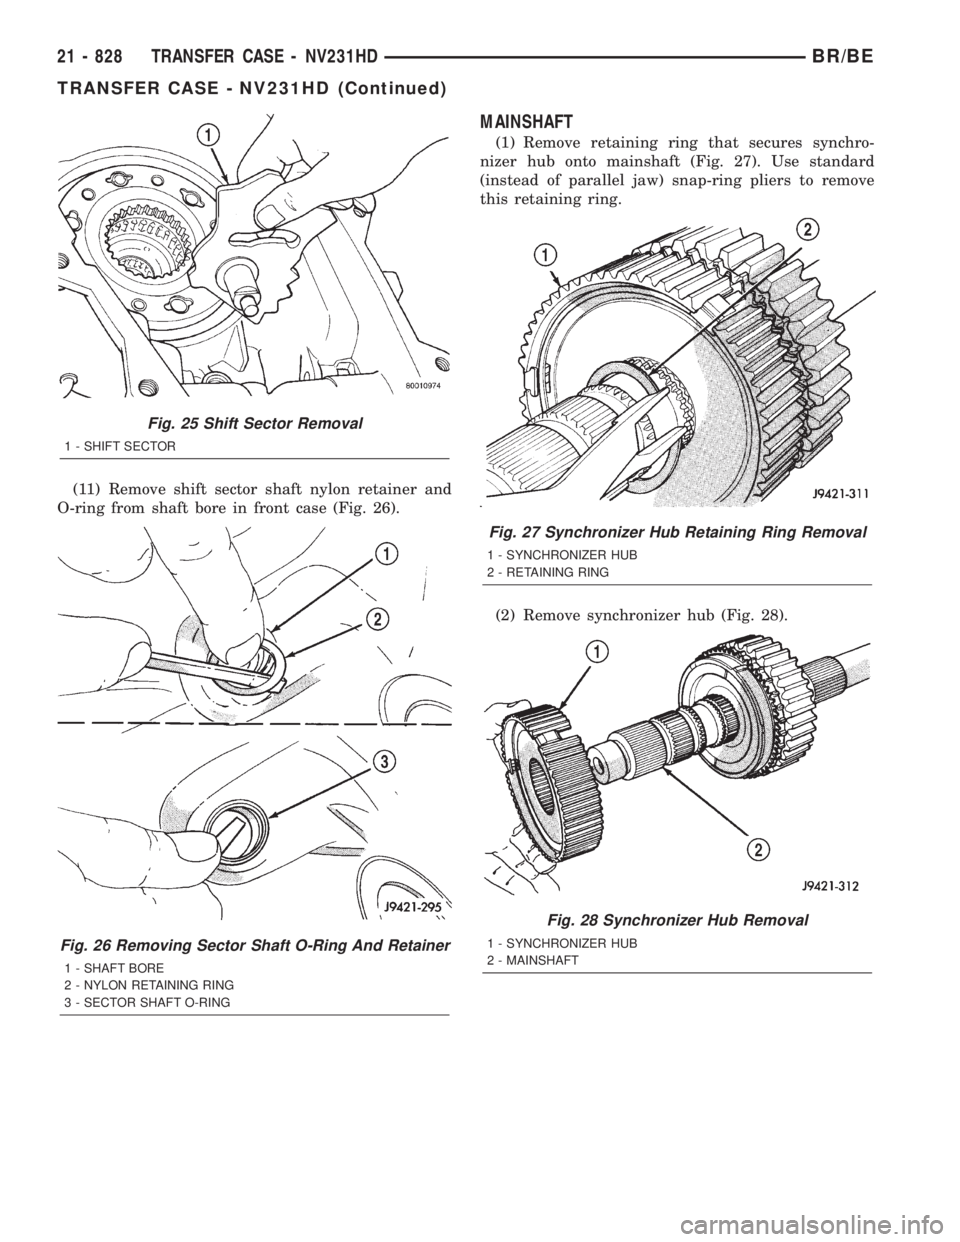
(11) Remove shift sector shaft nylon retainer and
O-ring from shaft bore in front case (Fig. 26).
MAINSHAFT
(1) Remove retaining ring that secures synchro-
nizer hub onto mainshaft (Fig. 27). Use standard
(instead of parallel jaw) snap-ring pliers to remove
this retaining ring.
(2) Remove synchronizer hub (Fig. 28).
Fig. 25 Shift Sector Removal
1 - SHIFT SECTOR
Fig. 26 Removing Sector Shaft O-Ring And Retainer
1 - SHAFT BORE
2 - NYLON RETAINING RING
3 - SECTOR SHAFT O-RING
Fig. 27 Synchronizer Hub Retaining Ring Removal
1 - SYNCHRONIZER HUB
2 - RETAINING RING
Fig. 28 Synchronizer Hub Removal
1 - SYNCHRONIZER HUB
2 - MAINSHAFT
21 - 828 TRANSFER CASE - NV231HDBR/BE
TRANSFER CASE - NV231HD (Continued)
Page 2464 of 2889
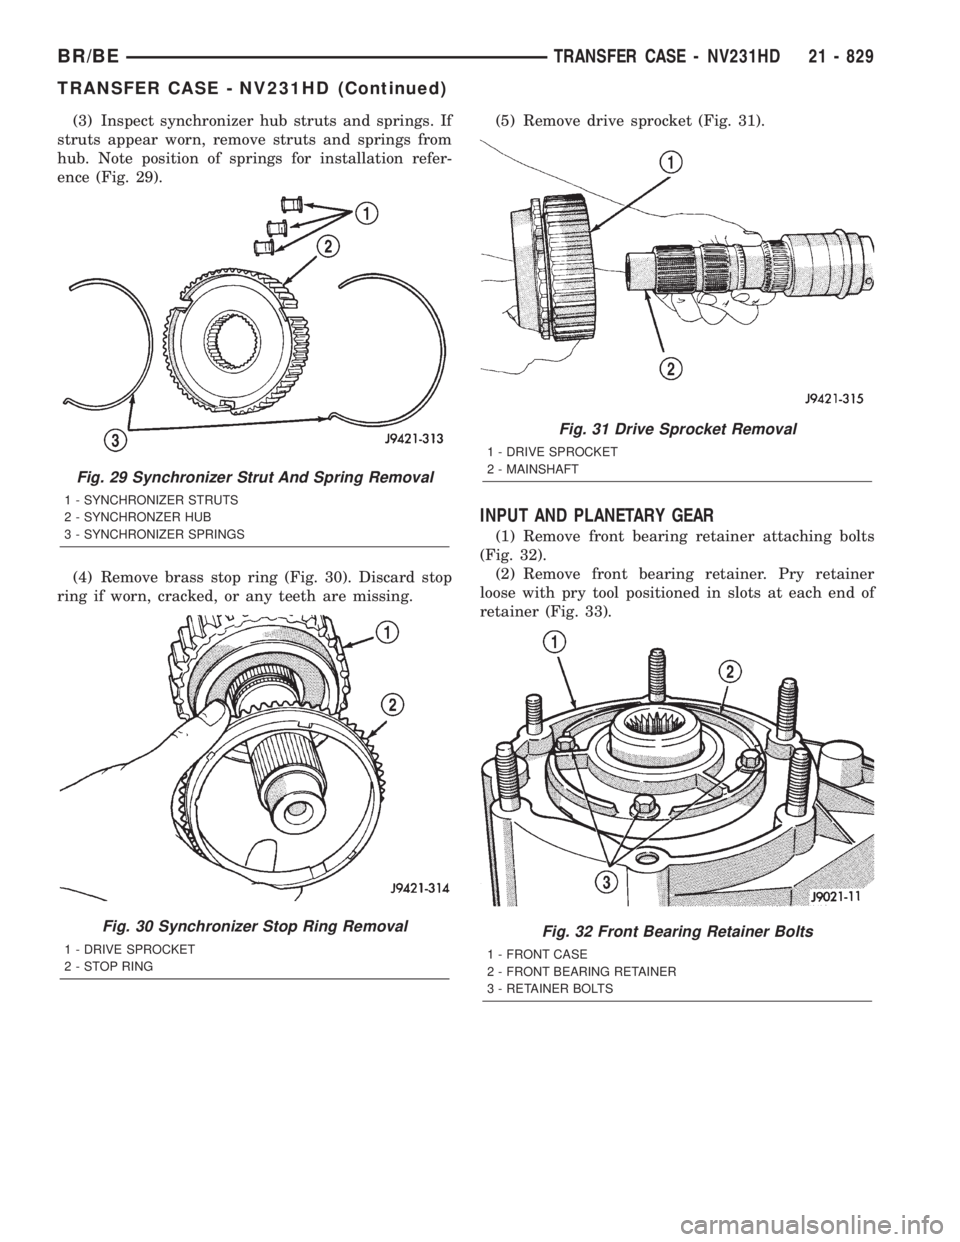
(3) Inspect synchronizer hub struts and springs. If
struts appear worn, remove struts and springs from
hub. Note position of springs for installation refer-
ence (Fig. 29).
(4) Remove brass stop ring (Fig. 30). Discard stop
ring if worn, cracked, or any teeth are missing.(5) Remove drive sprocket (Fig. 31).
INPUT AND PLANETARY GEAR
(1) Remove front bearing retainer attaching bolts
(Fig. 32).
(2) Remove front bearing retainer. Pry retainer
loose with pry tool positioned in slots at each end of
retainer (Fig. 33).
Fig. 29 Synchronizer Strut And Spring Removal
1 - SYNCHRONIZER STRUTS
2 - SYNCHRONZER HUB
3 - SYNCHRONIZER SPRINGS
Fig. 30 Synchronizer Stop Ring Removal
1 - DRIVE SPROCKET
2 - STOP RING
Fig. 31 Drive Sprocket Removal
1 - DRIVE SPROCKET
2 - MAINSHAFT
Fig. 32 Front Bearing Retainer Bolts
1 - FRONT CASE
2 - FRONT BEARING RETAINER
3 - RETAINER BOLTS
BR/BETRANSFER CASE - NV231HD 21 - 829
TRANSFER CASE - NV231HD (Continued)
Page 2465 of 2889
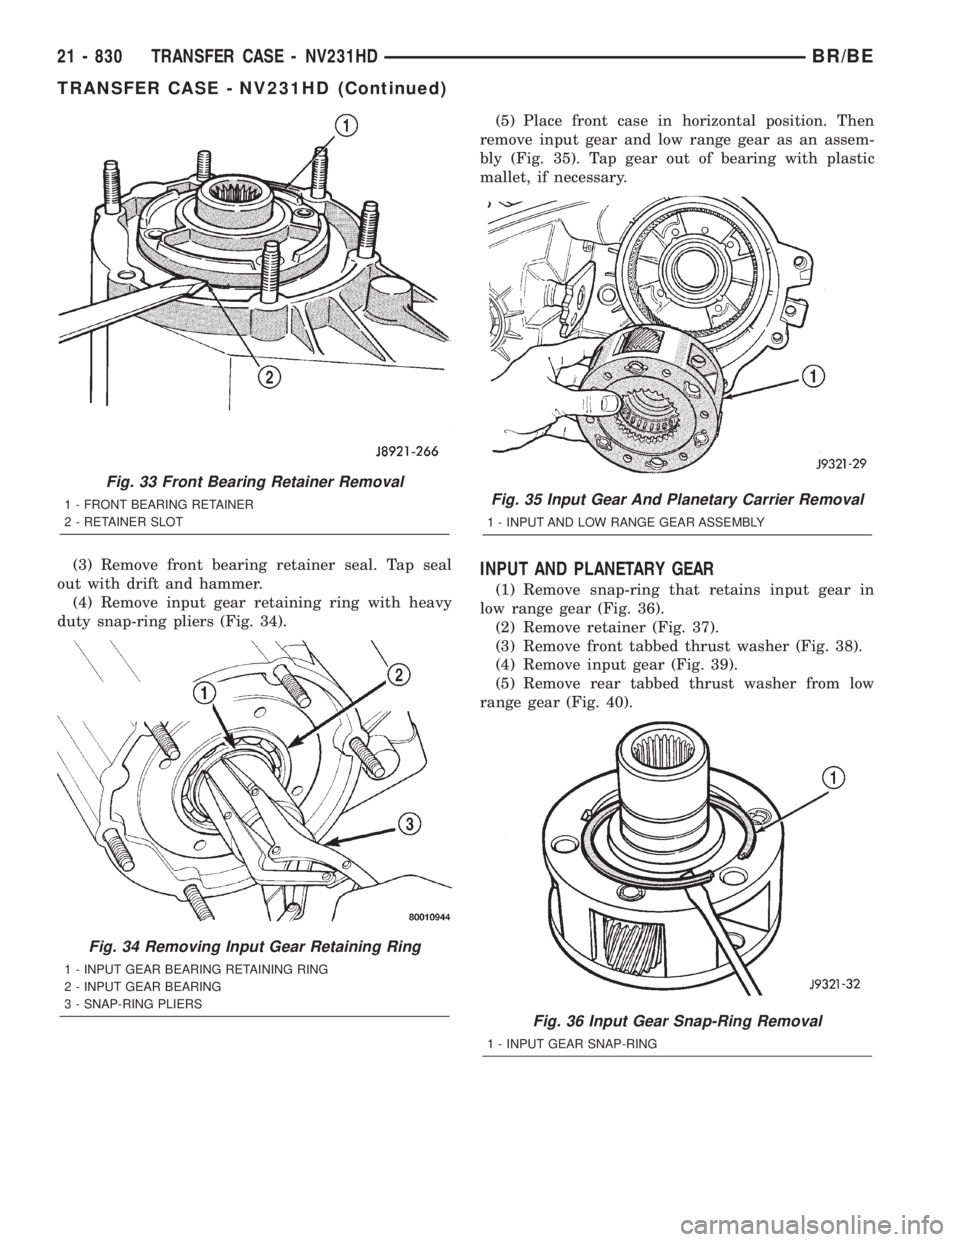
(3) Remove front bearing retainer seal. Tap seal
out with drift and hammer.
(4) Remove input gear retaining ring with heavy
duty snap-ring pliers (Fig. 34).(5) Place front case in horizontal position. Then
remove input gear and low range gear as an assem-
bly (Fig. 35). Tap gear out of bearing with plastic
mallet, if necessary.INPUT AND PLANETARY GEAR
(1) Remove snap-ring that retains input gear in
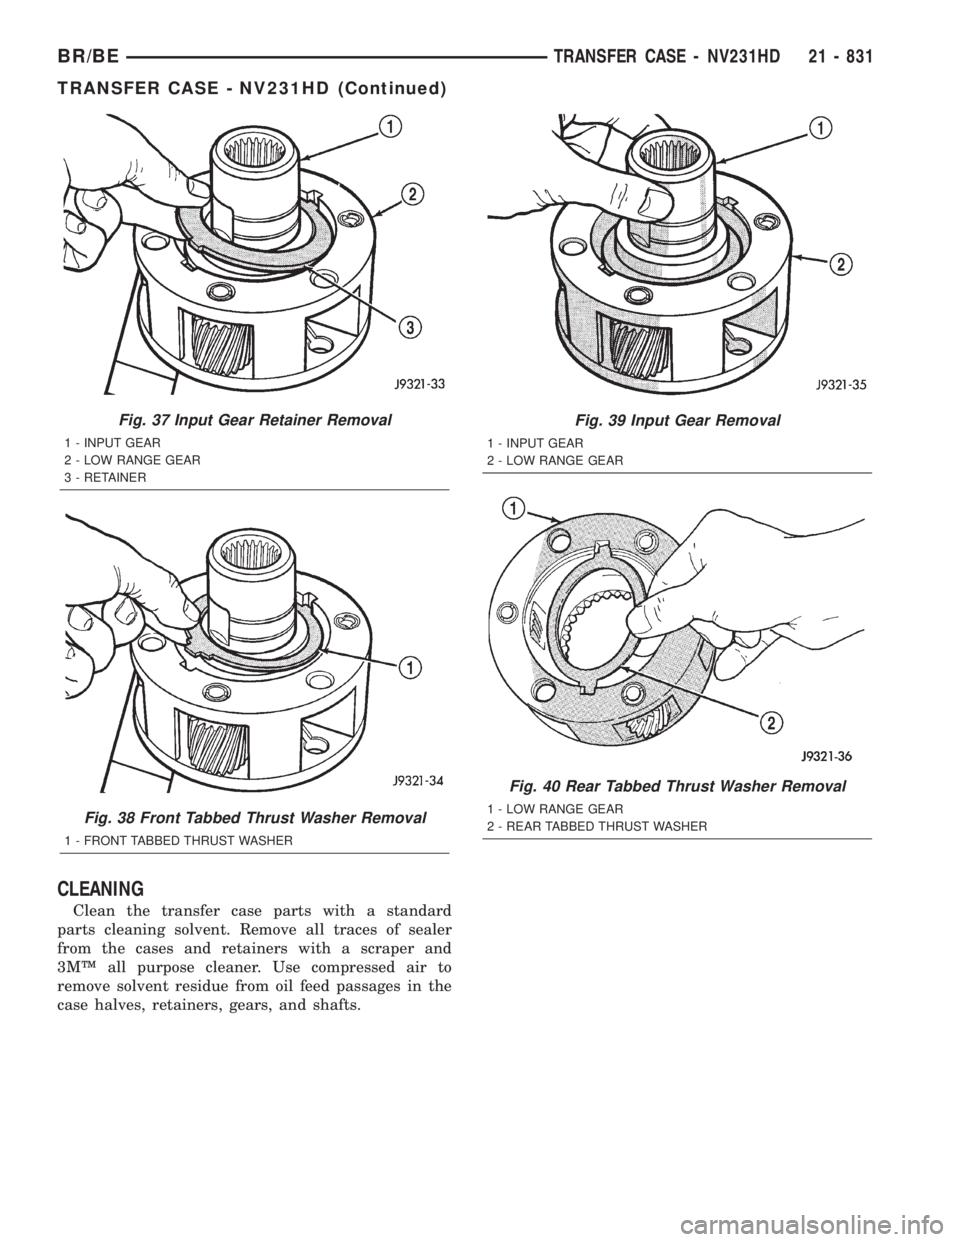
low range gear (Fig. 36).
(2) Remove retainer (Fig. 37).
(3) Remove front tabbed thrust washer (Fig. 38).
(4) Remove input gear (Fig. 39).
(5) Remove rear tabbed thrust washer from low
range gear (Fig. 40).
Fig. 33 Front Bearing Retainer Removal
1 - FRONT BEARING RETAINER
2 - RETAINER SLOT
Fig. 34 Removing Input Gear Retaining Ring
1 - INPUT GEAR BEARING RETAINING RING
2 - INPUT GEAR BEARING
3 - SNAP-RING PLIERS
Fig. 35 Input Gear And Planetary Carrier Removal
1 - INPUT AND LOW RANGE GEAR ASSEMBLY
Fig. 36 Input Gear Snap-Ring Removal
1 - INPUT GEAR SNAP-RING
21 - 830 TRANSFER CASE - NV231HDBR/BE
TRANSFER CASE - NV231HD (Continued)
Page 2466 of 2889
CLEANING
Clean the transfer case parts with a standard
parts cleaning solvent. Remove all traces of sealer
from the cases and retainers with a scraper and
3MŸ all purpose cleaner. Use compressed air to
remove solvent residue from oil feed passages in the
case halves, retainers, gears, and shafts.
Fig. 37 Input Gear Retainer Removal
1 - INPUT GEAR
2 - LOW RANGE GEAR
3 - RETAINER
Fig. 38 Front Tabbed Thrust Washer Removal
1 - FRONT TABBED THRUST WASHER
Fig. 39 Input Gear Removal
1 - INPUT GEAR
2 - LOW RANGE GEAR
Fig. 40 Rear Tabbed Thrust Washer Removal
1 - LOW RANGE GEAR
2 - REAR TABBED THRUST WASHER
BR/BETRANSFER CASE - NV231HD 21 - 831
TRANSFER CASE - NV231HD (Continued)
Page 2467 of 2889
INSPECTION
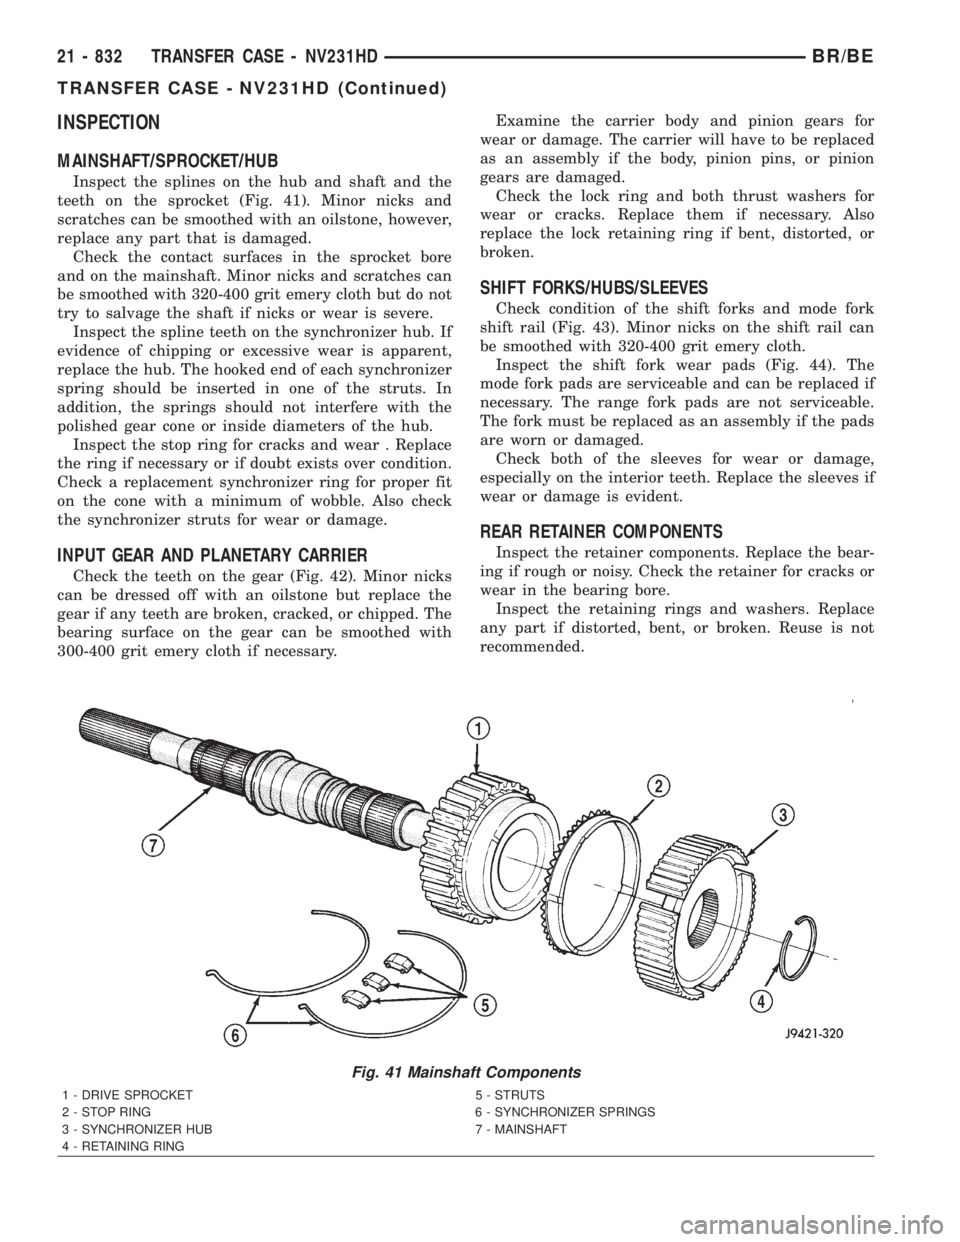
MAINSHAFT/SPROCKET/HUB
Inspect the splines on the hub and shaft and the
teeth on the sprocket (Fig. 41). Minor nicks and
scratches can be smoothed with an oilstone, however,
replace any part that is damaged.
Check the contact surfaces in the sprocket bore
and on the mainshaft. Minor nicks and scratches can
be smoothed with 320-400 grit emery cloth but do not
try to salvage the shaft if nicks or wear is severe.
Inspect the spline teeth on the synchronizer hub. If
evidence of chipping or excessive wear is apparent,
replace the hub. The hooked end of each synchronizer
spring should be inserted in one of the struts. In
addition, the springs should not interfere with the
polished gear cone or inside diameters of the hub.
Inspect the stop ring for cracks and wear . Replace
the ring if necessary or if doubt exists over condition.
Check a replacement synchronizer ring for proper fit
on the cone with a minimum of wobble. Also check
the synchronizer struts for wear or damage.
INPUT GEAR AND PLANETARY CARRIER
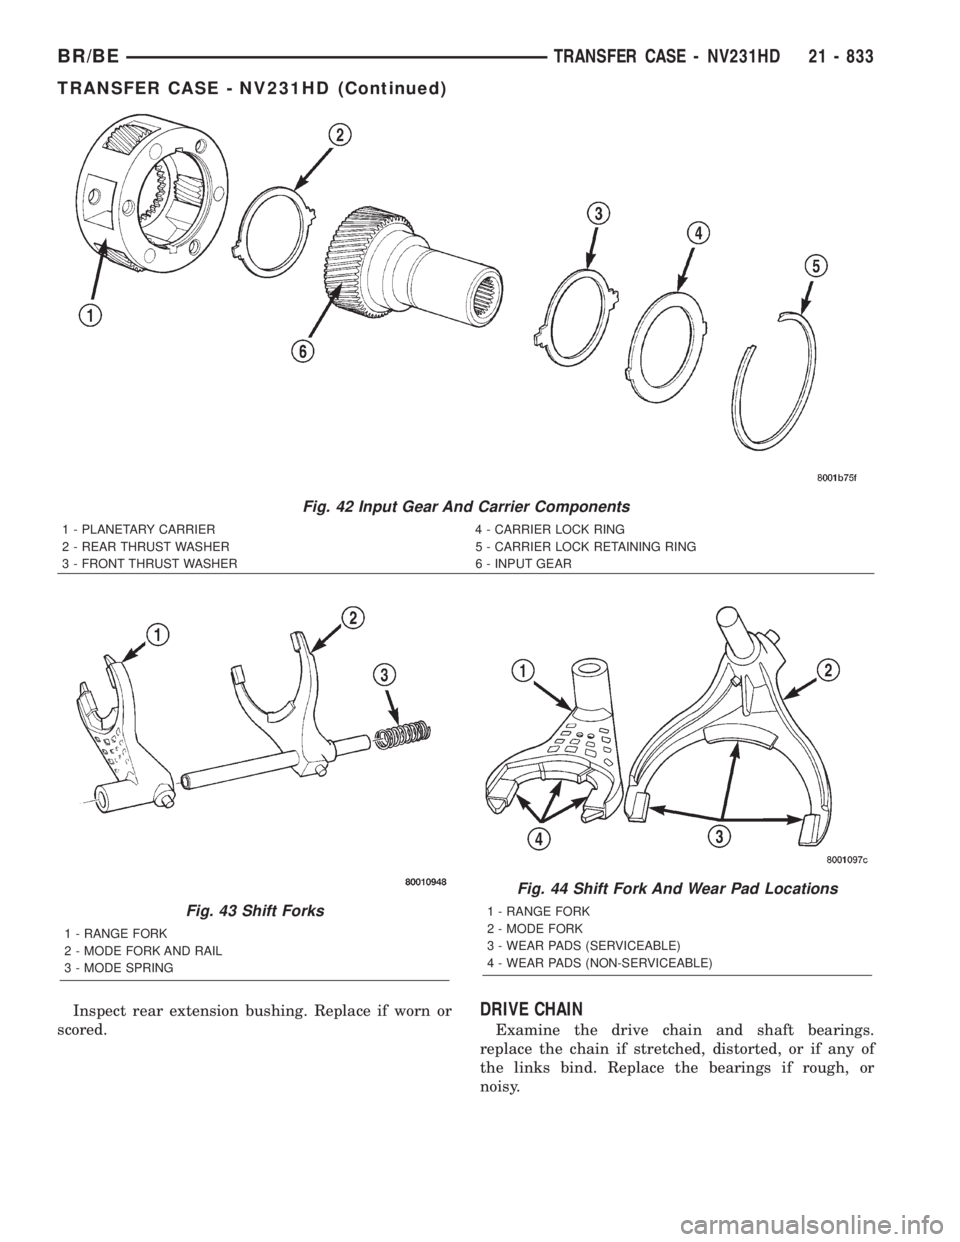
Check the teeth on the gear (Fig. 42). Minor nicks
can be dressed off with an oilstone but replace the
gear if any teeth are broken, cracked, or chipped. The
bearing surface on the gear can be smoothed with
300-400 grit emery cloth if necessary.Examine the carrier body and pinion gears for
wear or damage. The carrier will have to be replaced
as an assembly if the body, pinion pins, or pinion
gears are damaged.
Check the lock ring and both thrust washers for
wear or cracks. Replace them if necessary. Also
replace the lock retaining ring if bent, distorted, or
broken.
SHIFT FORKS/HUBS/SLEEVES
Check condition of the shift forks and mode fork
shift rail (Fig. 43). Minor nicks on the shift rail can
be smoothed with 320-400 grit emery cloth.
Inspect the shift fork wear pads (Fig. 44). The
mode fork pads are serviceable and can be replaced if
necessary. The range fork pads are not serviceable.
The fork must be replaced as an assembly if the pads
are worn or damaged.
Check both of the sleeves for wear or damage,
especially on the interior teeth. Replace the sleeves if
wear or damage is evident.
REAR RETAINER COMPONENTS
Inspect the retainer components. Replace the bear-
ing if rough or noisy. Check the retainer for cracks or
wear in the bearing bore.
Inspect the retaining rings and washers. Replace
any part if distorted, bent, or broken. Reuse is not
recommended.
Fig. 41 Mainshaft Components
1 - DRIVE SPROCKET 5 - STRUTS
2 - STOP RING 6 - SYNCHRONIZER SPRINGS
3 - SYNCHRONIZER HUB 7 - MAINSHAFT
4 - RETAINING RING
21 - 832 TRANSFER CASE - NV231HDBR/BE
TRANSFER CASE - NV231HD (Continued)
Page 2468 of 2889
Inspect rear extension bushing. Replace if worn or
scored.DRIVE CHAIN
Examine the drive chain and shaft bearings.
replace the chain if stretched, distorted, or if any of
the links bind. Replace the bearings if rough, or
noisy.
Fig. 42 Input Gear And Carrier Components
1 - PLANETARY CARRIER 4 - CARRIER LOCK RING
2 - REAR THRUST WASHER 5 - CARRIER LOCK RETAINING RING
3 - FRONT THRUST WASHER 6 - INPUT GEAR
Fig. 43 Shift Forks
1 - RANGE FORK
2 - MODE FORK AND RAIL
3 - MODE SPRING
Fig. 44 Shift Fork And Wear Pad Locations
1 - RANGE FORK
2 - MODE FORK
3 - WEAR PADS (SERVICEABLE)
4 - WEAR PADS (NON-SERVICEABLE)
BR/BETRANSFER CASE - NV231HD 21 - 833
TRANSFER CASE - NV231HD (Continued)
Page 2469 of 2889
LOW RANGE ANNULUS GEAR
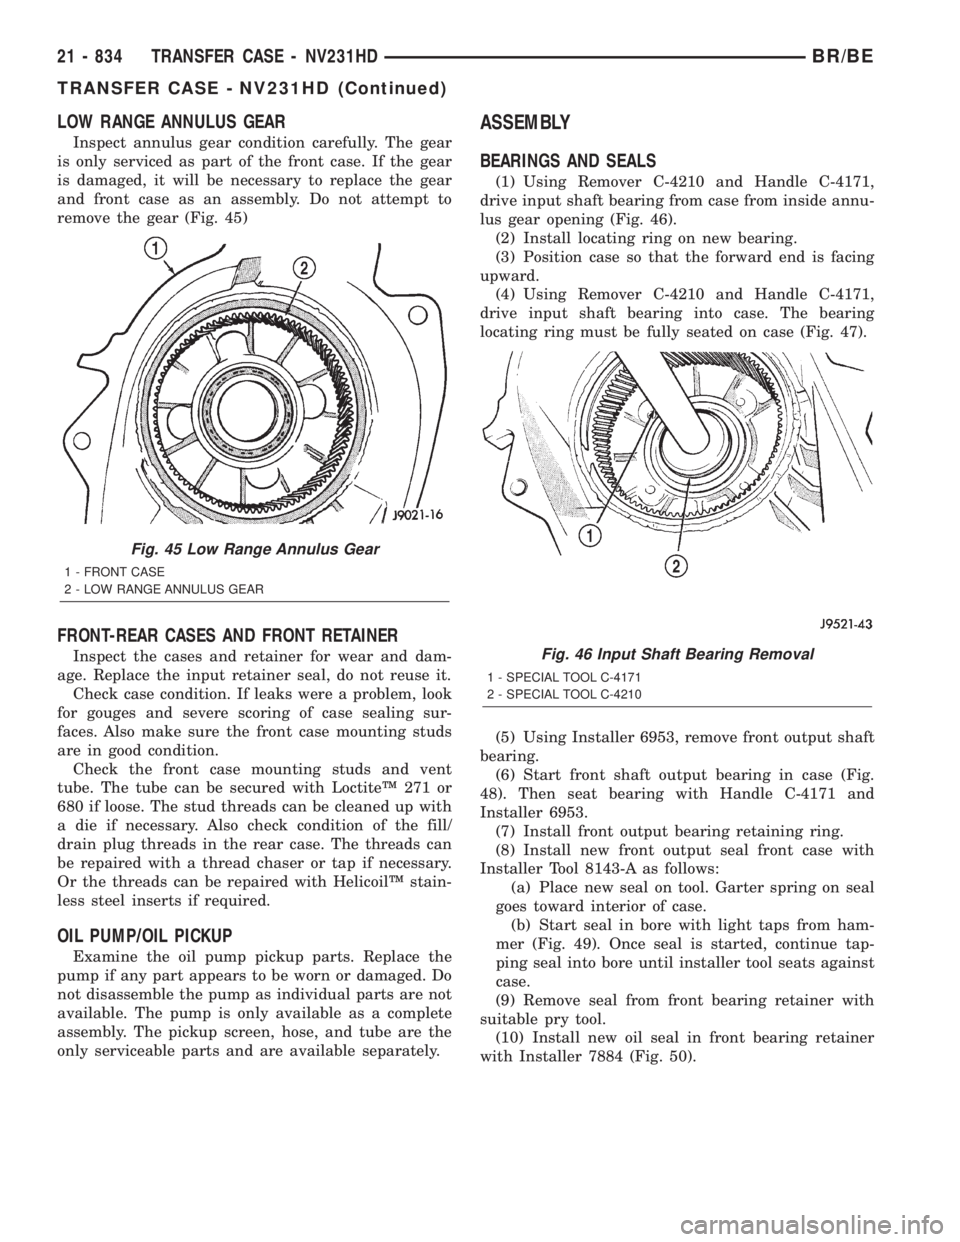
Inspect annulus gear condition carefully. The gear
is only serviced as part of the front case. If the gear
is damaged, it will be necessary to replace the gear
and front case as an assembly. Do not attempt to
remove the gear (Fig. 45)
FRONT-REAR CASES AND FRONT RETAINER
Inspect the cases and retainer for wear and dam-
age. Replace the input retainer seal, do not reuse it.
Check case condition. If leaks were a problem, look
for gouges and severe scoring of case sealing sur-
faces. Also make sure the front case mounting studs
are in good condition.
Check the front case mounting studs and vent
tube. The tube can be secured with LoctiteŸ 271 or
680 if loose. The stud threads can be cleaned up with
a die if necessary. Also check condition of the fill/
drain plug threads in the rear case. The threads can
be repaired with a thread chaser or tap if necessary.
Or the threads can be repaired with HelicoilŸ stain-
less steel inserts if required.
OIL PUMP/OIL PICKUP
Examine the oil pump pickup parts. Replace the
pump if any part appears to be worn or damaged. Do
not disassemble the pump as individual parts are not
available. The pump is only available as a complete
assembly. The pickup screen, hose, and tube are the
only serviceable parts and are available separately.
ASSEMBLY
BEARINGS AND SEALS
(1) Using Remover C-4210 and Handle C-4171,
drive input shaft bearing from case from inside annu-
lus gear opening (Fig. 46).
(2) Install locating ring on new bearing.
(3) Position case so that the forward end is facing
upward.
(4) Using Remover C-4210 and Handle C-4171,
drive input shaft bearing into case. The bearing
locating ring must be fully seated on case (Fig. 47).
(5) Using Installer 6953, remove front output shaft
bearing.
(6) Start front shaft output bearing in case (Fig.
48). Then seat bearing with Handle C-4171 and
Installer 6953.
(7) Install front output bearing retaining ring.
(8) Install new front output seal front case with
Installer Tool 8143-A as follows:
(a) Place new seal on tool. Garter spring on seal
goes toward interior of case.
(b) Start seal in bore with light taps from ham-
mer (Fig. 49). Once seal is started, continue tap-
ping seal into bore until installer tool seats against
case.
(9) Remove seal from front bearing retainer with
suitable pry tool.
(10) Install new oil seal in front bearing retainer
with Installer 7884 (Fig. 50).
Fig. 45 Low Range Annulus Gear
1 - FRONT CASE
2 - LOW RANGE ANNULUS GEAR
Fig. 46 Input Shaft Bearing Removal
1 - SPECIAL TOOL C-4171
2 - SPECIAL TOOL C-4210
21 - 834 TRANSFER CASE - NV231HDBR/BE
TRANSFER CASE - NV231HD (Continued)
Page 2470 of 2889
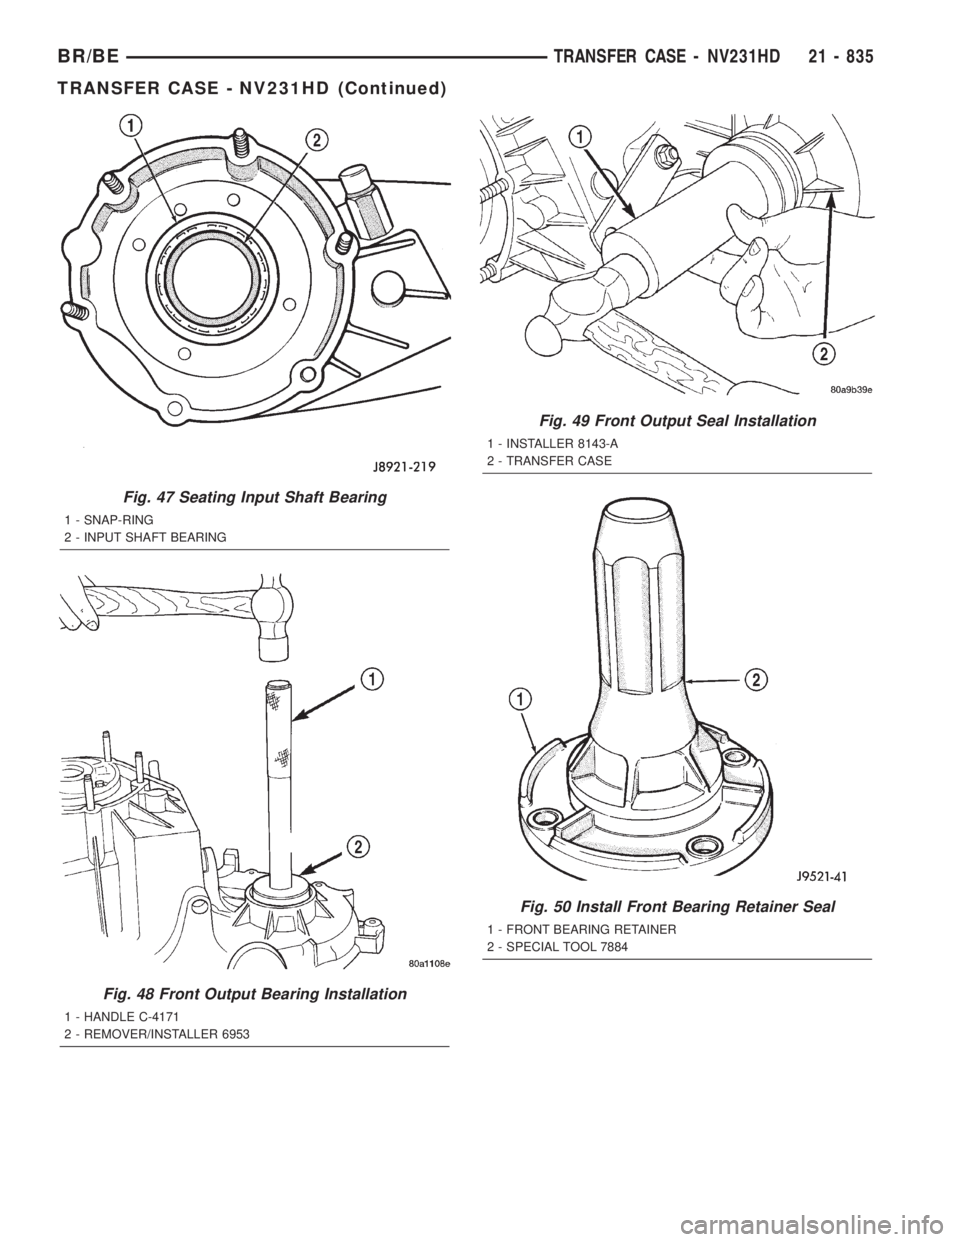
Fig. 47 Seating Input Shaft Bearing
1 - SNAP-RING
2 - INPUT SHAFT BEARING
Fig. 48 Front Output Bearing Installation
1 - HANDLE C-4171
2 - REMOVER/INSTALLER 6953
Fig. 49 Front Output Seal Installation
1 - INSTALLER 8143-A
2 - TRANSFER CASE
Fig. 50 Install Front Bearing Retainer Seal
1 - FRONT BEARING RETAINER
2 - SPECIAL TOOL 7884
BR/BETRANSFER CASE - NV231HD 21 - 835
TRANSFER CASE - NV231HD (Continued)