DODGE SPRINTER 2007 2.G Owners Manual
Manufacturer: DODGE, Model Year: 2007, Model line: SPRINTER, Model: DODGE SPRINTER 2007 2.GPages: 393, PDF Size: 7.61 MB
Page 161 of 393
160 Controls in detailTransporting
3
\1Always attach the lashing net or tarps
to all available lashing points. While do-
ing so, make sure that the mounting
hooks cannot open unintentionally.Warning
G
Do not carry out any modifications or repairs
to the lashing points, the lashing eyes or the
lashing materials. The load or the lashing
points could accidentally come loose and
cause serious injury to you or others as well
as damage to property.
Distribute loads evenly between the lashing
points or lashing eyes.
Observe the loading guidelines.iLoose loads should be secured with an
approved lashing net or tarp.
!
CAUTION
Observe the data on the maximum
load-bearing capacity of the individual
lashing points
(\2
page 371).
During full-braking applications, for ex-
ample, forces can be involved that are
much greater than the weight force of
the load.
Always use several lashing points in or-
der to distribute force absorption, and
make sure that the lashing points have
an equal load.
iIf your vehicle has load rails in the floor,
you should position locking rods imme-
diately in front of and behind the load.
The locking rods absorb possible shift-
ing forces directly.
Warning
G
If you tension the lashing straps between
the side walls or between a side wall and the
load compartment floor, the permissible
load for the lashing rails, lashing points or
lashing eyes could be exceeded in the event
of strong braking, sudden changes of direc-
tion or an accident.
The load would no longer be secured, which
could result in serious injuries caused by the
load slipping.
For this reason, do not tension a lashing
strap between the side walls or between a
side wall and the load compartment floor.
Only locking bars or rods may be installed
between the load rails near the side walls.
Observe the operating instructions issued
by the locking bar or locking rod manufac-
turer.
Page 162 of 393
161 Controls in detail
Transporting
3
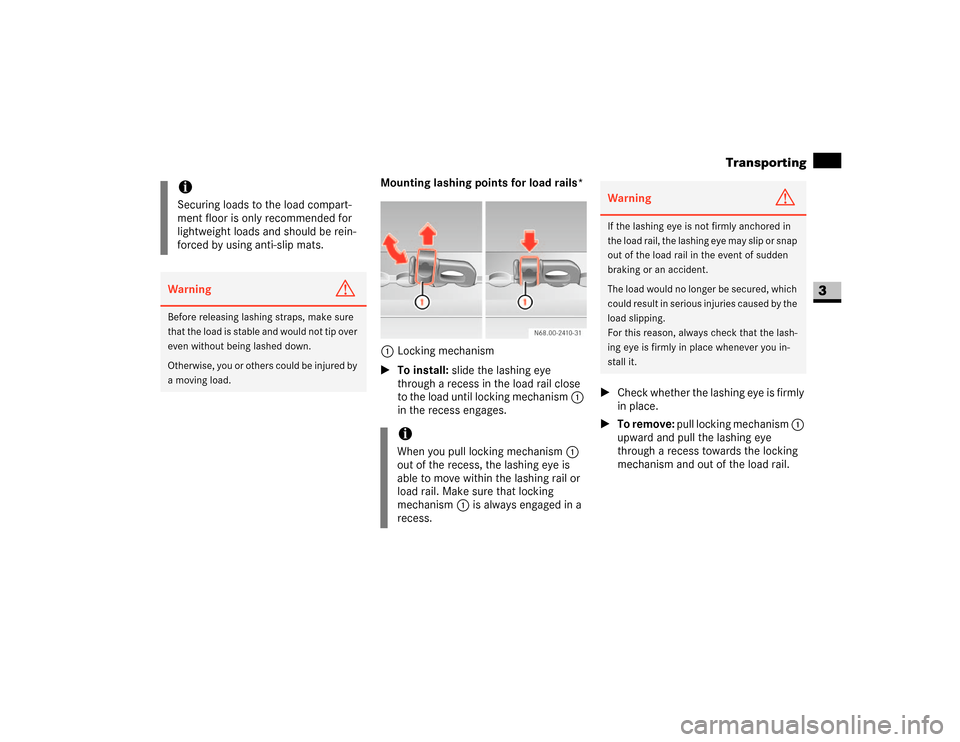
Mounting lashing points for load rails*
1Locking mechanism
\1To install: slide the lashing eye
through a recess in the load rail close
to the load until locking mechanism 1
in the recess engages.\1Check whether the lashing eye is firmly
in place.
\1To remove: pull locking mechanism 1
upward and pull the lashing eye
through a recess towards the locking
mechanism and out of the load rail.
iSecuring loads to the load compart-
ment floor is only recommended for
lightweight loads and should be rein-
forced by using anti-slip mats.Warning
G
Before releasing lashing straps, make sure
that the load is stable and would not tip over
even without being lashed down.
Otherwise, you or others could be injured by
a moving load.
iWhen you pull locking mechanism1
out of the recess, the lashing eye is
able to move within the lashing rail or
load rail. Make sure that locking
mechanism1 is always engaged in a
recess.
Warning
G
If the lashing eye is not firmly anchored in
the load rail, the lashing eye may slip or snap
out of the load rail in the event of sudden
braking or an accident.
The load would no longer be secured, which
could result in serious injuries caused by the
load slipping.
For this reason, always check that the lash-
ing eye is firmly in place whenever you in-
stall it.
Page 163 of 393
162 Controls in detailTransporting
3
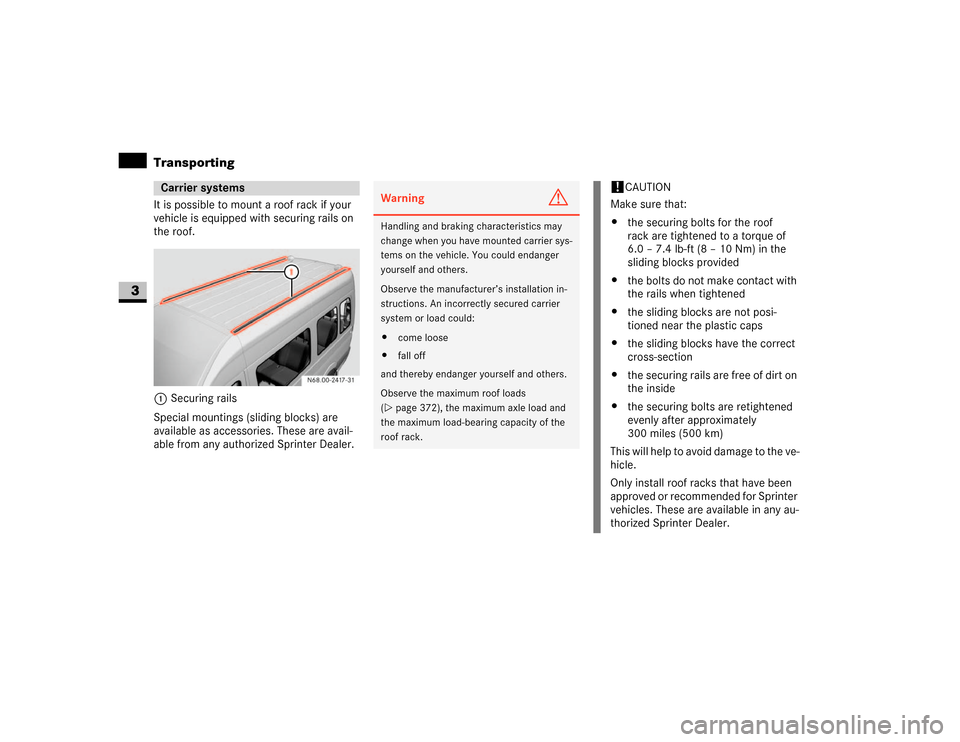
It is possible to mount a roof rack if your
vehicle is equipped with securing rails on
the roof.
1Securing rails
Special mountings (sliding blocks) are
available as accessories. These are avail-
able from any authorized Sprinter Dealer.Carrier systems
Warning
G
Handling and braking characteristics may
change when you have mounted carrier sys-
tems on the vehicle. You could endanger
yourself and others.
Observe the manufacturer’s installation in-
structions. An incorrectly secured carrier
system or load could:
\4come loose
\4fall off
and thereby endanger yourself and others.
Observe the maximum roof loads
(\2page 372), the maximum axle load and
the maximum load-bearing capacity of the
roof rack.
!
CAUTION
Make sure that:
\4the securing bolts for the roof
rack are tightened to a torque of
6.0 – 7.4 lb-ft (8 – 10 Nm) in the
sliding blocks provided
\4the bolts do not make contact with
the rails when tightened
\4the sliding blocks are not posi-
tioned near the plastic caps
\4the sliding blocks have the correct
cross-section
\4the securing rails are free of dirt on
the inside
\4the securing bolts are retightened
evenly after approximately
300 miles (500 km)
This will help to avoid damage to the ve-
hicle.
Only install roof racks that have been
approved or recommended for Sprinter
vehicles. These are available in any au-
thorized Sprinter Dealer.
Page 164 of 393
163 Controls in detail
Transporting
3
Observe the instructions in the “Opera-
tion” section (\2page 175).
!
CAUTION
If you wish to retrofit securing rails,
have them installed at a qualified spe-
cialist workshop which has the neces-
sary specialist knowledge and tools to
carry out the work required. You could
otherwise damage the vehicle.
The manufacturer recommends that
you use an authorized Sprinter Dealer
for this purpose.
Trailer towing
Page 165 of 393
164 Controls in detailFeatures
3
\3 FeaturesStorage compartments above the wind-
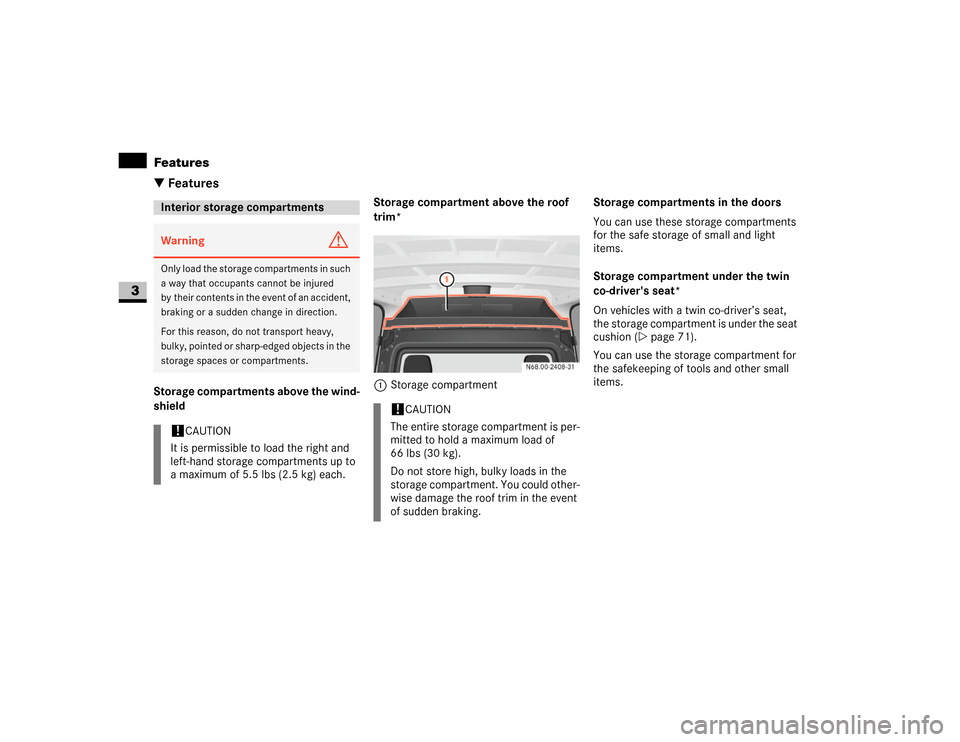
shieldStorage compartment above the roof
trim*
1Storage compartmentStorage compartments in the doors
You can use these storage compartments
for the safe storage of small and light
items.
Storage compartment under the twin
co-driver's seat*
On vehicles with a twin co-driver’s seat,
the storage compartment is under the seat
cushion (\2page 71).
You can use the storage compartment for
the safekeeping of tools and other small
items.Interior storage compartmentsWarning
G
Only load the storage compartments in such
a way that occupants cannot be injured
by their contents in the event of an accident,
braking or a sudden change in direction.
For this reason, do not transport heavy,
bulky, pointed or sharp-edged objects in the
storage spaces or compartments.!
CAUTION
It is permissible to load the right and
left-hand storage compartments up to
a maximum of 5.5 lbs (2.5 kg) each.
!
CAUTION
The entire storage compartment is per-
mitted to hold a maximum load of
66 lbs (30 kg).
Do not store high, bulky loads in the
storage compartment. You could other-
wise damage the roof trim in the event
of sudden braking.
Page 166 of 393
165 Controls in detail
Features
3
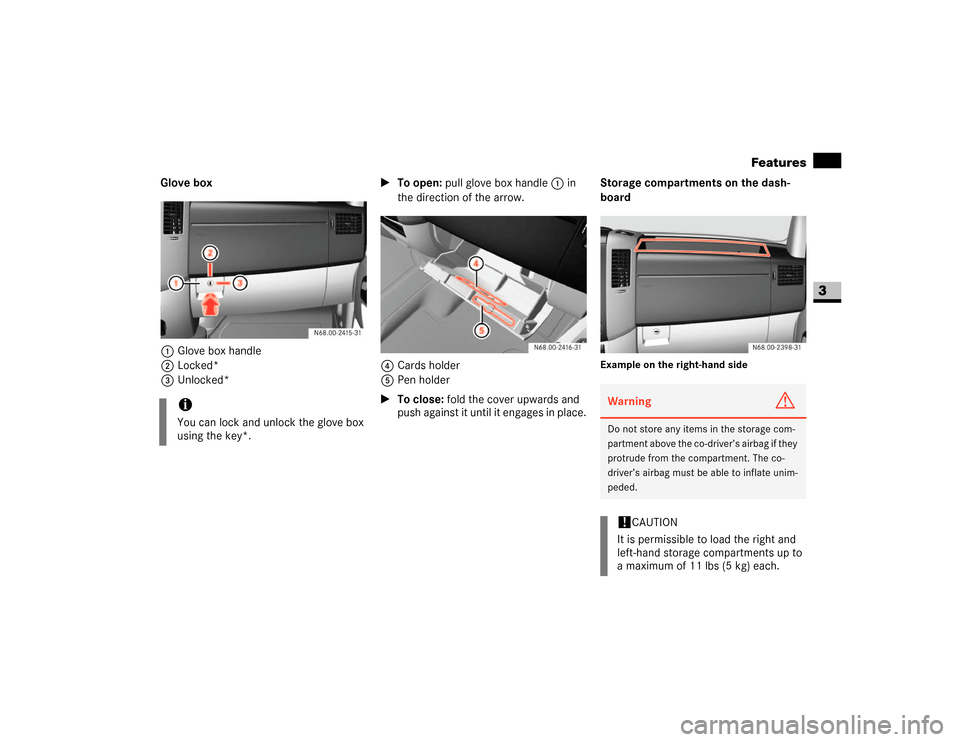
Glove box
1Glove box handle
2Locked*
3Unlocked*\1To open: pull glove box handle 1 in
the direction of the arrow.
4Cards holder
5Pen holder
\1To close: fold the cover upwards and
push against it until it engages in place.Storage compartments on the dash-
board
Example on the right-hand side
iYou can lock and unlock the glove box
using the key*.
Warning
G
Do not store any items in the storage com-
partment above the co-driver’s airbag if they
protrude from the compartment. The co-
driver’s airbag must be able to inflate unim-
peded.!
CAUTION
It is permissible to load the right and
left-hand storage compartments up to
a maximum of 11 lbs (5 kg) each.
Page 167 of 393
166 Controls in detailFeatures
3
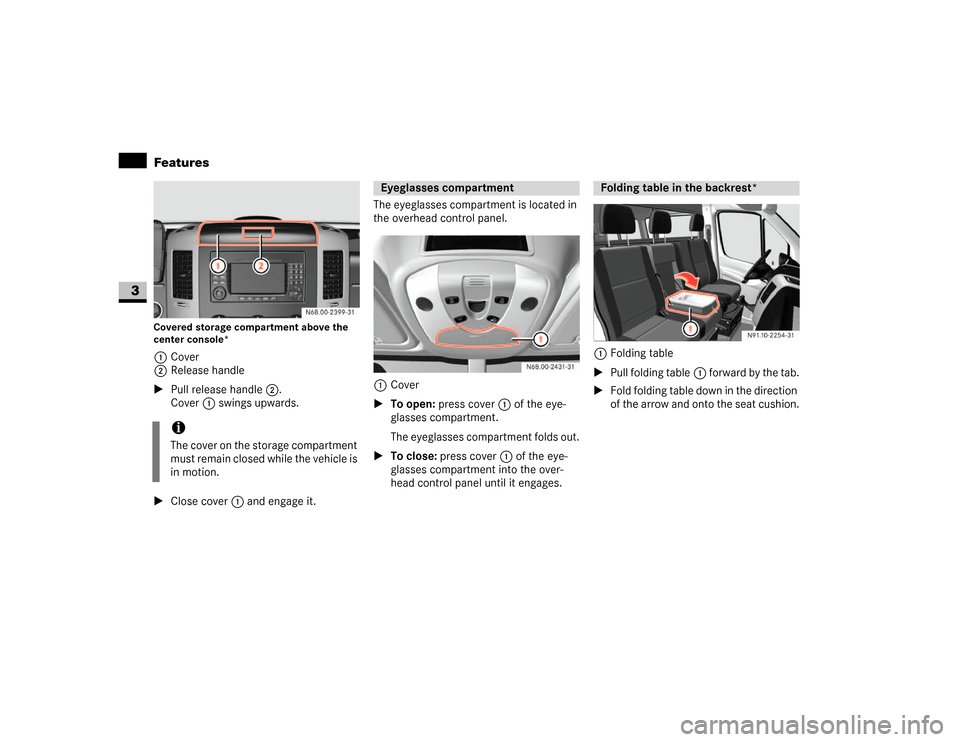
Covered storage compartment above the
center console*1Cover
2Release handle
\1Pull release handle2.
Cover1 swings upwards.
\1Close cover1 and engage it.The eyeglasses compartment is located in
the overhead control panel.
1Cover
\1To open: press cover1 of the eye-
glasses compartment.
The eyeglasses compartment folds out.
\1To close: press cover1 of the eye-
glasses compartment into the over-
head control panel until it engages.1Folding table
\1Pull folding table1 forward by the tab.
\1Fold folding table down in the direction
of the arrow and onto the seat cushion.
iThe cover on the storage compartment
must remain closed while the vehicle is
in motion.
Eyeglasses compartment
Folding table in the backrest*
Page 168 of 393
167 Controls in detail
Features
3
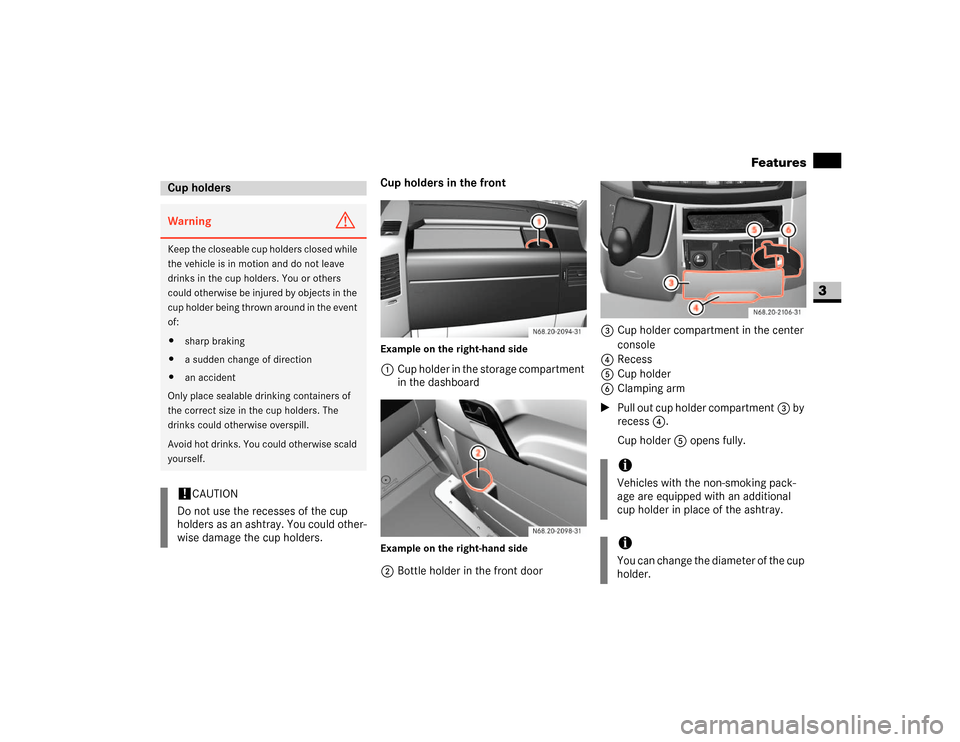
Cup holders in the frontExample on the right-hand side1Cup holder in the storage compartment
in the dashboardExample on the right-hand side2Bottle holder in the front door3Cup holder compartment in the center
console
4Recess
5Cup holder
6Clamping arm
\1Pull out cup holder compartment3 by
recess4.
Cup holder5 opens fully.
Cup holdersWarning
G
Keep the closeable cup holders closed while
the vehicle is in motion and do not leave
drinks in the cup holders. You or others
could otherwise be injured by objects in the
cup holder being thrown around in the event
of:
\4sharp braking
\4a sudden change of direction
\4an accident
Only place sealable drinking containers of
the correct size in the cup holders. The
drinks could otherwise overspill.
Avoid hot drinks. You could otherwise scald
yourself.!
CAUTION
Do not use the recesses of the cup
holders as an ashtray. You could other-
wise damage the cup holders.
iVehicles with the non-smoking pack-
age are equipped with an additional
cup holder in place of the ashtray.iYou can change the diameter of the cup
holder.
Page 169 of 393
168 Controls in detailFeatures
3
\1Place the container in cup holder5.
\1Press clamping arm6 onto the con-
tainer.
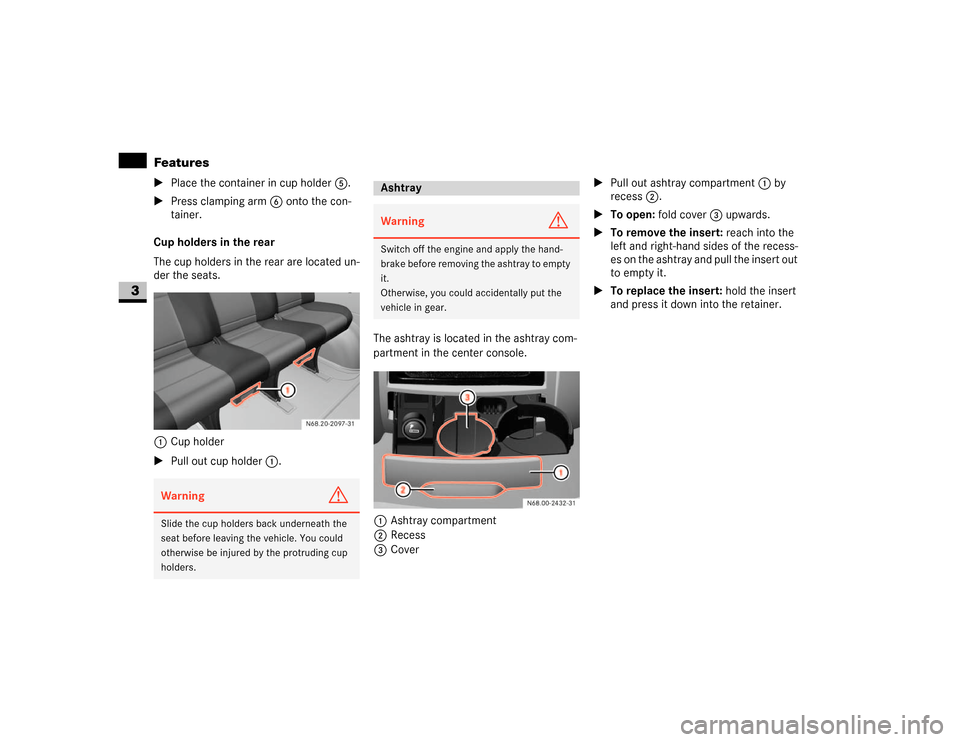
Cup holders in the rear
The cup holders in the rear are located un-
der the seats.
1Cup holder
\1Pull out cup holder1.The ashtray is located in the ashtray com-
partment in the center console.
1Ashtray compartment
2Recess
3Cover\1Pull out ashtray compartment1 by
recess2.
\1To open: fold cover3 upwards.
\1To remove the insert: reach into the
left and right-hand sides of the recess-
es on the ashtray and pull the insert out
to empty it.
\1To replace the insert: hold the insert
and press it down into the retainer.Warning
G
Slide the cup holders back underneath the
seat before leaving the vehicle. You could
otherwise be injured by the protruding cup
holders.
AshtrayWarning
G
Switch off the engine and apply the hand-
brake before removing the ashtray to empty
it.
Otherwise, you could accidentally put the
vehicle in gear.
Page 170 of 393
169 Controls in detail
Features
3
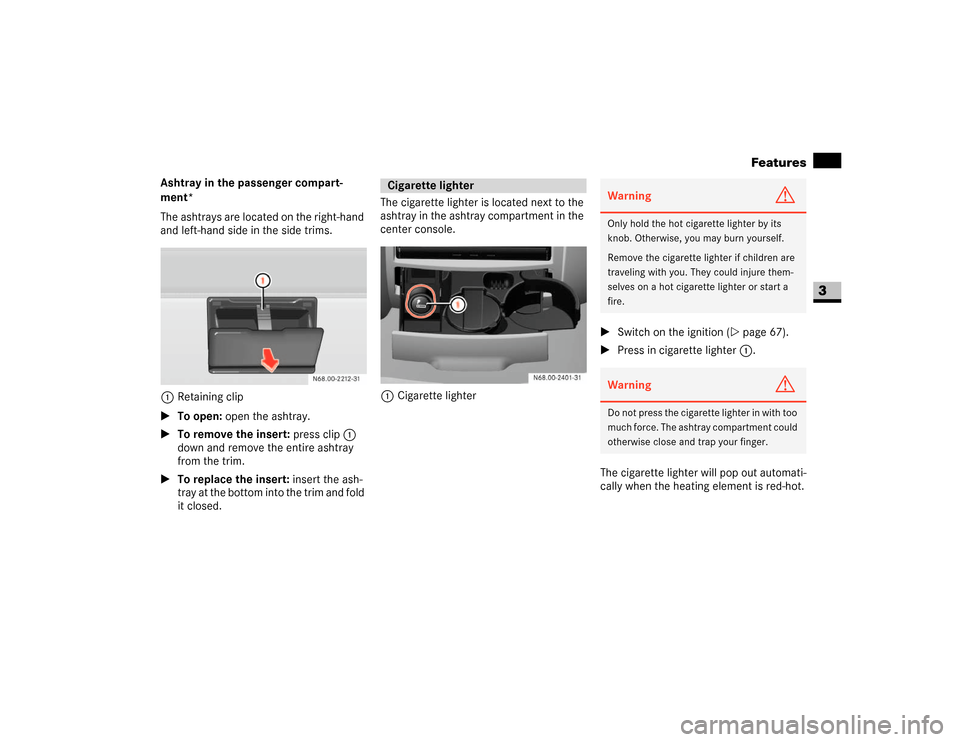
Ashtray in the passenger compart-
ment*
The ashtrays are located on the right-hand
and left-hand side in the side trims.
1Retaining clip
\1To open: open the ashtray.
\1To remove the insert: press clip1
down and remove the entire ashtray
from the trim.
\1To replace the insert: insert the ash-
tray at the bottom into the trim and fold
it closed.The cigarette lighter is located next to the
ashtray in the ashtray compartment in the
center console.
1Cigarette lighter\1Switch on the ignition (\2page 67).
\1Press in cigarette lighter 1.
The cigarette lighter will pop out automati-
cally when the heating element is red-hot.
Cigarette lighter
Warning
G
Only hold the hot cigarette lighter by its
knob. Otherwise, you may burn yourself.
Remove the cigarette lighter if children are
traveling with you. They could injure them-
selves on a hot cigarette lighter or start a
fire.Warning
G
Do not press the cigarette lighter in with too
much force. The ashtray compartment could
otherwise close and trap your finger.