DODGE TOWN AND COUNTRY 2001 Service Manual
Manufacturer: DODGE, Model Year: 2001, Model line: TOWN AND COUNTRY, Model: DODGE TOWN AND COUNTRY 2001Pages: 2321, PDF Size: 68.09 MB
Page 1681 of 2321
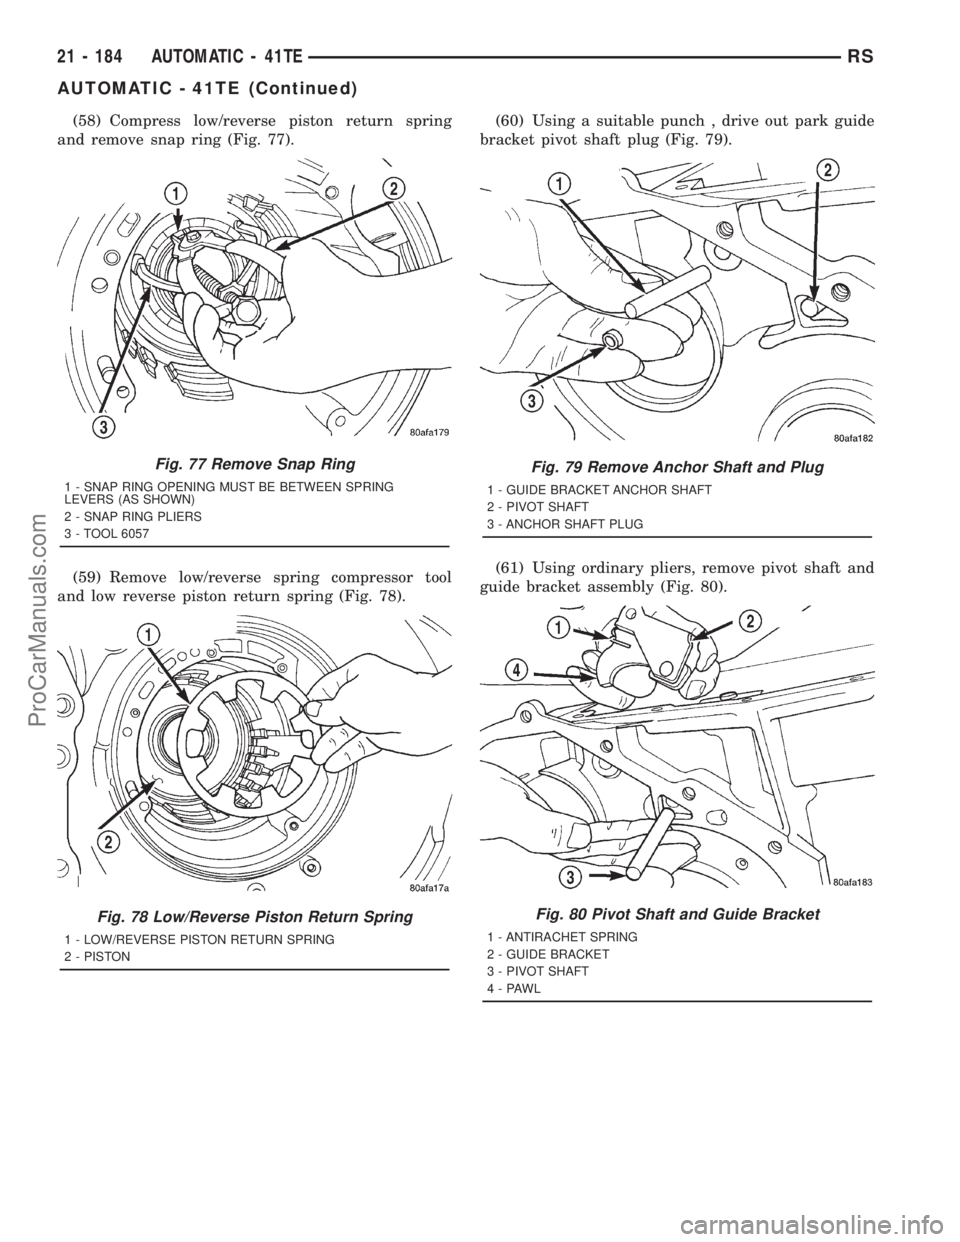
(58) Compress low/reverse piston return spring
and remove snap ring (Fig. 77).
(59) Remove low/reverse spring compressor tool
and low reverse piston return spring (Fig. 78).(60) Using a suitable punch , drive out park guide
bracket pivot shaft plug (Fig. 79).
(61) Using ordinary pliers, remove pivot shaft and
guide bracket assembly (Fig. 80).
Fig. 77 Remove Snap Ring
1 - SNAP RING OPENING MUST BE BETWEEN SPRING
LEVERS (AS SHOWN)
2 - SNAP RING PLIERS
3 - TOOL 6057
Fig. 78 Low/Reverse Piston Return Spring
1 - LOW/REVERSE PISTON RETURN SPRING
2 - PISTON
Fig. 79 Remove Anchor Shaft and Plug
1 - GUIDE BRACKET ANCHOR SHAFT
2 - PIVOT SHAFT
3 - ANCHOR SHAFT PLUG
Fig. 80 Pivot Shaft and Guide Bracket
1 - ANTIRACHET SPRING
2 - GUIDE BRACKET
3 - PIVOT SHAFT
4-PAWL
21 - 184 AUTOMATIC - 41TERS
AUTOMATIC - 41TE (Continued)
ProCarManuals.com
Page 1682 of 2321
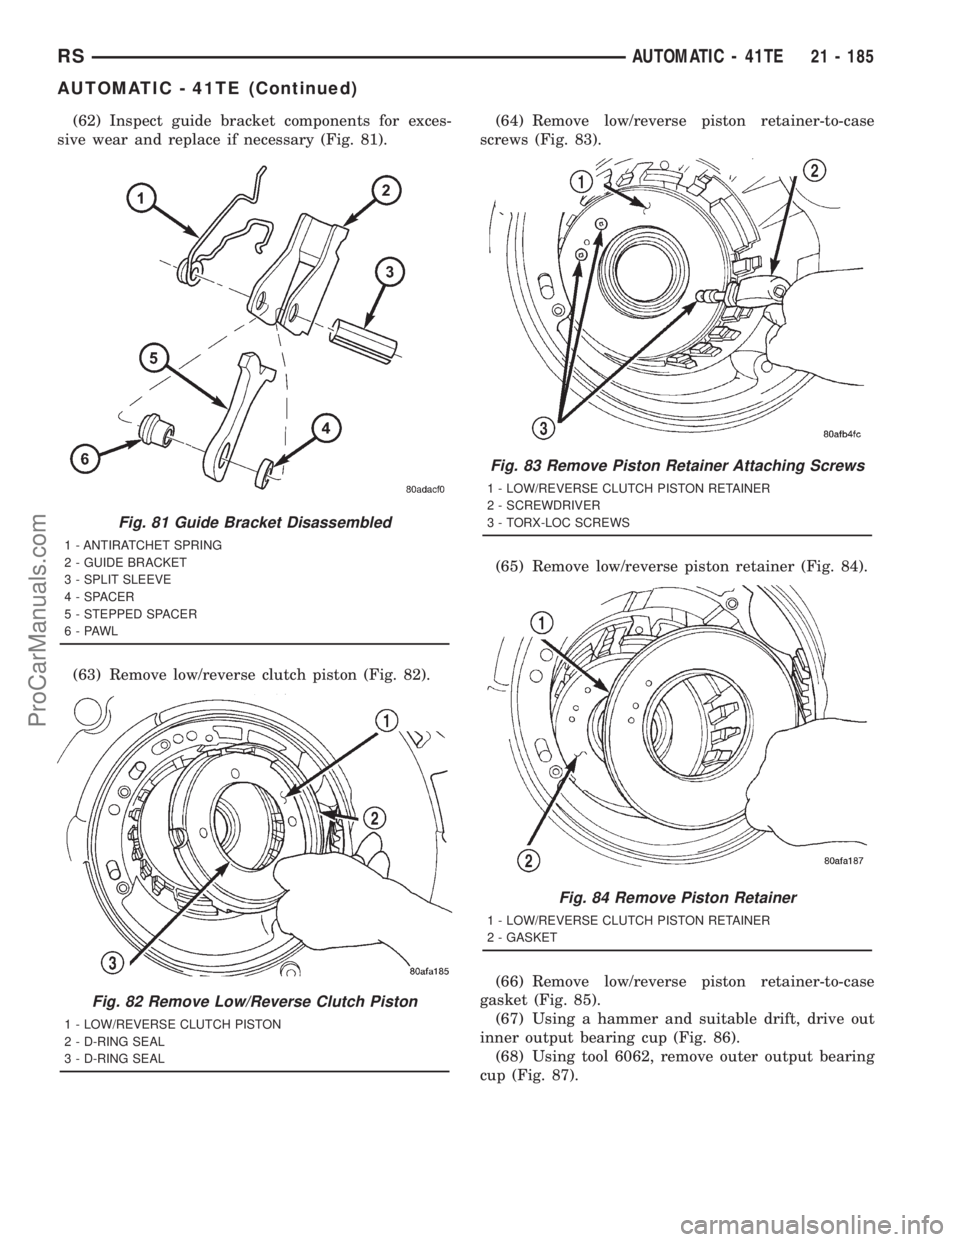
(62) Inspect guide bracket components for exces-
sive wear and replace if necessary (Fig. 81).
(63) Remove low/reverse clutch piston (Fig. 82).(64) Remove low/reverse piston retainer-to-case
screws (Fig. 83).
(65) Remove low/reverse piston retainer (Fig. 84).
(66) Remove low/reverse piston retainer-to-case
gasket (Fig. 85).
(67) Using a hammer and suitable drift, drive out
inner output bearing cup (Fig. 86).
(68) Using tool 6062, remove outer output bearing
cup (Fig. 87).
Fig. 81 Guide Bracket Disassembled
1 - ANTIRATCHET SPRING
2 - GUIDE BRACKET
3 - SPLIT SLEEVE
4 - SPACER
5 - STEPPED SPACER
6-PAWL
Fig. 82 Remove Low/Reverse Clutch Piston
1 - LOW/REVERSE CLUTCH PISTON
2 - D-RING SEAL
3 - D-RING SEAL
Fig. 83 Remove Piston Retainer Attaching Screws
1 - LOW/REVERSE CLUTCH PISTON RETAINER
2 - SCREWDRIVER
3 - TORX-LOC SCREWS
Fig. 84 Remove Piston Retainer
1 - LOW/REVERSE CLUTCH PISTON RETAINER
2 - GASKET
RSAUTOMATIC - 41TE21 - 185
AUTOMATIC - 41TE (Continued)
ProCarManuals.com
Page 1683 of 2321
ASSEMBLY
CAUTION: If transaxle failure has occurred, it is
necessary to flush the transaxle oil cooler and lines
to remove debris and particles that could contami-
nate and/or fail a new or rebuilt unit. (Refer to 7 -
COOLING/TRANSMISSION - STANDARD PROCE-
DURE)CAUTION: The cooler bypass valve must be
replaced if transaxle failure has occurred. Do not
attempt to reuse or clean old valve.
NOTE: If transaxle is being overhauled (clutch
and/or seal replacement), the TCM Quick Learn pro-
cedure must be performed. (Refer to 8 - ELECTRI-
CAL/ELECTRONIC CONTROL MODULES/
TRANSMISSION CONTROL MODULE - STANDARD
PROCEDURE)
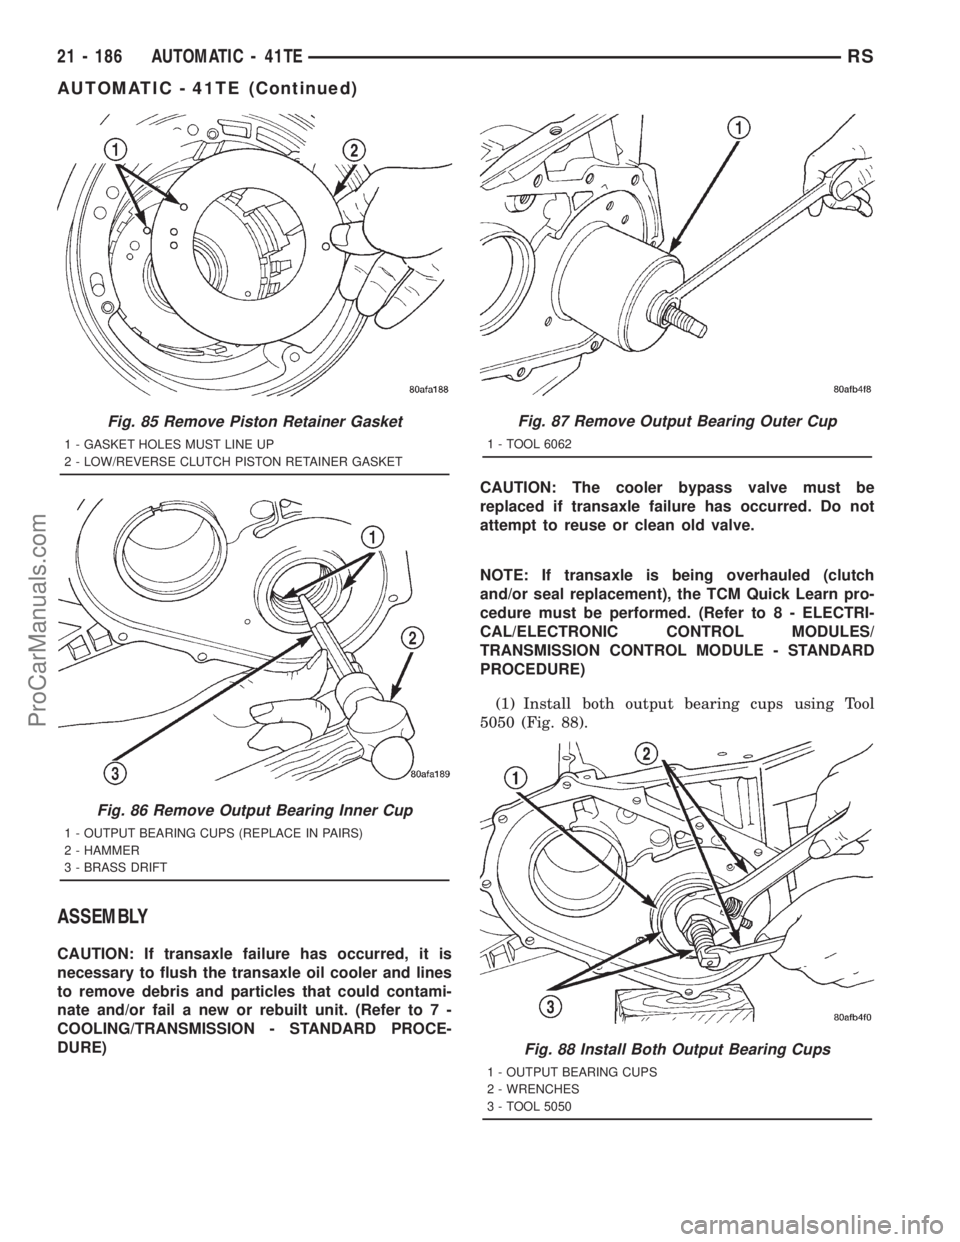
(1) Install both output bearing cups using Tool
5050 (Fig. 88).
Fig. 85 Remove Piston Retainer Gasket
1 - GASKET HOLES MUST LINE UP
2 - LOW/REVERSE CLUTCH PISTON RETAINER GASKET
Fig. 86 Remove Output Bearing Inner Cup
1 - OUTPUT BEARING CUPS (REPLACE IN PAIRS)
2 - HAMMER
3 - BRASS DRIFT
Fig. 87 Remove Output Bearing Outer Cup
1 - TOOL 6062
Fig. 88 Install Both Output Bearing Cups
1 - OUTPUT BEARING CUPS
2 - WRENCHES
3 - TOOL 5050
21 - 186 AUTOMATIC - 41TERS
AUTOMATIC - 41TE (Continued)
ProCarManuals.com
Page 1684 of 2321
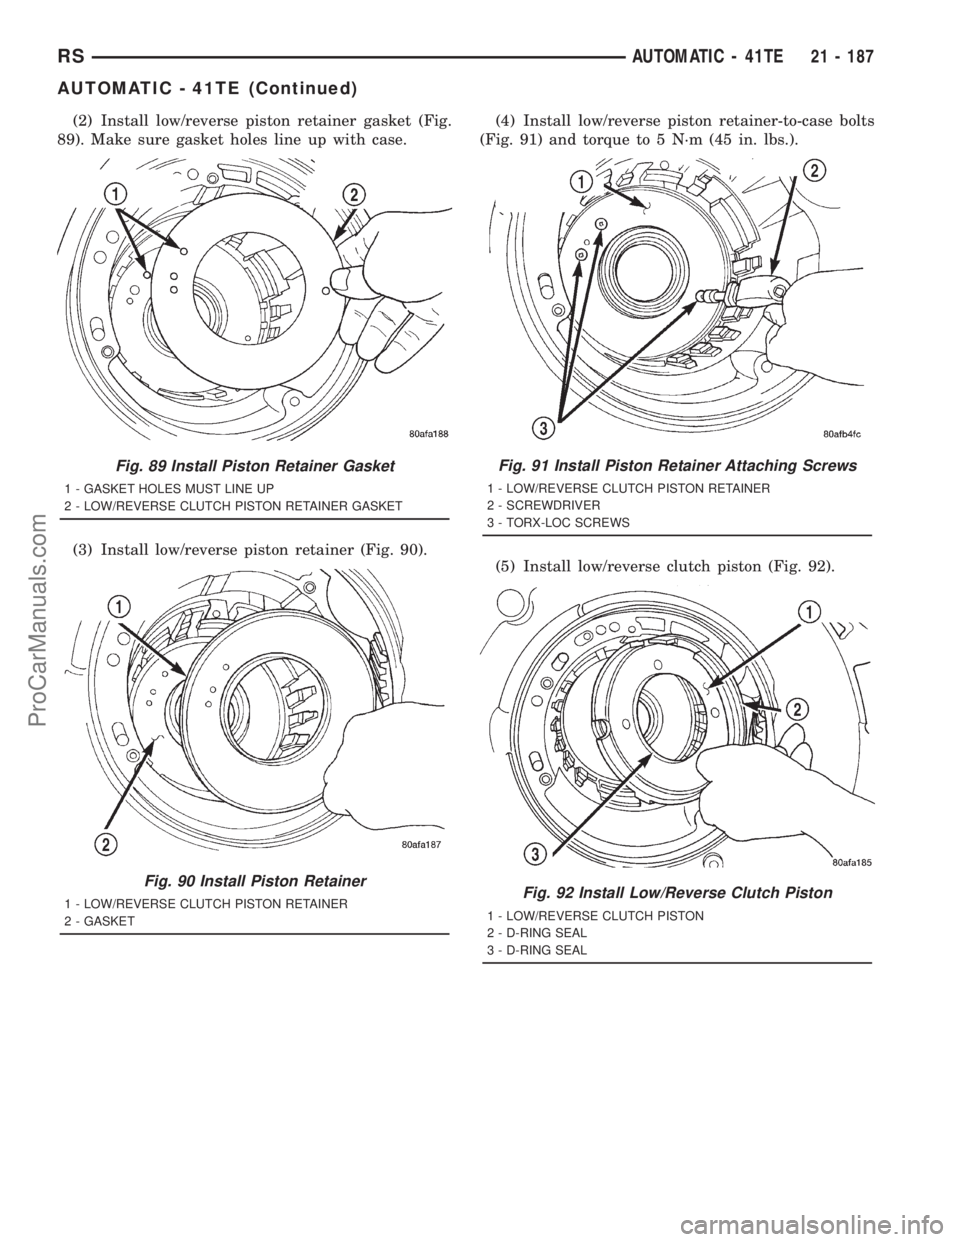
(2) Install low/reverse piston retainer gasket (Fig.
89). Make sure gasket holes line up with case.
(3) Install low/reverse piston retainer (Fig. 90).(4) Install low/reverse piston retainer-to-case bolts
(Fig. 91) and torque to 5 N´m (45 in. lbs.).
(5) Install low/reverse clutch piston (Fig. 92).
Fig. 89 Install Piston Retainer Gasket
1 - GASKET HOLES MUST LINE UP
2 - LOW/REVERSE CLUTCH PISTON RETAINER GASKET
Fig. 90 Install Piston Retainer
1 - LOW/REVERSE CLUTCH PISTON RETAINER
2 - GASKET
Fig. 91 Install Piston Retainer Attaching Screws
1 - LOW/REVERSE CLUTCH PISTON RETAINER
2 - SCREWDRIVER
3 - TORX-LOC SCREWS
Fig. 92 Install Low/Reverse Clutch Piston
1 - LOW/REVERSE CLUTCH PISTON
2 - D-RING SEAL
3 - D-RING SEAL
RSAUTOMATIC - 41TE21 - 187
AUTOMATIC - 41TE (Continued)
ProCarManuals.com
Page 1685 of 2321
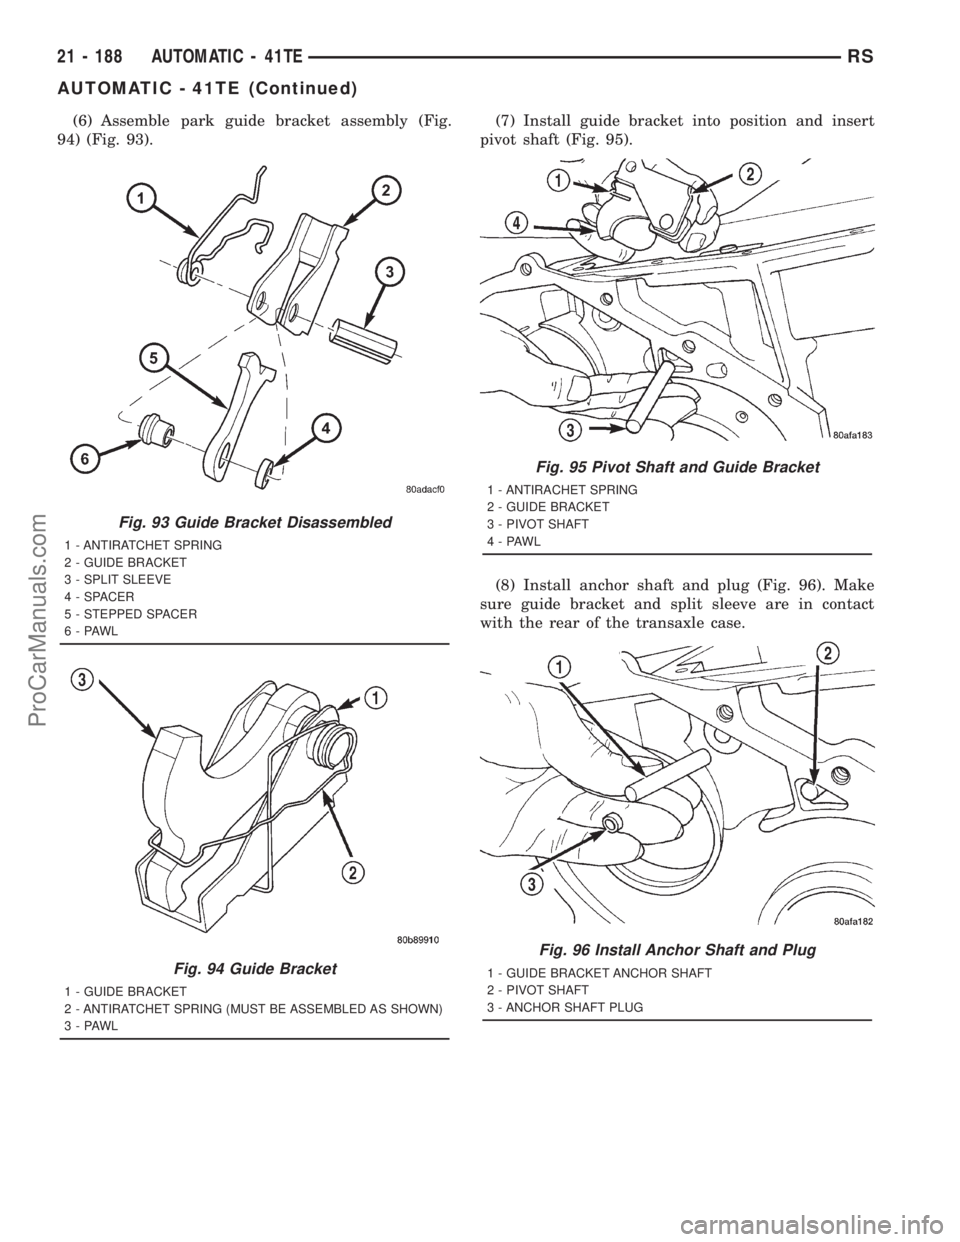
(6) Assemble park guide bracket assembly (Fig.
94) (Fig. 93).(7) Install guide bracket into position and insert
pivot shaft (Fig. 95).
(8) Install anchor shaft and plug (Fig. 96). Make
sure guide bracket and split sleeve are in contact
with the rear of the transaxle case.
Fig. 93 Guide Bracket Disassembled
1 - ANTIRATCHET SPRING
2 - GUIDE BRACKET
3 - SPLIT SLEEVE
4 - SPACER
5 - STEPPED SPACER
6-PAWL
Fig. 94 Guide Bracket
1 - GUIDE BRACKET
2 - ANTIRATCHET SPRING (MUST BE ASSEMBLED AS SHOWN)
3-PAWL
Fig. 95 Pivot Shaft and Guide Bracket
1 - ANTIRACHET SPRING
2 - GUIDE BRACKET
3 - PIVOT SHAFT
4-PAWL
Fig. 96 Install Anchor Shaft and Plug
1 - GUIDE BRACKET ANCHOR SHAFT
2 - PIVOT SHAFT
3 - ANCHOR SHAFT PLUG
21 - 188 AUTOMATIC - 41TERS
AUTOMATIC - 41TE (Continued)
ProCarManuals.com
Page 1686 of 2321
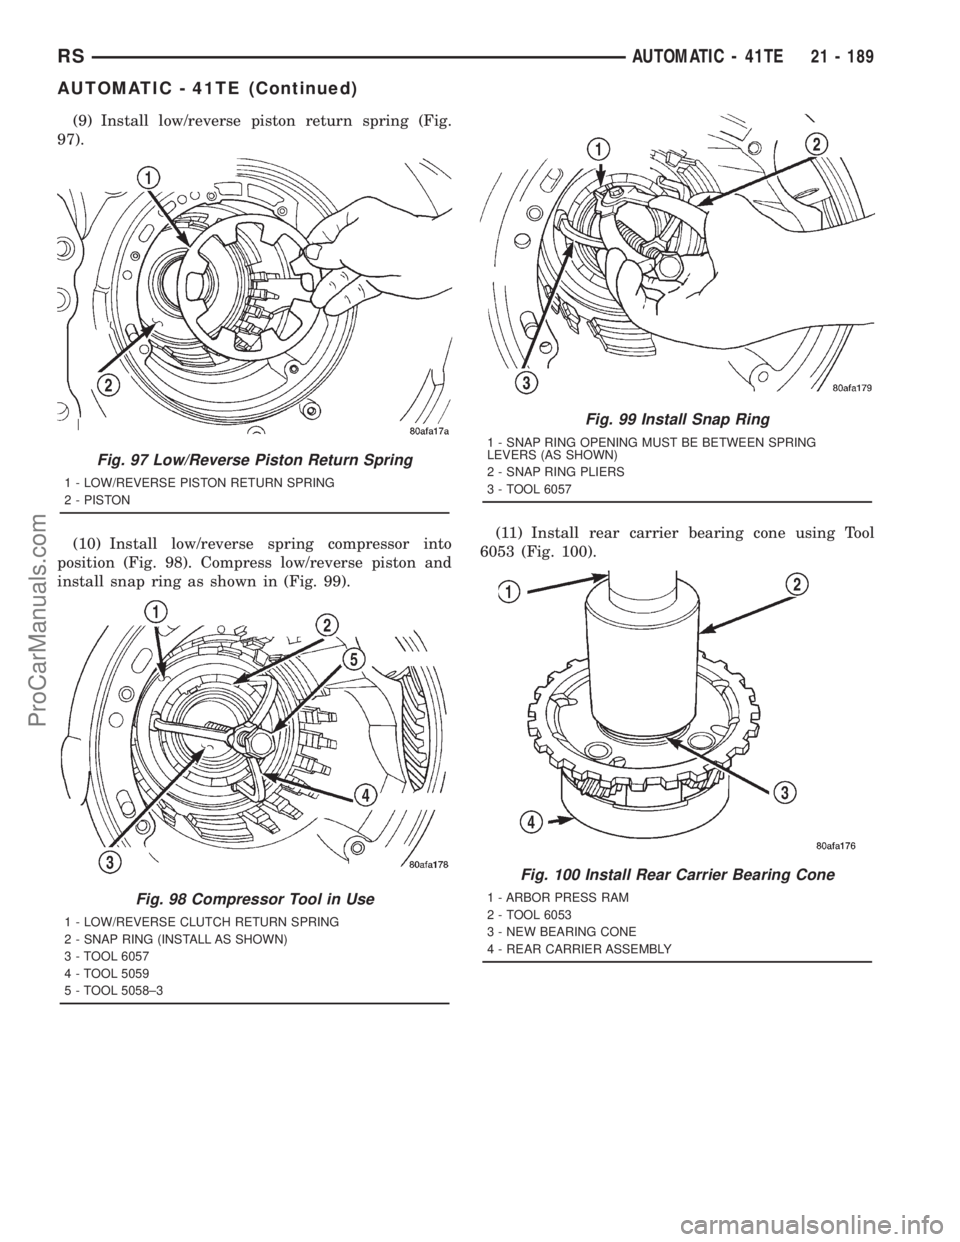
(9) Install low/reverse piston return spring (Fig.
97).
(10) Install low/reverse spring compressor into
position (Fig. 98). Compress low/reverse piston and
install snap ring as shown in (Fig. 99).(11) Install rear carrier bearing cone using Tool
6053 (Fig. 100).
Fig. 97 Low/Reverse Piston Return Spring
1 - LOW/REVERSE PISTON RETURN SPRING
2 - PISTON
Fig. 98 Compressor Tool in Use
1 - LOW/REVERSE CLUTCH RETURN SPRING
2 - SNAP RING (INSTALL AS SHOWN)
3 - TOOL 6057
4 - TOOL 5059
5 - TOOL 5058±3
Fig. 99 Install Snap Ring
1 - SNAP RING OPENING MUST BE BETWEEN SPRING
LEVERS (AS SHOWN)
2 - SNAP RING PLIERS
3 - TOOL 6057
Fig. 100 Install Rear Carrier Bearing Cone
1 - ARBOR PRESS RAM
2 - TOOL 6053
3 - NEW BEARING CONE
4 - REAR CARRIER ASSEMBLY
RSAUTOMATIC - 41TE21 - 189
AUTOMATIC - 41TE (Continued)
ProCarManuals.com
Page 1687 of 2321
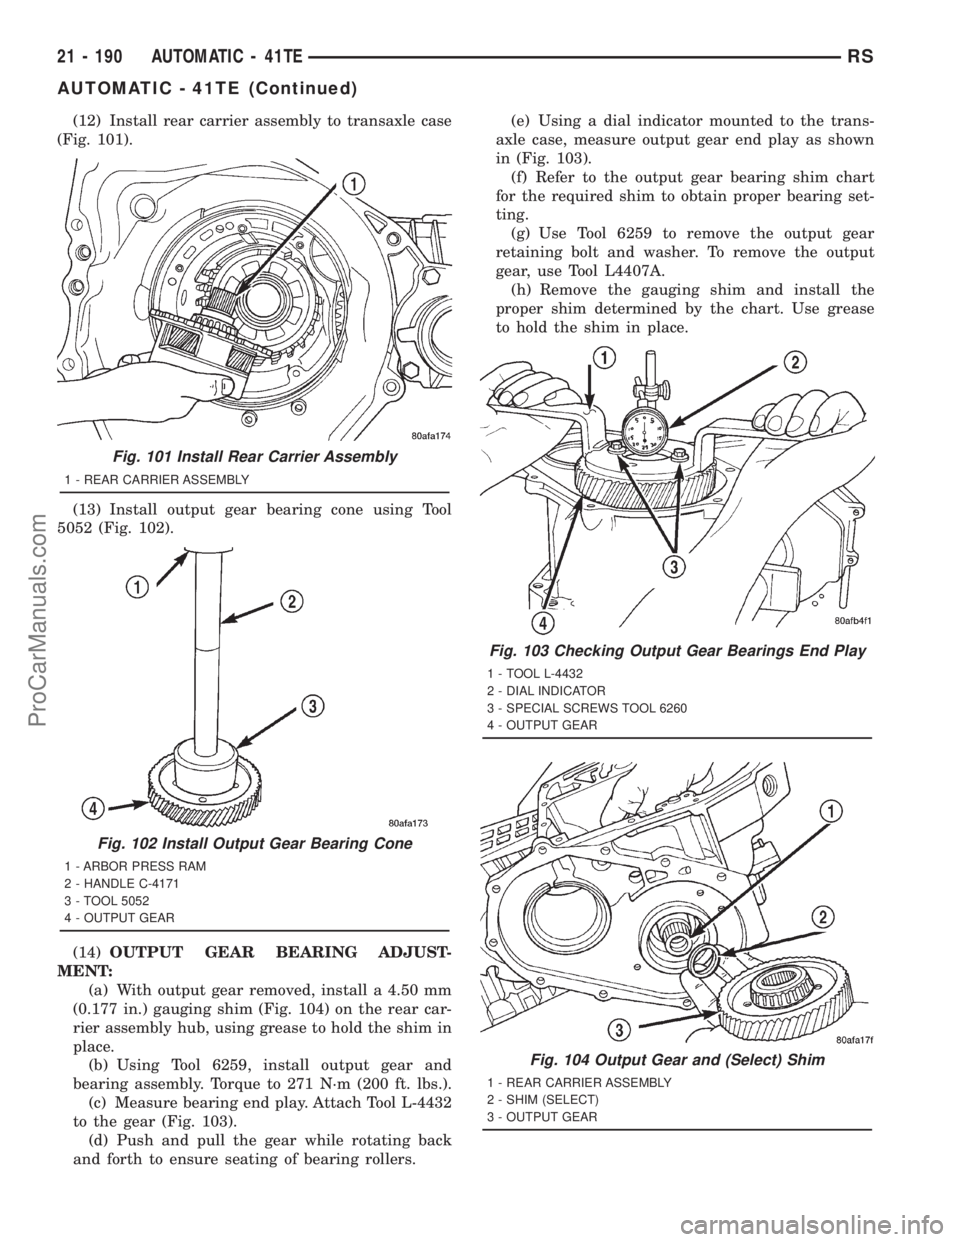
(12) Install rear carrier assembly to transaxle case
(Fig. 101).
(13) Install output gear bearing cone using Tool
5052 (Fig. 102).
(14)OUTPUT GEAR BEARING ADJUST-
MENT:
(a) With output gear removed, install a 4.50 mm
(0.177 in.) gauging shim (Fig. 104) on the rear car-
rier assembly hub, using grease to hold the shim in
place.
(b) Using Tool 6259, install output gear and
bearing assembly. Torque to 271 N´m (200 ft. lbs.).
(c) Measure bearing end play. Attach Tool L-4432
to the gear (Fig. 103).
(d) Push and pull the gear while rotating back
and forth to ensure seating of bearing rollers.(e) Using a dial indicator mounted to the trans-
axle case, measure output gear end play as shown
in (Fig. 103).
(f) Refer to the output gear bearing shim chart
for the required shim to obtain proper bearing set-
ting.
(g) Use Tool 6259 to remove the output gear
retaining bolt and washer. To remove the output
gear, use Tool L4407A.
(h) Remove the gauging shim and install the
proper shim determined by the chart. Use grease
to hold the shim in place.
Fig. 101 Install Rear Carrier Assembly
1 - REAR CARRIER ASSEMBLY
Fig. 102 Install Output Gear Bearing Cone
1 - ARBOR PRESS RAM
2 - HANDLE C-4171
3 - TOOL 5052
4 - OUTPUT GEAR
Fig. 103 Checking Output Gear Bearings End Play
1 - TOOL L-4432
2 - DIAL INDICATOR
3 - SPECIAL SCREWS TOOL 6260
4 - OUTPUT GEAR
Fig. 104 Output Gear and (Select) Shim
1 - REAR CARRIER ASSEMBLY
2 - SHIM (SELECT)
3 - OUTPUT GEAR
21 - 190 AUTOMATIC - 41TERS
AUTOMATIC - 41TE (Continued)
ProCarManuals.com
Page 1688 of 2321
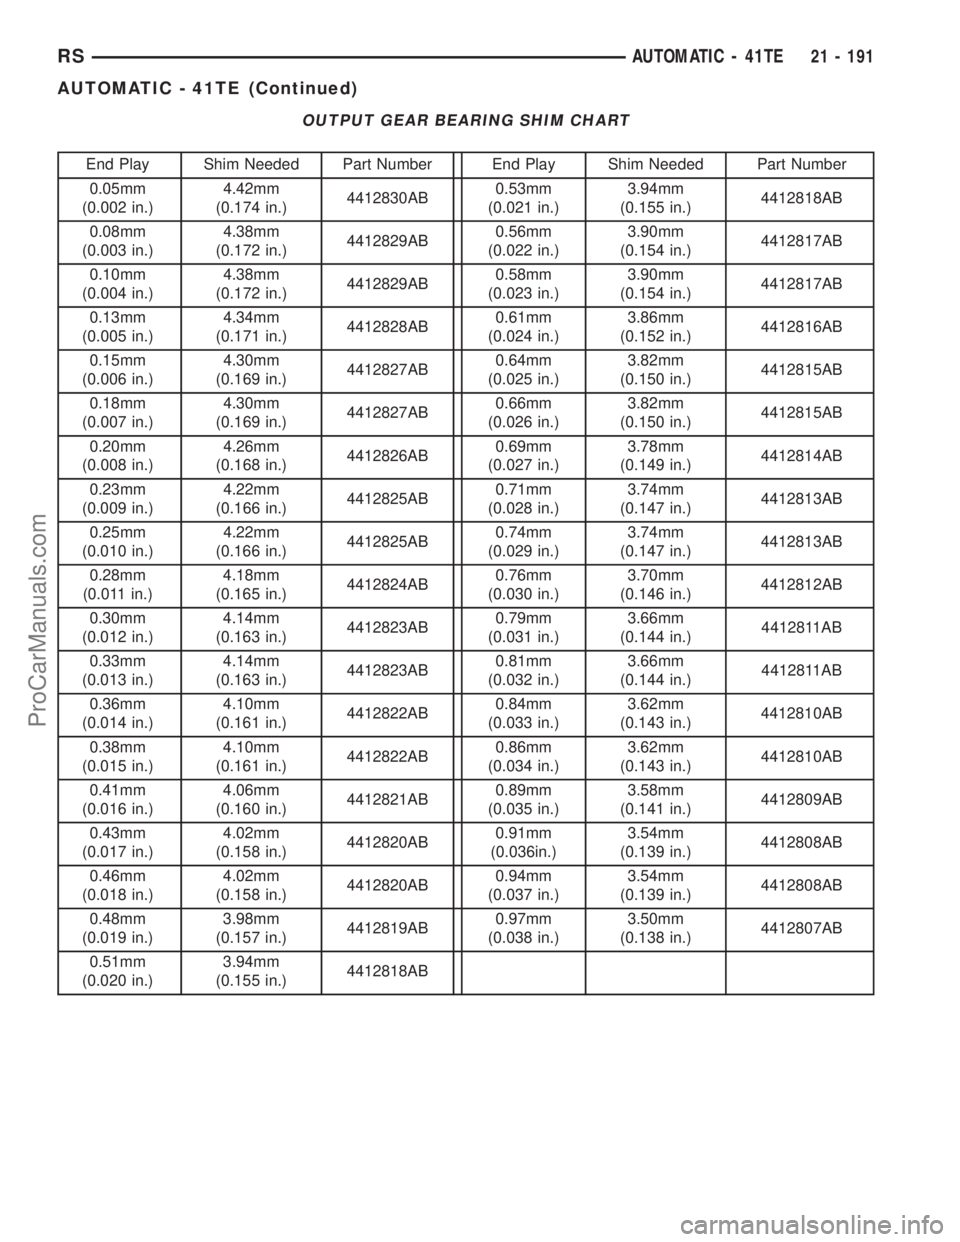
OUTPUT GEAR BEARING SHIM CHART
End Play Shim Needed Part Number End Play Shim Needed Part Number
0.05mm
(0.002 in.)4.42mm
(0.174 in.)4412830AB0.53mm
(0.021 in.)3.94mm
(0.155 in.)4412818AB
0.08mm
(0.003 in.)4.38mm
(0.172 in.)4412829AB0.56mm
(0.022 in.)3.90mm
(0.154 in.)4412817AB
0.10mm
(0.004 in.)4.38mm
(0.172 in.)4412829AB0.58mm
(0.023 in.)3.90mm
(0.154 in.)4412817AB
0.13mm
(0.005 in.)4.34mm
(0.171 in.)4412828AB0.61mm
(0.024 in.)3.86mm
(0.152 in.)4412816AB
0.15mm
(0.006 in.)4.30mm
(0.169 in.)4412827AB0.64mm
(0.025 in.)3.82mm
(0.150 in.)4412815AB
0.18mm
(0.007 in.)4.30mm
(0.169 in.)4412827AB0.66mm
(0.026 in.)3.82mm
(0.150 in.)4412815AB
0.20mm
(0.008 in.)4.26mm
(0.168 in.)4412826AB0.69mm
(0.027 in.)3.78mm
(0.149 in.)4412814AB
0.23mm
(0.009 in.)4.22mm
(0.166 in.)4412825AB0.71mm
(0.028 in.)3.74mm
(0.147 in.)4412813AB
0.25mm
(0.010 in.)4.22mm
(0.166 in.)4412825AB0.74mm
(0.029 in.)3.74mm
(0.147 in.)4412813AB
0.28mm
(0.011 in.)4.18mm
(0.165 in.)4412824AB0.76mm
(0.030 in.)3.70mm
(0.146 in.)4412812AB
0.30mm
(0.012 in.)4.14mm
(0.163 in.)4412823AB0.79mm
(0.031 in.)3.66mm
(0.144 in.)4412811AB
0.33mm
(0.013 in.)4.14mm
(0.163 in.)4412823AB0.81mm
(0.032 in.)3.66mm
(0.144 in.)4412811AB
0.36mm
(0.014 in.)4.10mm
(0.161 in.)4412822AB0.84mm
(0.033 in.)3.62mm
(0.143 in.)4412810AB
0.38mm
(0.015 in.)4.10mm
(0.161 in.)4412822AB0.86mm
(0.034 in.)3.62mm
(0.143 in.)4412810AB
0.41mm
(0.016 in.)4.06mm
(0.160 in.)4412821AB0.89mm
(0.035 in.)3.58mm
(0.141 in.)4412809AB
0.43mm
(0.017 in.)4.02mm
(0.158 in.)4412820AB0.91mm
(0.036in.)3.54mm
(0.139 in.)4412808AB
0.46mm
(0.018 in.)4.02mm
(0.158 in.)4412820AB0.94mm
(0.037 in.)3.54mm
(0.139 in.)4412808AB
0.48mm
(0.019 in.)3.98mm
(0.157 in.)4412819AB0.97mm
(0.038 in.)3.50mm
(0.138 in.)4412807AB
0.51mm
(0.020 in.)3.94mm
(0.155 in.)4412818AB
RSAUTOMATIC - 41TE21 - 191
AUTOMATIC - 41TE (Continued)
ProCarManuals.com
Page 1689 of 2321
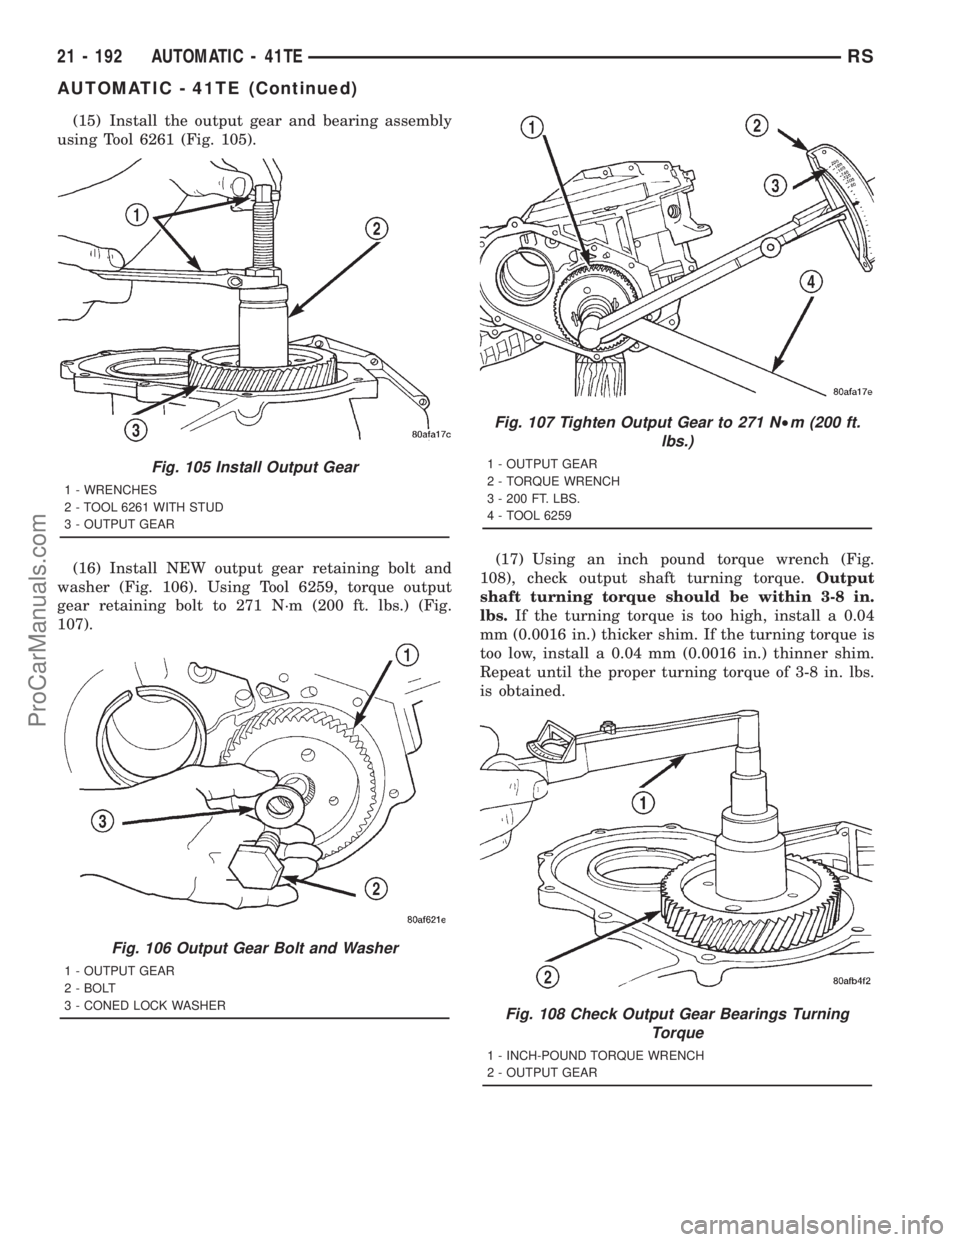
(15) Install the output gear and bearing assembly
using Tool 6261 (Fig. 105).
(16) Install NEW output gear retaining bolt and
washer (Fig. 106). Using Tool 6259, torque output
gear retaining bolt to 271 N´m (200 ft. lbs.) (Fig.
107).(17) Using an inch pound torque wrench (Fig.
108), check output shaft turning torque.Output
shaft turning torque should be within 3-8 in.
lbs.If the turning torque is too high, install a 0.04
mm (0.0016 in.) thicker shim. If the turning torque is
too low, install a 0.04 mm (0.0016 in.) thinner shim.
Repeat until the proper turning torque of 3-8 in. lbs.
is obtained.
Fig. 105 Install Output Gear
1 - WRENCHES
2 - TOOL 6261 WITH STUD
3 - OUTPUT GEAR
Fig. 106 Output Gear Bolt and Washer
1 - OUTPUT GEAR
2 - BOLT
3 - CONED LOCK WASHER
Fig. 107 Tighten Output Gear to 271 N²m (200 ft.
lbs.)
1 - OUTPUT GEAR
2 - TORQUE WRENCH
3 - 200 FT. LBS.
4 - TOOL 6259
Fig. 108 Check Output Gear Bearings Turning
Torque
1 - INCH-POUND TORQUE WRENCH
2 - OUTPUT GEAR
21 - 192 AUTOMATIC - 41TERS
AUTOMATIC - 41TE (Continued)
ProCarManuals.com
Page 1690 of 2321
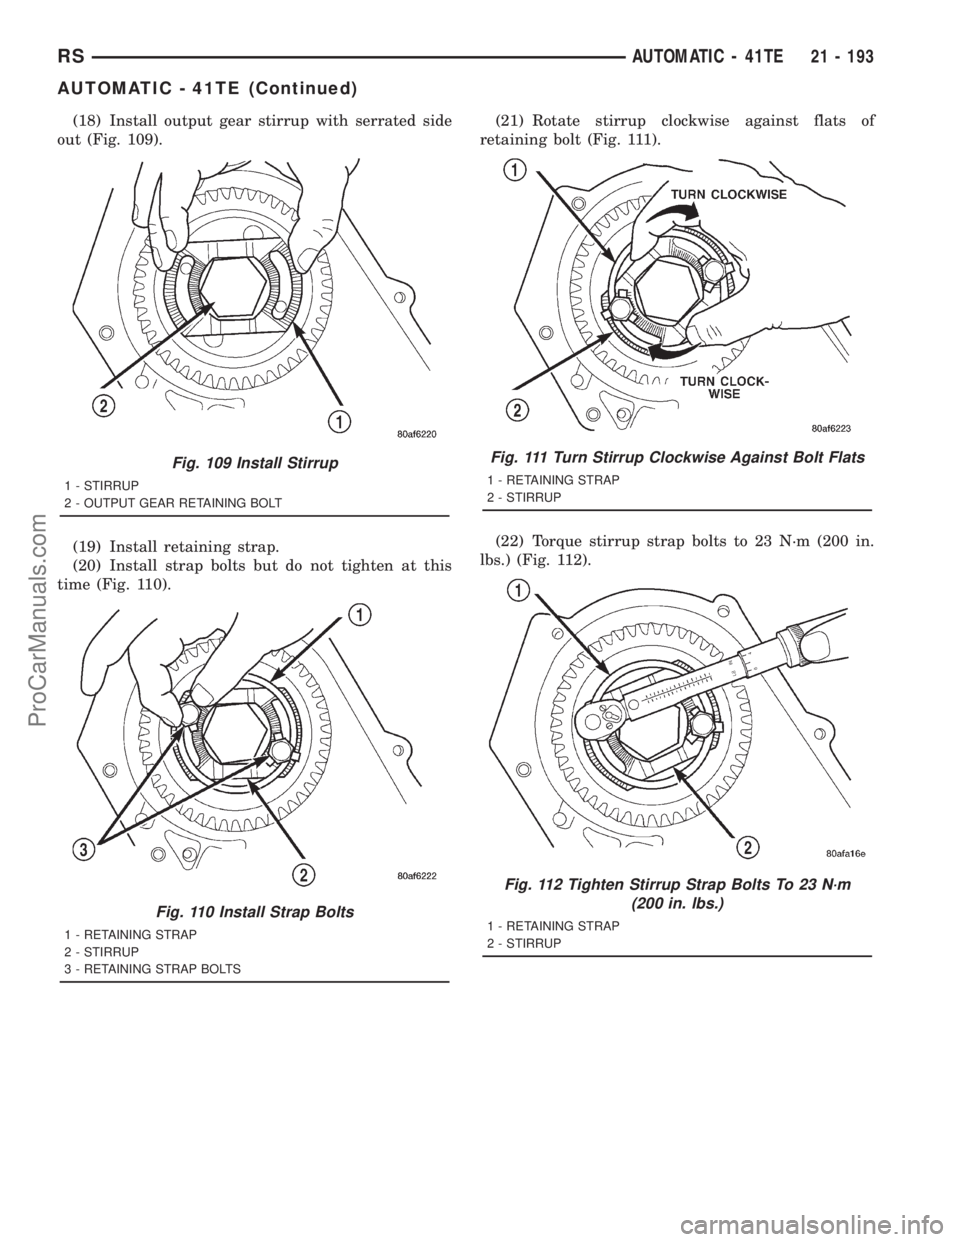
(18) Install output gear stirrup with serrated side
out (Fig. 109).
(19) Install retaining strap.
(20) Install strap bolts but do not tighten at this
time (Fig. 110).(21) Rotate stirrup clockwise against flats of
retaining bolt (Fig. 111).
(22) Torque stirrup strap bolts to 23 N´m (200 in.
lbs.) (Fig. 112).
Fig. 109 Install Stirrup
1 - STIRRUP
2 - OUTPUT GEAR RETAINING BOLT
Fig. 110 Install Strap Bolts
1 - RETAINING STRAP
2 - STIRRUP
3 - RETAINING STRAP BOLTS
Fig. 111 Turn Stirrup Clockwise Against Bolt Flats
1 - RETAINING STRAP
2 - STIRRUP
Fig. 112 Tighten Stirrup Strap Bolts To 23 N´m
(200 in. lbs.)
1 - RETAINING STRAP
2 - STIRRUP
RSAUTOMATIC - 41TE21 - 193
AUTOMATIC - 41TE (Continued)
ProCarManuals.com