DODGE TOWN AND COUNTRY 2001 Service Manual
TOWN AND COUNTRY 2001
DODGE
DODGE
https://www.carmanualsonline.info/img/12/56921/w960_56921-0.png
DODGE TOWN AND COUNTRY 2001 Service Manual
Trending: air filter, checking oil, air condition, radio, wheel torque, towing, diagnostic menu
Page 1881 of 2321
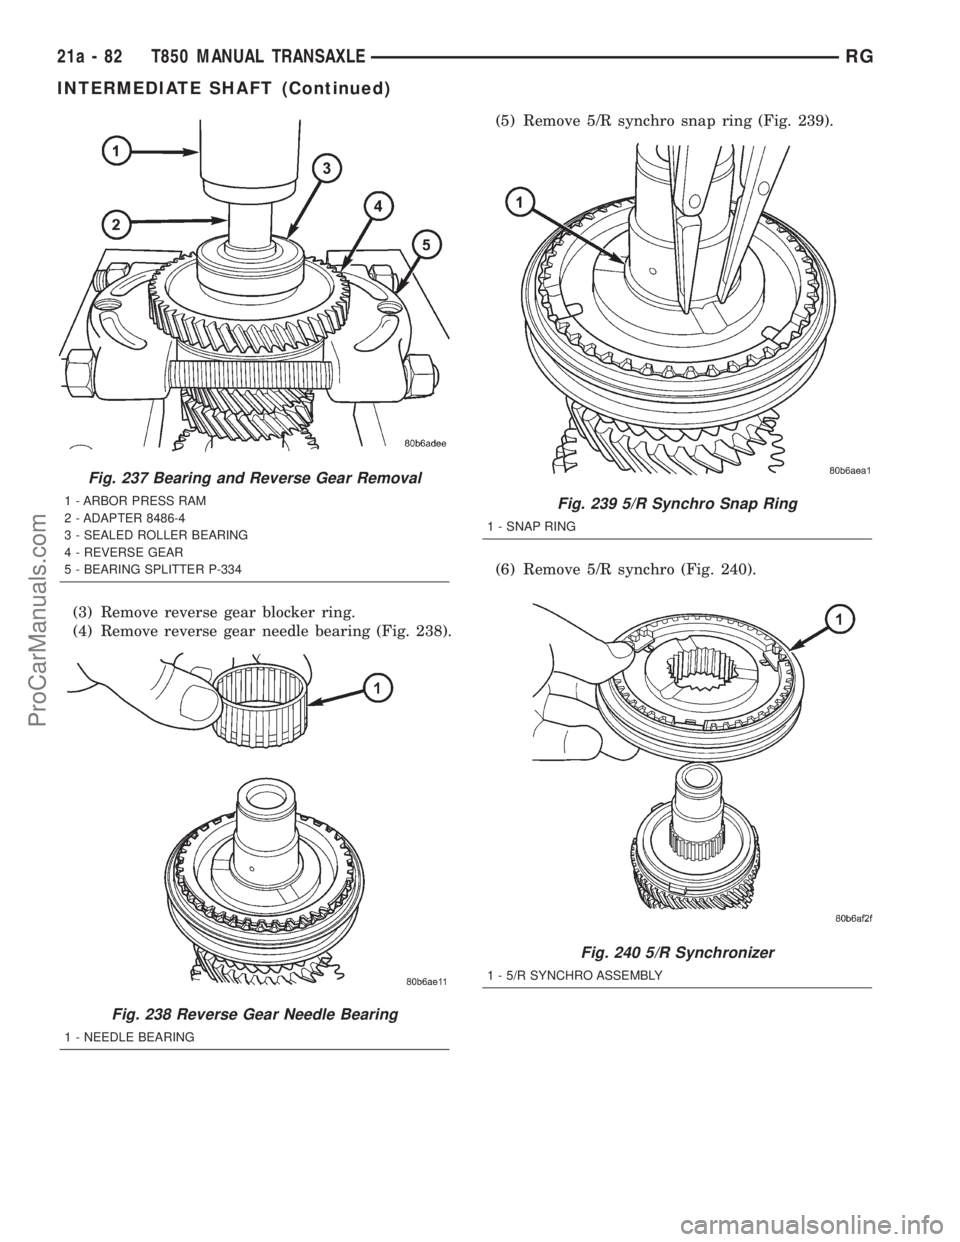
(3) Remove reverse gear blocker ring.
(4) Remove reverse gear needle bearing (Fig. 238).(5) Remove 5/R synchro snap ring (Fig. 239).
(6) Remove 5/R synchro (Fig. 240).
Fig. 237 Bearing and Reverse Gear Removal
1 - ARBOR PRESS RAM
2 - ADAPTER 8486-4
3 - SEALED ROLLER BEARING
4 - REVERSE GEAR
5 - BEARING SPLITTER P-334
Fig. 238 Reverse Gear Needle Bearing
1 - NEEDLE BEARING
Fig. 239 5/R Synchro Snap Ring
1 - SNAP RING
Fig. 240 5/R Synchronizer
1 - 5/R SYNCHRO ASSEMBLY
21a - 82 T850 MANUAL TRANSAXLERG
INTERMEDIATE SHAFT (Continued)
ProCarManuals.com
Page 1882 of 2321
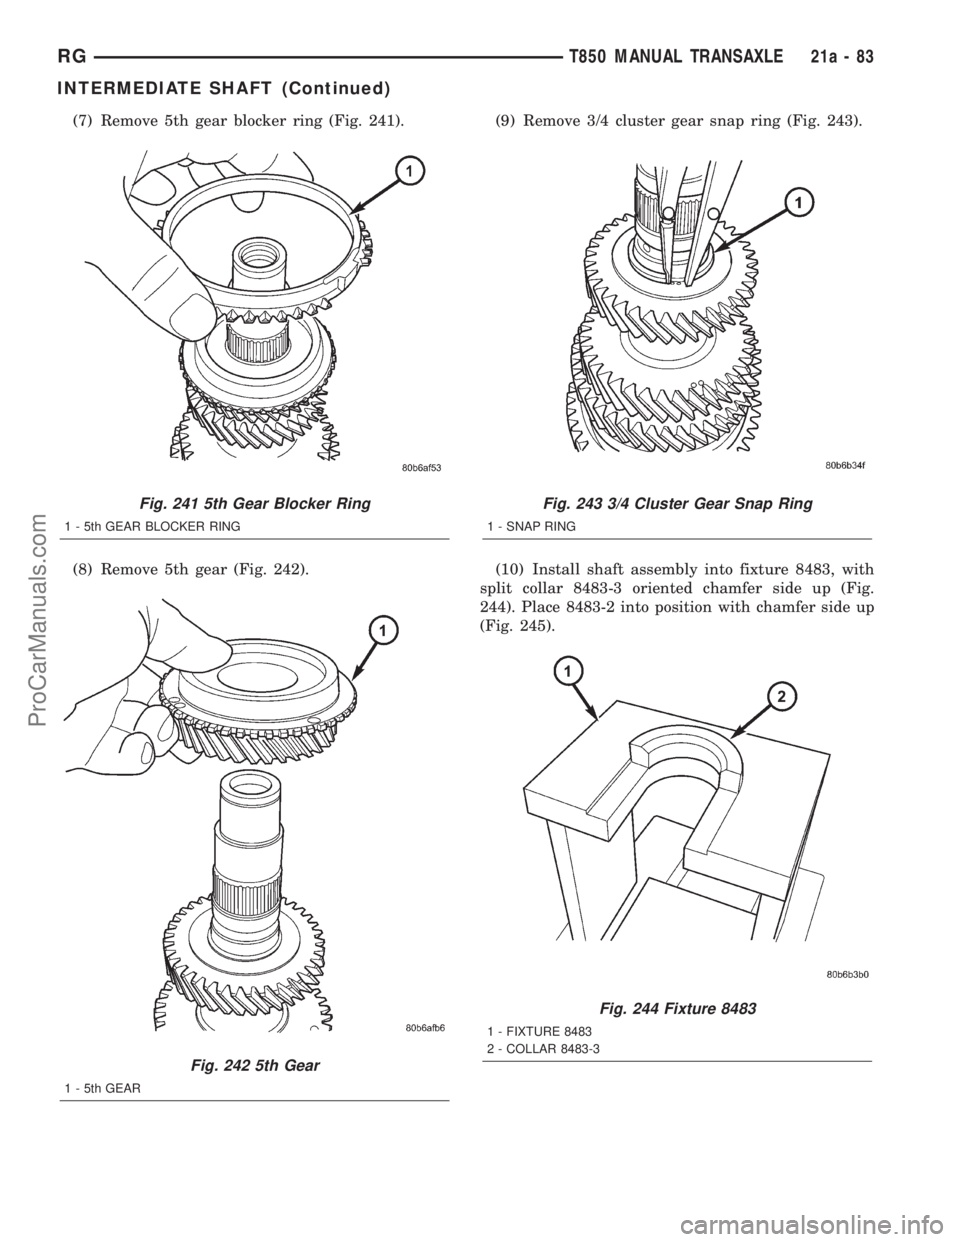
(7) Remove 5th gear blocker ring (Fig. 241).
(8) Remove 5th gear (Fig. 242).(9) Remove 3/4 cluster gear snap ring (Fig. 243).
(10) Install shaft assembly into fixture 8483, with
split collar 8483-3 oriented chamfer side up (Fig.
244). Place 8483-2 into position with chamfer side up
(Fig. 245).
Fig. 241 5th Gear Blocker Ring
1 - 5th GEAR BLOCKER RING
Fig. 242 5th Gear
1 - 5th GEAR
Fig. 243 3/4 Cluster Gear Snap Ring
1 - SNAP RING
Fig. 244 Fixture 8483
1 - FIXTURE 8483
2 - COLLAR 8483-3
RGT850 MANUAL TRANSAXLE21a-83
INTERMEDIATE SHAFT (Continued)
ProCarManuals.com
Page 1883 of 2321
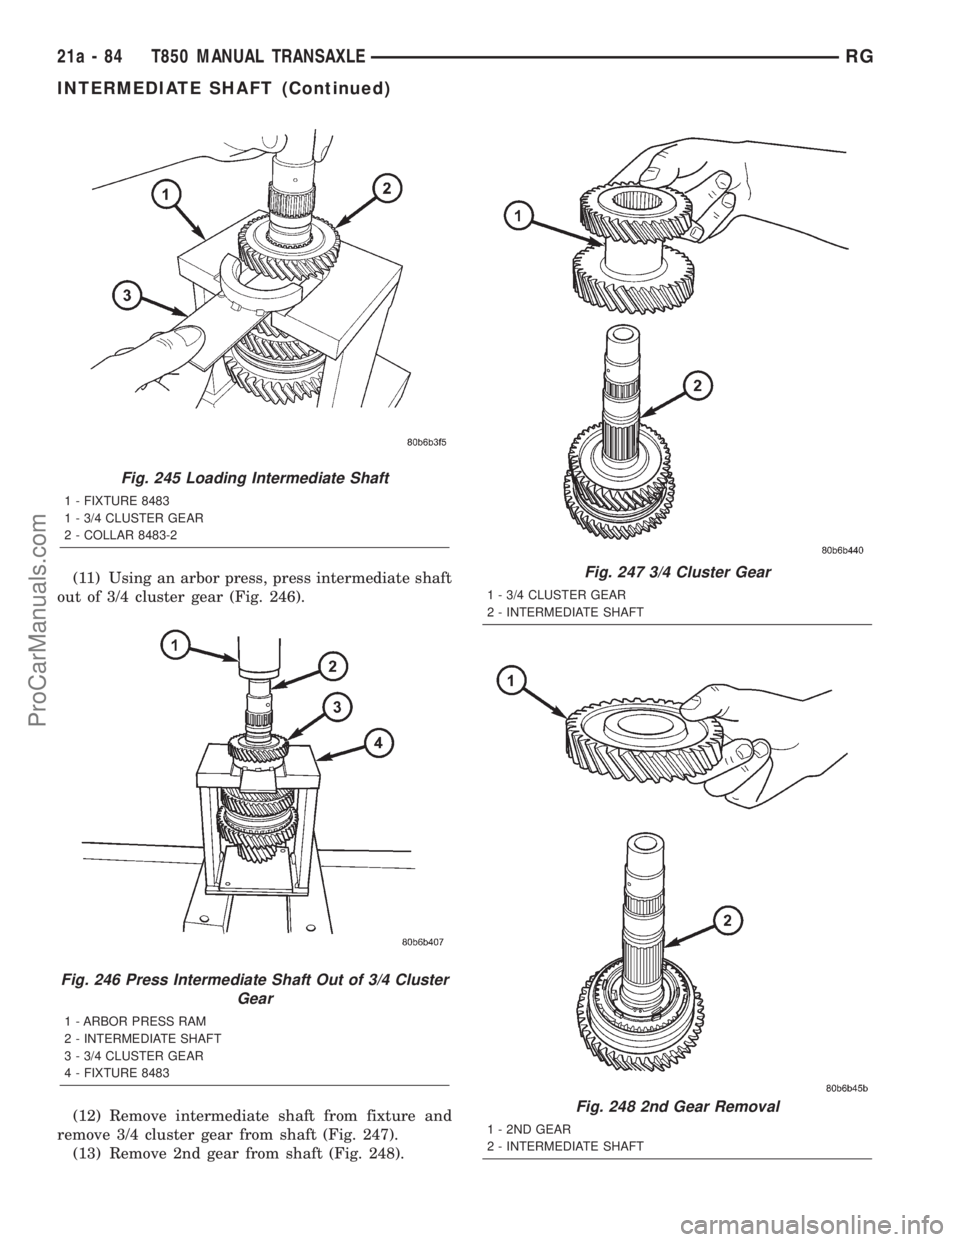
(11) Using an arbor press, press intermediate shaft
out of 3/4 cluster gear (Fig. 246).
(12) Remove intermediate shaft from fixture and
remove 3/4 cluster gear from shaft (Fig. 247).
(13) Remove 2nd gear from shaft (Fig. 248).
Fig. 245 Loading Intermediate Shaft
1 - FIXTURE 8483
1 - 3/4 CLUSTER GEAR
2 - COLLAR 8483-2
Fig. 246 Press Intermediate Shaft Out of 3/4 Cluster
Gear
1 - ARBOR PRESS RAM
2 - INTERMEDIATE SHAFT
3 - 3/4 CLUSTER GEAR
4 - FIXTURE 8483
Fig. 247 3/4 Cluster Gear
1 - 3/4 CLUSTER GEAR
2 - INTERMEDIATE SHAFT
Fig. 248 2nd Gear Removal
1 - 2ND GEAR
2 - INTERMEDIATE SHAFT
21a - 84 T850 MANUAL TRANSAXLERG
INTERMEDIATE SHAFT (Continued)
ProCarManuals.com
Page 1884 of 2321
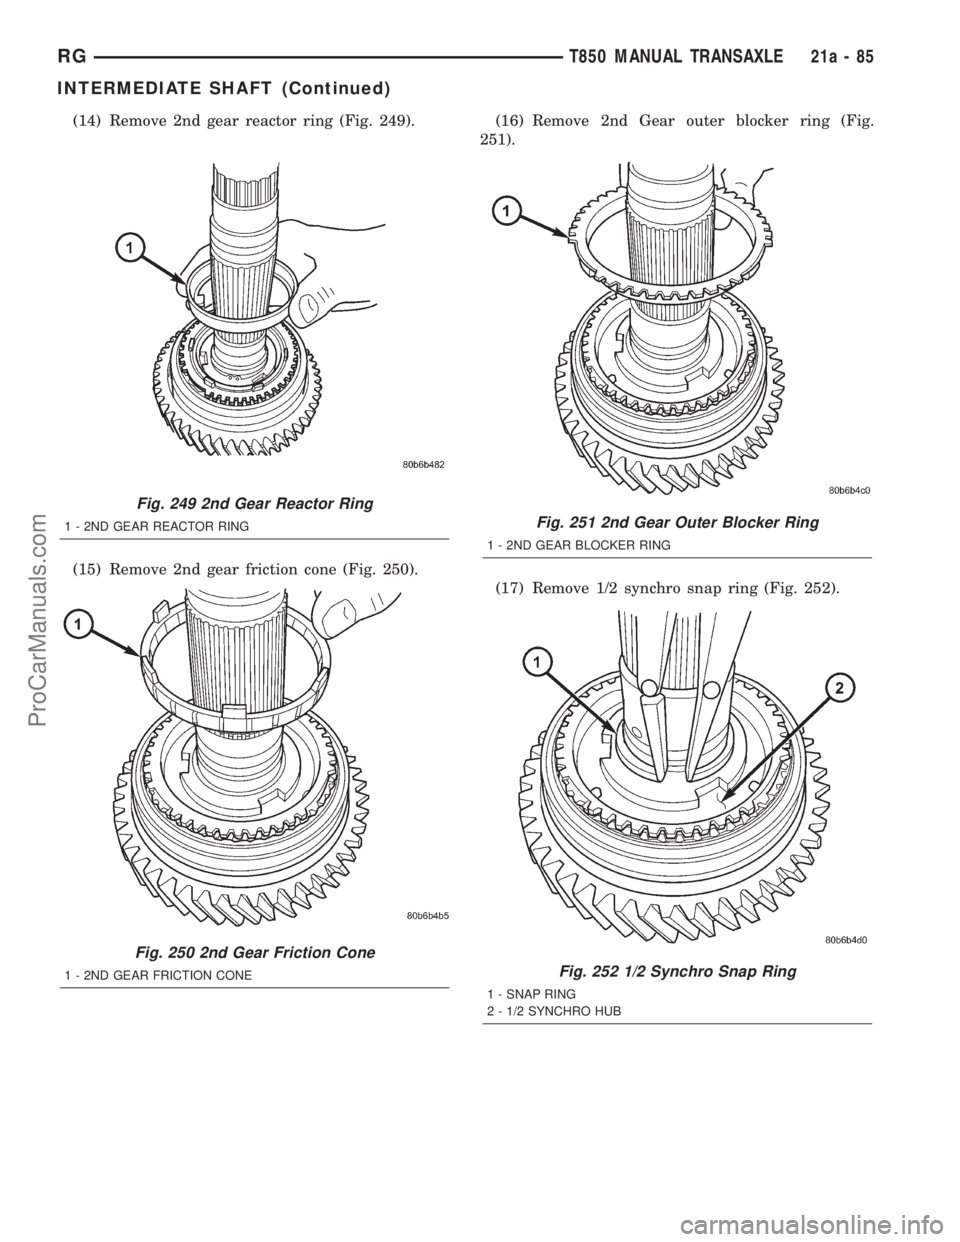
(14) Remove 2nd gear reactor ring (Fig. 249).
(15) Remove 2nd gear friction cone (Fig. 250).(16) Remove 2nd Gear outer blocker ring (Fig.
251).
(17) Remove 1/2 synchro snap ring (Fig. 252).
Fig. 249 2nd Gear Reactor Ring
1 - 2ND GEAR REACTOR RING
Fig. 250 2nd Gear Friction Cone
1 - 2ND GEAR FRICTION CONE
Fig. 251 2nd Gear Outer Blocker Ring
1 - 2ND GEAR BLOCKER RING
Fig. 252 1/2 Synchro Snap Ring
1 - SNAP RING
2 - 1/2 SYNCHRO HUB
RGT850 MANUAL TRANSAXLE21a-85
INTERMEDIATE SHAFT (Continued)
ProCarManuals.com
Page 1885 of 2321
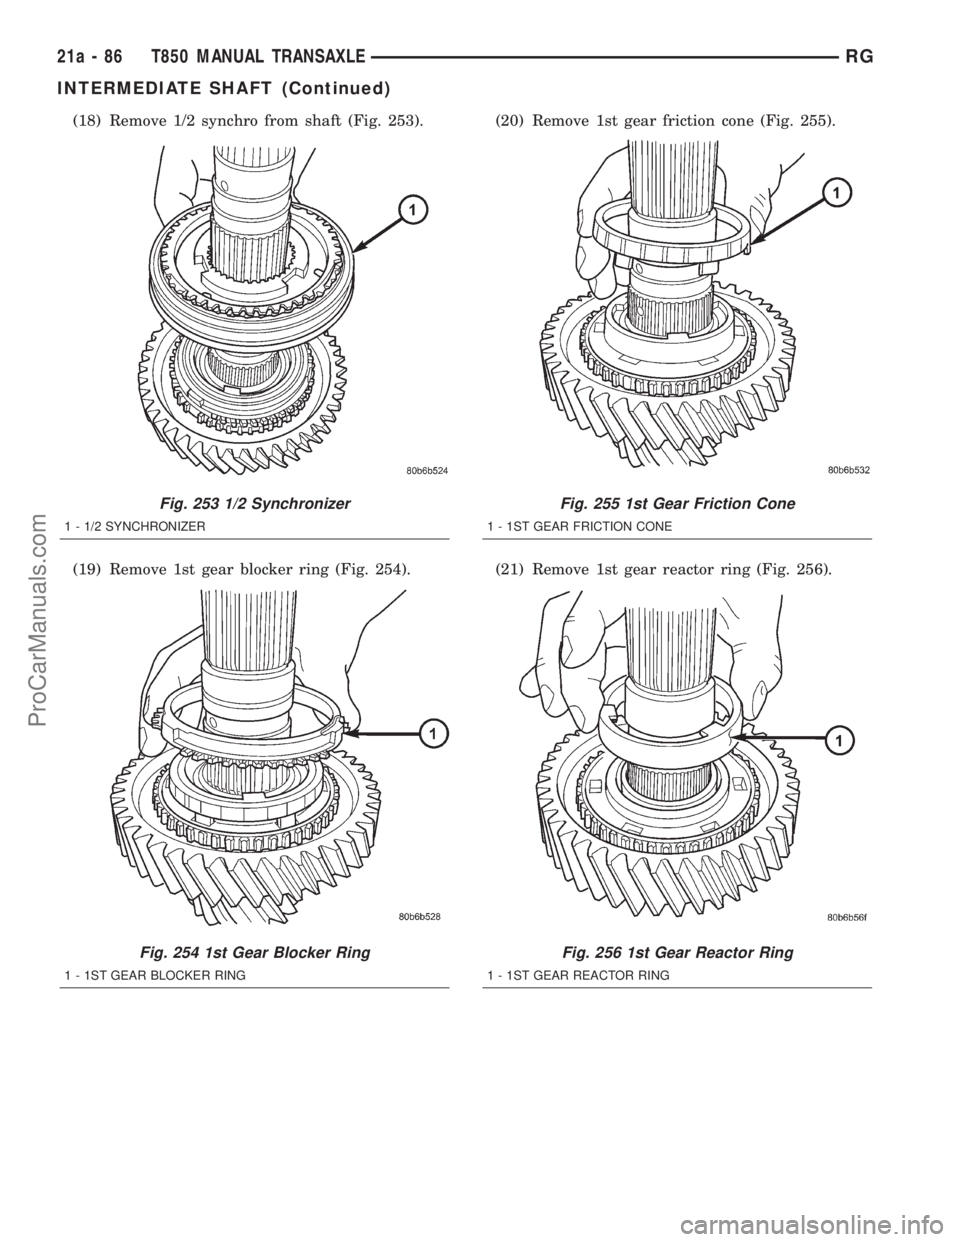
(18) Remove 1/2 synchro from shaft (Fig. 253).
(19) Remove 1st gear blocker ring (Fig. 254).(20) Remove 1st gear friction cone (Fig. 255).
(21) Remove 1st gear reactor ring (Fig. 256).
Fig. 253 1/2 Synchronizer
1 - 1/2 SYNCHRONIZER
Fig. 254 1st Gear Blocker Ring
1 - 1ST GEAR BLOCKER RING
Fig. 255 1st Gear Friction Cone
1 - 1ST GEAR FRICTION CONE
Fig. 256 1st Gear Reactor Ring
1 - 1ST GEAR REACTOR RING
21a - 86 T850 MANUAL TRANSAXLERG
INTERMEDIATE SHAFT (Continued)
ProCarManuals.com
Page 1886 of 2321
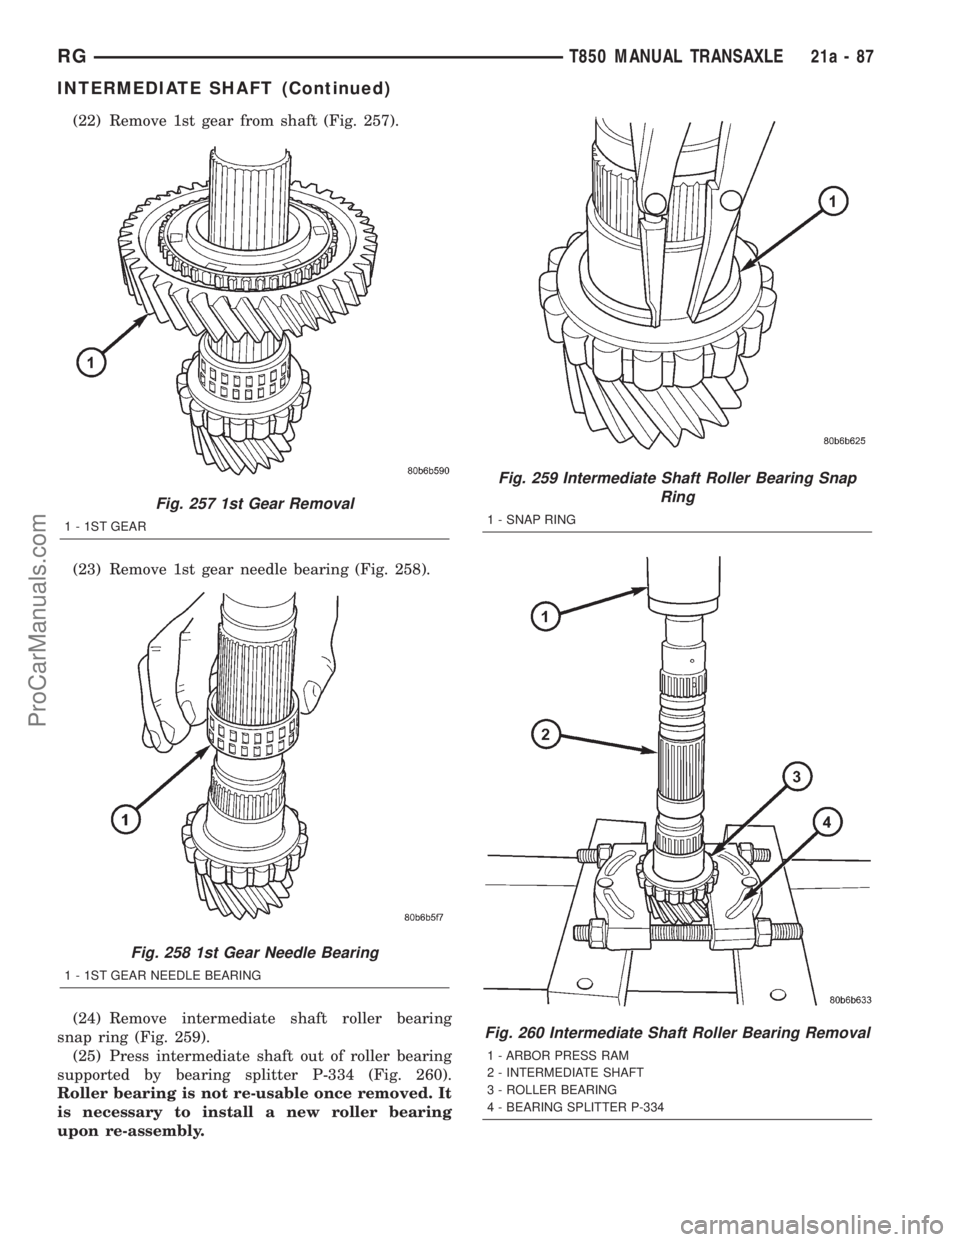
(22) Remove 1st gear from shaft (Fig. 257).
(23) Remove 1st gear needle bearing (Fig. 258).
(24) Remove intermediate shaft roller bearing
snap ring (Fig. 259).
(25) Press intermediate shaft out of roller bearing
supported by bearing splitter P-334 (Fig. 260).
Roller bearing is not re-usable once removed. It
is necessary to install a new roller bearing
upon re-assembly.
Fig. 257 1st Gear Removal
1 - 1ST GEAR
Fig. 258 1st Gear Needle Bearing
1 - 1ST GEAR NEEDLE BEARING
Fig. 259 Intermediate Shaft Roller Bearing Snap
Ring
1 - SNAP RING
Fig. 260 Intermediate Shaft Roller Bearing Removal
1 - ARBOR PRESS RAM
2 - INTERMEDIATE SHAFT
3 - ROLLER BEARING
4 - BEARING SPLITTER P-334
RGT850 MANUAL TRANSAXLE21a-87
INTERMEDIATE SHAFT (Continued)
ProCarManuals.com
Page 1887 of 2321
ASSEMBLY
NOTE: Do not re-use snap rings when servicing the
intermediate shaft assembly. Discard snap rings
and install new ones provided with available snap
ring service kit.NOTE: When installing 1/2 & 5/R synchronizers,
make sure to align oil slots on synchronizer hub
face with oil hold in the shaft splined hub journal.
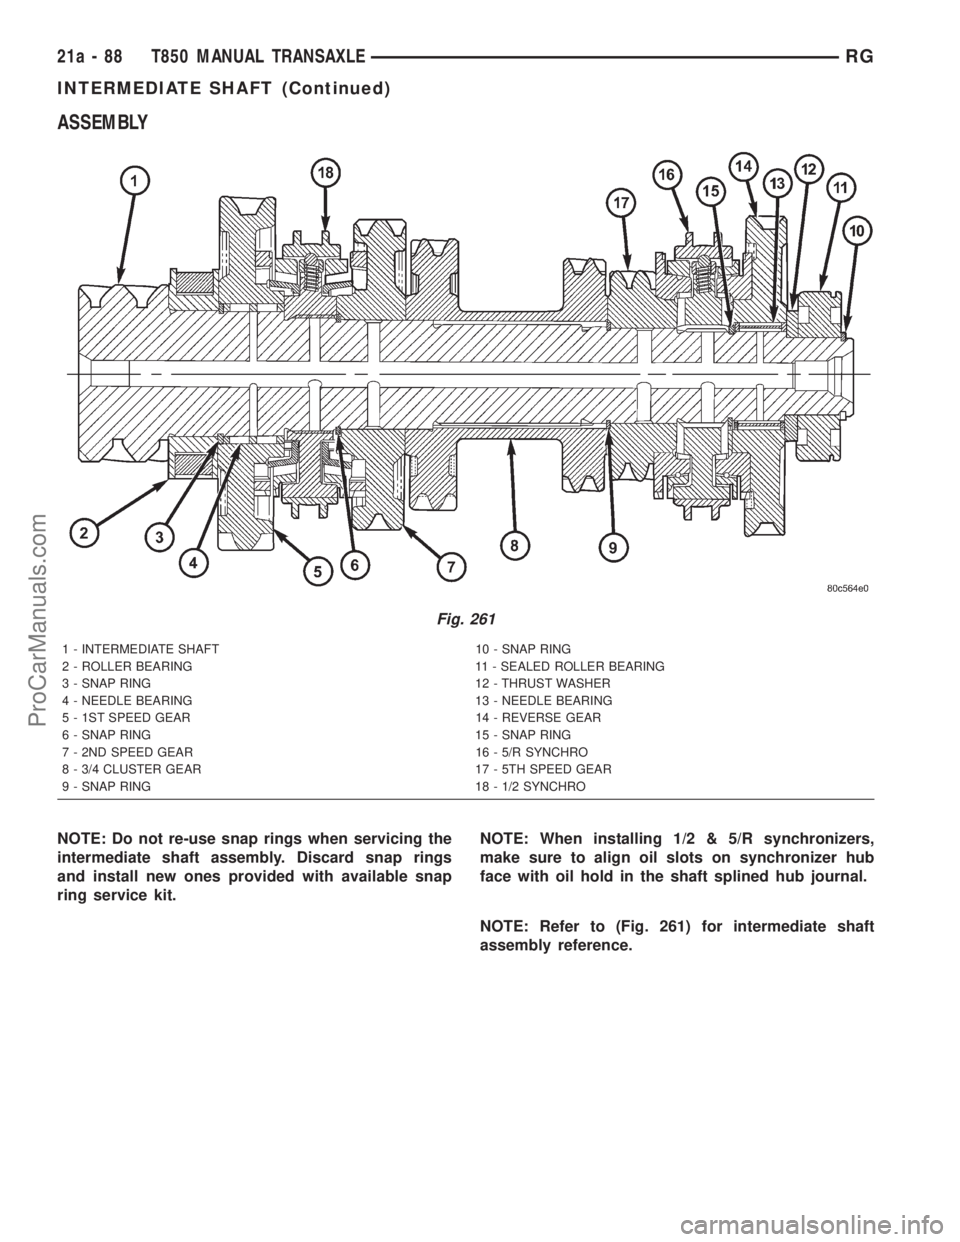
NOTE: Refer to (Fig. 261) for intermediate shaft
assembly reference.
1 - INTERMEDIATE SHAFT 10 - SNAP RING
2 - ROLLER BEARING 11 - SEALED ROLLER BEARING
3 - SNAP RING 12 - THRUST WASHER
4 - NEEDLE BEARING 13 - NEEDLE BEARING
5 - 1ST SPEED GEAR 14 - REVERSE GEAR
6 - SNAP RING 15 - SNAP RING
7 - 2ND SPEED GEAR 16 - 5/R SYNCHRO
8 - 3/4 CLUSTER GEAR 17 - 5TH SPEED GEAR
9 - SNAP RING 18 - 1/2 SYNCHRO
Fig. 261
21a - 88 T850 MANUAL TRANSAXLERG
INTERMEDIATE SHAFT (Continued)
ProCarManuals.com
Page 1888 of 2321
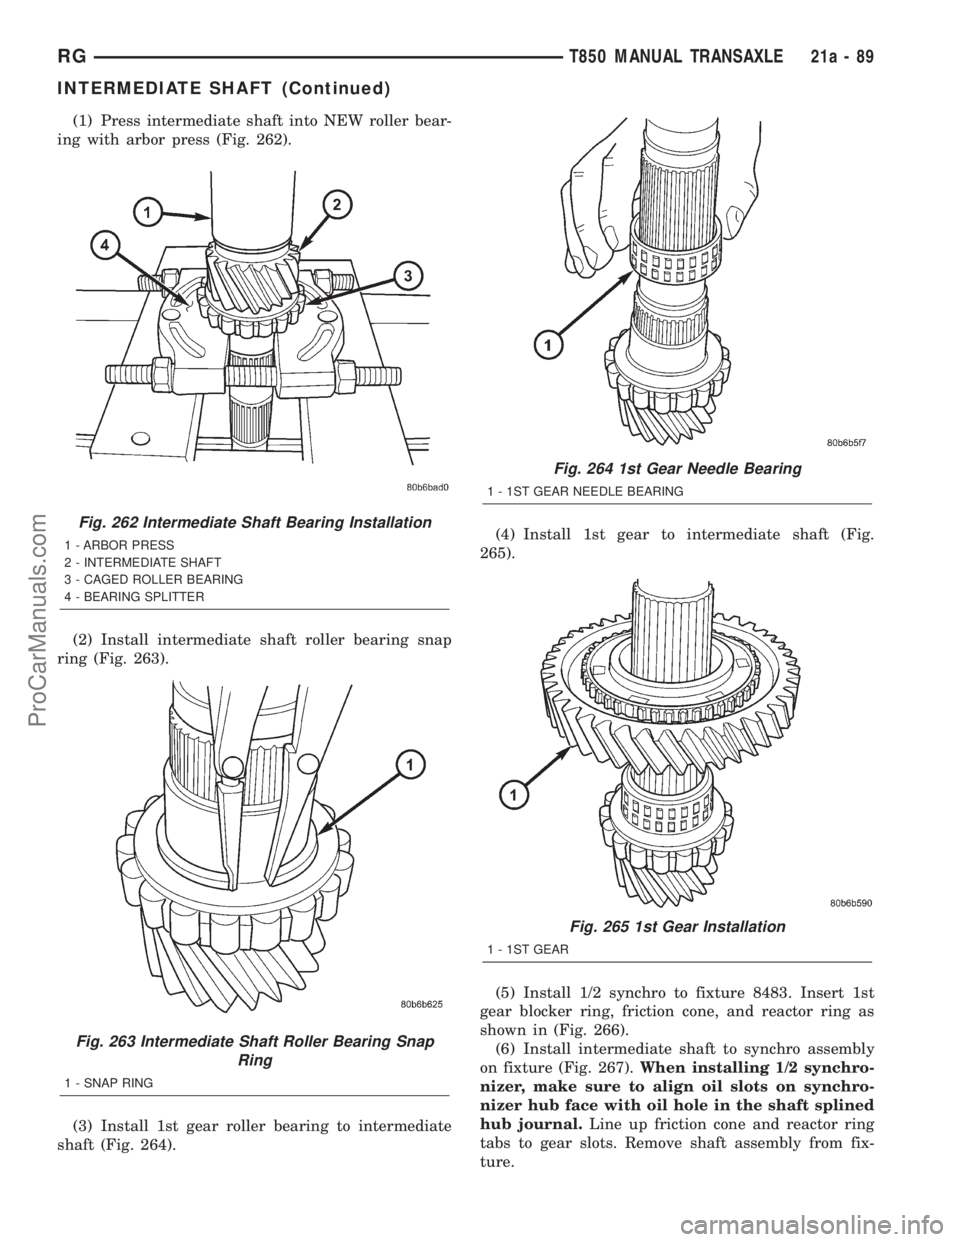
(1) Press intermediate shaft into NEW roller bear-
ing with arbor press (Fig. 262).
(2) Install intermediate shaft roller bearing snap
ring (Fig. 263).
(3) Install 1st gear roller bearing to intermediate
shaft (Fig. 264).(4) Install 1st gear to intermediate shaft (Fig.
265).
(5) Install 1/2 synchro to fixture 8483. Insert 1st
gear blocker ring, friction cone, and reactor ring as
shown in (Fig. 266).
(6) Install intermediate shaft to synchro assembly
on fixture (Fig. 267).When installing 1/2 synchro-
nizer, make sure to align oil slots on synchro-
nizer hub face with oil hole in the shaft splined
hub journal.Line up friction cone and reactor ring
tabs to gear slots. Remove shaft assembly from fix-
ture.
Fig. 262 Intermediate Shaft Bearing Installation
1 - ARBOR PRESS
2 - INTERMEDIATE SHAFT
3 - CAGED ROLLER BEARING
4 - BEARING SPLITTER
Fig. 263 Intermediate Shaft Roller Bearing Snap
Ring
1 - SNAP RING
Fig. 264 1st Gear Needle Bearing
1 - 1ST GEAR NEEDLE BEARING
Fig. 265 1st Gear Installation
1 - 1ST GEAR
RGT850 MANUAL TRANSAXLE21a-89
INTERMEDIATE SHAFT (Continued)
ProCarManuals.com
Page 1889 of 2321
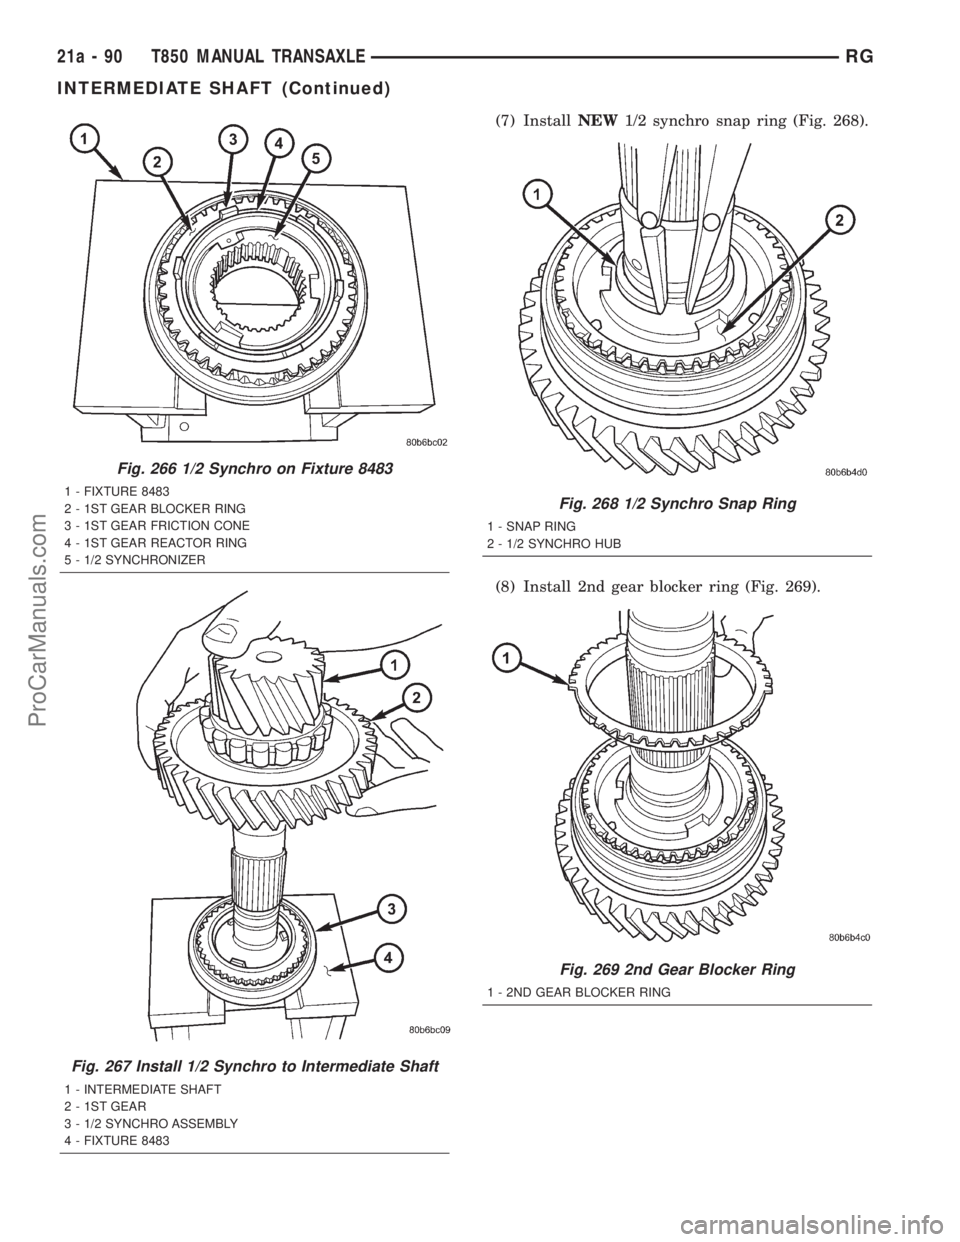
(7) InstallNEW1/2 synchro snap ring (Fig. 268).
(8) Install 2nd gear blocker ring (Fig. 269).
Fig. 266 1/2 Synchro on Fixture 8483
1 - FIXTURE 8483
2 - 1ST GEAR BLOCKER RING
3 - 1ST GEAR FRICTION CONE
4 - 1ST GEAR REACTOR RING
5 - 1/2 SYNCHRONIZER
Fig. 267 Install 1/2 Synchro to Intermediate Shaft
1 - INTERMEDIATE SHAFT
2 - 1ST GEAR
3 - 1/2 SYNCHRO ASSEMBLY
4 - FIXTURE 8483
Fig. 268 1/2 Synchro Snap Ring
1 - SNAP RING
2 - 1/2 SYNCHRO HUB
Fig. 269 2nd Gear Blocker Ring
1 - 2ND GEAR BLOCKER RING
21a - 90 T850 MANUAL TRANSAXLERG
INTERMEDIATE SHAFT (Continued)
ProCarManuals.com
Page 1890 of 2321
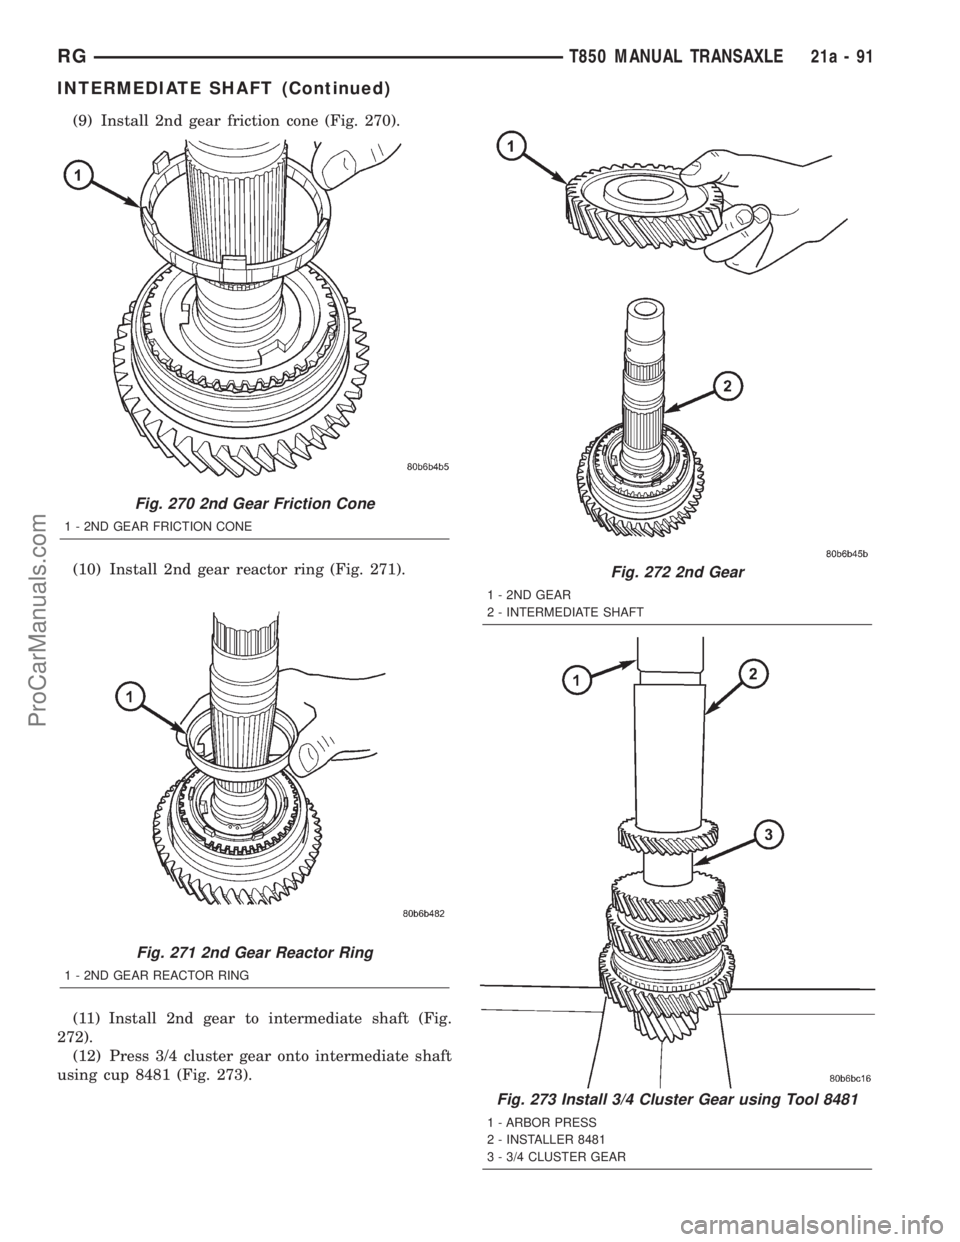
(9) Install 2nd gear friction cone (Fig. 270).
(10) Install 2nd gear reactor ring (Fig. 271).
(11) Install 2nd gear to intermediate shaft (Fig.
272).
(12) Press 3/4 cluster gear onto intermediate shaft
using cup 8481 (Fig. 273).
Fig. 270 2nd Gear Friction Cone
1 - 2ND GEAR FRICTION CONE
Fig. 271 2nd Gear Reactor Ring
1 - 2ND GEAR REACTOR RING
Fig. 272 2nd Gear
1 - 2ND GEAR
2 - INTERMEDIATE SHAFT
Fig. 273 Install 3/4 Cluster Gear using Tool 8481
1 - ARBOR PRESS
2 - INSTALLER 8481
3 - 3/4 CLUSTER GEAR
RGT850 MANUAL TRANSAXLE21a-91
INTERMEDIATE SHAFT (Continued)
ProCarManuals.com
Trending: engine oil, airbag, automatic transmission fluid, park assist, fuel tank capacity, boot, low oil pressure
