DODGE TOWN AND COUNTRY 2001 Service Manual
Manufacturer: DODGE, Model Year: 2001, Model line: TOWN AND COUNTRY, Model: DODGE TOWN AND COUNTRY 2001Pages: 2321, PDF Size: 68.09 MB
Page 1891 of 2321
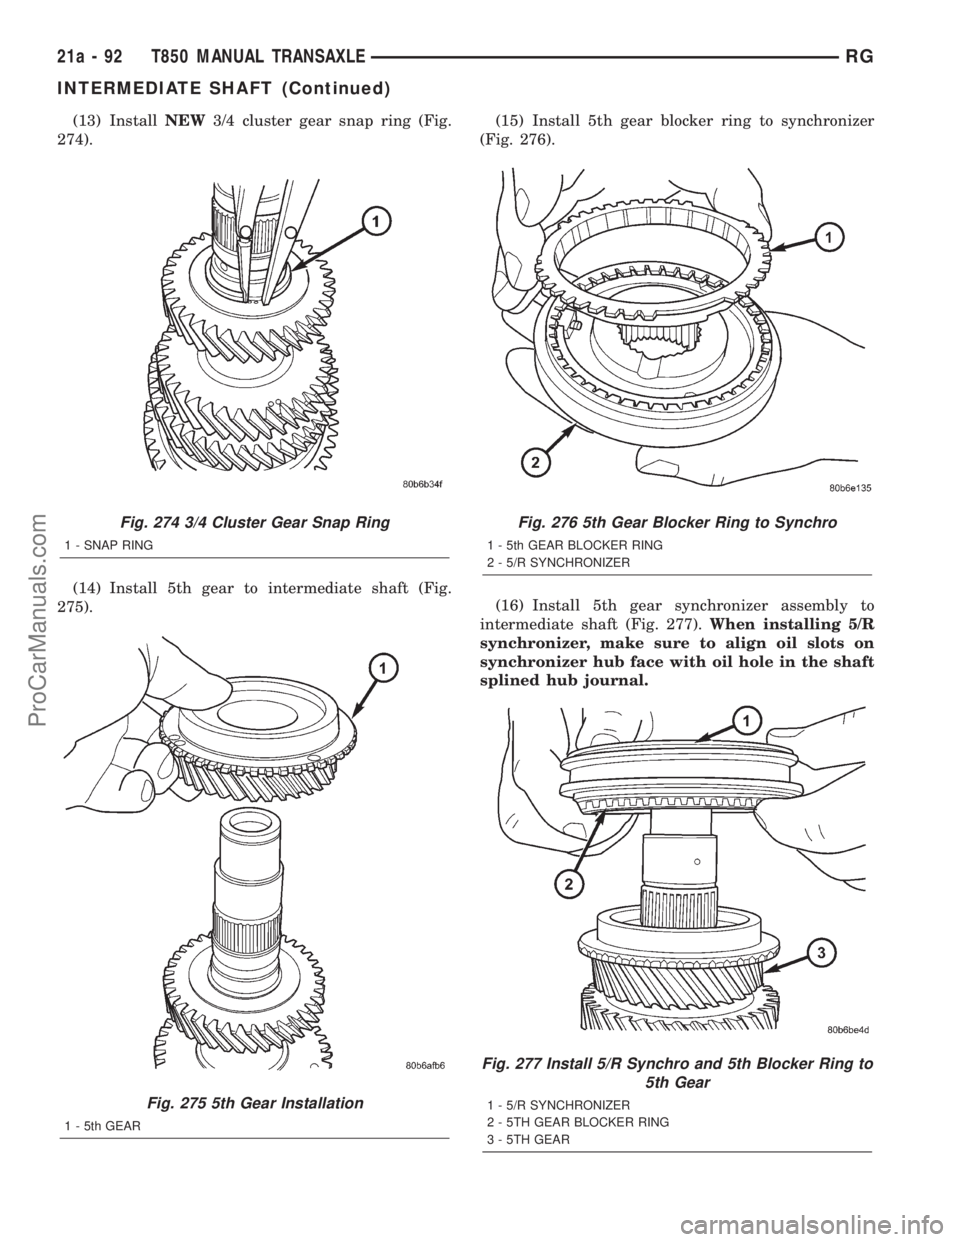
(13) InstallNEW3/4 cluster gear snap ring (Fig.
274).
(14) Install 5th gear to intermediate shaft (Fig.
275).(15) Install 5th gear blocker ring to synchronizer
(Fig. 276).
(16) Install 5th gear synchronizer assembly to
intermediate shaft (Fig. 277).When installing 5/R
synchronizer, make sure to align oil slots on
synchronizer hub face with oil hole in the shaft
splined hub journal.
Fig. 274 3/4 Cluster Gear Snap Ring
1 - SNAP RING
Fig. 275 5th Gear Installation
1 - 5th GEAR
Fig. 276 5th Gear Blocker Ring to Synchro
1 - 5th GEAR BLOCKER RING
2 - 5/R SYNCHRONIZER
Fig. 277 Install 5/R Synchro and 5th Blocker Ring to
5th Gear
1 - 5/R SYNCHRONIZER
2 - 5TH GEAR BLOCKER RING
3 - 5TH GEAR
21a - 92 T850 MANUAL TRANSAXLERG
INTERMEDIATE SHAFT (Continued)
ProCarManuals.com
Page 1892 of 2321
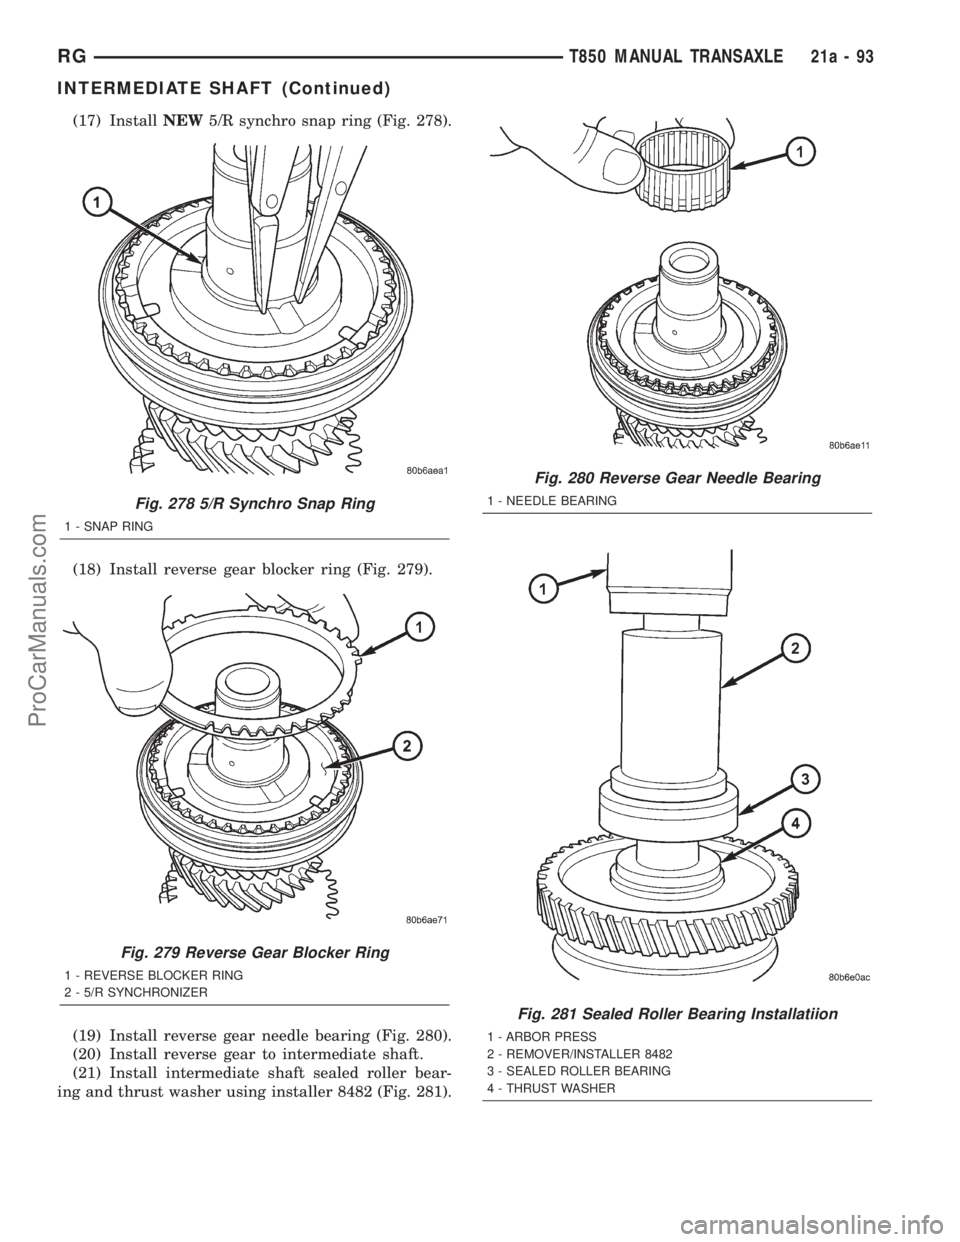
(17) InstallNEW5/R synchro snap ring (Fig. 278).
(18) Install reverse gear blocker ring (Fig. 279).
(19) Install reverse gear needle bearing (Fig. 280).
(20) Install reverse gear to intermediate shaft.
(21) Install intermediate shaft sealed roller bear-
ing and thrust washer using installer 8482 (Fig. 281).
Fig. 278 5/R Synchro Snap Ring
1 - SNAP RING
Fig. 279 Reverse Gear Blocker Ring
1 - REVERSE BLOCKER RING
2 - 5/R SYNCHRONIZER
Fig. 280 Reverse Gear Needle Bearing
1 - NEEDLE BEARING
Fig. 281 Sealed Roller Bearing Installatiion
1 - ARBOR PRESS
2 - REMOVER/INSTALLER 8482
3 - SEALED ROLLER BEARING
4 - THRUST WASHER
RGT850 MANUAL TRANSAXLE21a-93
INTERMEDIATE SHAFT (Continued)
ProCarManuals.com
Page 1893 of 2321
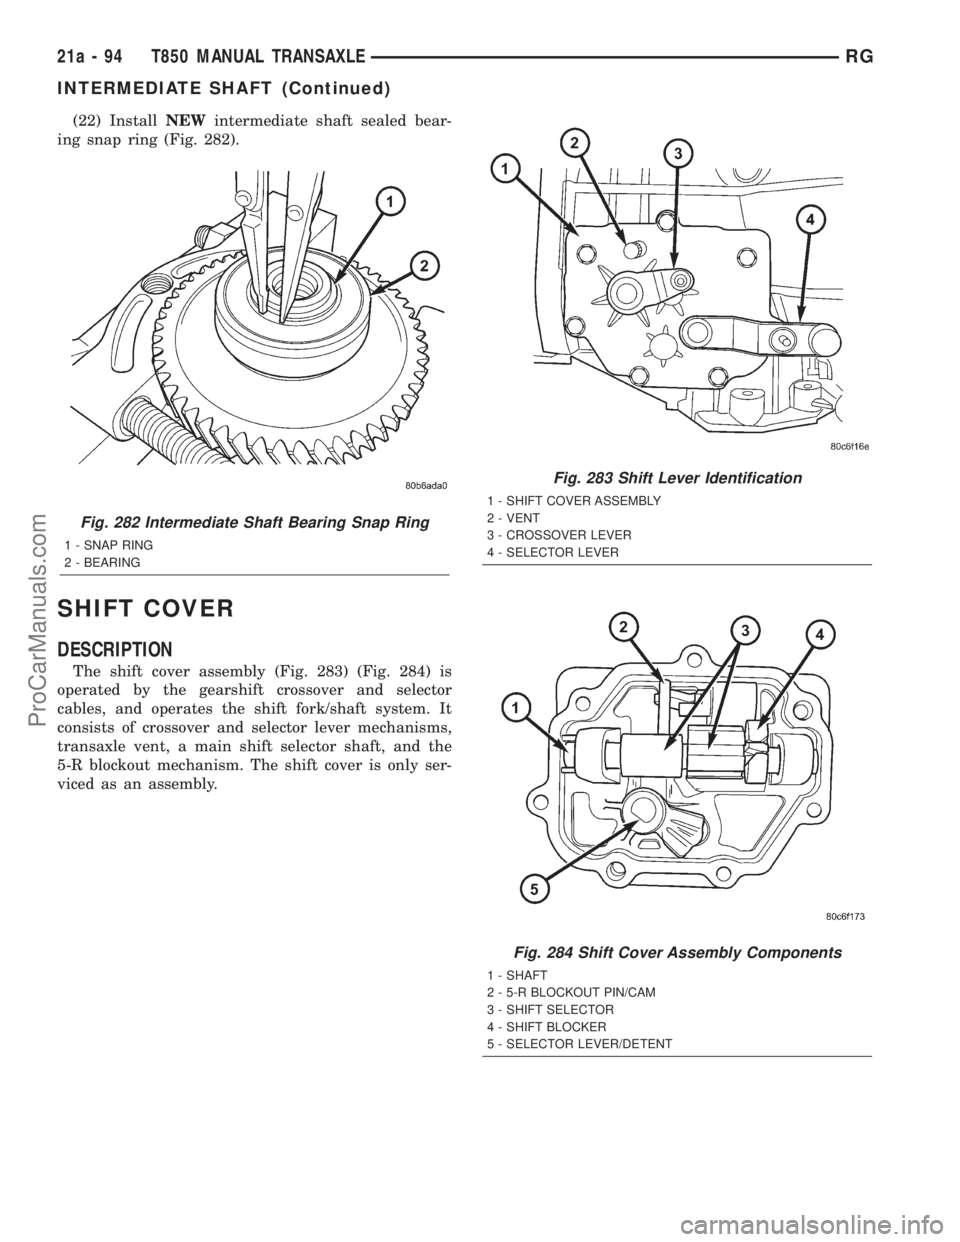
(22) InstallNEWintermediate shaft sealed bear-
ing snap ring (Fig. 282).
SHIFT COVER
DESCRIPTION
The shift cover assembly (Fig. 283) (Fig. 284) is
operated by the gearshift crossover and selector
cables, and operates the shift fork/shaft system. It
consists of crossover and selector lever mechanisms,
transaxle vent, a main shift selector shaft, and the
5-R blockout mechanism. The shift cover is only ser-
viced as an assembly.
Fig. 282 Intermediate Shaft Bearing Snap Ring
1 - SNAP RING
2 - BEARING
Fig. 283 Shift Lever Identification
1 - SHIFT COVER ASSEMBLY
2 - VENT
3 - CROSSOVER LEVER
4 - SELECTOR LEVER
Fig. 284 Shift Cover Assembly Components
1 - SHAFT
2 - 5-R BLOCKOUT PIN/CAM
3 - SHIFT SELECTOR
4 - SHIFT BLOCKER
5 - SELECTOR LEVER/DETENT
21a - 94 T850 MANUAL TRANSAXLERG
INTERMEDIATE SHAFT (Continued)
ProCarManuals.com
Page 1894 of 2321
SHIFT FORK AND SHAFT
DESCRIPTION
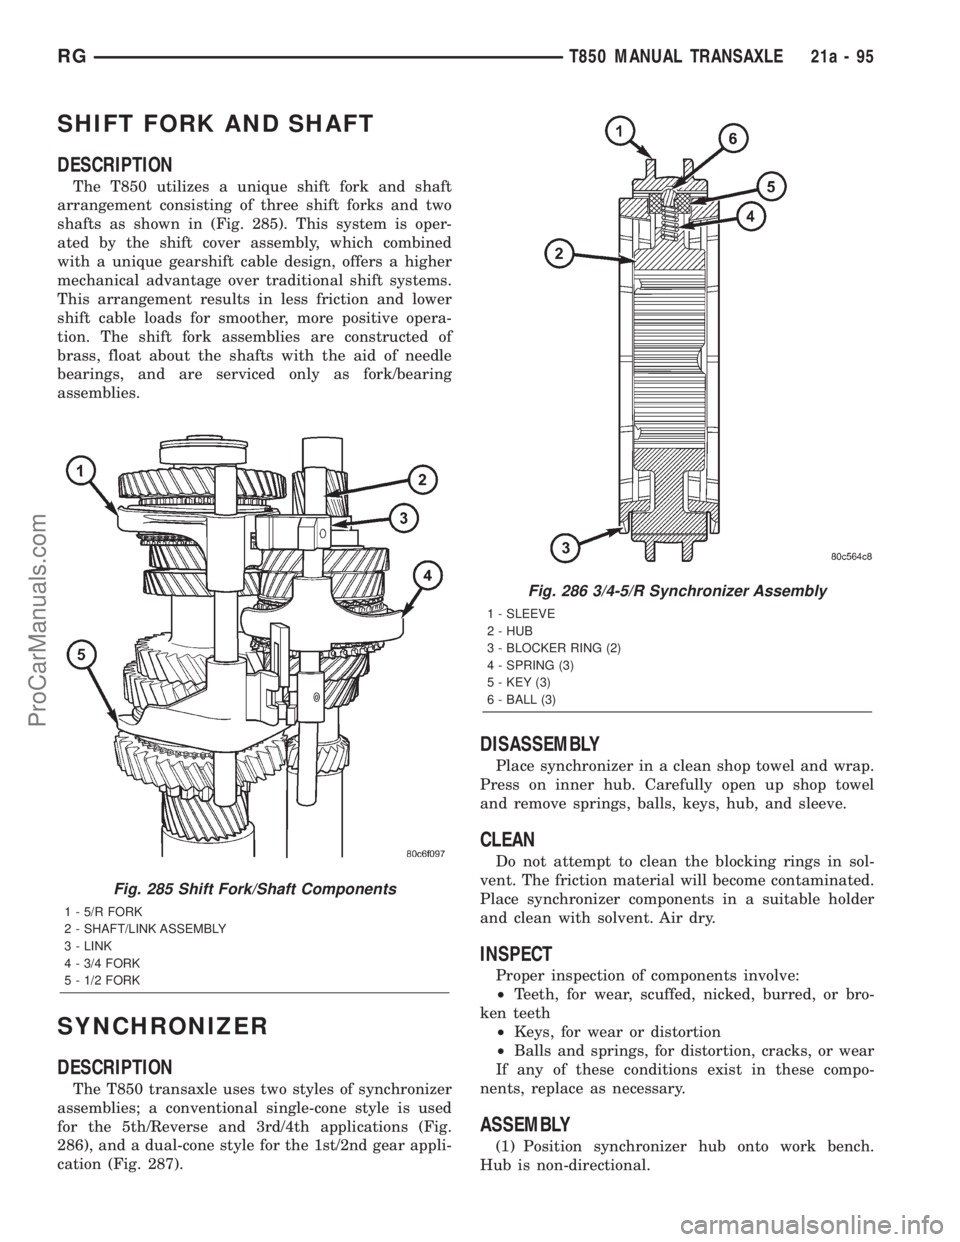
The T850 utilizes a unique shift fork and shaft
arrangement consisting of three shift forks and two
shafts as shown in (Fig. 285). This system is oper-
ated by the shift cover assembly, which combined
with a unique gearshift cable design, offers a higher
mechanical advantage over traditional shift systems.
This arrangement results in less friction and lower
shift cable loads for smoother, more positive opera-
tion. The shift fork assemblies are constructed of
brass, float about the shafts with the aid of needle
bearings, and are serviced only as fork/bearing
assemblies.
SYNCHRONIZER
DESCRIPTION
The T850 transaxle uses two styles of synchronizer
assemblies; a conventional single-cone style is used
for the 5th/Reverse and 3rd/4th applications (Fig.
286), and a dual-cone style for the 1st/2nd gear appli-
cation (Fig. 287).
DISASSEMBLY
Place synchronizer in a clean shop towel and wrap.
Press on inner hub. Carefully open up shop towel
and remove springs, balls, keys, hub, and sleeve.
CLEAN
Do not attempt to clean the blocking rings in sol-
vent. The friction material will become contaminated.
Place synchronizer components in a suitable holder
and clean with solvent. Air dry.
INSPECT
Proper inspection of components involve:
²Teeth, for wear, scuffed, nicked, burred, or bro-
ken teeth
²Keys, for wear or distortion
²Balls and springs, for distortion, cracks, or wear
If any of these conditions exist in these compo-
nents, replace as necessary.
ASSEMBLY
(1) Position synchronizer hub onto work bench.
Hub is non-directional.
Fig. 285 Shift Fork/Shaft Components
1 - 5/R FORK
2 - SHAFT/LINK ASSEMBLY
3 - LINK
4 - 3/4 FORK
5 - 1/2 FORK
Fig. 286 3/4-5/R Synchronizer Assembly
1 - SLEEVE
2 - HUB
3 - BLOCKER RING (2)
4 - SPRING (3)
5 - KEY (3)
6 - BALL (3)
RGT850 MANUAL TRANSAXLE21a-95
ProCarManuals.com
Page 1895 of 2321
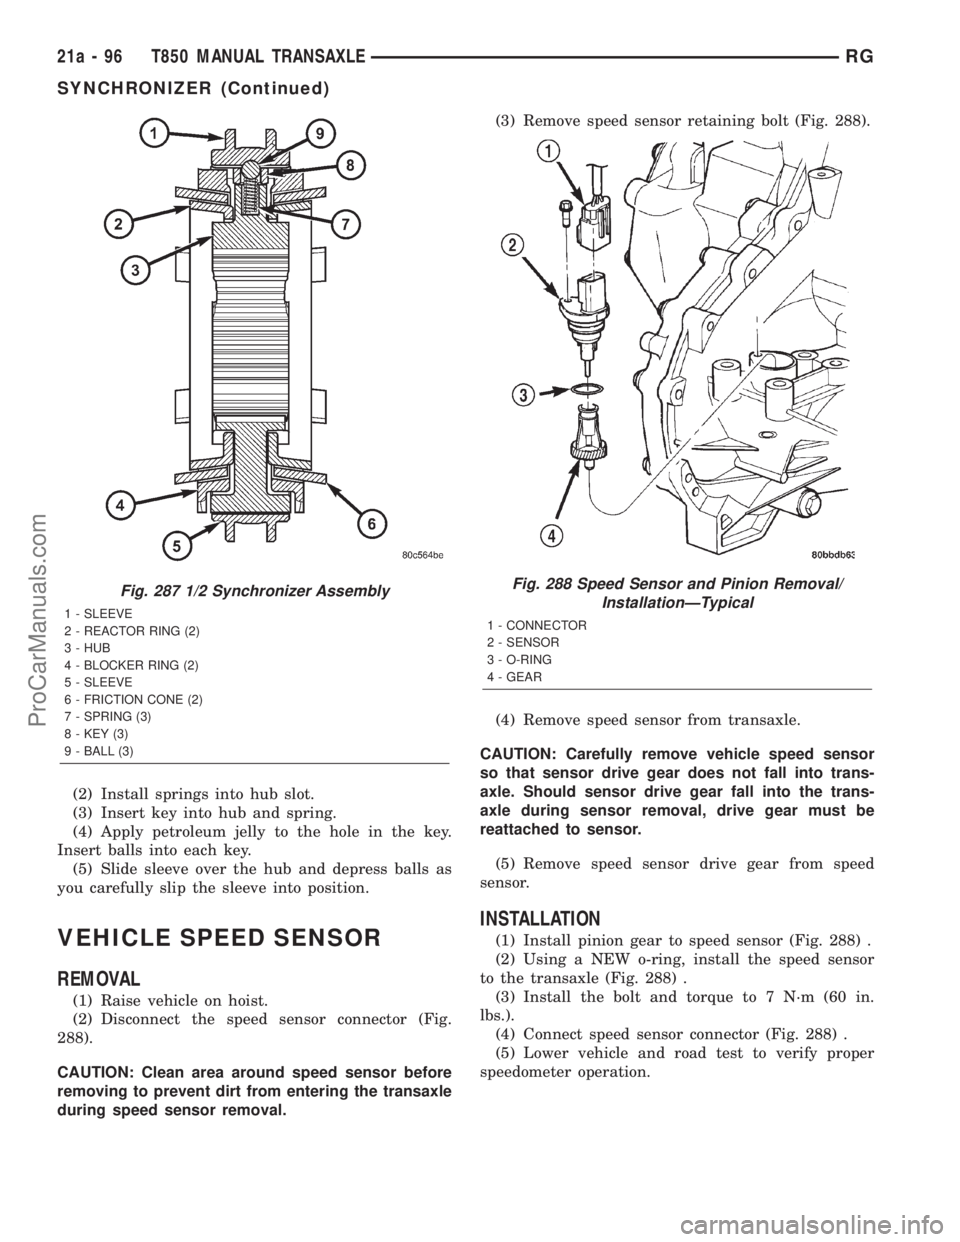
(2) Install springs into hub slot.
(3) Insert key into hub and spring.
(4) Apply petroleum jelly to the hole in the key.
Insert balls into each key.
(5) Slide sleeve over the hub and depress balls as
you carefully slip the sleeve into position.
VEHICLE SPEED SENSOR
REMOVAL
(1) Raise vehicle on hoist.
(2) Disconnect the speed sensor connector (Fig.
288).
CAUTION: Clean area around speed sensor before
removing to prevent dirt from entering the transaxle
during speed sensor removal.(3) Remove speed sensor retaining bolt (Fig. 288).
(4) Remove speed sensor from transaxle.
CAUTION: Carefully remove vehicle speed sensor
so that sensor drive gear does not fall into trans-
axle. Should sensor drive gear fall into the trans-
axle during sensor removal, drive gear must be
reattached to sensor.
(5) Remove speed sensor drive gear from speed
sensor.
INSTALLATION
(1) Install pinion gear to speed sensor (Fig. 288) .
(2) Using a NEW o-ring, install the speed sensor
to the transaxle (Fig. 288) .
(3) Install the bolt and torque to 7 N´m (60 in.
lbs.).
(4) Connect speed sensor connector (Fig. 288) .
(5) Lower vehicle and road test to verify proper
speedometer operation.
Fig. 287 1/2 Synchronizer Assembly
1 - SLEEVE
2 - REACTOR RING (2)
3 - HUB
4 - BLOCKER RING (2)
5 - SLEEVE
6 - FRICTION CONE (2)
7 - SPRING (3)
8 - KEY (3)
9 - BALL (3)
Fig. 288 Speed Sensor and Pinion Removal/
InstallationÐTypical
1 - CONNECTOR
2 - SENSOR
3 - O-RING
4 - GEAR
21a - 96 T850 MANUAL TRANSAXLERG
SYNCHRONIZER (Continued)
ProCarManuals.com
Page 1896 of 2321
TIRES/WHEELS
TABLE OF CONTENTS
page page
TIRES/WHEELS
DIAGNOSIS AND TESTING..................1
TIRE AND WHEEL VIBRATION..............1
STANDARD PROCEDURE...................4
TIRE AND WHEEL BALANCE...............4
TIRE AND WHEEL MATCH MOUNTING.......6
TIRE AND WHEEL ROTATION..............6
REMOVAL...............................7
INSTALLATION............................7
TIRES
DESCRIPTION............................8
DIAGNOSIS AND TESTING..................9
TIRE NOISE............................9
TIRE/VEHICLE LEAD.....................9
TIRE WEAR PATTERNS..................11
TREAD WEAR INDICATORS...............11
STANDARD PROCEDURE..................11
TIRE INFLATION PRESSURES.............11
TIRE PRESSURE FOR HIGH SPEED
OPERATION...........................12TIRE LEAK REPAIRING..................12
CLEANING..............................13
WHEELS
DESCRIPTION...........................13
DIAGNOSIS AND TESTING.................13
WHEEL INSPECTION....................13
CLEANING..............................14
SPECIFICATIONS........................14
WHEEL COVER
DESCRIPTION...........................14
REMOVAL..............................14
INSTALLATION...........................14
WHEEL MOUNTING STUDS - FRONT
REMOVAL..............................15
INSTALLATION...........................16
WHEEL MOUNTING STUDS - REAR
REMOVAL..............................16
INSTALLATION...........................17
TIRES/WHEELS
DIAGNOSIS AND TESTING - TIRE AND WHEEL
VIBRATION
Tire and wheel imbalance, runout and force varia-
tion can cause vehicles to exhibit steering wheel
vibration.
VISUAL INSPECTION
Visual inspection of the vehicle is recommended
prior to road testing or performing any other proce-
dure. Raise vehicle on a suitable hoist. Refer to
Hoisting in Lubrication and Maintenance.
Inspect for the following:
²Verify correct (OEM) wheel and tire, as well as
correct wheel weights. Aluminum wheels require
unique wheel weights. They are designed to fit the
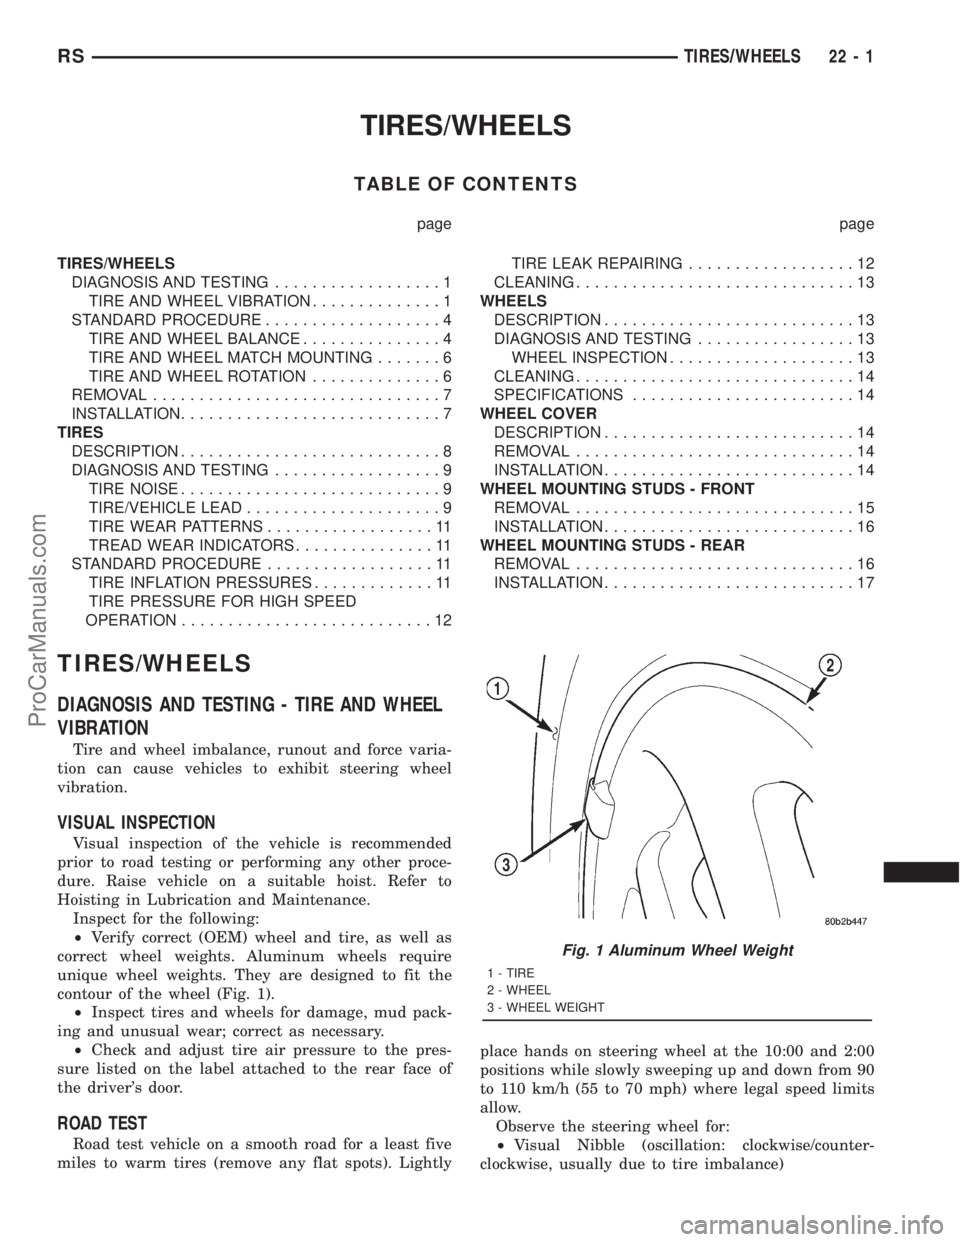
contour of the wheel (Fig. 1).
²Inspect tires and wheels for damage, mud pack-
ing and unusual wear; correct as necessary.
²Check and adjust tire air pressure to the pres-
sure listed on the label attached to the rear face of
the driver's door.
ROAD TEST
Road test vehicle on a smooth road for a least five
miles to warm tires (remove any flat spots). Lightlyplace hands on steering wheel at the 10:00 and 2:00
positions while slowly sweeping up and down from 90
to 110 km/h (55 to 70 mph) where legal speed limits
allow.
Observe the steering wheel for:
²Visual Nibble (oscillation: clockwise/counter-
clockwise, usually due to tire imbalance)
Fig. 1 Aluminum Wheel Weight
1 - TIRE
2 - WHEEL
3 - WHEEL WEIGHT
RSTIRES/WHEELS22-1
ProCarManuals.com
Page 1897 of 2321
²Visual Buzziness (high frequency, rapid vibra-
tion up and down)
To rule out vibrations due to brakes or powertrain:
²Lightly apply brakes at speed; if vibration occurs
or is enhanced, vibration is likely due to causes other
than tire and wheel assemblies.
²Shift transmission into neutral while vibration
is occurring; if vibration is eliminated, vibration is
likely due to causes other than tire and wheel assem-
blies.
For brake vibrations, (Refer to 5 - BRAKES -
BASE/HYDRAULIC/MECHANICAL/ROTORS -
DIAGNOSIS AND TESTING).
For powertrain vibrations, (Refer to 3 - DIFFER-
ENTIAL & DRIVELINE - DIAGNOSIS AND TEST-
ING).
For tire and wheel assembly vibrations, continue
with this diagnosis an testing procedure.
TIRE AND WHEEL BALANCE
(1) Balance the tire and wheel assemblies as nec-
essary following the wheel balancer manufacturer's
instructions and using the information listed in Stan-
dard Procedure - Tire And Wheel Balance. (Refer to
22 - TIRES/WHEELS - STANDARD PROCEDURE)
(2) Road test the vehicle for at least 5 miles, fol-
lowing the format described in Road Test.
(3) If the vibration persists, continue with this
diagnosis an testing procedure.
TIRE AND WHEEL RUNOUT/MATCH MOUNTING
(1)System Radial Runout.This on-the-vehicle
system check will measure the radial runout includ-
ing the hub, wheel and tire.
(a) Raise vehicle so tires clear floor. Refer to
Hoisting in Lubrication and Maintenance.
(b) Apply masking tape around the circumfer-
ence of the tire in the locations to be measured
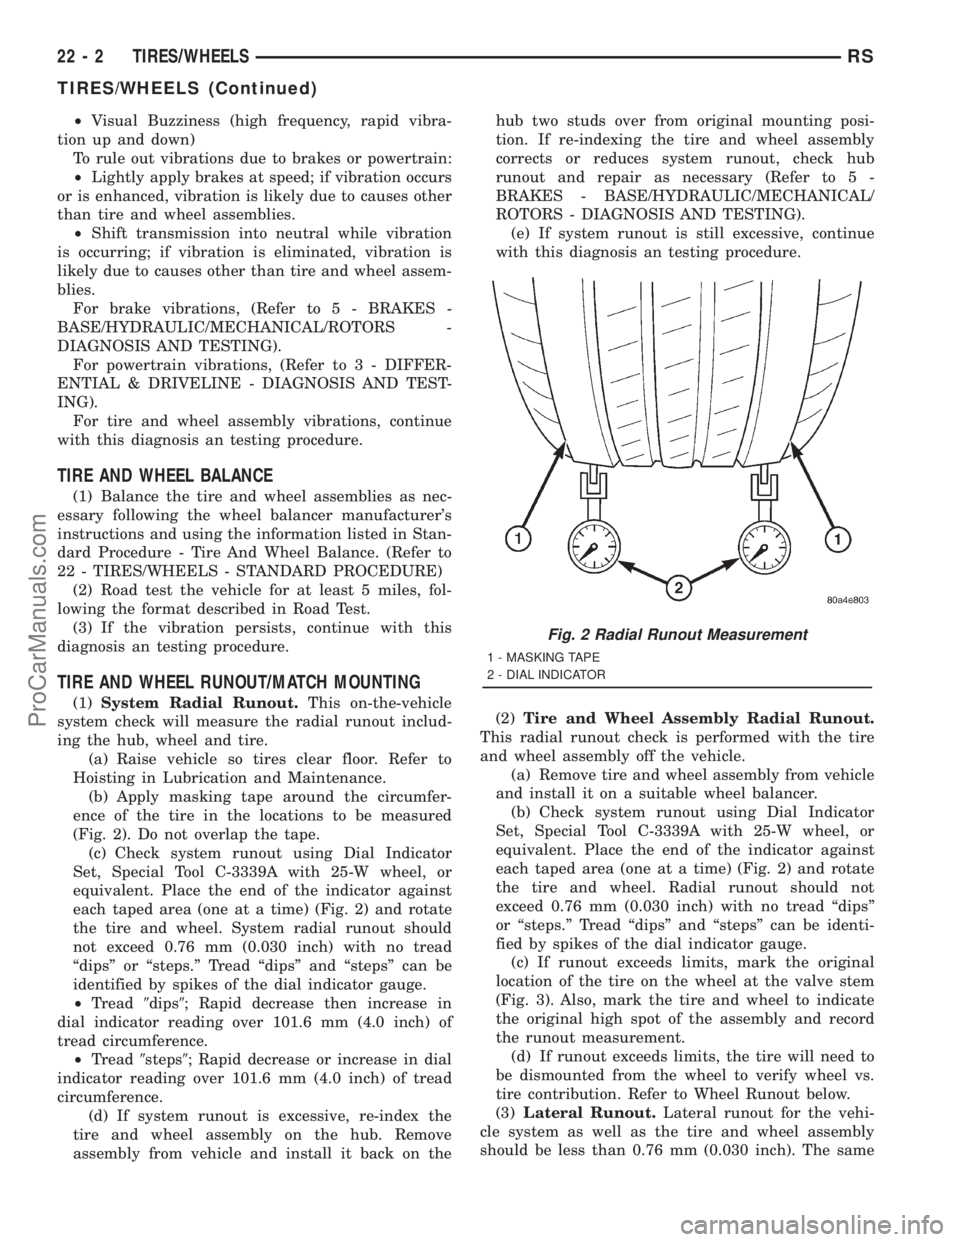
(Fig. 2). Do not overlap the tape.
(c) Check system runout using Dial Indicator
Set, Special Tool C-3339A with 25-W wheel, or
equivalent. Place the end of the indicator against
each taped area (one at a time) (Fig. 2) and rotate
the tire and wheel. System radial runout should
not exceed 0.76 mm (0.030 inch) with no tread
ªdipsº or ªsteps.º Tread ªdipsº and ªstepsº can be
identified by spikes of the dial indicator gauge.
²Tread9dips9; Rapid decrease then increase in
dial indicator reading over 101.6 mm (4.0 inch) of
tread circumference.
²Tread9steps9; Rapid decrease or increase in dial
indicator reading over 101.6 mm (4.0 inch) of tread
circumference.
(d) If system runout is excessive, re-index the
tire and wheel assembly on the hub. Remove
assembly from vehicle and install it back on thehub two studs over from original mounting posi-
tion. If re-indexing the tire and wheel assembly
corrects or reduces system runout, check hub
runout and repair as necessary (Refer to 5 -
BRAKES - BASE/HYDRAULIC/MECHANICAL/
ROTORS - DIAGNOSIS AND TESTING).
(e) If system runout is still excessive, continue
with this diagnosis an testing procedure.
(2)Tire and Wheel Assembly Radial Runout.
This radial runout check is performed with the tire
and wheel assembly off the vehicle.
(a) Remove tire and wheel assembly from vehicle
and install it on a suitable wheel balancer.
(b) Check system runout using Dial Indicator
Set, Special Tool C-3339A with 25-W wheel, or
equivalent. Place the end of the indicator against
each taped area (one at a time) (Fig. 2) and rotate
the tire and wheel. Radial runout should not
exceed 0.76 mm (0.030 inch) with no tread ªdipsº
or ªsteps.º Tread ªdipsº and ªstepsº can be identi-
fied by spikes of the dial indicator gauge.
(c) If runout exceeds limits, mark the original
location of the tire on the wheel at the valve stem
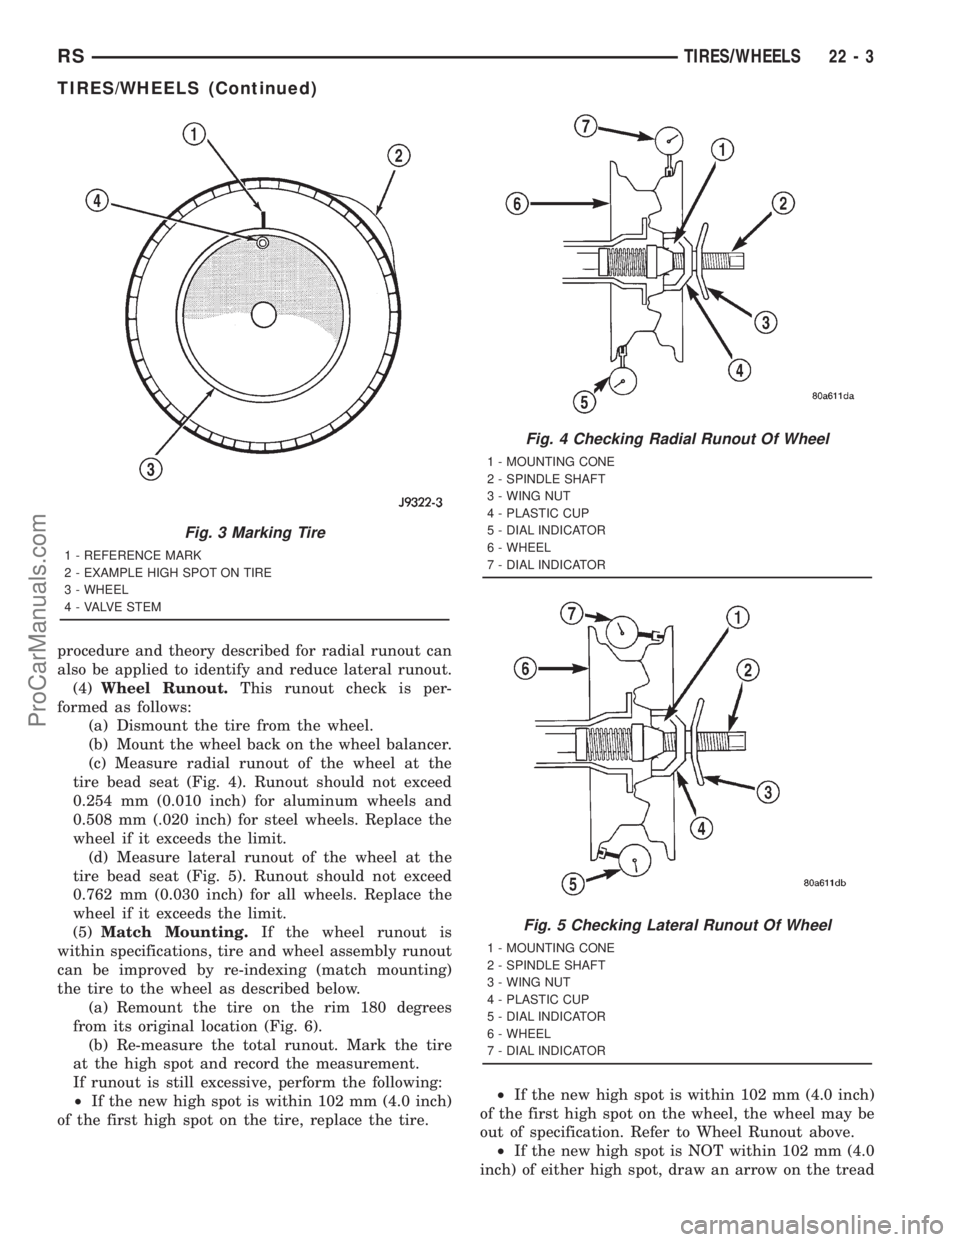
(Fig. 3). Also, mark the tire and wheel to indicate
the original high spot of the assembly and record
the runout measurement.
(d) If runout exceeds limits, the tire will need to
be dismounted from the wheel to verify wheel vs.
tire contribution. Refer to Wheel Runout below.
(3)Lateral Runout.Lateral runout for the vehi-
cle system as well as the tire and wheel assembly
should be less than 0.76 mm (0.030 inch). The same
Fig. 2 Radial Runout Measurement
1 - MASKING TAPE
2 - DIAL INDICATOR
22 - 2 TIRES/WHEELSRS
TIRES/WHEELS (Continued)
ProCarManuals.com
Page 1898 of 2321
procedure and theory described for radial runout can
also be applied to identify and reduce lateral runout.
(4)Wheel Runout.This runout check is per-
formed as follows:
(a) Dismount the tire from the wheel.
(b) Mount the wheel back on the wheel balancer.
(c) Measure radial runout of the wheel at the
tire bead seat (Fig. 4). Runout should not exceed
0.254 mm (0.010 inch) for aluminum wheels and
0.508 mm (.020 inch) for steel wheels. Replace the
wheel if it exceeds the limit.
(d) Measure lateral runout of the wheel at the
tire bead seat (Fig. 5). Runout should not exceed
0.762 mm (0.030 inch) for all wheels. Replace the
wheel if it exceeds the limit.
(5)Match Mounting.If the wheel runout is
within specifications, tire and wheel assembly runout
can be improved by re-indexing (match mounting)
the tire to the wheel as described below.
(a) Remount the tire on the rim 180 degrees
from its original location (Fig. 6).
(b) Re-measure the total runout. Mark the tire
at the high spot and record the measurement.
If runout is still excessive, perform the following:
²If the new high spot is within 102 mm (4.0 inch)
of the first high spot on the tire, replace the tire.²If the new high spot is within 102 mm (4.0 inch)
of the first high spot on the wheel, the wheel may be
out of specification. Refer to Wheel Runout above.
²If the new high spot is NOT within 102 mm (4.0
inch) of either high spot, draw an arrow on the tread
Fig. 3 Marking Tire
1 - REFERENCE MARK
2 - EXAMPLE HIGH SPOT ON TIRE
3 - WHEEL
4 - VALVE STEM
Fig. 4 Checking Radial Runout Of Wheel
1 - MOUNTING CONE
2 - SPINDLE SHAFT
3 - WING NUT
4 - PLASTIC CUP
5 - DIAL INDICATOR
6 - WHEEL
7 - DIAL INDICATOR
Fig. 5 Checking Lateral Runout Of Wheel
1 - MOUNTING CONE
2 - SPINDLE SHAFT
3 - WING NUT
4 - PLASTIC CUP
5 - DIAL INDICATOR
6 - WHEEL
7 - DIAL INDICATOR
RSTIRES/WHEELS22-3
TIRES/WHEELS (Continued)
ProCarManuals.com
Page 1899 of 2321
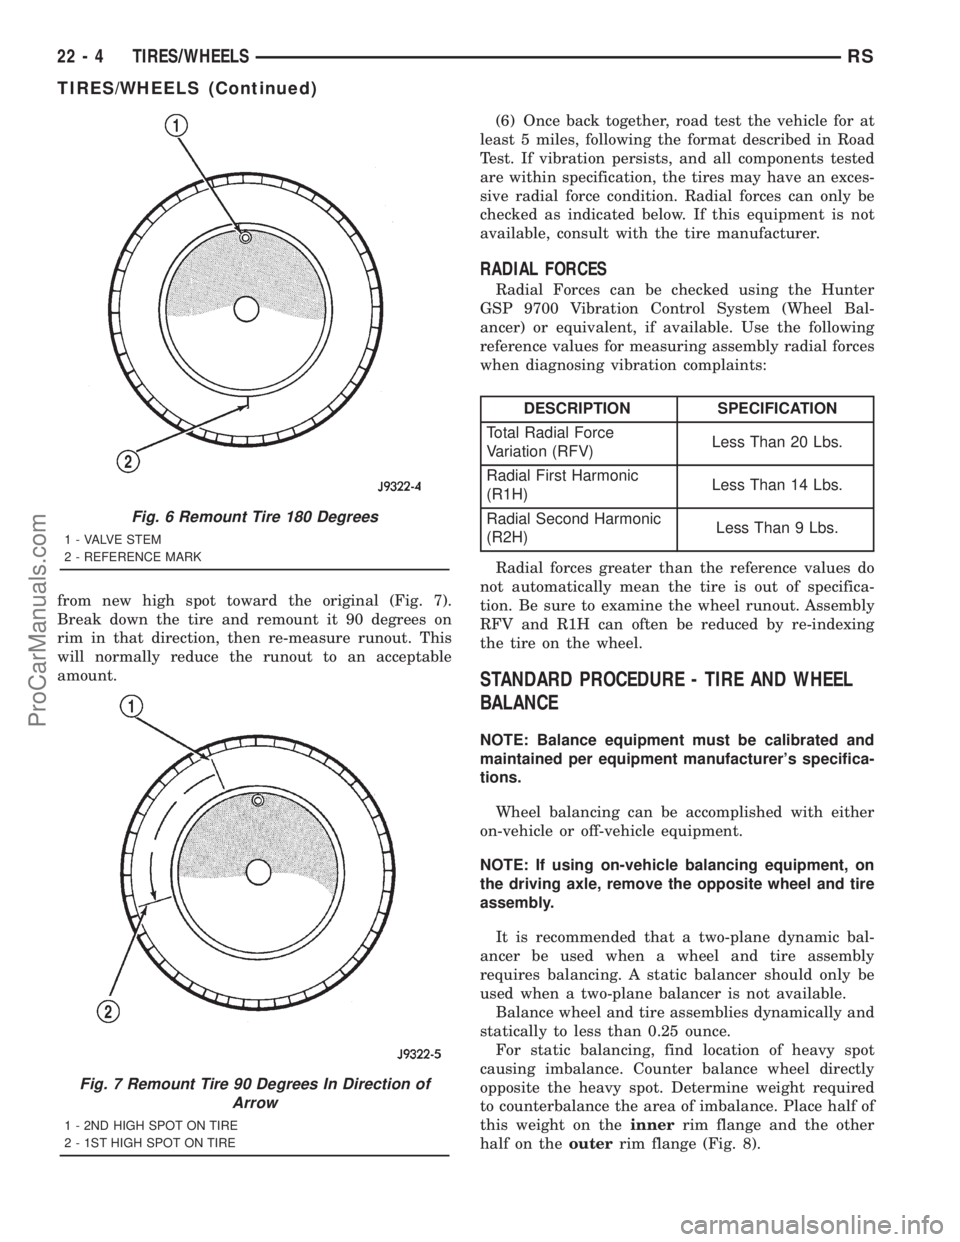
from new high spot toward the original (Fig. 7).
Break down the tire and remount it 90 degrees on
rim in that direction, then re-measure runout. This
will normally reduce the runout to an acceptable
amount.(6) Once back together, road test the vehicle for at
least 5 miles, following the format described in Road
Test. If vibration persists, and all components tested
are within specification, the tires may have an exces-
sive radial force condition. Radial forces can only be
checked as indicated below. If this equipment is not
available, consult with the tire manufacturer.
RADIAL FORCES
Radial Forces can be checked using the Hunter
GSP 9700 Vibration Control System (Wheel Bal-
ancer) or equivalent, if available. Use the following
reference values for measuring assembly radial forces
when diagnosing vibration complaints:
DESCRIPTION SPECIFICATION
Total Radial Force
Variation (RFV)Less Than 20 Lbs.
Radial First Harmonic
(R1H)Less Than 14 Lbs.
Radial Second Harmonic
(R2H)Less Than 9 Lbs.
Radial forces greater than the reference values do
not automatically mean the tire is out of specifica-
tion. Be sure to examine the wheel runout. Assembly
RFV and R1H can often be reduced by re-indexing
the tire on the wheel.
STANDARD PROCEDURE - TIRE AND WHEEL
BALANCE
NOTE: Balance equipment must be calibrated and
maintained per equipment manufacturer's specifica-
tions.
Wheel balancing can be accomplished with either
on-vehicle or off-vehicle equipment.
NOTE: If using on-vehicle balancing equipment, on
the driving axle, remove the opposite wheel and tire
assembly.
It is recommended that a two-plane dynamic bal-
ancer be used when a wheel and tire assembly
requires balancing. A static balancer should only be
used when a two-plane balancer is not available.
Balance wheel and tire assemblies dynamically and
statically to less than 0.25 ounce.
For static balancing, find location of heavy spot
causing imbalance. Counter balance wheel directly
opposite the heavy spot. Determine weight required
to counterbalance the area of imbalance. Place half of
this weight on theinnerrim flange and the other
half on theouterrim flange (Fig. 8).
Fig. 6 Remount Tire 180 Degrees
1 - VALVE STEM
2 - REFERENCE MARK
Fig. 7 Remount Tire 90 Degrees In Direction of
Arrow
1 - 2ND HIGH SPOT ON TIRE
2 - 1ST HIGH SPOT ON TIRE
22 - 4 TIRES/WHEELSRS
TIRES/WHEELS (Continued)
ProCarManuals.com
Page 1900 of 2321
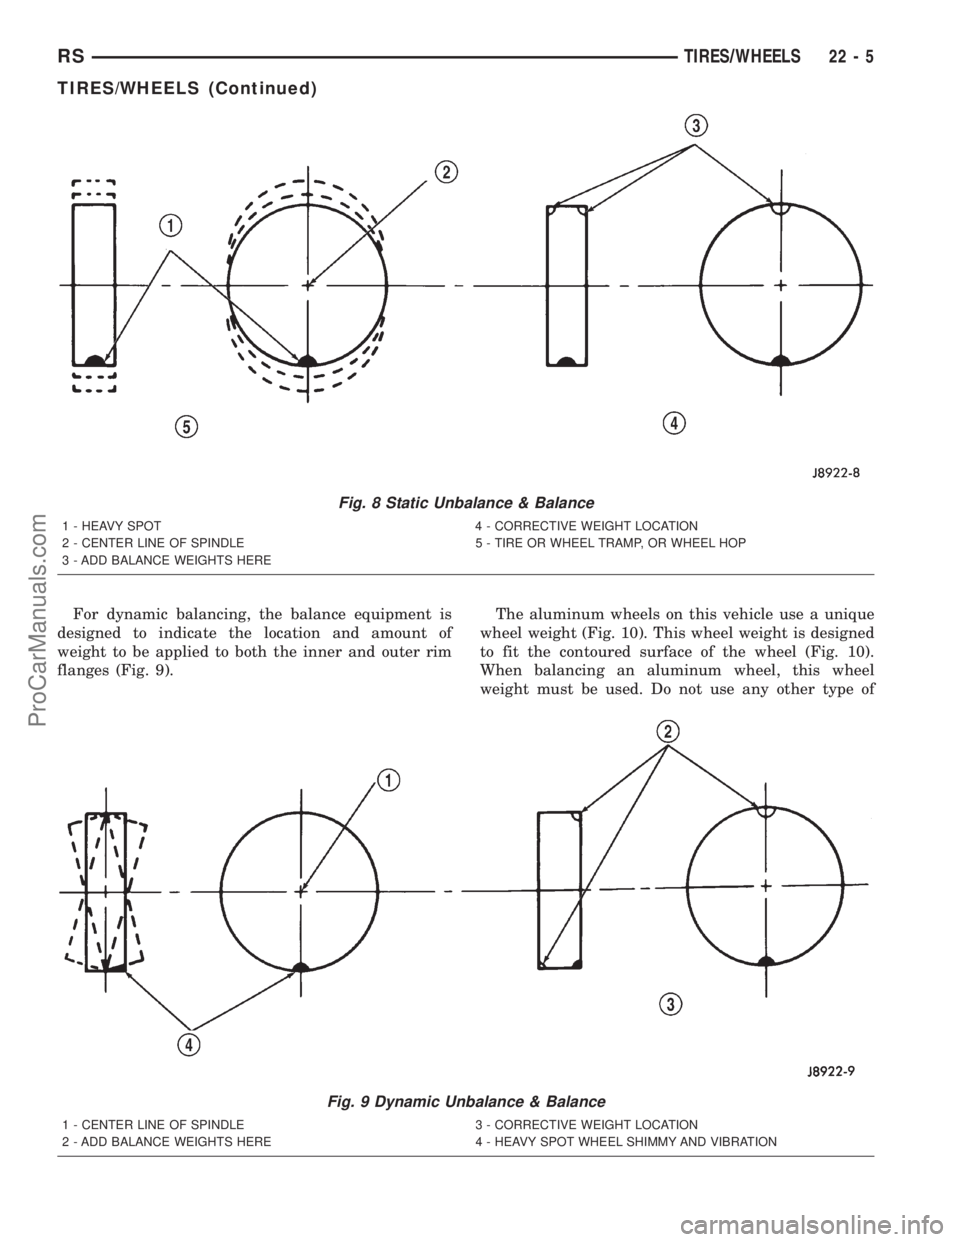
For dynamic balancing, the balance equipment is
designed to indicate the location and amount of
weight to be applied to both the inner and outer rim
flanges (Fig. 9).The aluminum wheels on this vehicle use a unique
wheel weight (Fig. 10). This wheel weight is designed
to fit the contoured surface of the wheel (Fig. 10).
When balancing an aluminum wheel, this wheel
weight must be used. Do not use any other type of
Fig. 9 Dynamic Unbalance & Balance
1 - CENTER LINE OF SPINDLE 3 - CORRECTIVE WEIGHT LOCATION
2 - ADD BALANCE WEIGHTS HERE 4 - HEAVY SPOT WHEEL SHIMMY AND VIBRATION
Fig. 8 Static Unbalance & Balance
1 - HEAVY SPOT 4 - CORRECTIVE WEIGHT LOCATION
2 - CENTER LINE OF SPINDLE 5 - TIRE OR WHEEL TRAMP, OR WHEEL HOP
3 - ADD BALANCE WEIGHTS HERE
RSTIRES/WHEELS22-5
TIRES/WHEELS (Continued)
ProCarManuals.com