DODGE TRUCK 1993 Service Repair Manual
Manufacturer: DODGE, Model Year: 1993, Model line: TRUCK, Model: DODGE TRUCK 1993Pages: 1502, PDF Size: 80.97 MB
Page 1381 of 1502
22-12
WHEELS
AND
TIRES
VIBRATION
DIAGNOSIS
Vibration
Sensitivity
Correction
Codes
For
Mechanical
Vibrations
Within
Specific
MPH
(km/h)
Ranges
10
(16km)
20
(32 km) 30
(48 km) 40
(64 km) 50
(80 km) 60
(96 km) 70
(112 km) 80
(128 km) 90
(144 km) Vehicle
Speed
Sensitive
•W
-WH-
-TRR
and
SSC-
-UJ
and AN-
-WB-
-TB-
-DSY
•TLR-
Torque
Sensitive
I
-UJA-
•
UJ
and AN
•
•UJA-
Engine
Speed
Sensitive
•ES
•EA-
•DEM-
Vibration
Sensitivity
Correction
Codes
For
Audible
Vibrations
Within
Specific
MPH
(km/h)
Ranges
10
(16 km) 20
(32 km) 30
(48 km) 40
(64 km) 50
(80 km) 60
(96 km) 70
(112 km) 80
(128 km) 90
(144 km)
Vehicle
Speed
Sensitive
•UJA-
JU
and WH
•DSY"
-TW-
•WB-
Torque
Sensitive
-AN
*
-UJ
and
TED,
Engine
Speed
Sensitive
•
EA
and
ES-
-ADB-
-DEM-
J8922-12
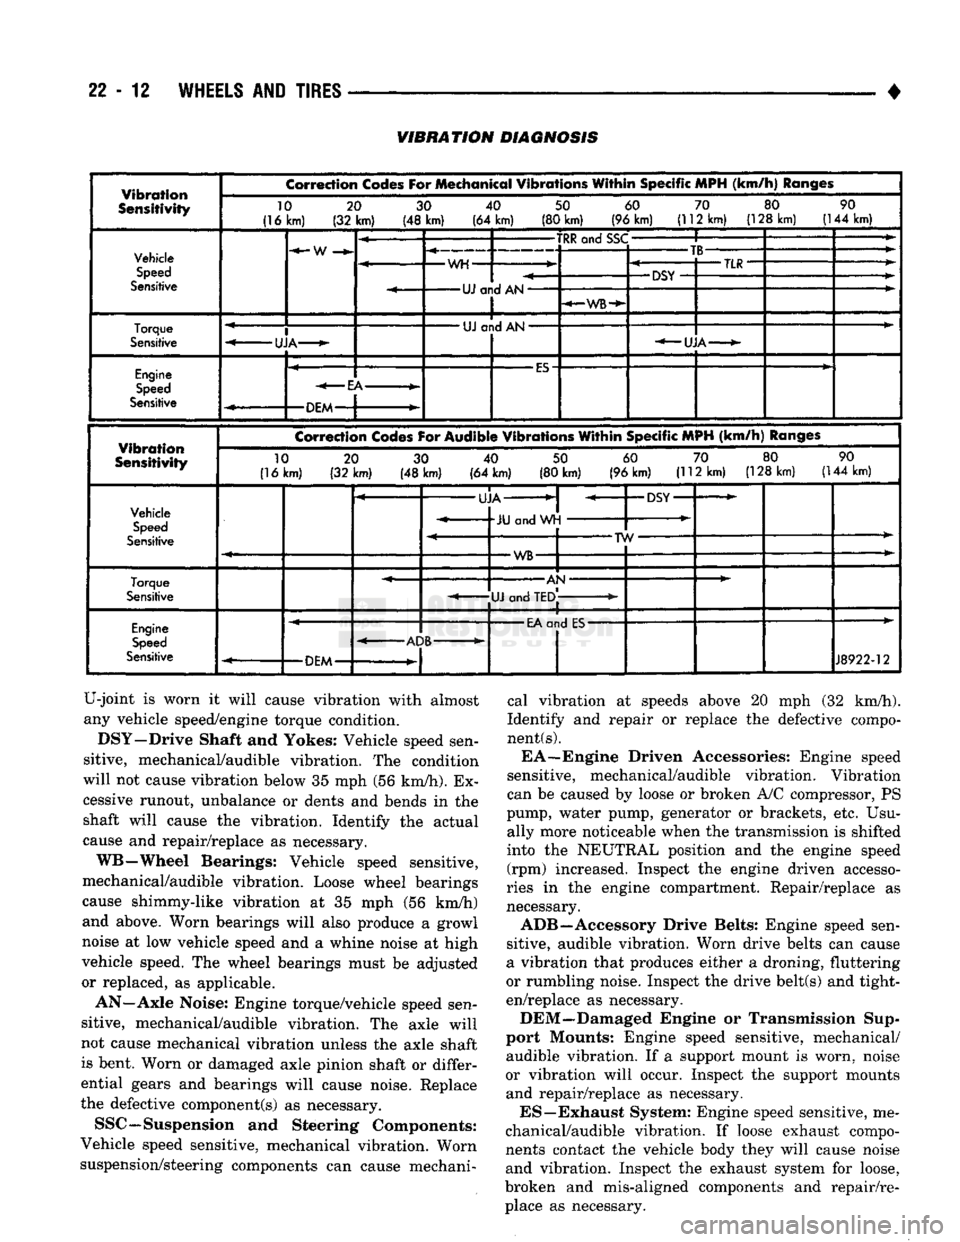
U-joint is worn it will cause vibration with almost
any vehicle speed/engine torque condition. DSY—Drive Shaft and Yokes: Vehicle speed sen
sitive, mechanical/audible vibration. The condition
will not cause vibration below 35 mph (56 km/h). Ex
cessive runout, unbalance or dents and bends in the shaft will cause the vibration. Identify the actual
cause and repair/replace as necessary.
WB—Wheel Bearings: Vehicle speed sensitive,
mechanical/audible vibration. Loose wheel bearings
cause shimmy-like vibration at 35 mph (56 km/h)
and above. Worn bearings will also produce a growl
noise at low vehicle speed and a whine noise at high
vehicle speed. The wheel bearings must be adjusted
or replaced, as applicable.
AN—Axle Noise: Engine torque/vehicle speed sen
sitive, mechanical/audible vibration. The axle will
not cause mechanical vibration unless the axle shaft
is bent. Worn or damaged axle pinion shaft or differ
ential gears and bearings will cause noise. Replace
the defective component(s) as necessary.
SSC—Suspension and Steering Components:
Vehicle speed sensitive, mechanical vibration. Worn
suspension/steering components can cause mechani cal vibration at speeds above 20 mph (32 km/h).
Identify and repair or replace the defective compo
nent
(s).
EA—Engine Driven Accessories: Engine speed
sensitive, mechanical/audible vibration. Vibration
can be caused by loose or broken A/C compressor, PS
pump, water pump, generator or brackets, etc. Usu ally more noticeable when the transmission is shifted
into the NEUTRAL position and the engine speed (rpm) increased. Inspect the engine driven accesso
ries in the engine compartment. Repair/replace as
necessary.
ADB—Accessory Drive Belts: Engine speed sen
sitive, audible vibration. Worn drive belts can cause
a vibration that produces either a droning, fluttering
or rumbling noise. Inspect the drive belt(s) and tight
en/replace as necessary.
DEM—Damaged Engine or Transmission Sup
port Mounts: Engine speed sensitive, mechanical/ audible vibration. If a support mount is worn, noise
or vibration will occur. Inspect the support mounts and repair/replace as necessary.
ES—Exhaust System: Engine speed sensitive, me
chanical/audible vibration. If loose exhaust compo
nents contact the vehicle body they will cause noise
and vibration. Inspect the exhaust system for loose,
broken and mis-aligned components and repair/re place as necessary.
Page 1382 of 1502
•
WHEELS
AND
TIRES
22 - 13
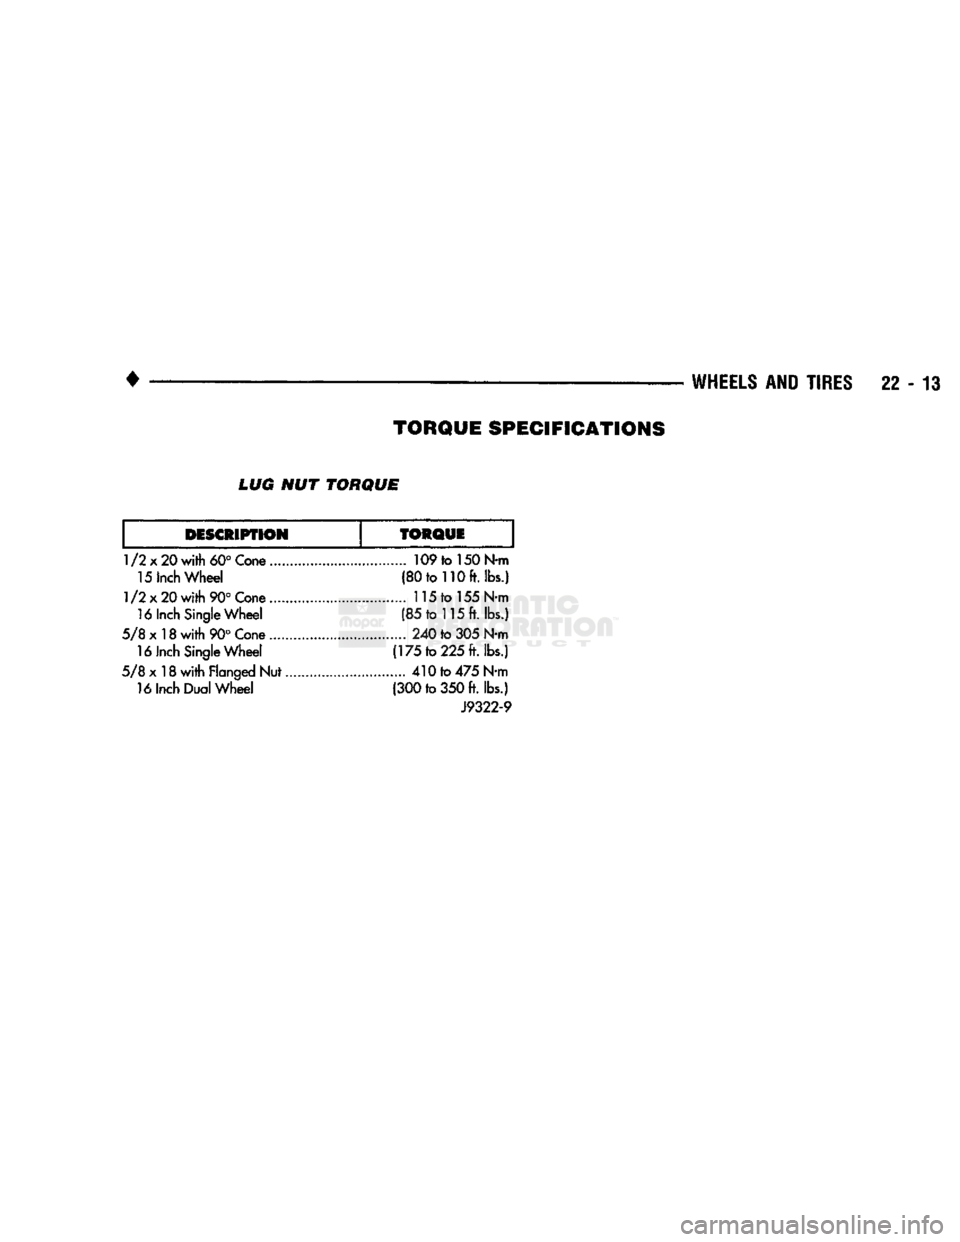
LUG
NUT
TORQUE
DESCRIPTION
1/2x20
with
60°
Cone 15 Inch Wheel
1/2x20
with
90°
Cone 16 Inch Single Wheel
5/8x18
with
90°
Cone 16 Inch Single Wheel
5/8x18
with Flanged
Nut..
16 Inch Dual Wheel
TORQUE
109
to 150
N-m
(80 to 110 ft.
lbs.)
115
to
155 N-m
(85 to 115
ft. lbs.)
240 to 305 N-m
(175 to
225 ft. lbs.)
410 to 475 N-m
(300 to
350 ft. lbs.)
J9322-9
TORQUE SPECIFICATIONS
Page 1383 of 1502

Page 1384 of 1502
•
BODY
COMPONENTS
23 - 1
CONTENTS
page
page
CAB/BODY
INTERIOR COMPONENTS
35
FIXED
GLASS
. 29
DOORS
21
PAINT
CODE
CHART
54
EXTERIOR
COMPONENTS
1
REFINISHING
PROCEDURES
54
EXTERIOR COMPONENTS
INDEX
page
Battery
Tray
7
Blower Motor Housing
Insulation
Panel—Diesel
Engine
Only
7
Body
Mouldings, Nameplates
and
Decals .......
9
Cab
. 14
Cab/Body
and
Cargo
Box
Stripes
11
Cargo
Box
19
Cowl
Grille
7
Front
Fenders
8
Fuel
Filler
Door
and
Nozzle/Tubes
12
Grille
and
Grille
Extension Panel
1
Grille
Extension Panel Support Bracket
(With
Diesel Engine Only)
3
page
Grille
Opening Panel (GOP)
and
Radiator Support Panel
3
Hatchgate
and
Components
16
Hood
5
Hood
Inside Release Cable
5
Hood
Latch
4
Labels/Decals/Plates
1
Outside Mirrors
13
Roof
Vent—Ramcharger
. 20
Splash
Shields—Front Fender
9
Sport
Bar
18
Tailgate
14
LABELS/DECALS/PLATES
GENERAL
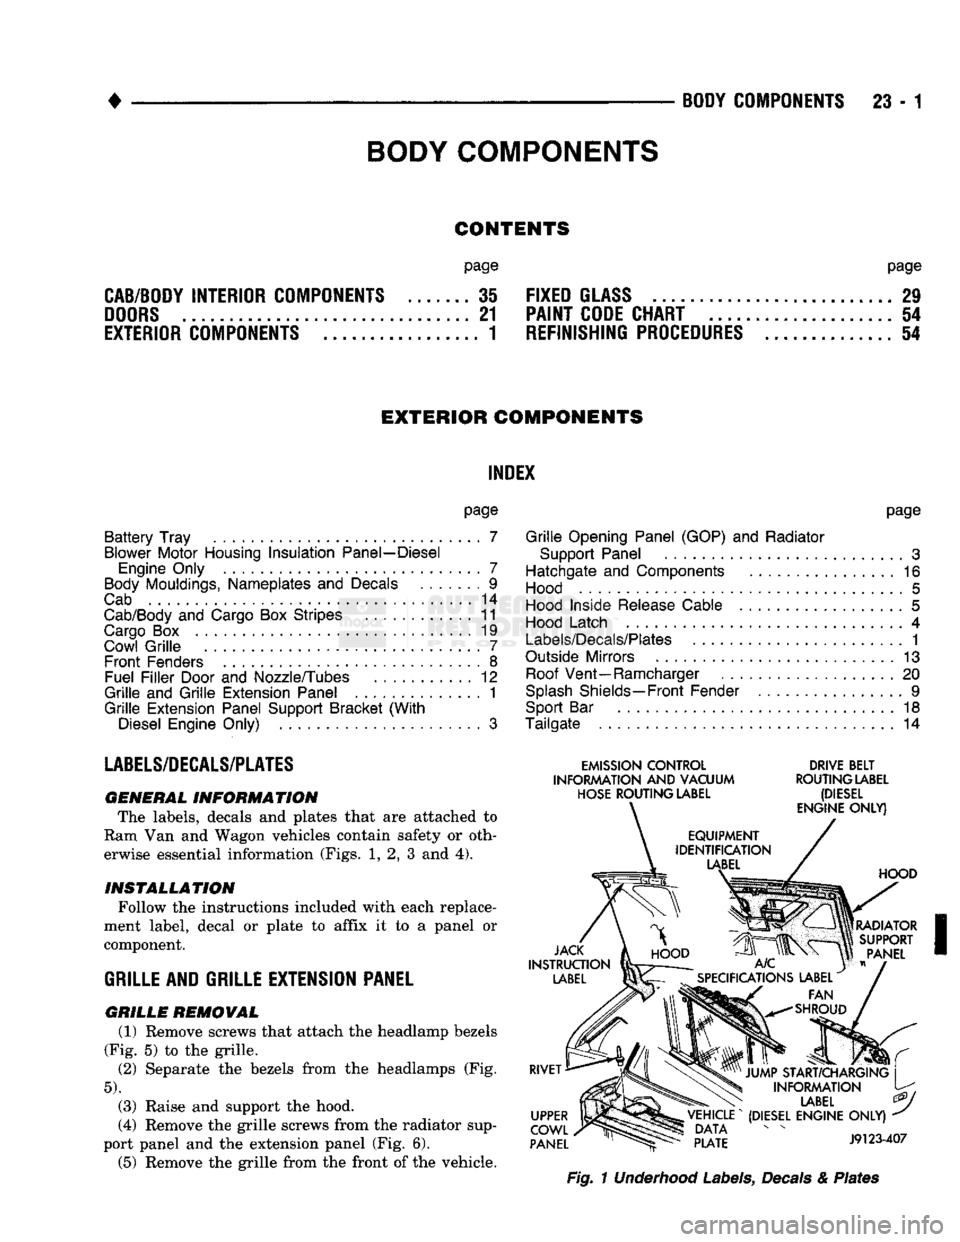
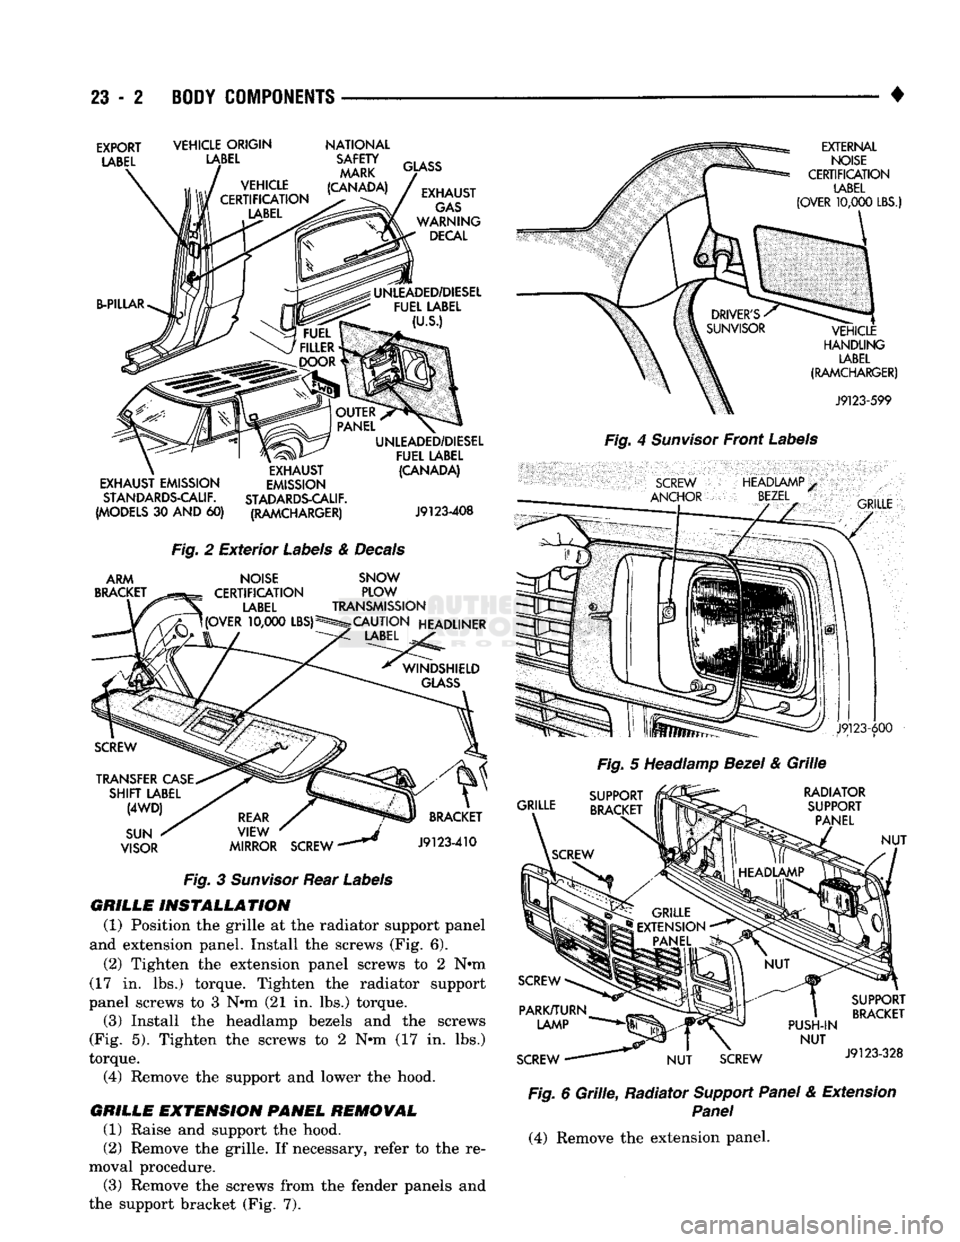
INFORMATION The labels, decals
and
plates that
are
attached
to
Ram Van
and
Wagon vehicles contain safety
or
oth erwise essential information (Figs.
1, 2, 3 and 4).
INSTALLATION
Follow the instructions included with each replace
ment label, decal
or
plate
to
affix
it to a
panel
or
component.
GRILLE
AND GRILLE EXTENSION PANEL
GRILLE
REMOVAL (1) Remove screws that attach the headlamp bezels
(Fig.
5) to the
grille.
(2)
Separate
the
bezels from
the
headlamps
(Fig.
5).
(3) Raise
and
support
the
hood.
(4) Remove the grille screws from the radiator sup
port panel
and the
extension panel (Fig.
6).
(5) Remove
the
grille from the front
of
the vehicle.
EMISSION
CONTROL
DRIVE
BELT
INFORMATION
AND
VACUUM
ROUTING
LABEL
HOSE
ROUTING
LABEL
(DIESEL
Fig.
1 Underhood Labels, Decals & Plates
BODY
COMPONENTS
Page 1385 of 1502
23
- 2
BODY COMPONENTS
•
EXPORT
LABEL
VEHICLE ORIGIN
LABEL
NATIONAL
SAFETY MARK
(CANADA) B-PILLAR
GLASS
EXHAUST
GAS
WARNING DECAL
UNLEADED/DIESEL FUEL LABEL
(U.S.)
EXHAUST EMISSION STANDARDS-CALIF.
(MODELS
30 AND 60)
EXHAUST
EMISSION
STADARDS-CALIF. (RAMCHARGER) UNLEADED/DIESEL
FUEL LABEL (CANADA)
J9123-408
Fig.
2
Exterior
Labels
&
Decals
ARM
BRACKET
NOISE
CERTIFICATION
LABEL
UOVER
10,000
LBS)5 SNOW
PLOW
TRANSMISSION
CAUTION HEADLINER
LABEL
TRANSFER
CASE
SHIFT
LABEL
(4WD)
SUN
VISOR
REAR
VIEW
MIRROR SCREW
*
BRACKET
J9123-410
Fig.
3
Sunvisor
Rear
Labels
GRILLE INSTALLATION
(1) Position
the
grille
at the
radiator support panel
and extension panel. Install
the
screws
(Fig. 6).
(2) Tighten
the
extension panel screws
to 2 N»m
(17
in. lbs.)
torque. Tighten
the
radiator support
panel screws
to 3 Nnn (21 in. lbs.)
torque. (3) Install
the
headlamp bezels
and the
screws
(Fig.
5).
Tighten
the
screws
to 2 Nnn (17 in. lbs.)
torque. (4) Remove
the
support
and
lower
the
hood.
GRILLE EMTENSION PANEL REMOVAL (1) Raise
and
support
the
hood.
(2) Remove
the
grille.
If
necessary, refer
to the re
moval procedure. (3) Remove
the
screws from
the
fender panels
and
the support bracket
(Fig. 7).
EXTERNAL
NOISE
CERTIFICATION
LABEL
(OVER
10,000
LBS.)
VEHICLE
HANDLING
LABEL
(RAMCHARGER)
J9123-599
Fig.
4
Sunvisor
Front
Labels
SCREW
ANCHOR
HEADIAMP
BEZEL
•
GRILLE
J9123-600
Fig.
5
Headlamp
Bezel
&
Grille
GRILLE RADIATOR
SUPPORT PANEL
NUT
PUSH-IN
NUT
SCREW
NUT
SCREW SUPPORT
BRACKET
J9123-328
Fig.
6
Grille,
Radiator
Support Panel
&
Extension
Panel
(4) Remove
the
extension panel.
Page 1386 of 1502
•
BODY
COMPONENTS
23 - 3
GRILLE
EXTENSION
PANEL
INSTALLATION
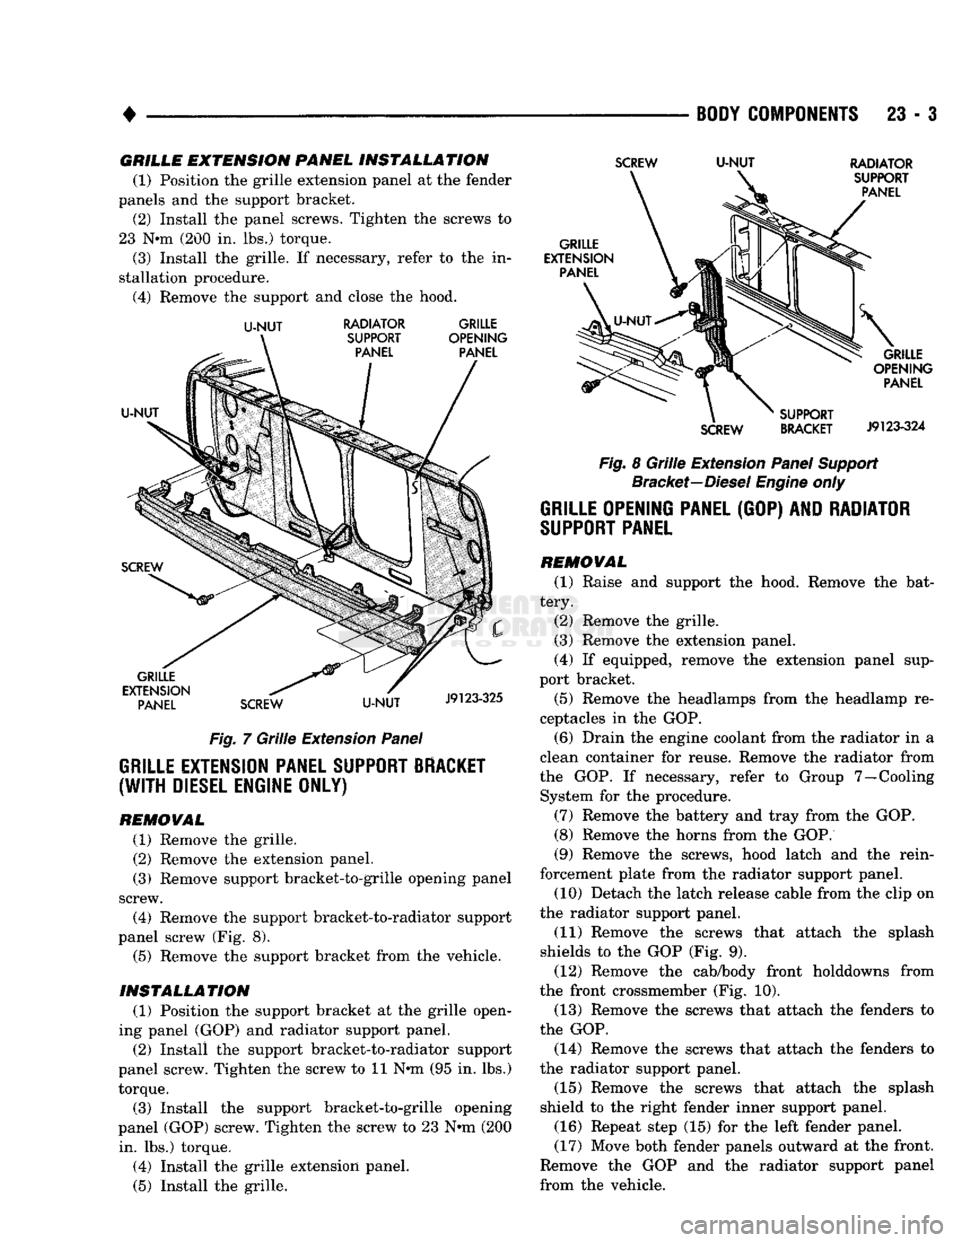
(1) Position the grille extension panel at the fender
panels and the support bracket. (2) Install the panel screws. Tighten the screws to
23 N*m (200 in. lbs.) torque.
(3) Install the grille. If necessary, refer to the in
stallation procedure. (4) Remove the support and close the hood.
U-NUT
RADIATOR GRILLE
Fig. 7 Grille Extension Panel
GRILLE EXTENSION PANEL SUPPORT BRACKET
(WITH
DIESEL ENGINE ONLY)
REMOWAL
(1) Remove the grille.
(2) Remove the extension panel.
(3) Remove support bracket-to-grille opening panel
screw. (4) Remove the support bracket-to-radiator support
panel screw (Fig. 8). (5) Remove the support bracket from the vehicle.
INSTALLATION
(1) Position the support bracket at the grille open
ing panel (GOP) and radiator support panel. (2) Install the support bracket-to-radiator support
panel screw. Tighten the screw to 11 N*m (95 in. lbs.) torque.
(3) Install the support bracket-to-grille opening
panel (GOP) screw. Tighten the screw to 23 N-m (200 in. lbs.) torque.
(4) Install the grille extension panel.
(5) Install the grille.
SCREW
U-NUT
RADIATOR
Fig. 8 Grille Extension Panel Support Bracket—Diesel Engine only
GRILLE OPENING PANEL
(GOP) AND
RADIATOR
SUPPORT
PANEL
REMOVAL
(1) Raise and support the hood. Remove the bat
tery. (2) Remove the grille.
(3) Remove the extension panel.
(4) If equipped, remove the extension panel sup
port bracket.
(5) Remove the headlamps from the headlamp re
ceptacles in the GOP.
(6) Drain the engine coolant from the radiator in a
clean container for reuse. Remove the radiator from
the GOP. If necessary, refer to Group 7—Cooling System for the procedure.
(7) Remove the battery and tray from the GOP.
(8) Remove the horns from the GOP.
(9) Remove the screws, hood latch and the rein
forcement plate from the radiator support panel. (10) Detach the latch release cable from the clip on
the radiator support panel.
(11) Remove the screws that attach the splash
shields to the GOP (Fig. 9). (12) Remove the cab/body front holddowns from
the front crossmember (Fig. 10). (13) Remove the screws that attach the fenders to
the GOP.
(14) Remove the screws that attach the fenders to
the radiator support panel.
(15) Remove the screws that attach the splash
shield to the right fender inner support panel.
(16) Repeat step (15) for the left fender panel.
(17) Move both fender panels outward at the front.
Remove the GOP and the radiator support panel
from the vehicle.
Page 1387 of 1502
23
- 4
BODY
COMPONENTS
• INSTALLATION
(1) If necessary, install U-nuts at the GOP lower
flange. (2) Move both fender panels outward at the front.
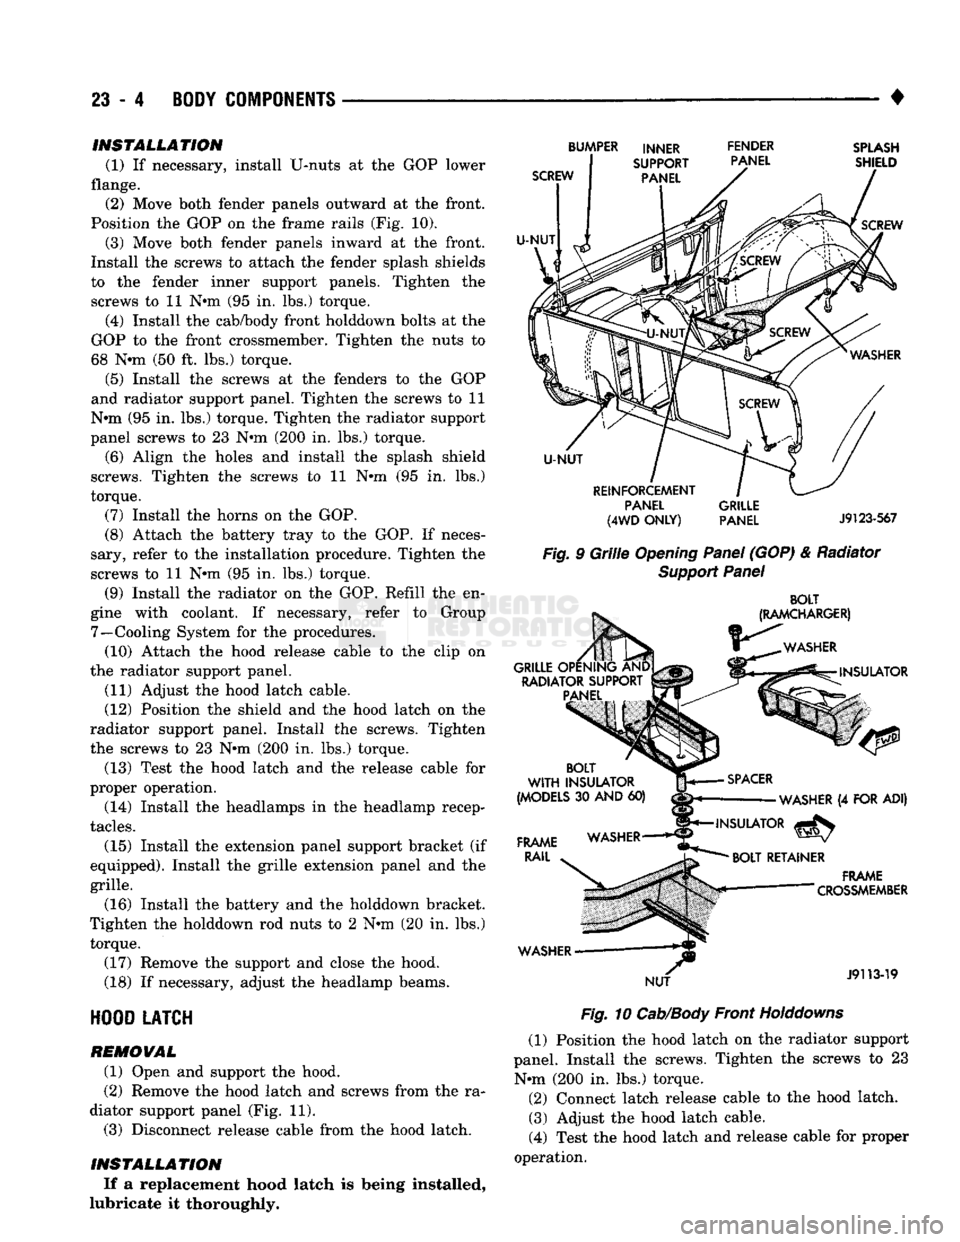
Position the GOP on the frame rails (Fig. 10).
(3) Move both fender panels inward at the front.
Install the screws to attach the fender splash shields
to the fender inner support panels. Tighten the
screws to 11 N#m (95 in. lbs.) torque.
(4) Install the cab/body front holddown bolts at the
GOP to the front crossmember. Tighten the nuts to
68 Nnn (50 ft. lbs.) torque.
(5) Install the screws at the fenders to the GOP
and radiator support panel. Tighten the screws to 11
N»m (95 in. lbs.) torque. Tighten the radiator support
panel screws to 23 Nnn (200 in. lbs.) torque.
(6) Align the holes and install the splash shield
screws. Tighten the screws to 11 N»m (95 in. lbs.)
torque.
(7) Install the horns on the GOP.
(8) Attach the battery tray to the GOP. If neces
sary, refer to the installation procedure. Tighten the
screws to 11 Nnn (95 in. lbs.) torque.
(9) Install the radiator on the GOP. Refill the en
gine with coolant. If necessary, refer to Group 7—Cooling System for the procedures. (10) Attach the hood release cable to the clip on
the radiator support panel.
(11) Adjust the hood latch cable.
(12) Position the shield and the hood latch on the
radiator support panel. Install the screws. Tighten
the screws to 23 Nnn (200 in. lbs.) torque.
(13) Test the hood latch and the release cable for
proper operation.
(14) Install the headlamps in the headlamp recep
tacles.
(15) Install the extension panel support bracket (if
equipped). Install the grille extension panel and the
grille.
(16) Install the battery and the holddown bracket.
Tighten the holddown rod nuts to 2 Nnn (20 in. lbs.) torque.
(17) Remove the support and close the hood.
(18) If necessary, adjust the headlamp beams.
HOOD
LATCH
REMOVAL
(1) Open and support the hood.
(2) Remove the hood latch and screws from the ra
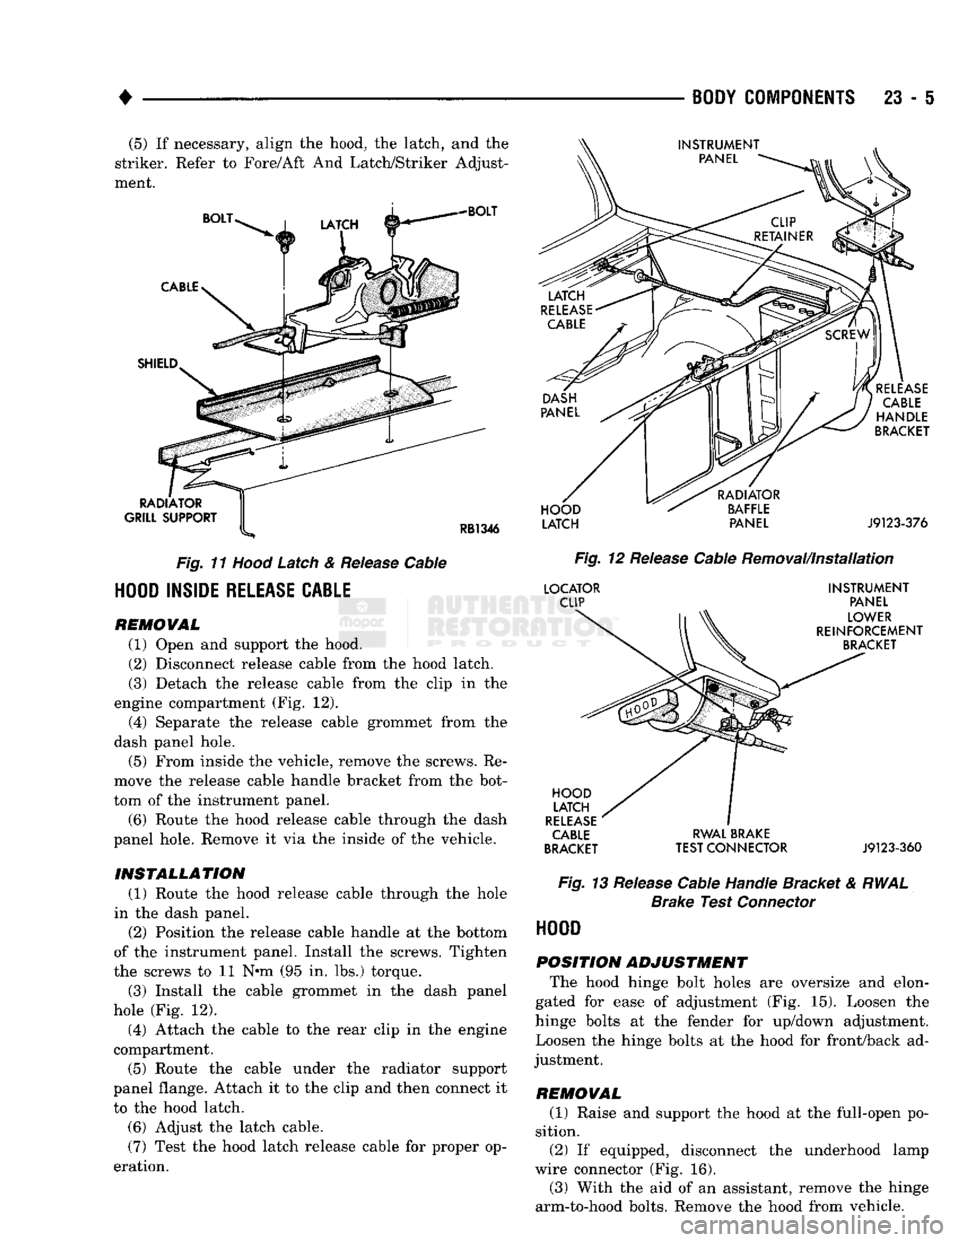
diator support panel (Fig. 11). (3) Disconnect release cable from the hood latch.
INSTALLATION If a replacement hood latch is being installed,
lubricate it thoroughly.
SCREW
U-NUT
BUMPER INNER FENDER
SUPPORT PANEL
PANEL
SPLASH
SHIELD
SCREW
U-NUT
REINFORCEMENT PANEL
(4WD
ONLY)
GRILLE
PANEL
J9123-567
Fig.
9
Grille
Opening
Panel
(GOP) & Radiator
Support
Panel
BOLT
(RAMCHARGER)
WASHER
GRILLE OPENING AND RADIATOR SUPPORT PANEL INSULATOR
BOLT
WITH
INSULATOR
(MODELS
30
AND
60)
FRAME
RAIL
WASHER NUT
SPACER
WASHER
(4
FOR ADI)
INSULATOR
^
BOLT
RETAINER
.
FRAME
— "
"
CROSSMEMBER
J9113-19
Fig.
10
Cab/Body
Front
Holddowns
(1) Position the hood latch on the radiator support
panel. Install the screws. Tighten the screws to 23 Nnn (200 in. lbs.) torque. (2) Connect latch release cable to the hood latch. (3) Adjust the hood latch cable.
(4) Test the hood latch and release cable for proper
operation.
Page 1388 of 1502
•
BODY
COMPONENTS
23 - 5
(5)
If
necessary, align
the
hood,
the
latch,
and the
striker. Refer
to
Fore/Aft
And
Latch/Striker Adjust
ment.
BOLT
CABLE
SHIELD
RADIATOR
GRILL SUPPORT
RB1346
Fig.
11
Hood
Latch
&
Release
Cable
HOOD
INSIDE
RELEASE
CABLE
REMOWAL
(1) Open
and
support
the
hood.
(2) Disconnect release cable from
the
hood latch.
(3) Detach
the
release cable from
the
clip
in the
engine compartment
(Fig. 12).
(4)
Separate
the
release cable grommet from
the
dash panel hole.
(5) From inside
the
vehicle, remove
the
screws.
Re
move
the
release cable handle bracket from
the
bot
tom
of the
instrument panel.
(6) Route
the
hood release cable through
the
dash
panel hole. Remove
it via the
inside
of the
vehicle.
INSTALLATION (1) Route
the
hood release cable through
the
hole
in
the
dash panel.
(2) Position
the
release cable handle
at the
bottom
of
the
instrument panel. Install
the
screws. Tighten
the screws
to 11 Nem (95 in. lbs.)
torque.
(3) Install
the
cable grommet
in the
dash panel
hole
(Fig. 12).
(4)
Attach
the
cable
to the
rear clip
in the
engine
compartment. (5) Route
the
cable under
the
radiator support
panel flange. Attach
it to the
clip
and
then connect
it
to
the
hood latch.
(6) Adjust
the
latch cable.
(7) Test
the
hood latch release cable
for
proper
op
eration.
RELEASE
CABLE
HANDLE
BRACKET
HOOD
LATCH
RADIATOR
BAFFLE PANEL
J9123-376
Fig.
12
Release
Cable Removal/Installation
LOCATOR
CLIP
HOOD
LATCH
RELEASE
CABLE
BRACKET
INSTRUMENT
PANEL
LOWER
REINFORCEMENT
BRACKET
RWAL BRAKE
TEST CONNECTOR
J9123-360
Fig.
13
Release
Cable Handle Bracket
&
RWAL
Brake
Test
Connector
HOOD
POSITION ADJUSTMENT The hood hinge bolt holes
are
oversize
and
elon
gated
for
ease
of
adjustment
(Fig. 15).
Loosen
the
hinge bolts
at the
fender
for
up/down adjustment.
Loosen
the
hinge bolts
at the
hood
for
front/back
ad
justment.
REMOVAL (1) Raise
and
support
the
hood
at the
full-open
po
sition. (2)
If
equipped, disconnect
the
underhood lamp
wire connector
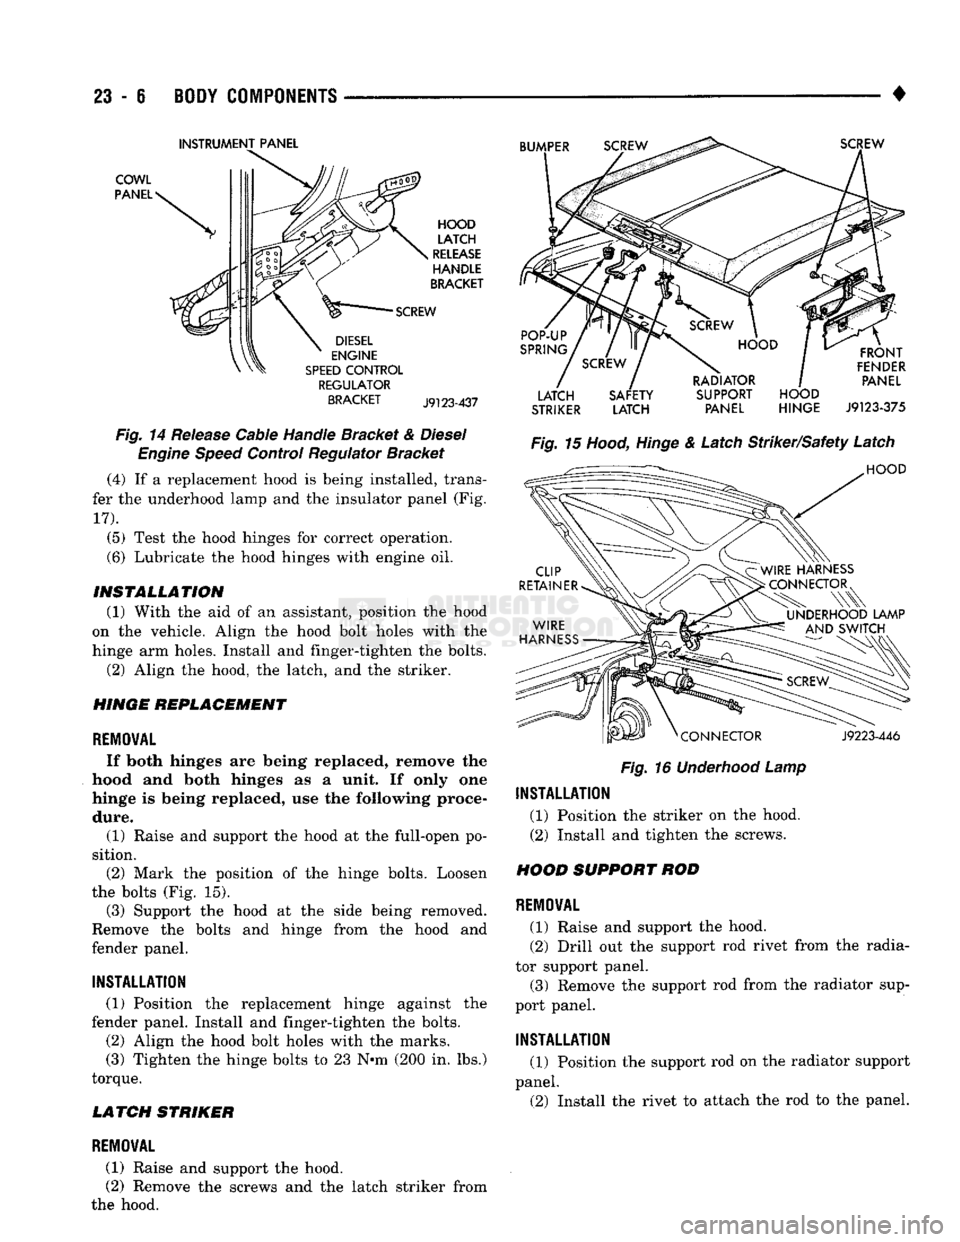
(Fig. 16).
(3) With
the aid of an
assistant, remove
the
hinge
arm-to-hood bolts. Remove
the
hood from vehicle.
Page 1389 of 1502
23
- 6
BODY
COMPONENTS
•
INSTRUMENT
PANEL
COWL
PANEL
REGULATOR
BRACKET
J9123-437
Fig.
14 Release Cable Handle Bracket &
Diesel
Engine
Speed
Control Regulator Bracket (4) If a replacement hood is being installed, trans
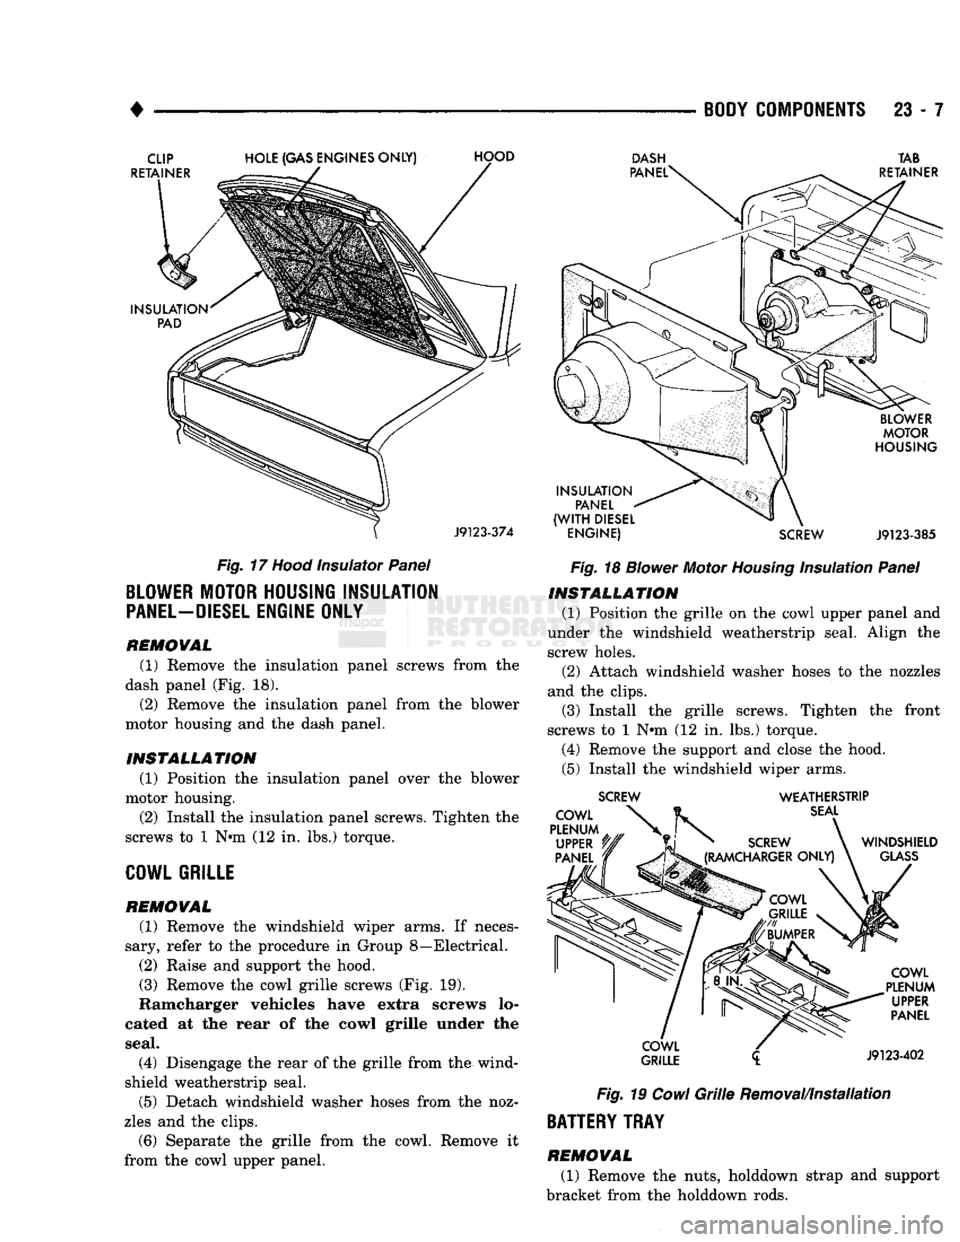
fer the underhood lamp and the insulator panel (Fig.
17).
(5) Test the hood hinges for correct operation.
(6) Lubricate the hood hinges with engine oil.
INSTALLATION
(1) With the aid of an assistant, position the hood
on the vehicle. Align the hood bolt holes with the
hinge arm holes. Install and finger-tighten the bolts. (2) Align the hood, the latch, and the striker.
HINGE
REPLACEMENT
REMOVAL
If both hinges are being replaced, remove the
hood and both hinges as a unit. If only one
hinge is being replaced, use the following proce dure. (1) Raise and support the hood at the full-open po
sition. (2) Mark the position of the hinge bolts. Loosen
the bolts (Fig. 15). (3) Support the hood at the side being removed.
Remove the bolts and hinge from the hood and
fender panel.
INSTALLATION
(1) Position the replacement hinge against the
fender panel. Install and finger-tighten the bolts. (2) Align the hood bolt holes with the marks.
(3) Tighten the hinge bolts to 23 N-m (200 in. lbs.)
torque.
LATCH STRIKER
LATCH SAFETY SUPPORT HOOD
STRIKER
LATCH PANEL HINGE
J9123-375
Fig.
16
Underhood
Lamp
INSTALLATION
(1) Position the striker on the hood.
(2) Install and tighten the screws.
HOOD SUPPORT ROD
REMOVAL
(1) Raise and support the hood.
(2) Drill out the support rod rivet from the radia
tor support panel. (3) Remove the support rod from the radiator sup
port panel.
INSTALLATION
(1) Position the support rod on the radiator support
panel. (2) Install the rivet to attach the rod to the panel.
REMOVAL
(1) Raise and support the hood.
(2) Remove the screws and the latch striker from
the hood.
Page 1390 of 1502
•
BODY COMPONENTS
23 - 7
Fig.
17
Hood
Insulator
Panel
BLOWER MOTOR HOUSING INSULATION
PANEL-DIESEL
ENGINE ONLY
REMOVAL
(1) Remove the insulation panel screws from the
dash panel (Fig. 18).
(2) Remove the insulation panel from the blower
motor housing and the dash panel.
INSTALLATION
(1) Position the insulation panel over the blower
motor housing. (2) Install the insulation panel screws. Tighten the
screws to 1 N#m (12 in. lbs.) torque.
COWL GRILLE
REMOVAL
(1) Remove the windshield wiper arms. If neces
sary, refer to the procedure in Group 8—Electrical. (2) Raise and support the hood.
(3) Remove the cowl grille screws (Fig. 19).
Ramcharger vehicles have extra screws lo
cated at the rear of the cowl grille under the
seal.
(4) Disengage the rear of the grille from the wind
shield weatherstrip seal. (5) Detach windshield washer hoses from the noz
zles and the clips.
(6) Separate the grille from the cowl. Remove it
from the cowl upper panel.
DASH
TAB
ENGINE) SCREW
J9123-385
Fig.
18
Blower
Motor
Housing
Insulation
Panel
INSTALLATION
(1) Position the grille on the cowl upper panel and
under the windshield weatherstrip seal. Align the screw holes.
(2) Attach windshield washer hoses to the nozzles
and the clips.
(3) Install the grille screws. Tighten the front
screws to 1 N»m (12 in. lbs.) torque. (4) Remove the support and close the hood.
(5) Install the windshield wiper arms.
SCREW WEATHERSTRIP
Fig.
19
Cowl
Grille
Removal/Installation
BATTERY TRAY
REMOVAL
(1) Remove the nuts, holddown strap and support
bracket from the holddown rods.