DODGE VIPER 2008 ZB II / 2.G Owners Manual
Manufacturer: DODGE, Model Year: 2008, Model line: VIPER, Model: DODGE VIPER 2008 ZB II / 2.GPages: 303, PDF Size: 2.65 MB
Page 101 of 303
NOTE:The light will turn on when the ignition switch
is in the ON/RUN position and the parking brake is
applied. This light shows only that the parking brake is
applied. It does not show the degree of brake application.
WARNING!
Driving a vehicle with the brake light on is danger-
ous. Part of the brake system has failed. It will take
longer to stop the vehicle. You could have an acci-
dent. Have the brakes checked immediately. (See
page 144 for more information.)
Electronic Throttle Control (ETC) Light
This light will turn on briefly as a bulb check
when turning on the ignition switch. It will also
turn on while the engine is running to warn of
a problem with the Electronic Throttle Control
system.
²If the light fails to turn on during the bulb check, see
you authorized dealer for service.
²If the light turns on steady while the engine is running,
safely bring the vehicle to a complete stop as soon as
possible, cycle the ignition key, and then restart the
engine. The light should turn off. However, if the light
remains on steady, see your authorized dealer for
service as soon as possible.
²If the light is flashing when the engine is running,
immediate service is required. If this occurs, you may
experience reduced vehicle performance, an elevated/
rough idle or engine stall, and your vehicle may
require towing.
100 UNDERSTANDING YOUR INSTRUMENT PANEL
Page 102 of 303
Low Tire Pressure Telltale / TPMS Malfunction
Indicator
Each tire, including the spare (if provided),
should be checked monthly when cold and
inflated to the inflation pressure recommended
by the vehicle manufacturer on the vehicle
placard or tire inflation pressure label. (If your vehicle
has tires of a different size than the size indicated on the
vehicle placard or tire inflation pressure label, you should
determine the proper tire inflation pressure for those
tires.)
As an added safety feature, your vehicle has been
equipped with a tire pressure monitoring system (TPMS)
that illuminates a low tire pressure telltale when one or
more of your tires is significantly under-inflated. Accord-
ingly, when the low tire pressure telltale illuminates, you
should stop and check your tires as soon as possible and
inflate them to the proper pressure. Driving on a signifi-
cantly under-inflated tire causes the tire to overheat andcan lead to tire failure. Under-inflation also reduces fuel
efficiency and tire tread life and may affect the vehicle's
handling and stopping ability.
Please note that the TPMS is not a substitute for proper
tire maintenance, and it is the driver 's responsibility to
maintain correct tire pressure, even if under-inflation has
not reached the level to trigger illumination of the TPMS
low tire pressure telltale.
Your vehicle has also been equipped with a TPMS
malfunction indicator to indicate when the system is not
operating properly. The TPMS malfunction indicator is
combined with the low tire pressure telltale.
When the system detects a malfunction, the telltale will
flash for approximately one minute and then remain
continuously illuminated. This sequence will continue
UNDERSTANDING YOUR INSTRUMENT PANEL 101
4
Page 103 of 303
upon subsequent vehicle start-ups as long as the mal-
function exists. When the malfunction indicator is illumi-
nated, the system may not be able to detect or signal low
tire pressure as intended.
TPMS malfunctions may occur for a variety of reasons,
including the installation of replacement or alternate tires
or wheels on the vehicle that prevent the TPMS from
functioning properly. Always check the TPMS malfunc-
tion telltale after replacing one or more tires or wheels on
your vehicle to ensure that the replacement or alternate
tires and wheels allow the TPMS to continue to function
properly. (See page 166 for more information.)CAUTION!
The Tire Pressure Monitor System (TPMS) has been
optimized for the original equipment tires and
wheels. The TPMS pressures have been established
for the tire size equipped on your vehicle. Undesir-
able operation or sensor damage may result when
using replacement equipment that is not of the same
size, type, and/or style. Aftermarket wheels can cause
sensor damage. Do not use aftermarket tire sealants
or balance beads if your vehicle is equipped with the
TPMS, as damage to the sensors may result.
102 UNDERSTANDING YOUR INSTRUMENT PANEL
Page 104 of 303
WARNING!
Do not exceed 55 mph (88 km/h) if the LOW Tire
indicator is activated. Vehicle handling and braking
may be reduced. You could have an accident and be
severely or fatally injured.
Seat Belt Reminder Light
If the driver does not buckle their seat belt and
vehicle speed exceeds 5 mph (8 km/h), or if the
passenger does not buckle their seat belt within 10
seconds of vehicle speed exceeding 5 mph (8 km/h), the
Enhanced Warning System (Belt Alert) will alert the
occupant(s) to buckle their seat belt(s). Once triggered,
the Enhanced Warning System (Belt Alert) will flash the
Seat Belt Reminder light and chime for up to 96 seconds
to alert the occupant(s) to buckle their seat belt(s). If the
driver unbuckles their seat belt while vehicle speed isgreater than 5 mph (8 km/h), or if the passenger unbuck-
les their seat belt for more than 10 seconds while vehicle
speed is greater than 5 mph (8 km/h), the Enhanced
Warning System (Belt Alert) will reactivate. (See page 36
for more information.)
Gauges & Indicator Lights
Tachometer
This gauge shows engine speed in revolutions-
per-minute (RPM) times 1,000. Avoid excessive
engine speeds in any part of the red warning
zone, particularly when driving downhill or in
lower gears.
Skip Shift Indicator Light
This indicator is located in the Tachometer. When
the indicator light turns amber, it means that you
are being prevented from shifting the transmission from
First to Second or to Third gear. When the indictor light
turns red, it means that the tachometer gauge pointer is at
UNDERSTANDING YOUR INSTRUMENT PANEL 103
4
Page 105 of 303
6000 RPM. This serves as a visual aid to shift before
reaching the red line. This warning will turn off when the
tachometer pointer falls below 5900 RPM. (See page 136
for more information.)
Coolant Temperature Gauge
This gauge shows the engine coolant tempera-
ture. The gauge pointer will likely show higher
temperatures when driving in hot weather, up
mountain grades, or in heavy stop and go
traffic. If the red warning Light turns on while driving,
safely bring the vehicle to a stop, and turn off the engine.
DO NOT operate the vehicle until the cause is corrected.
Engine Temperature Warning Light
The red Engine Temperature Warning Light is
located in the Coolant Temperature Gauge. It will
turn on to warn of an overheated engine condi-
tion. If this light turns on while driving, safely bring thevehicle to a stop and turn off the engine. DO NOT
operate the vehicle until the cause is corrected. (See page
176 for more information.)
Oil Temperature Gauge
This gauge shows the oil temperature. The
gauge pointer will likely show higher tempera-
tures when driving in hot weather, up moun-
tain grades, or in heavy stop and go traffic. If
the red warning light remains on after the bulb check or
turns on while driving, safely bring the vehicle to a
complete stop and turn off the engine. DO NOT operate
the vehicle until the cause is corrected.
Oil Pressure Gauge
This gauge shows engine oil pressure when the
engine is running. The pressure will vary with
engine speed, oil viscosity, and engine tem-
perature. Oil pressures will be higher as the
engine is warming up. The normal operating pressure is
104 UNDERSTANDING YOUR INSTRUMENT PANEL
Page 106 of 303
between 20 and 80 psi (pounds per square inch). If the
pointer remains in the red range, safely bring the vehicle
to a complete stop and turn off the engine. DO NOT
operate the vehicle until the cause is corrected.
This gauge does not indicate the amount of oil in the
engine. The engine oil level must be checked under the
hood. Check the level often during severe usage.
Oil Pressure Warning Light
The red Oil Pressure Warning Light is located in
the Oil Pressure Gauge. It will turn on to indicate
low engine oil pressure. The light should turn on briefly
as a bulb check when the engine is first started. If the
light remains on or turns on while driving, safely bring
the vehicle to a complete stop and turn off the engine. DO
NOT operate the vehicle until the cause is corrected.NOTE:This light does not indicate how much oil is in
the engine. The engine oil level must be checked using
the procedure shown in section 7. (See page 198 for more
information.)
Fuel Gauge
This gauge shows the amount of fuel in the gas
tank. The reaction time of the gauge has been
slowed to avoid needle fluctuation during pe-
riods of high G force cornering.
Voltage Gauge
This gauge shows the electrical system voltage.
The normal operating voltage is from 12 to 14
volts with the engine running. If the pointer
remains at either the high or low ends of the
scale, the electrical system should be serviced.
UNDERSTANDING YOUR INSTRUMENT PANEL 105
4
Page 107 of 303
Charge System Light
The red Charge System Light is located in the
Voltage Gauge. It will turn on when there is a
charging system malfunction or a possible accessory
drive belt failure.
CAUTION!
The accessory belt also drives the water pump. Op-
erating the vehicle with a failed belt can cause engine
overheating and possible severe engine damage.
SETTING THE DIGITAL CLOCK
The digital display panel on the radio displays the time in
hours and minutes. The display panel is operative when
the ignition switch is in the ON/RUN or ACC position.
Press and release the Time button on the radio to display
the time. Press and release the button a second time to
turn off the time display.
Clock Setting Procedure
1. Turn the ignition switch to the ªON/RUNº or ªACCº
position.
2. Using the point of a ballpoint pen or similar object,
press either the ªHº (Hour) or ªMº (Minute) button on
the radio. The display will show the time.
3. Press the ªHº button to set hours or the ªMº button to
set minutes. The time setting will increase each time you
press a button.
RADIO GENERAL INFORMATION
Radio Broadcast Signals
The radio will provide excellent reception under most
operating conditions. Like any system, however, car
radios have performance limitations, due to mobile op-
eration and natural phenomena, which might lead you to
believe your sound system is malfunctioning. To help
106 UNDERSTANDING YOUR INSTRUMENT PANEL
Page 108 of 303
you understand and save you concern about these ªap-
parentº malfunctions, you must understand a point or
two about the transmission and reception of radio sig-
nals.
Two Types of Signals
There are two basic types of radio signals: AM or
Amplitude Modulation, in which the transmitted sound
causes the amplitude, or height, of the radio waves to
vary; and FM or Frequency Modulation, in which the
frequency of the wave is varied to carry the sound.
Electrical Disturbances
Radio waves may pick up electrical disturbances during
transmission. They mainly affect the wave amplitude,
and thus remain a part of the AM reception. They
interfere very little with the frequency variations that
carry the FM signal.
AM Reception
AM sound is based on wave amplitude, so AM reception
can be disrupted by such things as lightning, power lines
and neon signs.
FM Reception
Because FM transmission is based on frequency varia-
tions, interference that consists of amplitude variations
can be filtered out, leaving the reception relatively clear,
which is the major feature of FM radio.
NOTE:The radio, steering wheel radio controls (if
equipped), and 6±Disc CD/DVD changer (if equipped)
will remain active for up to 10 minutes after the ignition
switch has been turned OFF. Opening a vehicle front
door will cancel this feature.
UNDERSTANDING YOUR INSTRUMENT PANEL 107
4
Page 109 of 303
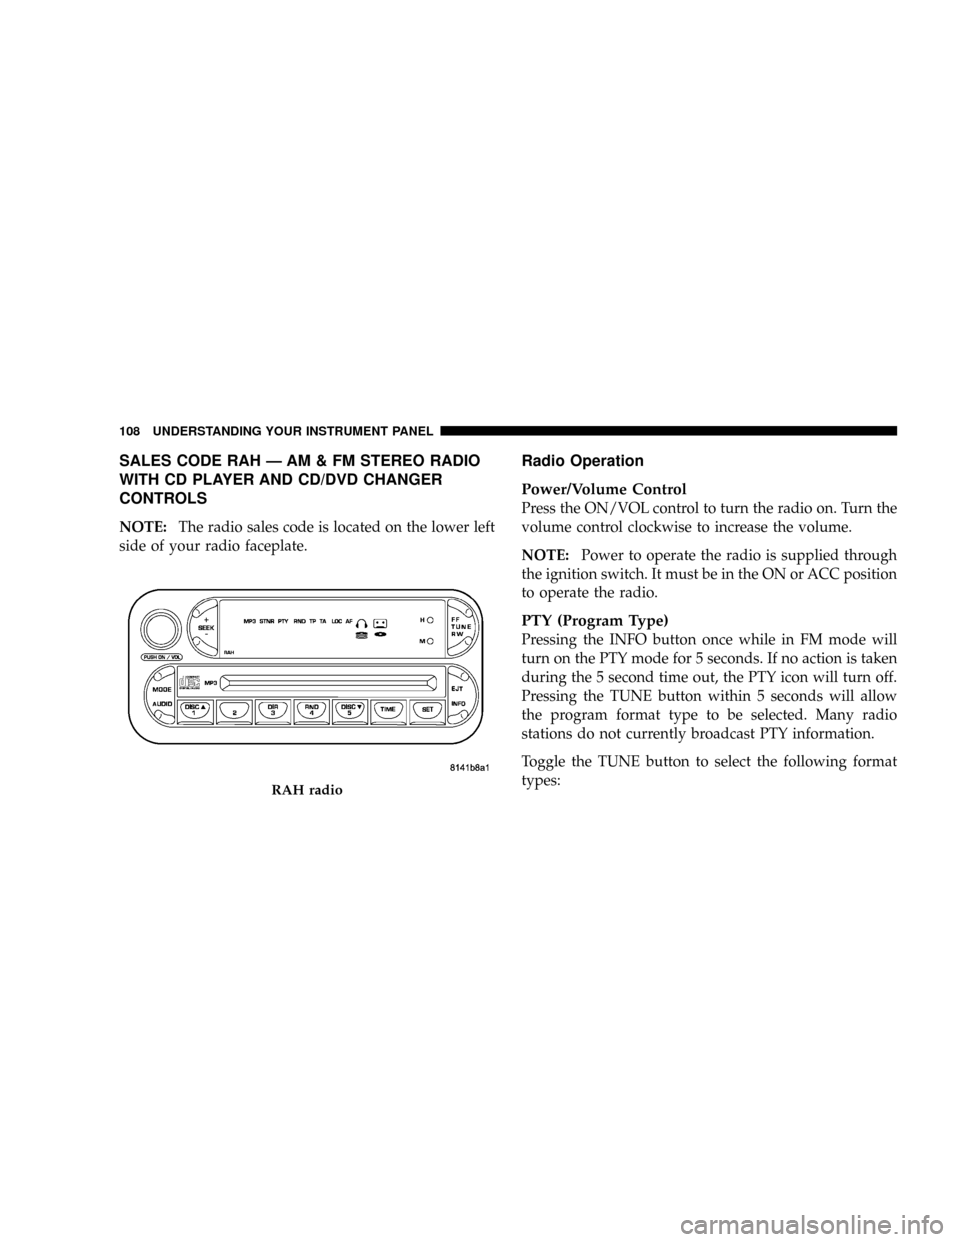
SALES CODE RAH Ð AM & FM STEREO RADIO
WITH CD PLAYER AND CD/DVD CHANGER
CONTROLS
NOTE:The radio sales code is located on the lower left
side of your radio faceplate.
Radio Operation
Power/Volume Control
Press the ON/VOL control to turn the radio on. Turn the
volume control clockwise to increase the volume.
NOTE:Power to operate the radio is supplied through
the ignition switch. It must be in the ON or ACC position
to operate the radio.
PTY (Program Type)
Pressing the INFO button once while in FM mode will
turn on the PTY mode for 5 seconds. If no action is taken
during the 5 second time out, the PTY icon will turn off.
Pressing the TUNE button within 5 seconds will allow
the program format type to be selected. Many radio
stations do not currently broadcast PTY information.
Toggle the TUNE button to select the following format
types:
RAH radio
108 UNDERSTANDING YOUR INSTRUMENT PANEL
Page 110 of 303
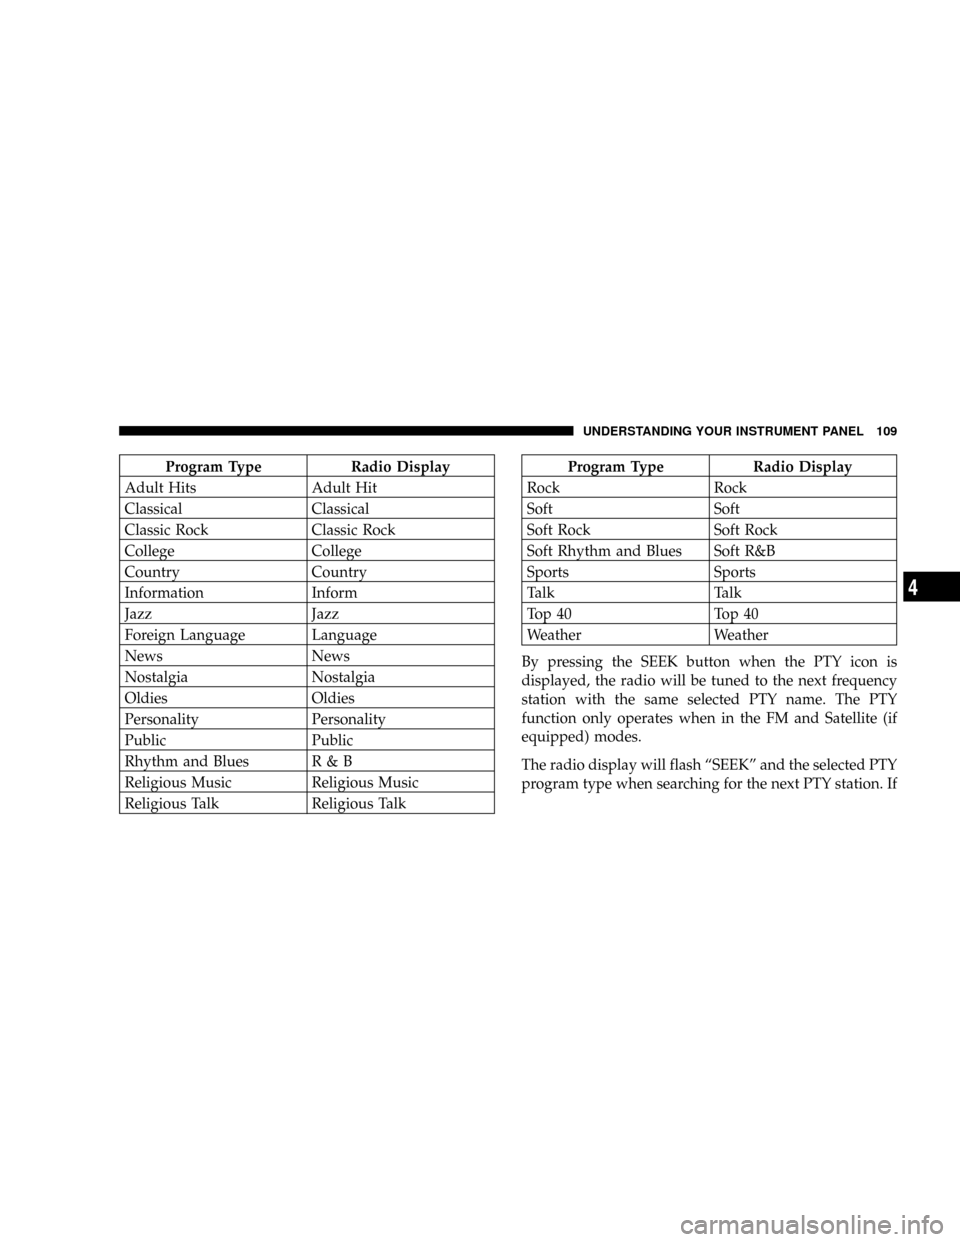
Program Type Radio Display
Adult Hits Adult Hit
Classical Classical
Classic Rock Classic Rock
College College
Country Country
Information Inform
Jazz Jazz
Foreign Language Language
News News
Nostalgia Nostalgia
Oldies Oldies
Personality Personality
Public Public
Rhythm and Blues R & B
Religious Music Religious Music
Religious Talk Religious TalkProgram Type Radio Display
Rock Rock
Soft Soft
Soft Rock Soft Rock
Soft Rhythm and Blues Soft R&B
Sports Sports
Talk Talk
Top 40 Top 40
Weather Weather
By pressing the SEEK button when the PTY icon is
displayed, the radio will be tuned to the next frequency
station with the same selected PTY name. The PTY
function only operates when in the FM and Satellite (if
equipped) modes.
The radio display will flash ªSEEKº and the selected PTY
program type when searching for the next PTY station. If
UNDERSTANDING YOUR INSTRUMENT PANEL 109
4