technical specifications FIAT DUCATO 2012 Owner handbook (in English)
[x] Cancel search | Manufacturer: FIAT, Model Year: 2012, Model line: DUCATO, Model: FIAT DUCATO 2012Pages: 287, PDF Size: 4.5 MB
Page 97 of 287

93
KNOWING
YOUR CAR
SAFETY
STARTING
AND
DRIVING
WARNING
LIGHTS AND
MESSAGES
IN AN
EMERGENCY
MAINTENANCE
AND CARE
TECHNICAL
SPECIFICATIONS
INDEX
GENERAL WARNINGS
Area of visibility
The area of visibility may vary according to the vehicle
position (full load condition included), according to the
vehicle specification and according to weather
conditions (high brightness, rain, snow and fog). Visibility
may be reduced during poor lighting or full load
conditions.
The area covered by the TV camera is approximately
3 m in length and approximately a maximum of 5.5 m in
width fig. 107.
F0N0215mfig. 107
Notes on use
To clean the TV camera, it is advisable to use a non-
abrasive cloth when the protective glass is dirty or iced
over (on the outside). It is absolutely necessary to avoid
using any tool for cleaning as this could scratch the glass.
It is also advisable to use a dry non-abrasive cloth when
cleaning the display. The dust that settles on the display
may be removed with special brushes. Avoid using any
detergent for cleaning.
The display glass could break in the event of impact. In
this case, do not touch the liquid crystal that emerges
from the display. If this occurs, quickly wash the
contaminated parts with soap and water.
Page 98 of 287
94
KNOWING
YOUR CAR
SAFETY
STARTING
AND
DRIVING
WARNING
LIGHTS AND
MESSAGES
IN AN
EMERGENCY
MAINTENANCE
AND CARE
TECHNICAL
SPECIFICATIONS
INDEX
F0N0216mfig. 108
MESSAGES ON THE SCREEN
Messages are shown on the display under the following
conditions:
❒An alert message is displayed during the 5 seconds
following reverse engagement.
❒When a speed of approximately 18 km/h is exceeded
and only the activation button is ON, the image
disappears and a message reporting that the system
has gone into stand-by mode is displayed for
approximately 5 seconds.
❒When a speed of approximately 18 km/h is exceeded
and reverse gear is engaged, the image disappears
and an alert message is displayed that remains until
the speed drops to approximately 15 km/h. In this
case, the image is displayed again.
The system makes it possible to change the language in
which the text messages are displayed. For this
selection, with the system deactivated, press the
ON/OFF button and any other button simultaneously
and then select the language by scrolling through the
menu using the ON/OFF button. When the desired
language is reached, wait for about 3 seconds so that it
is programmed. USER INTERFACE
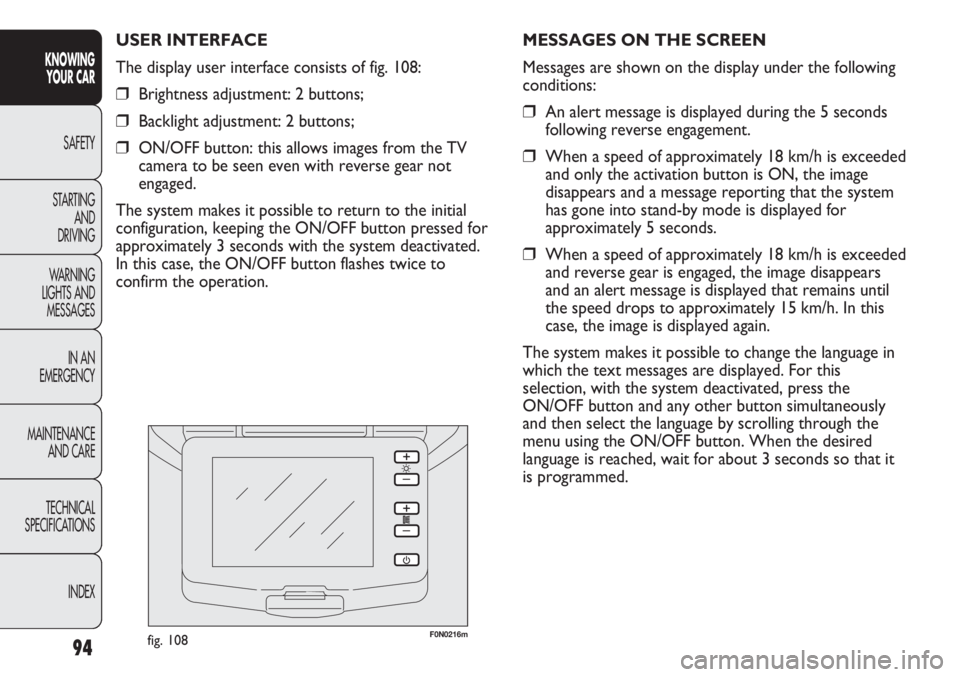
The display user interface consists of fig. 108:
❒Brightness adjustment: 2 buttons;
❒Backlight adjustment: 2 buttons;
❒ON/OFF button: this allows images from the TV
camera to be seen even with reverse gear not
engaged.
The system makes it possible to return to the initial
configuration, keeping the ON/OFF button pressed for
approximately 3 seconds with the system deactivated.
In this case, the ON/OFF button flashes twice to
confirm the operation.
Page 99 of 287
95
KNOWING
YOUR CAR
SAFETY
STARTING
AND
DRIVING
WARNING
LIGHTS AND
MESSAGES
IN AN
EMERGENCY
MAINTENANCE
AND CARE
TECHNICAL
SPECIFICATIONS
INDEX
TACHOGRAPH
For tachograph operation and use, consult the owner
handbook supplied by the device manufacturer.
The tachograph must be installed on the vehicle when
the vehicle weight (with or without trailer) exceeds
3.5 tons.
IMPORTANT Anyone making changes to the
monitoring device or signal transmission system that
affects recording by the monitoring instrument,
particularly if this is done for purposes of fraud, may be
in breach of criminal or administrative state regulations.
IMPORTANT If a tachograph is fitted, if the vehicle is
parked for more than 5 days, it is advisable to
disconnect the negative battery terminal to maintain its
charge.
IMPORTANT NOTES
Do not use abrasive detergents or solvents to clean the
device. To clean the outside of the device, use a damp
cloth or special products for the care of synthetic
materials.The tachograph is installed and sealed by authorised
personnel: do not try and access the device or the
supply and recording leads in any way. It is the
responsibility of the owner of the vehicle on which the
tachograph is installed to check the device regularly.
The check must be carried out at least every two years
and a test must be carried out to ensure that it is
working properly. Ensure that the data label is renewed
after every check that that the label contains the
specified data.
Page 100 of 287
96
KNOWING
YOUR CAR
SAFETY
STARTING
AND
DRIVING
WARNING
LIGHTS AND
MESSAGES
IN AN
EMERGENCY
MAINTENANCE
AND CARE
TECHNICAL
SPECIFICATIONS
INDEX
F0N0800mfig. 109
DOORS
CENTRAL DOOR LOCKING/UNLOCKING
SYSTEM
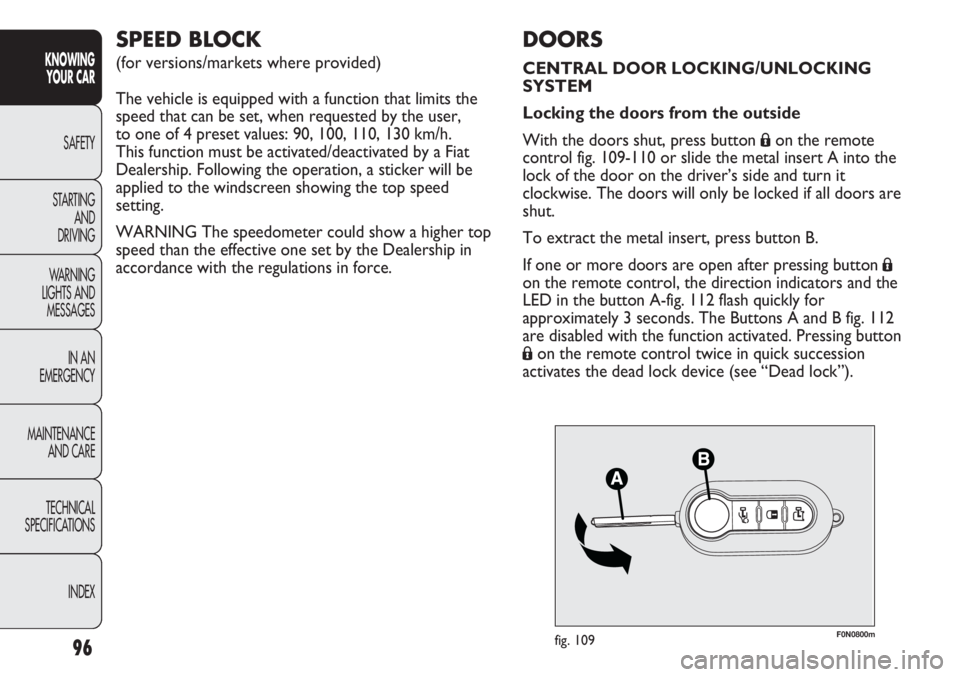
Locking the doors from the outside
With the doors shut, press button
Áon the remote
control fig. 109-110 or slide the metal insert A into the
lock of the door on the driver’s side and turn it
clockwise. The doors will only be locked if all doors are
shut.
To extract the metal insert, press button B.
If one or more doors are open after pressing button
Á
on the remote control, the direction indicators and the
LED in the button A-fig. 112 flash quickly for
approximately 3 seconds. The Buttons A and B fig. 112
are disabled with the function activated. Pressing button
Áon the remote control twice in quick succession
activates the dead lock device (see “Dead lock”).
SPEED BLOCK
(for versions/markets where provided)
The vehicle is equipped with a function that limits the
speed that can be set, when requested by the user,
to one of 4 preset values: 90, 100, 110, 130 km/h.
This function must be activated/deactivated by a Fiat
Dealership. Following the operation, a sticker will be
applied to the windscreen showing the top speed
setting.
WARNING The speedometer could show a higher top
speed than the effective one set by the Dealership in
accordance with the regulations in force.
Page 101 of 287
97
KNOWING
YOUR CAR
SAFETY
STARTING
AND
DRIVING
WARNING
LIGHTS AND
MESSAGES
IN AN
EMERGENCY
MAINTENANCE
AND CARE
TECHNICAL
SPECIFICATIONS
INDEX
F0N0059mfig. 111F0N0801mfig. 110
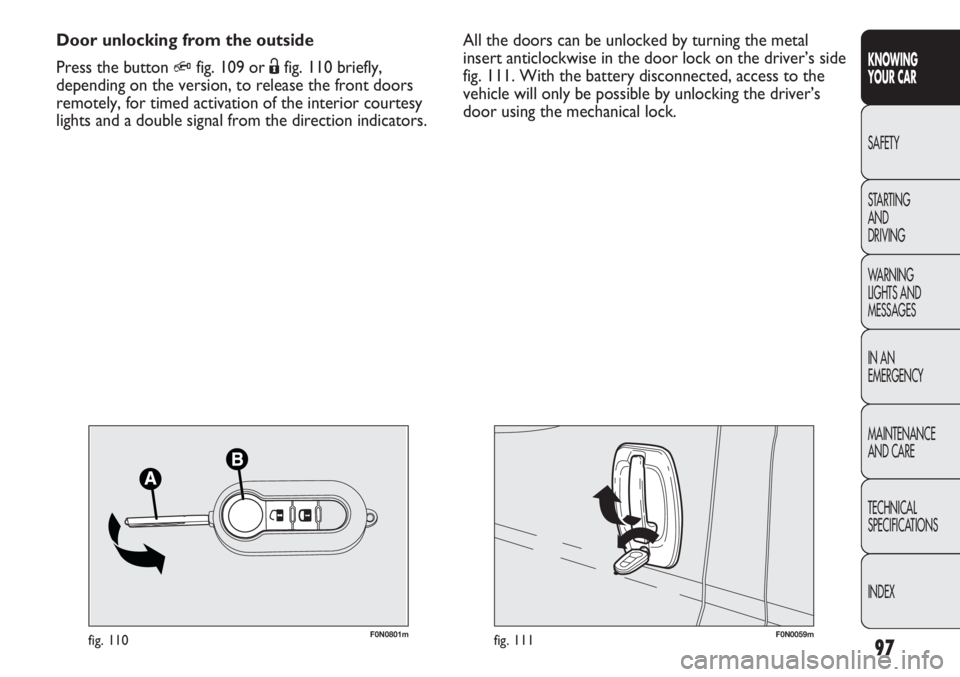
All the doors can be unlocked by turning the metal
insert anticlockwise in the door lock on the driver’s side
fig. 111. With the battery disconnected, access to the
vehicle will only be possible by unlocking the driver’s
door using the mechanical lock. Door unlocking from the outside
Press the button
Qfig. 109 or Ëfig. 110 briefly,
depending on the version, to release the front doors
remotely, for timed activation of the interior courtesy
lights and a double signal from the direction indicators.
Page 102 of 287
98
KNOWING
YOUR CAR
SAFETY
STARTING
AND
DRIVING
WARNING
LIGHTS AND
MESSAGES
IN AN
EMERGENCY
MAINTENANCE
AND CARE
TECHNICAL
SPECIFICATIONS
INDEX
F0N0047mfig. 112F0N0132mfig. 113
IMPORTANT With the central locking engaged, pulling
the opening lever for one of the front doors switches
off the central locking function. Individual doors can be
unlocked by pulling the opening handle of one of the
rear doors.
If a power supply is not present (blown fuse, battery
disconnected, etc.) it is, however, possible to lock the
doors manually.
After exceeding 20 km/h, all the doors will be locked
automatically if the setup menu function has been
selected (see “Multifunction display” paragraph in this
section).
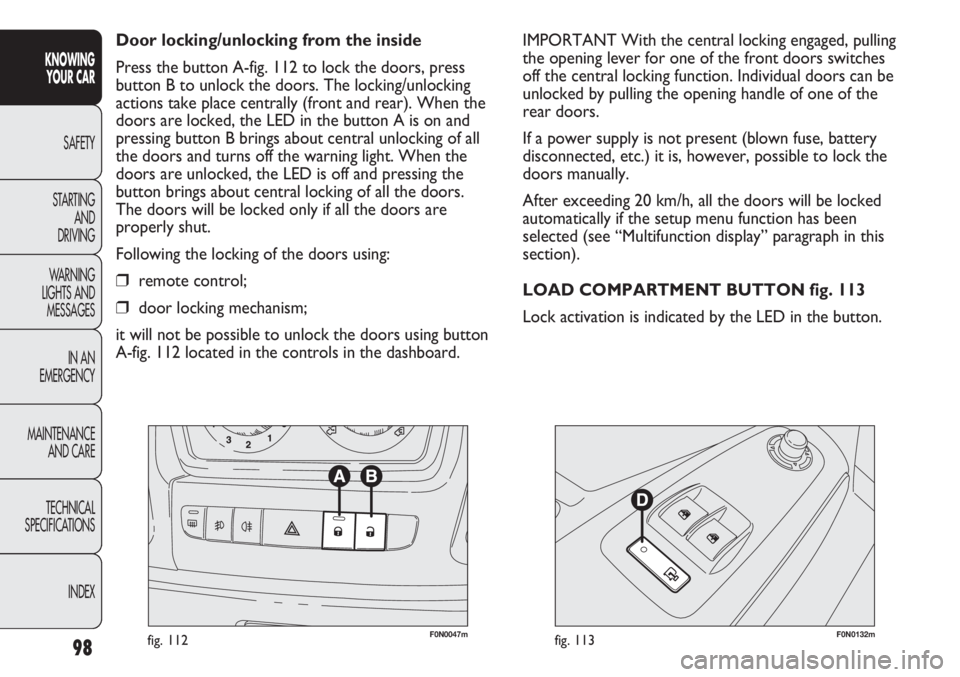
LOAD COMPARTMENT BUTTON fig. 113
Lock activation is indicated by the LED in the button. Door locking/unlocking from the inside
Press the button A-fig. 112 to lock the doors, press
button B to unlock the doors. The locking/unlocking
actions take place centrally (front and rear). When the
doors are locked, the LED in the button A is on and
pressing button B brings about central unlocking of all
the doors and turns off the warning light. When the
doors are unlocked, the LED is off and pressing the
button brings about central locking of all the doors.
The doors will be locked only if all the doors are
properly shut.
Following the locking of the doors using:
❒remote control;
❒door locking mechanism;
it will not be possible to unlock the doors using button
A-fig. 112 located in the controls in the dashboard.
Page 103 of 287
99
KNOWING
YOUR CAR
SAFETY
STARTING
AND
DRIVING
WARNING
LIGHTS AND
MESSAGES
IN AN
EMERGENCY
MAINTENANCE
AND CARE
TECHNICAL
SPECIFICATIONS
INDEX
The LED comes on in the following cases:
❒after each door lock command generated by the
button D or by button
Áin the dashboard;
❒when the instrument panel is activated;
❒upon opening of one of the front doors;
❒when the door is locked at 20 km/h (if activated
from the menu).
The lock is turned off when one of the load
compartment doors is opened or on a door release
request (load compartment or centralised) or an
unlocking request from the remote control/door catch.
DEAD LOCK
(for versions/markets where provided)
This safety device inhibits the operation of:
❒interior handles;
❒locking/unlocking buttons A-B fig. 112;
thereby preventing the opening of the doors from inside
the passenger compartment if there has been a break-in
attempt (e.g. a window has been broken).
The dead lock device therefore offers the best possible
protection against break in attempts. We recommend
engaging it whenever the vehicle is parked and left
unattended.
Once the dead lock system is engaged it
is impossible to open the doors from
inside the vehicle. Therefore, before engaging
the system check that there is no one left inside.
If the remote control battery is flat, the system
can only be disengaged by using the metal insert
in either of the door locks as described
previously: in this case the device only remains
on for the rear doors.
WARNING
Device activation
The dead lock device is automatically activated on every
door when pressing the remote control button
Ábriefly
twice, fig. 109.
Device activation is indicated by 3 flashes of the
direction indicators and the flashing of the LED on
button A-fig. 112 on the dashboard.
If one of the doors is not perfectly shut, the dead lock
device will not be activated, thus preventing a person
getting into the car through the open door and, on
shutting it, remaining stuck inside the passenger
compartment.
Page 104 of 287
100
KNOWING
YOUR CAR
SAFETY
STARTING
AND
DRIVING
WARNING
LIGHTS AND
MESSAGES
IN AN
EMERGENCY
MAINTENANCE
AND CARE
TECHNICAL
SPECIFICATIONS
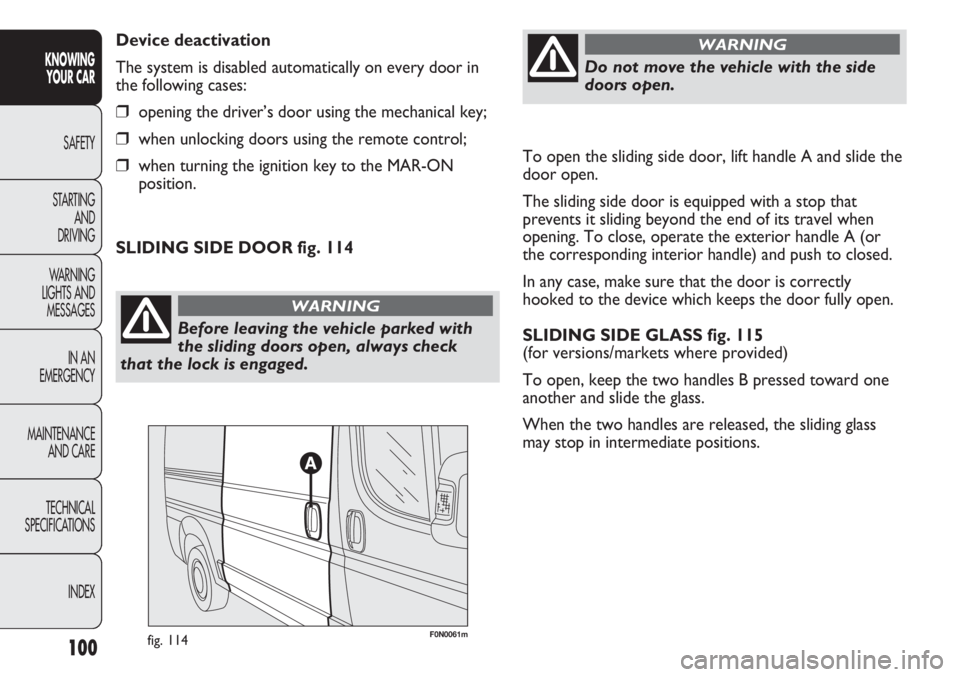
INDEXTo open the sliding side door, lift handle A and slide the
door open.
The sliding side door is equipped with a stop that
prevents it sliding beyond the end of its travel when
opening. To close, operate the exterior handle A (or
the corresponding interior handle) and push to closed.
In any case, make sure that the door is correctly
hooked to the device which keeps the door fully open.
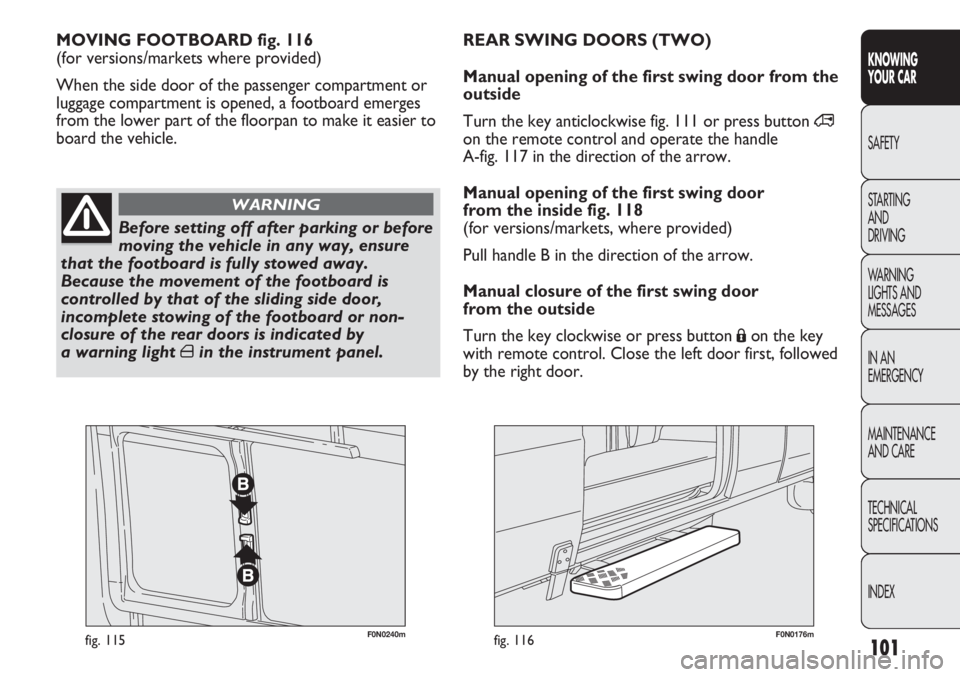
SLIDING SIDE GLASS fig. 115
(for versions/markets where provided)
To open, keep the two handles B pressed toward one
another and slide the glass.
When the two handles are released, the sliding glass
may stop in intermediate positions. Device deactivation
The system is disabled automatically on every door in
the following cases:
❒opening the driver’s door using the mechanical key;
❒when unlocking doors using the remote control;
❒when turning the ignition key to the MAR-ON
position.
Before leaving the vehicle parked with
the sliding doors open, always check
that the lock is engaged.
WARNING
Do not move the vehicle with the side
doors open.
WARNING
SLIDING SIDE DOOR fig. 114
F0N0061mfig. 114
Page 105 of 287
101
KNOWING
YOUR CAR
SAFETY
STARTING
AND
DRIVING
WARNING
LIGHTS AND
MESSAGES
IN AN
EMERGENCY
MAINTENANCE
AND CARE
TECHNICAL
SPECIFICATIONS
INDEX
F0N0240mfig. 115F0N0176mfig. 116
MOVING FOOTBOARD fig. 116
(for versions/markets where provided)
When the side door of the passenger compartment or
luggage compartment is opened, a footboard emerges
from the lower part of the floorpan to make it easier to
board the vehicle.
Before setting off after parking or before
moving the vehicle in any way, ensure
that the footboard is fully stowed away.
Because the movement of the footboard is
controlled by that of the sliding side door,
incomplete stowing of the footboard or non-
closure of the rear doors is indicated by
a warning light
´in the instrument panel.
WARNING
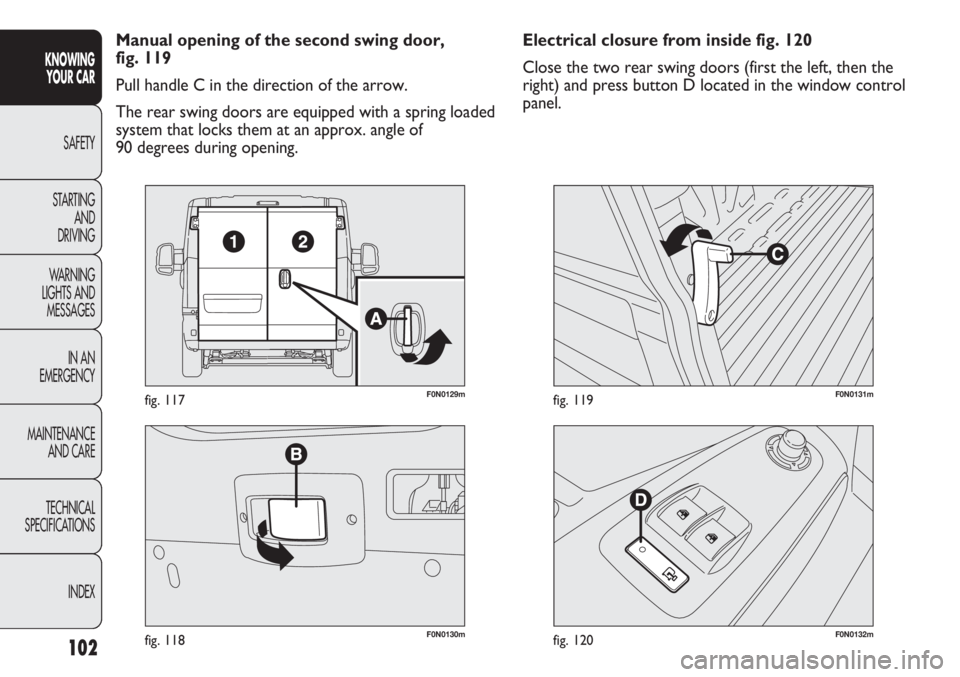
REAR SWING DOORS (TWO)
Manual opening of the first swing door from the
outside
Turn the key anticlockwise fig. 111 or press button
∞
on the remote control and operate the handle
A-fig. 117 in the direction of the arrow.
Manual opening of the first swing door
from the inside fig. 118
(for versions/markets, where provided)
Pull handle B in the direction of the arrow.
Manual closure of the first swing door
from the outside
Turn the key clockwise or press button
Áon the key
with remote control. Close the left door first, followed
by the right door.
Page 106 of 287
102
KNOWING
YOUR CAR
SAFETY
STARTING
AND
DRIVING
WARNING
LIGHTS AND
MESSAGES
IN AN
EMERGENCY
MAINTENANCE
AND CARE
TECHNICAL
SPECIFICATIONS
INDEX
F0N0130mfig. 118
F0N0129mfig. 117
F0N0132mfig. 120
F0N0131mfig. 119
Electrical closure from inside fig. 120
Close the two rear swing doors (first the left, then the
right) and press button D located in the window control
panel. Manual opening of the second swing door,
fig. 119
Pull handle C in the direction of the arrow.
The rear swing doors are equipped with a spring loaded
system that locks them at an approx. angle of
90 degrees during opening.