FIAT DUCATO BASE CAMPER 2018 Owner handbook (in English)
Manufacturer: FIAT, Model Year: 2018, Model line: DUCATO BASE CAMPER, Model: FIAT DUCATO BASE CAMPER 2018Pages: 304, PDF Size: 14.93 MB
Page 141 of 304
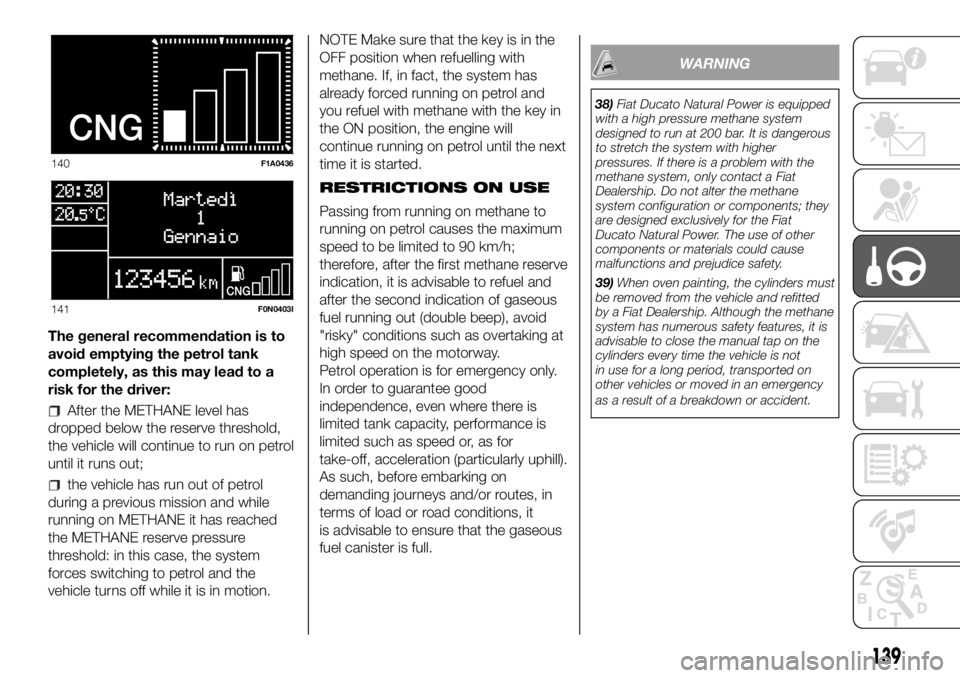
The general recommendation is to
avoid emptying the petrol tank
completely, as this may lead to a
risk for the driver:
After the METHANE level has
dropped below the reserve threshold,
the vehicle will continue to run on petrol
until it runs out;
the vehicle has run out of petrol
during a previous mission and while
running on METHANE it has reached
the METHANE reserve pressure
threshold: in this case, the system
forces switching to petrol and the
vehicle turns off while it is in motion.NOTE Make sure that the key is in the
OFF position when refuelling with
methane. If, in fact, the system has
already forced running on petrol and
you refuel with methane with the key in
the ON position, the engine will
continue running on petrol until the next
time it is started.
RESTRICTIONS ON USE
Passing from running on methane to
running on petrol causes the maximum
speed to be limited to 90 km/h;
therefore, after the first methane reserve
indication, it is advisable to refuel and
after the second indication of gaseous
fuel running out (double beep), avoid
"risky" conditions such as overtaking at
high speed on the motorway.
Petrol operation is for emergency only.
In order to guarantee good
independence, even where there is
limited tank capacity, performance is
limited such as speed or, as for
take-off, acceleration (particularly uphill).
As such, before embarking on
demanding journeys and/or routes, in
terms of load or road conditions, it
is advisable to ensure that the gaseous
fuel canister is full.
WARNING
38)Fiat Ducato Natural Power is equipped
with a high pressure methane system
designed to run at 200 bar. It is dangerous
to stretch the system with higher
pressures. If there is a problem with the
methane system, only contact a Fiat
Dealership. Do not alter the methane
system configuration or components; they
are designed exclusively for the Fiat
Ducato Natural Power. The use of other
components or materials could cause
malfunctions and prejudice safety.
39)When oven painting, the cylinders must
be removed from the vehicle and refitted
by a Fiat Dealership. Although the methane
system has numerous safety features, it is
advisable to close the manual tap on the
cylinders every time the vehicle is not
in use for a long period, transported on
other vehicles or moved in an emergency
as a result of a breakdown or accident.
140F1A0436
141F0N0403I
139
Page 142 of 304
LOADING ADVICE
The Fiat Ducato version used by you
has been designed and type approved
on the basis of certain maximum
weights (see "Weights" table in the
"Technical Data" chapter): kerb weight,
payload, total weight, maximum weight
on front axle, maximum weight on
rear axle, towable weight.
IMPORTANT The maximum permitted
load on the floor fastenings is 500
kg; the maximum permitted load on the
side panel is 150 kg.
IMPORTANT For versions with right and
left side flaps, it is advisable to
reposition the release lever in the closed
position before lowering the sides.
134) 135) 136)
40)
In addition to these general
precautions, some simple precautions
can improve driving safety, travelling
comfort and vehicle durability:
distribute the load evenly over the
platform: if it is necessary to
concentrate it in a single area, choose
an area mid-way between both axles;
lastly, remember that the vehicle’s
dynamic behaviour is affected by the
weight transported: in particular, the
stopping distances are longer,
especially at high speed.
WARNING
134)Bumpy roads and abrupt braking may
cause unexpected load shifting with
consequently hazardous situations for the
driver and passengers: before setting
off, secure the load tightly using the
partition and appropriate hooks, steel
cables, ropes or chains strong enough to
hold the items to be secured.
135)Even when the car is stopped on a
steep hill or side slope, opening the rear or
side doors could cause unsecured goods
to fall out.
136)If you wish to carry a reserve of petrol
in a can, observe the legal restrictions
and only use a can that is type-approved
and properly secured to the load
anchorage eyebolts. In the event of a
collision the fire risk is increased all the
same.
WARNING
40)Each of these must be strictly
observed and MUST NEVER BE
EXCEEDED in any case. In particular,
ensure that you never exceed the
maximum permitted weights on the front
and rear axles when arranging the load on
the vehicle (particularly if the vehicle is
equipped with a specific trim level).
140
STARTING AND DRIVING
Page 143 of 304
TOWING TRAILERS
IMPORTANT NOTES
The vehicle must be provided with a
type-approved tow hook and adequate
electrical system to tow caravans or
trailers. Installation should be carried
out by specialised personnel who
will issue the required papers for
travelling on roads.
Install any specific and/or additional
door mirrors as specified by the
Highway Code.
Remember that when towing a trailer,
steep hills are harder to climb, the
braking spaces increase and overtaking
takes longer depending on the overall
weight.
Engage a low gear when driving
downhill, rather than constantly using
the brake.
The weight of the trailer on the vehicle
tow hook will reduce the loading
capacity of the vehicle by the same
amount. Consider the weight of the
trailer fully laden, including accessories
and luggage, to make sure you do
not exceed the maximum towable
weight (shown on the vehicle
registration document).Do not exceed the speed limits specific
to each country you are driving in, in
the case of vehicles towing trailers.
In any case, the top speed must not
exceed 100 km/h.
You are advised to fit a suitable
stabiliser to the trailer drawbar.
In the vehicles equipped with parking
sensors, after fitting the tow hook
malfunctioning warnings may be
displayed, as some parts (tow bar, ball
tow hook) may be within the sensor
detection range. In this case the
detection range must be adjusted or
the parking assistance function must be
deactivated.
In vehicles equipped with "Comfort-
matic" transmission, make sure that the
gearbox is in neutral (N) (checking that
the vehicle moves when pushed) and
proceed in the same way as for towing
a normal vehicle with manual
transmission. If the gearbox cannot be
put in neutral, do not tow the vehicle
and contact a Fiat Dealership.
137) 138)
INSTALLING THE TOW
HOOK
The towing device should be fastened
to the body by specialised technicians
according to any additional and/or
integrative information supplied by the
Manufacturer of the device.
The towing device must meet current
regulations with reference to Directive
94/20/EC and subsequent
amendments.
For any version the towing device used
must match the towable weight of the
vehicle on which it is to be installed.
For the electric connection a standard
connector should be used which is
generally placed on a special bracket
normally fastened to the towing device,
and a special ECU for external trailer
light control must be installed on the
vehicle. For the electrical connection, 7
or 13 pin 12 V DC connections are to
be used (CUNA/UNI and ISO/DIN
Standards). Follow the instructions
provided by the vehicle manufacturer
and/or the tow hitch manufacturer.
Any electric brake (or electric winch,
etc.) should be supplied directly by the
battery through a cable with a section
of at least 2.5 mm
2.
IMPORTANT Electric brakes or other
devices must be used with engine
running.
141
Page 144 of 304
In addition to the electrical branches,
the vehicle's electric system can only
be connected to the supply cable for an
electric brake and to the cable for an
internal light, though not above 15
W. For connections use the preset
control unit with battery cable no less
than 2.5 mm
2.
IMPORTANT The trailer tow hook
contributes to the length of the vehicle.
When installing on long wheelbase
versions, it is only possible to install
removable tow hooks because the total
vehicle length limit of 6 metres is
exceeded.
If no trailer is fitted, the hook must be
removed from the attachment base and
it must not exceed the vehicle's
original length.
IMPORTANT If you wish to leave the
tow hook fitted without towing a trailer,
it is advisable to contact a Fiat
Dealership for the relevant system
update operations because the tow
hook could be detected as an obstacle
by the central sensors.Installation diagram for Van
versions fig. 142
The tow hook structure must be
fastened in the points shown by the
symbol Ø using a total of 6 M10x1.25
screws and 4 M12 screws.
The internal back plates must be at
least 5 mm thick. MAX LOAD ON
BALL: 100/120 kg depending on the
payload (see the “Weights” table in the
“Technical Data” chapter).
139)
To install a tow hook, the bumpers
must be trimmed as described in the
supplier's installation kit.
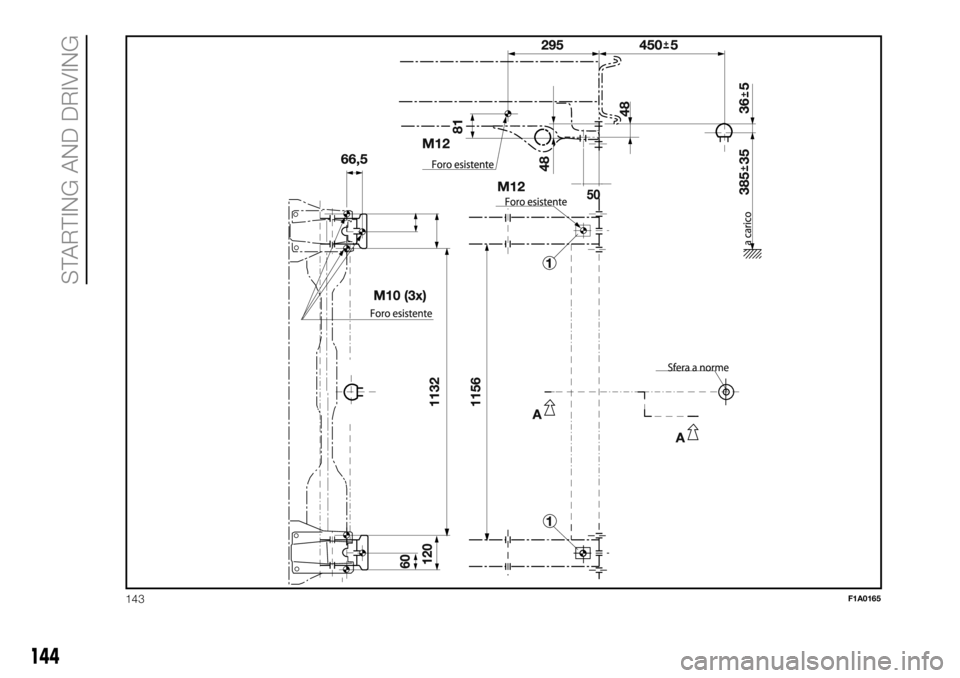
Installation diagram for Truck and
Chassis Cab versions fig. 143
Another tow hook specific to Truck and
Chassis Cab versions is shown in fig.
143.
The structure Ø must be fixed in the
points indicated using a total of 6
M10x1.25 screws and 4 M12 screws.
MAX LOAD ON BALL: 100/120 kg
depending on the payload (see the
“Weights” table in the “Technical Data”
chapter).
WARNING
137)The ABS with which the vehicle may
be equipped will not control the braking
system of the trailer. Particular caution
is required on slippery roads.
138)Never modify the braking system of
the vehicle to control the trailer brake. The
trailer braking system must be fully
independent from the hydraulic system of
the vehicle.
139)After fitting, screw holes must be
sealed to prevent a exhaust gas inlet.
142
STARTING AND DRIVING
Page 145 of 304

.
.
M12
142F1A0164
143
Page 146 of 304
143F1A0165
144
STARTING AND DRIVING
Page 147 of 304

INSTRUCTIONS FOR
USING THE REMOVABLE
BALL HEAD TOW BAR
41) 42) 43) 44) 45) 46)
Before setting off, check the correct
locking of the removable ball head tow
bar, as follows:
The green mark of the flywheel must
coincide with the green mark on the
tow bar.
The flywheel is in the stop position
on the tow bar (without slot).
Locked lock and key removed. The
flywheel cannot be removed.
Ball head bar firmly secured to the
housing pipe. Check by shaking with a
hand.
The fitting procedure must be repeated
if any of the 4 checked requirements
is not met.
If even only one of the requirements is
not met the tow hook must not be
used, as in this case there is risk of
accidents. Contact the joint
manufacturer.
The ball head tow bar can be fitted and
removed manually, without needing
any tool.
Never use working tools or means, as
the mechanism could be damaged.
Never unlock in the case of trailer
attached to the vehicle or fitted rack.When driving without trailer or rack the
ball head tow bar must be removed
and the closing plug must always
be inserted in the housing pipe. This
applies particularly if the visibility of the
number plate characters or of the
lighting system is reduced.
Removable ball head tow bar fig.
144 - fig. 145 - fig. 146
1. Mounting pipe - 2. Ball head tow bar
- 3. Locking ball - 4. Release lever -
5. Handwheel - 6. Cap - 7. Wrench - 8.
Red mark (handwheel) - 9. Green
mark (handwheel) - 10. Green mark
(tow bar) - 11. Symbol (release control)
- 12. Closing plug - 13. Coupling pin
- 14. No gaps between 2 and5-15.
Gap of about 5 mm
Installing the ball head tow bar
1. Remove the plug from the mounting
pipe.
The ball head tow bar is usually in the
released position when taken out from
the boot. This can be observed by
the flywheel spaced from the tow bar,
corresponding to a slot of approx. 5
mm (see figure) and by the red mark on
the flywheel directed to the green
mark on the tow bar.
144F1A0380
145 - Locked position, drivingF1A0381
146 - Released position, removedF1A0382
145
Page 148 of 304
Please note that the tow bar can be
installed only when in these conditions.
If the locking mechanism of the tow
bar is disengaged before the
installation, or at any other time, and is
in the locked position, it must be
pre-loaded. The locked position can be
identified by the green mark of the
flywheel coinciding with the green mark
of the tow bar and by the flywheel in
the stop position on the tow bar,
namely without slot (see figure).
The locking mechanism is pre-loaded
as follows: with the key inserted and
the lock open, extract the flywheel
following the direction of the arrow and,
to pre-load, rotate according to the
direction of the arrow b until the stop.
The release lever is engaged and the
locking mechanism remains in the
pre-loading position even when the
flywheel is released. The tow bar must
be inserted in the housing pipe with the
coupling pin for the installation. Insert
from the bottom and push upwards.
The mechanism then locks
automatically. Keep your hands far from
the flywheel, as it rotates during the
locking procedure.2. The tow bar must be inserted in the
housing pipe with the coupling pin
for the installation. Insert from the
bottom and push upwards. The
mechanism then locks automatically.
Keep your hands far from the flywheel,
as it rotates during the locking
procedure.
3. Close the lock and always remove
the key. The key cannot be removed
when the lock is released. Apply the
protection cap on the lock.
Removing the tow bar
1. Remove the protection cap from the
lock and press it on the key grip. Open
the lock with the key.
2. Hold the tow bar firmly, remove the
flywheel following the direction of the
arrow and rotate according to the
direction of the arrow b until stopping,
so as to remove till the extracted
position. Then remove the tow bar from
the housing pipe. The flywheel can
then be released; it autonomously
stops in the released position.
3. Arrange the tow bar in the luggage
compartment so that it cannot be
dirtied or damaged by other
transported objects.
4. Insert the suitable plug in the
mounting pipe.
WARNING
41)The removable ball head bar must be
repaired and taken apart by the
manufacturer only.
42)The accompanying plate must be in a
highly visible point of the vehicle, near
the mounting pipe or inside the luggage
compartment.
43)To ensure correct operation of the
system, periodically remove all dirt deposits
from the ball head bar and from the
mounting pipe. The mechanical
components must be serviced at the
specified intervals. The lock must only be
treated with graphite.
44)Periodically lubricate the joints, the
sliding surfaces and the balls with grease
without resin or oil. Lubrication is also a
further corrosion protection.
45)If the vehicle is washed with high-
pressure jets, the ball head bar must be
removed and the dedicated cap fitted. The
ball head bar must never be treated with
steam jets.
46)Two keys are supplied together with
the removable ball tow bar. Note down the
key number on the pawl for any following
order and keep it.
146
STARTING AND DRIVING
Page 149 of 304
PROLONGED
VEHICLE INACTIVITY
If the vehicle needs to be off the road
for longer than one month, the following
precautions must be taken:
park the vehicle indoors in a dry
and, if possible, well-ventilated place;
engage a gear;
check that the handbrake is not
engaged;
disconnect the negative battery
terminal; if the vehicle is equipped with
a battery disconnection function
(disconnector), see the description of
the procedure in the "Controls"
paragraph in the "Dashboard and
controls" section;
clean and protect the painted parts
using protective wax;
clean and protect the shiny metal
parts using special compounds
available commercially;
sprinkle talcum powder on the
windscreen and rear window wiper
rubber blades and lift them off the
glass;
slightly open the windows;
cover the vehicle with a piece of
fabric or perforated plastic sheet. Do
not use compact plastic tarpaulins,
which prevent humidity from
evaporating from the surface of the
vehicle;
inflate tyres to +0.5 bar above the
standard specified pressure and check
it at intervals;
do not drain the engine cooling
system.
IMPORTANT If the vehicle is equipped
with an alarm system, switch off the
vehicle alarm with the remote control.
IMPORTANT After turning the ignition
key to STOP and having closed the
driver side door, wait at least one
minute before disconnecting the
electrical supply from the battery. When
reconnecting the electrical supply to
the battery, make sure that the ignition
key is in the STOP position and the
driver side door is closed.
147
Page 150 of 304
IN AN EMERGENCY
REPLACING A BULB ......................149
REPLACING AN EXTERIOR
BULB ..............................................152
REPLACING INTERIOR BULBS ......157
REPLACING FUSES........................158
GATEWAY FMS MODULE ...............171
CHANGING A WHEEL ....................176
FIX & GO AUTOMATIC QUICK
TYRE REPAIR KIT ...........................180
JUMP STARTING ............................183
BATTERY RECHARGING ................184
FUEL CUT-OFF SWITCH ................185
TOWING THE VEHICLE ..................186
148
IN AN EMERGENCY
A punctured tyre or a burnt-out bulb?
At times, a problem may interfere
with our journey.
The pages on emergencies can help
you to deal with critical situations
independently and with calm.
In an emergency we recommend that
you call the freephone number found in
the Warranty Booklet.
The www.fiatprofessional.com website,
or www.fiatcamper.com for motorhome
owners, provides information about
the nearest Fiat Service Network
together with a great deal of other
useful information.