FIAT FIORINO 2018 Owner handbook (in English)
Manufacturer: FIAT, Model Year: 2018, Model line: FIORINO, Model: FIAT FIORINO 2018Pages: 196, PDF Size: 4.99 MB
Page 121 of 196
REPLACING
INTERIOR BULBS
For the type of bulb and relevant power
rating, see “Changing a bulb”.
FRONT CEILING LIGHT
Roof light with movable lens
To replace the bulbs, proceed as
follows:
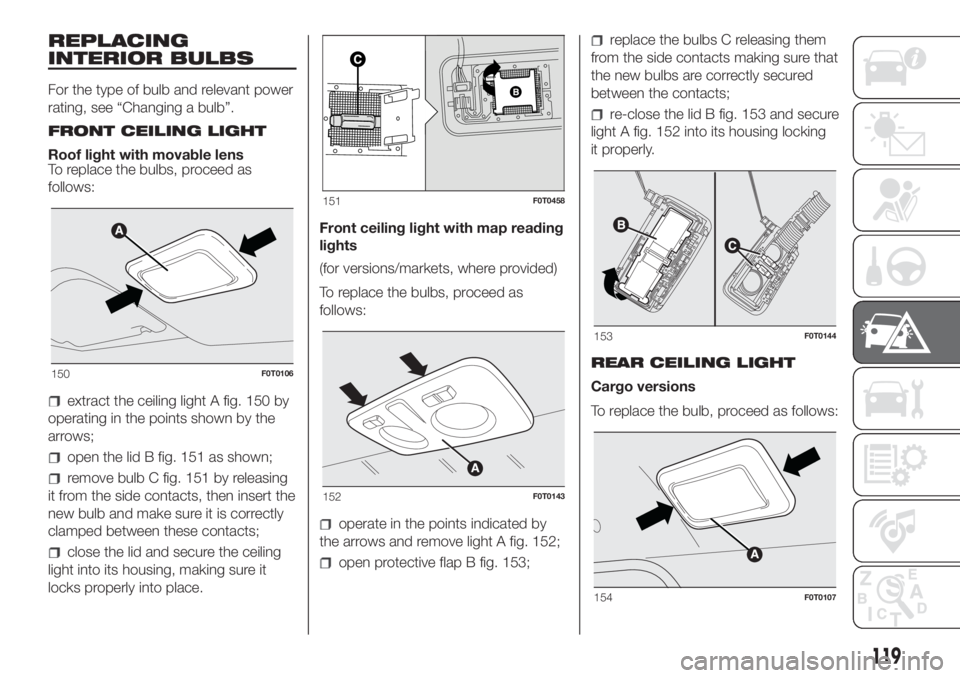
extract the ceiling light A fig. 150 by
operating in the points shown by the
arrows;
open the lid B fig. 151 as shown;
remove bulb C fig. 151 by releasing
it from the side contacts, then insert the
new bulb and make sure it is correctly
clamped between these contacts;
close the lid and secure the ceiling
light into its housing, making sure it
locks properly into place.Front ceiling light with map reading
lights
(for versions/markets, where provided)
To replace the bulbs, proceed as
follows:
operate in the points indicated by
the arrows and remove light A fig. 152;
open protective flap B fig. 153;
replace the bulbs C releasing them
from the side contacts making sure that
the new bulbs are correctly secured
between the contacts;
re-close the lid B fig. 153 and secure
light A fig. 152 into its housing locking
it properly.
REAR CEILING LIGHT
Cargo versions
To replace the bulb, proceed as follows:
150F0T0106
151F0T0458
152F0T0143
153F0T0144
154F0T0107
119
Page 122 of 196

extract the ceiling light A fig. 154 by
operating in the points shown by the
arrows;
open the lid B fig. 155 as shown;
remove bulb C fig. 155 by releasing
it from the side contacts, then insert the
new bulb and make sure it is correctly
clamped between these contacts;
close the lid B fig. 155 and secure
the ceiling light into its housing, making
sure it locks properly into place.
close the lid B and secure the ceiling
light into its housing, making sure it
locks properly into place.
Combi versions
To replace the bulb, proceed as follows:
press button A fig. 156 and extract
the removable ceiling light B;
extract the ceiling light by operating
in the points shown by the arrows;
change the bulb C fig. 157 by
releasing it from the side contacts and
making sure the new bulb is correctly
fastened between these contacts.
REPLACING FUSES
GENERAL INFORMATION
122) 123) 124) 125) 126)
38)
Fuses protect the electrical system:
they intervene (blow) in the event of a
failure or improper action on the
system.
When a device does not work, check
the condition of its protection fuse: the
filament A fig. 158 must be intact.
If it is not, replace the blown fuse with
another with the same amperage (same
colour).
B intact fuse.
C fuse with damaged filament.
To change a fuse, use the tongs D
located in the tool bag or the Fix & Go
container (for versions/markets, where
provided).
155F0T0458
A
U
T
O
156F0T0108
AU
T
O
157F0T0109
158F0T0015
120
IN AN EMERGENCY
Page 123 of 196
Refer to the tables on the following
pages to identify the protective fuse.
ENGINE BAY FUSE BOX
The fuse box is on the right-hand side
of the engine.
Removing the fuse box lid
Proceed as follows:
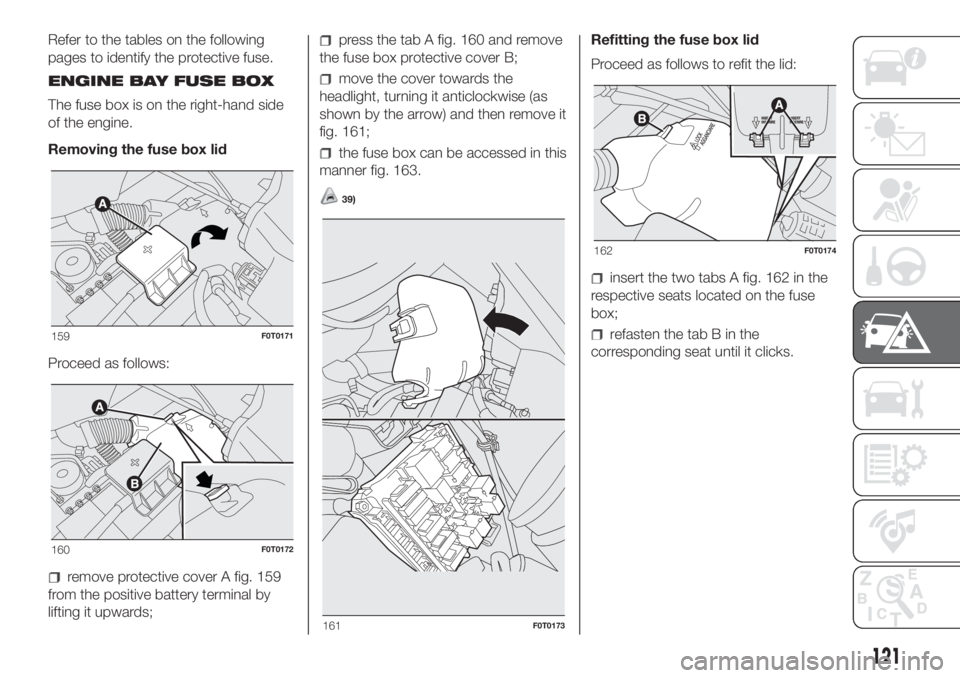
remove protective cover A fig. 159
from the positive battery terminal by
lifting it upwards;
press the tab A fig. 160 and remove
the fuse box protective cover B;
move the cover towards the
headlight, turning it anticlockwise (as
shown by the arrow) and then remove it
fig. 161;
the fuse box can be accessed in this
manner fig. 163.
39)
Refitting the fuse box lid
Proceed as follows to refit the lid:
insert the two tabs A fig. 162 in the
respective seats located on the fuse
box;
refasten the tab B in the
corresponding seat until it clicks.159F0T0171
160F0T0172
161F0T0173
162F0T0174
121
Page 124 of 196
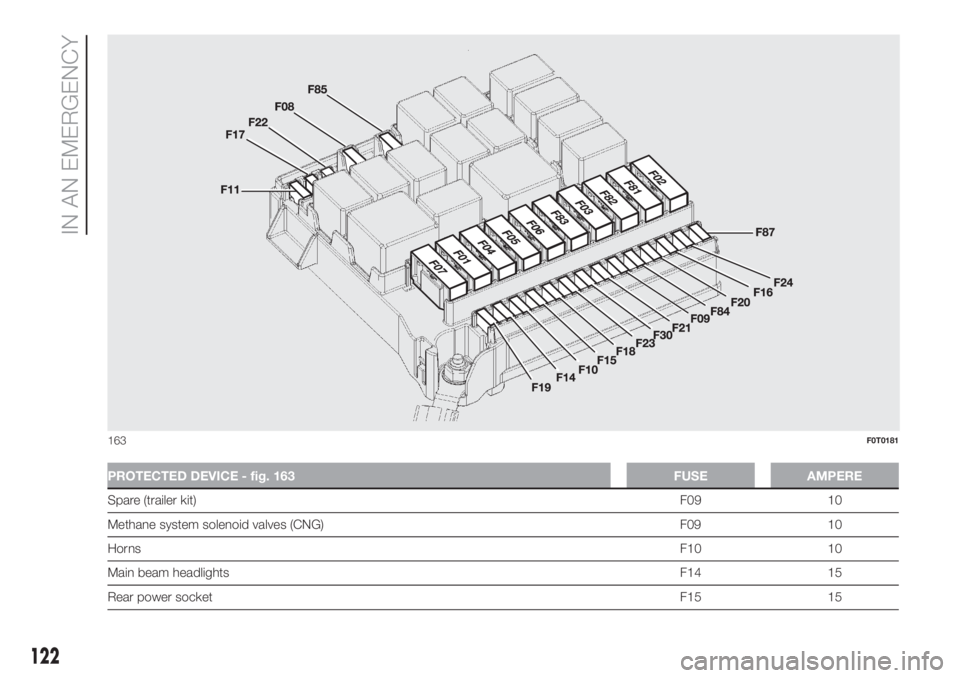
PROTECTED DEVICE - fig. 163 FUSE AMPERE
Spare (trailer kit)F09 10
Methane system solenoid valves (CNG) F09 10
HornsF10 10
Main beam headlightsF14 15
Rear power socketF15 15
163F0T0181
122
IN AN EMERGENCY
Page 125 of 196
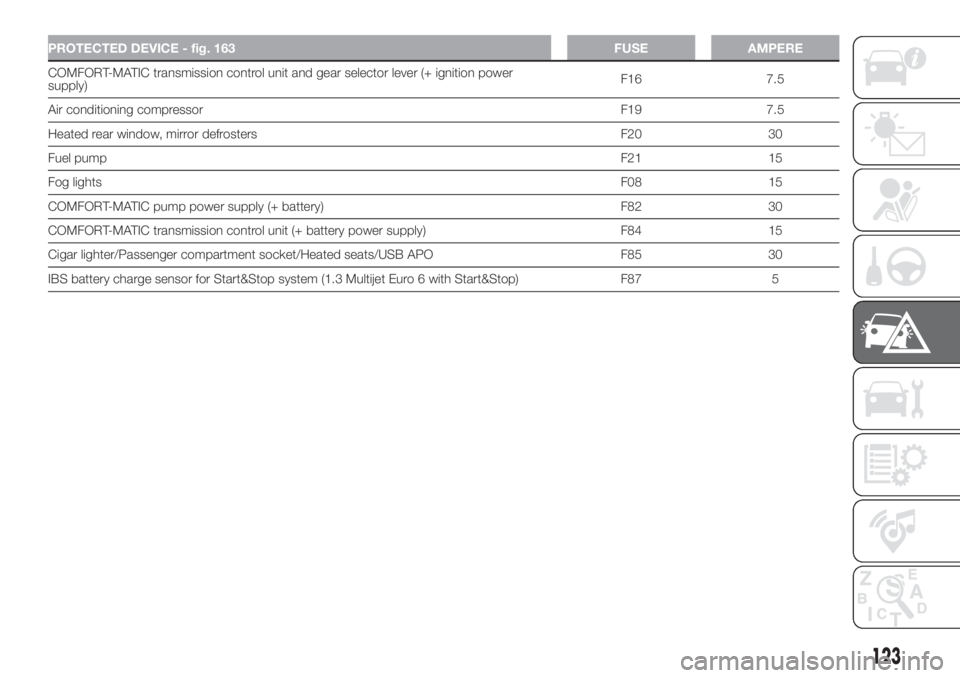
PROTECTED DEVICE - fig. 163 FUSE AMPERE
COMFORT-MATIC transmission control unit and gear selector lever (+ ignition power
supply)F16 7.5
Air conditioning compressorF19 7.5
Heated rear window, mirror defrosters F20 30
Fuel pumpF21 15
Fog lightsF08 15
COMFORT-MATIC pump power supply (+ battery) F82 30
COMFORT-MATIC transmission control unit (+ battery power supply) F84 15
Cigar lighter/Passenger compartment socket/Heated seats/USB APO F85 30
IBS battery charge sensor for Start&Stop system (1.3 Multijet Euro 6 with Start&Stop) F87 5
123
Page 126 of 196
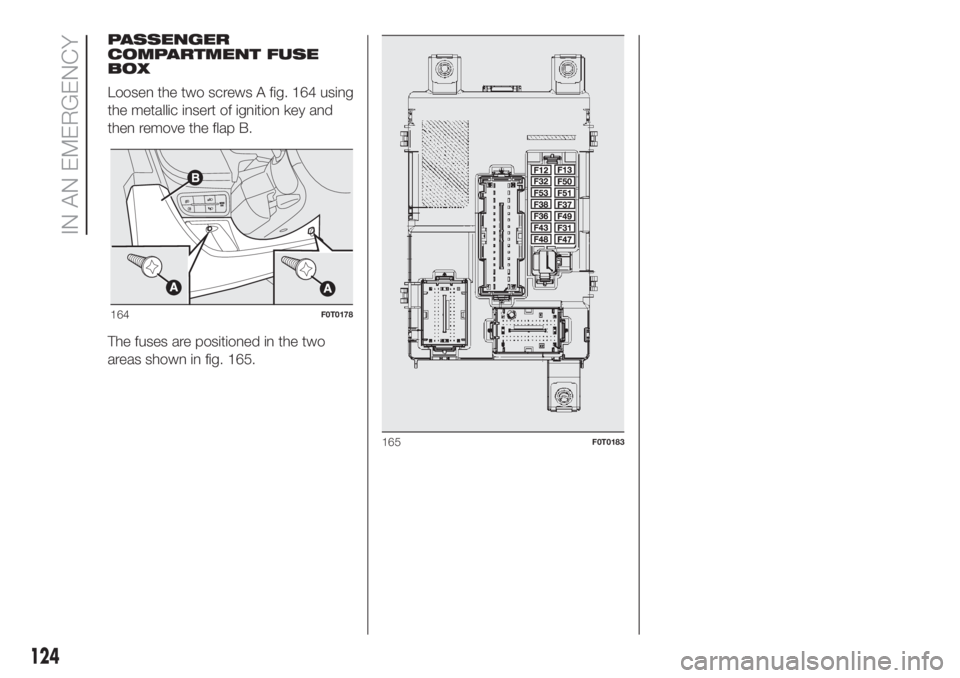
PASSENGER
COMPARTMENT FUSE
BOX
Loosen the two screws A fig. 164 using
the metallic insert of ignition key and
then remove the flap B.
The fuses are positioned in the two
areas shown in fig. 165.
164F0T0178
165F0T0183
124
IN AN EMERGENCY
Page 127 of 196
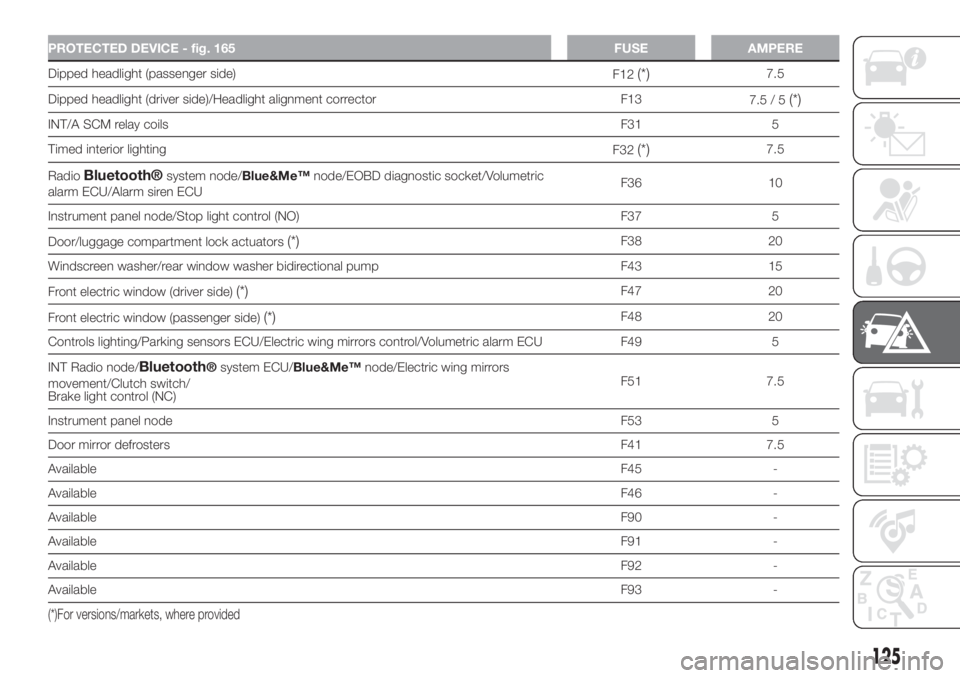
PROTECTED DEVICE - fig. 165 FUSE AMPERE
Dipped headlight (passenger side)
F12(*)7.5
Dipped headlight (driver side)/Headlight alignment corrector F13
7.5 / 5
(*)
INT/A SCM relay coilsF31 5
Timed interior lighting
F32
(*)7.5
Radio
Bluetooth®system node/Blue&Me™node/EOBD diagnostic socket/Volumetric
alarm ECU/Alarm siren ECUF36 10
Instrument panel node/Stop light control (NO) F37 5
Door/luggage compartment lock actuators
(*)F38 20
Windscreen washer/rear window washer bidirectional pump F43 15
Front electric window (driver side)
(*)F47 20
Front electric window (passenger side)
(*)F48 20
Controls lighting/Parking sensors ECU/Electric wing mirrors control/Volumetric alarm ECU F49 5
INT Radio node/
Bluetooth®system ECU/Blue&Me™node/Electric wing mirrors
movement/Clutch switch/
Brake light control (NC)F51 7.5
Instrument panel nodeF53 5
Door mirror defrostersF41 7.5
AvailableF45 -
AvailableF46 -
AvailableF90 -
AvailableF91 -
AvailableF92 -
AvailableF93 -
(*)For versions/markets, where provided
125
Page 128 of 196
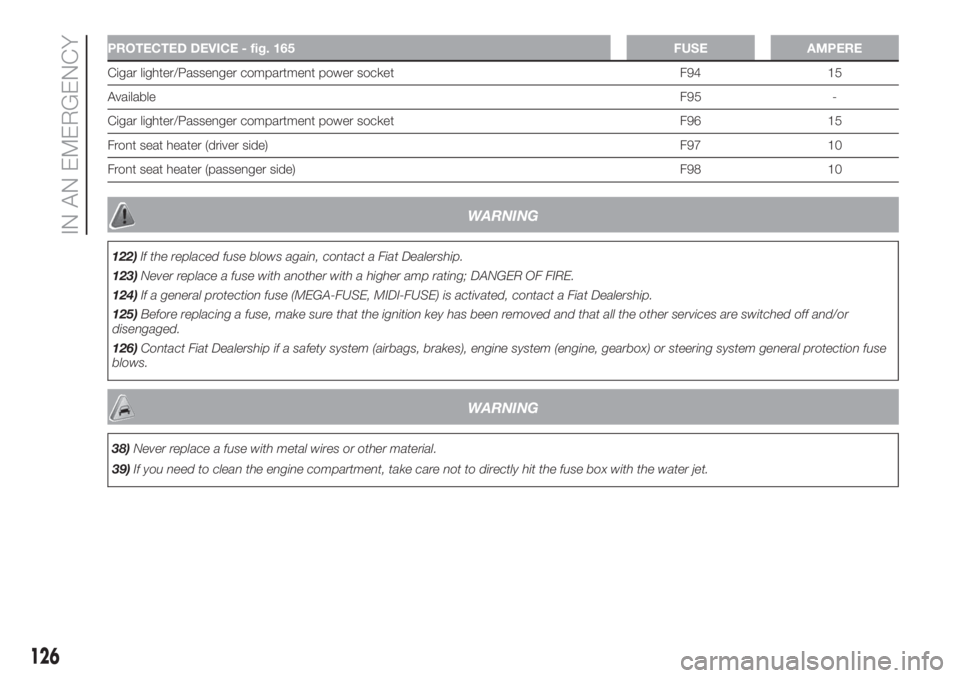
PROTECTED DEVICE - fig. 165 FUSE AMPERE
Cigar lighter/Passenger compartment power socket F94 15
AvailableF95 -
Cigar lighter/Passenger compartment power socket F96 15
Front seat heater (driver side) F97 10
Front seat heater (passenger side) F98 10
WARNING
122)If the replaced fuse blows again, contact a Fiat Dealership.
123)Never replace a fuse with another with a higher amp rating; DANGER OF FIRE.
124)If a general protection fuse (MEGA-FUSE, MIDI-FUSE) is activated, contact a Fiat Dealership.
125)Before replacing a fuse, make sure that the ignition key has been removed and that all the other services are switched off and/or
disengaged.
126)Contact Fiat Dealership if a safety system (airbags, brakes), engine system (engine, gearbox) or steering system general protection fuse
blows.
WARNING
38)Never replace a fuse with metal wires or other material.
39)If you need to clean the engine compartment, take care not to directly hit the fuse box with the water jet.
126
IN AN EMERGENCY
Page 129 of 196
JUMP STARTING
If the warning lightremains on
continuously on the instrument panel,
contact the Fiat Dealership immediately.
JUMP STARTING
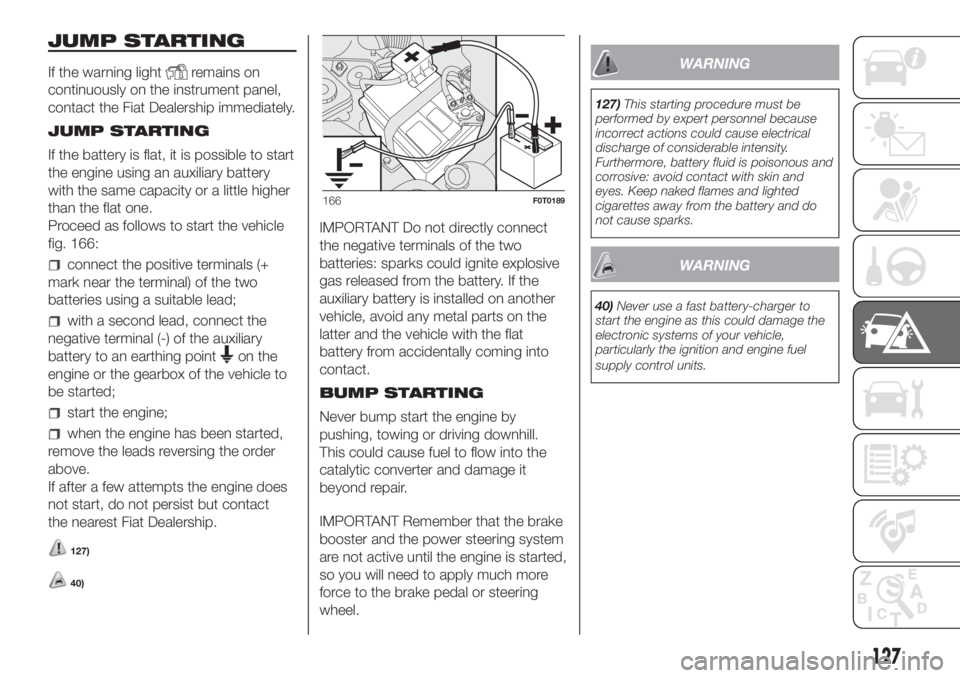
If the battery is flat, it is possible to start
the engine using an auxiliary battery
with the same capacity or a little higher
than the flat one.
Proceed as follows to start the vehicle
fig. 166:
connect the positive terminals (+
mark near the terminal) of the two
batteries using a suitable lead;
with a second lead, connect the
negative terminal (-) of the auxiliary
battery to an earthing point
on the
engine or the gearbox of the vehicle to
be started;
start the engine;
when the engine has been started,
remove the leads reversing the order
above.
If after a few attempts the engine does
not start, do not persist but contact
the nearest Fiat Dealership.
127)
40)
IMPORTANT Do not directly connect
the negative terminals of the two
batteries: sparks could ignite explosive
gas released from the battery. If the
auxiliary battery is installed on another
vehicle, avoid any metal parts on the
latter and the vehicle with the flat
battery from accidentally coming into
contact.
BUMP STARTING
Never bump start the engine by
pushing, towing or driving downhill.
This could cause fuel to flow into the
catalytic converter and damage it
beyond repair.
IMPORTANT Remember that the brake
booster and the power steering system
are not active until the engine is started,
so you will need to apply much more
force to the brake pedal or steering
wheel.
WARNING
127)This starting procedure must be
performed by expert personnel because
incorrect actions could cause electrical
discharge of considerable intensity.
Furthermore, battery fluid is poisonous and
corrosive: avoid contact with skin and
eyes. Keep naked flames and lighted
cigarettes away from the battery and do
not cause sparks.
WARNING
40)Never use a fast battery-charger to
start the engine as this could damage the
electronic systems of your vehicle,
particularly the ignition and engine fuel
supply control units.
166F0T0189
127
Page 130 of 196
FUEL CUT-OFF
SYSTEM
128)
This intervenes in the case of an impact
causing:
the interruption of the fuel supply
with the engine consequently cutting
out;
the automatic unlocking of the
doors;
turning on the lights inside the car.
When the system has been triggered,
the message “Fuel cut off, see
handbook” is displayed on some
versions.
IMPORTANT Check carefully for fuel
leaks, for instance in the engine
compartment, under the vehicle or near
the tank area.
After a crash, turn the ignition key to
STOP to avoid draining the battery.
The following procedure should be
carried out to restore the correct
operation of the vehicle:
turn the ignition key to MAR;
activate the right direction indicator;
deactivate the right direction
indicator;
activate the left direction indicator;
deactivate the left direction indicator;
activate the right direction indicator;
deactivate the right direction
indicator;
activate the left direction indicator;
deactivate the left direction indicator;
turn the ignition key to STOP.
Natural Power versions
In the event of an impact to the car, the
petrol and injection supply is cut off
immediately, causing the engine to cut
out and, as a result, the safety solenoid
valves to close.
WARNING
128)If, after an impact, you smell fuel or
notice leaks from the fuel system, do
not reactivate the system to avoid the risk
of fire.
TOWING THE
VEHICLE
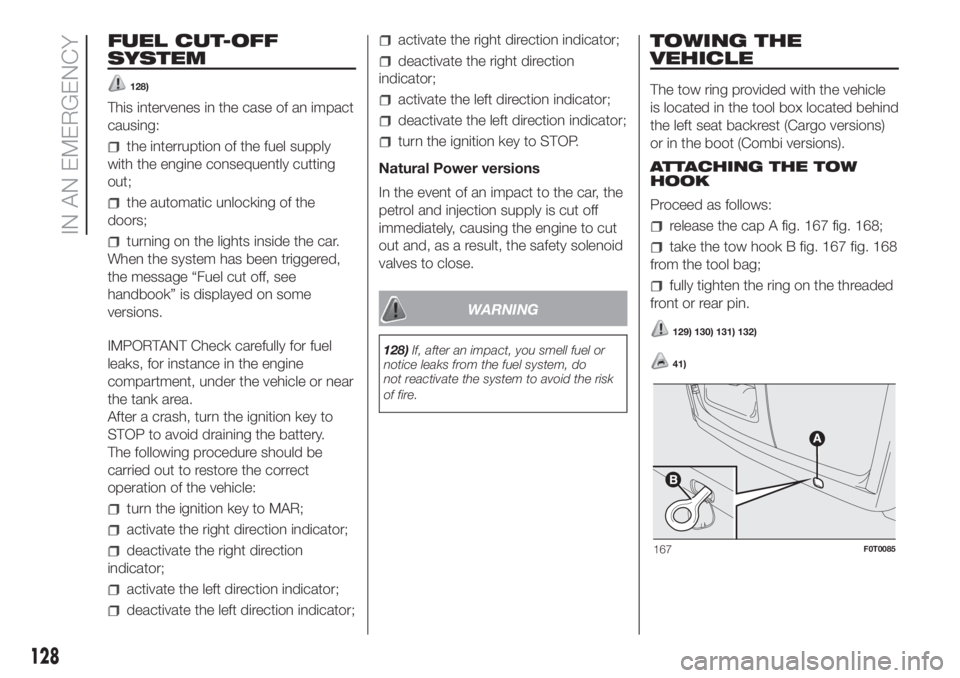
The tow ring provided with the vehicle
is located in the tool box located behind
the left seat backrest (Cargo versions)
or in the boot (Combi versions).
ATTACHING THE TOW
HOOK
Proceed as follows:
release the cap A fig. 167 fig. 168;
take the tow hook B fig. 167 fig. 168
from the tool bag;
fully tighten the ring on the threaded
front or rear pin.
129) 130) 131) 132)
41)
167F0T0085
128
IN AN EMERGENCY