ESP FIAT FREEMONT 2012 Owner handbook (in English)
[x] Cancel search | Manufacturer: FIAT, Model Year: 2012, Model line: FREEMONT, Model: FIAT FREEMONT 2012Pages: 332, PDF Size: 5.61 MB
Page 127 of 332
LOOSE FUEL FILLER CAP MESSAGE
If the vehicle diagnostic system determines that the
fuel filler cap is loose, improperly installed, or damaged,
the word “gASCAP” will display in the odometer. If this
occurs, tighten the fuel filler cap until a “clicking” sound
is heard and press the TRIP ODOMETER button to
turn off the message. If the problem persists, the
message will appear the next time the vehicle is
started.
A loose, improperly installed, or damaged fuel filler cap
may also turn on the MIL.POWER STEERING
The standard power steering system will give you good
vehicle response and increased ease of maneuverability
in tight spaces. The system will provide mechanical
steering capability if power assist is lost.
If for some reason the power assist is interrupted, it
will still be possible to steer your vehicle. Under these
conditions, you will observe a substantial increase in
steering effort, especially at very low vehicle speeds
and during parking maneuvers.
NOTE:
• Increased noise levels at the end of the steering
wheel travel are considered normal and do not indicate
that there is a problem with the power steering system.
• Upon initial start-up in cold weather, the power
steering pump may make noise for a short amount of
time. This is due to the cold, thick fluid in the steering
system. This noise should be considered normal, and it
does not in any way damage the steering system.
WARNING!
Continued operation with reduced
power steering assist could pose a safety
risk to yourself and others. Service should be
obtained as soon as possible.
121
KNOWING
YOURVEHICLESAFETY
STARTING ANDDRIVING
WARNING LIGHTSAND
MESSAGES
IN AN
EMERGENCY
SERVICING AND
CARETECHNICAL
SPECIFICATIONSCONTENTS
Page 130 of 332

NOTE:
• The TPMS is not intended to replace normal tire care
and maintenance, or to provide warning of a tire failure
or condition.
• The TPMS should not be used as a tire pressure
gauge while adjusting your tire pressure.
• Driving on a significantly under-inflated tire causes
the tire to overheat and can lead to tire failure. Under-
inflation also reduces fuel efficiency and tire tread life,
and may affect the vehicle’s handling and stopping
ability.
• The TPMS is not a substitute for proper tire mainte-
nance, and it is the driver’s responsibility to maintain
correct tire pressure using an accurate tire pressure
gauge, even if under-inflation has not reached the level
to trigger illumination of the Tire Pressure Monitoring
Telltale Light.
• Seasonal temperature changes will affect tire pres-
sure, and the TPMS will monitor the actual tire pres-
sure in the tire.
BASE SYSTEM
The Tire Pressure Monitor System (TPMS) uses wire-
less technology with wheel rim mounted electronic
sensors to monitor tire pressure levels. Sensors,
mounted to each wheel as part of the valve stem,
transmit tire pressure readings to the receiver module.NOTE:
It is particularly important for you to check
the tire pressure in all of the tires on your vehicle
monthly and to maintain the proper pressure.
The TPMS consists of the following components:
• Receiver Module
• Four Tire Pressure Monitoring Sensors
• Tire Pressure Monitoring Telltale Light
Tire Pressure Monitoring Low Pressure
Warnings
The Tire Pressure Monitoring Telltale Light will
illuminate in the instrument cluster and a chime
will sound when tire pressure is low in one or
more of the four active road tires. Should this occur,
you should stop as soon as possible, check the inflation
pressure of each tire on your vehicle, and inflate each
tire to the vehicle’s recommended cold placard pres-
sure value. Once the system receives the updated tire
pressures, the system will automatically update and the
Tire Pressure Monitoring Telltale Light will turn off.
The vehicle may need to be driven for up to 20 minutes
above 25 km/h in order for the TPMS to receive this
information.
Check TPMS Warning
When a system fault is detected, the Tire Pressure
Monitoring Telltale Light will flash on and off for 75 sec-
onds and then remain on solid. The system fault will
also sound a chime. If the ignition switch is cycled, this
sequence will repeat, providing the system fault still
124
KNOWING YOUR
VEHICLE
SAFETY
STARTING AND
DRIVING
WARNING LIGHTSAND
MESSAGES
IN AN
EMERGENCY
SERVICING AND
CARETECHNICAL
SPECIFICATIONSCONTENTS
Page 139 of 332
• When you move the shift lever to the REVERSE
position and ParkSense
®is turned off, the EVIC will
display the “PARK ASSIST OFF” message for as long as
the vehicle is in REVERSE.
• Clean the ParkSense
®sensors regularly, taking care
not to scratch or damage them. The sensors must not
be covered with ice, snow, slush, mud, dirt or debris.
Failure to do so can result in the system not working
properly. The ParkSense®system might not detect an
obstacle behind the fascia/bumper, or it could provide a
false indication that an obstacle is behind the fascia/
bumper.
• Objects such as bicycle carriers, trailer hitches, etc.,
must not be placed within 30 cm from the rear fascia/
bumper while driving the vehicle. Failure to do so can
result in the system misinterpreting a close object as a
sensor problem, causing the “SERVICE PARK ASSIST
SYSTEM” message to be displayed in the EVIC.
ParkSense
®is only a parking aid and it
is unable to recognize every obstacle,
including small obstacles. Parking curbs
might be temporarily detected or not detected at
all. Obstacles located above or below the sensors
will not be detected when they are in close prox-
imity.
The vehicle must be driven slowly when using
ParkSense
®
in order to be able to stop in time
when an obstacle is detected. It is recommended
that the driver looks over his/her shoulder when
using ParkSense
®.
WARNING!
Drivers must be careful when backing
up even when using the ParkSense
®
Rear Park Assist system. Always check carefully
behind your vehicle, look behind you, and be sure
to check for pedestrians, animals, other vehicles,
obstructions, and blind spots before backing up.
You are responsible for safety and must continue
to pay attention to your surroundings. Failure to
do so can result in serious injury or death.
(Continued)
133
KNOWING
YOURVEHICLESAFETY
STARTING ANDDRIVING
WARNING LIGHTSAND
MESSAGES
IN AN
EMERGENCY
SERVICING AND
CARETECHNICAL
SPECIFICATIONSCONTENTS
Page 141 of 332
WARNING!
Drivers must be careful when backing up
even when using the ParkView
®
Rear
Back Up Camera. Always check carefully behind
your vehicle, and be sure to check for pedestri-
ans, animals, other vehicles, obstructions, or blind
spots before backing up. You are responsible for
the safety of your surroundings and must con-
tinue to pay attention while backing up. Failure
to do so can result in serious injury or death.
To avoid vehicle damage, ParkView
®
should only be used as a parking aid.The
ParkView
®camera is unable to view ev-
ery obstacle or object in your drive path.
To avoid vehicle damage, the vehicle must be
driven slowly when using ParkView
®to be able to
stop in time when an obstacle is seen. It is recom-
mended that the driver look frequently over his/
her shoulder when using ParkView®. NOTE:
If snow, ice, mud, or any foreign substance
builds up on the camera lens, clean the lens, rinse with
water, and dry with a soft cloth. Do not cover the lens.
TURNING PARKVIEW
®ON OR OFF —
WITH TOUCH SCREEN RADIO
1. Turn the Radio on.
2. Press the “More” soft-key.
3. Press the “Settings” soft-key.
4. Press the “Safety & Driving Assistance” soft-key.
5. Press the check box soft key next to “Parkview
®
Backup Camera” to enable/disable.
135
KNOWING
YOURVEHICLESAFETY
STARTING ANDDRIVING
WARNING LIGHTSAND
MESSAGES
IN AN
EMERGENCY
SERVICING AND
CARETECHNICAL
SPECIFICATIONSCONTENTS
Page 175 of 332
(Continued)
Drivers must be aware of pedestrians. Always
be sure to check for pedestrians, animals, other
vehicles, and obstructions.You are responsible for
safety and must continue to pay attention to
your surroundings. Failure to do so can result in
serious injury or death.
ENHANCED SEAT BELT USE REMINDER
SYSTEM (BELTALERT
®)
BeltAlert
®is a feature intended to remind the driver
and front passenger (for versions/markets, where pro-
vided with front passenger BeltAlert
®) to fasten their
seat belts. This feature is active whenever the ignition is
on. If the driver or front seat passenger is unbelted, the
Seat Belt Reminder Light will turn on and remain on
until both front seat belts are fastened. BeltAlert
®
triggers within 60 seconds of vehicle speed over
8 km/h. The reminder sequence lasts for 96 seconds or
until the respective seat belts are fastened. After the
sequence completes, the Seat Belt Reminder Light
remains illuminated until front belts are fastened. The
driver should instruct all other occupants to fasten
their seat belts. If a front seat belt is unbuckled while
traveling at speeds greater than 8 km/h, BeltAlert
®will
chime as a single notification and illuminate the Seat
Belt Reminder Light, then will proceed to the 96 sec-
ond reminder sequence. The front passenger seat BeltAlert
®is not active when
the front passenger seat is unoccupied. BeltAlert
®may
be triggered when an animal or heavy object is on the
front passenger seat or when the seat is folded flat (for
versions/markets, where provided). It is recommended
that pets be restrained in the rear seat in pet harnesses
or pet carriers that are secured by seat belts, and cargo
is properly stowed.
NOTE:
• The BeltAlert
®can be enabled or disabled by your
authorized dealer.
• The manufacturer of this vehicle does not recom-
mend deactivating the BeltAlert
®.
• If the BeltAlert
®
is deactivated, the Seat Belt Re-
minder Light will continue to illuminate as long as the
driver's seat belt is unbuckled/retracted.
SEAT BELTS AND PREGNANT WOMEN
We recommend that pregnant women use the seat
belts throughout their pregnancy. Keeping the mother
safe is the best way to keep the baby safe.
Pregnant women should wear the lap part of the belt
across the thighs and as snug across the hips as pos-
sible. Keep the belt low so that it does not come across
the abdomen. That way the strong bones of the hips
will take the force if there is an accident.
169
KNOWING
YOURVEHICLESAFETYSTARTING ANDDRIVING
WARNING LIGHTSAND
MESSAGES
IN AN
EMERGENCY
SERVICING AND
CARETECHNICAL
SPECIFICATIONSCONTENTS
Page 194 of 332

The Advanced Front Air Bag gas is vented through the
vent holes in the sides of the air bag. In this way, the air
bags do not interfere with your control of the vehicle.
Supplemental Seat-Mounted Side Air Bag
(SAB) Inflator Units
The Supplemental Seat-Mounted Side Air Bags (SAB)
are designed to activate only in certain side collisions.
The ORC determines if a side collision requires the
side air bags to inflate, based on the severity and type ofcollision.
Based on the severity and type of collision, the side air
bag inflator on the crash side of the vehicle may be
triggered, releasing a quantity of non-toxic gas. The
inflating SAB exits through the seat seam into the space
between the occupant and the door. The SAB fully
inflate in about 10 milliseconds. The side air bag moves
at a very high speed and with such a high force that it
could injure you if you are not seated properly, or if
items are positioned in the area where the side air bag
inflates. This especially applies to children.
Supplemental Side Air Bag Inflatable Curtain
(SABIC) Inflator Units
During collisions where the impact is confined to a
particular area of the side of the vehicle, the ORC may
deploy the SABIC air bags, depending on the severity
and type of collision. In these events, the ORC will
deploy the SABIC only on the impact side of the
vehicle.A quantity of non-toxic gas is generated to inflate the
side curtain air bag. The inflating side curtain air bag
pushes the outside edge of the headliner out of the way
and covers the window. The air bag inflates in about 30
milliseconds (about one-quarter of the time that it
takes to blink your eyes) with enough force to injure
you if you are not belted and seated properly, or if
items are positioned in the area where the side curtain
air bag inflates. This especially applies to children. The
side curtain air bag is only about 9 cm thick when it is
inflated.
Because air bag sensors estimate deceleration over
time, vehicle speed and damage are not good indicators
of whether or not an air bag should have deployed.
NOTE:
In a rollover the pretensioners and/or SAB
and SABIC air bags may deploy on both sides of the
vehicle.
Front And Side Impact Sensors
In front and side impacts, impact sensors can aid the
ORC in determining appropriate response to impact
events.
Enhanced Accident Response System
In the event of an impact causing air bag deployment, if
the communication network remains intact, and the
power remains intact, depending on the nature of the
event the ORC will determine whether to have the
Enhanced Accident Response System perform the fol-
lowing functions:
188
KNOWING YOUR
VEHICLESAFETYSTARTING AND
DRIVING
WARNING LIGHTSAND
MESSAGES
IN AN
EMERGENCY
SERVICING AND
CARETECHNICAL
SPECIFICATIONSCONTENTS
Page 208 of 332
MANUAL TRANSMISSION (for
versions/markets, where
provided)
WARNING!
You or others could be injured if you
leave the vehicle unattended without
having the parking brake fully applied.The park-
ing brake should always be applied when the
driver is not in the vehicle, especially on an
incline.
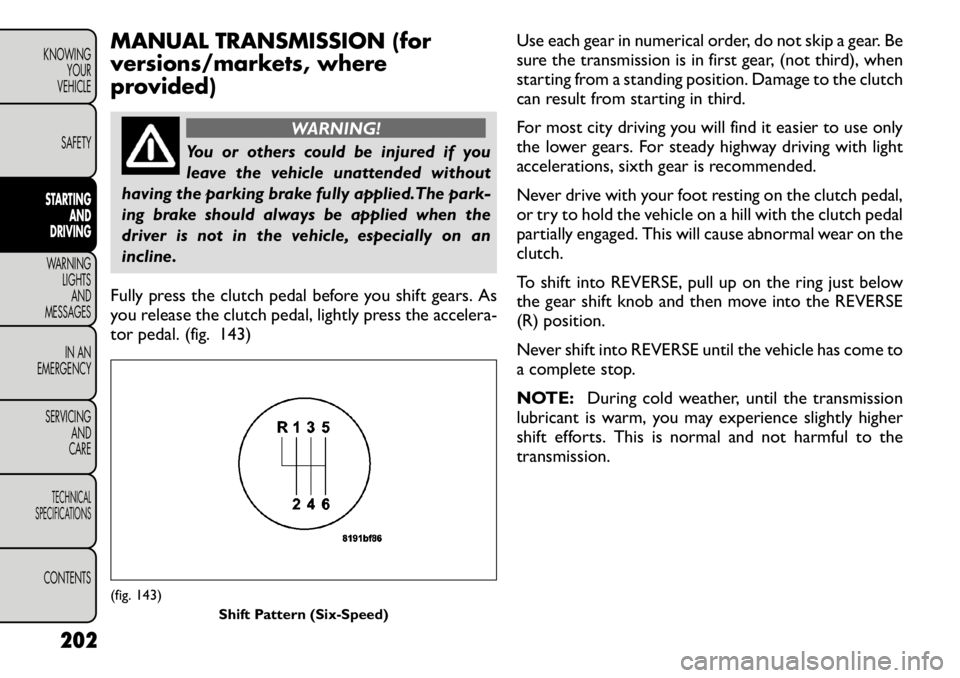
Fully press the clutch pedal before you shift gears. As
you release the clutch pedal, lightly press the accelera-
tor pedal. (fig. 143) Use each gear in numerical order, do not skip a gear. Be
sure the transmission is in first gear, (not third), when
starting from a standing position. Damage to the clutch
can result from starting in third.
For most city driving you will find it easier to use only
the lower gears. For steady highway driving with light
accelerations, sixth gear is recommended.
Never drive with your foot resting on the clutch pedal,
or try to hold the vehicle on a hill with the clutch pedal
partially engaged. This will cause abnormal wear on the
clutch.
To shift into REVERSE, pull up on the ring just below
the gear shift knob and then move into the REVERSE
(R) position.
Never shift into REVERSE until the vehicle has come to
a complete stop.
NOTE:
During cold weather, until the transmission
lubricant is warm, you may experience slightly higher
shift efforts. This is normal and not harmful to thetransmission.
(fig. 143) Shift Pattern(Six-Speed)
202
KNOWING YOUR
VEHICLE
SAFETYSTARTING AND
DRIVINGWARNING LIGHTSAND
MESSAGES
IN AN
EMERGENCY
SERVICING AND
CARETECHNICAL
SPECIFICATIONSCONTENTS
Page 215 of 332
• the transmission fluid has reached an adequate tem-perature,
• the engine coolant has reached an adequate tem- perature, and
• vehicle speed is sufficiently high.
Torque Converter Clutch
A feature designed to improve fuel economy has been
included in the automatic transmission on your vehicle.
A clutch within the torque converter engages auto-
matically at calibrated speeds. This may result in a
slightly different feeling or response during normal
operation in the upper gears. When the vehicle speed
drops or during some accelerations, the clutch auto-
matically disengages.
NOTE: The torque converter clutch will not engage
until the transmission fluid and engine coolant are
warm [usually after 1.6 to 4.8 km of driving]. Because
the engine speed is higher when the torque converter
clutch is not engaged, it may seem as if the transmission
is not shifting into Overdrive when cold. This is normal.
Using the AutoStick
®feature, when the transmission
is sufficiently warm, will demonstrate that the trans-
mission is able to shift into and out of Overdrive. ALL WHEEL DRIVE (AWD) (for
versions/markets, where
provided)
This feature provides on-demand All-Wheel Drive
(AWD). The system is automatic with no driver inputs
or additional driving skills required. Under normal
driving conditions, the front wheels provide most of
the traction. If the front wheels begin to lose traction,
power is shifted automatically to the rear wheels. The
greater the front wheel traction loss, the greater the
power transfer to the rear wheels.
Additionally, on dry pavement under heavy throttle
input (where one may have no wheel spin), torque will
be sent to the rear in a pre-emptive effort to improve
vehicle launch and performance characteristics.
All wheels must have the same size and
type tires. Unequal tire sizes must not be
used. Unequal tire size may cause failure
of the power transfer unit .
209
KNOWING
YOURVEHICLE SAFETYSTARTING ANDDRIVINGWARNING LIGHTSAND
MESSAGES
IN AN
EMERGENCY
SERVICING AND
CARETECHNICAL
SPECIFICATIONSCONTENTS
Page 232 of 332

cycles, and the vehicle has been driven several kilome-
ters at speeds greater than 48 km/h, see your autho-
rized dealer as soon as possible to have the problem
diagnosed and corrected.
NOTE:
• The “ESC Off Indicator Light” and the “ESC
Activation/Malfunction Indicator Light” come on mo-
mentarily each time the ignition switch is turned to
ON/RUN.
• Each time the ignition is turned to ON/RUN, the
ESC system will be ON, even if it was turned off
previously.
• The ESC system will make buzzing or clicking sounds
when it is active. This is normal; the sounds will stop
when ESC becomes inactive following the maneuver
that caused the ESC activation.
4. Turn Signal Indicator LightThe left or right arrow will flash in unison
with the corresponding front and rear turn
signal lights when the turn signal switch is
operated. (Refer to “Lights” in “Knowing
Your Vehicle” for further information).
NOTE:
• A chime will sound if the vehicle is driven more than
1.6 km with either turn signal on.
• Check for an inoperative outside light bulb if either
indicator flashes at a rapid rate. 5. High Beam Indicator
This light shows that the high beam headlights
are on. Pull the multifunction lever on the left
side of the steering column toward you to switch to
low beam. (Refer to “Lights” in “Knowing Your Vehicle”
for further information).
6. Front Fog Light Indicator (for versions/markets,
where provided)
This indicator will illuminate when the front fog
lights are on. (Refer to “Lights” in “Knowing
Your Vehicle” for further information).
7. Odometer Display / Electronic Vehicle
Information Center (EVIC) Display
Odometer
The odometer display shows the total distance the
vehicle has been driven.
Electronic Vehicle Information Center (EVIC)
Display
The Electronic Vehicle Information Center (EVIC) fea-
tures a driver-interactive display that is located in the
instrument cluster. For further information, refer to
“Electronic Vehicle Information Center (EVIC)” in
“Knowing Your Vehicle”.
226
KNOWING YOUR
VEHICLE
SAFETY
STARTING AND
DRIVINGWARNING LIGHTSAND
MESSAGES
IN AN
EMERGENCY
SERVICING AND
CARETECHNICAL
SPECIFICATIONSCONTENTS
Page 233 of 332

8. Park/Headlight ON Indicator (for
versions/markets, where provided)This indicator will illuminate when the park
lights or headlights are turned on. (Refer to
“Lights” in “Knowing Your Vehicle” for fur-
ther information).
9. Tire Pressure Monitoring Telltale Light (for
versions/markets, where provided) Each tire, including the spare (if provided),
should be checked monthly when cold and
inflated to the inflation pressure recom-
mended by the vehicle manufacturer on the
vehicle placard or tire inflation pressure label. (If your
vehicle has tires of a different size than the size indi-
cated on the vehicle placard or tire inflation pressure
label, you should determine the proper tire inflation
pressure for those tires.)
As an added safety feature, your vehicle has been
equipped with a tire pressure monitoring system
(TPMS) that illuminates a low tire pressure telltale
when one or more of your tires is significantly under-
inflated. Accordingly, when the low tire pressure tell-
tale light illuminates, you should stop and check your
tires as soon as possible, and inflate them to the proper
pressure. Driving on a significantly under-inflated tire
causes the tire to overheat and can lead to tire failure.
Under-inflation also reduces fuel efficiency and tire
tread life, and may affect the vehicle’s handling and
stopping ability. Please note that the TPMS is not a substitute for
proper tire maintenance, and it is the driver’s respon-
sibility to maintain correct tire pressure, even if under-
inflation has not reached the level to trigger illumina-
tion of the TPMS low tire pressure telltale.
Your vehicle has also been equipped with a TPMS
malfunction indicator to indicate when the system is
not operating properly. The TPMS malfunction indica-
tor is combined with the low tire pressure telltale.
When the system detects a malfunction, the telltale
will flash for approximately one minute and then re-
main continuously illuminated. This sequence will con-
tinue upon subsequent vehicle start-ups as long as the
malfunction exists. When the malfunction indicator is
illuminated, the system may not be able to detect or
signal low tire pressure as intended. TPMS malfunctions
may occur for a variety of reasons, including the instal-
lation of replacement or alternate tires or wheels on
the vehicle that prevent the TPMS from functioning
properly. Always check the TPMS malfunction telltale
light after replacing one or more tires or wheels on
your vehicle to ensure that the replacement or alter-
nate tires and wheels allow the TPMS to continue to
function properly.
227KNOWING
YOURVEHICLE SAFETY
STARTING ANDDRIVINGWARNING LIGHTSAND
MESSAGESIN AN
EMERGENCY
SERVICING AND
CARETECHNICAL
SPECIFICATIONSCONTENTS