turn signal FIAT FULLBACK 2017 Owner handbook (in English)
[x] Cancel search | Manufacturer: FIAT, Model Year: 2017, Model line: FULLBACK, Model: FIAT FULLBACK 2017Pages: 312, PDF Size: 12.31 MB
Page 199 of 312
NOTE The system stays in the “ON”
state for about 7 seconds after the
hazard lamp has stopped flashing or
the turn-signal lever has returned to the
home position.
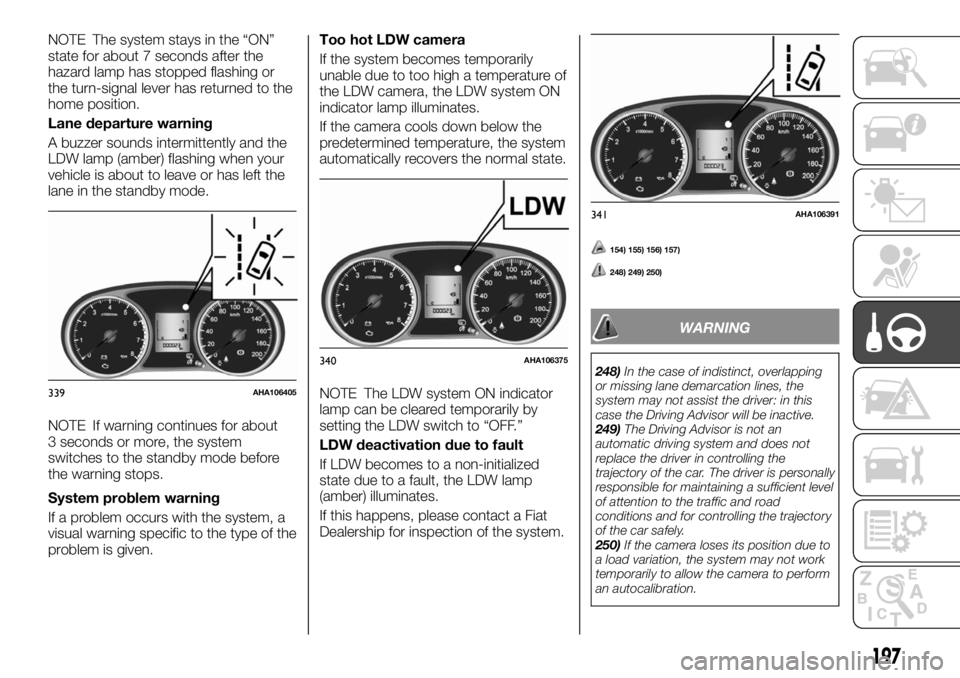
Lane departure warning
A buzzer sounds intermittently and the
LDW lamp (amber) flashing when your
vehicle is about to leave or has left the
lane in the standby mode.
NOTE If warning continues for about
3 seconds or more, the system
switches to the standby mode before
the warning stops.
System problem warning
If a problem occurs with the system, a
visual warning specific to the type of the
problem is given.Too hot LDW camera
If the system becomes temporarily
unable due to too high a temperature of
the LDW camera, the LDW system ON
indicator lamp illuminates.
If the camera cools down below the
predetermined temperature, the system
automatically recovers the normal state.
NOTE The LDW system ON indicator
lamp can be cleared temporarily by
setting the LDW switch to “OFF.”
LDW deactivation due to fault
If LDW becomes to a non-initialized
state due to a fault, the LDW lamp
(amber) illuminates.
If this happens, please contact a Fiat
Dealership for inspection of the system.
154) 155) 156) 157)
248) 249) 250)
WARNING
248)In the case of indistinct, overlapping
or missing lane demarcation lines, the
system may not assist the driver: in this
case the Driving Advisor will be inactive.
249)The Driving Advisor is not an
automatic driving system and does not
replace the driver in controlling the
trajectory of the car. The driver is personally
responsible for maintaining a sufficient level
of attention to the traffic and road
conditions and for controlling the trajectory
of the car safely.
250)If the camera loses its position due to
a load variation, the system may not work
temporarily to allow the camera to perform
an autocalibration.
339AHA106405
340AHA106375
341AHA106391
197
Page 218 of 312
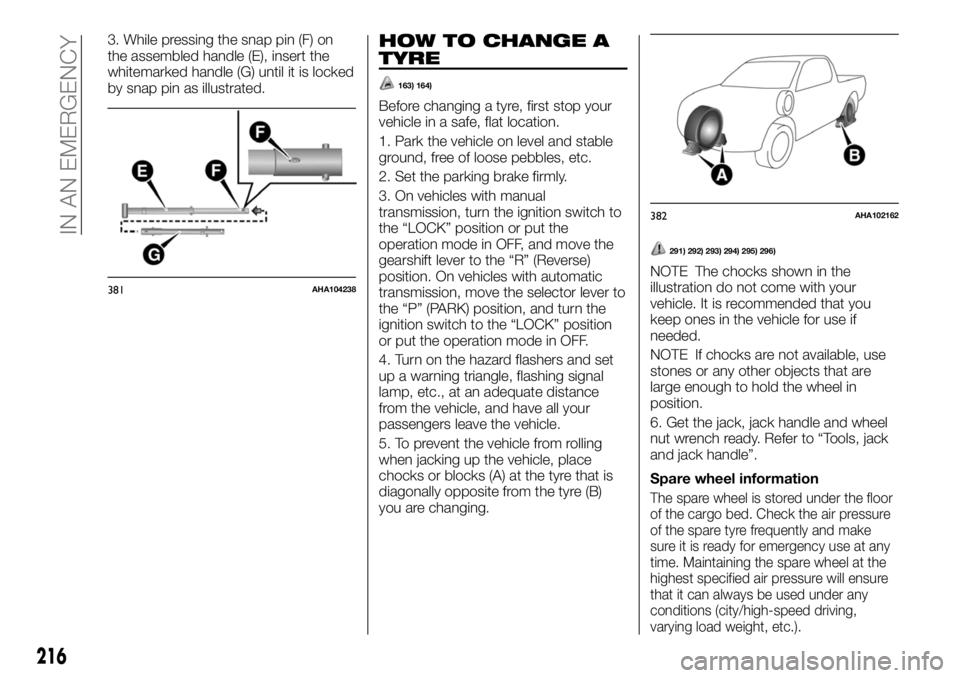
3. While pressing the snap pin (F) on
the assembled handle (E), insert the
whitemarked handle (G) until it is locked
by snap pin as illustrated.HOW TO CHANGE A
TYRE
163) 164)
Before changing a tyre, first stop your
vehicle in a safe, flat location.
1. Park the vehicle on level and stable
ground, free of loose pebbles, etc.
2. Set the parking brake firmly.
3. On vehicles with manual
transmission, turn the ignition switch to
the “LOCK” position or put the
operation mode in OFF, and move the
gearshift lever to the “R” (Reverse)
position. On vehicles with automatic
transmission, move the selector lever to
the “P” (PARK) position, and turn the
ignition switch to the “LOCK” position
or put the operation mode in OFF.
4. Turn on the hazard flashers and set
up a warning triangle, flashing signal
lamp, etc., at an adequate distance
from the vehicle, and have all your
passengers leave the vehicle.
5. To prevent the vehicle from rolling
when jacking up the vehicle, place
chocks or blocks (A) at the tyre that is
diagonally opposite from the tyre (B)
you are changing.
291) 292) 293) 294) 295) 296)
NOTE The chocks shown in the
illustration do not come with your
vehicle. It is recommended that you
keep ones in the vehicle for use if
needed.
NOTE If chocks are not available, use
stones or any other objects that are
large enough to hold the wheel in
position.
6. Get the jack, jack handle and wheel
nut wrench ready. Refer to “Tools, jack
and jack handle”.
Spare wheel information
The spare wheel is stored under the floor
of the cargo bed. Check the air pressure
of the spare tyre frequently and make
sure it is ready for emergency use at any
time. Maintaining the spare wheel at the
highest specified air pressure will ensure
that it can always be used under any
conditions (city/high-speed driving,
varying load weight, etc.).
381AHA104238
382AHA102162
216
IN AN EMERGENCY
Page 237 of 312
REPLACEMENT OF
LAMP BULBS
338) 339) 340) 341) 342) 343) 344) 345)
Before replacing a bulb, ensure the
lamp is off. Do not touch the glass part
of the new bulb with your bare fingers;
the skin oil left on the glass will
evaporate when the bulb gets hot and
the vapour will condense on the
reflector and dim the surface.
NOTE If you are unsure of how to carry
out the work as required, we
recommend you to consult a specialist.
Be careful not to scratch the vehicle
body when removing a lamp and lens.
When it rains, or when the vehicle has
been washed, the inside of the lens
sometimes becomes foggy. This is the
same phenomenon as when window
glass mists up on a humid day, and
does not indicate a functional problem.
When the lamp is switched on, the heatwill remove the fog. However, if water
gathers inside the lamp, we
recommend you to have the lamp
checked.
Bulb location and capacity
When replacing a bulb, use a new bulb
with the same wattage and colour.
Outside
Front
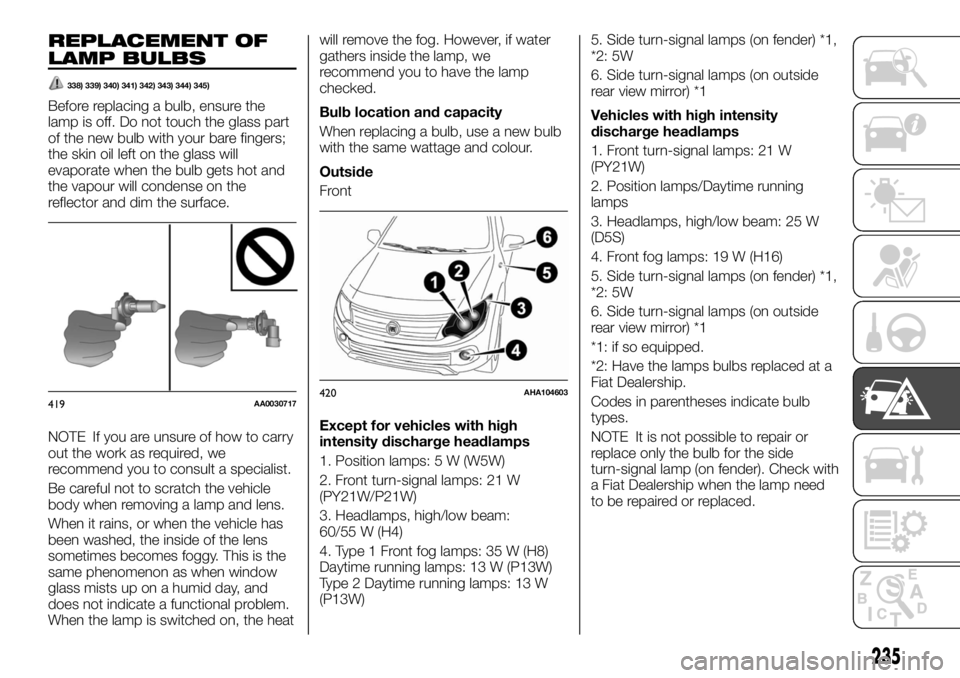
Except for vehicles with high
intensity discharge headlamps
1. Position lamps: 5 W (W5W)
2. Front turn-signal lamps: 21 W
(PY21W/P21W)
3. Headlamps, high/low beam:
60/55 W (H4)
4. Type 1 Front fog lamps: 35 W (H8)
Daytime running lamps: 13 W (P13W)
Type 2 Daytime running lamps: 13 W
(P13W)5. Side turn-signal lamps (on fender) *1,
*2: 5W
6. Side turn-signal lamps (on outside
rear view mirror) *1
Vehicles with high intensity
discharge headlamps
1. Front turn-signal lamps: 21 W
(PY21W)
2. Position lamps/Daytime running
lamps
3. Headlamps, high/low beam: 25 W
(D5S)
4. Front fog lamps: 19 W (H16)
5. Side turn-signal lamps (on fender) *1,
*2: 5W
6. Side turn-signal lamps (on outside
rear view mirror) *1
*1: if so equipped.
*2: Have the lamps bulbs replaced at a
Fiat Dealership.
Codes in parentheses indicate bulb
types.
NOTE It is not possible to repair or
replace only the bulb for the side
turn-signal lamp (on fender). Check with
a Fiat Dealership when the lamp need
to be repaired or replaced.
419AA0030717420AHA104603
235
Page 238 of 312
Rear
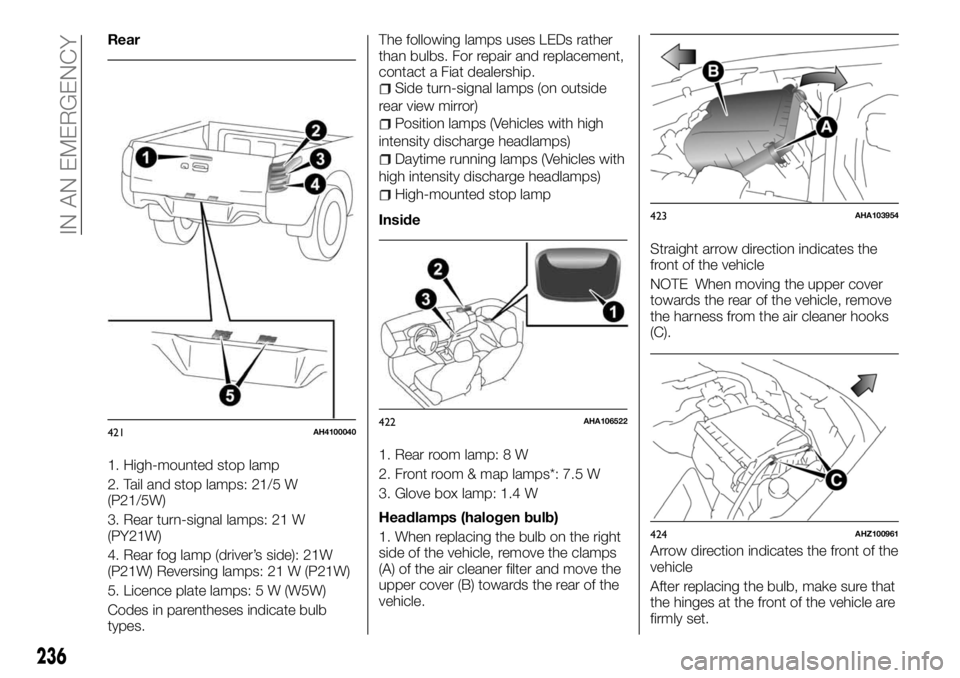
1. High-mounted stop lamp
2. Tail and stop lamps: 21/5 W
(P21/5W)
3. Rear turn-signal lamps: 21 W
(PY21W)
4. Rear fog lamp (driver’s side): 21W
(P21W) Reversing lamps: 21 W (P21W)
5. Licence plate lamps: 5 W (W5W)
Codes in parentheses indicate bulb
types.The following lamps uses LEDs rather
than bulbs. For repair and replacement,
contact a Fiat dealership.
Side turn-signal lamps (on outside
rear view mirror)
Position lamps (Vehicles with high
intensity discharge headlamps)
Daytime running lamps (Vehicles with
high intensity discharge headlamps)
High-mounted stop lamp
Inside
1. Rear room lamp: 8 W
2. Front room & map lamps*: 7.5 W
3. Glove box lamp: 1.4 W
Headlamps (halogen bulb)
1. When replacing the bulb on the right
side of the vehicle, remove the clamps
(A) of the air cleaner filter and move the
upper cover (B) towards the rear of the
vehicle.Straight arrow direction indicates the
front of the vehicle
NOTE When moving the upper cover
towards the rear of the vehicle, remove
the harness from the air cleaner hooks
(C).
Arrow direction indicates the front of the
vehicle
After replacing the bulb, make sure that
the hinges at the front of the vehicle are
firmly set.
421AH4100040422AHA106522
423AHA103954
424AHZ100961
236
IN AN EMERGENCY
Page 240 of 312
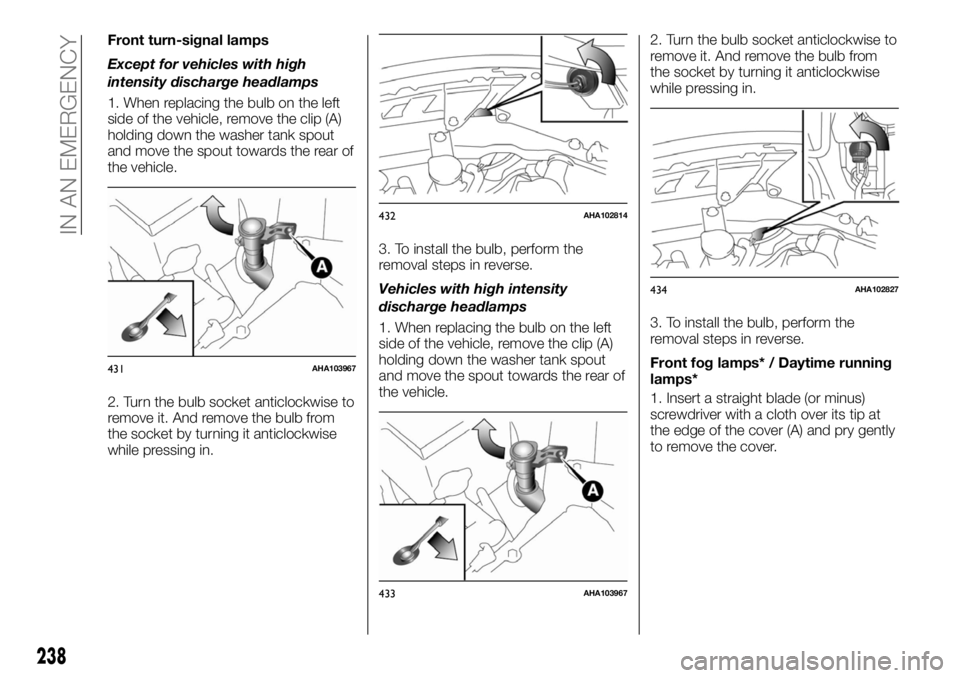
Front turn-signal lamps
Except for vehicles with high
intensity discharge headlamps
1. When replacing the bulb on the left
side of the vehicle, remove the clip (A)
holding down the washer tank spout
and move the spout towards the rear of
the vehicle.
2. Turn the bulb socket anticlockwise to
remove it. And remove the bulb from
the socket by turning it anticlockwise
while pressing in.3. To install the bulb, perform the
removal steps in reverse.
Vehicles with high intensity
discharge headlamps
1. When replacing the bulb on the left
side of the vehicle, remove the clip (A)
holding down the washer tank spout
and move the spout towards the rear of
the vehicle.2. Turn the bulb socket anticlockwise to
remove it. And remove the bulb from
the socket by turning it anticlockwise
while pressing in.
3. To install the bulb, perform the
removal steps in reverse.
Front fog lamps* / Daytime running
lamps*
1. Insert a straight blade (or minus)
screwdriver with a cloth over its tip at
the edge of the cover (A) and pry gently
to remove the cover.
431AHA103967
432AHA102814
433AHA103967
434AHA102827
238
IN AN EMERGENCY
Page 242 of 312
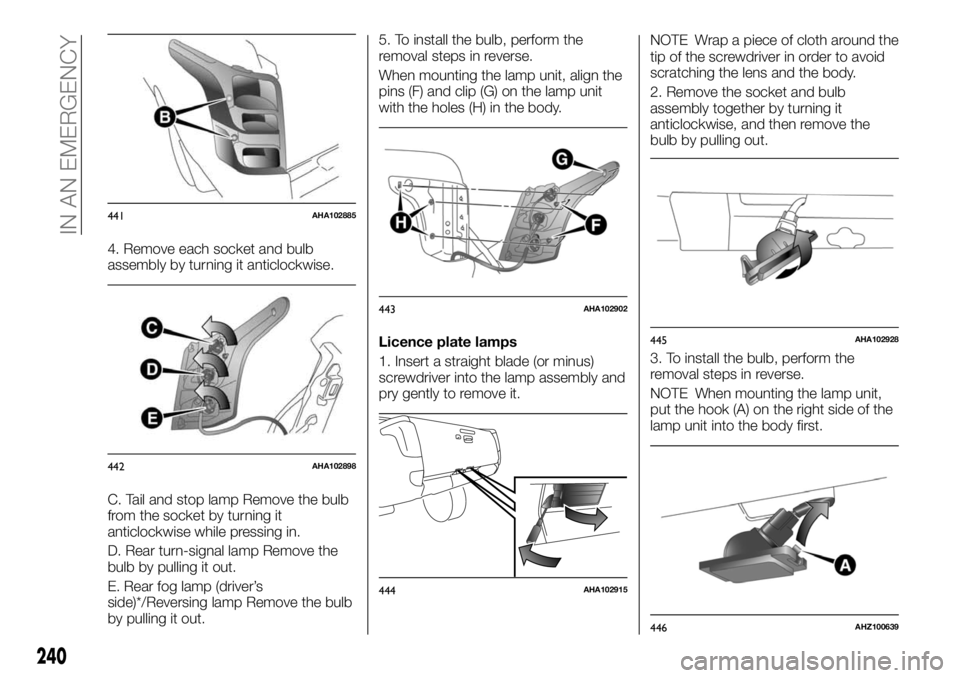
4. Remove each socket and bulb
assembly by turning it anticlockwise.
C. Tail and stop lamp Remove the bulb
from the socket by turning it
anticlockwise while pressing in.
D. Rear turn-signal lamp Remove the
bulb by pulling it out.
E. Rear fog lamp (driver’s
side)*/Reversing lamp Remove the bulb
by pulling it out.5. To install the bulb, perform the
removal steps in reverse.
When mounting the lamp unit, align the
pins (F) and clip (G) on the lamp unit
with the holes (H) in the body.
Licence plate lamps
1. Insert a straight blade (or minus)
screwdriver into the lamp assembly and
pry gently to remove it.NOTE Wrap a piece of cloth around the
tip of the screwdriver in order to avoid
scratching the lens and the body.
2. Remove the socket and bulb
assembly together by turning it
anticlockwise, and then remove the
bulb by pulling out.
3. To install the bulb, perform the
removal steps in reverse.
NOTE When mounting the lamp unit,
put the hook (A) on the right side of the
lamp unit into the body first.
441AHA102885
442AHA102898
443AHA102902
444AHA102915
445AHA102928
446AHZ100639
240
IN AN EMERGENCY
Page 310 of 312
Keyless operation system........17
Keys.....................13
Lane departure warning........195
Manual transmission..........157
Masking the headlamps.........48
Multi information display.........90
Operation under adverse driving
conditions...............226
Outside rear view mirrors........41
Parking..................149
Parking brake...............148
Periodic checks.............250
Power steering fluid...........257
Pretensioners...............112
Read this carefully.............2
Rear Differential lock..........174
Rear gate..................31
Rear seat..................34
Rear view camera............199
Rear view mirrors.............40
Rear window demister switch.....68
Refill capacities..............290
Replacement of lamp bulbs......235
Safe driving techniques........145
safety systems..............137
SBR system................110
Scheduled Servicing Plan.......245
Seat adjustment..............33
Seat belts
Use ...................108
Seats.....................33
Service precautions...........244
Side airbags................132
Speed limiter...............189
Sports mode...............159
Start&Stop System...........154
Starting and stopping the engine. . .150
Steering wheel...............38
Steering wheel height and reach
adjustment................38
Steering wheel lock............39
Storage spaces..............80
Sun visors..................78
Super Select 4WD II...........169
Supplemental restraint system
airbag..................127Tools, jack and jack handle......211
Towing...................223
Trailer towing................76
Turbocharger operation........153
Turn-signal lever..............47
Tyres ....................267
Tyres and wheels.............289
Use of the Owner Handbook......3
Vanity mirror................78
Vehicle care precautions........261
Vehicle changes/alterations........5
Vehicle dimensions...........276
Vehicle labeling..............272
Vehicle performance..........282
Ventilators..................56
Washer fluid...............255
Weights..................283
Window...................70
Wiper and washer switch........52
Wiper blade replacement.......260
FCA Italy S.p.A. - MOPAR - Technical Services - Service Engineering
Largo Senatore G. Agnelli, 3 - 10040 Volvera - Turin (Italy)
INDEX
Print no.603.91.226 - -Edition 0 2017 /3 6