FIAT FULLBACK 2017 Owner handbook (in English)
Manufacturer: FIAT, Model Year: 2017, Model line: FULLBACK, Model: FIAT FULLBACK 2017Pages: 312, PDF Size: 12.31 MB
Page 241 of 312
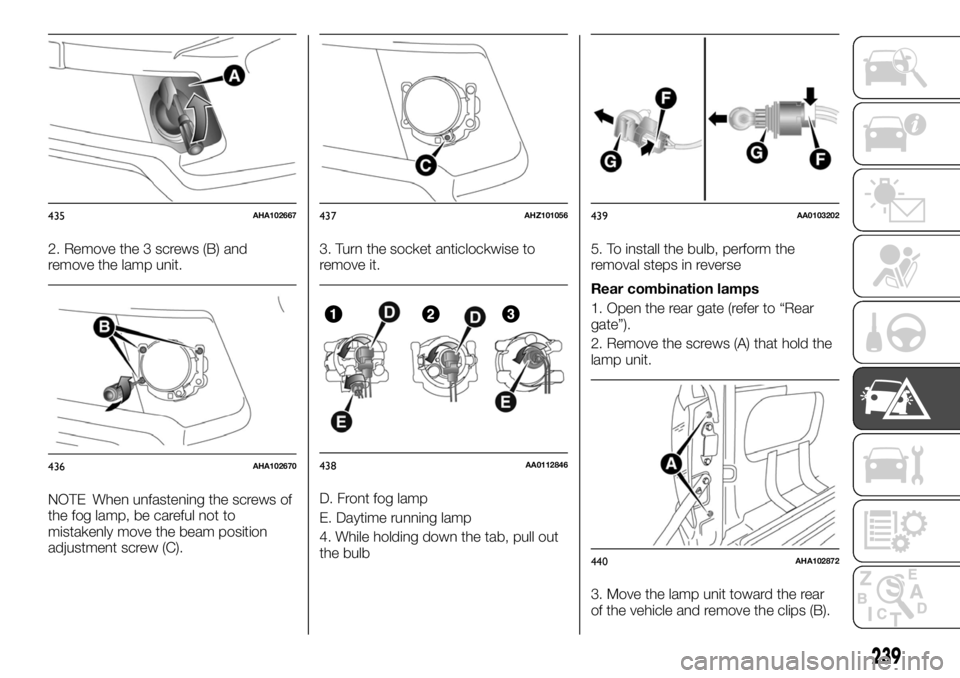
2. Remove the 3 screws (B) and
remove the lamp unit.
NOTE When unfastening the screws of
the fog lamp, be careful not to
mistakenly move the beam position
adjustment screw (C).3. Turn the socket anticlockwise to
remove it.
D. Front fog lamp
E. Daytime running lamp
4. While holding down the tab, pull out
the bulb5. To install the bulb, perform the
removal steps in reverse
Rear combination lamps
1. Open the rear gate (refer to “Rear
gate”).
2. Remove the screws (A) that hold the
lamp unit.
3. Move the lamp unit toward the rear
of the vehicle and remove the clips (B).
435AHA102667
436AHA102670
437AHZ101056
438AA0112846
439AA0103202
440AHA102872
239
Page 242 of 312
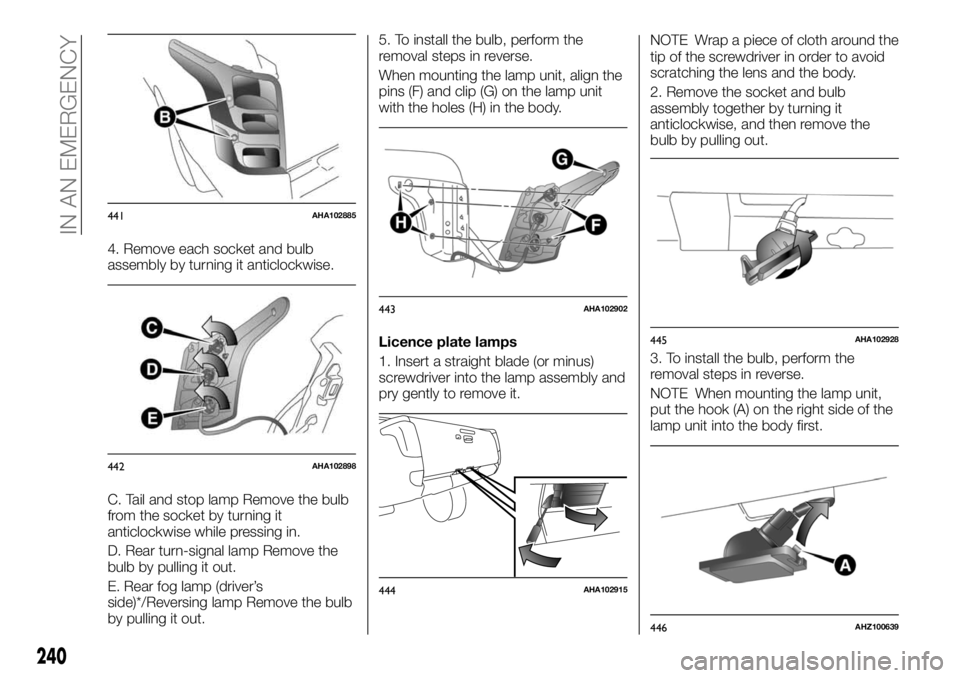
4. Remove each socket and bulb
assembly by turning it anticlockwise.
C. Tail and stop lamp Remove the bulb
from the socket by turning it
anticlockwise while pressing in.
D. Rear turn-signal lamp Remove the
bulb by pulling it out.
E. Rear fog lamp (driver’s
side)*/Reversing lamp Remove the bulb
by pulling it out.5. To install the bulb, perform the
removal steps in reverse.
When mounting the lamp unit, align the
pins (F) and clip (G) on the lamp unit
with the holes (H) in the body.
Licence plate lamps
1. Insert a straight blade (or minus)
screwdriver into the lamp assembly and
pry gently to remove it.NOTE Wrap a piece of cloth around the
tip of the screwdriver in order to avoid
scratching the lens and the body.
2. Remove the socket and bulb
assembly together by turning it
anticlockwise, and then remove the
bulb by pulling out.
3. To install the bulb, perform the
removal steps in reverse.
NOTE When mounting the lamp unit,
put the hook (A) on the right side of the
lamp unit into the body first.
441AHA102885
442AHA102898
443AHA102902
444AHA102915
445AHA102928
446AHZ100639
240
IN AN EMERGENCY
Page 243 of 312
Front room & map lamps*
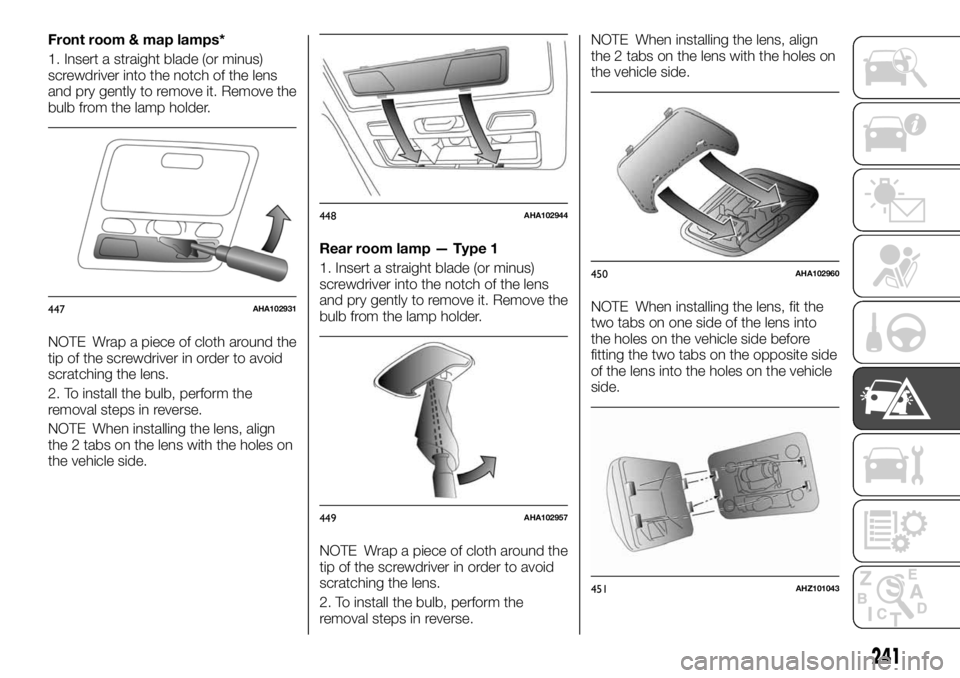
1. Insert a straight blade (or minus)
screwdriver into the notch of the lens
and pry gently to remove it. Remove the
bulb from the lamp holder.
NOTE Wrap a piece of cloth around the
tip of the screwdriver in order to avoid
scratching the lens.
2. To install the bulb, perform the
removal steps in reverse.
NOTE When installing the lens, align
the 2 tabs on the lens with the holes on
the vehicle side.Rear room lamp — Type 1
1. Insert a straight blade (or minus)
screwdriver into the notch of the lens
and pry gently to remove it. Remove the
bulb from the lamp holder.
NOTE Wrap a piece of cloth around the
tip of the screwdriver in order to avoid
scratching the lens.
2. To install the bulb, perform the
removal steps in reverse.NOTE When installing the lens, align
the 2 tabs on the lens with the holes on
the vehicle side.
NOTE When installing the lens, fit the
two tabs on one side of the lens into
the holes on the vehicle side before
fitting the two tabs on the opposite side
of the lens into the holes on the vehicle
side.
447AHA102931
448AHA102944
449AHA102957
450AHA102960
451AHZ101043
241
Page 244 of 312
Rear room lamp — Type 2
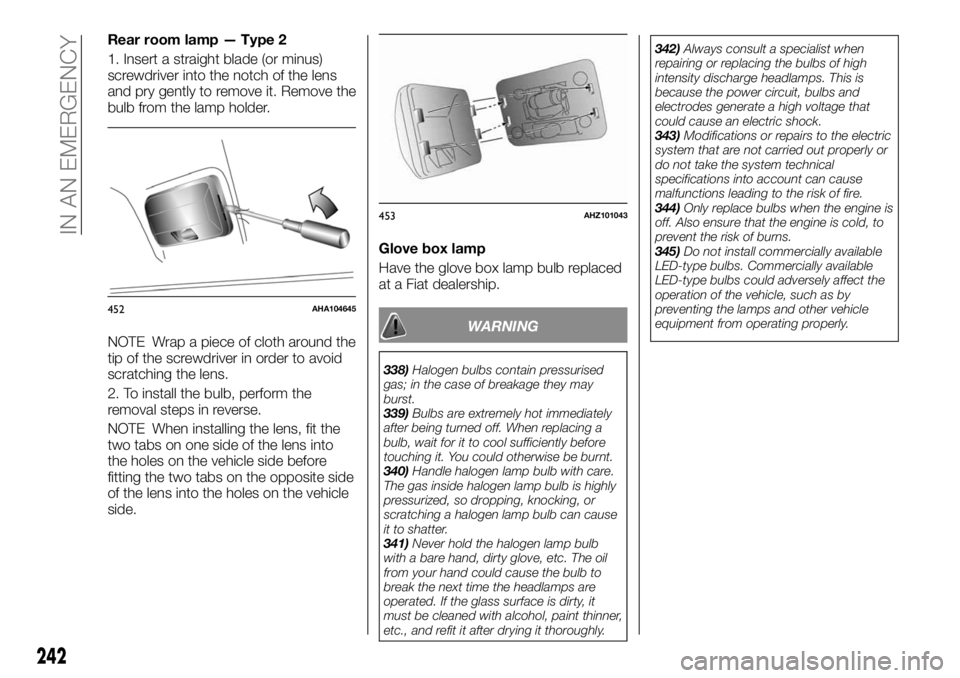
1. Insert a straight blade (or minus)
screwdriver into the notch of the lens
and pry gently to remove it. Remove the
bulb from the lamp holder.
NOTE Wrap a piece of cloth around the
tip of the screwdriver in order to avoid
scratching the lens.
2. To install the bulb, perform the
removal steps in reverse.
NOTE When installing the lens, fit the
two tabs on one side of the lens into
the holes on the vehicle side before
fitting the two tabs on the opposite side
of the lens into the holes on the vehicle
side.Glove box lamp
Have the glove box lamp bulb replaced
at a Fiat dealership.
WARNING
338)Halogen bulbs contain pressurised
gas; in the case of breakage they may
burst.
339)Bulbs are extremely hot immediately
after being turned off. When replacing a
bulb, wait for it to cool sufficiently before
touching it. You could otherwise be burnt.
340)Handle halogen lamp bulb with care.
The gas inside halogen lamp bulb is highly
pressurized, so dropping, knocking, or
scratching a halogen lamp bulb can cause
it to shatter.
341)Never hold the halogen lamp bulb
with a bare hand, dirty glove, etc. The oil
from your hand could cause the bulb to
break the next time the headlamps are
operated. If the glass surface is dirty, it
must be cleaned with alcohol, paint thinner,
etc., and refit it after drying it thoroughly.342)Always consult a specialist when
repairing or replacing the bulbs of high
intensity discharge headlamps. This is
because the power circuit, bulbs and
electrodes generate a high voltage that
could cause an electric shock.
343)Modifications or repairs to the electric
system that are not carried out properly or
do not take the system technical
specifications into account can cause
malfunctions leading to the risk of fire.
344)Only replace bulbs when the engine is
off. Also ensure that the engine is cold, to
prevent the risk of burns.
345)Do not install commercially available
LED-type bulbs. Commercially available
LED-type bulbs could adversely affect the
operation of the vehicle, such as by
preventing the lamps and other vehicle
equipment from operating properly.
452AHA104645
453AHZ101043
242
IN AN EMERGENCY
Page 245 of 312
SERVICING AND MAINTENANCE
Correct maintenance permits the
performance of the car to be
maintained over time, as well as limited
running costs and safeguarding the
efficiency of the safety systems.
This chapter explains how.SERVICE PRECAUTIONS.......244
SCHEDULED SERVICING PLAN . .245
PERIODIC CHECKS..........250
DEMANDING VEHICLE USE.....250
CHECKING LEVELS..........251
CATALYTIC CONVERTER.......252
ENGINE OIL...............252
ENGINE COOLANT...........253
WASHER FLUID.............255
BRAKE FLUID..............255
CLUTCH FLUID.............256
POWER STEERING FLUID......257
BATTERY.................258
WIPER BLADE REPLACEMENT . . .260
GENERAL MAINTENANCE......261
VEHICLE CARE PRECAUTIONS. . .261
CLEANING THE INTERIOR OF
YOUR VEHICLE.............262
CLEANING THE EXTERIOR OF
YOUR VEHICLE.............263
TYRES...................267
243
Page 246 of 312
SERVICE
PRECAUTIONS
346) 347) 348) 349) 350) 351) 352) 353)
Adequate care of your vehicle at regular
intervals serves to preserve the value
and appearance as long as possible.
Maintenance items as described in this
owner’s manual can be performed by
the owner.
We recommend you to have the
periodic inspection and maintenance
performed by a Fiat dealership.
In the event a malfunction or a problem
is discovered, we recommend you to
have it checked and repaired. This
section contains information on
inspection maintenance procedures
that you can do yourself. Follow the
instructions and cautions for each of
the various procedures.
WARNING
346)When checking or servicing the inside
of the engine compartment, make sure the
engine is switched off and has had a
chance to cool down.
347)If it is necessary to do work in the
engine compartment with the engine
running, be especially careful that your
clothing, hair, etc., does not become
caught by the cooling fan, drive belts, or
other moving parts.348)After performing the maintenance
work, make sure that no tools or cloths are
left behind in the engine compartment. If
they are left behind, a fire or damage to the
vehicle may occur.
349)The cooling fan can turn on
automatically even if the engine is not
running. Turn the ignition switch to “LOCK”
position or put the operation mode in OFF
to be safe while you work in the engine
compartment.
350)Do not smoke, cause sparks or allow
open flames around fuel or battery. The
fumes are flammable.
351)Be extremely cautious when working
around the battery. It contains poisonous
and corrosive sulphuric acid.
352)Do not get under your vehicle with
just the body jack supporting it. Always use
automotive jack stands.
353)Improper handling of components
and materials used in the vehicle can
endanger your personal safety. We
recommend you to consult a specialist for
necessary information.
244
SERVICING AND MAINTENANCE
Page 247 of 312
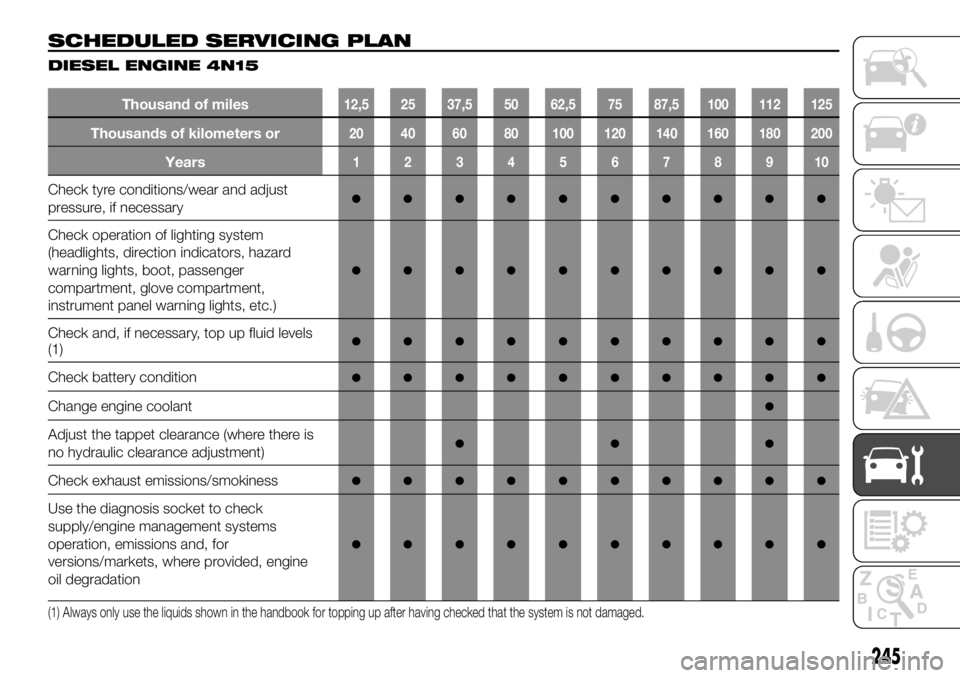
SCHEDULED SERVICING PLAN
DIESEL ENGINE 4N15
Thousand of miles12,5 25 37,5 50 62,5 75 87,5 100 112 125
Thousands of kilometers or20 40 60 80 100 120 140 160 180 200
Years12345678910
Check tyre conditions/wear and adjust
pressure, if necessary●●●●●●●●●●
Check operation of lighting system
(headlights, direction indicators, hazard
warning lights, boot, passenger
compartment, glove compartment,
instrument panel warning lights, etc.)
●●●●●●●●●●
Check and, if necessary, top up fluid levels
(1)●●●●●●●●●●
Check battery condition●●●●●●●●●●
Change engine coolant●
Adjust the tappet clearance (where there is
no hydraulic clearance adjustment)●●●
Check exhaust emissions/smokiness●●●●●●●●●●
Use the diagnosis socket to check
supply/engine management systems
operation, emissions and, for
versions/markets, where provided, engine
oil degradation
●●●●●●●●●●
(1) Always only use the liquids shown in the handbook for topping up after having checked that the system is not damaged.
245
Page 248 of 312

Thousand of miles12,5 25 37,5 50 62,5 75 87,5 100 112 125
Thousands of kilometers or20 40 60 80 100 120 140 160 180 200
Years12345678910
Perform the "Small Injection Quantity
Learning” procedure●●●●●●●●●●
Lubricate the appropriate points of the
transmission shaft●●●●●●●●●●
Visually inspect condition of: underbody
protection, pipes and hoses (exhaust, fuel
system), rubber elements (boots, sleeves,
bushes, etc.)
●●●●●●●●●●
Visually inspect the integrity of the steering
components and their fixings (including
gaskets and covers)
●●●●●●●●●●
Visually inspect the condition of the
turbocompressor flexible air intake
couplings and oil conduits (where present)
●●●●●
Check windscreen/rear window wiper blade
position/wear●●●●●
Check operation of the windscreen
wiper/washer system and adjust jets, if
necessary
●●●●●
Check cleanliness of bonnet and luggage
compartment locks, cleanliness and
lubrication of linkage
●●●●●
246
SERVICING AND MAINTENANCE
Page 249 of 312
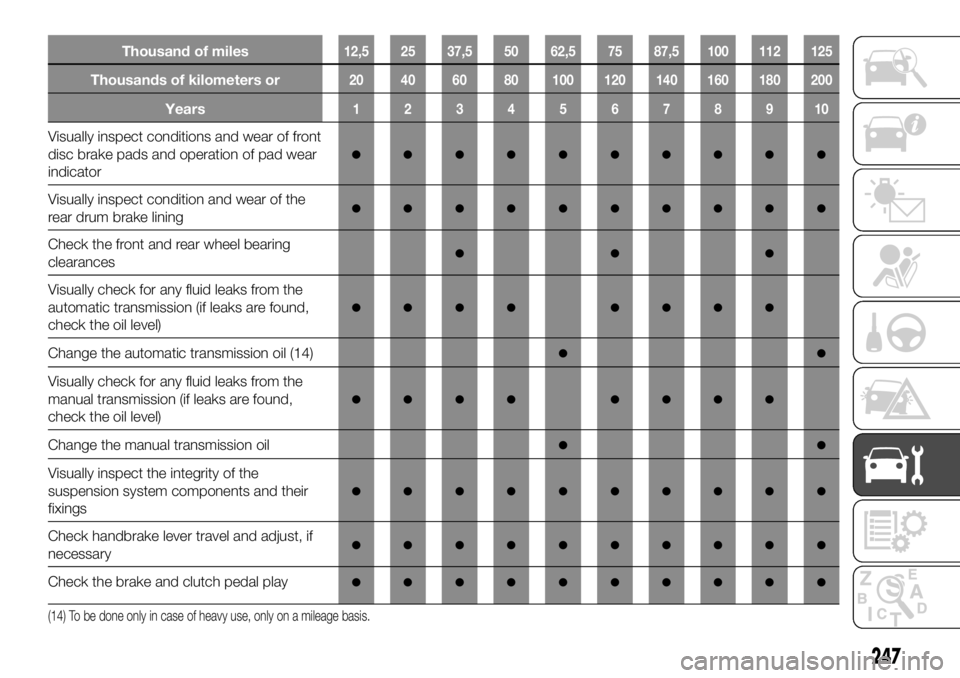
Thousand of miles12,5 25 37,5 50 62,5 75 87,5 100 112 125
Thousands of kilometers or20 40 60 80 100 120 140 160 180 200
Years12345678910
Visually inspect conditions and wear of front
disc brake pads and operation of pad wear
indicator
●●●●●●●●●●
Visually inspect condition and wear of the
rear drum brake lining●●●●●●●●●●
Check the front and rear wheel bearing
clearances●●●
Visually check for any fluid leaks from the
automatic transmission (if leaks are found,
check the oil level)
●●●● ●●●●
Change the automatic transmission oil (14)●●
Visually check for any fluid leaks from the
manual transmission (if leaks are found,
check the oil level)
●●●● ●●●●
Change the manual transmission oil●●
Visually inspect the integrity of the
suspension system components and their
fixings
●●●●●●●●●●
Check handbrake lever travel and adjust, if
necessary●●●●●●●●●●
Check the brake and clutch pedal play●●●●●●●●●●
(14) To be done only in case of heavy use, only on a mileage basis.
247
Page 250 of 312
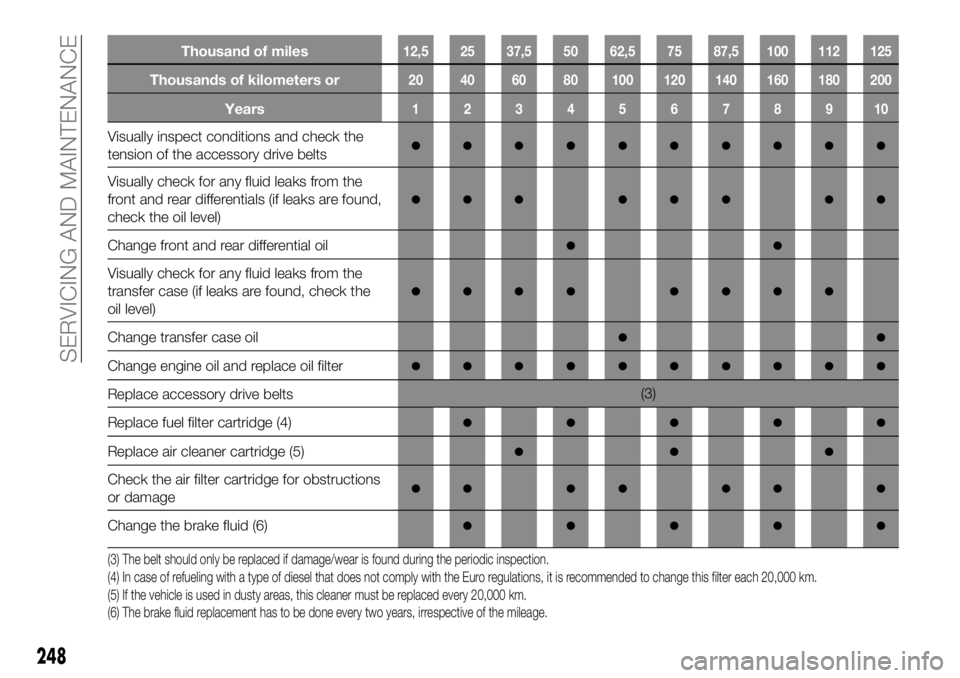
Thousand of miles12,5 25 37,5 50 62,5 75 87,5 100 112 125
Thousands of kilometers or20 40 60 80 100 120 140 160 180 200
Years12345678910
Visually inspect conditions and check the
tension of the accessory drive belts●●●●●●●●●●
Visually check for any fluid leaks from the
front and rear differentials (if leaks are found,
check the oil level)
●●● ●●● ●●
Change front and rear differential oil●●
Visually check for any fluid leaks from the
transfer case (if leaks are found, check the
oil level)
●●●● ●●●●
Change transfer case oil●●
Change engine oil and replace oil filter●●●●●●●●●●
Replace accessory drive belts(3)
Replace fuel filter cartridge (4)
●●●●●
Replace air cleaner cartridge (5)●●●
Check the air filter cartridge for obstructions
or damage●● ●● ●● ●
Change the brake fluid (6)●●●●●
(3) The belt should only be replaced if damage/wear is found during the periodic inspection.
(4) In case of refueling with a type of diesel that does not comply with the Euro regulations, it is recommended to change this filter each 20,000 km.
(5) If the vehicle is used in dusty areas, this cleaner must be replaced every 20,000 km.
(6) The brake fluid replacement has to be done every two years, irrespective of the mileage.
248
SERVICING AND MAINTENANCE