fuel FIAT FULLBACK 2018 Owner handbook (in English)
[x] Cancel search | Manufacturer: FIAT, Model Year: 2018, Model line: FULLBACK, Model: FIAT FULLBACK 2018Pages: 316, PDF Size: 10.52 MB
Page 102 of 316
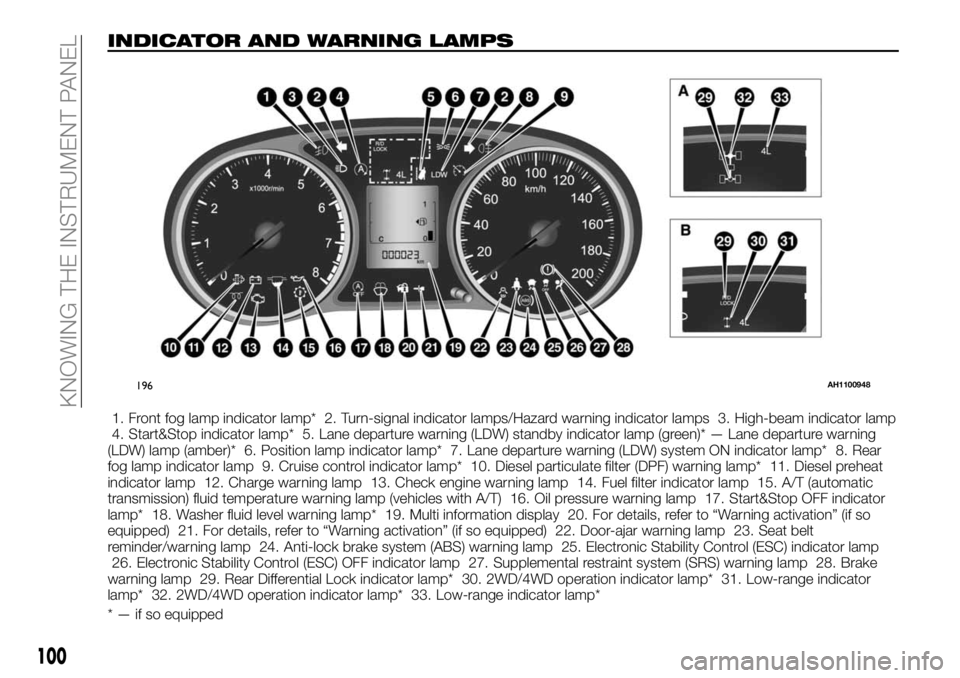
INDICATOR AND WARNING LAMPS
1. Front fog lamp indicator lamp* 2. Turn-signal indicator lamps/Hazard warning indicator lamps 3. High-beam indicator lamp
4. Start&Stop indicator lamp* 5. Lane departure warning (LDW) standby indicator lamp (green)* — Lane departure warning
(LDW) lamp (amber)* 6. Position lamp indicator lamp* 7. Lane departure warning (LDW) system ON indicator lamp* 8. Rear
fog lamp indicator lamp 9. Cruise control indicator lamp* 10. Diesel particulate filter (DPF) warning lamp* 11. Diesel preheat
indicator lamp 12. Charge warning lamp 13. Check engine warning lamp 14. Fuel filter indicator lamp 15. A/T (automatic
transmission) fluid temperature warning lamp (vehicles with A/T) 16. Oil pressure warning lamp 17. Start&Stop OFF indicator
lamp* 18. Washer fluid level warning lamp* 19. Multi information display 20. For details, refer to “Warning activation” (if so
equipped) 21. For details, refer to “Warning activation” (if so equipped) 22. Door-ajar warning lamp 23. Seat belt
reminder/warning lamp 24. Anti-lock brake system (ABS) warning lamp 25. Electronic Stability Control (ESC) indicator lamp
26. Electronic Stability Control (ESC) OFF indicator lamp 27. Supplemental restraint system (SRS) warning lamp 28. Brake
warning lamp 29. Rear Differential Lock indicator lamp* 30. 2WD/4WD operation indicator lamp* 31. Low-range indicator
lamp* 32. 2WD/4WD operation indicator lamp* 33. Low-range indicator lamp*
* — if so equipped
196AH1100948
100
KNOWING THE INSTRUMENT PANEL
Page 104 of 316
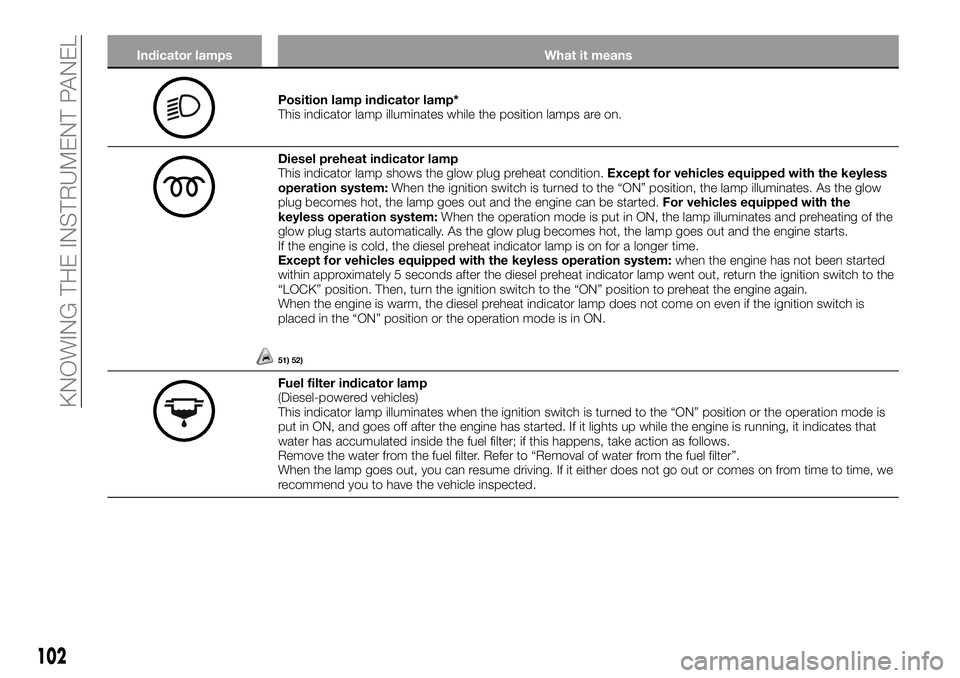
Indicator lamps What it means
Position lamp indicator lamp*
This indicator lamp illuminates while the position lamps are on.
Diesel preheat indicator lamp
This indicator lamp shows the glow plug preheat condition.Except for vehicles equipped with the keyless
operation system:When the ignition switch is turned to the “ON” position, the lamp illuminates. As the glow
plug becomes hot, the lamp goes out and the engine can be started.For vehicles equipped with the
keyless operation system:When the operation mode is put in ON, the lamp illuminates and preheating of the
glow plug starts automatically. As the glow plug becomes hot, the lamp goes out and the engine starts.
If the engine is cold, the diesel preheat indicator lamp is on for a longer time.
Except for vehicles equipped with the keyless operation system:when the engine has not been started
within approximately 5 seconds after the diesel preheat indicator lamp went out, return the ignition switch to the
“LOCK” position. Then, turn the ignition switch to the “ON” position to preheat the engine again.
When the engine is warm, the diesel preheat indicator lamp does not come on even if the ignition switch is
placed in the “ON” position or the operation mode is in ON.
51) 52)
Fuel filter indicator lamp
(Diesel-powered vehicles)
This indicator lamp illuminates when the ignition switch is turned to the “ON” position or the operation mode is
put in ON, and goes off after the engine has started. If it lights up while the engine is running, it indicates that
water has accumulated inside the fuel filter; if this happens, take action as follows.
Remove the water from the fuel filter. Refer to “Removal of water from the fuel filter”.
When the lamp goes out, you can resume driving. If it either does not go out or comes on from time to time, we
recommend you to have the vehicle inspected.
102
KNOWING THE INSTRUMENT PANEL
Page 109 of 316
WARNING
119)In the following situations, brake
performance may be compromised or the
vehicle may become unstable if brakes are
applied suddenly; consequently, avoid
driving at high speeds or applying the
brakes suddenly. Furthermore, immediately
the vehicle should be brought to a stop in a
safe location and we recommend you to
have it checked. 1 – The brake warning
lamp does not illuminate when the parking
brake is applied or does not turn off when
the parking brake is released.2–The
brake warning lamp and the ABS warning
lamp illuminate at the same time. For
details, refer to “ABS warning lamp”. 3 –
The brake warning lamp remains
illuminated while driving.
120)The vehicle should be brought to a
halt in the following manner when brake
performance has deteriorated. 1 – Depress
the brake pedal harder than usual. Even if
the brake pedal moves down to the very
end of its possible stroke, keep it pressed
down hard. 2 – Should the brakes fail, use
engine braking to reduce your speed and
carefully pull the parking brake lever.
Depress the brake pedal to operate the
stop lamp to alert the vehicles behind you.
IMPORTANT
51)This warning lightwill flash after
starting or during prolonged cranking to
indicate a fault with the glow plug heating
system. If the engine starts, the vehicle can
be used as normal, but a Fiat Dealership
must be contacted as soon as possible.
52)If the diesel preheat indicator lamp
comes on after the engine is started, the
engine speed may not rise above the idling
speed because of fuel freezing. In this case,
keep the engine idling for about
10 minutes, then turn off the ignition switch
or put in OFF the operation mode, and
immediately turn it on or put in ON again to
confirm that the diesel preheat indicator
lamp is off.
53)When this indicator lamp blinks,
electronic stability control function or active
traction control function is operating, which
means that the road is slippery or that your
vehicle’s wheels are beginning to slip. If this
happens, drive slower with less accelerator
input.54)If an abnormal condition occurs in the
system while driving, the
indicator lamp
will illuminate. In these cases, follow these
procedures:1–Ifthetemperature in the
braking system continues to increase due
to continuous brake control on a slippery
road surface, the
indicator lamp will
blink, and operation of the active traction
control function will be suspended to
protect the brake system. (The engine
control of the active traction control
function and normal brake operation will
not be affected). Park your vehicle in a safe
place. When the temperature in the braking
system has come down, the
indicator
lamp will go off and the electronic stability
control function and active traction control
function will start operating again.2–Ifthe
indicator lamp does not go out even
through the above procedure is followed,
there could be a problem in the system.
Stop the engine and start the engine again
and check whether the
indicator lamp
goes out. If the indicator lamp goes out,
there is no abnormal condition.3–Ifthe
indicator lamp illuminates even after
your vehicle is driven a short distance after
re-starting the engine, we recommend you
to have your vehicle checked as soon as
possible.
55)Prolonged driving with this lamp on
may cause further damage to the emission
control system. It could also affect fuel
economy and drivability.
56)If the lamp does not illuminate when the
ignition switch is turned to the “ON”
position or the operation mode is put in
ON, we recommend you to have the
system checked.
107
Page 148 of 316
ECONOMICAL
DRIVING
For economical driving, there are some
technical requirements that have to be
met. The prerequisite for low fuel
consumption is a properly adjusted
engine. In order to achieve longer life of
the vehicle and the most economical
operation, we recommend you to have
the vehicle checked at regular intervals
in accordance with the service
standards.
Fuel economy and generation of
exhaust gas and noise are highly
influenced by personal driving habits as
well as the particular operating
conditions. The following points should
be observed in order to minimize wear
of brakes, tyres and engine as well as
to reduce environmental pollution.
Accelerating and decelerating
Drive according to traffic conditions,
and avoid sudden starts, sudden
acceleration, and sudden braking, as
they will increase fuel consumption.
Shifting
Shift only at an appropriate speed and
engine speed. Always use the highest
shift position possible.
The transfer shift lever or the drive
modeselector should be set to “2H”
when driving 4WD vehicles on normal
roads and express ways to obtain best
possible fuel economy.City traffic
Frequent starting and stopping
increases the average fuel
consumption. Use roads with smooth
traffic flow whenever possible. When
driving on congested roads, avoid use
of a low shift position at high engine
speeds.
Idling
The vehicle consumes fuel even during
idling. Avoid extended idling whenever
possible.
Speed
At higher the vehicle speed, more fuel is
consumed. Avoid driving at full speed.
Even a slight release of the accelerator
pedal will save a significant amount of
fuel.
Tyre inflation pressure
Check the tyre inflation pressures at
regular intervals. Low tyre inflation
pressure increases road resistance and
fuel consumption. In addition, low tyre
pressures adversely affect tyre wear
and driving stability.
Cargo loads
Do not drive with unnecessary articles
in the luggage compartment. Especially
during city driving where frequent
starting and stopping is necessary, the
increased weight of the vehicle will
greatly affect fuel consumption. Also
avoid driving with unnecessary luggage
or carriers, etc., on the roof; theincreased air resistance will increase
fuel consumption.
Cold engine starting
Starting of a cold engine consumes
more fuel. Unnecessary fuel
consumption is also caused by keeping
a hot engine running. After the engine is
started, commence driving as soon as
possible.
Cooler or air conditioning
The use of the air conditioner will
increase the fuel consumption.
146
STARTING AND DRIVING
Page 156 of 316
Fuel injection amount learning
process
To keep exhaust emissions and engine
noise low, the engine very occasionally
performs a learning process for the fuel
injection amount.
The engine sounds slightly different
from usual while the learning process is
taking place. The change in the engine
sound does not indicate a fault.
If the keyless operation key is not
operating properly
Insert the keyless operation key into the
key slot. Starting the engine and
changing the operation mode should be
now possible.
Remove the keyless operation key from
the key slot after starting the engine or
changing the operation mode.NOTE Do not insert into the key slot
anything other than the keyless
operation key. This could cause
damage or a malfunction.
NOTE Remove the object or additional
key from the keyless operation key
before inserting the key into the key
slot. The vehicle may not be able to
receive the registered ID code from the
registered key. Therefore, the engine
may not start and the operation mode
may not change.
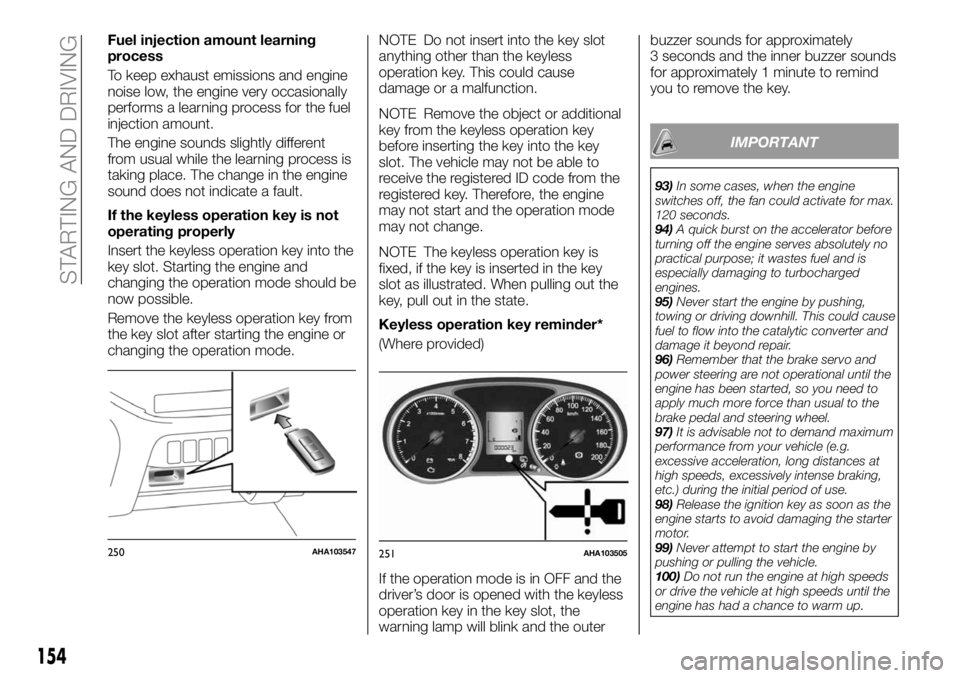
NOTE The keyless operation key is
fixed, if the key is inserted in the key
slot as illustrated. When pulling out the
key, pull out in the state.
Keyless operation key reminder*
(Where provided)
If the operation mode is in OFF and the
driver’s door is opened with the keyless
operation key in the key slot, the
warning lamp will blink and the outerbuzzer sounds for approximately
3 seconds and the inner buzzer sounds
for approximately 1 minute to remind
you to remove the key.
IMPORTANT
93)In some cases, when the engine
switches off, the fan could activate for max.
120 seconds.
94)A quick burst on the accelerator before
turning off the engine serves absolutely no
practical purpose; it wastes fuel and is
especially damaging to turbocharged
engines.
95)Never start the engine by pushing,
towing or driving downhill. This could cause
fuel to flow into the catalytic converter and
damage it beyond repair.
96)Remember that the brake servo and
power steering are not operational until the
engine has been started, so you need to
apply much more force than usual to the
brake pedal and steering wheel.
97)It is advisable not to demand maximum
performance from your vehicle (e.g.
excessive acceleration, long distances at
high speeds, excessively intense braking,
etc.) during the initial period of use.
98)Release the ignition key as soon as the
engine starts to avoid damaging the starter
motor.
99)Never attempt to start the engine by
pushing or pulling the vehicle.
100)Do not run the engine at high speeds
or drive the vehicle at high speeds until the
engine has had a chance to warm up.
250AHA103547251AHA103505
154
STARTING AND DRIVING
Page 157 of 316
101)If your vehicle is equipped with a
turbocharger, do not stop the engine
immediately after high-speed or uphill
driving. First allow the engine to idle to give
the turbocharger a chance to cool down.
102)It is advisable not to demand
maximum performance from your vehicle
(e.g. excessive acceleration, long distances
at high speeds, excessively intense braking,
etc.) during the initial period of use.
103)A quick burst on the accelerator
before turning off the engine serves
absolutely no practical purpose; it wastes
fuel and is especially damaging to
turbocharged engines.
WARNING
231)Never run the engine in a closed or
poorly ventilated area any longer than is
needed to move your vehicle in or out of
the area. Carbon monoxide gases are
odourless and can be fatal.
232)Do not operate the engine switch
while driving except in an emergency. If the
engine is stopped while driving, the brake
servomechanism will cease to function and
braking efficiency will deteriorate. Also, the
power steering system will not function and
it will require greater manual effort to
operate the steering. This could result in a
serious accident.
TURBOCHARGER
OPERATION
(where provided)
Turbocharger
104) 105)
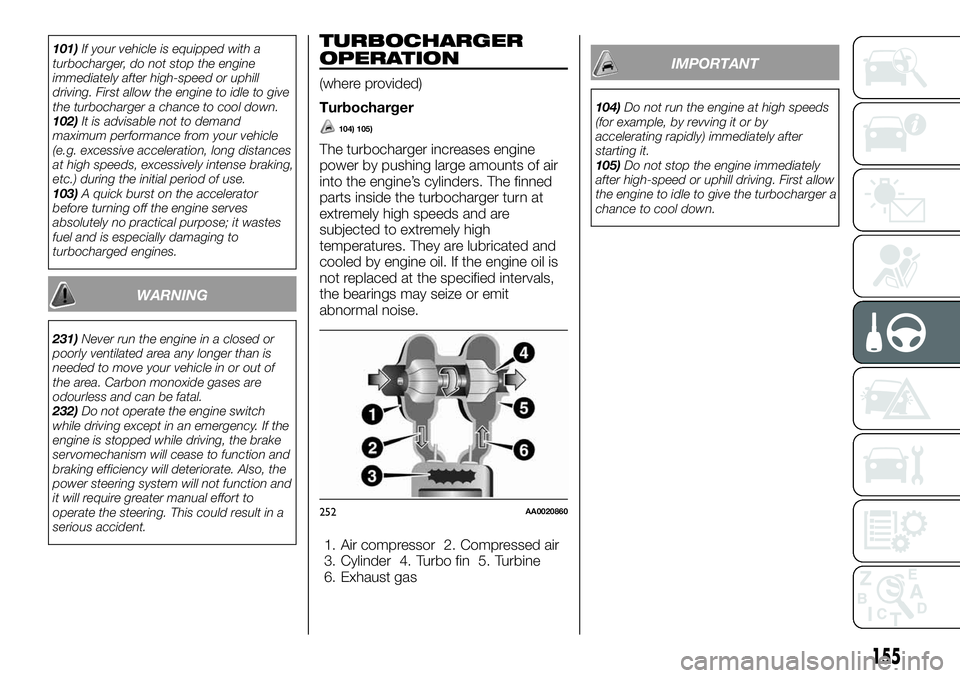
The turbocharger increases engine
power by pushing large amounts of air
into the engine’s cylinders. The finned
parts inside the turbocharger turn at
extremely high speeds and are
subjected to extremely high
temperatures. They are lubricated and
cooled by engine oil. If the engine oil is
not replaced at the specified intervals,
the bearings may seize or emit
abnormal noise.
1. Air compressor 2. Compressed air
3. Cylinder 4. Turbo fin 5. Turbine
6. Exhaust gas
IMPORTANT
104)Do not run the engine at high speeds
(for example, by revving it or by
accelerating rapidly) immediately after
starting it.
105)Do not stop the engine immediately
after high-speed or uphill driving. First allow
the engine to idle to give the turbocharger a
chance to cool down.
252AA0020860
155
Page 158 of 316
START&STOP
SYSTEM
The Start&Stop system automatically
stops and restarts the engine without
operating the ignition switch or engine
switch when the vehicle is stopped,
such as at a traffic light or in a traffic
jam, to reduce exhaust gases, increase
fuel efficiency.
NOTE The accumulated time the
engine has been stopped by
Start&Stop system is displayed in the
multi information display. Refer to
“Start&Stop monitor”.
106)
Automatically stopping the engine
The Start&Stop system is automatically
activated when the ignition switch is
turned to the “ON” position or the
operation mode is put in ON.
You can deactivate the system by
pressing the “Start&Stop OFF” switch.
Refer to “To deactivate”.
When the Start&Stop system will
operate, the indicator lamp will turn on
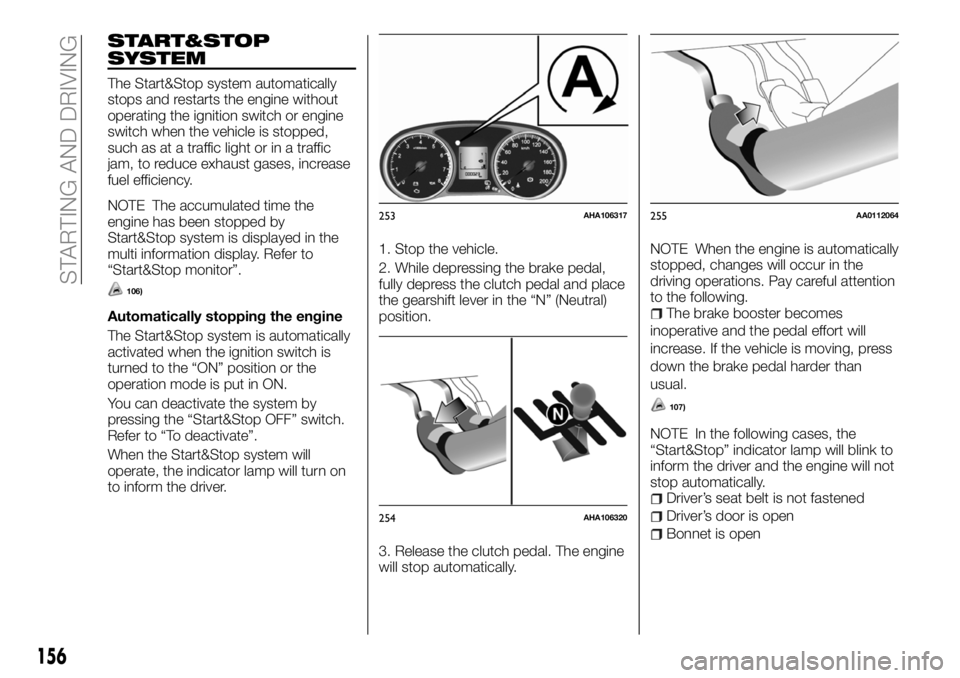
to inform the driver.1. Stop the vehicle.
2. While depressing the brake pedal,
fully depress the clutch pedal and place
the gearshift lever in the “N” (Neutral)
position.
3. Release the clutch pedal. The engine
will stop automatically.NOTE When the engine is automatically
stopped, changes will occur in the
driving operations. Pay careful attention
to the following.The brake booster becomes
inoperative and the pedal effort will
increase. If the vehicle is moving, press
down the brake pedal harder than
usual.
107)
NOTE In the following cases, the
“Start&Stop” indicator lamp will blink to
inform the driver and the engine will not
stop automatically.
Driver’s seat belt is not fastened
Driver’s door is open
Bonnet is open
253AHA106317
254AHA106320
255AA0112064
156
STARTING AND DRIVING
Page 161 of 316
108)In the following cases, the engine will
restart automatically even if the engine was
stopped by the Start&Stop system. Pay
careful attention, otherwise an unexpected
accident might occur when the engine
restarts.1—Vehicle speed is 3 km/h or
higher when coasting down a slope. 2 —
Brake booster vacuum pressure is low
because the brake pedal is depressed
repeatedly or depressed harder than usual.
3 — Engine coolant temperature is low. 4
— When the air conditioner is operated by
pressing the air conditioning switch. 5 —
When the preset temperature of the air
conditioner is changed significantly. 6 —
When the air conditioner is operated in
AUTO mode where the temperature control
is set to the max. hot or the max. cool (for
vehicles with automatic climate air
conditioning). 7 — When the air conditioner
is ON, the passenger compartment
temperature rises and the air conditioning
compressor operates to lower the
temperature. 8 — Demister switch is
pressed. Refer to “For quick demisting”. 9
— Electric power consumption is high,
such as when the rear window demister or
other electrical components are operating
or the blower speed is set to a high setting.
10 — Battery voltage or battery
performance is low. 11 — Operate the
steering wheel. 12 — Driver’s seat belt is
unfastened. 13 — Driver’s door is opened.MANUAL
TRANSMISSION
(Where provided)
The shift pattern is shown on the
gearshift lever knob. To start off,
depress the clutch pedal all the way
down and shift into 1st or “R” (Reverse)
position. Then operate the gearshift
lever slowly. Afterwards gradually
release the clutch pedal while
depressing the accelerator pedal.
233)
109) 110) 111) 112) 113)
NOTE During cold weather, shifting
may be difficult until the transmission
lubricant has warmed up. This is normal
and not harmful to the transmission.
If it is hard to shift into 1st, depress the
clutch pedal again; the shift will then be
easier to make.
In case of hot weather condition or long
time cruising with high speed, a speed
limitation function may work to restrict
the oil temperature rising of the manual
transmission. After the oil temperature
drops to the appropriate level, the
speed limitation function is cancelled.
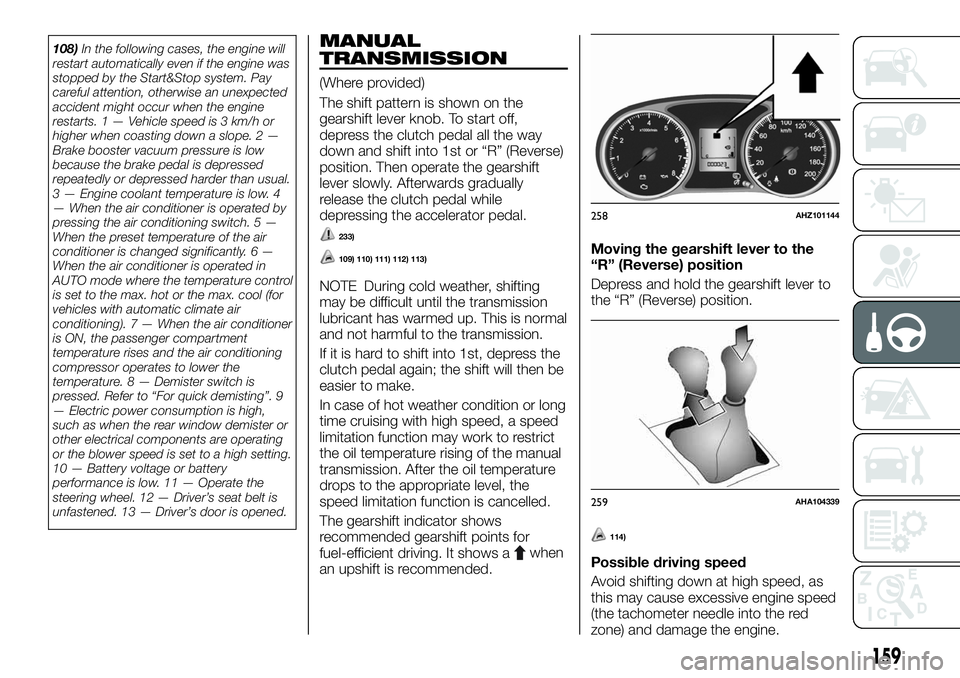
The gearshift indicator shows
recommended gearshift points for
fuel-efficient driving. It shows a
when
an upshift is recommended.Moving the gearshift lever to the
“R” (Reverse) position
Depress and hold the gearshift lever to
the “R” (Reverse) position.
114)
Possible driving speed
Avoid shifting down at high speed, as
this may cause excessive engine speed
(the tachometer needle into the red
zone) and damage the engine.
258AHZ101144
259AHA104339
159
Page 162 of 316
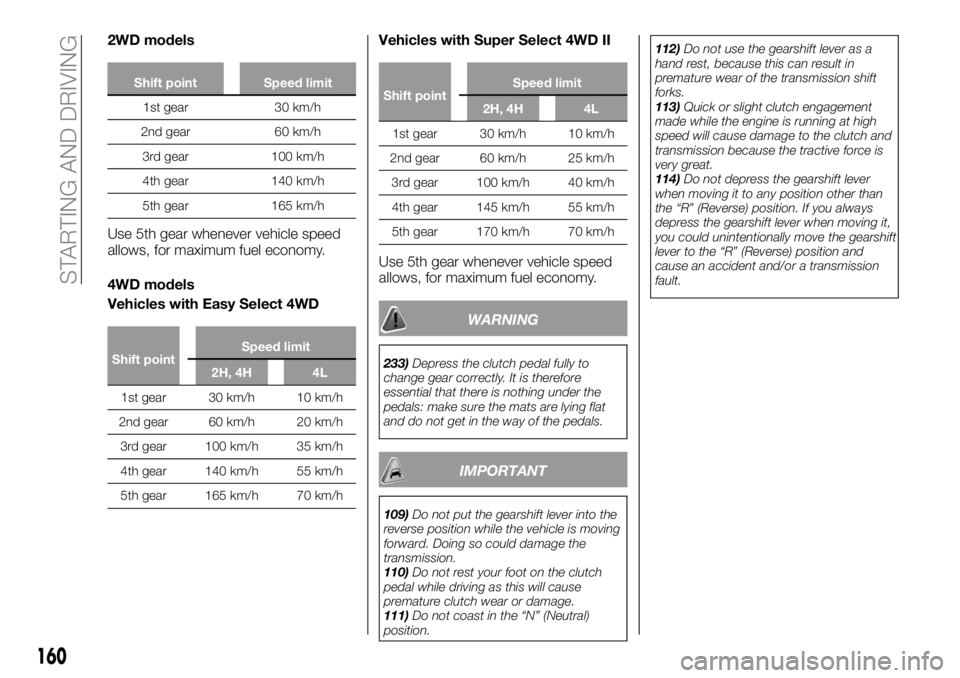
2WD models
Shift point Speed limit
1st gear 30 km/h
2nd gear 60 km/h
3rd gear 100 km/h
4th gear 140 km/h
5th gear 165 km/h
Use 5th gear whenever vehicle speed
allows, for maximum fuel economy.
4WD models
Vehicles with Easy Select 4WD
Shift pointSpeed limit
2H, 4H 4L
1st gear 30 km/h 10 km/h
2nd gear 60 km/h 20 km/h
3rd gear 100 km/h 35 km/h
4th gear 140 km/h 55 km/h
5th gear 165 km/h 70 km/h
Vehicles with Super Select 4WD II
Shift pointSpeed limit
2H, 4H 4L
1st gear 30 km/h 10 km/h
2nd gear 60 km/h 25 km/h
3rd gear 100 km/h 40 km/h
4th gear 145 km/h 55 km/h
5th gear 170 km/h 70 km/h
Use 5th gear whenever vehicle speed
allows, for maximum fuel economy.
WARNING
233)Depress the clutch pedal fully to
change gear correctly. It is therefore
essential that there is nothing under the
pedals: make sure the mats are lying flat
and do not get in the way of the pedals.
IMPORTANT
109)Do not put the gearshift lever into the
reverse position while the vehicle is moving
forward. Doing so could damage the
transmission.
110)Do not rest your foot on the clutch
pedal while driving as this will cause
premature clutch wear or damage.
111)Do not coast in the “N” (Neutral)
position.112)Do not use the gearshift lever as a
hand rest, because this can result in
premature wear of the transmission shift
forks.
113)Quick or slight clutch engagement
made while the engine is running at high
speed will cause damage to the clutch and
transmission because the tractive force is
very great.
114)Do not depress the gearshift lever
when moving it to any position other than
the “R” (Reverse) position. If you always
depress the gearshift lever when moving it,
you could unintentionally move the gearshift
lever to the “R” (Reverse) position and
cause an accident and/or a transmission
fault.
160
STARTING AND DRIVING
Page 172 of 316
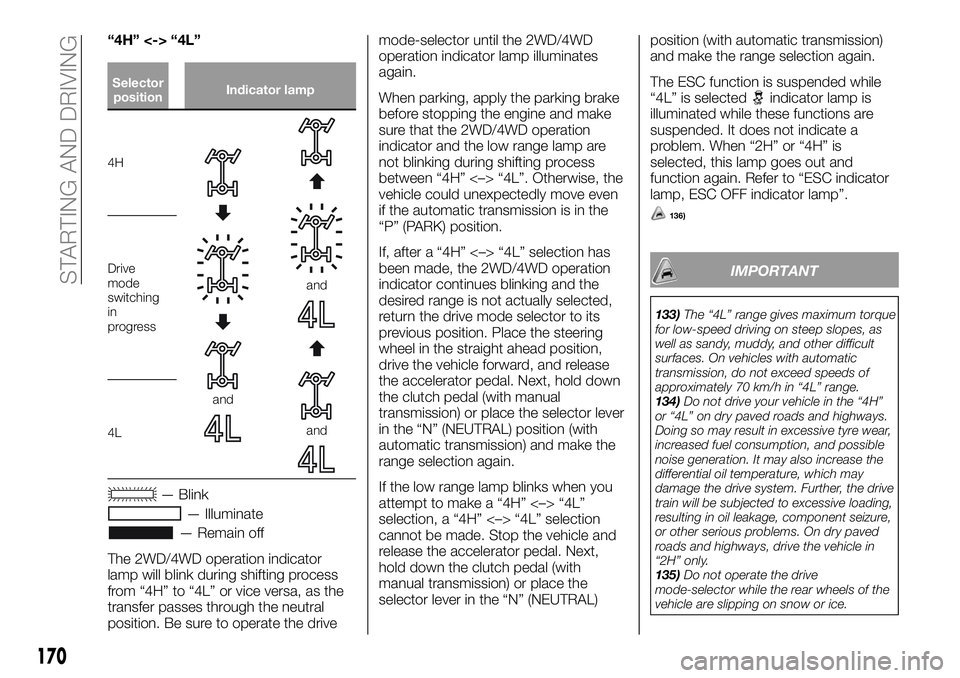
“4H” <-> “4L”
Selector
positionIndicator lamp
4H
and
and
and
Drive
mode
switching
in
progress
4L
— Blink
— Illuminate
— Remain off
The 2WD/4WD operation indicator
lamp will blink during shifting process
from “4H” to “4L” or vice versa, as the
transfer passes through the neutral
position. Be sure to operate the drivemode-selector until the 2WD/4WD
operation indicator lamp illuminates
again.
When parking, apply the parking brake
before stopping the engine and make
sure that the 2WD/4WD operation
indicator and the low range lamp are
not blinking during shifting process
between “4H” <–> “4L”. Otherwise, the
vehicle could unexpectedly move even
if the automatic transmission is in the
“P” (PARK) position.
If, after a “4H” <–> “4L” selection has
been made, the 2WD/4WD operation
indicator continues blinking and the
desired range is not actually selected,
return the drive mode selector to its
previous position. Place the steering
wheel in the straight ahead position,
drive the vehicle forward, and release
the accelerator pedal. Next, hold down
the clutch pedal (with manual
transmission) or place the selector lever
in the “N” (NEUTRAL) position (with
automatic transmission) and make the
range selection again.
If the low range lamp blinks when you
attempt to make a “4H” <–> “4L”
selection, a “4H” <–> “4L” selection
cannot be made. Stop the vehicle and
release the accelerator pedal. Next,
hold down the clutch pedal (with
manual transmission) or place the
selector lever in the “N” (NEUTRAL)position (with automatic transmission)
and make the range selection again.
The ESC function is suspended while
“4L” is selected
indicator lamp is
illuminated while these functions are
suspended. It does not indicate a
problem. When “2H” or “4H” is
selected, this lamp goes out and
function again. Refer to “ESC indicator
lamp, ESC OFF indicator lamp”.
136)
IMPORTANT
133)The “4L” range gives maximum torque
for low-speed driving on steep slopes, as
well as sandy, muddy, and other difficult
surfaces. On vehicles with automatic
transmission, do not exceed speeds of
approximately 70 km/h in “4L” range.
134)Do not drive your vehicle in the “4H”
or “4L” on dry paved roads and highways.
Doing so may result in excessive tyre wear,
increased fuel consumption, and possible
noise generation. It may also increase the
differential oil temperature, which may
damage the drive system. Further, the drive
train will be subjected to excessive loading,
resulting in oil leakage, component seizure,
or other serious problems. On dry paved
roads and highways, drive the vehicle in
“2H” only.
135)Do not operate the drive
mode-selector while the rear wheels of the
vehicle are slipping on snow or ice.
170
STARTING AND DRIVING