FIAT PANDA 2009 169 / 2.G Service Manual
Manufacturer: FIAT, Model Year: 2009, Model line: PANDA, Model: FIAT PANDA 2009 169 / 2.GPages: 226, PDF Size: 5.29 MB
Page 41 of 226
F0Z0143m
fig. 45
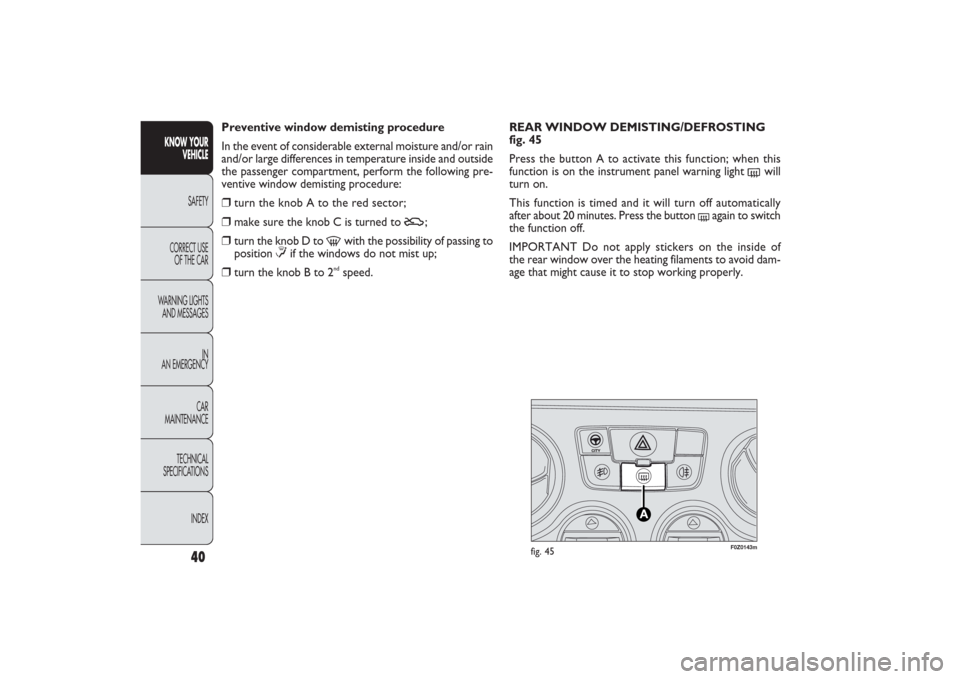
REAR WINDOW DEMISTING/DEFROSTING
fig. 45
Press the button A to activate this function; when this
function is on the instrument panel warning light
(
will
turn on.
This function is timed and it will turn off automatically
after about 20 minutes. Press the button
(
again to switch
the function off.
IMPORTANT Do not apply stickers on the inside of
the rear window over the heating filaments to avoid dam-
age that might cause it to stop working properly. Preventive window demisting procedure
In the event of considerable external moisture and/or rain
and/or large differences in temperature inside and outside
the passenger compartment, perform the following pre-
ventive window demisting procedure:
❒
turn the knob A to the red sector;
❒
make sure the knob C is turned to
U
;
❒
turn the knob D to
-
with the possibility of passing to
position ≤if the windows do not mist up;
❒
turn the knob B to 2
ndspeed.
40
KNOW YOUR
VEHICLE
SAFETY
CORRECT USE
OF THE CAR
WARNING LIGHTS
AND MESSAGES
IN
AN EMERGENCY
CAR
MAINTENANCE
TECHNICAL
SPECIFICATIONS
INDEX
031-064 PANDA EN 7-10-2009 13:43 Pagina 40
Page 42 of 226
41KNOW YOUR
VEHICLESAFETY
CORRECT USE
OF THE CAR
WARNING LIGHTS
AND MESSAGES
IN
AN EMERGENCY
CAR
MAINTENANCE
TECHNICAL
SPECIFICATIONS
INDEX
Air recirculation on/off knob CU
= outside air intake
T
= inside air recirculation
It is advisable to switch the internal air recirculation on while
standing in queues or in tunnels to prevent the introduc-
tion of polluted air. However, it is better not to use the
function for long periods, particularly if there are many peo-
ple on board, to prevent the windows from misting inside.
IMPORTANT The inside air recirculation system makes it
possible to reach the required heating or cooling condi-
tions faster. Do not use the air recirculation function on
rainy/cold days as it would considerably increase the pos-
sibility of the windows misting inside.
Air distribution knob D
¥
air flow from central vents and side vents;
μ
to warm the feet and keep the face cool (“bilevel”
function);
w
to speed up passenger compartment warming;
≤to warm the passenger compartment and at the same
time demist the windscreen;
-
to demist and defrost the windscreen and front side
windows.
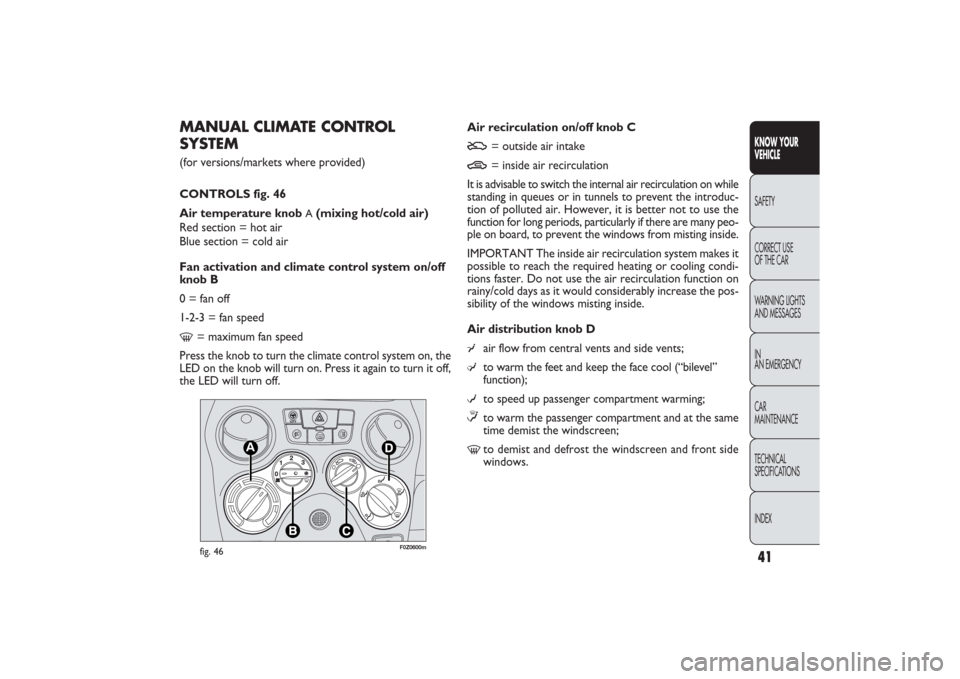
MANUAL CLIMATE CONTROL
SYSTEM(for versions/markets where provided)
CONTROLS fig. 46
Air temperature knob
A(mixing hot/cold air)
Red section = hot air
Blue section = cold air
Fan activation and climate control system on/off
knob B
0 = fan off
1-2-3 = fan speed
-
= maximum fan speed
Press the knob to turn the climate control system on, the
LED on the knob will turn on. Press it again to turn it off,
the LED will turn off.
F0Z0600m
fig. 46
031-064 PANDA EN 7-10-2009 13:43 Pagina 41
Page 43 of 226
Then use the controls to keep the required comfort con-
ditions and turn the knob
Cto
U
.
IMPORTANT With cold engine, you have to wait for
a few minutes to let the system fluid reach the operating
temperature.
WINDSCREEN AND FRONT SIDE WINDOW
FAST DEMISTING/DEFROSTING
(MAX-DEF function)
Proceed as follows:
❒
turn the knob A to the red sector;
❒
turn the knob C to
U
;
❒
turn the knob D to
-
;
❒
turn the knob B to
-
(maximum fan speed).
After demisting/defrosting, operate the controls to keep
the required comfort conditions.
IMPORTANT The climate control system is very useful to
speed up demisting since it dehumidifies the air. Adjust the
controls as described above and press knob B to switch
the climate control system on: the LED on the knob will
light up. PASSENGER COMPARTMENT VENTILATION
To ventilate the passenger compartment properly, pro-
ceed as follows:
❒
fully open the central and side air vents;
❒
turn the knob A to blue sector;
❒
turn the knob C to
U
;
❒
turn the knob D to
¥;
❒
turn the knob B to the required speed.
PASSENGER COMPARTMENT HEATING
Proceed as follows:
❒
turn the knob A to the red sector;
❒
turn the knob D to the required symbol;
❒
turn the knob B to the required speed.
FAST PASSENGER COMPARTMENT HEATING
For the fast heating of the passenger compartment, pro-
ceed as follows:
❒
turn the knob A to the red sector;
❒
turn the knob C to
T
;
❒
turn the knob D to
-
;
❒
turn the knob B to
-
(maximum fan speed).
42
KNOW YOUR
VEHICLE
SAFETY
CORRECT USE
OF THE CAR
WARNING LIGHTS
AND MESSAGES
IN
AN EMERGENCY
CAR
MAINTENANCE
TECHNICAL
SPECIFICATIONS
INDEX
031-064 PANDA EN 7-10-2009 13:43 Pagina 42
Page 44 of 226
43KNOW YOUR
VEHICLESAFETY
CORRECT USE
OF THE CAR
WARNING LIGHTS
AND MESSAGES
IN
AN EMERGENCY
CAR
MAINTENANCE
TECHNICAL
SPECIFICATIONS
INDEX
Preventive window demisting procedure
In the event of considerable external moisture and/or rain
and/or large differences in temperature inside and outside
the passenger compartment, perform the following pre-
ventive window demisting procedure:❒
turn the knob A to the red sector;
❒
turn the knob C to
U
;
❒
turn the knob D to
-
with the possibility of passing to
position ≤if the windows do not mist up;
❒
turn knob B to 2
ndspeed.
CLIMATE CONTROL SYSTEM (cooling)
For fast cooling of the passenger compartment, proceed
as follows:
❒
turn the knob A to blue sector;
❒
turn the knob C to
T
;
❒
turn the knob D to
¥;
❒
press the knob B to turn the climate control system on;
the LED on the knob will come on;
❒
turn the knob B to
-
(maximum fan speed).
The system uses R134a refrigerant fluid
which does not pollute the environment in
the event of accidental leakage. Under no
circumstances should R12 fluid be used as it is in-
compatible with the system components.
Cooling adjustment❒
turn the knob A to the right to increase the
temperature;
❒
turn the knob C to
U
;
❒
turn the knob B to reduce the fan speed.
SYSTEM SERVICING
In winter, the climate control system must be turned on
at least once a month for about 10 minutes. Before sum-
mer, have the system checked at a Fiat Dealership.
031-064 PANDA EN 7-10-2009 13:43 Pagina 43
Page 45 of 226
F0Z0601m
fig. 47
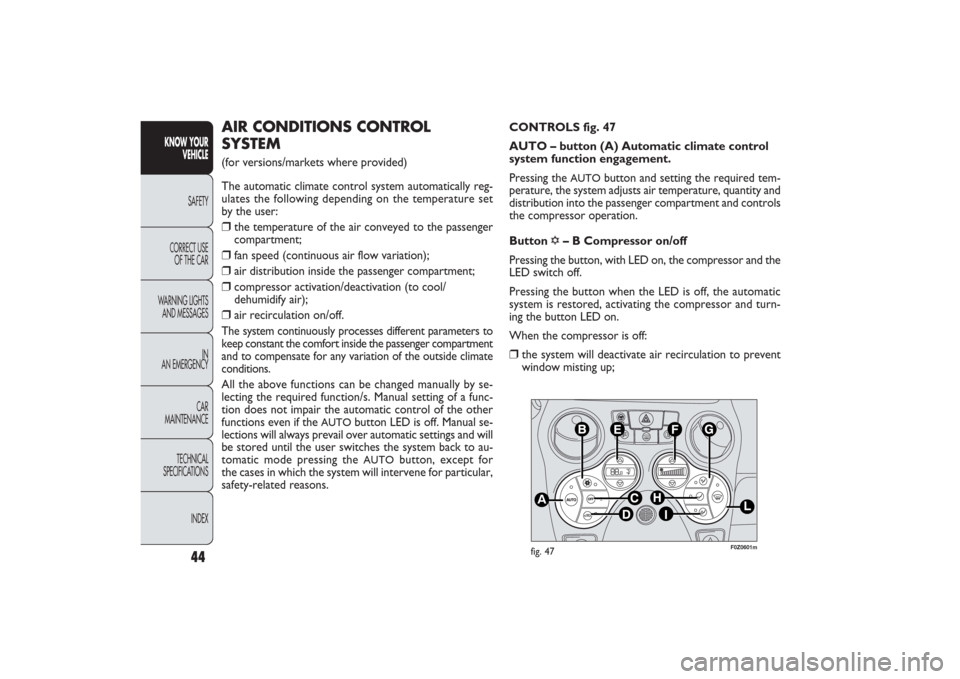
CONTROLS fig. 47
AUTO – button (A) Automatic climate control
system function engagement.
Pressing the
AUTO
button and setting the required tem-
perature, the system adjusts air temperature, quantity and
distribution into the passenger compartment and controls
the compressor operation.
Button
√
– B Compressor on/off
Pressing the button, with LED on, the compressor and the
LED switch off.
Pressing the button when the LED is off, the automatic
system is restored, activating the compressor and turn-
ing the button LED on.
When the compressor is off:
❒
the system will deactivate air recirculation to prevent
window misting up;
AIR CONDITIONS CONTROL
SYSTEM(for versions/markets where provided)
The automatic climate control system automatically reg-
ulates the following depending on the temperature set
by the user:❒
the temperature of the air conveyed to the passenger
compartment;
❒
fan speed (continuous air flow variation);
❒
air distribution inside the passenger compartment;
❒
compressor activation/deactivation (to cool/
dehumidify air);
❒
air recirculation on/off.
The system continuously processes different parameters to
keep constant the comfort inside the passenger compartment
and to compensate for any variation of the outside climate
conditions.All the above functions can be changed manually by se-
lecting the required function/s. Manual setting of a func-
tion does not impair the automatic control of the other
functions even if the
AUTO
button LED is off. Manual se-
lections will always prevail over automatic settings and will
be stored until the user switches the system back to au-
tomatic mode pressing the AUTO
button, except for
the cases in which the system will intervene for particular,
safety-related reasons.
44
KNOW YOUR
VEHICLE
SAFETY
CORRECT USE
OF THE CAR
WARNING LIGHTS
AND MESSAGES
IN
AN EMERGENCY
CAR
MAINTENANCE
TECHNICAL
SPECIFICATIONS
INDEX
031-064 PANDA EN 7-10-2009 13:43 Pagina 44
Page 46 of 226
45KNOW YOUR
VEHICLESAFETY
CORRECT USE
OF THE CAR
WARNING LIGHTS
AND MESSAGES
IN
AN EMERGENCY
CAR
MAINTENANCE
TECHNICAL
SPECIFICATIONS
INDEX
Button
T
– D
Air recirculation on/off
It is advisable to switch the internal air recirculation on
while standing in queues or in tunnels to prevent the in-
troduction of polluted air.
Led on button ON = recirculation ON.
Led on button OFF = recirculation OFF.
At low temperatures or if the compressor is off, the re-
circulation is forced to off to avoid misting.
IMPORTANT It is inadvisable to use air recirculation on
cold days as it would considerably increase the possibility
of windows misting up inside.
During
AUTO
operation, due to safety reasons and to refresh
air flow, after long recirculation activation (over 25 minutes)
the system will deactivate automatically air recirculation for
1 minute.
Buttons
ÕÔ
– E
Temperature setting
Pressing the button
Õ
the temperature in the passen-
ger compartment will rise until the value HI is reached
(maximum heating).
Pressing the button
Ô
the temperature in the passenger
compartment will decrease until the value LO is reached
(maximum cooling).
HI function
This function can be switched on to heat the passenger
compartment as quickly as possible; air distribution and fan
speed are controlled by the system.
To turn this function off, set the required temperature.
❒
it is not possible to convey air to the passenger com-
partment with a temperature below the outside tem-
perature (the displayed temperature value will flash
when the system cannot guarantee the required com-
fort conditions);
❒
the fan speed can be manually reset (with compressor
enabled, ventilation cannot go below a bar shown on
the display).
Button OFF – C
System switching off
Pressing the
OFF
button the system is switched off.
With the system off, the climate control system conditions
are as follows:
❒
all LEDs off;
❒
set temperature display off;
❒
air recirculation off;
❒
compressor off;
❒
fan off.
Under this condition, air recirculation can be turned on
or off without activating the system.
IMPORTANT The system will store the settings (except
recirculation) performed before turning off and will re-
sume them when pressing any button (if the function cor-
responding to the button pressed is off, it will be turned
on; if on it will be kept active). Press
AUTO
to start the
system automatically.
031-064 PANDA EN 7-10-2009 13:43 Pagina 45
Page 47 of 226
μ
air flow towards the front seat feet area. Due to the
natural tendency of heat to spread upwards, this type
of distribution warms the passenger compartment
up as quickly as possible, providing an immediate
feeling of warmth.
w+μ
distribution between feet area vents (warmest air)
and dashboard vents (coolest air).
¥+μ
distribution between feet area vents and wind-
screen/side front window vents. This type of distri-
bution achieves an adequate warming of the pas-
senger compartment and prevents the windows
from misting up.
The set air distribution is shown by the LEDs on the
selected buttons.
To restore the automatic air distribution control, press
the AUTO button.
During automatic operation, under particular climate con-
ditions, the system can send air to the windscreen although
the relevant LED does not turn on.
Button
-
- L
Fast front window demisting/defrosting
Pressing the button
-
the system activates all the functions
required for fast demisting/defrosting, that is:
❒
compressor switching-on (if the weather conditions are
suitable);
❒
air recirculation switching-off;
❒
maximum air temperature setting (HI); IMPORTANT If the heating fluid is not sufficiently hot, max-
imum fan speed will not be activated immediately to pre-
vent air not warm enough from entering the passenger
compartment.
LO function
This function can be switched on to cool the passenger
compartment as quickly as possible; with this function
switched on the compressor will be engaged whereas air
distribution and fan speed are controlled by the system.
To turn this function off, set the required temperature.
IMPORTANT With the function switched on, however, all
the manual settings can be made.
Buttons
ÕÔ
– F
Fan speed adjustment
Pressing the buttons
Õ
or
Ôrespectively, the fan speed
shown on the display bars increases or decreases.
The fan can be cut off only if the compressor has been
switched off (B button).
To restore automatic fan speed control, press the
AUTO
button.
Buttons
¥wμ
– G H I
Air distribution manual selection
Pressing the buttons, one of the five possible air flow
distribution patterns can be selected:
¥
air flow to the windscreen and front side window
vents to demist or defrost them.
w
air flow to the central and side dashboard vents to ven-
tilate the chest and the face during the hot season.
46
KNOW YOUR
VEHICLE
SAFETY
CORRECT USE
OF THE CAR
WARNING LIGHTS
AND MESSAGES
IN
AN EMERGENCY
CAR
MAINTENANCE
TECHNICAL
SPECIFICATIONS
INDEX
031-064 PANDA EN 7-10-2009 13:43 Pagina 46
Page 48 of 226
47KNOW YOUR
VEHICLESAFETY
CORRECT USE
OF THE CAR
WARNING LIGHTS
AND MESSAGES
IN
AN EMERGENCY
CAR
MAINTENANCE
TECHNICAL
SPECIFICATIONS
INDEX
❒
fan speed enabling depending on the coolant
temperature;
❒
air flow conveying to the windscreen and front side win-
dows;
❒
heated rear window switching-on.
IMPORTANT This function stays on for about 3 minutes,
since engine coolant temperature exceeds 50 °C (petrol
versions) or 35 °C (Diesel versions).
When the function is on, the LEDs on button
-
and those
on the heated rear window button
(
turn on, whereas
the AUTO button LED will turn off; when this function is
on, the only operations possible are fan speed adjustment
and heated rear window switching-off.
To turn the function off, press the button
-
again or
the AUTO button.
USING THE CLIMATE CONTROL SYSTEM The system can be turned on in different ways, it is how-
ever advisable to set the required temperature and then
to press the AUTO button. In this way, the system starts
to work fully automatically to reach the required com-
fort conditions as soon as possible.
During automatic operation it is possible:❒
to select the required temperature (buttons
ÔÕ
– E);
❒
to activate or deactivate air recirculation
(button
T
– D);
❒
to activate fast window demisting/defrosting
(button
-
– L);
❒
to select air distribution (buttons
¥wμ
– G H I);
❒
to select the fan speed (buttons
ÕÔ
– F).
The system will automatically modify its settings accord-
ing to set changes and the button LED will turn off.
To restore automatic operation press again the
AUTO
button.
SYSTEM SERVICING
In winter, the climate control system must be turned on
at least once a month for about 10 minutes.
Before summer, have the system inspected at a Fiat
Dealership.
The system uses R134a refrigerant fluid
which does not pollute the environment in
the event of accidental leakage. Under no
circumstances should R12 fluid be used as it is in-
compatible with the system components.
031-064 PANDA EN 7-10-2009 13:43 Pagina 47
Page 49 of 226
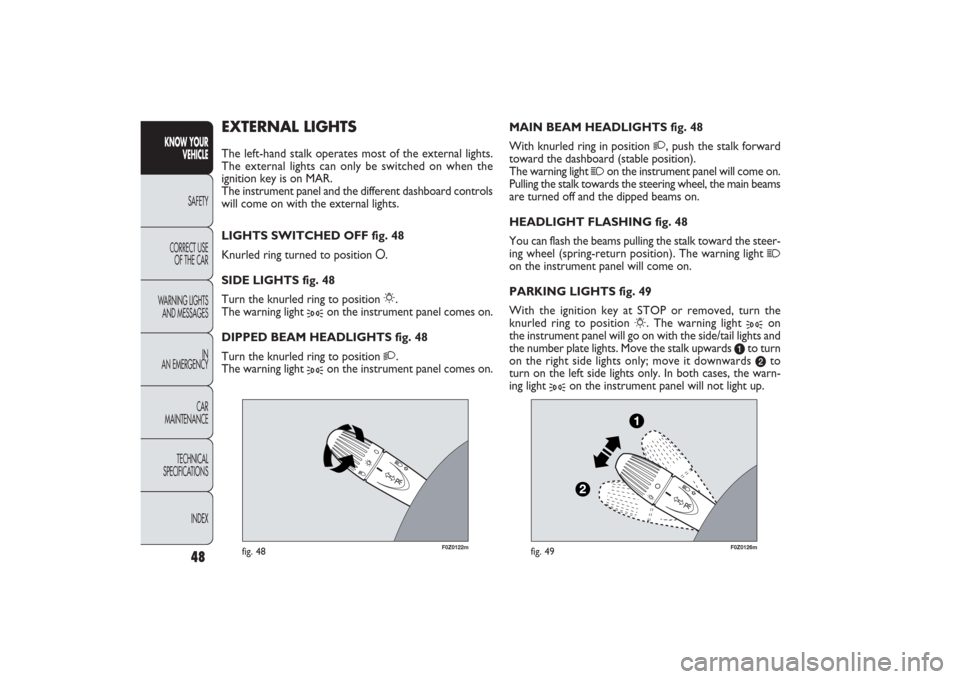
F0Z0122m
fig. 48
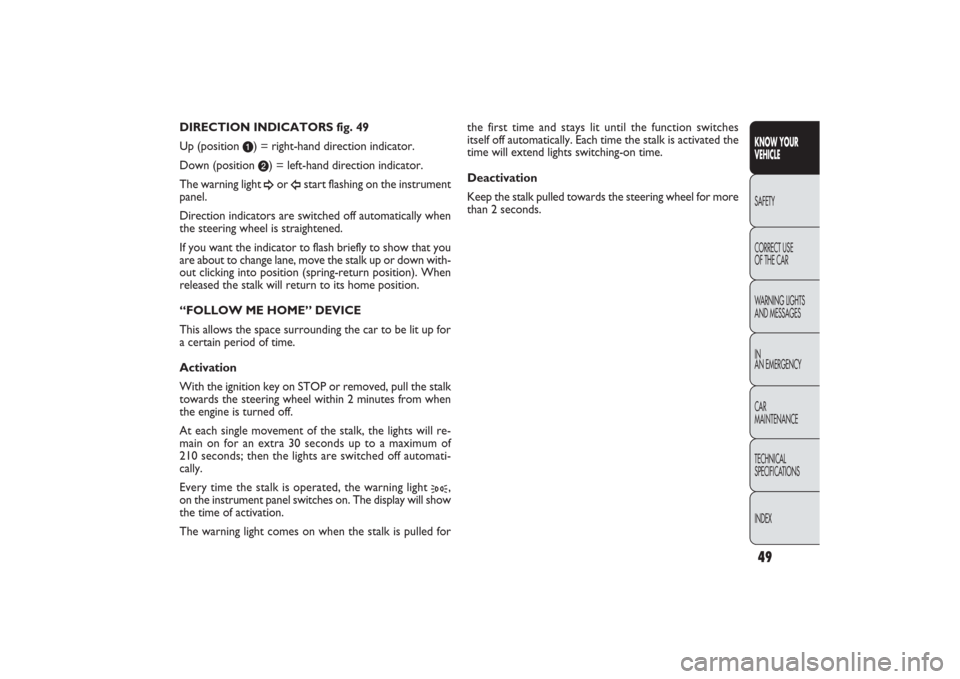
F0Z0126m
fig. 49
MAIN BEAM HEADLIGHTS fig. 48
With knurled ring in position
2
, push the stalk forward
toward the dashboard (stable position).
The warning light
1
on the instrument panel will come on.
Pulling the stalk towards the steering wheel, the main beams
are turned off and the dipped beams on.
HEADLIGHT FLASHING fig. 48
You can flash the beams pulling the stalk toward the steer-
ing wheel (spring-return position). The warning light
1
on the instrument panel will come on.
PARKING LIGHTS fig. 49
With the ignition key at STOP or removed, turn the
knurled ring to position
6
. The warning light
3
on
the instrument panel will go on with the side/tail lights and
the number plate lights. Move the stalk upwards
a
to turn
on the right side lights only; move it downwards b
to
turn on the left side lights only. In both cases, the warn-
ing light
3
on the instrument panel will not light up.
EXTERNAL LIGHTSThe left-hand stalk operates most of the external lights.
The external lights can only be switched on when the
ignition key is on MAR.
The instrument panel and the different dashboard controls
will come on with the external lights.
LIGHTS SWITCHED OFF fig. 48
Knurled ring turned to position O.
SIDE LIGHTS fig. 48
Turn the knurled ring to position
6
.
The warning light
3
on the instrument panel comes on.
DIPPED BEAM HEADLIGHTS fig. 48
Turn the knurled ring to position
2
.
The warning light
3
on the instrument panel comes on.
48
KNOW YOUR
VEHICLE
SAFETY
CORRECT USE
OF THE CAR
WARNING LIGHTS
AND MESSAGES
IN
AN EMERGENCY
CAR
MAINTENANCE
TECHNICAL
SPECIFICATIONS
INDEX
031-064 PANDA EN 7-10-2009 13:43 Pagina 48
Page 50 of 226
49KNOW YOUR
VEHICLESAFETY
CORRECT USE
OF THE CAR
WARNING LIGHTS
AND MESSAGES
IN
AN EMERGENCY
CAR
MAINTENANCE
TECHNICAL
SPECIFICATIONS
INDEX
the first time and stays lit until the function switches
itself off automatically. Each time the stalk is activated the
time will extend lights switching-on time.
Deactivation
Keep the stalk pulled towards the steering wheel for more
than 2 seconds. DIRECTION INDICATORS fig. 49
Up (position
a) = right-hand direction indicator.
Down (position b) = left-hand direction indicator.
The warning light ¥
or
Î
start flashing on the instrument
panel.
Direction indicators are switched off automatically when
the steering wheel is straightened.
If you want the indicator to flash briefly to show that you
are about to change lane, move the stalk up or down with-
out clicking into position (spring-return position). When
released the stalk will return to its home position.
“FOLLOW ME HOME” DEVICE
This allows the space surrounding the car to be lit up for
a certain period of time.
Activation
With the ignition key on STOP or removed, pull the stalk
towards the steering wheel within 2 minutes from when
the engine is turned off.
At each single movement of the stalk, the lights will re-
main on for an extra 30 seconds up to a maximum of
210 seconds; then the lights are switched off automati-
cally.
Every time the stalk is operated, the warning light
3
,
on the instrument panel switches on. The display will show
the time of activation.
The warning light comes on when the stalk is pulled for
031-064 PANDA EN 7-10-2009 13:43 Pagina 49