FORD C MAX 2011 2.G Owners Manual
Manufacturer: FORD, Model Year: 2011, Model line: C MAX, Model: FORD C MAX 2011 2.GPages: 296, PDF Size: 7.87 MB
Page 141 of 296
Downloaded from www.Manualslib.com manuals search engine Your Ford dealer can give you advice on
improving your fuel consumption.
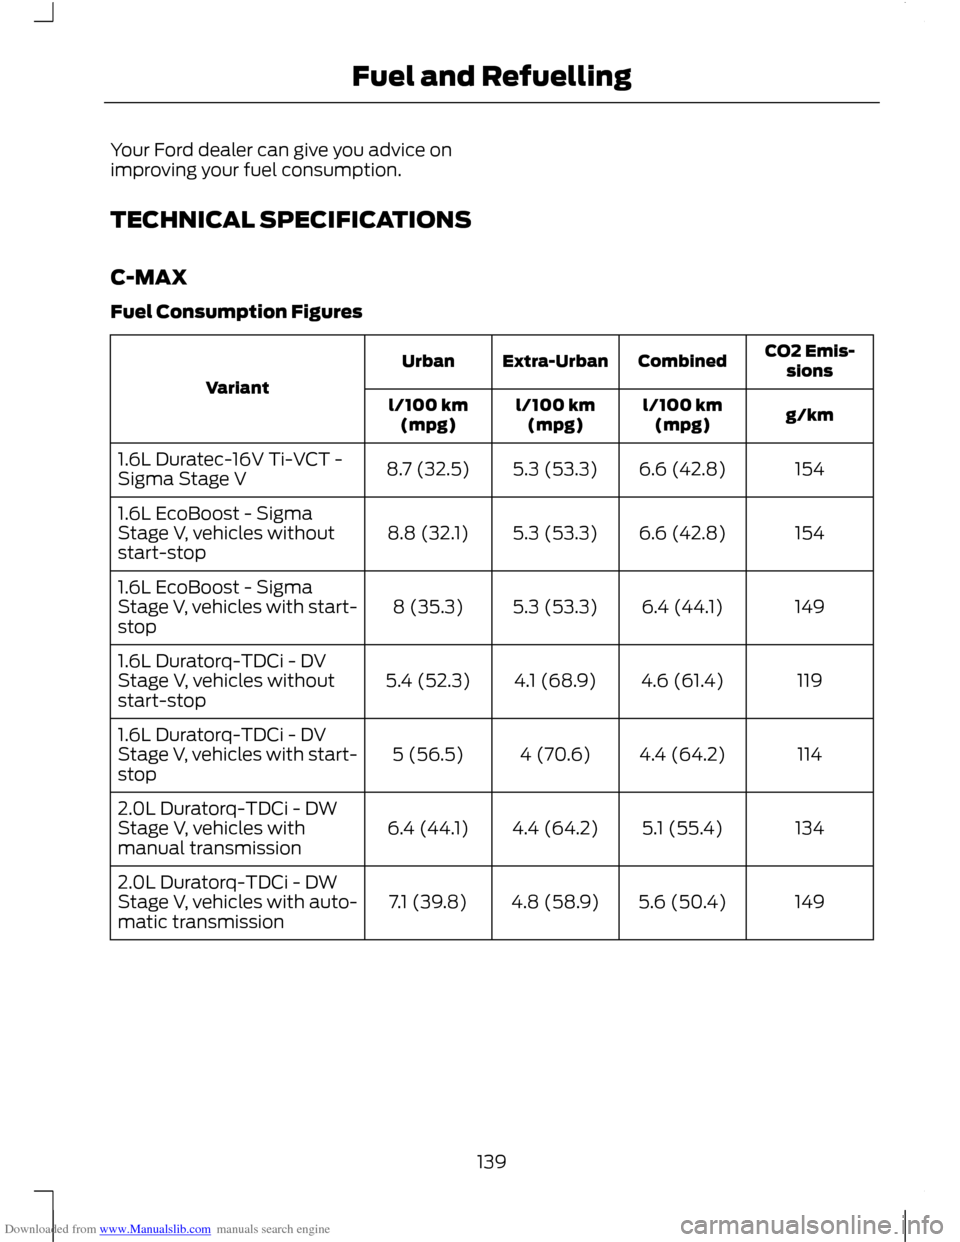
TECHNICAL SPECIFICATIONS
C-MAX
Fuel Consumption Figures
CO2 Emis-
sions
Combined
Extra-Urban
Urban
Variant g/km
l/100 km
(mpg)
l/100 km
(mpg)
l/100 km
(mpg)
154
6.6 (42.8)
5.3 (53.3)
8.7 (32.5)
1.6L Duratec-16V Ti-VCT -
Sigma Stage V
154
6.6 (42.8)
5.3 (53.3)
8.8 (32.1)
1.6L EcoBoost - Sigma
Stage V, vehicles without
start-stop
149
6.4 (44.1)
5.3 (53.3)
8 (35.3)
1.6L EcoBoost - Sigma
Stage V, vehicles with start-
stop
119
4.6 (61.4)
4.1 (68.9)
5.4 (52.3)
1.6L Duratorq-TDCi - DV
Stage V, vehicles without
start-stop
114
4.4 (64.2)
4 (70.6)
5 (56.5)
1.6L Duratorq-TDCi - DV
Stage V, vehicles with start-
stop
134
5.1 (55.4)
4.4 (64.2)
6.4 (44.1)
2.0L Duratorq-TDCi - DW
Stage V, vehicles with
manual transmission
149
5.6 (50.4)
4.8 (58.9)
7.1 (39.8)
2.0L Duratorq-TDCi - DW
Stage V, vehicles with auto-
matic transmission
139
Fuel and Refuelling
Page 142 of 296
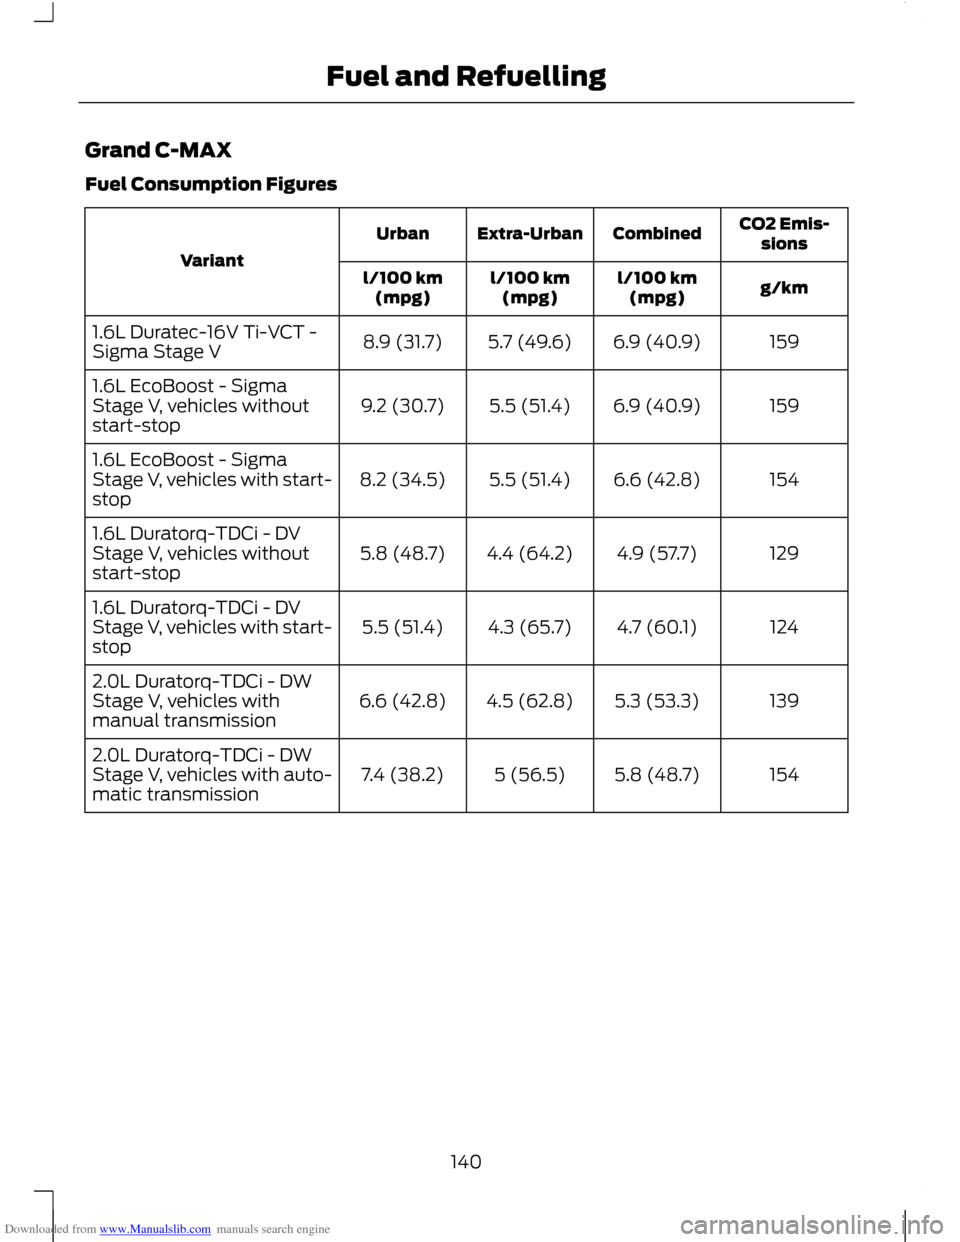
Downloaded from www.Manualslib.com manuals search engine Grand C-MAX
Fuel Consumption Figures
CO2 Emis-
sions
Combined
Extra-Urban
Urban
Variant g/km
l/100 km
(mpg)
l/100 km
(mpg)
l/100 km
(mpg)
159
6.9 (40.9)
5.7 (49.6)
8.9 (31.7)
1.6L Duratec-16V Ti-VCT -
Sigma Stage V
159
6.9 (40.9)
5.5 (51.4)
9.2 (30.7)
1.6L EcoBoost - Sigma
Stage V, vehicles without
start-stop
154
6.6 (42.8)
5.5 (51.4)
8.2 (34.5)
1.6L EcoBoost - Sigma
Stage V, vehicles with start-
stop
129
4.9 (57.7)
4.4 (64.2)
5.8 (48.7)
1.6L Duratorq-TDCi - DV
Stage V, vehicles without
start-stop
124
4.7 (60.1)
4.3 (65.7)
5.5 (51.4)
1.6L Duratorq-TDCi - DV
Stage V, vehicles with start-
stop
139
5.3 (53.3)
4.5 (62.8)
6.6 (42.8)
2.0L Duratorq-TDCi - DW
Stage V, vehicles with
manual transmission
154
5.8 (48.7)
5 (56.5)
7.4 (38.2)
2.0L Duratorq-TDCi - DW
Stage V, vehicles with auto-
matic transmission
140
Fuel and Refuelling
Page 143 of 296
Downloaded from www.Manualslib.com manuals search engine MANUAL TRANSMISSION
CAUTION
Do not engage reverse gear when the
vehicle is moving. This can cause
damage to the transmission.
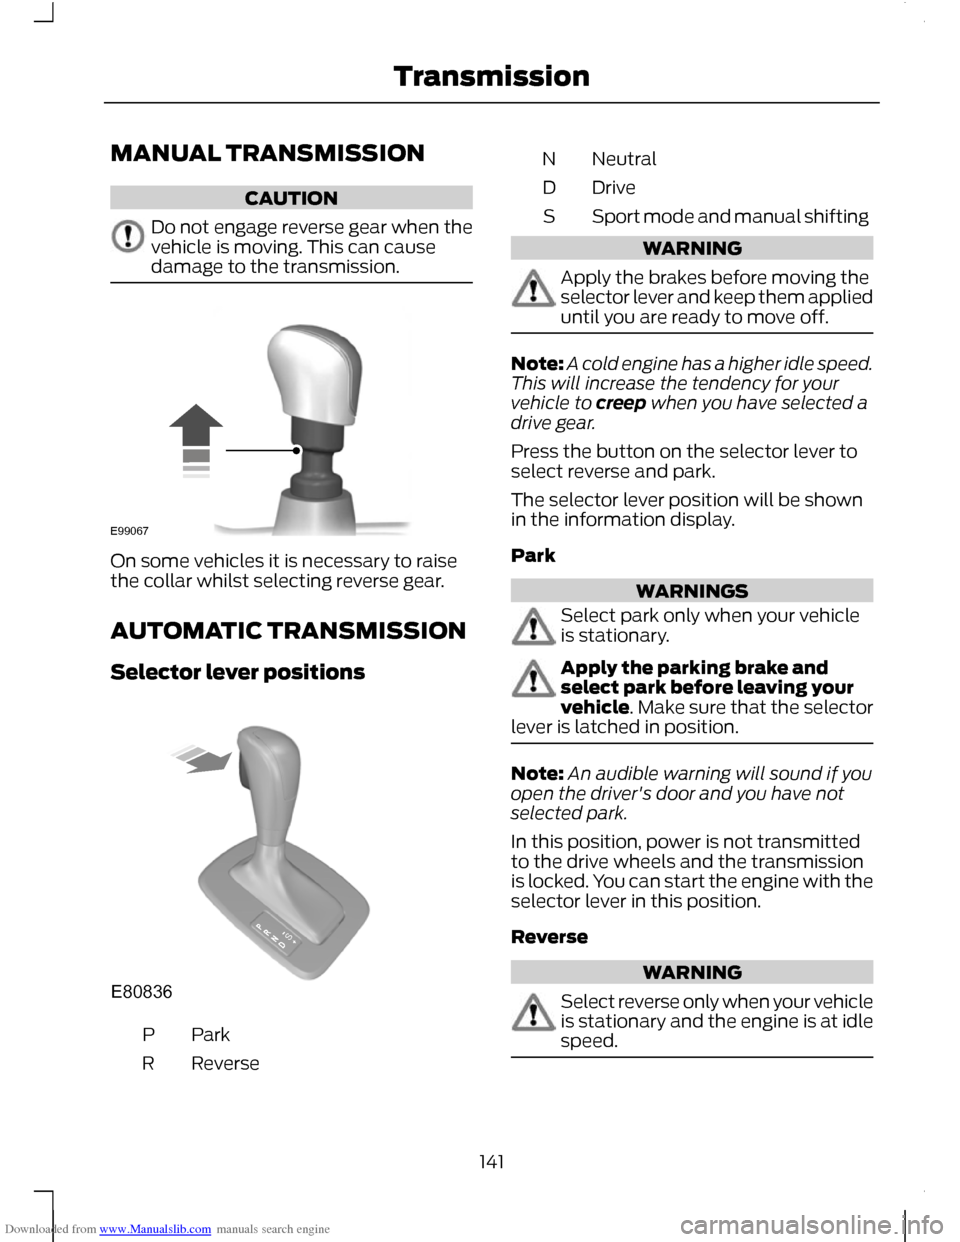
On some vehicles it is necessary to raise
the collar whilst selecting reverse gear.
AUTOMATIC TRANSMISSION
Selector lever positions
ParkP
Reverse
R Neutral
N
Drive
D
Sport mode and manual shifting
S WARNING
Apply the brakes before moving the
selector lever and keep them applied
until you are ready to move off.
Note:
A cold engine has a higher idle speed.
This will increase the tendency for your
vehicle to creep when you have selected a
drive gear.
Press the button on the selector lever to
select reverse and park.
The selector lever position will be shown
in the information display.
Park WARNINGS
Select park only when your vehicle
is stationary.
Apply the parking brake and
select park before leaving your
vehicle. Make sure that the selector
lever is latched in position. Note:
An audible warning will sound if you
open the driver's door and you have not
selected park.
In this position, power is not transmitted
to the drive wheels and the transmission
is locked. You can start the engine with the
selector lever in this position.
Reverse WARNING
Select reverse only when your vehicle
is stationary and the engine is at idle
speed.
141
TransmissionE99067 E80836S
Page 144 of 296
Downloaded from www.Manualslib.com manuals search engine Neutral
In this position, power is not transmitted
to the drive wheels but the transmission is
not locked. You can start the engine with
the selector lever in this position.
Drive
Select drive to shift automatically through
the forward gears.
The transmission will select the
appropriate gear for optimum performance
based on ambient temperature, road
gradient, vehicle load and driver input.
Manual shifting - Vehicles with a
5 speed transmission
WARNING
Do not hold the selector lever
permanently in – or +.
CAUTION
The transmission will automatically
downshift when the engine speed is
too low and upshift when too high.
Note:
A shift will occur only when the
vehicle speed and the engine speed are
appropriate.
Note: In Select mode the current gear (1,
2, 3, 4 or 5) will be displayed on the
instrument panel.
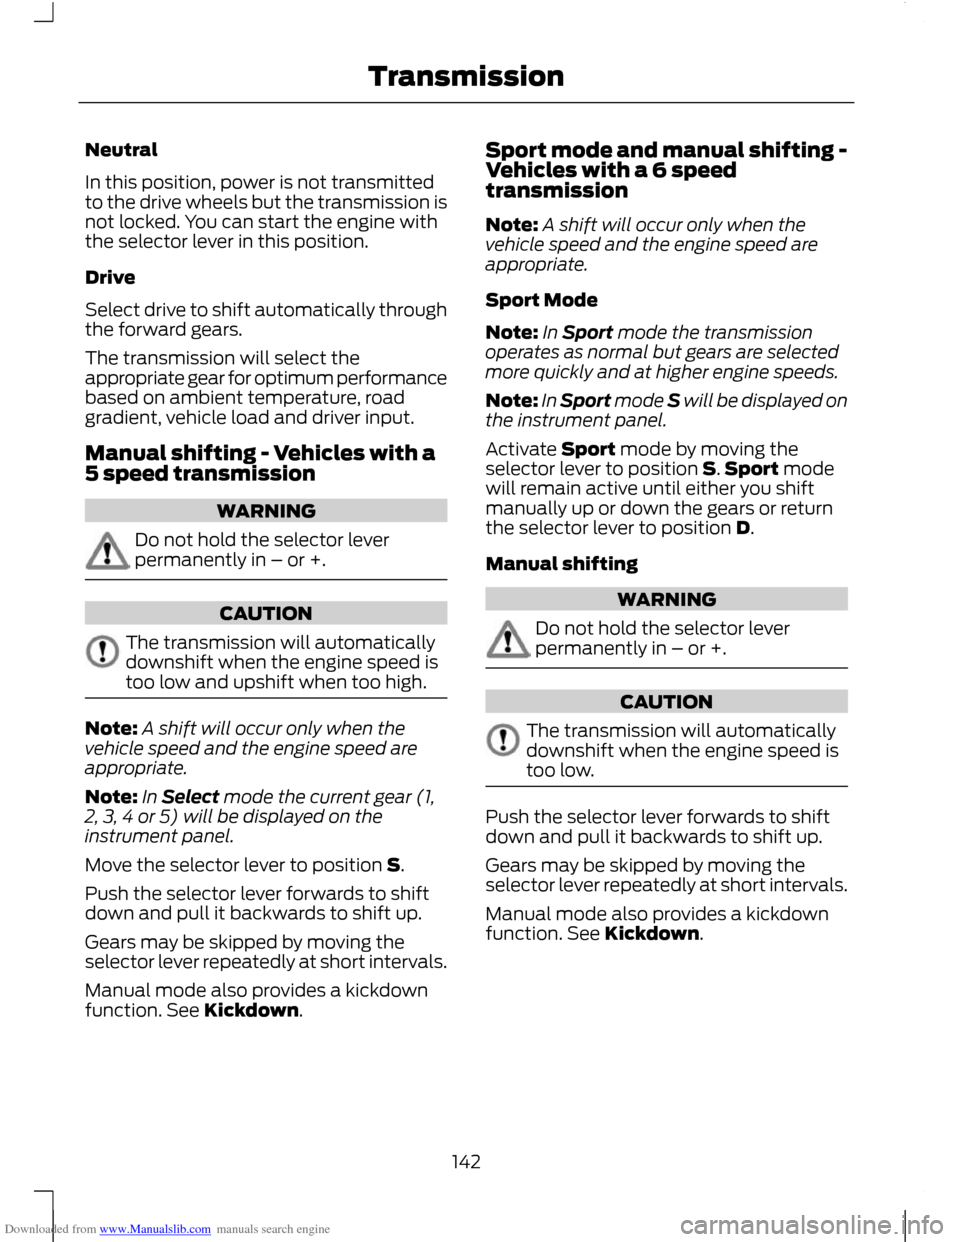
Move the selector lever to position S.
Push the selector lever forwards to shift
down and pull it backwards to shift up.
Gears may be skipped by moving the
selector lever repeatedly at short intervals.
Manual mode also provides a kickdown
function. See Kickdown. Sport mode and manual shifting -
Vehicles with a 6 speed
transmission
Note:
A shift will occur only when the
vehicle speed and the engine speed are
appropriate.
Sport Mode
Note: In Sport mode the transmission
operates as normal but gears are selected
more quickly and at higher engine speeds.
Note: In Sport mode S will be displayed on
the instrument panel.
Activate Sport mode by moving the
selector lever to position S. Sport mode
will remain active until either you shift
manually up or down the gears or return
the selector lever to position D.
Manual shifting WARNING
Do not hold the selector lever
permanently in – or +.
CAUTION
The transmission will automatically
downshift when the engine speed is
too low.
Push the selector lever forwards to shift
down and pull it backwards to shift up.
Gears may be skipped by moving the
selector lever repeatedly at short intervals.
Manual mode also provides a kickdown
function. See Kickdown.
142
Transmission
Page 145 of 296
Downloaded from www.Manualslib.com manuals search engine Hints on driving with an automatic
transmission
CAUTION
Do not idle the engine for long periods
of time in drive with the brakes
applied.
Moving off
1. Release the parking brake.
2.
Release the brake pedal and press the
accelerator pedal.
Stopping
1. Release the accelerator pedal and press the brake pedal.
2. Apply the parking brake.
3. Select neutral or park.
Kickdown
Press the accelerator pedal fully with the
selector lever in the drive position to select
the next lowest gear for optimum
performance. Release the accelerator
pedal when you no longer require
kickdown.
Emergency park position release
lever
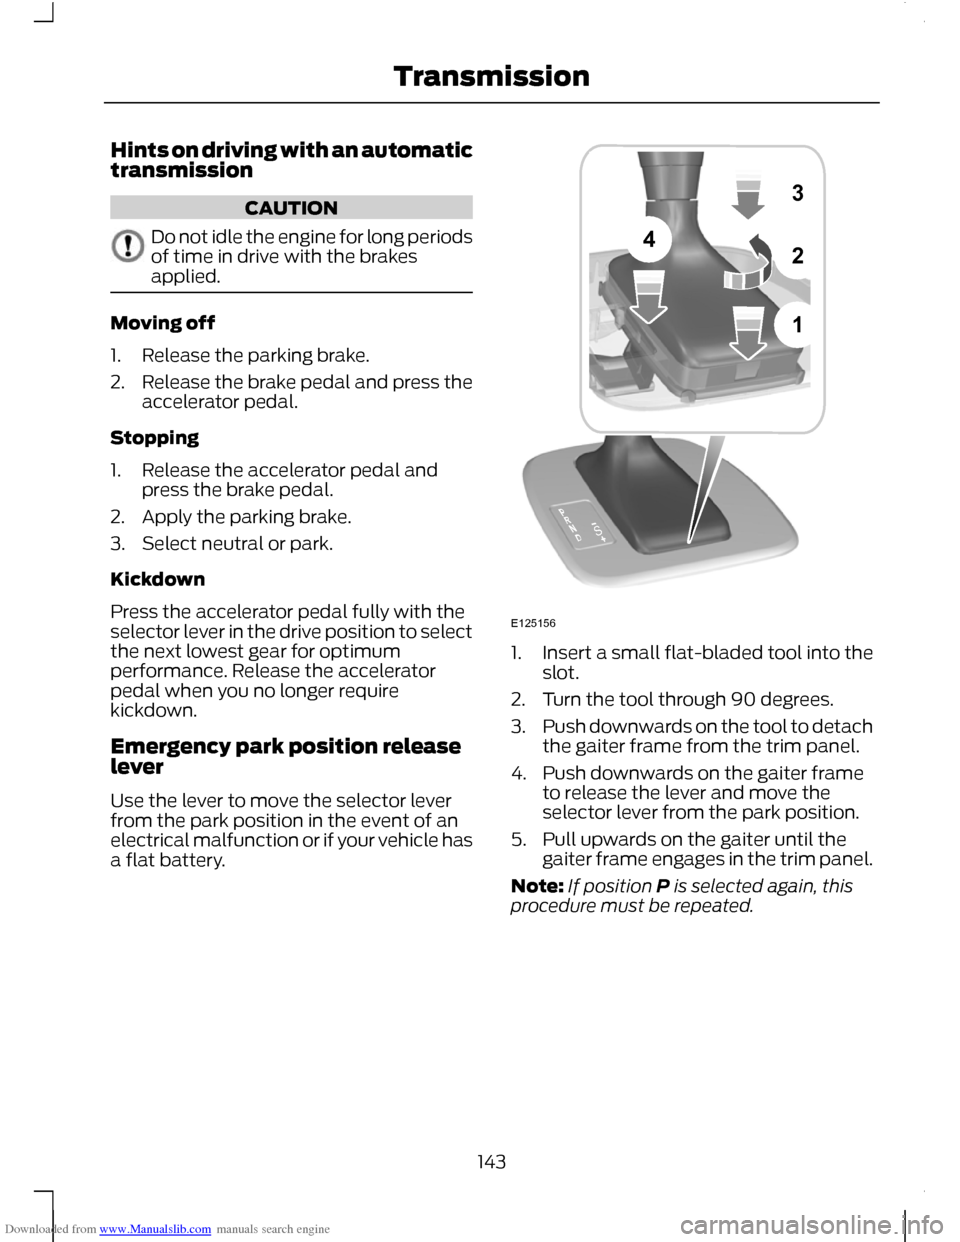
Use the lever to move the selector lever
from the park position in the event of an
electrical malfunction or if your vehicle has
a flat battery. 1.
Insert a small flat-bladed tool into the
slot.
2. Turn the tool through 90 degrees.
3. Push downwards on the tool to detach
the gaiter frame from the trim panel.
4. Push downwards on the gaiter frame to release the lever and move the
selector lever from the park position.
5. Pull upwards on the gaiter until the gaiter frame engages in the trim panel.
Note: If position P is selected again, this
procedure must be repeated.
143
Transmission1324SE125156
Page 146 of 296
Downloaded from www.Manualslib.com manuals search engine PRINCIPLE OF OPERATION
Note:
Depending on applicable laws and
regulations in the country for which your
vehicle was originally built, the brake lamps
may flash if you brake heavily.
Note: Occasional brake noise is normal and
often does not indicate a concern. In normal
operation, the system may emit occasional
or intermittent squeal or groan noises when
the brakes are applied. Such noises are
usually caused by environmental conditions
such as cold, heat, moisture, road dust, salt
or mud.
Disc brakes
Wet brake discs result in reduced braking
efficiency. Dab the brake pedal when
driving from a car wash to remove the film
of water.
ABS WARNING
The ABS does not relieve you of your
responsibility to drive with due care
and attention.
The ABS helps you to maintain full steering
and directional stability when you brake
heavily in an emergency, by preventing the
road wheels from locking.
HINTS ON DRIVING WITH
ANTI-LOCK BRAKES
When the ABS is operating, the brake pedal
will pulse. This is normal. Maintain pressure
on the brake pedal.
The ABS will not eliminate the dangers
inherent when:
•
you drive too close to the vehicle in
front of you.
• the vehicle is aquaplaning. •
you take corners too fast.
• the road surface is poor.
PARKING BRAKE WARNING
Vehicles with an automatic
transmission should always be left
with the selector lever in position P
(Park). •
Press the foot brake pedal firmly.
• Pull the parking brake lever up smartly
to its fullest extent.
• Do not press the release button while
pulling the lever up.
• If your vehicle is parked on a hill and
facing uphill, select first gear or P
(Park) and turn the steering wheel
away from the kerb.
• If your vehicle is parked on a hill and
facing downhill, select reverse gear or
P (Park) and turn the steering wheel
towards the kerb.
To release the parking brake, press the
brake pedal firmly, pull the lever up slightly,
depress the release button and push the
lever down.
144
Brakes
Page 147 of 296
Downloaded from www.Manualslib.com manuals search engine PRINCIPLE OF OPERATION
Electronic stability programme
(ESP)
WARNING
ESP does not relieve you of your
responsibility to drive with due care
and attention.
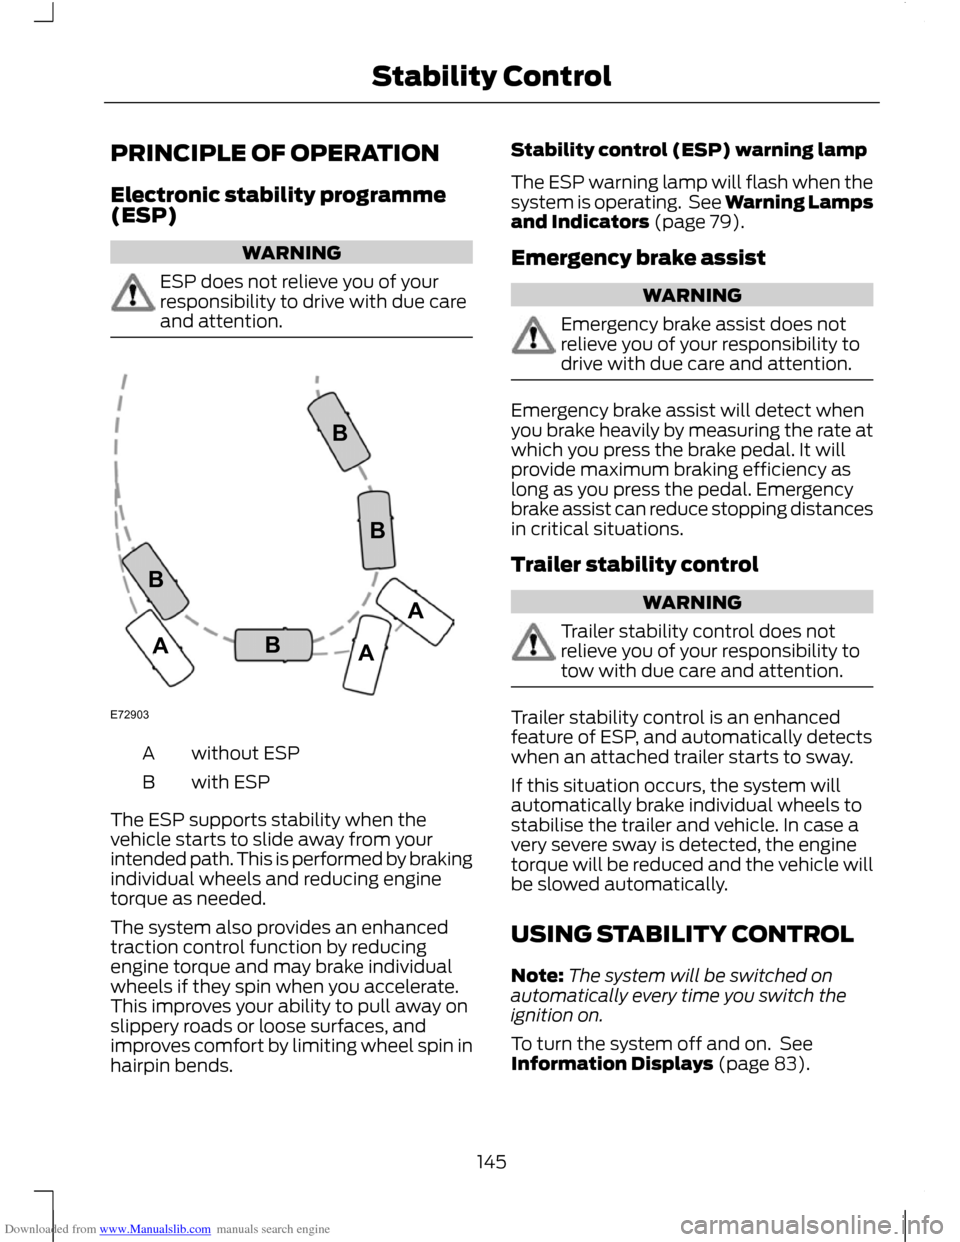
without ESP
A
with ESP
B
The ESP supports stability when the
vehicle starts to slide away from your
intended path. This is performed by braking
individual wheels and reducing engine
torque as needed.
The system also provides an enhanced
traction control function by reducing
engine torque and may brake individual
wheels if they spin when you accelerate.
This improves your ability to pull away on
slippery roads or loose surfaces, and
improves comfort by limiting wheel spin in
hairpin bends. Stability control (ESP) warning lamp
The ESP warning lamp will flash when the
system is operating. See Warning Lamps
and Indicators (page 79).
Emergency brake assist
WARNING
Emergency brake assist does not
relieve you of your responsibility to
drive with due care and attention.
Emergency brake assist will detect when
you brake heavily by measuring the rate at
which you press the brake pedal. It will
provide maximum braking efficiency as
long as you press the pedal. Emergency
brake assist can reduce stopping distances
in critical situations.
Trailer stability control
WARNING
Trailer stability control does not
relieve you of your responsibility to
tow with due care and attention.
Trailer stability control is an enhanced
feature of ESP, and automatically detects
when an attached trailer starts to sway.
If this situation occurs, the system will
automatically brake individual wheels to
stabilise the trailer and vehicle. In case a
very severe sway is detected, the engine
torque will be reduced and the vehicle will
be slowed automatically.
USING STABILITY CONTROL
Note:
The system will be switched on
automatically every time you switch the
ignition on.
To turn the system off and on. See
Information Displays (page 83).
145
Stability ControlE72903AAABBBB
Page 148 of 296
Downloaded from www.Manualslib.com manuals search engine PRINCIPLE OF OPERATION
The system makes it easier to pull away
when the vehicle is on a slope without the
need to use the parking brake.
When the system is active, the vehicle will
remain stationary on the slope for a short
time after you release the brake pedal.
During this time, you have time to move
your foot from the brake to the accelerator
pedal and pull away. The brakes are
released automatically once the engine
has developed sufficient drive to prevent
the vehicle from rolling down the slope.
This is an advantage when pulling away
on a slope, for example from a car park
ramp, traffic lights or when reversing uphill
into a parking space.
WARNING
The system does not replace the
parking brake. When you leave the
vehicle, always apply the parking
brake and select first or reverse gear. USING HILL START ASSIST
The system is activated automatically
when you stop your vehicle on a slope
greater than 3%. The system operates with
the vehicle facing downhill if reverse gear
is selected and with the vehicle facing
uphill if any forward gear is selected.
Vehicles with manual
transmission only
The system can be switched on and off
using the information display. See General
Information (page 83).
Activating the system
WARNINGS
You must remain in the vehicle once
you have activated the system. WARNINGS
At all times you are responsible for
controlling the vehicle, supervising
the system and intervening, if
required. If a malfunction is detected when the
system is active, the system will be
deactivated and a message will be
shown in the display. See Information
Messages (page 90). You can activate the system only if the
following conditions have been met:
•
The engine is running.
• The system is switched on.
• On vehicles with manual transmission,
the clutch pedal is pressed.
• No failure mode is present.
To activate the system:
1. Press the brake pedal to bring the vehicle to a complete standstill. Keep
the brake pedal depressed.
2. If the sensors detect that the vehicle is
on a slope the system will be activated
automatically.
3. When you remove your foot from the brake pedal, the vehicle will remain on
the slope without rolling away for a
short time. This hold time will
automatically be extended if you are
in the process of driving off.
4. Drive off in the normal manner. The brakes will be released automatically.
Deactivating the system
To deactivate the system, perform one of
the following:
146
Hill Start Assist
Page 149 of 296
Downloaded from www.Manualslib.com manuals search engine •
Wait for a short time until the system
deactivates automatically.
• If a forward gear was selected when
the system became active, select
reverse gear.
• If reverse gear was selected when the
system became active, select a
forward gear.
147
Hill Start Assist
Page 150 of 296
Downloaded from www.Manualslib.com manuals search engine PRINCIPLE OF OPERATION
WARNING
The system does not relieve you of
your responsibility to drive with due
care and attention.
CAUTIONS
Vehicles fitted with a trailer tow
module not approved by us may not
correctly detect obstacles.
The sensors may not detect objects
in heavy rain or other conditions that
cause disruptive reflections.
The sensors may not detect objects
with surfaces that absorb ultrasonic
waves.
The parking aid does not detect
obstacles moving away from the
vehicle. They will only be detected
shortly after they start to move towards
the vehicle again. If you use a high pressure spray to
wash your vehicle, only spray the
sensors briefly from a distance not
less than 20 centimetres (8 inches). Parking aid sends tones via the audio
system fitted and approved by us. If
this is not working the parking aid
system will not work. Note:
On vehicles fitted with a tow ball
arm, the rear parking aid is deactivated
automatically when any trailer lamps (or
lighting boards) are connected to the 13-pin
socket via a trailer tow module we have
approved.
Note: Keep the sensors free from dirt, ice
and snow. Do not clean with sharp objects.
Note: The parking aid may emit false tones
if it detects a signal using the same
frequency as the sensors or if the vehicle is
fully laden. Note:
The outer sensors may detect the
side walls of a garage. If the distance
between the outer sensor and the side wall
remains constant for three seconds, the
tone will switch off. As you continue, the
inner sensors will detect rearward objects.
USING THE PARKING AID -
VEHICLES WITH: REAR
PARKING AID WARNING
The parking aid does not relieve you
of your responsibility to drive with
due care and attention.
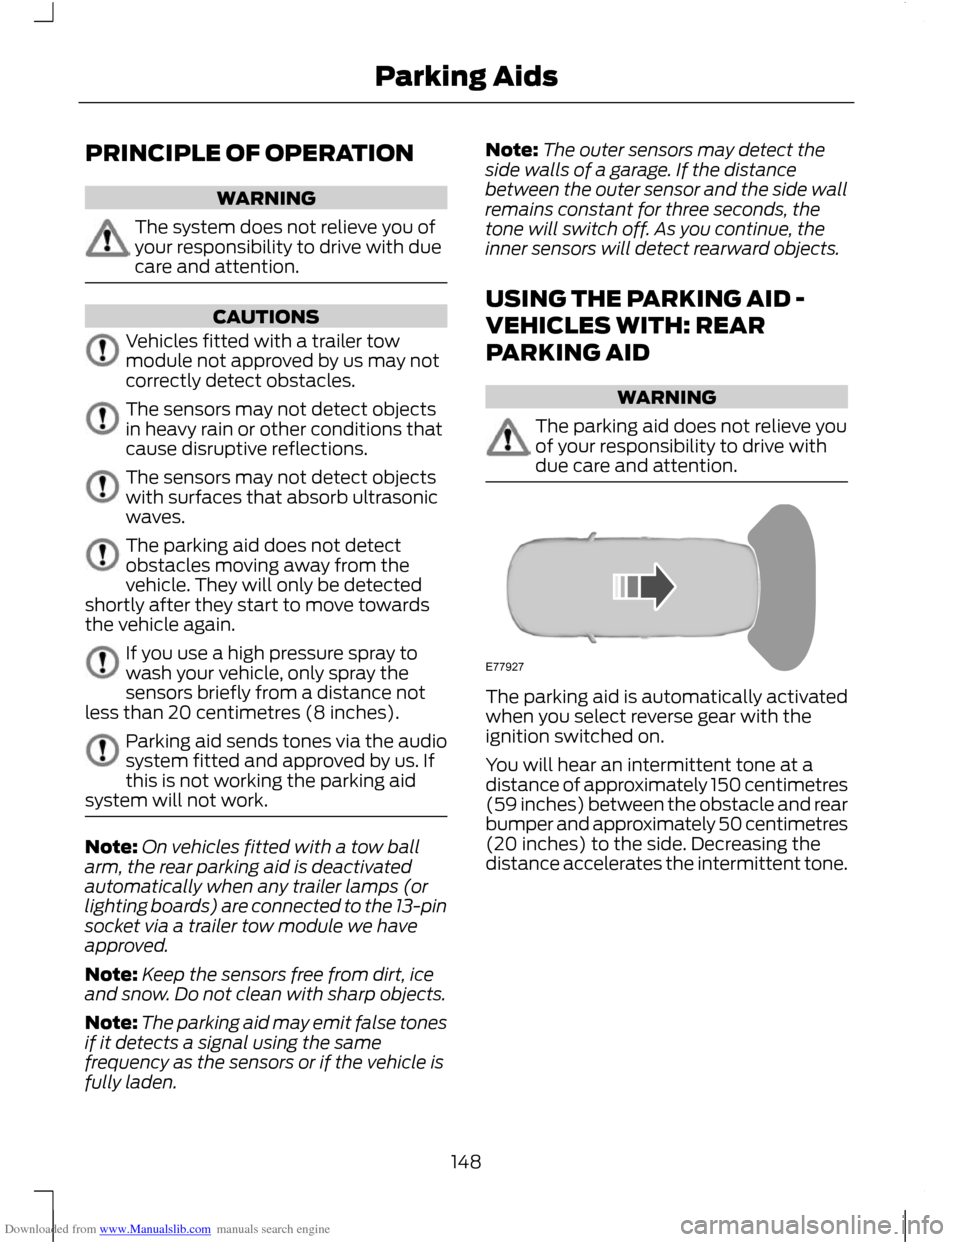
The parking aid is automatically activated
when you select reverse gear with the
ignition switched on.
You will hear an intermittent tone at a
distance of approximately 150 centimetres
(59 inches) between the obstacle and rear
bumper and approximately 50 centimetres
(20 inches) to the side. Decreasing the
distance accelerates the intermittent tone.
148
Parking AidsE77927