FORD C MAX 2011 2.G Owners Manual
Manufacturer: FORD, Model Year: 2011, Model line: C MAX, Model: FORD C MAX 2011 2.GPages: 296, PDF Size: 7.87 MB
Page 151 of 296
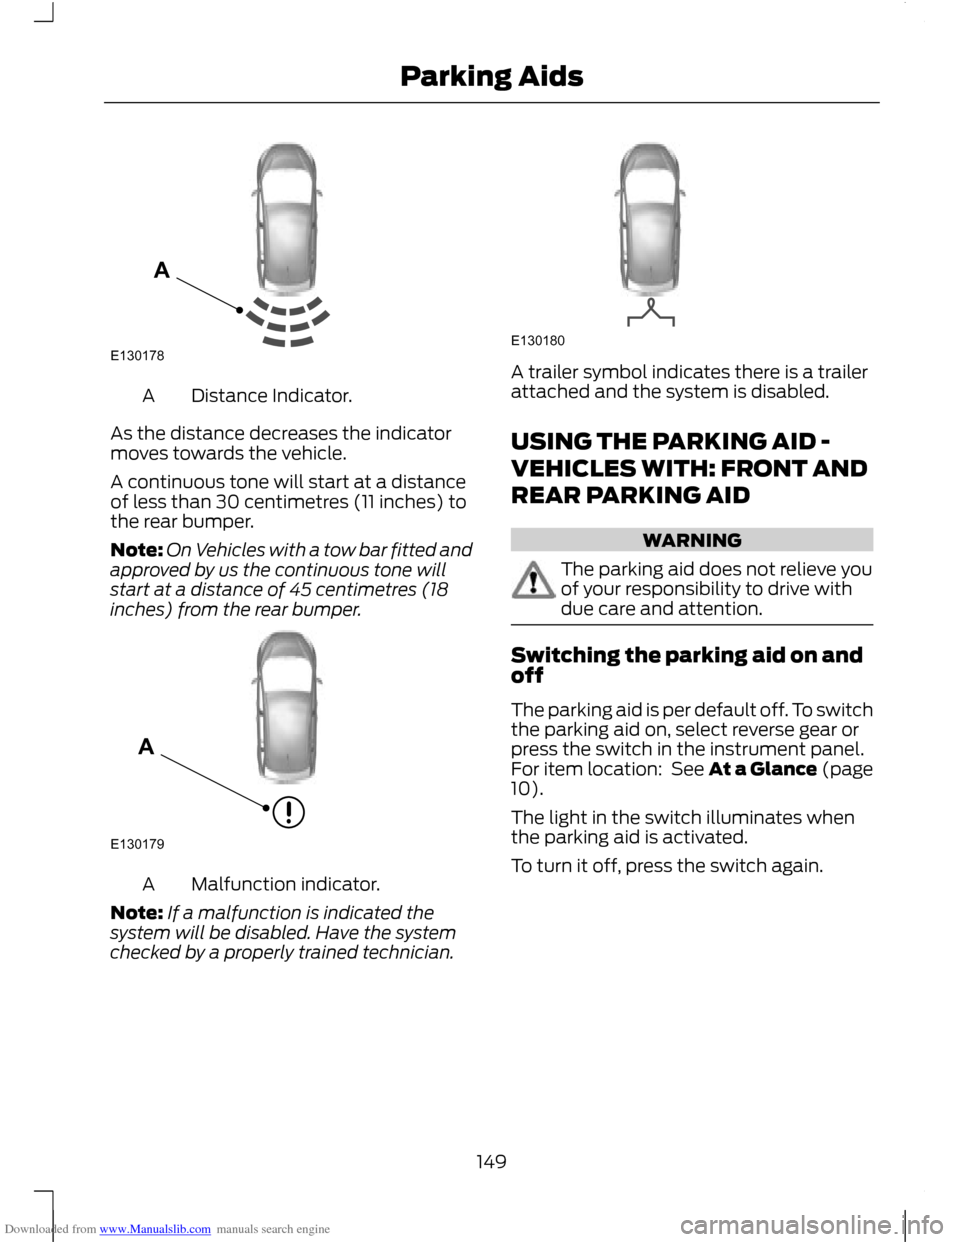
Downloaded from www.Manualslib.com manuals search engine Distance Indicator.
A
As the distance decreases the indicator
moves towards the vehicle.
A continuous tone will start at a distance
of less than 30 centimetres (11 inches) to
the rear bumper.
Note: On Vehicles with a tow bar fitted and
approved by us the continuous tone will
start at a distance of 45 centimetres (18
inches) from the rear bumper. Malfunction indicator.
A
Note: If a malfunction is indicated the
system will be disabled. Have the system
checked by a properly trained technician. A trailer symbol indicates there is a trailer
attached and the system is disabled.
USING THE PARKING AID -
VEHICLES WITH: FRONT AND
REAR PARKING AID
WARNING
The parking aid does not relieve you
of your responsibility to drive with
due care and attention.
Switching the parking aid on and
off
The parking aid is per default off. To switch
the parking aid on, select reverse gear or
press the switch in the instrument panel.
For item location: See At a Glance (page
10).
The light in the switch illuminates when
the parking aid is activated.
To turn it off, press the switch again.
149
Parking AidsE130178A E130179A E130180
Page 152 of 296
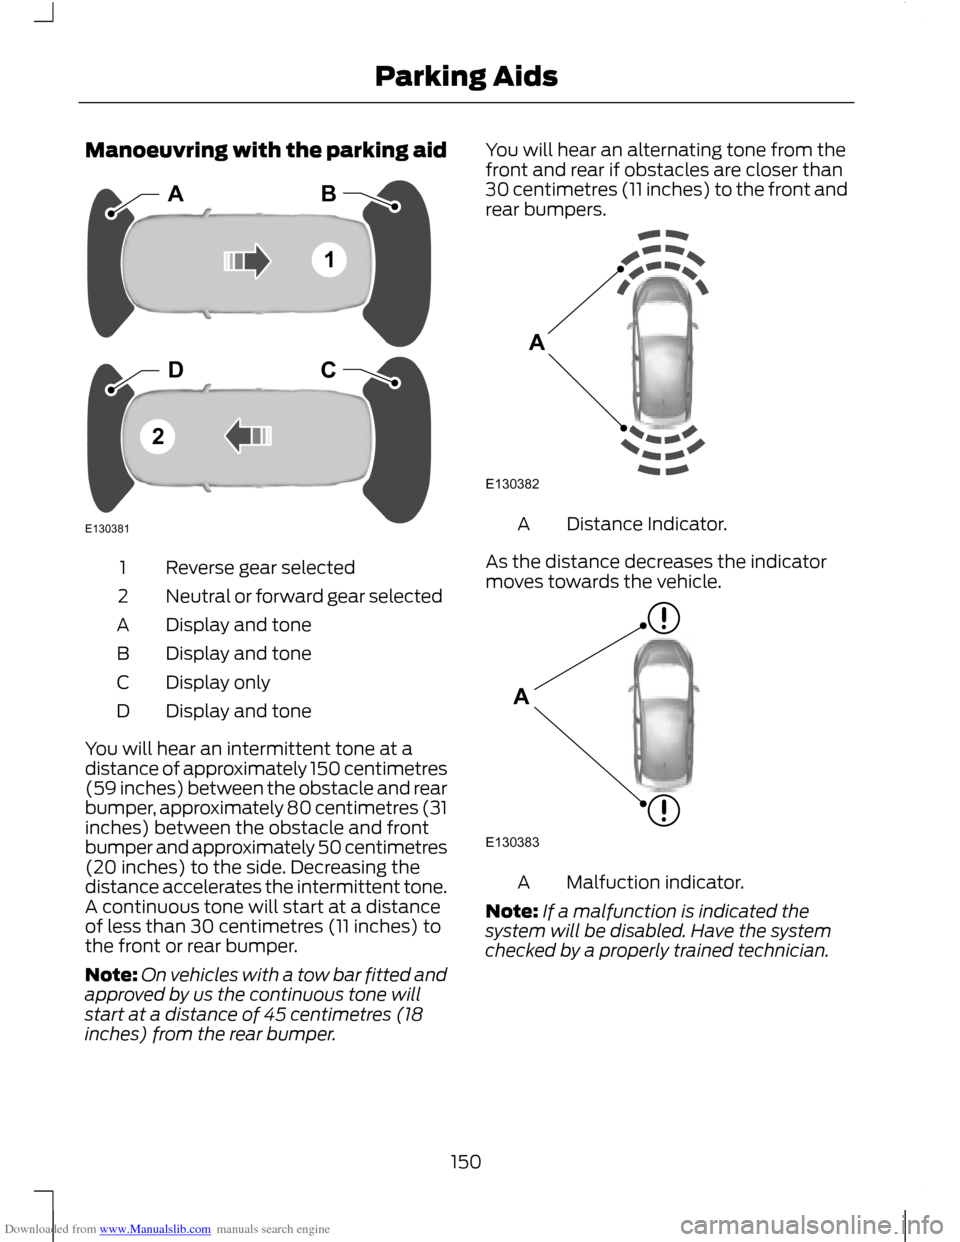
Downloaded from www.Manualslib.com manuals search engine Manoeuvring with the parking aid
Reverse gear selected
1
Neutral or forward gear selected
2
Display and tone
A
Display and tone
B
Display only
C
Display and tone
D
You will hear an intermittent tone at a
distance of approximately 150 centimetres
(59 inches) between the obstacle and rear
bumper, approximately 80 centimetres (31
inches) between the obstacle and front
bumper and approximately 50 centimetres
(20 inches) to the side. Decreasing the
distance accelerates the intermittent tone.
A continuous tone will start at a distance
of less than 30 centimetres (11 inches) to
the front or rear bumper.
Note: On vehicles with a tow bar fitted and
approved by us the continuous tone will
start at a distance of 45 centimetres (18
inches) from the rear bumper. You will hear an alternating tone from the
front and rear if obstacles are closer than
30 centimetres (11 inches) to the front and
rear bumpers.
Distance Indicator.
A
As the distance decreases the indicator
moves towards the vehicle. Malfuction indicator.
A
Note: If a malfunction is indicated the
system will be disabled. Have the system
checked by a properly trained technician.
150
Parking AidsE130381ABDC12 E130382A E130383A
Page 153 of 296
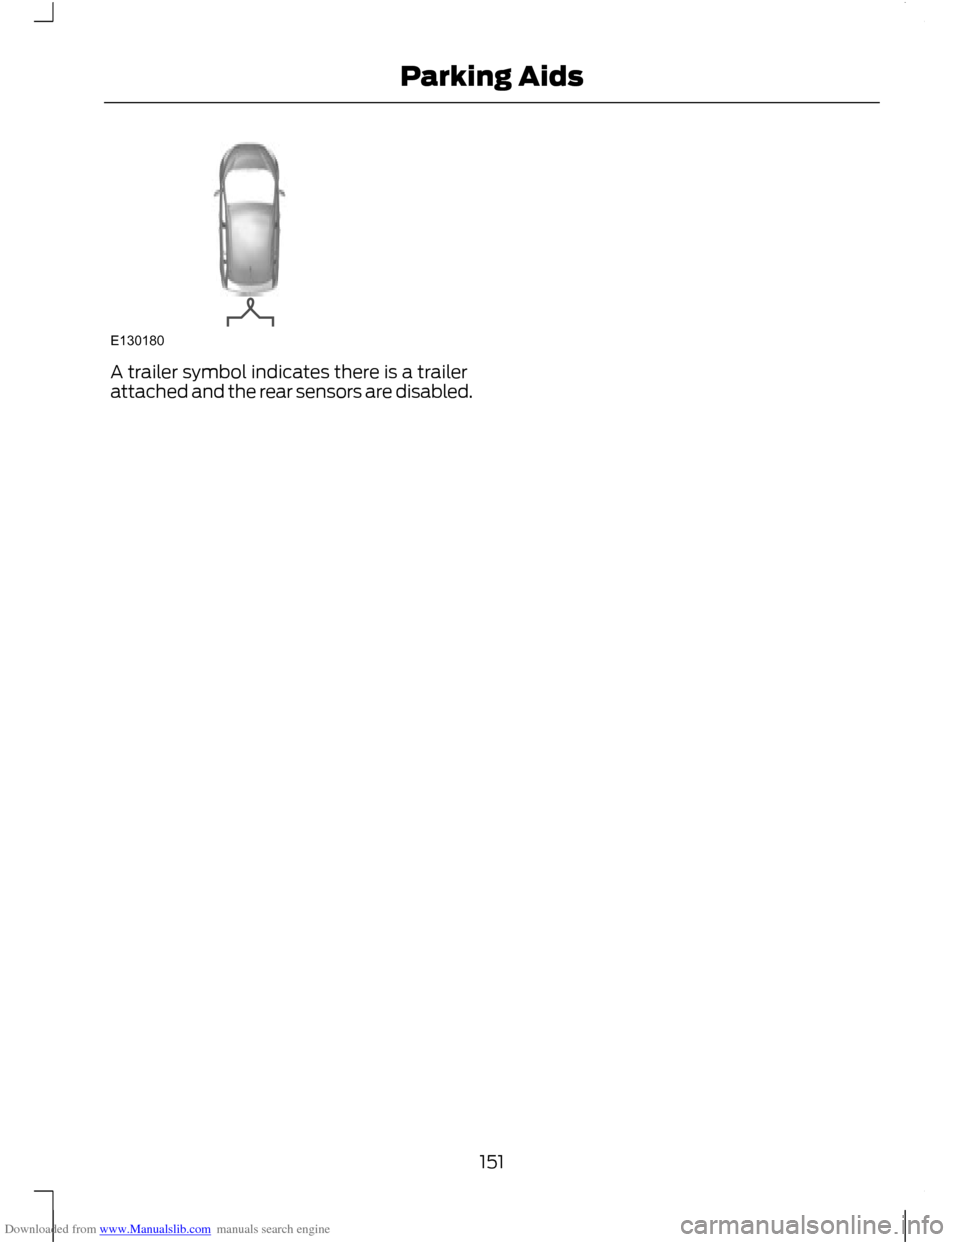
Downloaded from www.Manualslib.com manuals search engine A trailer symbol indicates there is a trailer
attached and the rear sensors are disabled.
151
Parking AidsE130180
Page 154 of 296
Downloaded from www.Manualslib.com manuals search engine PRINCIPLE OF OPERATION
WARNINGS
The system does not relieve you of
your responsibility to drive with due
care and attention.
At all times you are responsible for
controlling the vehicle, supervising
the system and intervening if
required. You must observe that the selected
space remains clear of obstructions
at all times in the manoeuver.
Vehicles with overhanging loads,
street furniture and other items may
not be detected by the system. You
must make sure that the selected space
is suitable for parking. Do not use the system if a trailer is
attached to the vehicle.
Do not use the system if a bike rack
is attached to the back of the vehicle.
Do not use the system if an
overhanging item is attached to the
roof.
If the manoeuvre is interrupted
before completion, the system will
be disabled. The steering wheel
position will not indicate the true position
of the steering and you will have to take
control of the vehicle. Make sure that loose clothing, your
hands or your arms do not get caught
in the rotating steering wheel. The system will detect a suitable parallel
parking space and steer the vehicle into
the space. The system controls the
steering while the driver controls the
accelerator, transmission and brakes. The
manoeuvre can be stopped at any time by
holding the steering wheel or pressing the
active park assist switch. See At a Glance
(page 10).
The system will visually and audibly
instruct the driver throughout the
procedure to safely park the vehicle.
USING ACTIVE PARK ASSIST
CAUTIONS
The sensors may not detect objects
in heavy rain or other conditions that
cause disruptive reflections.
The sensors may not detect objects
with surfaces that absorb ultrasonic
waves.
The sensors may not detect the kerb.
Note:
If the traction control system is
disabled active park assist will not be
available. See General Information (page
83).
The system will not align the vehicle
correctly if:
• a spare tyre, or a tyre worn significantly
more than the other tyres is used
• the factory installed tyre size is not
used on the vehicle
• the tyres skid
• you allow the vehicle to roll
• the weather conditions are poor (heavy
rain, snow, fog, etc).
152
Active Park Assist
Page 155 of 296
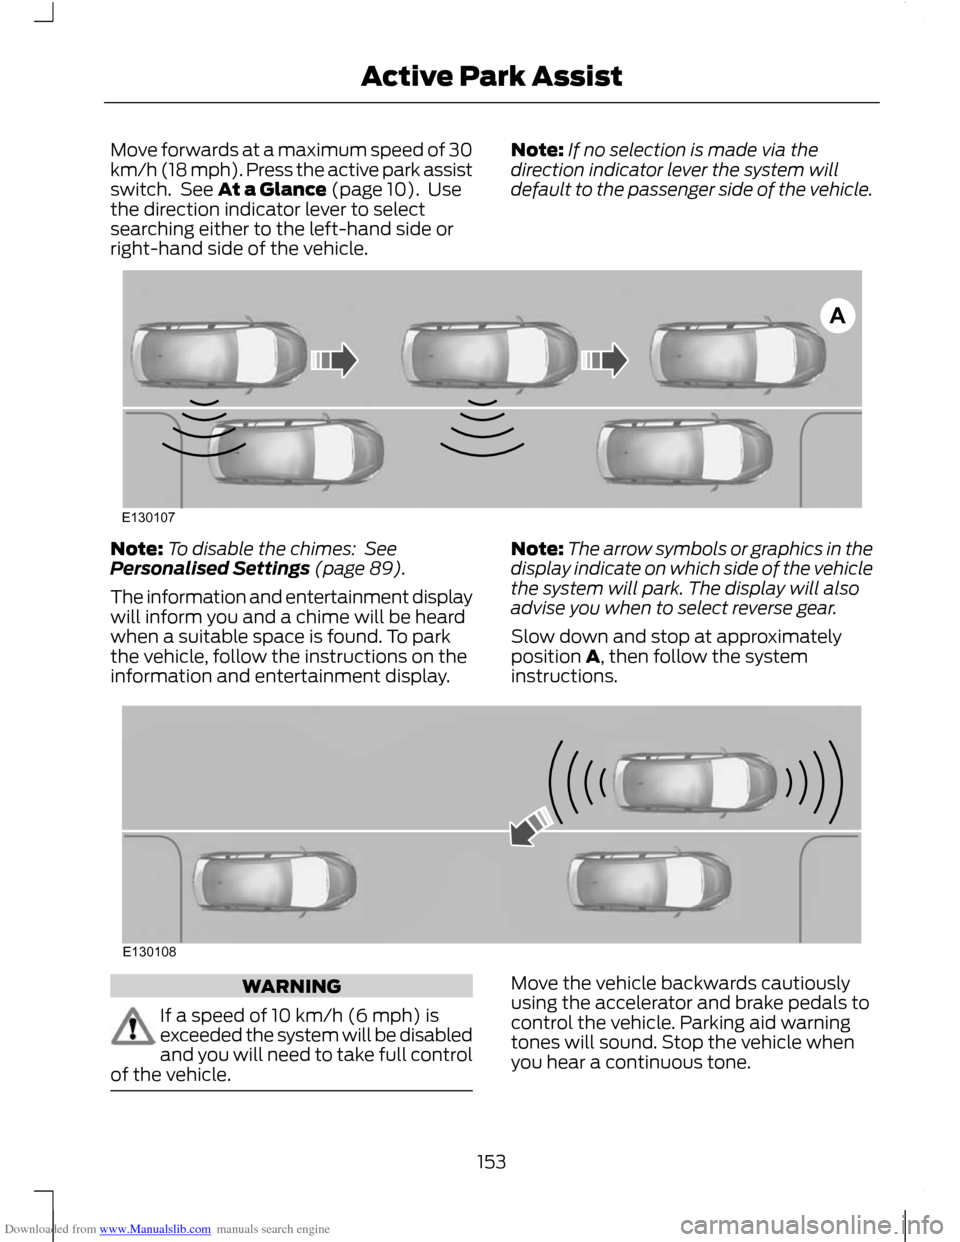
Downloaded from www.Manualslib.com manuals search engine Move forwards at a maximum speed of 30
km/h (18 mph). Press the active park assist
switch. See At a Glance (page 10). Use
the direction indicator lever to select
searching either to the left-hand side or
right-hand side of the vehicle.
Note:
If no selection is made via the
direction indicator lever the system will
default to the passenger side of the vehicle. Note:
To disable the chimes: See
Personalised Settings (page 89).
The information and entertainment display
will inform you and a chime will be heard
when a suitable space is found. To park
the vehicle, follow the instructions on the
information and entertainment display. Note:
The arrow symbols or graphics in the
display indicate on which side of the vehicle
the system will park. The display will also
advise you when to select reverse gear.
Slow down and stop at approximately
position A, then follow the system
instructions. WARNING
If a speed of 10 km/h (6 mph) is
exceeded the system will be disabled
and you will need to take full control
of the vehicle. Move the vehicle backwards cautiously
using the accelerator and brake pedals to
control the vehicle. Parking aid warning
tones will sound. Stop the vehicle when
you hear a continuous tone.
153
Active Park AssistAE130107 E130108
Page 156 of 296
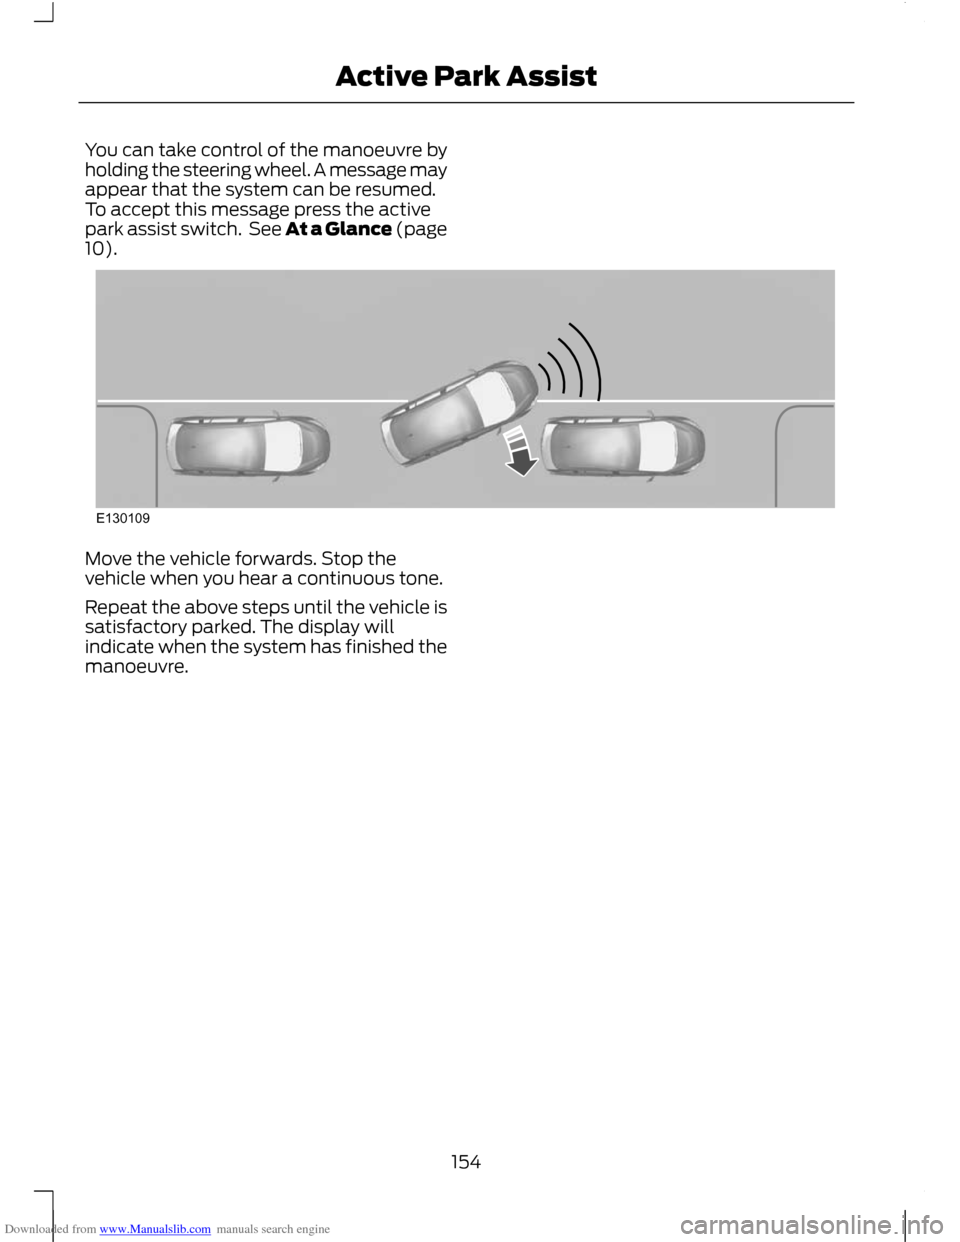
Downloaded from www.Manualslib.com manuals search engine You can take control of the manoeuvre by
holding the steering wheel. A message may
appear that the system can be resumed.
To accept this message press the active
park assist switch. See At a Glance (page
10).
Move the vehicle forwards. Stop the
vehicle when you hear a continuous tone.
Repeat the above steps until the vehicle is
satisfactory parked. The display will
indicate when the system has finished the
manoeuvre.
154
Active Park AssistE130109
Page 157 of 296
Downloaded from www.Manualslib.com manuals search engine PRINCIPLE OF OPERATION
The camera is a visual aid for use when
reversing.
WARNING
The system does not relieve you of
your responsibility to drive with due
care and attention.
CAUTIONS
If you use a high pressure spray to
wash your vehicle, only spray the
camera briefly from a distance not
less than 20 centimetres (8 inches). Do not apply pressure to the camera.
Note:
Keep the camera free from dirt, ice
and snow. Do not clean with sharp objects,
degreaser, wax or organic products. Use only
a soft cloth.
During operation, guide lines appear in the
display which represent your vehicle's path
and approximate distance from rearward
objects.
USING THE REAR VIEW
CAMERA WARNINGS
The operation of the camera may
vary depending on the ambient
temperature, vehicle and road
conditions. The distances shown in the display
may differ from the actual distance.
Do not place objects in front of the
camera.
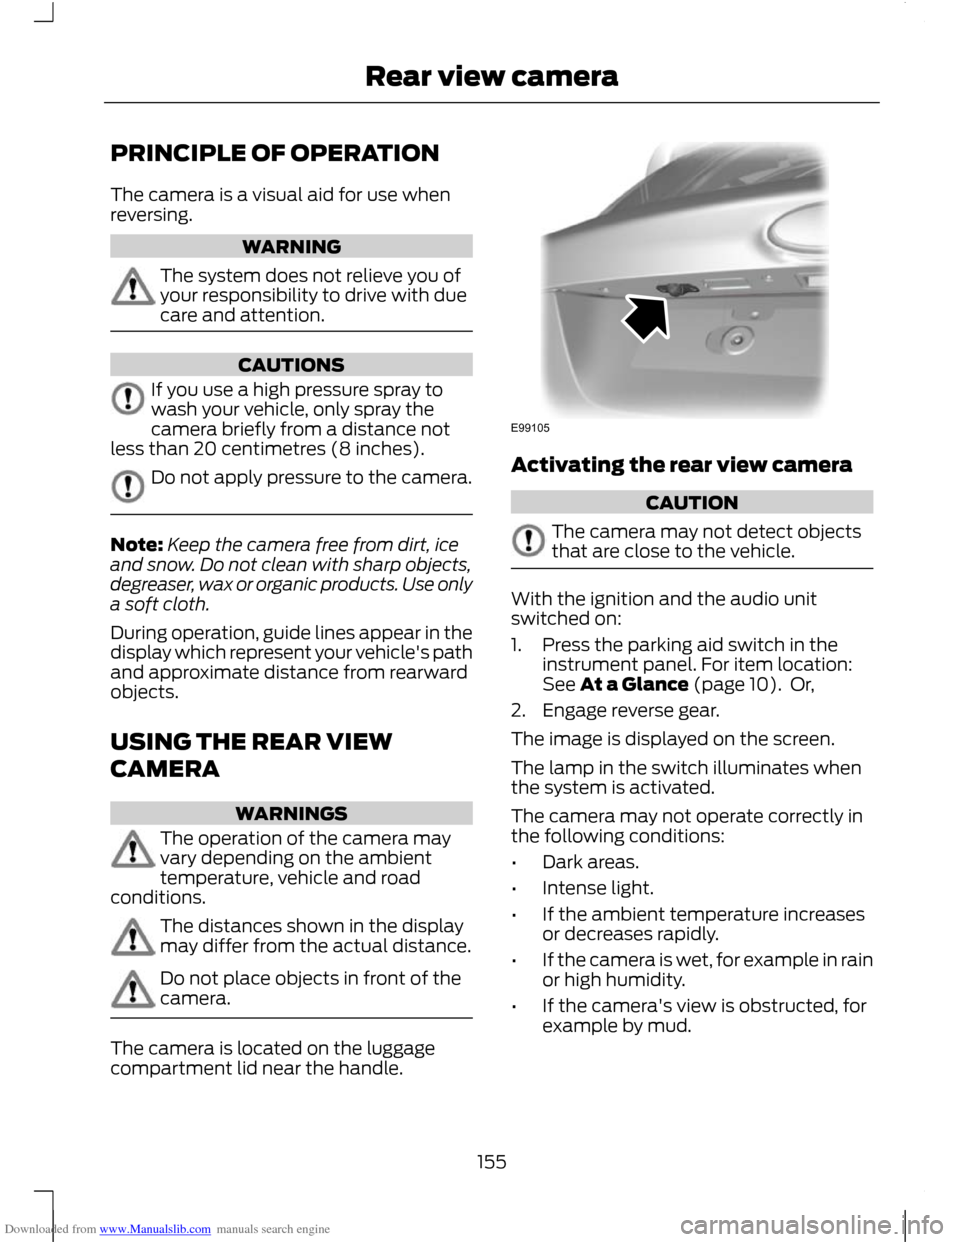
The camera is located on the luggage
compartment lid near the handle. Activating the rear view camera
CAUTION
The camera may not detect objects
that are close to the vehicle.
With the ignition and the audio unit
switched on:
1. Press the parking aid switch in the
instrument panel. For item location:
See At a Glance (page 10). Or,
2. Engage reverse gear.
The image is displayed on the screen.
The lamp in the switch illuminates when
the system is activated.
The camera may not operate correctly in
the following conditions:
• Dark areas.
• Intense light.
• If the ambient temperature increases
or decreases rapidly.
• If the camera is wet, for example in rain
or high humidity.
• If the camera's view is obstructed, for
example by mud.
155
Rear view cameraE99105
Page 158 of 296
Downloaded from www.Manualslib.com manuals search engine Using the display
CAUTIONS
Obstacles above the camera position
will not be shown. Inspect the area
behind your vehicle if necessary.
Marks are for general guidance only,
and are calculated for vehicles in
maximum load conditions on an even
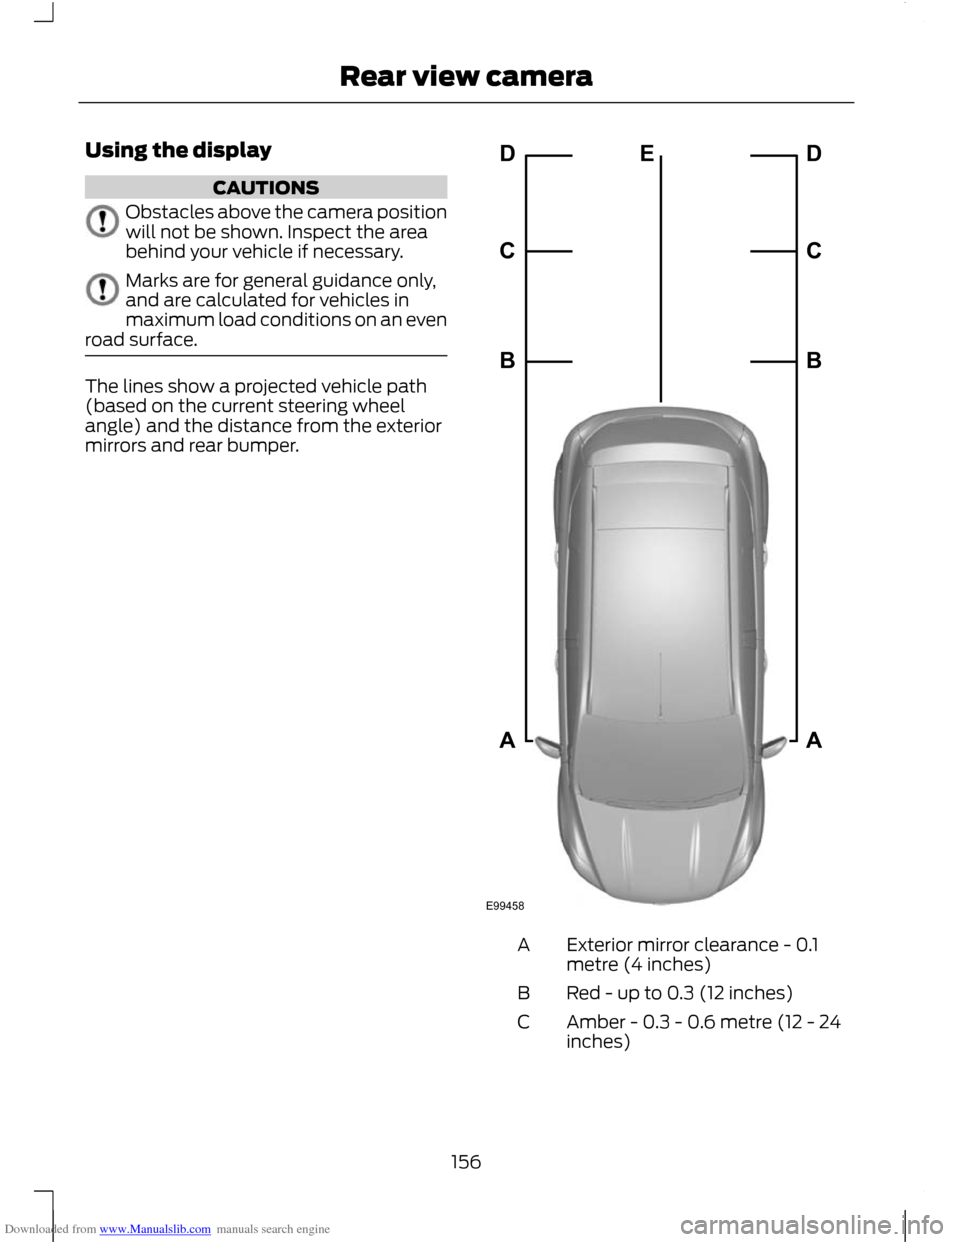
road surface. The lines show a projected vehicle path
(based on the current steering wheel
angle) and the distance from the exterior
mirrors and rear bumper.
Exterior mirror clearance - 0.1
metre (4 inches)
A
Red - up to 0.3 (12 inches)
B
Amber - 0.3 - 0.6 metre (12 - 24
inches)
C
156
Rear view cameraE99458ABCDEABCD
Page 159 of 296
Downloaded from www.Manualslib.com manuals search engine Green - 0.6 - 0.9 metre (24 - 35
inches)
D
Amber - centre line of the
projected vehicle path
E
Note: The green line is extended from 0.9
metre (35 inches) up to a distance of 3.2
metres (126 inches).
Note: When reversing with a trailer, the lines
on the screen are not shown. The camera
will show the vehicle direction and not the
trailer.
Deactivating the rear view camera
Note: Disengage reverse gear. The display
will stay on for a short period before
switching off.
Note: The system will automatically switch
off once the vehicle speed has reached
approximately 15 km/h (9 mph).
Press the parking aid switch in the
instrument panel. For item location: See
At a Glance (page 10).
Vehicles with parking aid
The display will additionally show a
coloured distance bar. This guide indicates
the distance from the rear bumper to the
detected obstacle.
These are colour coded as follows:
• Green - 0.6 to 1.8 metres (24 - 71
inches).
• Amber - 0.3 to 0.6 metre (12 - 24
inches).
• Red - 0.3 metre (12 inches) or less.
157
Rear view camera
Page 160 of 296
Downloaded from www.Manualslib.com manuals search engine PRINCIPLE OF OPERATION
WARNING
The system does not relieve you of
your responsibility to drive with due
care and attention.
Cruise control allows you to control your
speed using the switches on the steering
wheel. You can use cruise control when
you exceed approximately 30 km/h (20
mph).
USING CRUISE CONTROL
WARNING
Do not use cruise control in heavy
traffic, on twisty roads or when the
road surface is slippery.
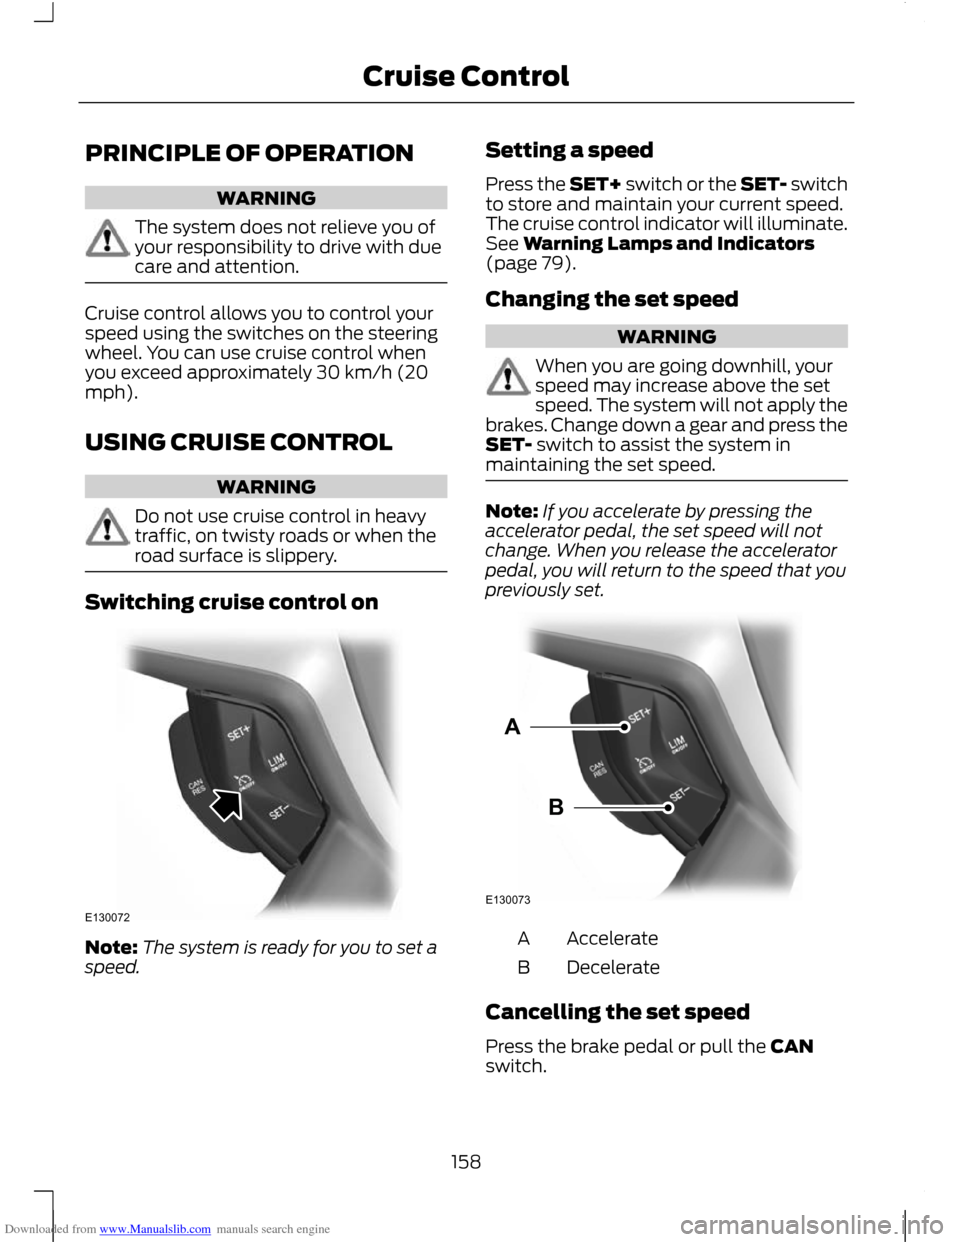
Switching cruise control on
Note:
The system is ready for you to set a
speed. Setting a speed
Press the SET+ switch or the SET- switch
to store and maintain your current speed.
The cruise control indicator will illuminate.
See Warning Lamps and Indicators
(page 79).
Changing the set speed WARNING
When you are going downhill, your
speed may increase above the set
speed. The system will not apply the
brakes. Change down a gear and press the
SET- switch to assist the system in
maintaining the set speed. Note:
If you accelerate by pressing the
accelerator pedal, the set speed will not
change. When you release the accelerator
pedal, you will return to the speed that you
previously set. Accelerate
A
Decelerate
B
Cancelling the set speed
Press the brake pedal or pull the CAN
switch.
158
Cruise ControlE130072 E130073AB