FORD C MAX 2011 2.G Owners Manual
Manufacturer: FORD, Model Year: 2011, Model line: C MAX, Model: FORD C MAX 2011 2.GPages: 296, PDF Size: 7.87 MB
Page 221 of 296
Downloaded from www.Manualslib.com manuals search engine IMPORTANT AUDIO
INFORMATION
WARNINGS
Due to technical incompatibility,
recordable (CD-R) and rewritable
(CD-RW) discs may not function
correctly. These CD radio units will play
compact discs that conform to the
International Red Book standard
audio specification. Copy protected CDs
from some manufacturers do not conform
to this standard and playback cannot be
guaranteed. Dual format, dual sided discs (DVD
Plus, CD-DVD format), adopted by
the music industry, are thicker than
normal CDs and consequently playback
cannot be guaranteed, and jamming could
occur. Irregular shaped CDs and CDs with
a scratch protection film or self adhesive
labels attached should not be used.
Warranty claims, where this type of disc is
found to be inside an audio unit returned
for repair, will not be accepted. All CD units are designed to play
commercially pressed 12 cm audio
compact discs only.
The audio unit may be damaged if
unsuitable items like credit cards or
coins are pushed inside the CD
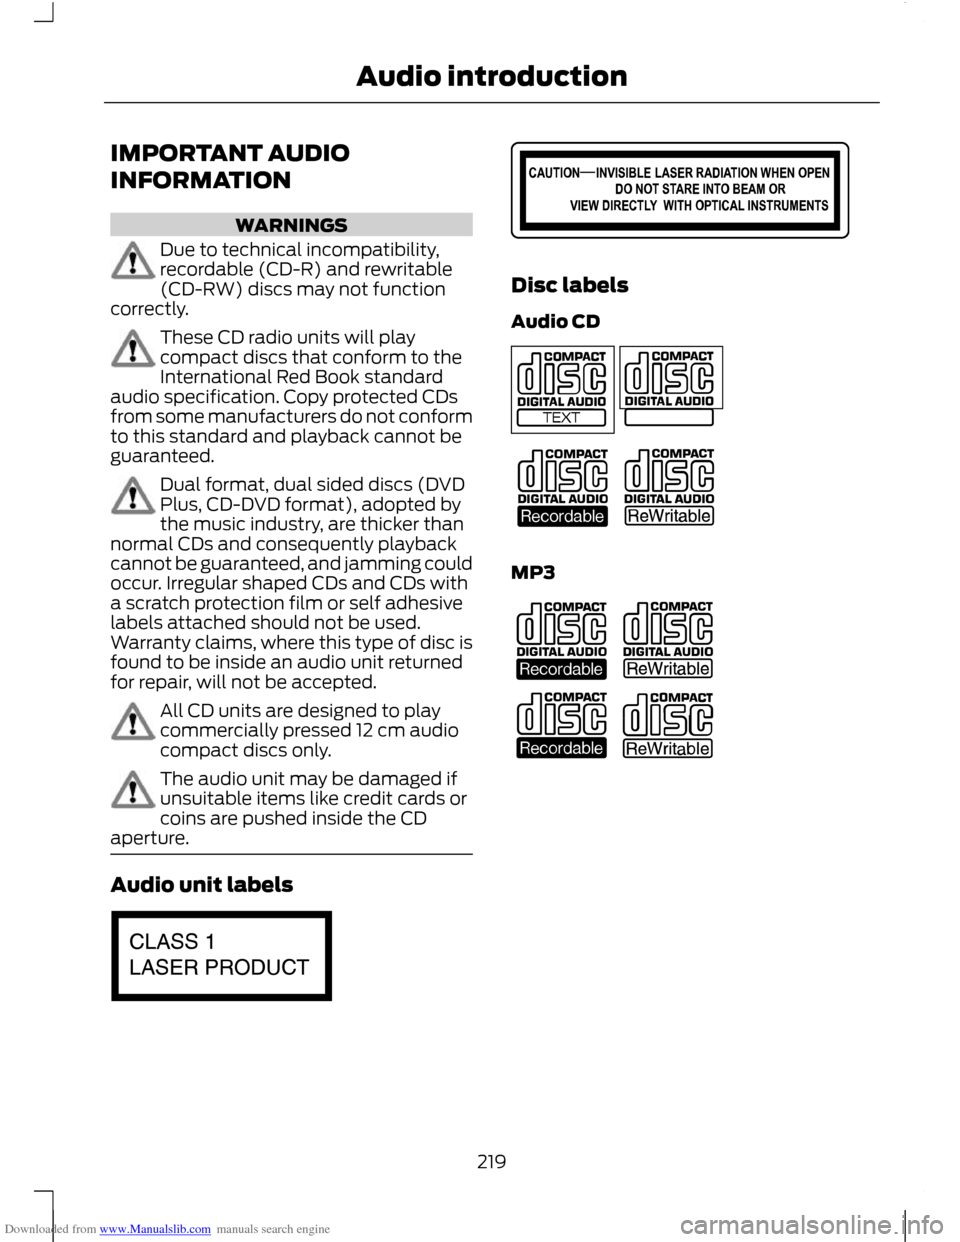
aperture. Audio unit labels Disc labels
Audio CD
MP3
219
Audio introductionE66256 E66257 E66254 E66255
Page 222 of 296
Downloaded from www.Manualslib.com manuals search engine Note:
Units have an integrated multi
function display situated above the CD
aperture. This shows important information
regarding control of your audio unit.
Additionally, there are various icons placed
around the display screen which light up
when a function is active (for example CD,
Radio or Aux.)
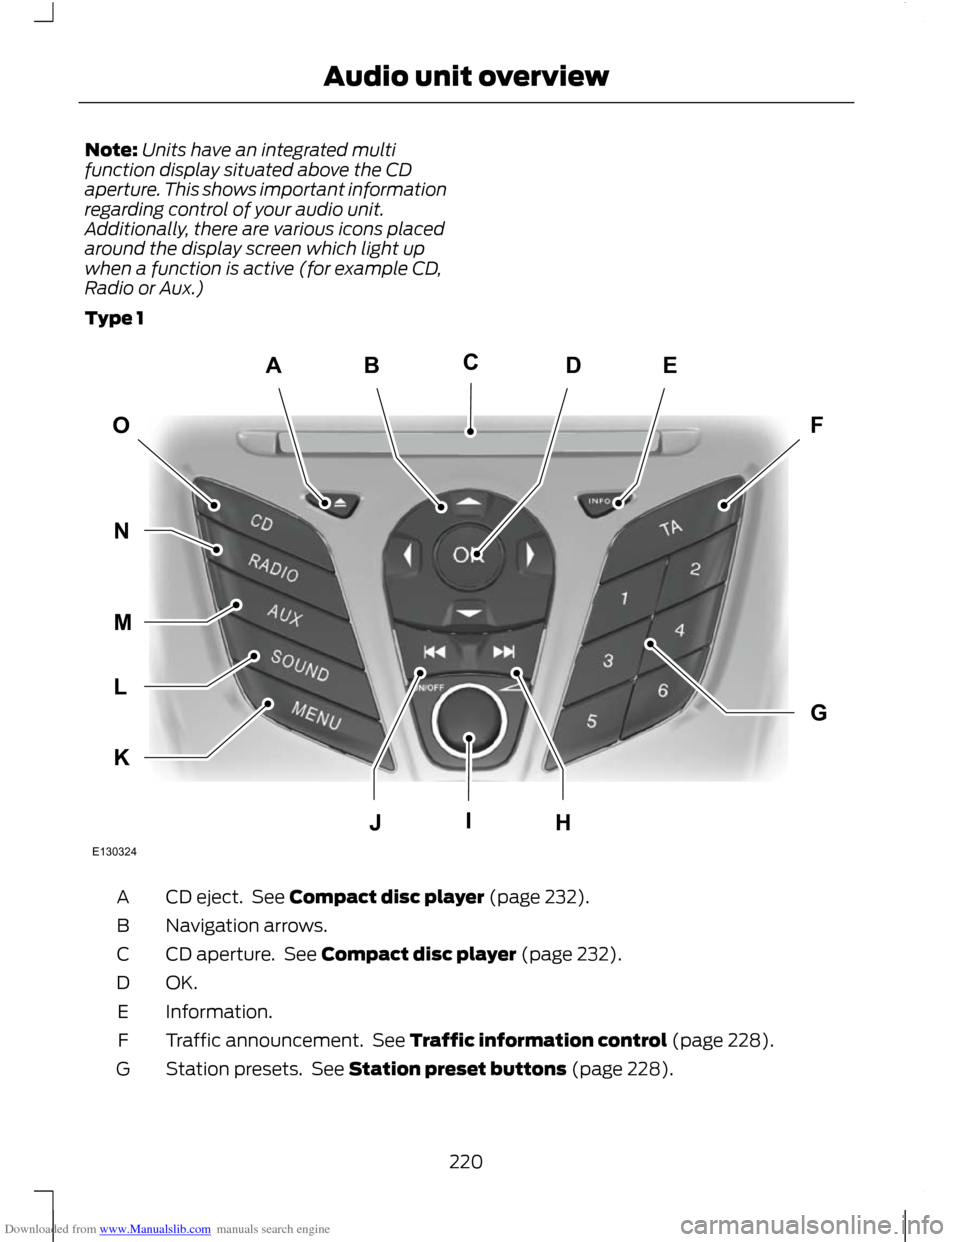
Type 1 CD eject. See Compact disc player (page 232).
A
Navigation arrows.
B
CD aperture. See Compact disc player (page 232).
C
OK.D
Information.
E
Traffic announcement. See Traffic information control (page 228).
F
Station presets. See Station preset buttons (page 228).
G
220
Audio unit overviewABEDFOGKLMNJHICE130324
Page 223 of 296
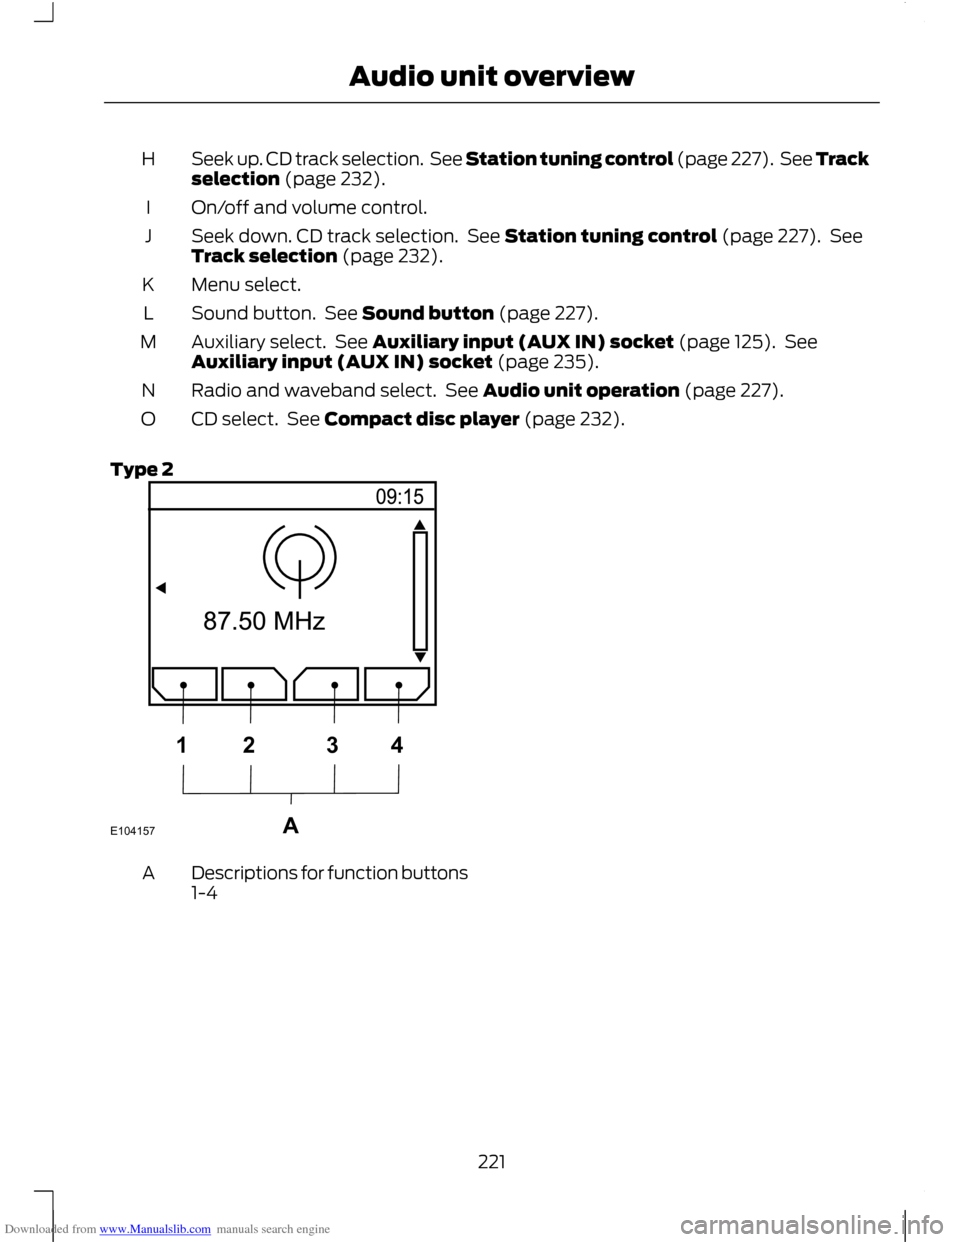
Downloaded from www.Manualslib.com manuals search engine Seek up. CD track selection. See Station tuning control (page 227). See Track
selection (page 232).
H
On/off and volume control.
I
Seek down. CD track selection. See Station tuning control (page 227). See
Track selection (page 232).
J
Menu select.
K
Sound button. See Sound button (page 227).
L
Auxiliary select. See Auxiliary input (AUX IN) socket (page 125). See
Auxiliary input (AUX IN) socket (page 235).
M
Radio and waveband select. See Audio unit operation (page 227).
N
CD select. See Compact disc player (page 232).
O
Type 2 Descriptions for function buttons
1-4
A
221
Audio unit overviewE104157A1234
Page 224 of 296
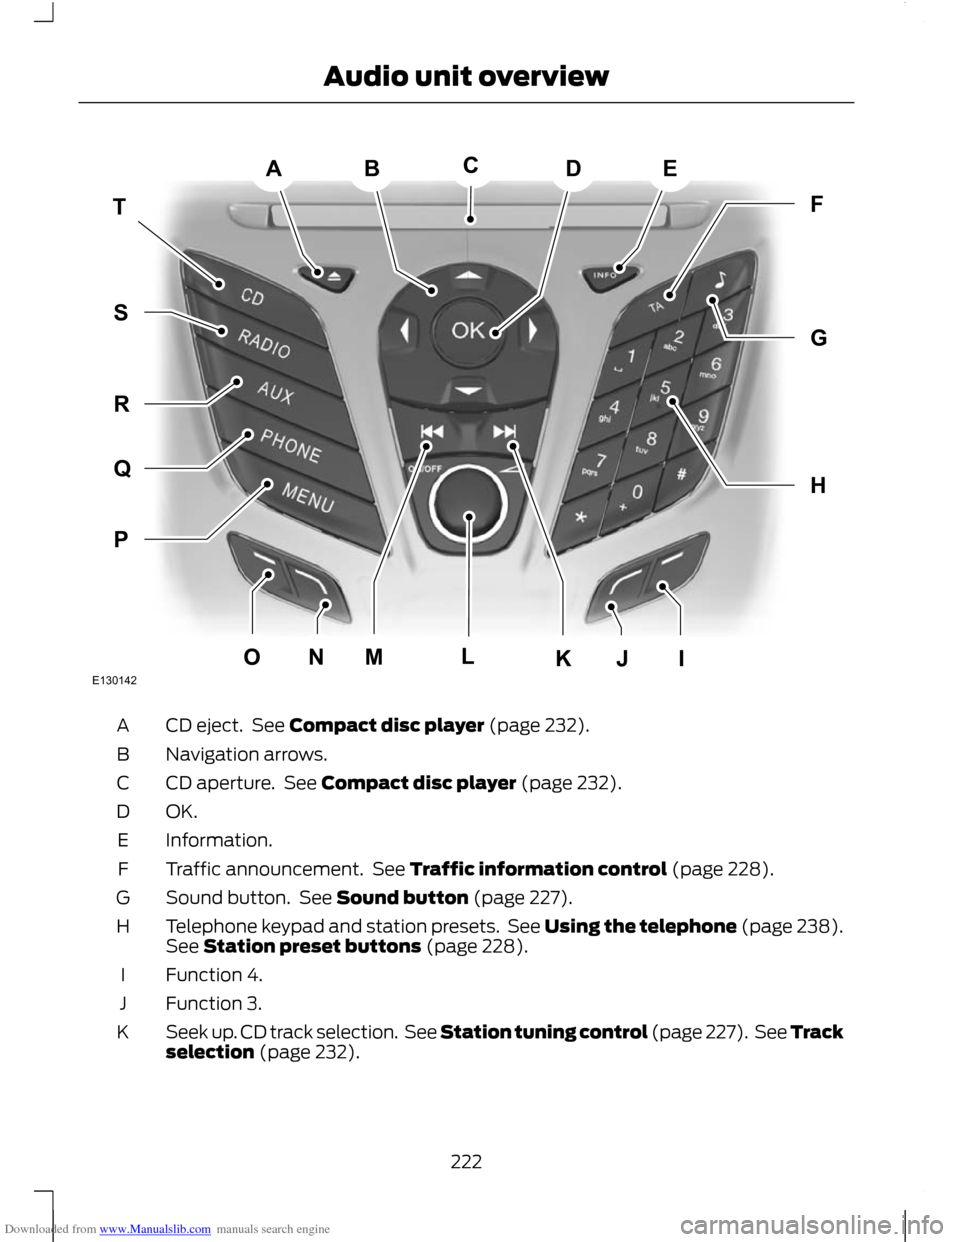
Downloaded from www.Manualslib.com manuals search engine CD eject. See Compact disc player (page 232).
A
Navigation arrows.
B
CD aperture. See Compact disc player (page 232).
C
OK.D
Information.
E
Traffic announcement. See Traffic information control (page 228).
F
Sound button. See Sound button (page 227).
G
Telephone keypad and station presets. See Using the telephone (page 238).
See Station preset buttons (page 228).
H
Function 4.
I
Function 3.
J
Seek up. CD track selection. See Station tuning control (page 227). See Track
selection (page 232).
K
222
Audio unit overviewABEDTHFGPQRSMONJIKLCE130142
Page 225 of 296
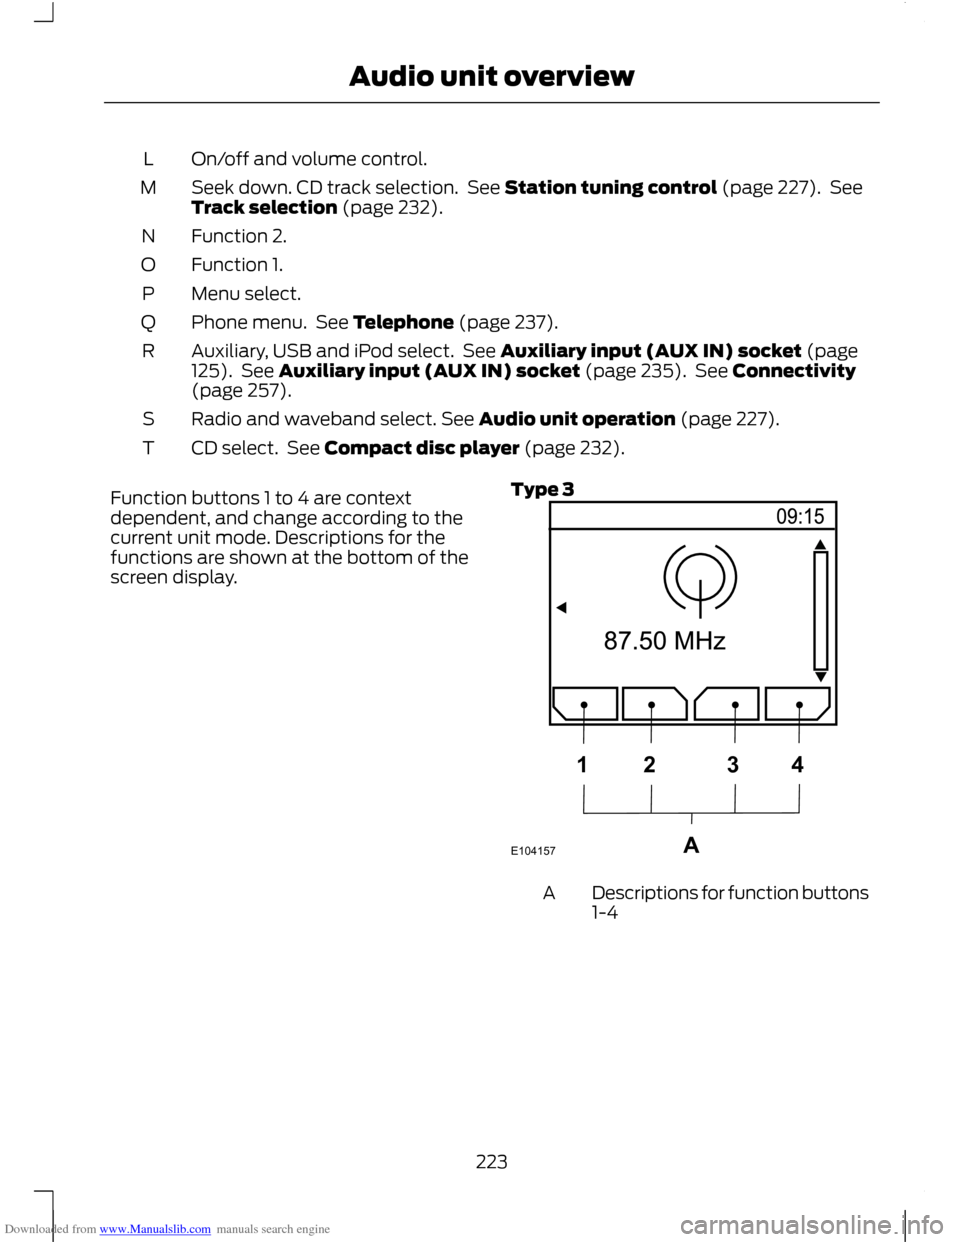
Downloaded from www.Manualslib.com manuals search engine On/off and volume control.
L
Seek down. CD track selection. See Station tuning control (page 227). See
Track selection (page 232).
M
Function 2.
N
Function 1.
O
Menu select.
P
Phone menu. See Telephone (page 237).
Q
Auxiliary, USB and iPod select. See Auxiliary input (AUX IN) socket (page
125). See Auxiliary input (AUX IN) socket (page 235). See Connectivity
(page 257).
R
Radio and waveband select. See Audio unit operation (page 227).
S
CD select. See Compact disc player (page 232).
T
Function buttons 1 to 4 are context
dependent, and change according to the
current unit mode. Descriptions for the
functions are shown at the bottom of the
screen display. Type 3 Descriptions for function buttons
1-4
A
223
Audio unit overviewE104157A1234
Page 226 of 296
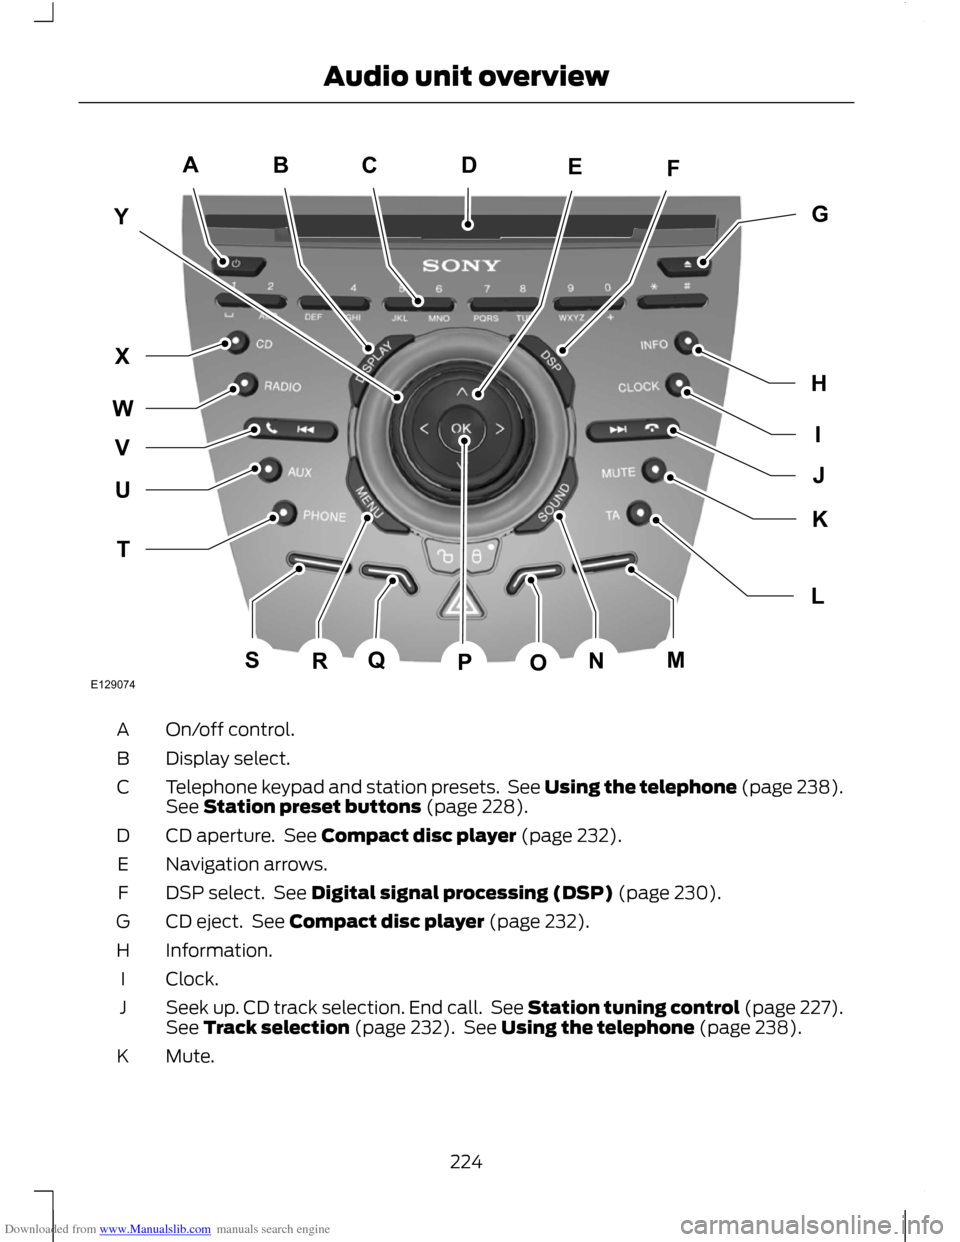
Downloaded from www.Manualslib.com manuals search engine On/off control.
A
Display select.
B
Telephone keypad and station presets. See Using the telephone (page 238).
See Station preset buttons (page 228).
C
CD aperture. See Compact disc player (page 232).
D
Navigation arrows.
E
DSP select. See Digital signal processing (DSP) (page 230).
F
CD eject. See Compact disc player (page 232).
G
Information.
H
Clock.
I
Seek up. CD track selection. End call. See Station tuning control (page 227).
See Track selection (page 232). See Using the telephone (page 238).
J
Mute.
K
224
Audio unit overviewE129074ACBFEYIGHJLKTUWXVQSRNMOPD
Page 227 of 296
Downloaded from www.Manualslib.com manuals search engine Traffic announcement. See Traffic information control (page 228).
L
Function 4.
M
Sound button. See Sound button (page 227).
N
Function 3.
O
OK.P
Function 2.
Q
Menu select.
R
Function 1.
S
Phone menu. See Telephone (page 237).
T
Auxiliary select. See Auxiliary input (AUX IN) socket (page 125). See
Auxiliary input (AUX IN) socket (page 235).
U
Seek down. CD track selection. Accept call. See Station tuning control (page
227). See Track selection (page 232). See Using the telephone (page 238).
V
Radio and waveband select. See Audio unit operation (page 227).
W
CD select. See Compact disc player (page 232).
X
Volume control.
Y
Function buttons 1 to 4 are context
dependent, and change according to the
current unit mode. Descriptions for the
functions are shown at the bottom of the
screen display.
225
Audio unit overview
Page 228 of 296
Downloaded from www.Manualslib.com manuals search engine SECURITY CODE
Each unit incorporates a unique code that
is linked to the vehicle identification
number (VIN). The system will
automatically check that the audio unit
and vehicle match before allowing
operation.
If a security code message appears, please
see your dealer.
226
Audio system security
Page 229 of 296
Downloaded from www.Manualslib.com manuals search engine ON/OFF CONTROL
Press the on/off control. This will also
operate the unit for up to one hour with the
ignition turned off.
The radio will switch off automatically
after one hour.
SOUND BUTTON
This will allow you to adjust the sound
settings (for example bass and treble).
1. Press the sound button.
2.
Use the up and down arrow buttons to
select the required setting.
3. Use the left and right arrow buttons to
make the necessary adjustment. The
display indicates the level selected.
4. Press the OK button to confirm the new settings.
WAVEBAND BUTTON
Press the RADIO button to select from the
wavebands available.
The selector can also be used to return to
radio reception when you have been
listening to another source.
Alternatively, press the left arrow button
to display the available wavebands. Scroll
to the required waveband and press OK.
STATION TUNING CONTROL
DAB service linking
Note: The DAB service linking is as per
default off.
Note: Service linking allows
cross-referencing to other corresponding
frequencies of the same station, for example
FM and other DAB ensembles. Note:
The system will automatically
change to another corresponding station if
the current one becomes unavailable, for
example when leaving the coverage area.
Switching DAB service linking on and off.
See General Information (page 83).
Seek tuning
Select a waveband and briefly press one
of the seek buttons. The unit will stop at
the first station it finds in the direction you
have chosen.
Manual tuning
Type 1
1. Press the MENU button.
2. Select RADIO mode and then MANUAL
TUNE.
3. Use the left and right arrow buttons to
tune down or up the waveband in small
increments or press and hold to
increment quickly, until you find a
station you want to listen to.
4. Press OK to continue listening to a station.
Type 2 and 3
1. Press function button 2.
2. Use the left and right arrow buttons to
tune down or up the waveband in small
increments or press and hold to
increment quickly, until you find a
station you want to listen to.
3. Press OK to continue listening to a station.
Scan tuning
Scan allows you to listen to a few seconds
of each station detected.
Type 1
1. Press the MENU button.
227
Audio unit operation
Page 230 of 296
Downloaded from www.Manualslib.com manuals search engine 2. Select RADIO mode and then SCAN.
3. Use the seek buttons to scan up or
down the selected waveband.
4. Press OK to continue listening to a station.
Type 2 and 3
1. Press function button 3.
2. Use the seek buttons to scan up or down the selected waveband.
3. Press function button 3 again or OK to
continue listening to a station.
STATION PRESET BUTTONS
This feature allows you to store your
favourite stations so that they can be
recalled by selecting the appropriate
waveband and pressing one of the preset
buttons.
1. Select a waveband.
2. Tune to the station required.
3. Press and hold one of the preset buttons. A progress bar and message
will appear. When the progress bar
completes the station has been stored.
The audio unit will also mute
momentarily as confirmation.
This can be repeated on each waveband
and for each preset button.
Note: When you drive to another part of the
country, FM and DAB stations that
broadcast on alternative frequencies, and
are stored on preset buttons, may be
updated with the correct frequency and
station name for that area. AUTOSTORE CONTROL
Note:
This will store up to a maximum of
the 10 strongest signals available, either
from the AM or the FM waveband, and
overwrite the previously stored stations. It
can also be used to store stations manually
in the same way as other wavebands.
Note: On type 3 you must select either FM
AST or AM AST to use this function.
• Press and hold function button 1 or the
RADIO button.
• When the search is complete, sound is
restored and the strongest signals are
stored on the Autostore presets.
TRAFFIC INFORMATION
CONTROL
Many stations that broadcast on the FM
waveband have a TP code to signify that
they carry traffic programme information.
Activating traffic announcements
Before you can receive traffic
announcements, you must press either the
TA or TRAFFIC button. A ‘TA’ display will
appear to show the feature is switched on.
If you are already tuned to a station that
broadcasts traffic information, ‘TP’ will
also be displayed. Otherwise the unit will
search for a traffic programme.
When traffic information is broadcast, it
will automatically interrupt normal radio
or CD playback and ‘Traffic announcement
(TA)’ will appear in the display.
If a non-traffic station is selected or
recalled using a preset button, the audio
unit will remain on that station unless TA
or TRAFFIC is turned off, then on again.
Note: If TA is on and you select a preset or
manual tune to a non TA station no traffic
announcement will be heard.
228
Audio unit operation