jacking FORD FIESTA 2007 Repair Manual
[x] Cancel search | Manufacturer: FORD, Model Year: 2007, Model line: FIESTA, Model: FORD FIESTA 2007Pages: 1226, PDF Size: 61.26 MB
Page 530 of 1226
Engine - I .25L Duratec-1 6V (Sigma)llI4L
303-01 A-54 Duratec-1 6V (Sigma)/l .6L Duratec-1 6V (Sigma)
303-01 A-54
IN-VEHICLE REPAIR
Cylinder Head(21 163 0)
1 I Socket, Cylinder Head Bolts I
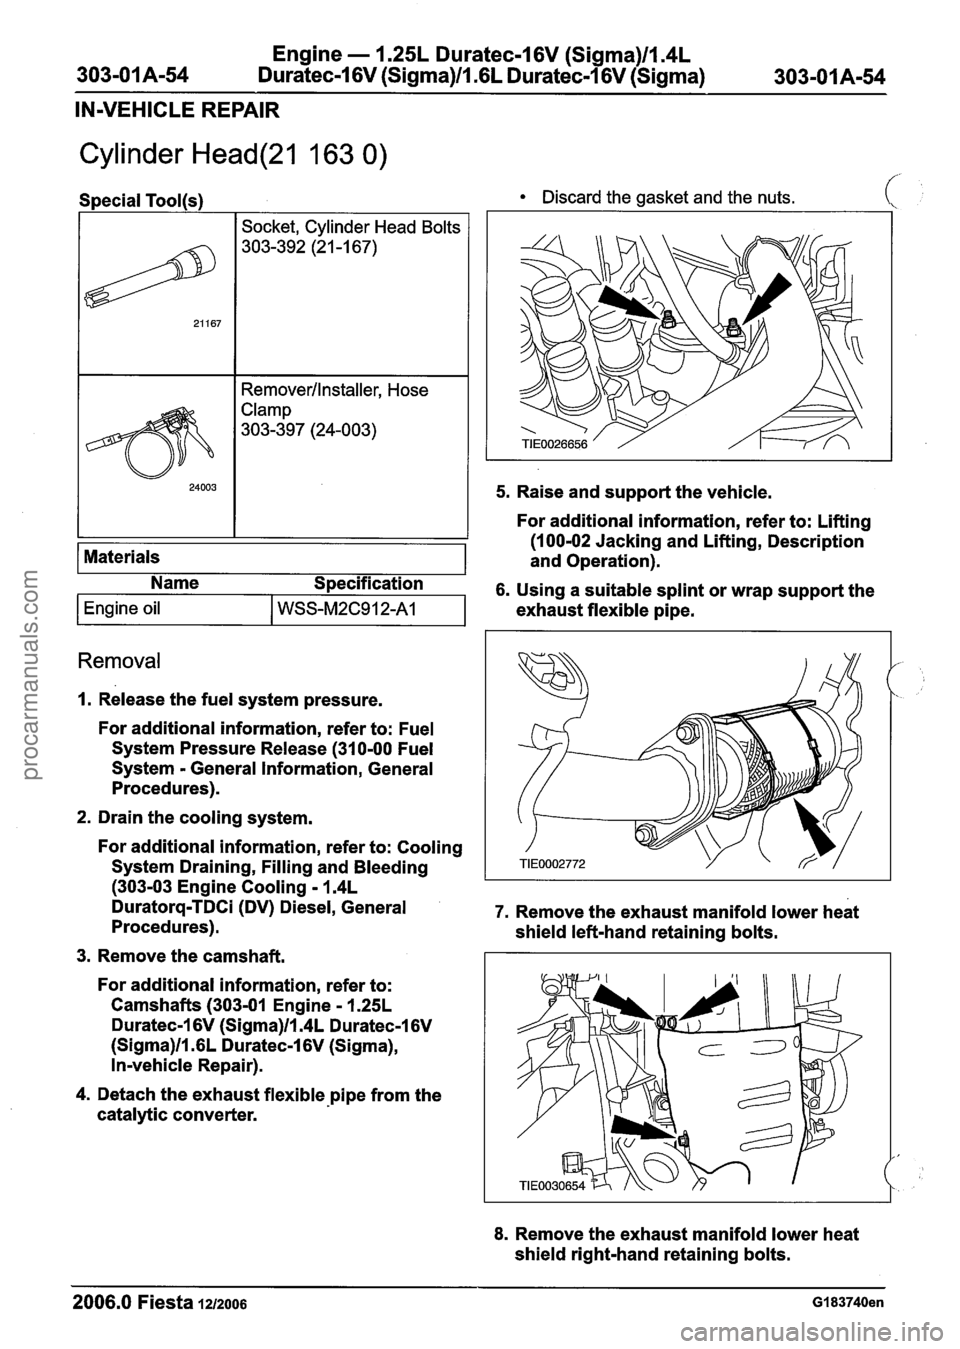
Discard the gasket and the nuts. (
Removerllnstaller, Hose
Clamp
303-397 (24-003)
I 24003 1 1 5. Raise and support the vehicle.
Removal
I I 1 For additional information, refer to: Lifting
(100-02 Jacking and Lifting, Description
1. Release the fuel system pressure.
Materials
For
additional information, refer to: Fuel
System Pressure Release (31 0-00 Fuel
System - General Information, General
Procedures). and
Operation).
2. Drain the
cooling system.
For
additional information, refer to: Cooling
System Draining, Filling and Bleeding
(303-03 Engine Cooling - 1.4L
Duratorq-TDCi (DV) Diesel, General 7. Remove the exhaust manifold lower heat
Procedures). shield left-hand retaining bolts.
3. Remove the camshaft.
Name
Specification
6. Using a suitable splint or wrap support the
For
additional information, refer to:
Camshafts
(303-01 Engine - 1.25L
Duratec-1 6V (Sigma)ll.4L Duratec-1 6V
(Sigma)ll.GL Duratec-1 6V (Sigma),
In-vehicle Repair).
Engine oil I WSS-M2C912-A1
4. Detach the exhaust flexible pipe from the
catalytic converter. exhaust
flexible pipe.
8. Remove the exhaust manifold lower heat
shield right-hand retaining bolts.
2006.0 Fiesta 1212006 GI 83740en
procarmanuals.com
Page 539 of 1226
Engine - 1.25L Duratec-1 6V (Sigma)ll.4L
303-01 A-63 Duratec-1 6V (Sigma)/l.6L Duratec-1 6V (Sigma) 303-01 A-63
IN-VEHICLE REPAIR
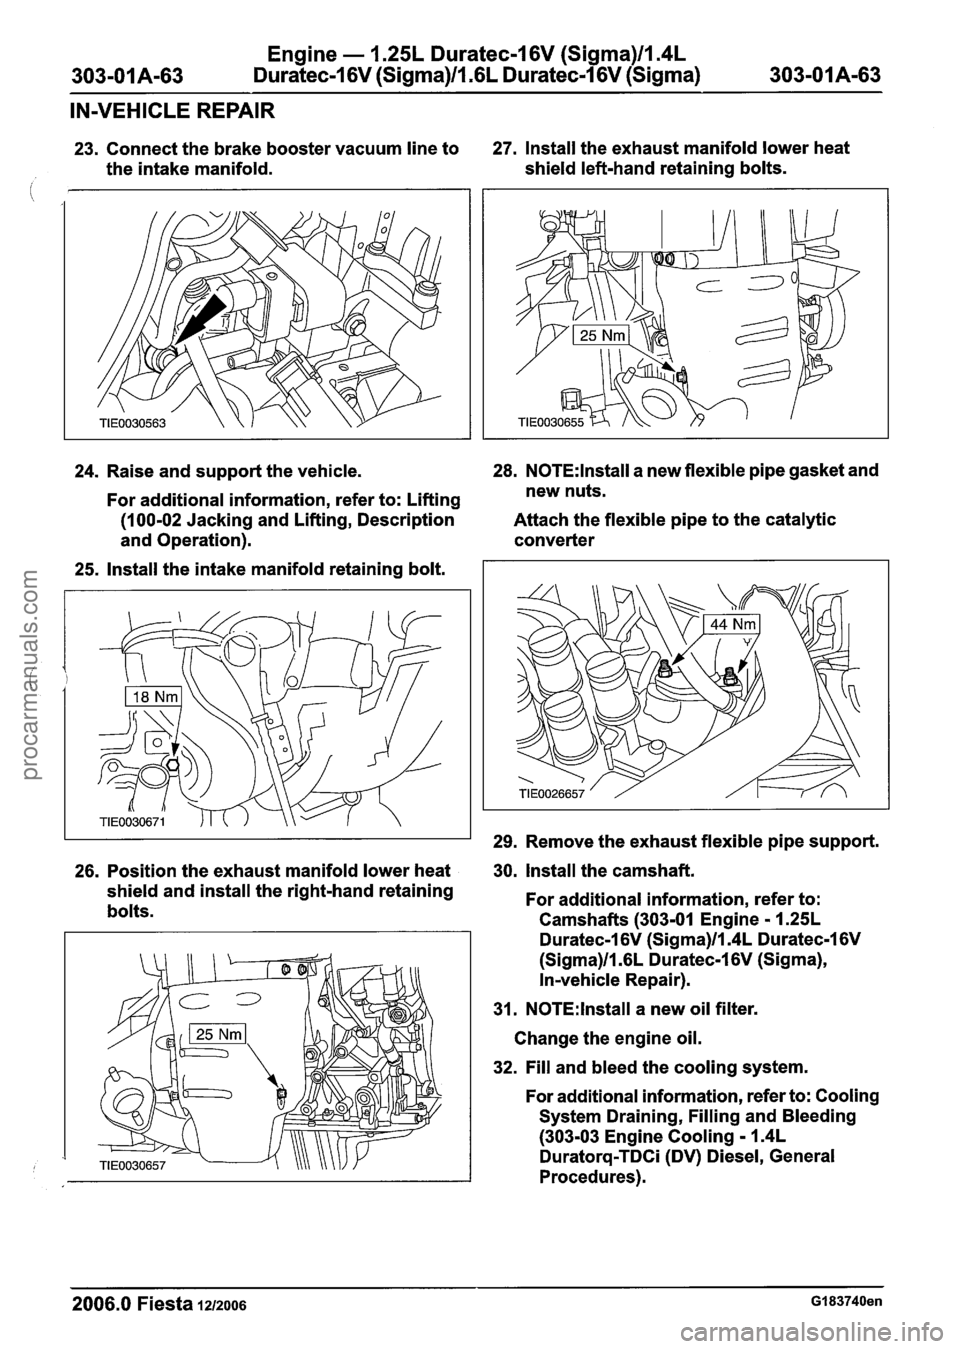
23. Connect the brake booster vacuum line to 27. Install the
exhaust manifold lower heat
the intake manifold. shield
left-hand retaining bolts.
24. Raise and support the vehicle. 28.
N0TE:lnstall a
new flexible pipe gasket and
For
additional information, refer to: Lifting new
nuts.
(1 00-02 Jacking and Lifting, Description Attach the flexible pipe to the catalytic
and Operation). converter
25.
Install the intake manifold retaining bolt.
29. Remove the exhaust flexible pipe support.
26. Position the exhaust
manifold lower heat . 30, Install the camshaft.
shield and install the right-hand retaining
For additional information, refer to:
bolts. Camshafts (303-01 Engine
- 1.25L
Duratec-1 6V (Sigma)ll.4L Duratec-1 6V
(Sigma)ll.GL Duratec-1 6V (Sigma),
In-vehicle Repair).
31.
N0TE:lnstall a new oil filter.
Change the engine oil.
32. Fill and bleed the cooling system.
For
additional information, refer to: Cooling
System Draining, Filling and Bleeding
(303-03 Engine Cooling - 1.4L
Duratorq-TDCi (DV) Diesel, General
Procedures).
2006.0 Fiesta 1212006 GI 83740en
procarmanuals.com
Page 540 of 1226
Engine - 1.25L Duratec-1 6V (Sigma)lla4L
303-01 A-64 Duratec-1 6V (Sigma)ll .6L Duratec-1 6V (Sigma) 303-01 A-64
IN-VEHICLE REPAIR
Oil Pan(21 154 0)
Special Tool(s)
Adapter for 205-047
303-633 (2
1 -227)
1501 1
General Equipment
Slide Hammer
205-047 (1 5-0 1 1 )
I Five M8 x 20 mm studs I
Materials
Name
S~ecification
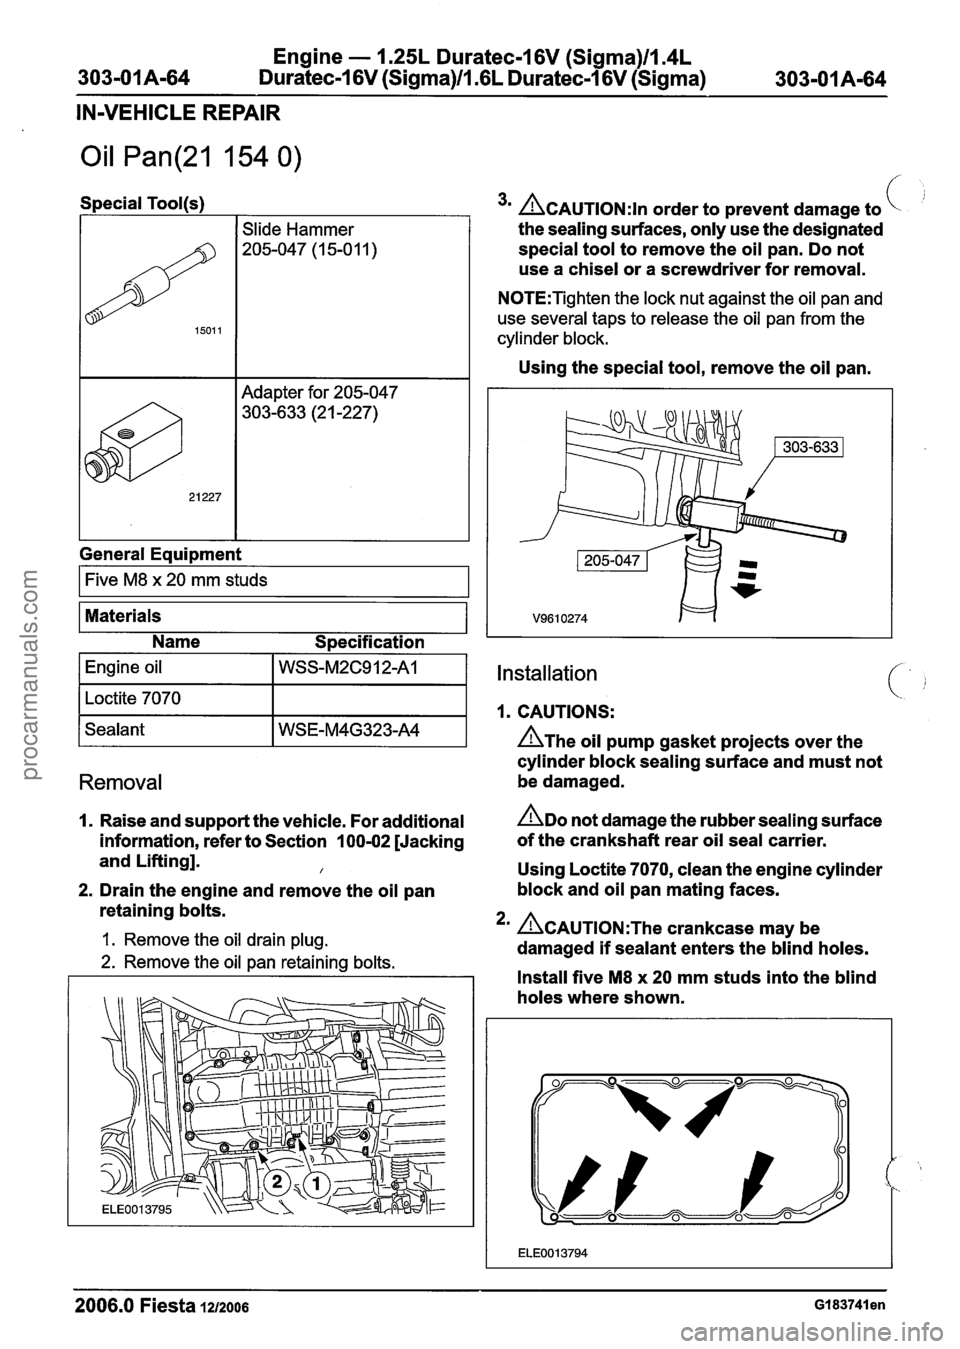
3m CAUTION:^^ order to prevent damage to
the sealing surfaces, only use the designated
special tool to remove the oil pan. Do not
use a chisel or a screwdriver for removal.
N0TE:Tighten the lock nut against the oil pan and
use several taps to release the oil pan from the
cylinder block.
Using the special tool, remove the oil pan.
Installation
1. CAUTIONS:
n~he oil pump gasket projects over the
cylinder block sealing surface and must not
Removal be damaged.
I. Raise and support the vehicle. For additional ADO not damage the rubber sealing surface
information, refer to Section 100-02 [Jacking of
the crankshaft rear oil seal carrier.
and Lifting].
I Using Loctite 7070, clean the engine cylinder
2. Drain the engine and remove the oil pan block and
oil pan mating faces.
retaining bolts.
1. Remove the oil drain plug. 2m ~CAUTION:T~~ crankcase may be
damaged
if sealant enters the blind holes. 2. Remove the oil pan retaining bolts.
I I Install five M8 x 20 mm studs into the blind
holes where shown.
2006.0 Fiesta 1212006 GI 83741 en
procarmanuals.com
Page 550 of 1226
Engine - 1.25L Duratec-1 6V (Sigma)ll.4L
Duratec-1 6V (Sigma)ll.GL Duratec-1 6V (Sigma)
REMOVAL
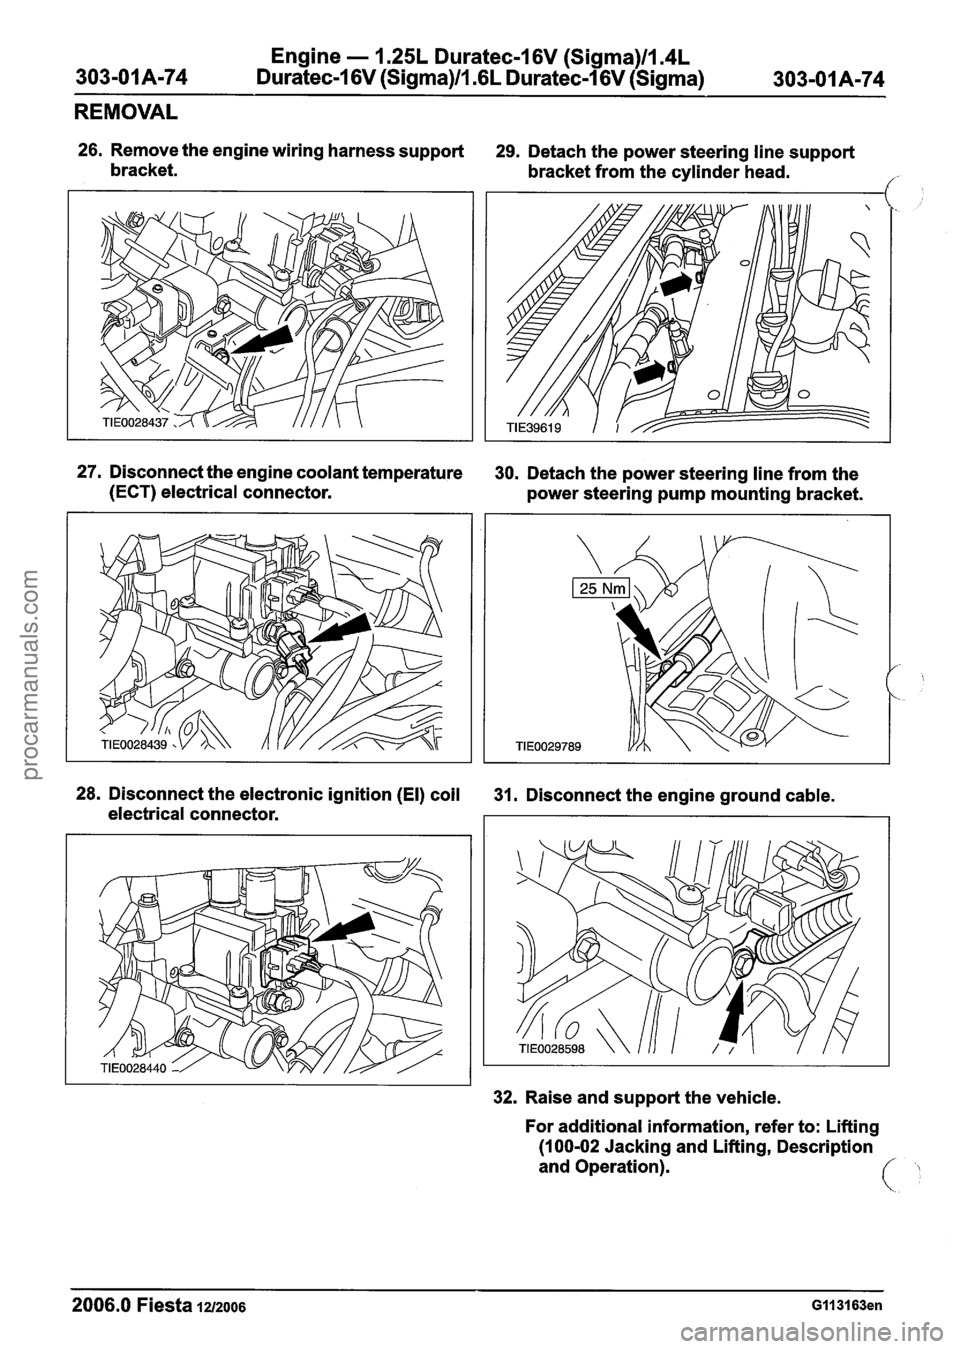
26. Remove the engine wiring harness support
29. Detach the power steering line support
bracket. bracket from the cylinder head.
f
27. Disconnect the engine coolant temperature
30. Detach the power steering line from the
(ECT) electrical connector.
power steering pump mounting bracket.
28. Disconnect the electronic ignition (El) coil
31. Disconnect the engine ground cable.
electrical connector.
32. Raise and support the vehicle.
For additional information, refer to: Lifting
(100-02 Jacking and Lifting, Description
and Operation).
2006.0 Fiesta 1212006 GII 31 63en
procarmanuals.com
Page 564 of 1226
Engine - 1.25L Duratec-1 6V (Sigma)llI4L
303-01 Am88 Duratec-1 6V (Sigma)/l .6L Duratec-1 6V (Sigma) 303101 A-88
REMOVAL
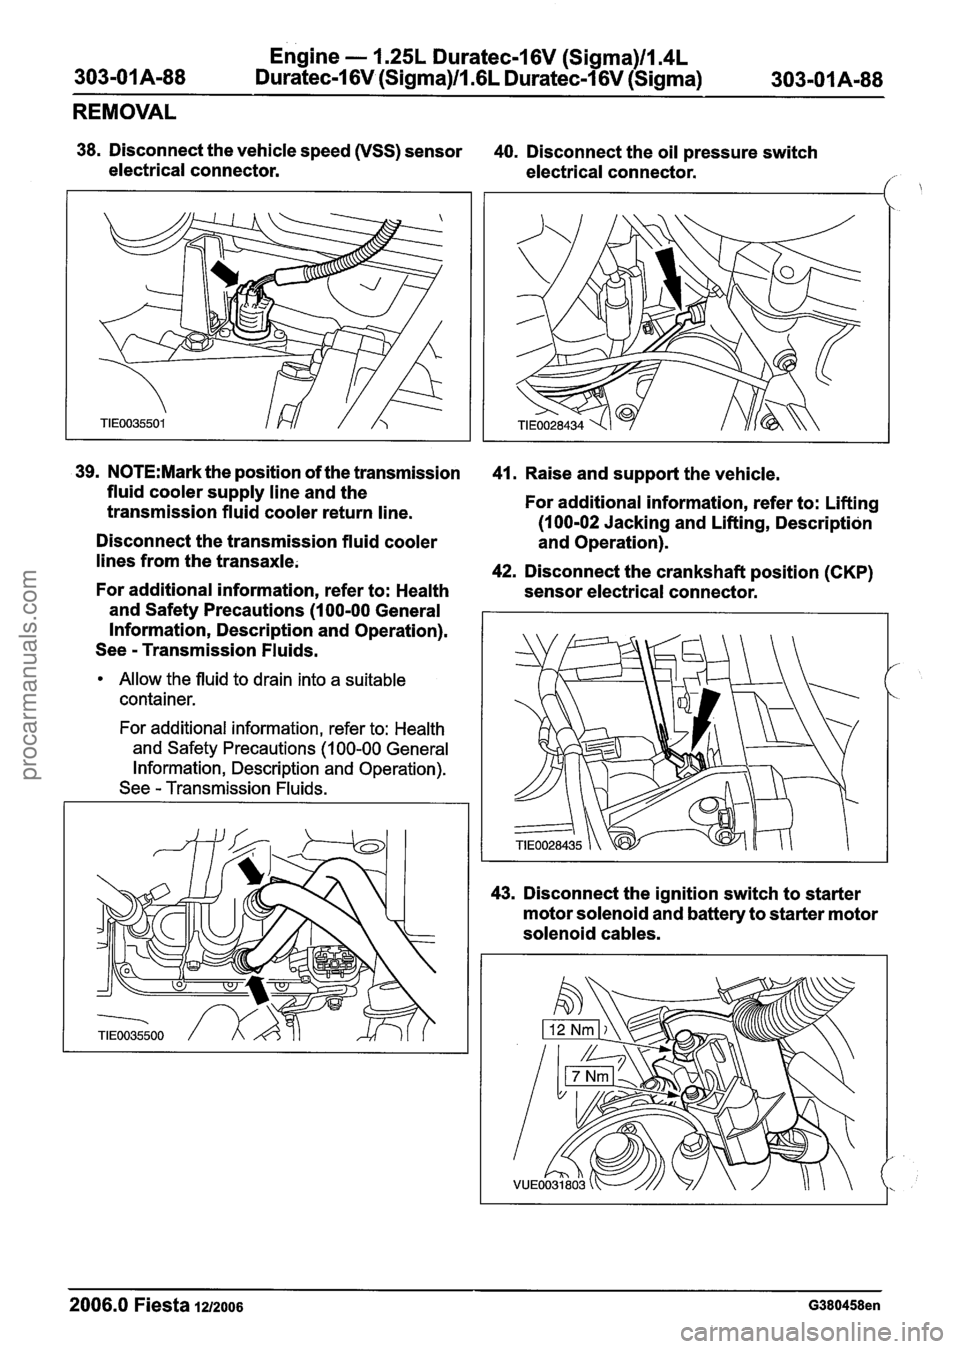
38. Disconnect the vehicle speed (VSS) sensor
40. Disconnect the oil pressure switch
electrical connector. electrical connector.
/
39. N0TE:Mark the position of the transmission
fluid cooler supply line and the
transmission fluid cooler return line.
Disconnect the transmission fluid cooler
lines from the transaxle.
For additional information, refer to: Health
and Safety Precautions
(1 00-00 General
Information, Description and Operation).
See
- Transmission Fluids.
Allow the fluid to drain into a suitable
container.
For additional information, refer to: Health and Safety Precautions
(1 00-00 General
Information, Description and Operation).
See
- Transmission Fluids.
41. Raise and support the vehicle.
For additional information, refer to: Lifting
(1 00-02 Jacking and Lifting, Description
and Operation).
42. Disconnect the crankshaft position (CKP)
sensor electrical connector.
43. Disconnect the ignition switch to starter
motor solenoid and battery to starter motor
solenoid cables.
2006.0 Fiesta la2006 G380458en
procarmanuals.com
Page 599 of 1226
Engine - 1.25L Duratec-1 6V (Sigma)ll.4L
303-01A-123 Duratec-1 6V (Sigma)/l .6L Duratec-1 6V (Sigma) 303-01 A-I 23
INSTALLATION
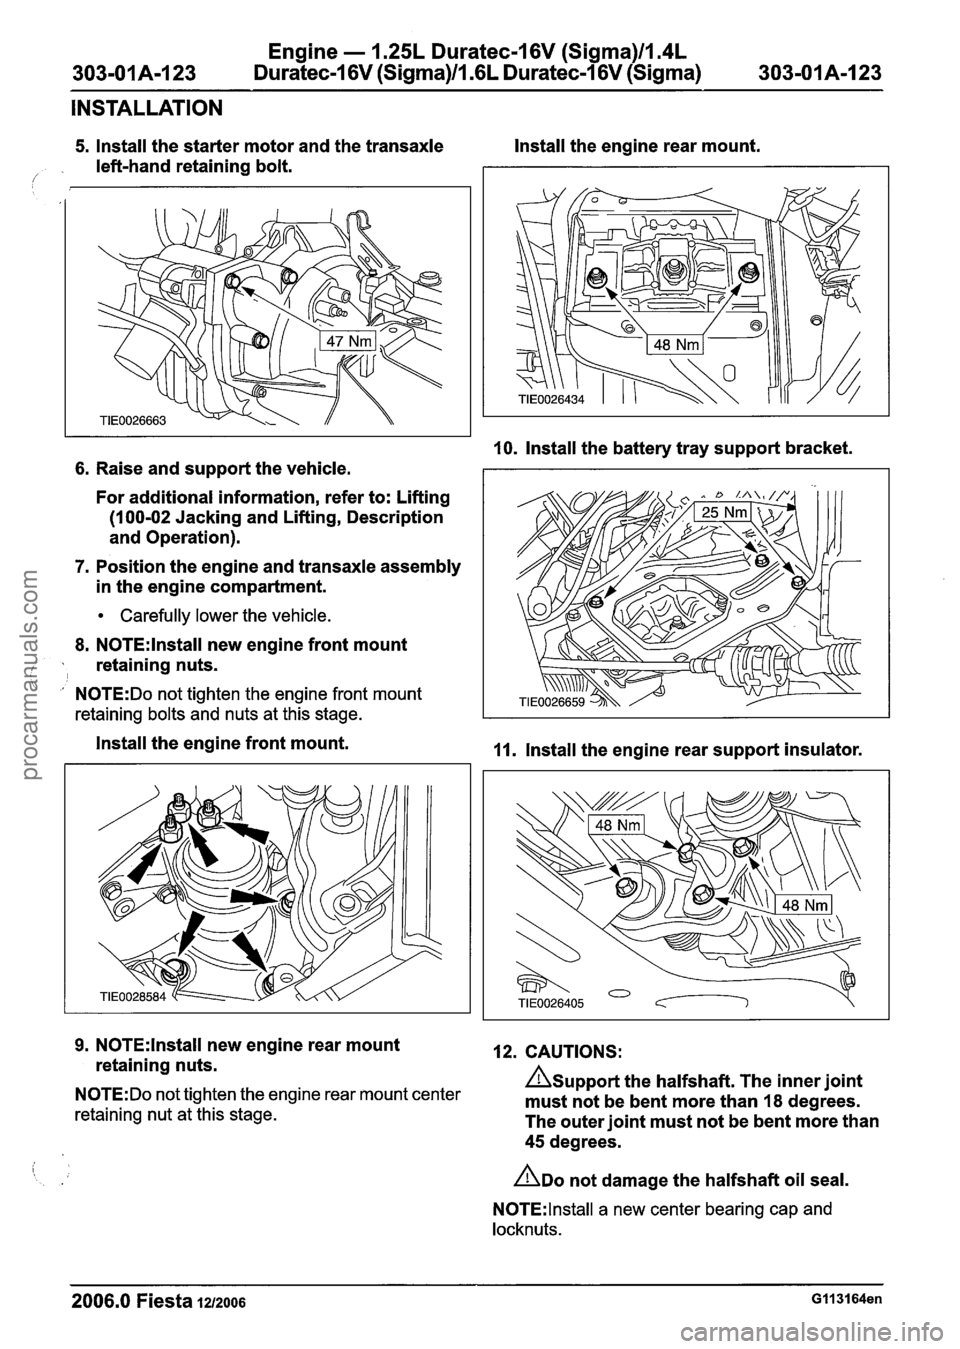
5. Install the starter motor and the transaxle Install the engine rear mount.
left-hand retaining bolt.
/'
10. lnstall the battery tray support bracket.
6. Raise and support the vehicle.
For additional information, refer to: Lifting
(1 00-02 Jacking and Lifting, Description
and Operation).
7. Position the engine and transaxle assembly
in the engine compartment.
Carefully lower the vehicle.
8.
N0TE:lnstall new engine front mount
, retaining nuts. ' I ' N0TE:Do not tighten the engine front mount
retaining bolts and nuts at this stage.
Install the engine front mount. 11. Install the engine rear support insulator.
9.
N0TE:lnstall new engine rear mount 12. CAUTIONS:
retaining nuts.
Asupport the halfshaft. The inner joint N0TE:Do not tighten the engine rear mount center must not be bent more than 18 degrees. retaining nut at this stage. The outer joint must not be bent more than
45 degrees.
ADO not damage the halfshaft oil seal.
N0TE:lnstall a new center bearing cap and
locknuts.
2006.0 Fiesta 1212006 GII 31 64en
procarmanuals.com
Page 611 of 1226
Engine - 1.25L Duratec-1 6V (Sigma)ll.4L
303-01 Am1 35 Duratec-1 6V (Sigma)/l.GL Duratec-1 6V (Sigma)
303-01 A-1 35
INSTALLATION
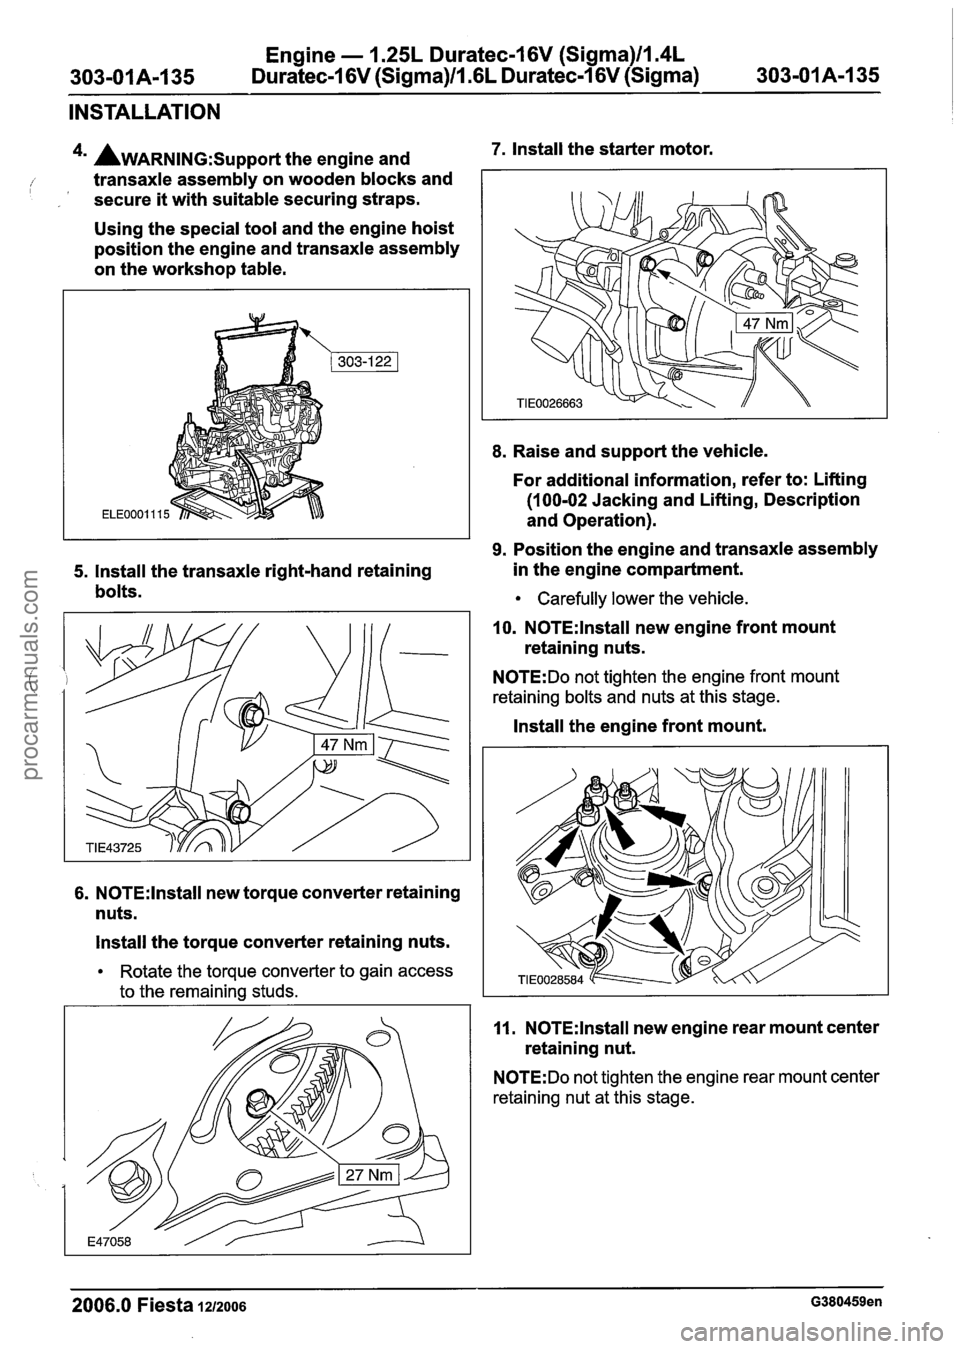
4m AWARNING:S~~~~~~ the engine and 7. Install the starter motor.
transaxle assembly on wooden blocks and
secure
it with suitable securing straps.
Using the special tool and the engine hoist
position the engine and transaxle assembly
on the workshop table.
8. Raise and support the vehicle.
For additional information, refer to: Lifting
(100-02 Jacking and Lifting, Description
and Operation).
9. Position the engine and transaxle assembly
5. Install the transaxle right-hand retaining in
the engine compartment.
bolts.
Carefully lower the vehicle.
6. N0TE:lnstall new torque converter retaining
nuts.
Install the torque converter retaining nuts.
Rotate the torque converter to gain access
to the remaining studs. 10.
N0TE:lnstall new engine
front mount
retaining nuts.
N0TE:Do not tighten the engine front mount
retaining bolts and nuts at this stage.
Install the engine front mount.
11. N0TE:lnstall new engine rear mount center
retaining nut.
N0TE:Do not tighten the engine rear mount center
retaining nut at this stage.
2006.0 Fiesta iz12006 G380459en
procarmanuals.com
Page 643 of 1226
303-01 B-21 Engine - 2.OL Duratec-HE (M14) 303-01 B-21
IN-VEHICLE REPAIR
Intake Manifold(21 183 0)
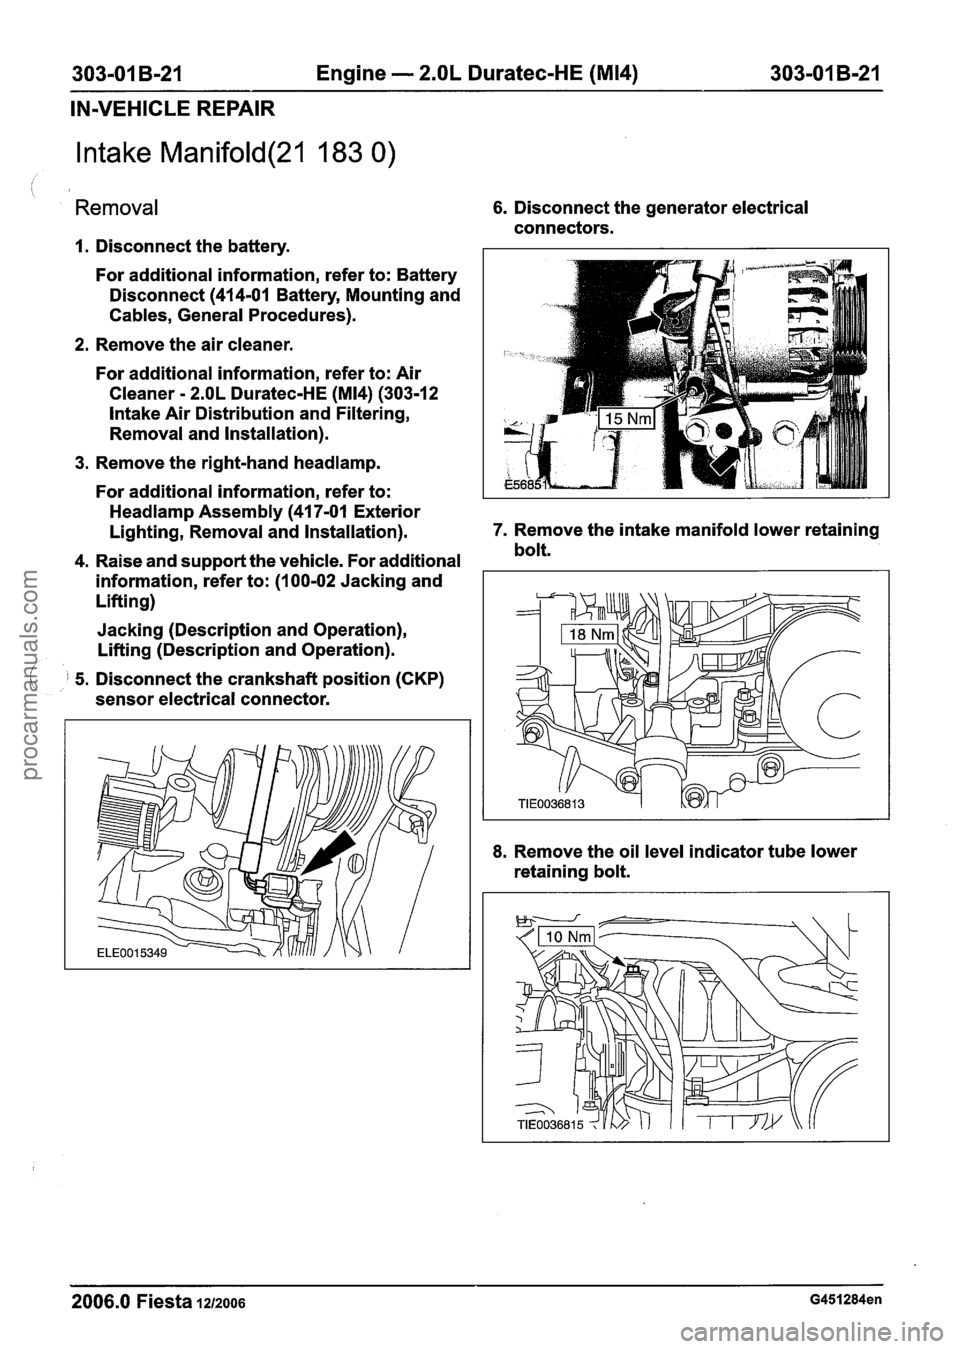
Removal
1. Disconnect the battery.
For additional information, refer to: Battery
Disconnect (414-01 Battery, Mounting and
Cables, General Procedures).
2. Remove the air cleaner.
For additional information, refer to: Air
Cleaner
- 2.OL Duratec-HE (M14) (303-12
lntake Air Distribution and Filtering,
Removal and Installation).
3. Remove the right-hand headlamp.
6. Disconnect the generator electrical
connectors.
For additional information, refer to:
Headlamp Assembly (41 7-01 Exterior
Lighting, Removal and Installation). 7.
Remove the intake manifold lower retaining
4. Raise and support the vehicle. For additional bolt.
information, refer to: (I
00-02 Jacking and
Lifting)
Jacking (Description and Operation),
Lifting (Description and Operation).
( 5. Disconnect the crankshaft position (CKP)
sensor electrical connector.
8. Remove the oil level indicator tube lower
retaining bolt.
2006.0 Fiesta 1212006 G451284en
procarmanuals.com
Page 651 of 1226

303-01 B-29 Engine - 2.OL Duratec-HE (M14) 303-01 B-29
IN-VEHICLE REPAIR
Remove and discard the CV joint boot clamp. 5. Install the special tool.
Installation 6. Raise the vehicle. For additional information,
refer to: (1 00-02 Jacking and Lifting)
1. N0TE:lnstall a new front friction washer.
Jacking (Description and Operation),
Install the front friction washer (engine
Lifting (Description and Operation).
shown removed for clarity).
7. Remove the cylinder block lower blanking
plug and install the special tool.
2. Install the crankshaft front seal.
For additional information, refer to:
8. N0TE:Only rotate the crankshaft in the
Crankshaft Front Seal (303-01 Engine - 2.OL normal direction of rotation.
Duratec-HE (M14), In-vehicle Repair).
Rotate the crankshaft using the crankshaft
3. Lower the vehicle.
pulley bolt until the crankshaft contacts the
4. N0TE:Only rotate the camshafts in the special
tool.
normal direction of rotation.
Carefully rotate the camshafts using a
spanner until the cams of cylinder no. 4 are
positioned at the valve overlap.
2006.0 Fiesta 1212006
procarmanuals.com
Page 652 of 1226
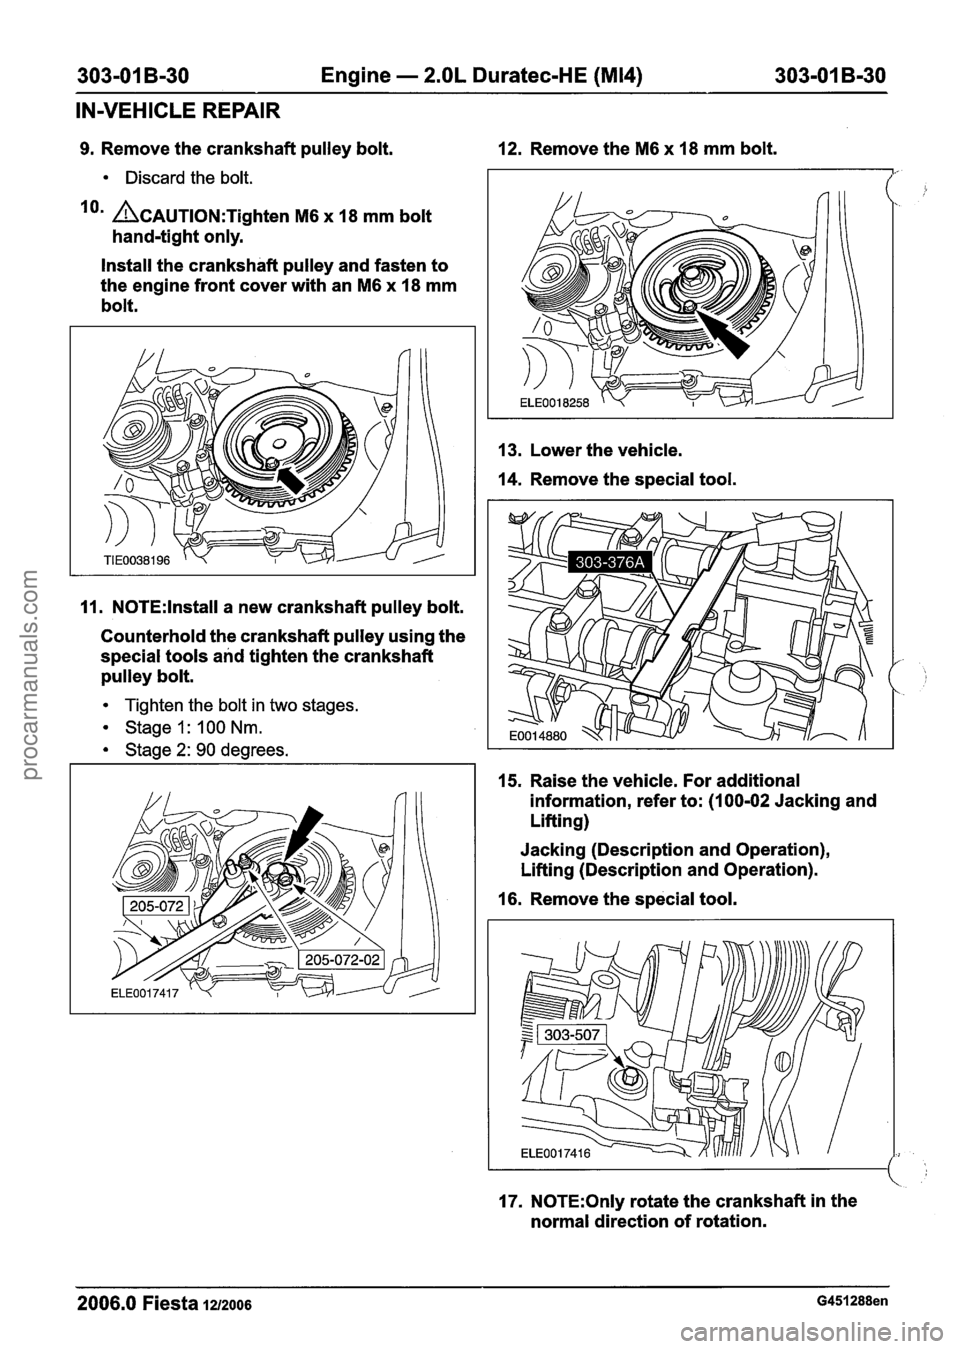
303-01 B-30 Engine - 2.OL Duratec-HE (M14) 303-01 B-30
IN-VEHICLE REPAIR
9. Remove the crankshaft pulley bolt. 12. Remove the M6 x 18 mm bolt.
Discard the bolt.
lorn ACAUTION:T~~~~~~ M6 x 18 mm bolt
hand-tight only.
Install the crankshaft pulley and fasten to
the engine front cover with an
M6 x 18 mm
bolt.
11. N0TE:lnstall a new crankshaft pulley bolt.
Counterhold the crankshaft pulley using the
special tools and tighten the crankshaft
pulley bolt.
Tighten the bolt in two stages.
Stage 1: I00 Nm.
Stage 2: 90 degrees. 13.
Lower
the vehicle.
14. Remove the special tool.
I 1 15. Raise the vehicle. For additional
information, refer to:
(100-02 Jacking and
Lifting)
Jacking (Description and Operation),
Lifting (Description and Operation).
16. Remove the special tool.
17. N0TE:Only rotate the crankshaft in the
normal direction of rotation.
2006.0 Fiesta 1212006 G451288en
procarmanuals.com