jacking FORD FIESTA 2007 Repair Manual
[x] Cancel search | Manufacturer: FORD, Model Year: 2007, Model line: FIESTA, Model: FORD FIESTA 2007Pages: 1226, PDF Size: 61.26 MB
Page 654 of 1226
303-01 B-32 Engine - 2.OL Duratec-HE (M14) 303-01 B-32
IN-VEHICLE REPAIR
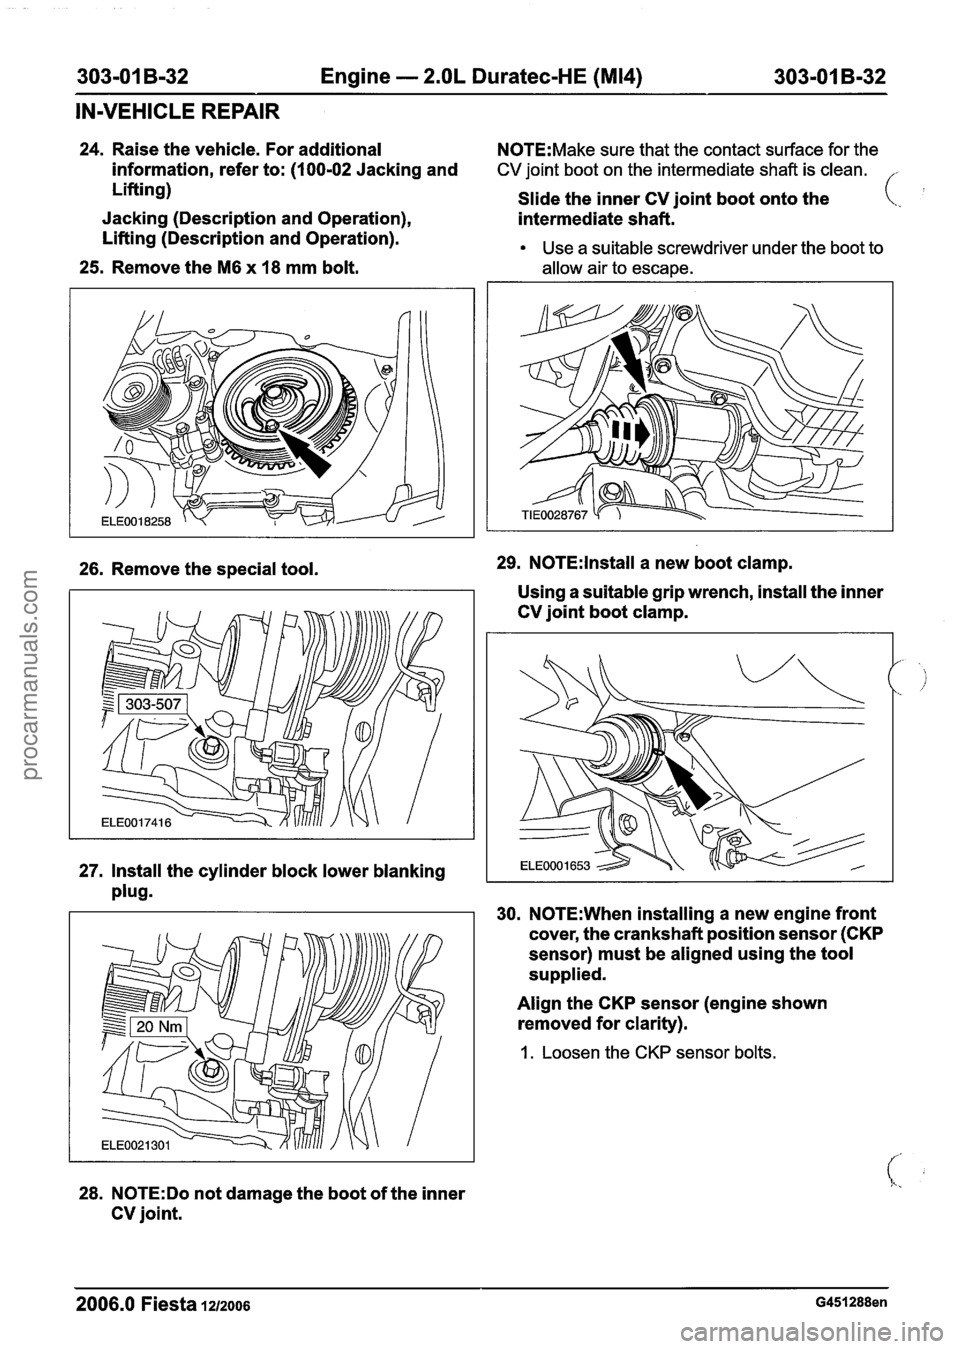
24. Raise the vehicle. For additional N0TE:Make sure that the contact surface for the
information, refer to: (100-02 Jacking and CV joint boot on the intermediate shaft is clean. ,
Lifting)
Slide the inner CV joint boot onto the
Jacking (Description and Operation),
intermediate shaft. (..
Lifting (Description and Operation). Use a suitable screwdriver under the boot to
25. Remove the M6 x 18 mm bolt. allow air to escape.
26. Remove the special tool. 29. N0TE:lnstall a
new boot clamp.
Using a suitable grip wrench, install the inner
CV joint boot clamp.
27. Install the cylinder block lower blanking
plug.
30. N0TE:When installing a new engine front
cover, the crankshaft position sensor
(CKP
sensor) must be aligned using the tool
supplied.
28.
N0TE:Do not damage the boot of the inner
CV joint. Align
the
CKP sensor (engine shown
removed for clarity).
1. Loosen the CKP sensor bolts.
2006.0 Fiesta 1212006 G451288en
procarmanuals.com
Page 663 of 1226
303-01 B-41 Engine - 2.OL Duratec-HE (M14) 303-01 B-41
IN-VEHICLE REPAIR
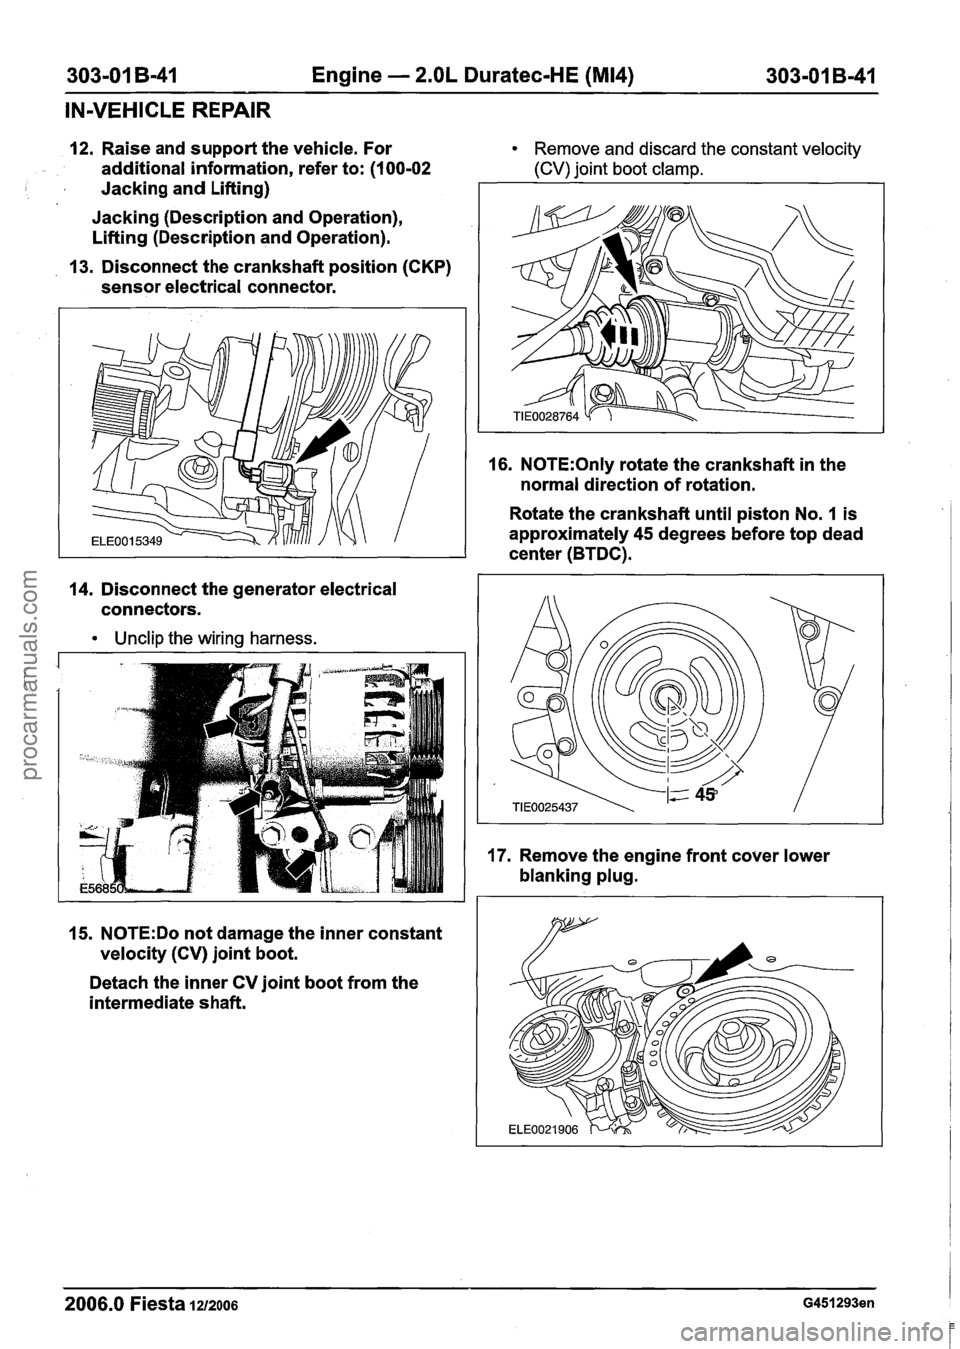
12. Raise and support the vehicle. For Remove and discard the constant velocity
additional information, refer to: (1 00-02 (CV) joint boot clamp.
I Jacking and Lifting)
Jacking (Description and Operation),
Lifting (Description and Operation).
13. Disconnect the crankshaft position (CKP)
sensor electrical connector.
14. Disconnect the generator electrical
connectors.
Unclip the wiring harness.
16. N0TE:Only rotate the crankshaft in the
normal direction of rotation.
Rotate the crankshaft until piston No.
1 is
approximately 45 degrees before top dead
center (BTDC).
15.
N0TE:Do not damage the inner constant
velocity (CV) joint boot.
Detach the inner CV joint boot from the
intermediate shaft.
2006.0 Fiesta 1212006 G451293en
procarmanuals.com
Page 666 of 1226
303-01 B-44 Engine - 2.OL Duratec-HE (M14) 303-01 B-44
IN-VEHICLE REPAIR
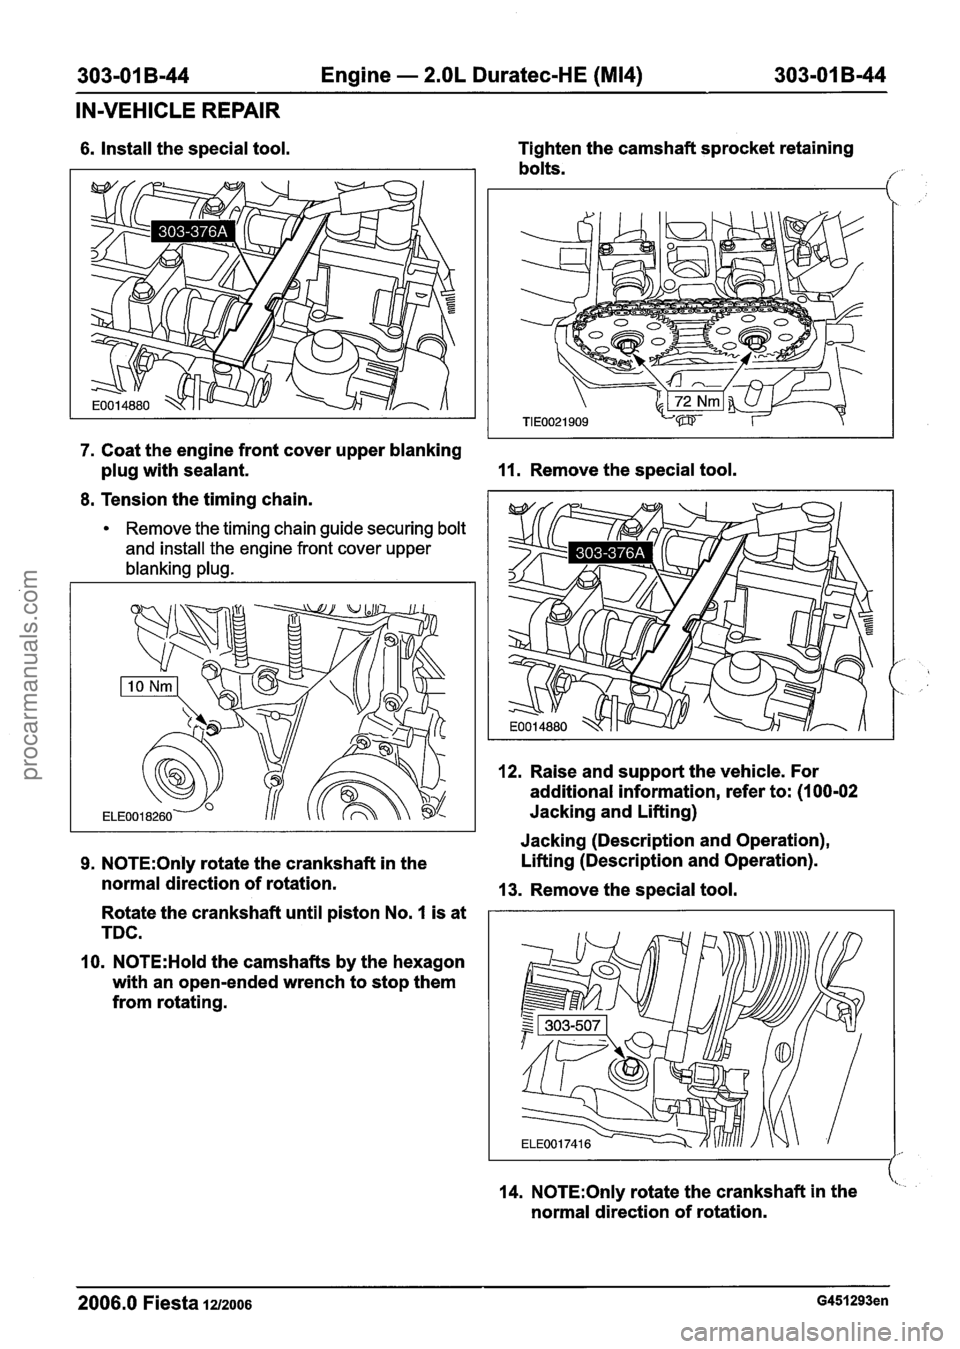
6. Install the special tool. Tighten
the camshaft sprocket retaining
bolts.
,
7. Coat the engine front cover upper blanking
plug with sealant.
11. Remove the special tool.
8. Tension the timing chain.
Remove the timing chain guide securing bolt
and install the engine front cover upper
blanking plug.
12. Raise and support the vehicle. For
additional information, refer to: (1
00-02
Jacking and Lifting) I I Jacking (Description and Operation),
9. N0TE:Only rotate the crankshaft in the Lifting
(Description and Operation).
normal direction of rotation.
13. Remove the special tool.
Rotate the crankshaft until piston No.
I is at
TDC.
10.
N0TE:Hold the camshafts by the hexagon
with an open-ended wrench to stop them
from rotating.
14.
N0TE:Only rotate the crankshaft in the <
normal direction of rotation.
2006.0 Fiesta 1212006 G451293en
procarmanuals.com
Page 668 of 1226
303-01 B-46 Engine - 2.OL Duratec-HE (M14) 303-01 B-46
IN-VEHICLE REPAIR
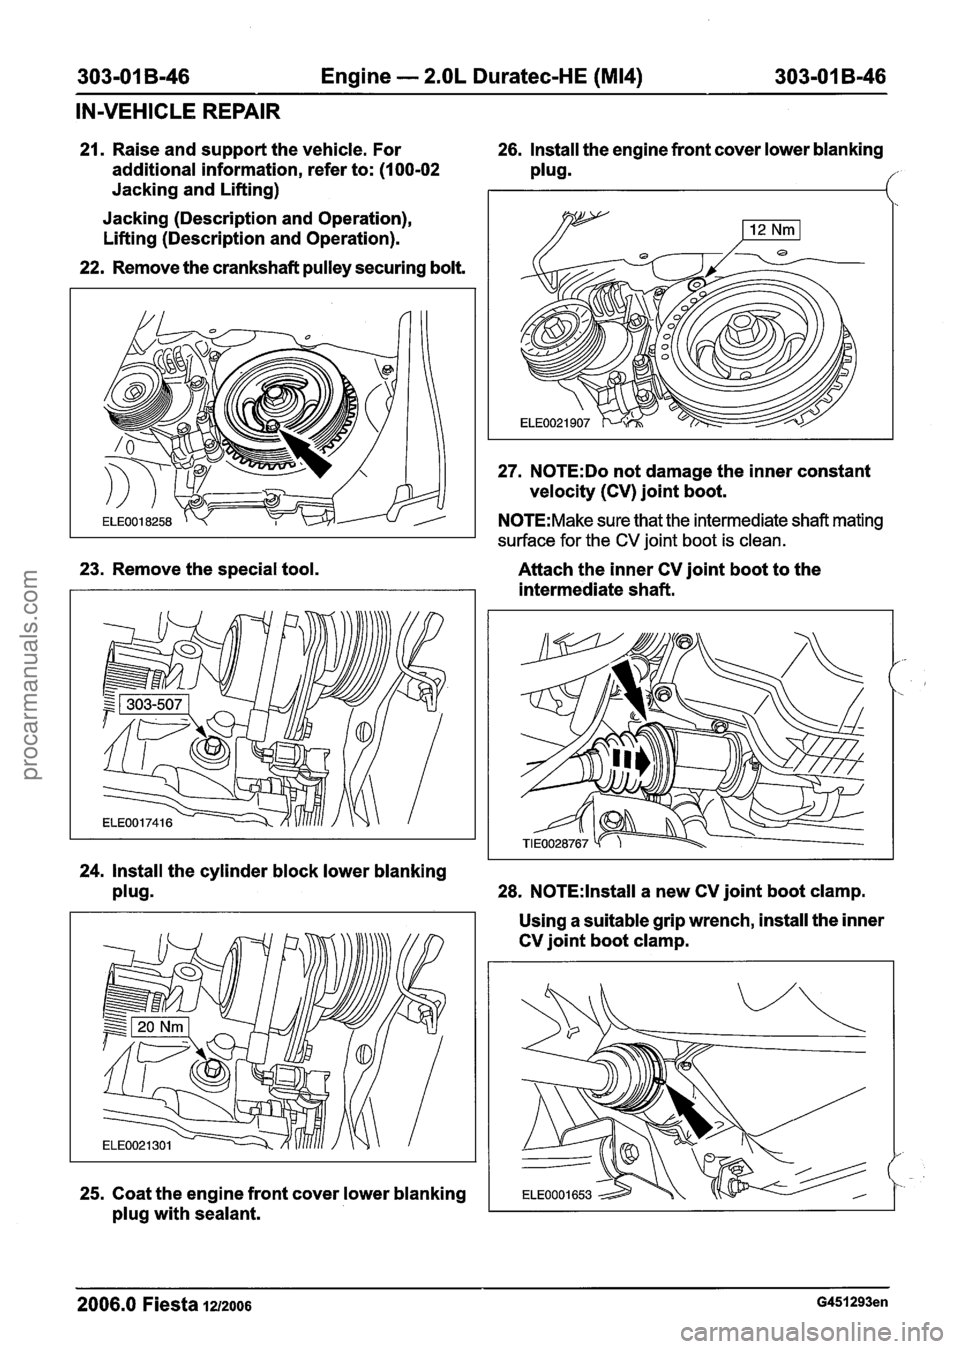
23. Remove the special tool.
21. Raise and support the vehicle. For 26. Install the engine front cover lower blanking
additional information, refer to:
(I 00-02 plug.
27. N0TE:Do not damage the inner constant
velocity (CV) joint boot.
Jacking
and Lifting)
Jacking (Description and Operation),
Lifting (Description and Operation).
22. Remove the crankshaft pulley securing bolt.
N0TE:Make sure that the intermediate shaft mating
surface for the
CV joint boot is clean.
ELE0021907
Attach the inner CV joint boot to the
intermediate shaft.
24. Install the cylinder block lower blanking
plugB 28. N0TE:lnstall a new CV joint boot clamp.
25. Coat the engine front cover lower blanking
plug with sealant. Using
a suitable grip wrench, install the inner
CV joint boot clamp.
2006.0 Fiesta 1212006 G451293en
procarmanuals.com
Page 671 of 1226
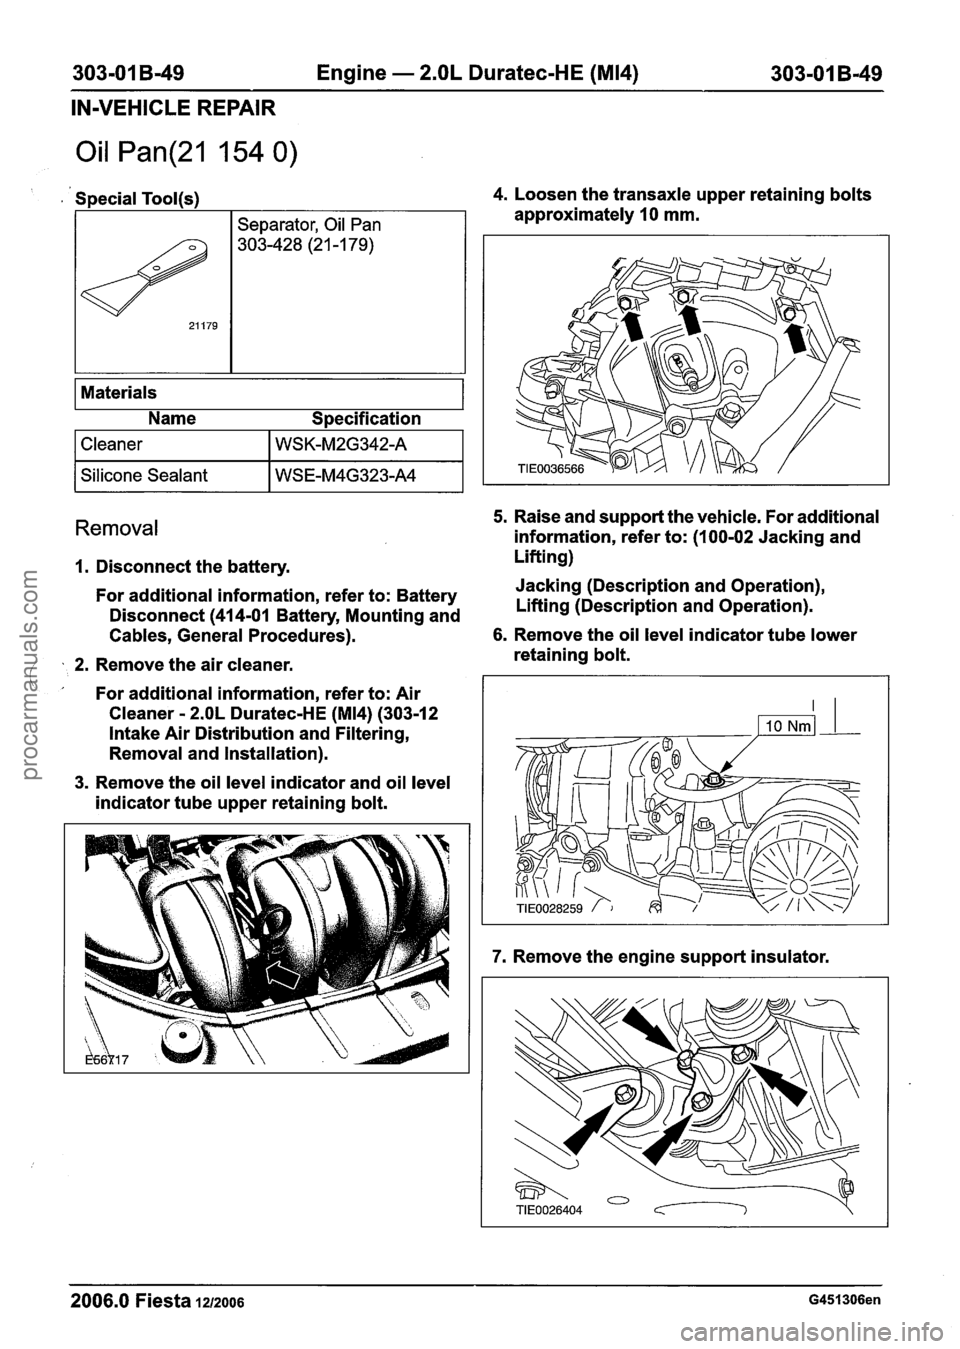
303-01 B-49 Engine - 2.OL Duratec-HE (M14) 303-01 B-49
IN-VEHICLE REPAIR
Oil Pan(21 154 0)
Materials
Name Specification
. Special Tool(s) 4. Loosen the transaxle upper retaining bolts
1 Cleaner I WSK-M2G342-A I
I Silicone Sealant I WSE-M4G323-A4 I
approximately 10 mm.
/ 21 179
Removal
1. Disconnect the battery.
Separator, Oil Pan
303-428 (21 -1
79)
5. Raise and support the vehicle. For additional
information, refer to: (100-02 Jacking and
Lifting)
-
For additional information, refer to: Battery Jacking
(Description and Operation),
Disconnect
(414-01 Battery, Mounting and Lifting
(Description and Operation).
Cables, General Procedures).
2. Remove the air cleaner.
' For additional information, refer to: Air
Cleaner
- 2.OL Duratec-HE (M14) (303-12
Intake Air Distribution and Filtering,
Removal and Installation).
3. Remove the oil level indicator and oil level
indicator tube upper retaining bolt.
6. Remove the oil level indicator tube lower
retaining bolt.
7. Remove the engine support insulator.
2006.0 Fiesta 1212006 G451306en
procarmanuals.com
Page 687 of 1226
303-01 B-65 Engine - 2.OL Duratec-HE (M14) 303-01 B-65
IN-VEHICLE REPAIR
151
Exhaust manifold
See Removal Detail
Item Description Item Description
Removal Details
See Installation Detail
1 6 ~xhaust manifold gasket
I See Installation Detail
1 3. To install, reverse the removal procedure.
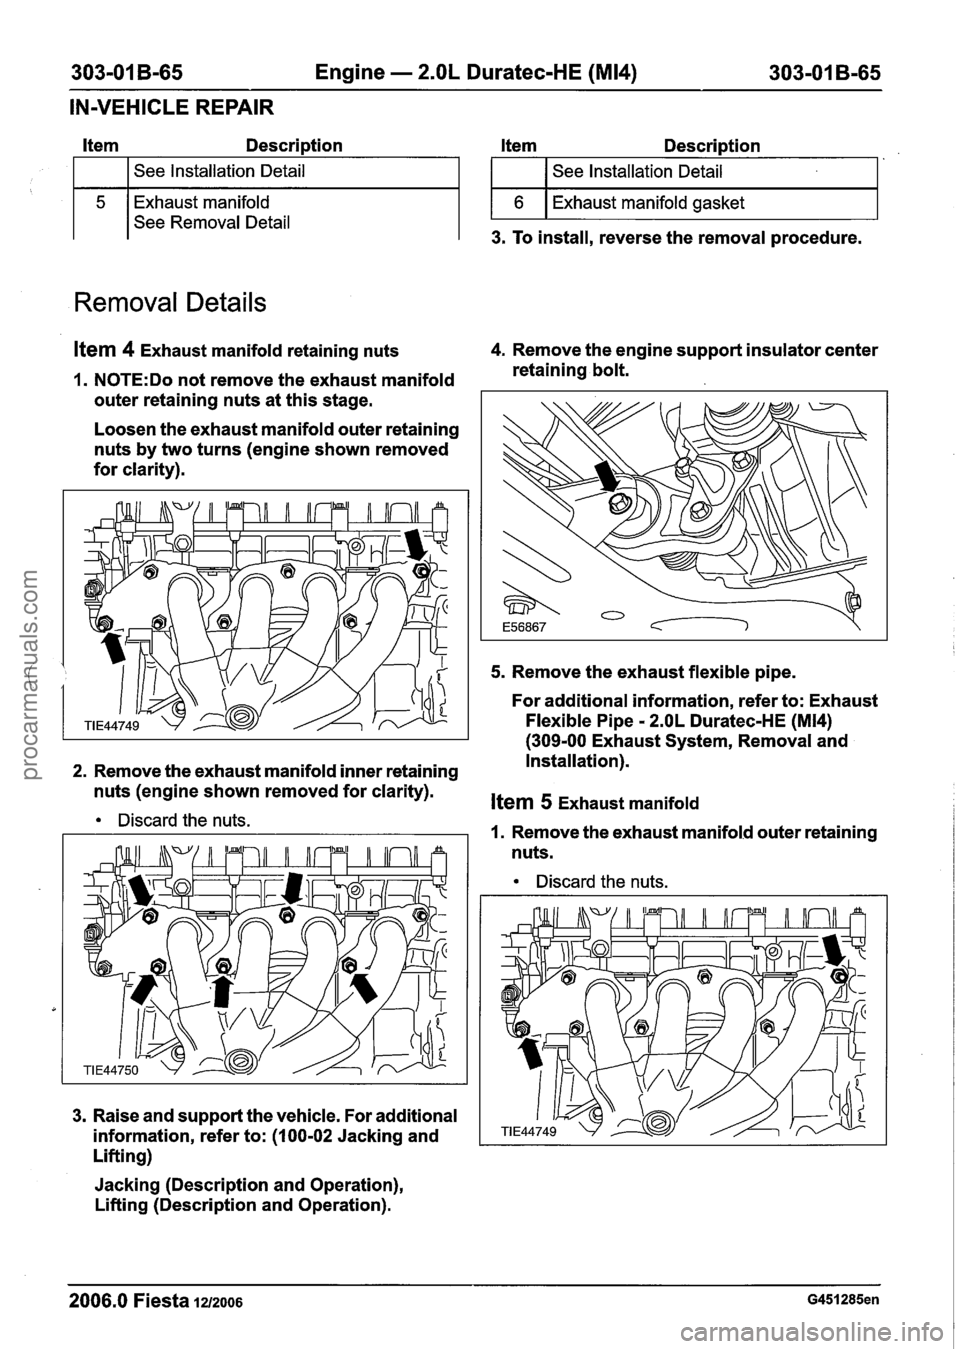
Item 4 Exhaust manifold retaining nuts 4.
Remove the engine support insulator center
1. N0TE:Do not remove the exhaust manifold retaining
bolt.
outer retaining nuts at this stage.
Loosen the exhaust manifold outer retaining
nuts by two turns (engine shown removed
for clarity).
i 5. Remove the exhaust flexible pipe.
For additional information, refer to: Exhaust
Flexible Pipe
- 2.OL Duratec-HE (M14)
(309-00 Exhaust System, Removal and
2. Remove the exhaust manifold inner retaining Installation).
nuts (engine shown removed for clarity).
kern 5 Exhaust manifold
Discard the nuts. I. Remove the exhaust manifold outer retaining
nuts.
Discard the nuts.
3. Raise and support the vehicle. For additional
information, refer to: (1 00-02 Jacking and
Lifting)
Jacking (Description and Operation),
Lifting (Description and Operation).
2006.0 Fiesta 1212006 G451285en
procarmanuals.com
Page 695 of 1226
303-01 B-73 Engine - 2.OL Duratec-HE (M14) 303-01 B-73
IN-VEHICLE REPAIR
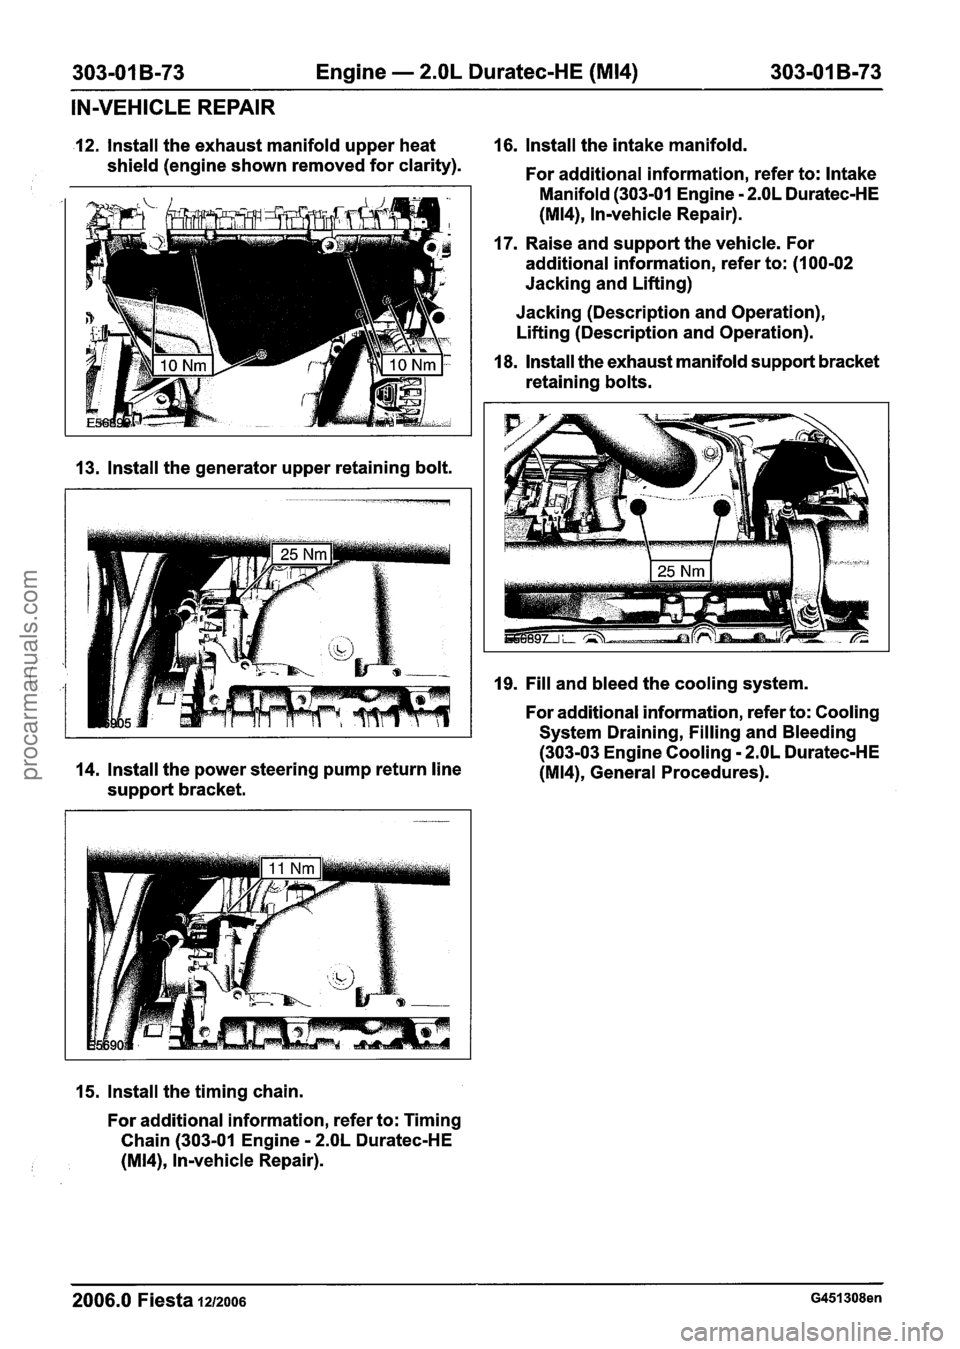
12. Install the exhaust manifold upper heat 16.
Install the intake manifold.
shield (engine shown removed for clarity).
For additional information, refer to: Intake
Manifold (303-01 Engine
- 2.OL Duratec-HE
(M14), ln-vehicle Repair).
17. Raise and support the vehicle. For
additional information, refer to: (1 00-02
Jacking and Lifting)
Jacking (Description and Operation),
Lifting (Description and Operation).
13. lnstall the generator upper retaining bolt.
18, lnstall the exhaust manifold support bracket
retaining bolts.
19. Fill and bleed the cooling system.
For additional information, refer to: Cooling
System Draining, Filling and Bleeding
(303-03 Engine Cooling
- 2.OL Duratec-HE
14. Install the power steering pump return line
(M14), General Procedures).
support bracket.
15. lnstall the timing chain.
For additional information, refer to: Timing
Chain (303-01 Engine
- 2.OL Duratec-HE
(M14), ln-vehicle Repair).
2006.0 Fiesta 12/2006 G451308en
procarmanuals.com
Page 700 of 1226
303-01 B-78 Engine - 2.OL Duratec-HE (M14) 303-01 B-78
REMOVAL
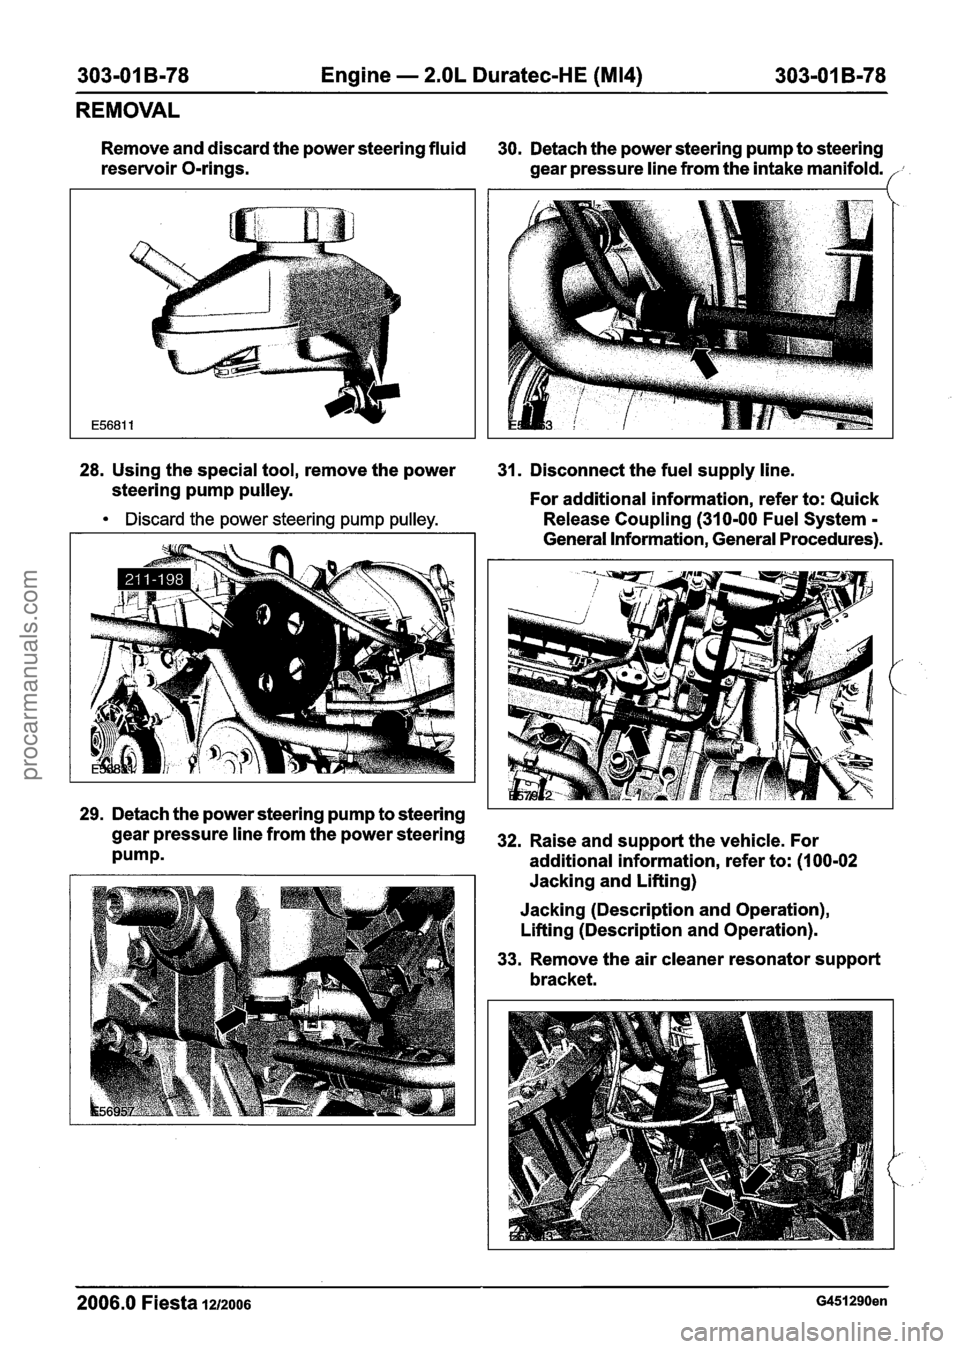
Remove and discard the power steering fluid
30. Detach the power steering pump to steering
reservoir O-rings.
gear pressure line from the intake manifold.
28. Using the special tool, remove the power
31. Disconnect the fuel supply line.
steering pump pulley.
For additional information, refer to: Quick
Discard the power steering pump pulley. Release Coupling (310-00 Fuel System - - - - -
General information, General procedures).
,'-
', .
29. Detach the power steering pump to steering
gearpressurelinefromthepowersteering 32. Raiseands~pportthevehicle~For
Pumpm additional information, refer to: (I 00-02
Jacking and Lifting)
Jacking (Description and Operation),
Lifting (Description and Operation).
33. Remove the air cleaner resonator support
bracket.
2006.0 Fiesta 1212006 G451290en
procarmanuals.com
Page 703 of 1226
303-01 B-81 Engine - 2.OL Duratec-HE (M14) 303-01 B-81
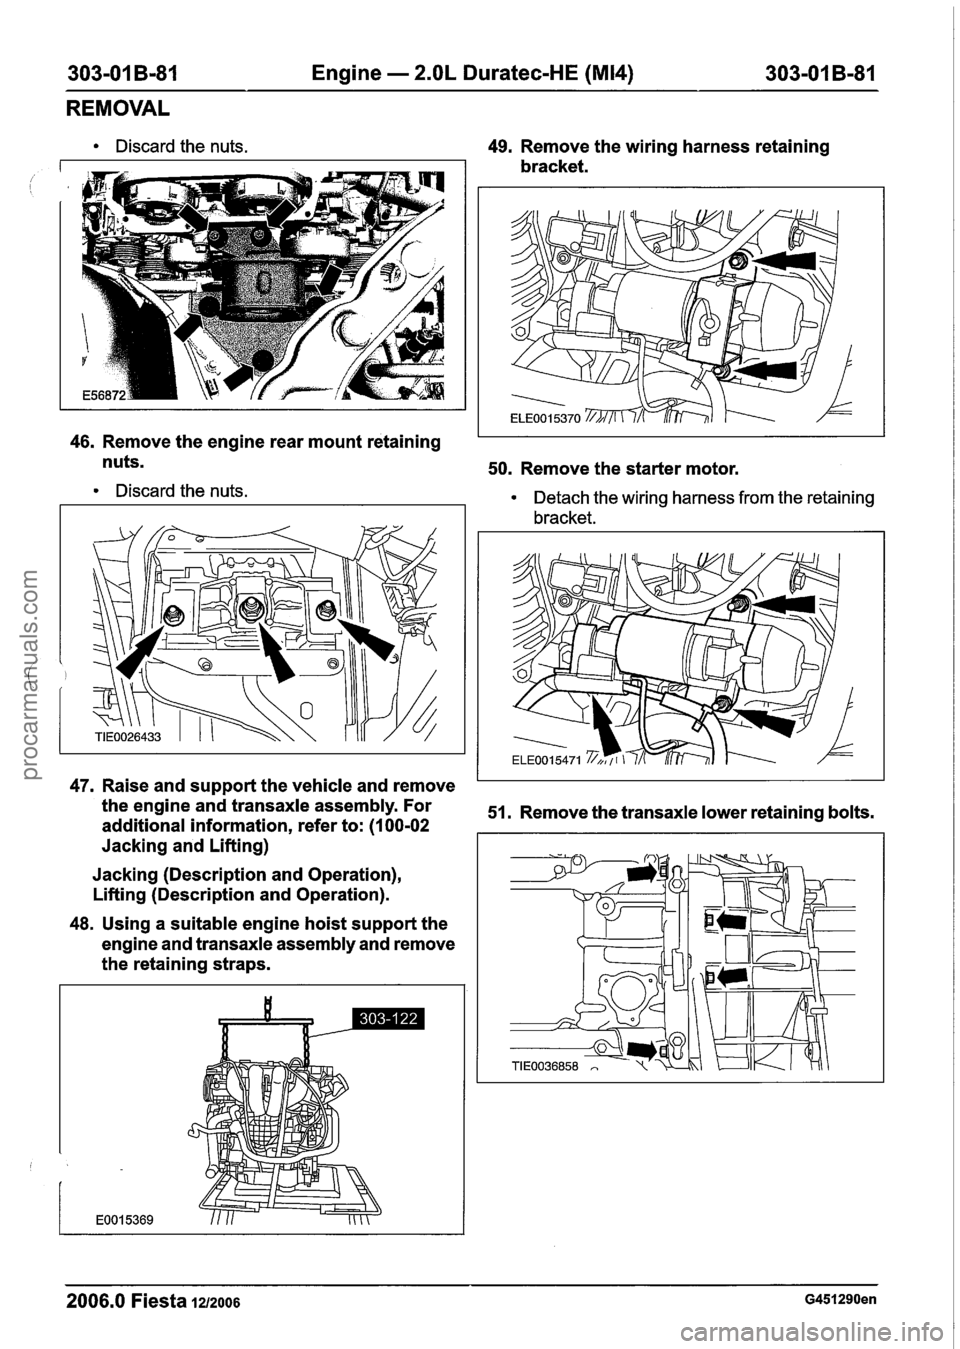
REMOVAL
Discard the nuts. 49. Remove the wiring harness retaining
bracket.
46. Remove the engine rear mount retaining
nuts.
50. Remove the starter motor.
Discard the nuts. Detach the wiring harness from the retaining
bracket.
47. Raise and support the vehicle and remove
the engine and transaxle assembly. For
51. Remove the transaxle lower retaining bolts.
additional information, refer to: (1 00-02
Jacking and Lifting)
Jacking (Description and Operation),
Lifting (Description and Operation).
48. Using a suitable engine hoist support the
engine and transaxle assembly and remove
the retaining straps.
2006.0 Fiesta 1212006 G451290en
procarmanuals.com
Page 735 of 1226
303-01 B-I 13 Engine - 2.OL Duratec-HE (M14) 303-01 B-113
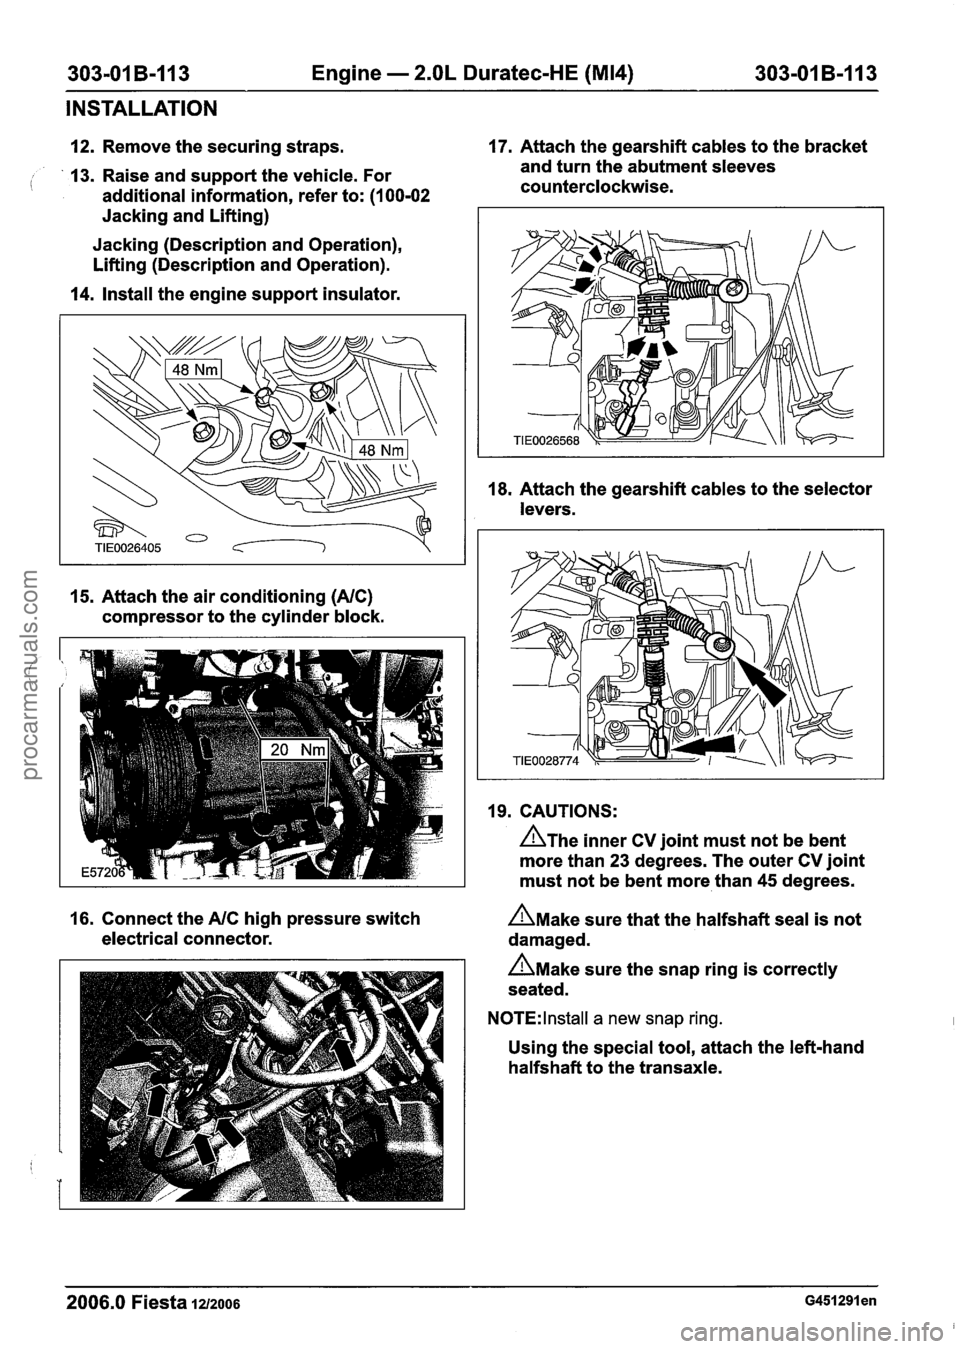
INSTALLATION
12. Remove the securing straps. 17.
Attach the gearshift cables to the bracket
13. Raise and support the vehicle. For and
turn the abutment sleeves
( additional information, refer to: (I 00-02 counterclockwise.
Jacking and Lifting)
Jacking (Description and Operation),
Lifting (Description and Operation).
14. Install the engine support insulator.
15. Attach the air conditioning (NC)
compressor to the cylinder block. 18.
Attach the gearshift cables to the selector
levers.
19. CAUTIONS:
A~he inner CV joint must not be bent
more than 23 degrees. The outer CV joint
must not be bent more than 45 degrees.
16. Connect the
NC high pressure switch n~ake sure that the halfshaft seal is not
electrical connector. damaged.
n~ake sure the snap ring is correctly
seated.
N0TE:lnstall a new snap ring.
Using the special tool, attach the left-hand
halfshaft to the transaxle.
2006.0 Fiesta 1212006 ~451291 en
procarmanuals.com