head FORD FIESTA 2007 Manual Online
[x] Cancel search | Manufacturer: FORD, Model Year: 2007, Model line: FIESTA, Model: FORD FIESTA 2007Pages: 1226, PDF Size: 61.26 MB
Page 643 of 1226
303-01 B-21 Engine - 2.OL Duratec-HE (M14) 303-01 B-21
IN-VEHICLE REPAIR
Intake Manifold(21 183 0)
Removal
1. Disconnect the battery.
For additional information, refer to: Battery
Disconnect (414-01 Battery, Mounting and
Cables, General Procedures).
2. Remove the air cleaner.
For additional information, refer to: Air
Cleaner
- 2.OL Duratec-HE (M14) (303-12
lntake Air Distribution and Filtering,
Removal and Installation).
3. Remove the right-hand headlamp.
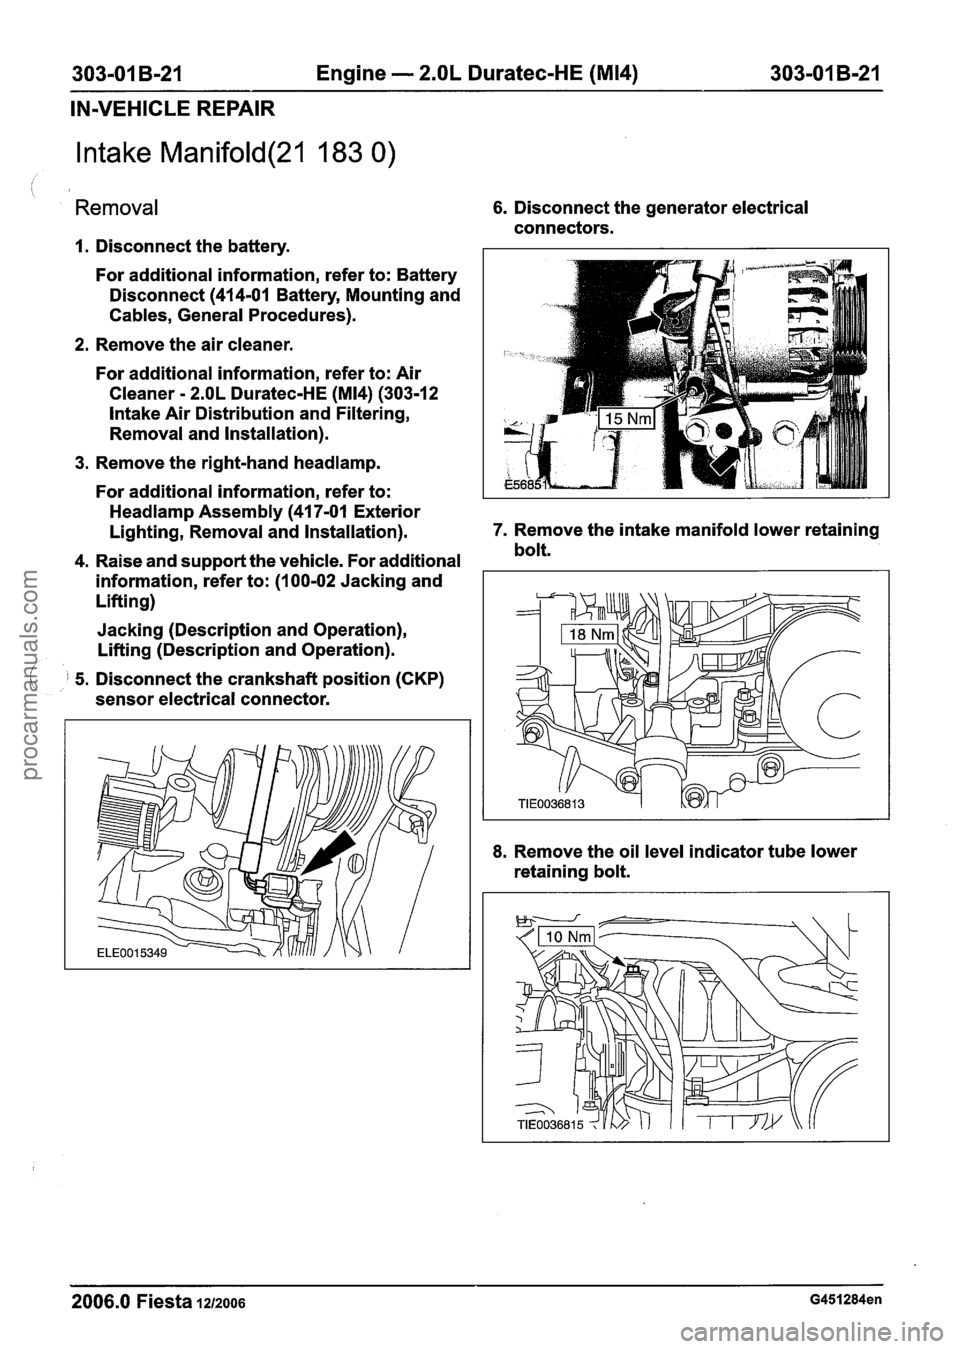
6. Disconnect the generator electrical
connectors.
For additional information, refer to:
Headlamp Assembly (41 7-01 Exterior
Lighting, Removal and Installation). 7.
Remove the intake manifold lower retaining
4. Raise and support the vehicle. For additional bolt.
information, refer to: (I
00-02 Jacking and
Lifting)
Jacking (Description and Operation),
Lifting (Description and Operation).
( 5. Disconnect the crankshaft position (CKP)
sensor electrical connector.
8. Remove the oil level indicator tube lower
retaining bolt.
2006.0 Fiesta 1212006 G451284en
procarmanuals.com
Page 646 of 1226
303-01 B-24 Engine - 2.OL Duratec-HE (M14) 303-01 B-24
IN-VEHICLE REPAIR
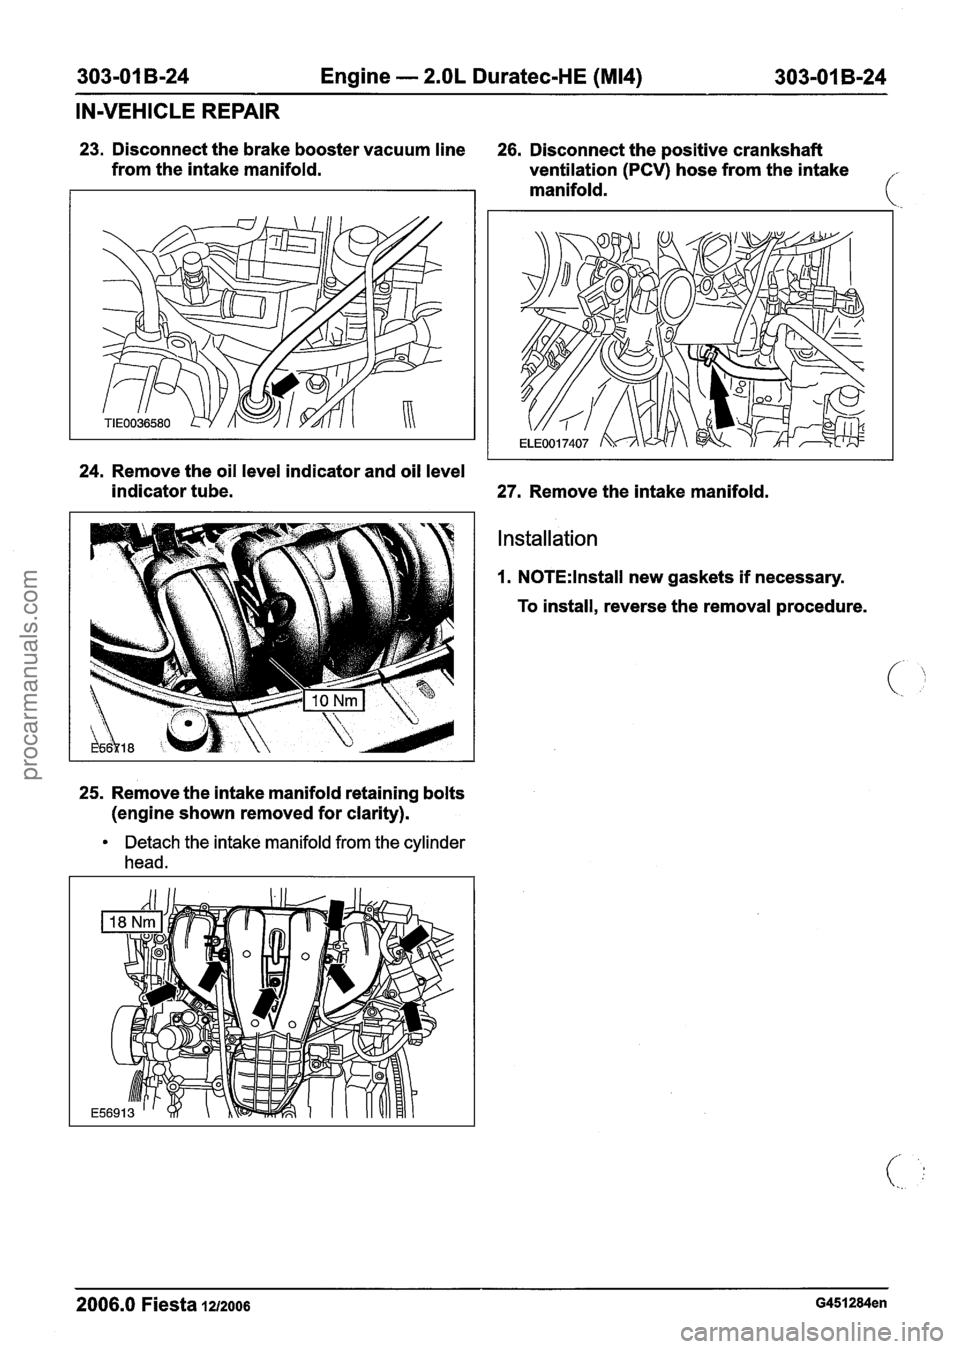
23. Disconnect the brake booster vacuum line
26. Disconnect the positive crankshaft
from the intake manifold.
ventilation
(PCV) hose from the intake
manifold.
24. Remove the oil level indicator and oil level
indicator tube.
27. Remove the intake manifold.
Installation
1. N0TE:lnstall new gaskets if necessary.
To install, reverse the removal procedure.
25. Remove the intake manifold retaining bolts
(engine shown removed for clarity).
Detach the intake manifold from the cylinder
head.
2006.0 Fiesta 12/2006 G451284en
procarmanuals.com
Page 657 of 1226
303-01 B-35 Engine - 2.OL Duratec-HE (M14) 303-01 B-35 -- - - - - -
IN-VEHICLE REPAIR
Valve Seals(21 238 0)
Special Tool(s)
I I Compressor, Valve Spring I
Adapter for 303-361 A
303-36 1 -02 (2 1
- 1 55-02A)
Adapter, Air Supply (Cylinder
Head)
303-363 (2
I -1 57)
21157
I I Pliers, Valve Stem Seal
Removal
1. Remove the camshafts.
For additional information, refer to:
Camshafts (303-01 Engine
- 2.OL
Duratec-HE (M14), In-vehicle Repair). 2.
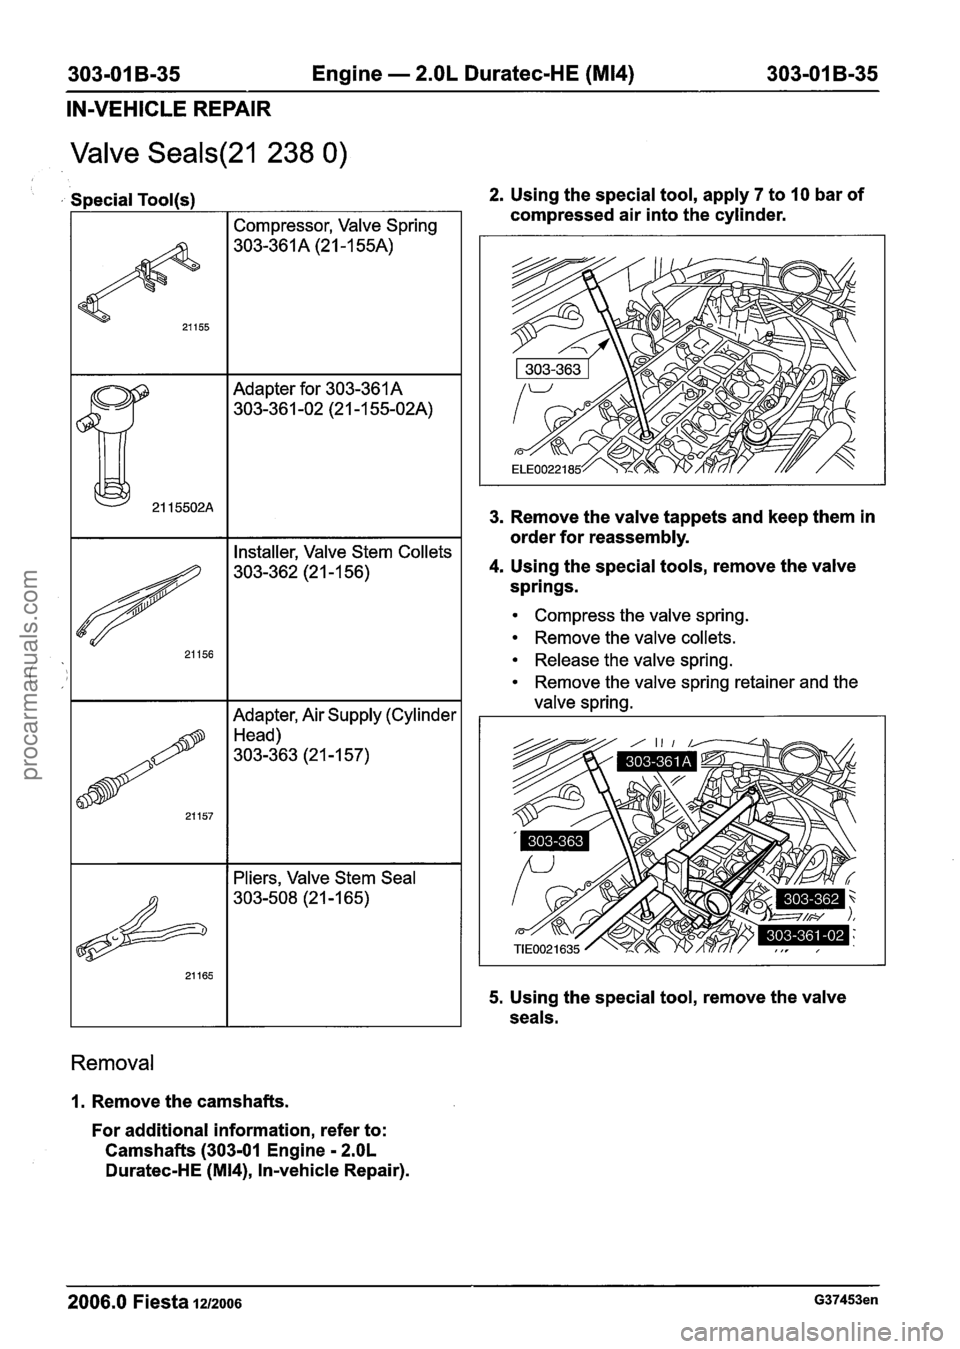
Using the special tool, apply
7 to 10 bar of
compressed air into the cylinder.
3. Remove the valve tappets and keep them in
order for reassembly.
4. Using the special tools, remove the valve
springs.
Compress the valve spring.
Remove the valve collets.
Release the valve spring.
Remove the valve spring retainer and the
valve spring.
5. Using the special tool, remove the valve
seals.
2006.0 Fiesta 1212006 G37453en
procarmanuals.com
Page 659 of 1226
303-01 B-37 Engine - 2.OL Duratec-HE (M14) 303-01 B-37
IN-VEHICLE REPAIR
Valves(21 2 1 5 4)
Adapter for 303-361 A
303-361 -02 (2 1-1 55-02A)
Special Tool(s)
I I Pliers, Valve Stem Seal I
21155
Removal
Compressor, Valve Spring
303-361 A (21 -1 55A)
1. Remove the cylinder head.
For additional information, refer to: Cylinder
Head (303-01 Engine
- 2.OL Duratec-HE
(M14), In-vehicle Repair).
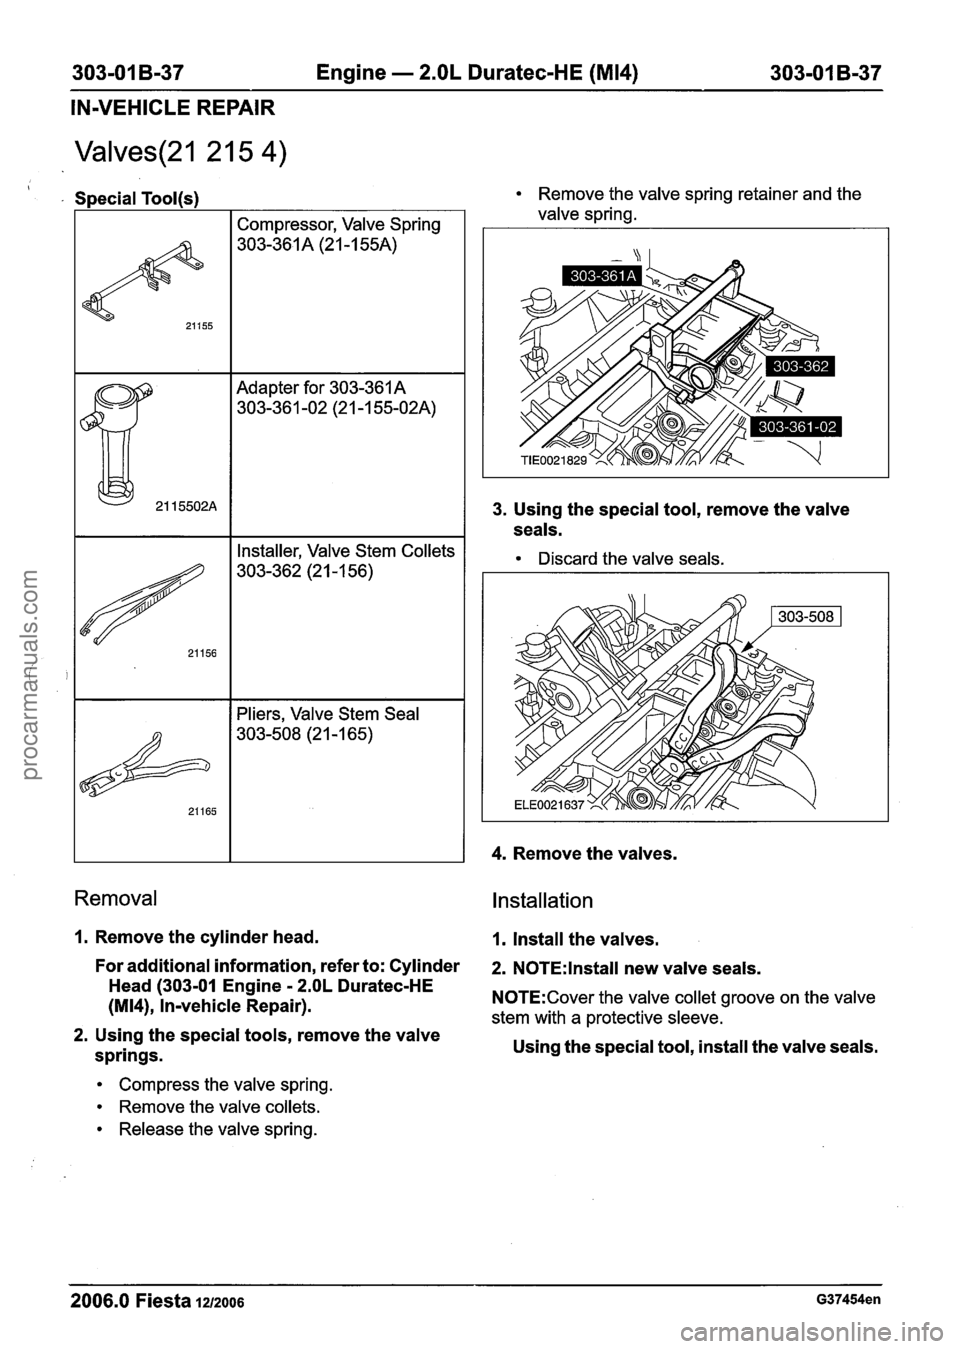
2. Using the special tools, remove the valve
springs.
Compress the valve spring.
Remove the valve collets.
Release the valve spring.
Remove the valve spring retainer and the
valve spring.
3. Using the special tool, remove the valve
seals.
Discard the valve seals.
4. Remove the valves.
Installation
1. Install the valves.
2. N0TE:lnstall new valve seals.
N0TE:Cover the valve collet groove on the valve
stem with a protective sleeve.
Using the special tool, install the valve seals.
2006.0 Fiesta 12/2006 G37454en
procarmanuals.com
Page 660 of 1226
303-01 B-38 Engine - 2.OL Duratec-HE (M14) 303-01 B-38 - --
IN-VEHICLE REPAIR
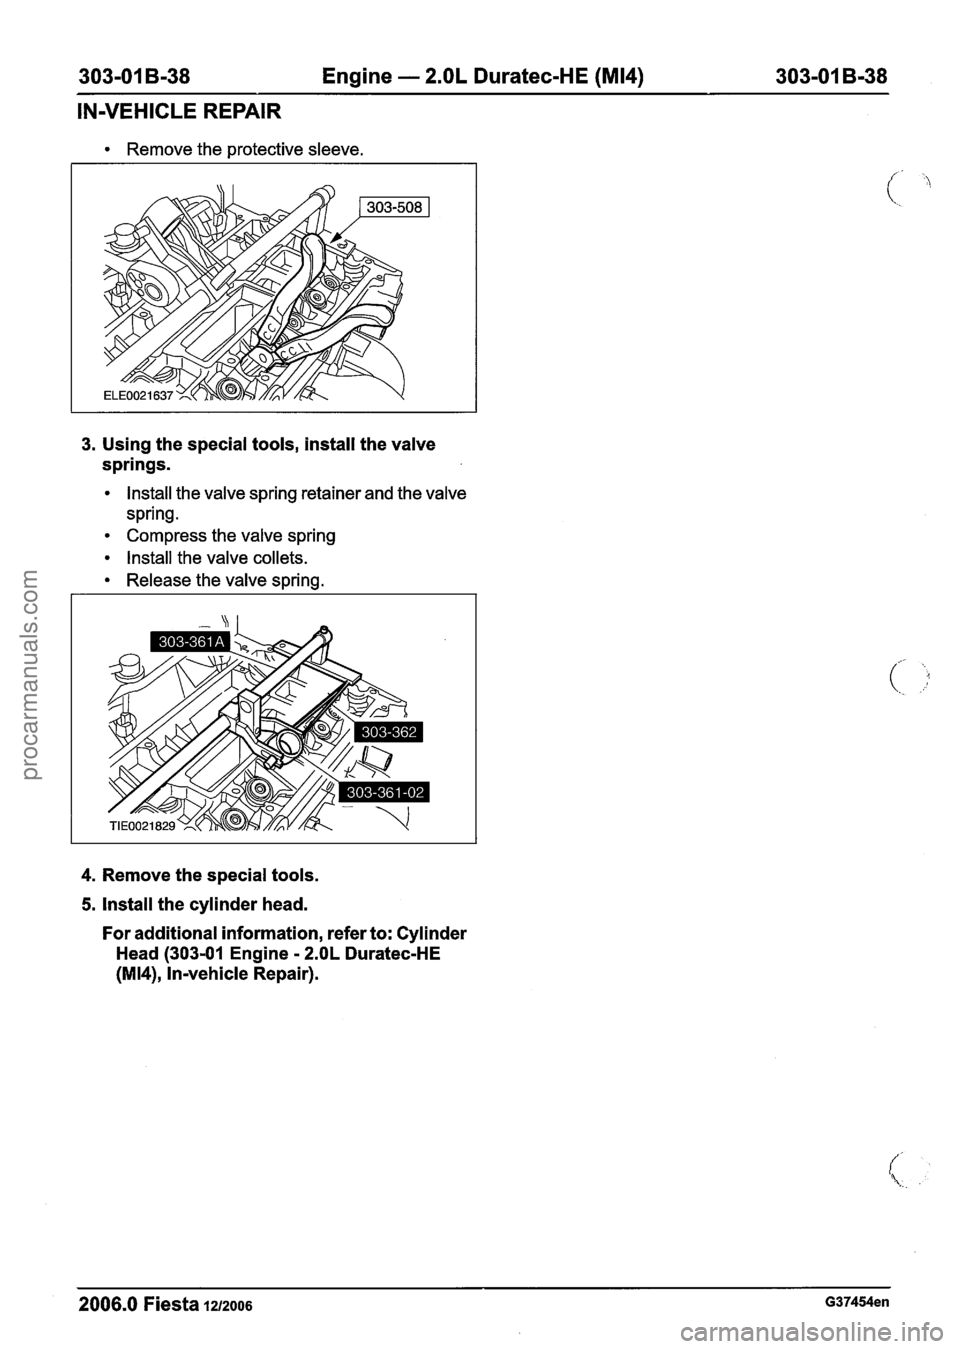
Remove the protective sleeve.
3.
Using the special tools, install the valve
springs.
lnstall the valve spring retainer and the valve
spring.
Compress the valve spring
Install the valve collets.
Release the valve spring.
4. Remove the special tools.
5. lnstall the cylinder head.
For additional information, refer to: Cylinder
Head (303-01 Engine
- 2.OL Duratec-HE
(M14), Invehicle Repair).
2006.0 Fiesta 1212006 G37454en
procarmanuals.com
Page 665 of 1226
303-01 B-43 Engine - 2.OL Duratec-HE (M14) 303-01 B-43
IN-VEHICLE REPAIR
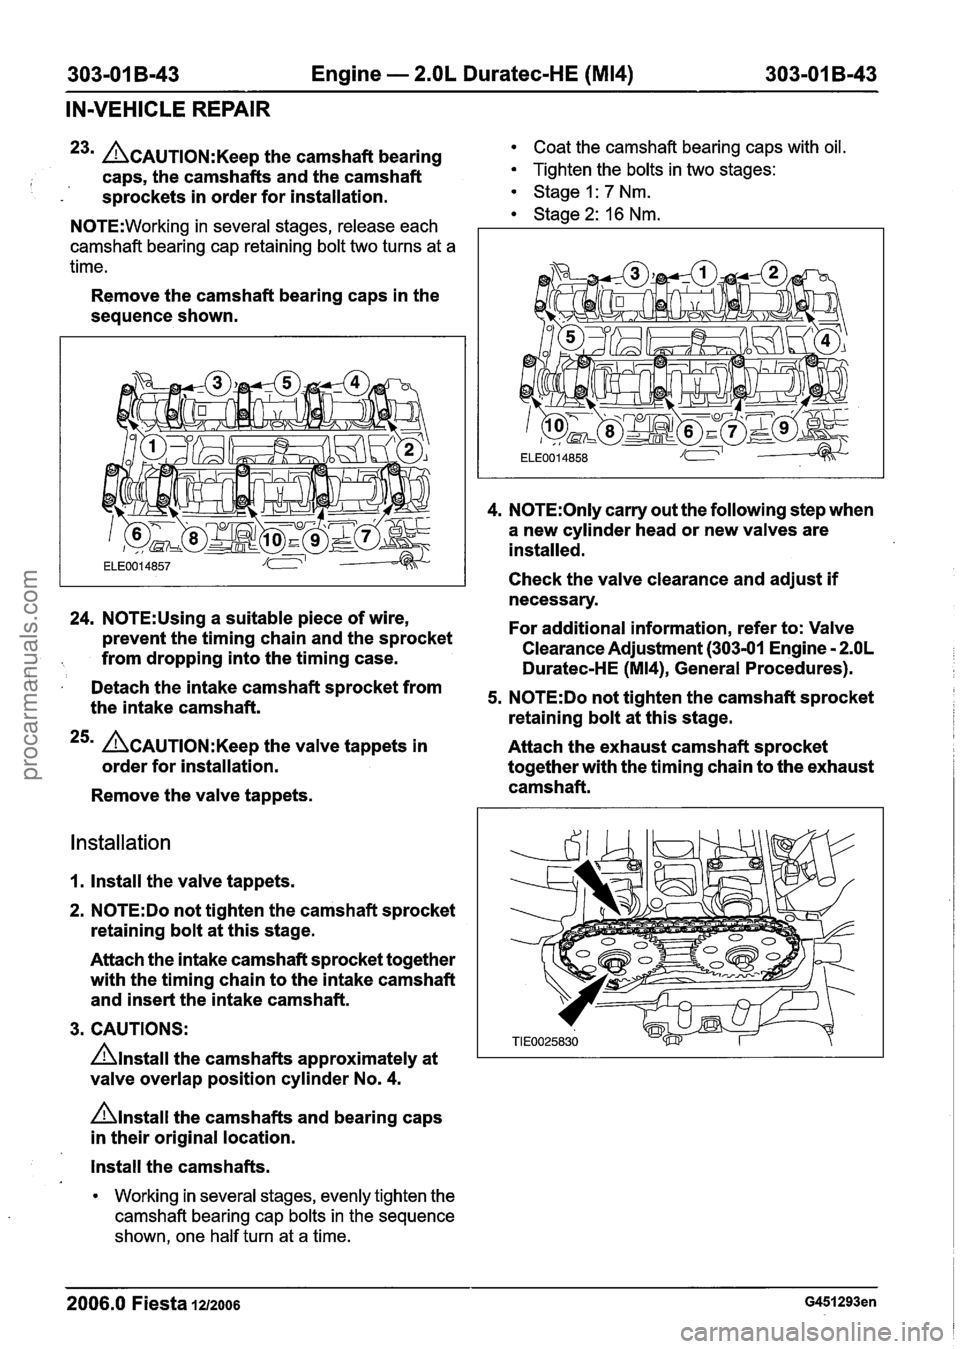
23m L?~AUTION:K~~~ the camshaft bearing Coat the camshaft bearing caps with oil.
I caps, the camshafts and the camshaft Tighten the bolts in two stages:
- s~rockets in order for installation. Stage I: 7 Nm. 1 Stage 2: 16 Nm. N0TE:Working in several stages, release each
camshaft bearing cap retaining bolt two turns at a
time.
Remove the camshaft bearing caps in the
sequence shown.
24. N0TE:Using a suitable piece of wire,
prevent the timing chain and the sprocket
from dropping into the timing case.
I Detach the intake camshaft sprocket from
the intake camshaft.
25m ACAUTION:K~~~ the valve tappets in
order for installation.
Remove the valve tappets.
Installation
1. Install the valve tappets.
2.
N0TE:Do not tighten the camshaft sprocket
retaining bolt at this stage.
Attach the intake camshaft sprocket together
with the timing chain to the intake camshaft
and insert the intake camshaft.
3. CAUTIONS:
Anstall the camshafts approximately at
valve overlap position cylinder No.
4.
nlnstall the camshafts and bearing caps
in their original location.
4. N0TE:Only carry out the following step when
a new cylinder head or new valves are
installed.
Check the valve clearance and adjust
if
necessary.
For additional information, refer to: Valve
Clearance Adjustment (303-01 Engine
- 2.OL
Duratec-HE (M14), General Procedures).
5. N0TE:Do not tighten the camshaft sprocket
retaining bolt at this stage.
Attach the exhaust camshaft sprocket
together with the timing chain to the exhaust
camshaft.
Install the camshafts.
Working in several stages, evenly tighten the
camshaft bearing cap bolts in the sequence
shown, one half turn at a time.
2006.0 Fiesta 1212006
procarmanuals.com
Page 691 of 1226
303-01 B-69 Engine - 2.OL Duratec-HE (M14) 303-01 B-69
IN-VEHICLE REPAIR
Cylinder Head(21 163 0)
Special Tool(s) 5. Remove the timing chain.
I Materials I
24003
I I Name Specification
Remover/lnstaller, Hose
Clamp
303-397
Removal
For additional information, refer to: Timing
Chain (303-01 Engine
- 2.OL Duratec-HE
(M14), Invehicle Repair).
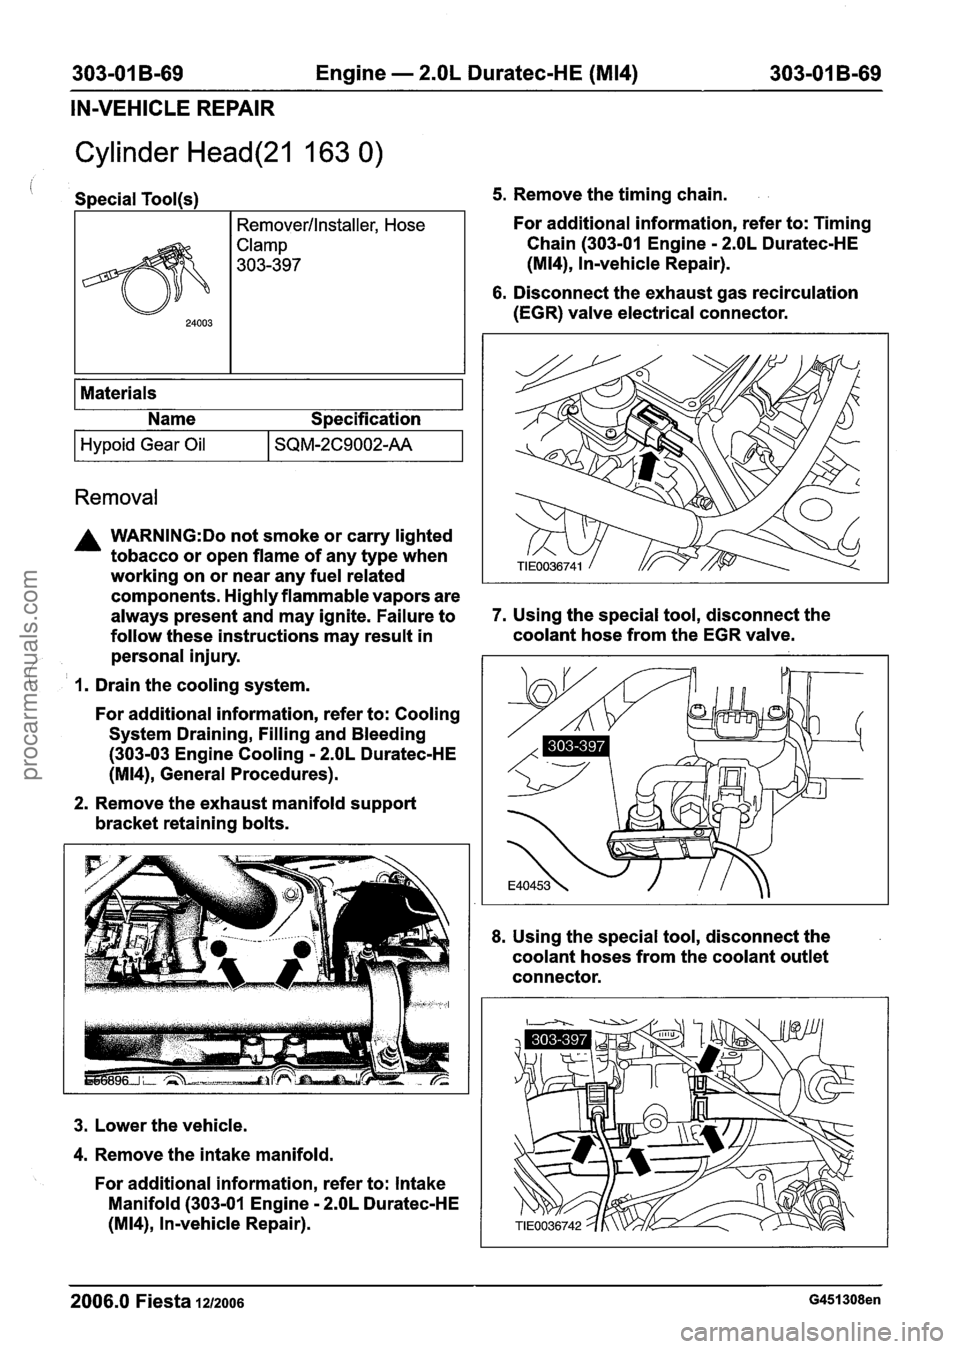
6. Disconnect the exhaust gas recirculation
(EGR) valve electrical connector.
Hypoid Gear Oil
A WARNING:Do not smoke or carry lighted
tobacco or open flame of any type when
working on or near any fuel related
components. Highly flammable vapors are
always present and may ignite. Failure to
7. Using the special tool, disconnect the
follow these instructions may result in coolant hose
from the EGR valve.
personal injury.
/
SQM-2C9002-AA
( I. Drain the cooling system.
For additional information, refer to: Cooling
System Draining, Filling and Bleeding
(303-03 Engine Cooling
- 2.OL Duratec-HE
(M14), General Procedures).
2. Remove the exhaust manifold support
bracket retaining bolts.
3. Lower the vehicle.
4. Remove the intake manifold.
For additional information, refer to: Intake
Manifold (303-01 Engine
- 2.OL Duratec-HE
(M14), In-vehicle Repair).
8. Using the special tool, disconnect the
coolant hoses from the coolant outlet
connector.
2006.0 Fiesta 1212006 G451308en
procarmanuals.com
Page 692 of 1226
303-01 B-70 Engine - 2.OL Duratec-HE (M14) 303-01 B-70
IN-VEHICLE REPAIR
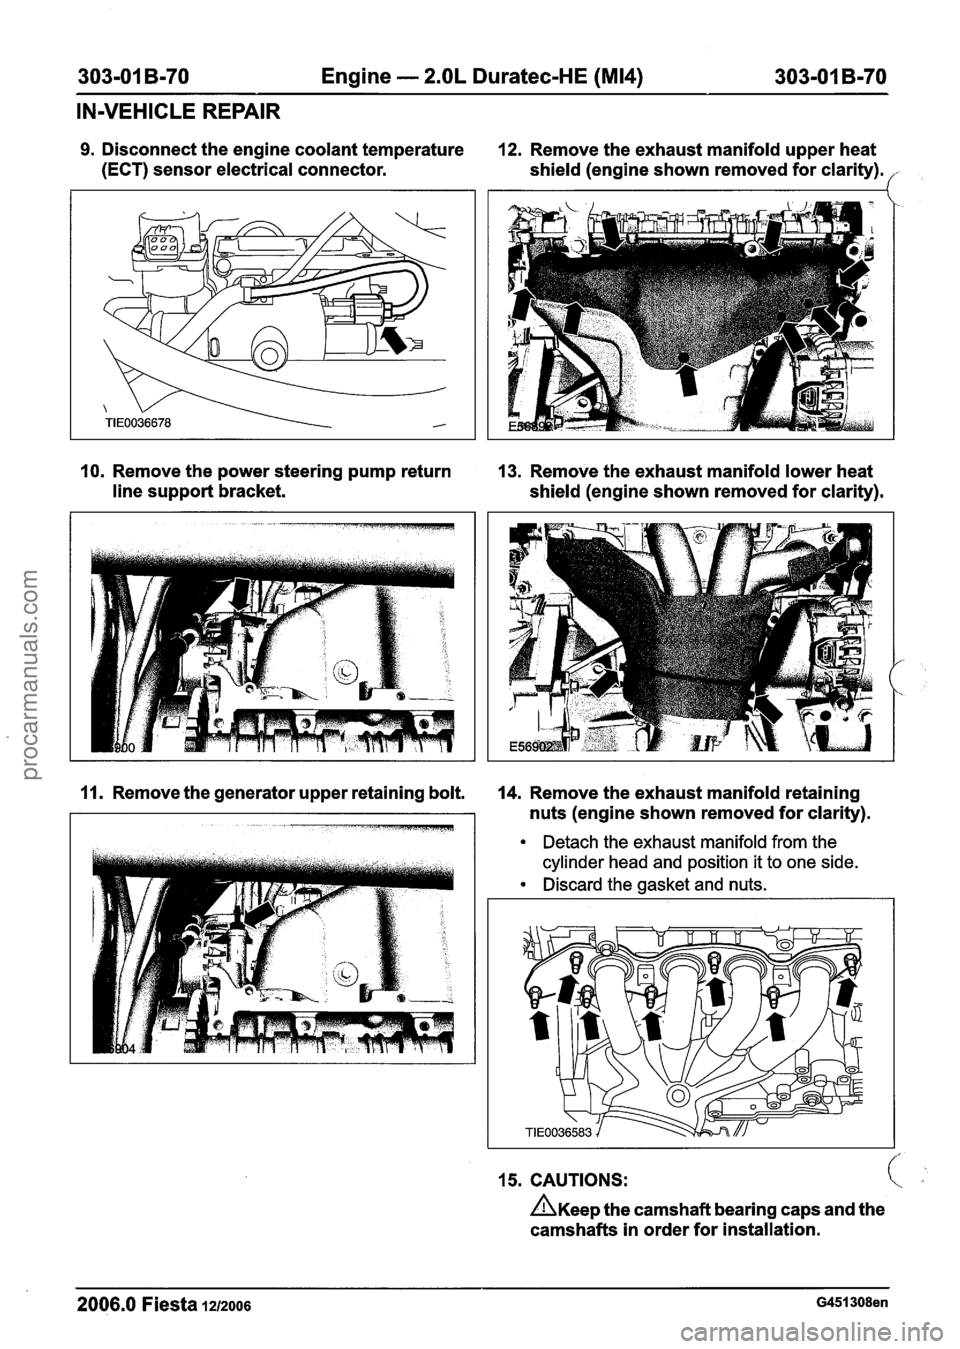
9. Disconnect the engine coolant temperature 12. Remove the exhaust manifold upper heat
(ECT) sensor electrical connector.
shield (engine shown removed for clarity).
('
10. Remove the power steering pump return 13. Remove the exhaust manifold lower heat
line support bracket.
shield (engine shown removed for clarity).
11. Remove the generator upper retaining bolt. 14. Remove the exhaust manifold retaining
nuts (engine shown removed for clarity).
Detach the exhaust manifold from the
cylinder head and position it to one side.
Discard the gasket and nuts.
15. CAUTIONS: c
n~ee~ the camshaft bearing caps and the
camshafts in order for installation.
2006.0 Fiesta 12/2006 G451308en
procarmanuals.com
Page 693 of 1226
303-01 B-71 Engine - 2.OL Duratec-HE (M14) 303-01 B-71
IN-VEHICLE REPAIR
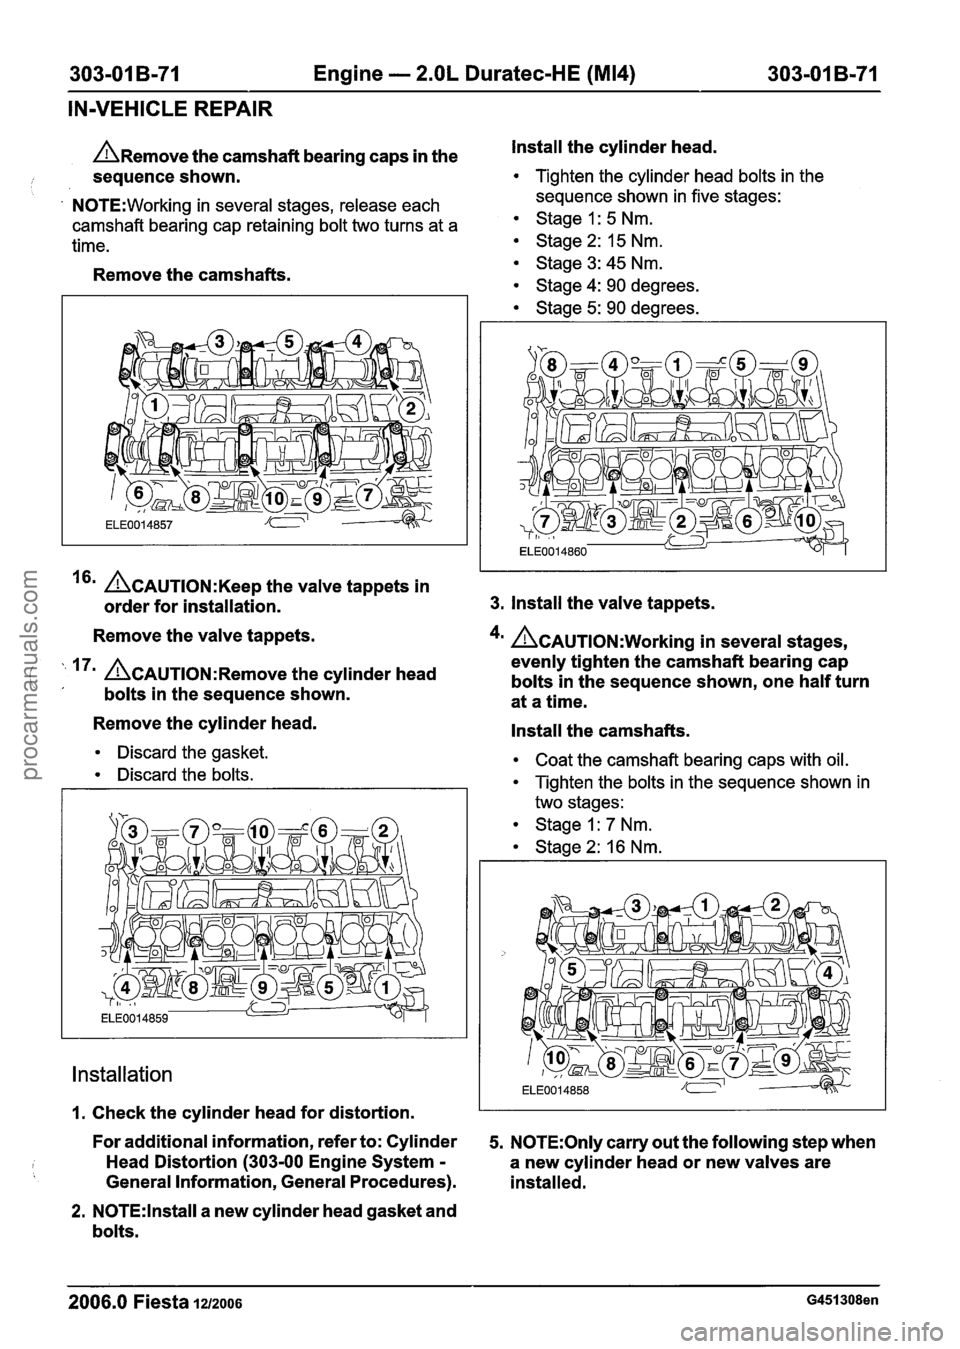
n~emove the camshaft bearing caps in the Install the
cylinder head.
i sequence shown. Tighten the cylinder head bolts in the
' N0TE:Working in several stages, release each sequence
shown in five stages:
camshaft bearing cap retaining bolt two turns at a Stage I : 5 Nm.
time. Stage 2: 15 Nm.
Remove the camshafts.
~CAUTION:K~~~ the valve tappets in
order for installation.
Remove the valve tappets.
( ' 17' &AUTION:R~~~~~ the cylinder head ' bolts in the sequence shown.
Remove the cylinder head.
Discard the gasket.
Discard the bolts.
Installation
Stage3:45Nm.
Stage 4: 90 degrees.
Stage 5: 90 degrees.
3. Install the valve tappets.
4m &AUTION:W~~~~~~ in several stages,
evenly tighten the camshaft bearing cap
bolts in the sequence shown, one half turn
at a time.
Install the camshafts.
Coat the camshaft bearing caps with oil.
Tighten the bolts in the sequence shown in
two stages:
Stage I: 7 Nm.
Stage 2: 16 Nm.
I i
I. Check the cylinder head for distortion. I I
For additional information, refer to: Cylinder 5. N0TE:Only carry out the following step when
Head Distortion
(303-00 Engine System - a new cylinder head or new valves are
General Information, General Procedures). installed.
2. N0TE:lnstall a new cylinder head gasket and
bolts.
2006.0 Fiesta 1212006 G451308en
procarmanuals.com
Page 696 of 1226
303-01 B-74 Engine - 2.OL Duratec-HE (M14) 303-01 B-74
REMOVAL
Engine
Special Tool(s)
I I Remover, Power Steering I
I I Removerllnstaller, Hose
General Equipment
I Workshop table I
I Engine hoist I
I Securing straps I
Removal
A WARNING:Do not smoke or carry lighted
tobacco or open flame of any type when
working on or near any fuel related
components. Highly flammable vapors are
always present and may ignite. Failure to
follow these instructions may result in
personal injury.
1. Remove the air cleaner. c.
For additional information, refer to: Air
Cleaner
- 2.OL Duratec-HE (M14) (30312
Intake Air Distribution and Filtering,
Removal and Installation).
2. Remove the battery tray.
For additional information, refer to: Battery
Tray
- 2.OL Duratec-HE (M14) (414-01
Battery, Mounting and Cables, Removal
and Installation).
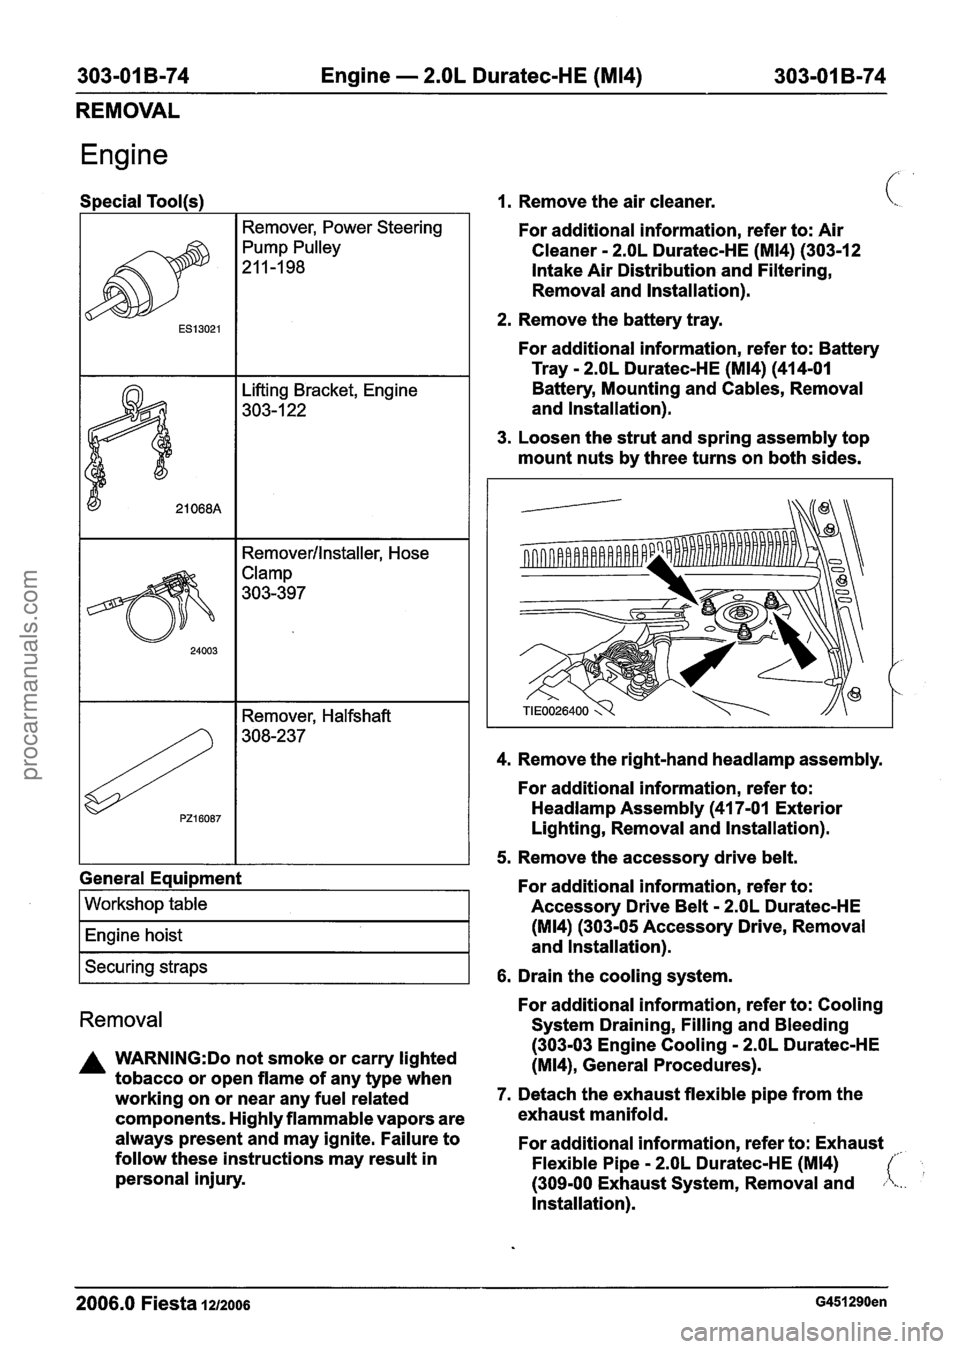
3. Loosen the strut and spring assembly top
mount nuts by three turns on both sides.
4. Remove the right-hand
headlamp assembly.
For additional information, refer to:
Headlamp Assembly (41 7-01 Exterior
Lighting, Removal and Installation).
5. Remove the accessory drive belt.
For additional information, refer to:
Accessory Drive Belt
- 2.OL Duratec-HE
(M14) (303-05 Accessory Drive, Removal
and Installation).
6. Drain the cooling system.
For additional information, refer to: Cooling
System Draining, Filling and Bleeding
(303-03 Engine Cooling
- 2.OL Duratec-HE
(M14), General Procedures).
7. Detach the exhaust flexible pipe from the
exhaust manifold.
For additional information, refer to: Exhaust
Flexible Pipe
- 2.OL Duratec-HE (M14)
(309-00 Exhaust System, Removal and
Installation).
2006.0 Fiesta 1212006 G451290en
procarmanuals.com