FORD KUGA 2010 1.G Owners Manual
Manufacturer: FORD, Model Year: 2010, Model line: KUGA, Model: FORD KUGA 2010 1.GPages: 226, PDF Size: 8.07 MB
Page 161 of 226
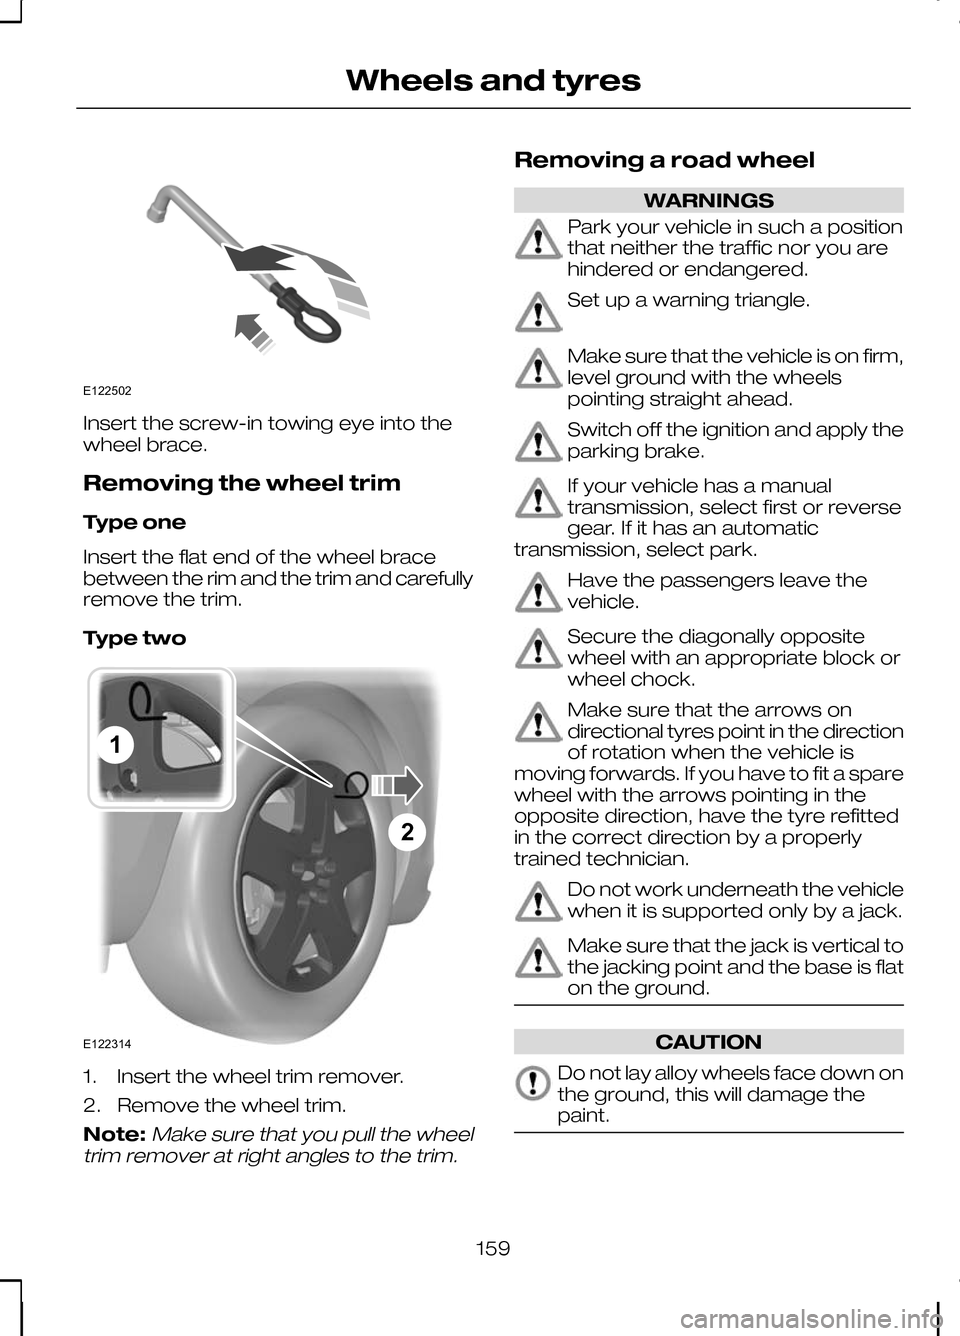
Insert the screw-in towing eye into the
wheel brace.
Removing the wheel trim
Type one
Insert the flat end of the wheel brace
between the rim and the trim and carefully
remove the trim.
Type two
1. Insert the wheel trim remover.
2. Remove the wheel trim.
Note:Make sure that you pull the wheel
trim remover at right angles to the trim.
Removing a road wheel WARNINGS
Park your vehicle in such a position
that neither the traffic nor you are
hindered or endangered.
Set up a warning triangle.
Make sure that the vehicle is on firm,
level ground with the wheels
pointing straight ahead.
Switch off the ignition and apply the
parking brake.
If your vehicle has a manual
transmission, select first or reverse
gear. If it has an automatic
transmission, select park. Have the passengers leave the
vehicle.
Secure the diagonally opposite
wheel with an appropriate block or
wheel chock.
Make sure that the arrows on
directional tyres point in the direction
of rotation when the vehicle is
moving forwards. If you have to fit a spare
wheel with the arrows pointing in the
opposite direction, have the tyre refitted
in the correct direction by a properly
trained technician. Do not work underneath the vehicle
when it is supported only by a jack.
Make sure that the jack is vertical to
the jacking point and the base is flat
on the ground.
CAUTION
Do not lay alloy wheels face down on
the ground, this will damage the
paint.
159
Wheels and tyresE122502 E12231421
Page 162 of 226
Note:The spare wheel is located under
the floor cover in the luggage compartment.
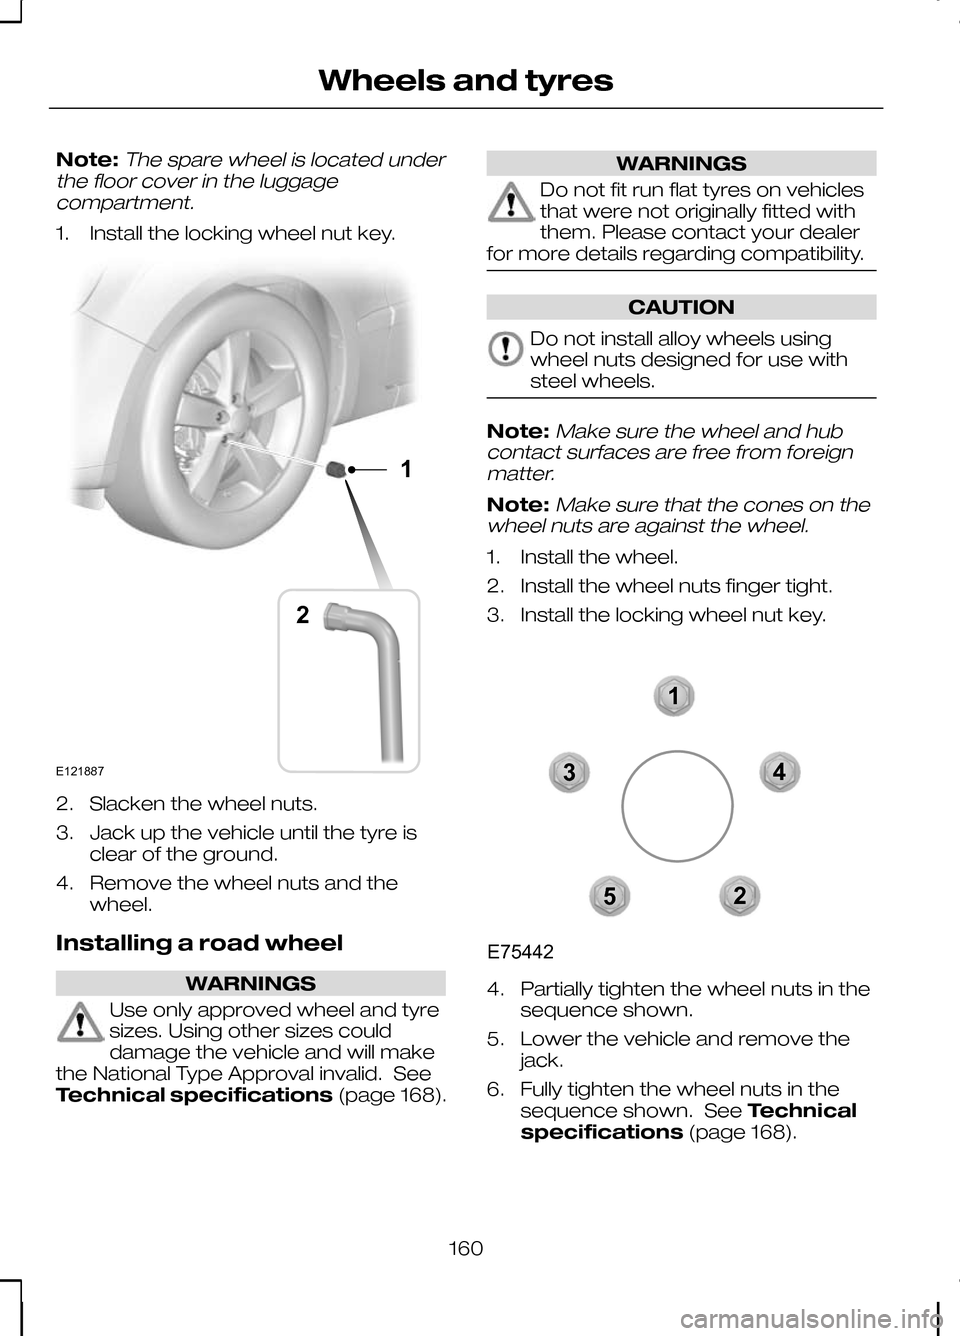
1. Install the locking wheel nut key. 2. Slacken the wheel nuts.
3. Jack up the vehicle until the tyre is
clear of the ground.
4. Remove the wheel nuts and the wheel.
Installing a road wheel WARNINGS
Use only approved wheel and tyre
sizes. Using other sizes could
damage the vehicle and will make
the National Type Approval invalid. See
Technical specifications (page 168). WARNINGS
Do not fit run flat tyres on vehicles
that were not originally fitted with
them. Please contact your dealer
for more details regarding compatibility. CAUTION
Do not install alloy wheels using
wheel nuts designed for use with
steel wheels.
Note:
Make sure the wheel and hub
contact surfaces are free from foreign matter.
Note:Make sure that the cones on the
wheel nuts are against the wheel.
1. Install the wheel.
2. Install the wheel nuts finger tight.
3. Install the locking wheel nut key. 4. Partially tighten the wheel nuts in the
sequence shown.
5. Lower the vehicle and remove the jack.
6. Fully tighten the wheel nuts in the sequence shown. See Technical
specifications (page 168).
160
Wheels and tyresE12188712 12345E75442
Page 163 of 226
7. Install the wheel trim using the ball of
your hand. WARNING
Have the wheel nuts checked for
tightness and the tyre pressure
checked as soon as possible.
Note:If the spare wheel is different in size
or construction to the road wheels, have this replaced as soon as possible.
TYRE REPAIR KIT
Your vehicle is not equipped with a spare
tyre, but does include an emergency tyre
repair kit that can be used to repair one
flat tyre.
The tyre repair kit is located in the
underfloor storage compartment. See
Storage compartments (page 98).
General information WARNINGS
Depending on the type and extent
of tyre damage, some tyres can
only be partially sealed or not sealed
at all. Loss of tyre pressure can affect
vehicle handling, leading to loss of vehicle
control. Do not use the tyre repair kit if the
tyre has already been damaged as
a result of being driven under
inflated. Do not use the tyre repair kit on run
flat tyres.
Do not try to seal damage other
than that located within the visible
tread of the tyre.
Do not try to seal damage to the
tyre’s sidewall. The tyre repair kit seals most tyre
punctures [with a diameter of up to six
millimetres (1/4 inch)] to temporarily
restore mobility.
Observe the following rules when using
the kit:
•
Drive with caution and avoid
making sudden steering or
driving manoeuvres, especially if
the vehicle is heavily loaded or you are
towing a trailer.
• The kit will provide you with an
emergency temporary repair, enabling
you to continue your journey to the
next vehicle or tyre dealer, or to drive
a maximum distance of
200 kilometres (125 miles).
• Do not exceed a
maximum speed
of 80 km/h (50 mph).
• Keep the kit out of the reach of
children.
• Only use the kit when the ambient
temperature is between –30°C (-22°F)
and +70°C (+158°F).
Using the tyre repair kit WARNINGS
Compressed air can act as an
explosive or propellant.
Never leave the tyre repair kit
unattended while in use.
CAUTION
Do not keep the compressor
operating for more than 10 minutes.
Note:
Use the tyre repair kit only for the
vehicle with which it was supplied.
161
Wheels and tyres
Page 164 of 226
•
Park your vehicle at the roadside so
that you do not obstruct the flow of
traffic and so that you are able to use
the kit without being in danger.
• Apply the parking brake, even if you
have parked on a level road, to make
sure that the vehicle will not move.
• Do not attempt to remove foreign
objects like nails or screws penetrating
the tyre.
• Leave the engine running while the kit
is in use, but not if the vehicle is in an
enclosed or poorly ventilated area (for
example, inside a building). In these
circumstances, switch the
compressor on with the engine turned
off.
• Replace the sealant bottle with a new
one before the expiry date (see top
of bottle) is reached.
• Inform all other users of the vehicle
that the tyre has been temporarily
sealed with the tyre repair kit and
make them aware of the special
driving conditions to be observed.
Inflating the tyre WARNINGS
Check the sidewall of the tyre prior
to inflation. If there are any cracks,
bumps or similar damage, do not
attempt to inflate the tyre. Do not stand directly beside the tyre
while the compressor is pumping.
Watch the sidewall of the tyre. If any
cracks, bumps or similar damage
appear, turn off the compressor and
let the air out by means of the pressure
relief valve B. Do not continue driving with
this tyre. WARNINGS
The sealant contains natural rubber
latex. Avoid contact with skin and
clothing. If this happens, rinse the
affected areas immediately with plenty of
water and contact your doctor. If the tyre inflation pressure does not
reach 1.8 bar (26 psi) within seven
minutes, the tyre may have suffered
excessive damage, making a temporary
repair impossible. In this case, do not
continue driving with this tyre. CAUTION
Screwing the bottle onto the bottle
holder will pierce the seal of the
bottle. Do not unscrew the bottle
from the holder as the sealant will escape. 162
Wheels and tyres
Page 165 of 226
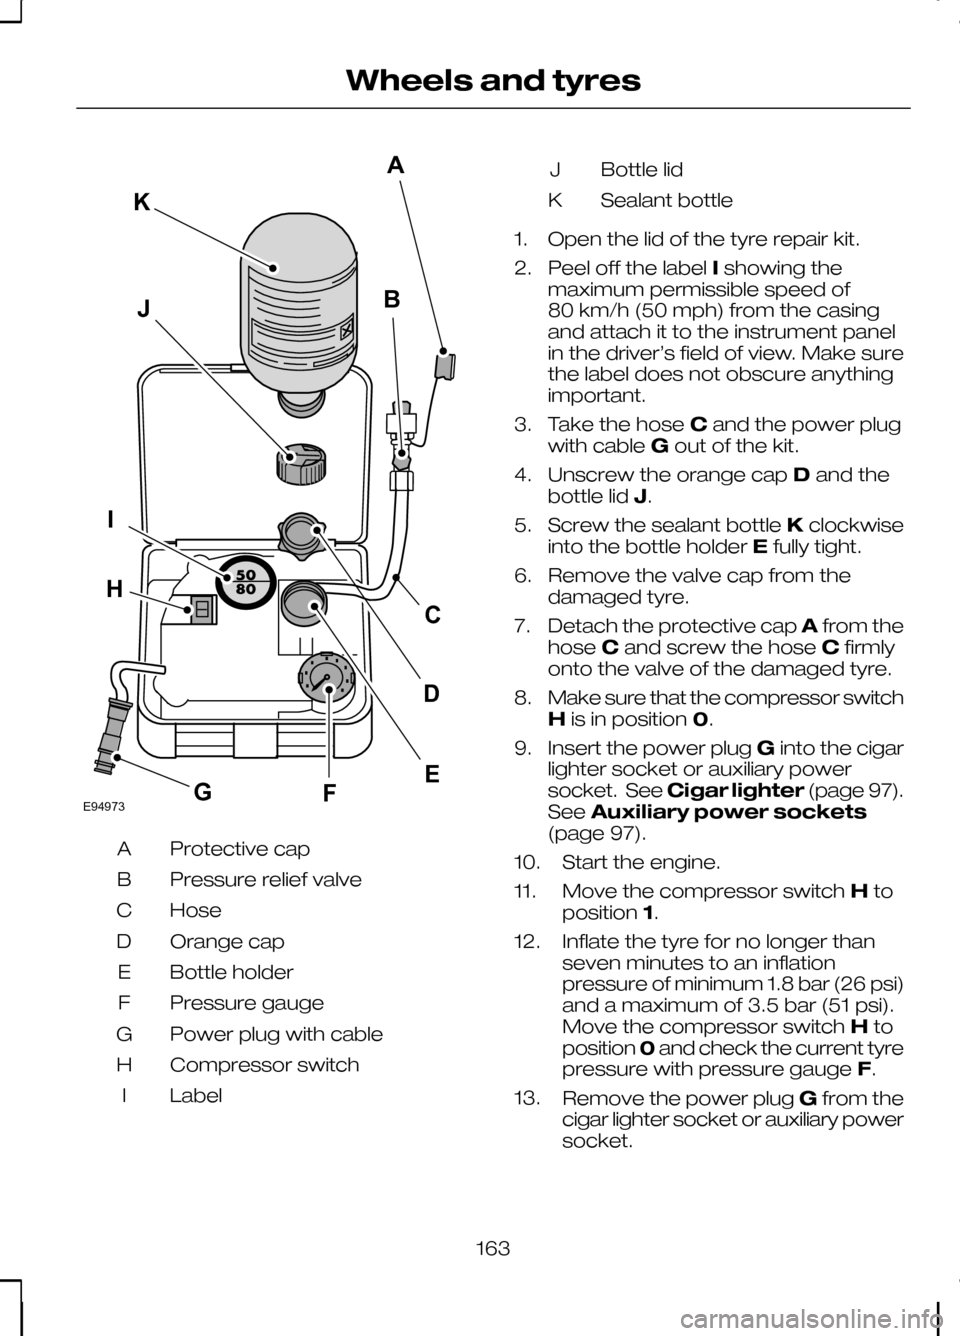
Protective cap
A
Pressure relief valve
B
Hose
C
Orange cap
D
Bottle holder
E
Pressure gauge
F
Power plug with cable
G
Compressor switch
H
Label
I Bottle lid
J
Sealant bottle
K
1. Open the lid of the tyre repair kit.
2. Peel off the label Ishowing the
maximum permissible speed of
80 km/h (50 mph) from the casing
and attach it to the instrument panel
in the driver’s field of view. Make sure
the label does not obscure anything
important.
3. Take the hose Cand the power plug
with cable Gout of the kit.
4. Unscrew the orange cap Dand the
bottle lid J.
5. Screw the sealant bottle Kclockwise
into the bottle holder Efully tight.
6. Remove the valve cap from the damaged tyre.
7. Detach the protective cap Afrom the
hose Cand screw the hose Cfirmly
onto the valve of the damaged tyre.
8. Make sure that the compressor switch
His in position 0.
9. Insert the power plug Ginto the cigar
lighter socket or auxiliary power
socket. See Cigar lighter (page 97).
See Auxiliary power sockets
(page 97).
10. Start the engine.
11. Move the compressor switch Hto
position 1.
12. Inflate the tyre for no longer than seven minutes to an inflation
pressure of minimum 1.8 bar (26 psi)
and a maximum of 3.5 bar (51 psi).
Move the compressor switch Hto
position 0and check the current tyre
pressure with pressure gauge F.
13. Remove the power plug Gfrom the
cigar lighter socket or auxiliary power
socket.
163
Wheels and tyresE94973BJIFECKAGHD
Page 166 of 226
14.
Quickly unscrew the hose Cfrom
the tyre valve and replace the
protective cap A. Fasten the valve
cap again.
15. Leave the sealant bottle Kin the
bottle holder E.
16. Make sure the kit, the bottle lid and the orange cap are stored safely, but
still easily accessible in the vehicle.
The kit will be required again when
you check the tyre pressure.
17. Immediately drive approximately three kilometres (two miles) so that
the sealant can seal the damaged
area.
Note:When pumping in the sealant
through the tyre valve, the pressure may rise up to 6 bar (87 psi) but will drop againafter about 30 seconds. WARNING
If you experience heavy vibrations,
unsteady steering behaviour or
noises while driving, reduce your
speed and drive with caution to a place
where it is safe for you to stop the vehicle.
Recheck the tyre and its pressure. If the
tyre pressure is less than 1.3 bar (19 psi)
or if there are any cracks, bumps or similar
damage visible, do not continue driving
with this tyre. Checking the tyre pressure
1. Stop the vehicle after driving
approximately three kilometres
(two miles). Check, and where
necessary, adjust the pressure of the
damaged tyre.
2. Attach the kit and read the tyre pressure from the pressure gauge F.
3. If the pressure of the sealant-filled tyre
is 1.3 bar (19 psi) or more, adjust it to
the specified pressure. See
Technical specifications (page
168). 4. Follow the inflation procedure once
again to top up the tyre.
5. Check the tyre pressure again from the pressure gauge F. If the tyre
pressure is too high, deflate the tyre
to the specified pressure using the
pressure relief valve B.
6. Once you have inflated the tyre to its correct tyre pressure, move the
compressor switch Hto position 0,
remove the power plug Gfrom the
socket, unscrew the hose C, fasten
the valve cap and replace the
protective cap A.
7. Leave the sealant bottle Kin the bottle
holder Eand store the kit away safely
in its original location.
8. Drive to the nearest tyre specialist to get the damaged tyre replaced.
Before the tyre is removed from the
rim, inform your tyre dealer that the
tyre contains sealant. Renew the kit
as soon as possible after it has been
used once.
Note:
Remember that emergency
roadside tyre repair kits only provide temporary mobility. Regulationsconcerning tyre repair after usage of tyrerepair kit may differ from country tocountry. You should consult a tyrespecialist for advice. WARNING
Before driving, make sure the tyre
is adjusted to the recommended
inflation pressure. See
Technical
specifications (page 168). Monitor the
tyre pressure until the sealed tyre is
replaced. Empty sealant bottles can be disposed
of together with normal household waste.
Return remains of sealant to your dealer
or dispose of it in compliance with local
waste disposal regulations.
164
Wheels and tyres
Page 167 of 226
RUN FLAT TYRES
Principle of operation
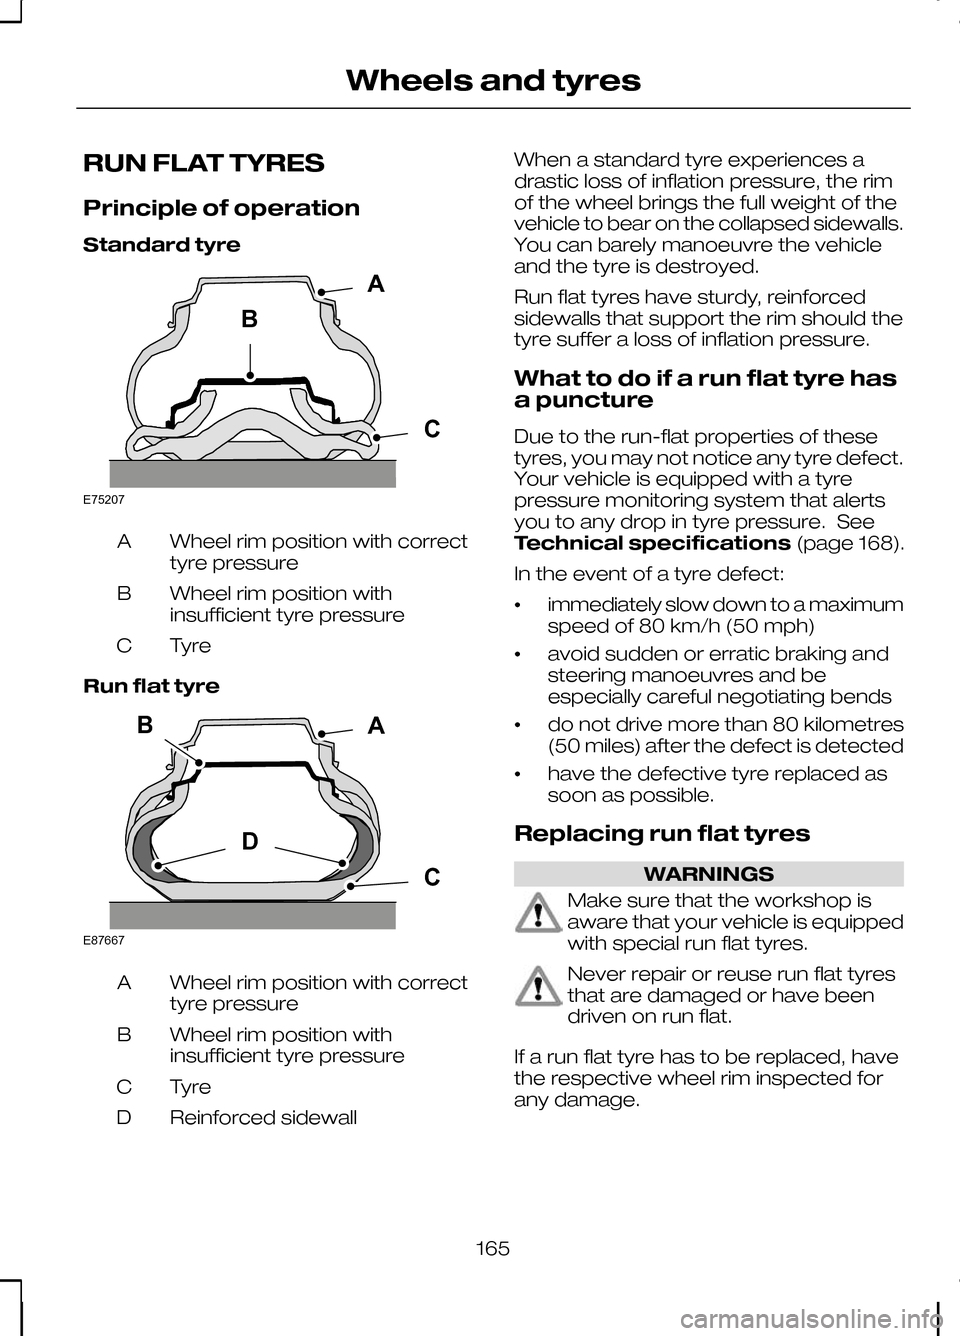
Standard tyre
Wheel rim position with correct
tyre pressure
A
Wheel rim position with
insufficient tyre pressure
B
TyreC
Run flat tyre Wheel rim position with correct
tyre pressure
A
Wheel rim position with
insufficient tyre pressure
B
TyreC
Reinforced sidewall
D When a standard tyre experiences a
drastic loss of inflation pressure, the rim
of the wheel brings the full weight of the
vehicle to bear on the collapsed sidewalls.
You can barely manoeuvre the vehicle
and the tyre is destroyed.
Run flat tyres have sturdy, reinforced
sidewalls that support the rim should the
tyre suffer a loss of inflation pressure.
What to do if a run flat tyre has
a puncture
Due to the run-flat properties of these
tyres, you may not notice any tyre defect.
Your vehicle is equipped with a tyre
pressure monitoring system that alerts
you to any drop in tyre pressure. See
Technical specifications
(page 168).
In the event of a tyre defect:
• immediately slow down to a maximum
speed of 80 km/h (50 mph)
• avoid sudden or erratic braking and
steering manoeuvres and be
especially careful negotiating bends
• do not drive more than 80 kilometres
(50 miles) after the defect is detected
• have the defective tyre replaced as
soon as possible.
Replacing run flat tyres WARNINGS
Make sure that the workshop is
aware that your vehicle is equipped
with special run flat tyres.
Never repair or reuse run flat tyres
that are damaged or have been
driven on run flat.
If a run flat tyre has to be replaced, have
the respective wheel rim inspected for
any damage.
165
Wheels and tyresBACE75207 BDCAE87667
Page 168 of 226
WARNINGS
Do not fit a mixture of run flat and
standard tyres. In isolated cases, a
standard tyre can be temporarily
mounted on a vehicle otherwise equipped
with run flat tyres. It must be pointed out
to the driver that the standard tyre has no
runflat properties. Do not fit run flat tyres on vehicles
that were not originally fitted with
them. Please contact your dealer
for more details regarding compatibility. Run flat tyres may be sold and mounted
only by specially trained and certified tyre
dealers.
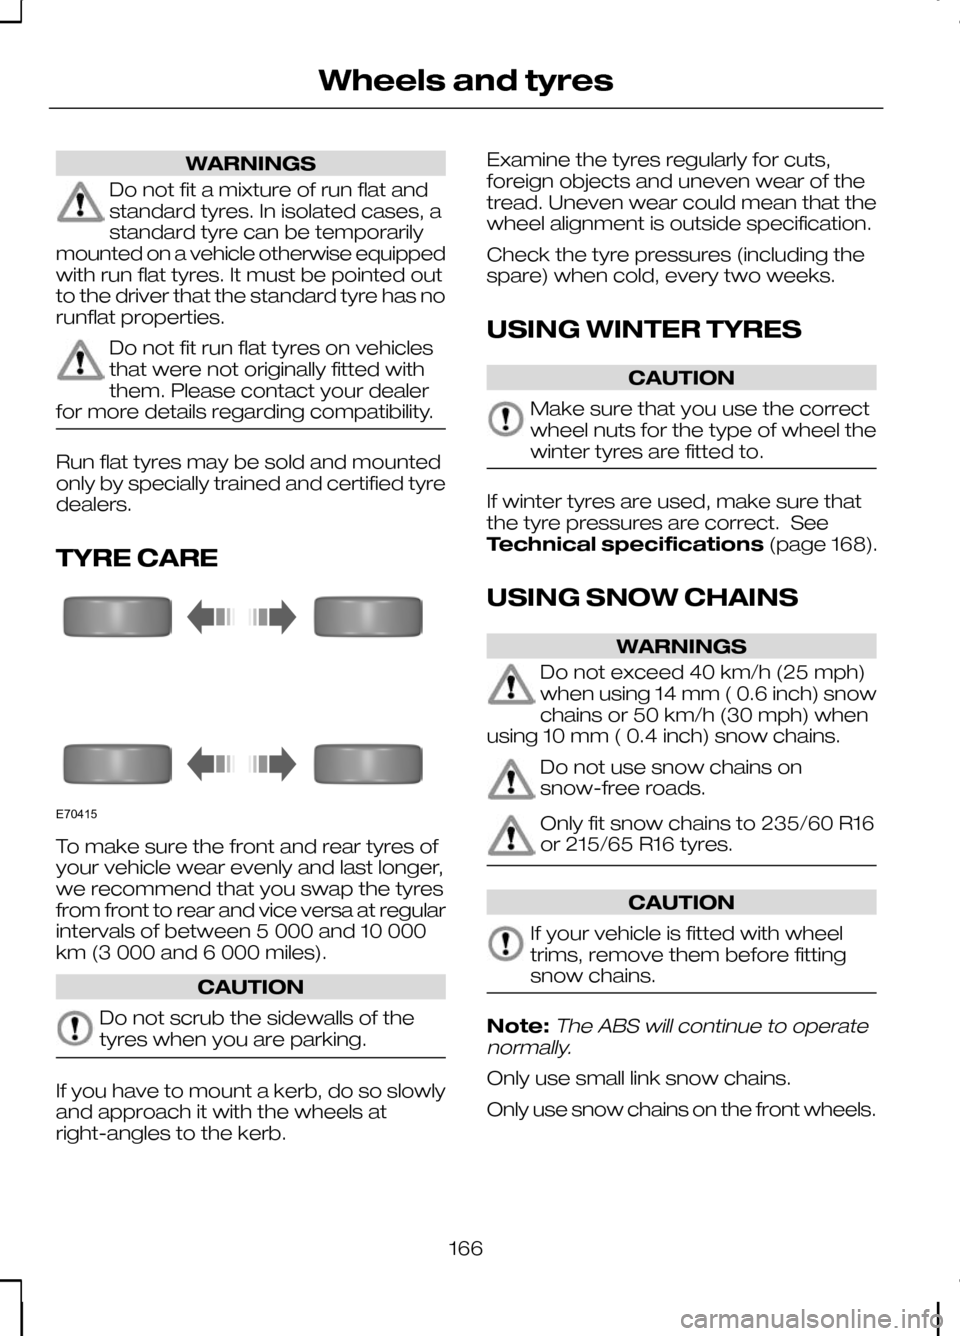
TYRE CARE
To make sure the front and rear tyres of
your vehicle wear evenly and last longer,
we recommend that you swap the tyres
from front to rear and vice versa at regular
intervals of between 5 000 and 10 000
km (3 000 and 6 000 miles).
CAUTION
Do not scrub the sidewalls of the
tyres when you are parking.
If you have to mount a kerb, do so slowly
and approach it with the wheels at
right-angles to the kerb. Examine the tyres regularly for cuts,
foreign objects and uneven wear of the
tread. Uneven wear could mean that the
wheel alignment is outside specification.
Check the tyre pressures (including the
spare) when cold, every two weeks.
USING WINTER TYRES
CAUTION
Make sure that you use the correct
wheel nuts for the type of wheel the
winter tyres are fitted to.
If winter tyres are used, make sure that
the tyre pressures are correct. See
Technical specifications
(page 168).
USING SNOW CHAINS WARNINGS
Do not exceed 40 km/h (25 mph)
when using 14 mm ( 0.6 inch) snow
chains or 50 km/h (30 mph) when
using 10 mm ( 0.4 inch) snow chains. Do not use snow chains on
snow-free roads.
Only fit snow chains to 235/60 R16
or 215/65 R16 tyres.
CAUTION
If your vehicle is fitted with wheel
trims, remove them before fitting
snow chains.
Note:The ABS will continue to operate
normally.
Only use small link snow chains.
Only use snow chains on the front wheels.
166
Wheels and tyresE70415
Page 169 of 226
Vehicles with stability control
(ESP)
Vehicles with stability control (ESP) may
exhibit some unusual driving
characteristics which can be avoided by
switching the system off. See
Using
stability control (page 113).
TYRE PRESSURE
MONITORING SYSTEM WARNINGS
The system does not relieve you of
your responsibility to regularly check
the tyre pressures.
The system will only provide a low
tyre pressure warning. It will not
inflate the tyres.
Do not drive on significantly
under-inflated tyres. This may cause
the tyres to overheat and fail.
Under-inflation reduces fuel efficiency,
tyre tread life and may also affect your
ability to drive the vehicle safely. CAUTIONS
Do not bend or damage the valves
when you are inflating the tyres.
Have tyres installed by properly
trained technicians.
The Deflation Detection System will alert
you if there is a change of air pressure in
any tyre. It does this by using the ABS
sensors to detect the rolling
circumference of the wheels. When the
circumference changes, this indicates low
pressure in a tyre, a warning message is
displayed in the information display and
the message indicator will illuminate. See
Information messages
(page 73).Apart from a too low tyre pressure or a
damaged tyre, the following situations can
affect the rolling circumference:
•
Vehicle load is uneven.
• When using a trailer or travelling up
and down an incline.
• Using snow chains.
• Driving on soft surfaces such as snow
or mud.
Note:The system will still function
correctly, but there may be an increased detection time.
If a low pressure warning message is
displayed in the information display, check
the tyre pressures as soon as possible
and inflate them to the recommended
pressure. See Technical
specifications (page 168).
If this happens frequently, have the cause
determined and rectified as soon as
possible.
System reset
Note:
Do not reset the system when the
vehicle is moving.
Note:You should reset the system
following any adjustment to the tyre pressures or any changing of tyres.
Note:Turn the ignition on.
Type 2 instrument cluster
1. Using the multifunction lever, navigate
to'SET' > T. Pres.
2. Press and hold the SET/RESET
button until the message Tyre
Pressure set appears.
Type 3 instrument cluster
1. Using the multifunction lever, navigate
tohold 'SET' to set Tyre Pres.
167
Wheels and tyres
Page 170 of 226
2.
Press and hold the SET/RESET
button until the message Tyre Pressure set
appears.
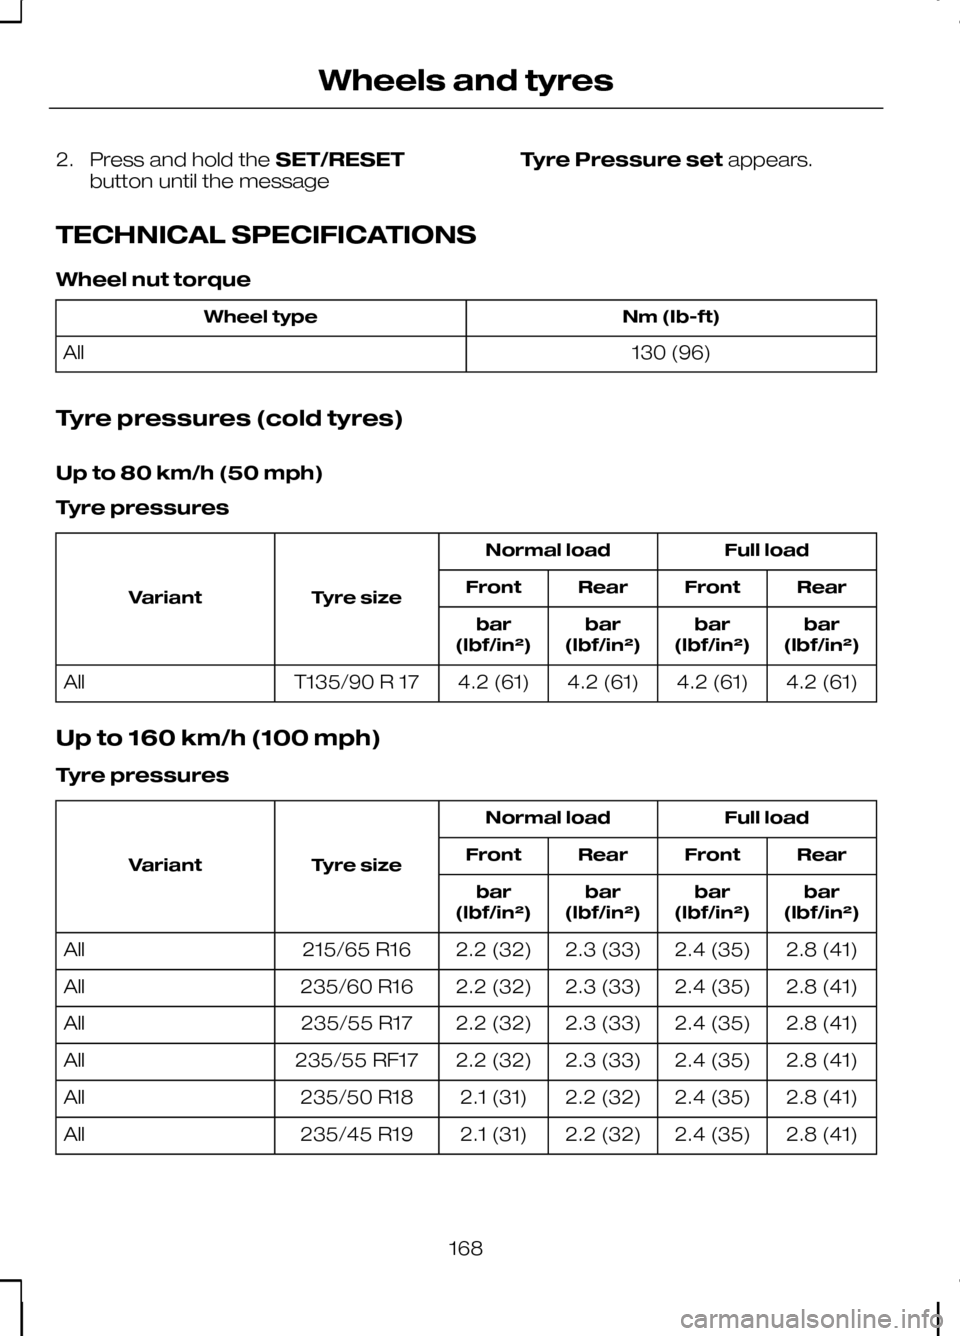
TECHNICAL SPECIFICATIONS
Wheel nut torque Nm (Ib-ft)
Wheel type
130 (96)
All
Tyre pressures (cold tyres)
Up to 80 km/h (50 mph)
Tyre pressures Full load
Normal load
Tyre size
Variant Rear
Front
Rear
Front
bar
(lbf/in²)
bar
(lbf/in²)
bar
(lbf/in²)
bar
(lbf/in²)
4.2 (61)
4.2 (61)
4.2 (61)
4.2 (61)
T135/90 R 17
All
Up to 160 km/h (100 mph)
Tyre pressures Full load
Normal load
Tyre size
Variant Rear
Front
Rear
Front
bar
(lbf/in²)
bar
(lbf/in²)
bar
(lbf/in²)
bar
(lbf/in²)
2.8 (41)
2.4 (35)
2.3 (33)
2.2 (32)
215/65 R16
All
2.8 (41)
2.4 (35)
2.3 (33)
2.2 (32)
235/60 R16
All
2.8 (41)
2.4 (35)
2.3 (33)
2.2 (32)
235/55 R17
All
2.8 (41)
2.4 (35)
2.3 (33)
2.2 (32)
235/55 RF17
All
2.8 (41)
2.4 (35)
2.2 (32)
2.1 (31)
235/50 R18
All
2.8 (41)
2.4 (35)
2.2 (32)
2.1 (31)
235/45 R19
All
168
Wheels and tyres