clutch FORD MUSTANG 1969 Volume One Chassis
[x] Cancel search | Manufacturer: FORD, Model Year: 1969, Model line: MUSTANG, Model: FORD MUSTANG 1969Pages: 413, PDF Size: 75.81 MB
Page 211 of 413
04-02-14
Rear Axle
—
Removable Carrier Type
04-02-14
DIFFERENTIAL
BEARING
Tool—
7
571-4220-A
T66P°4220-P
E1015-B
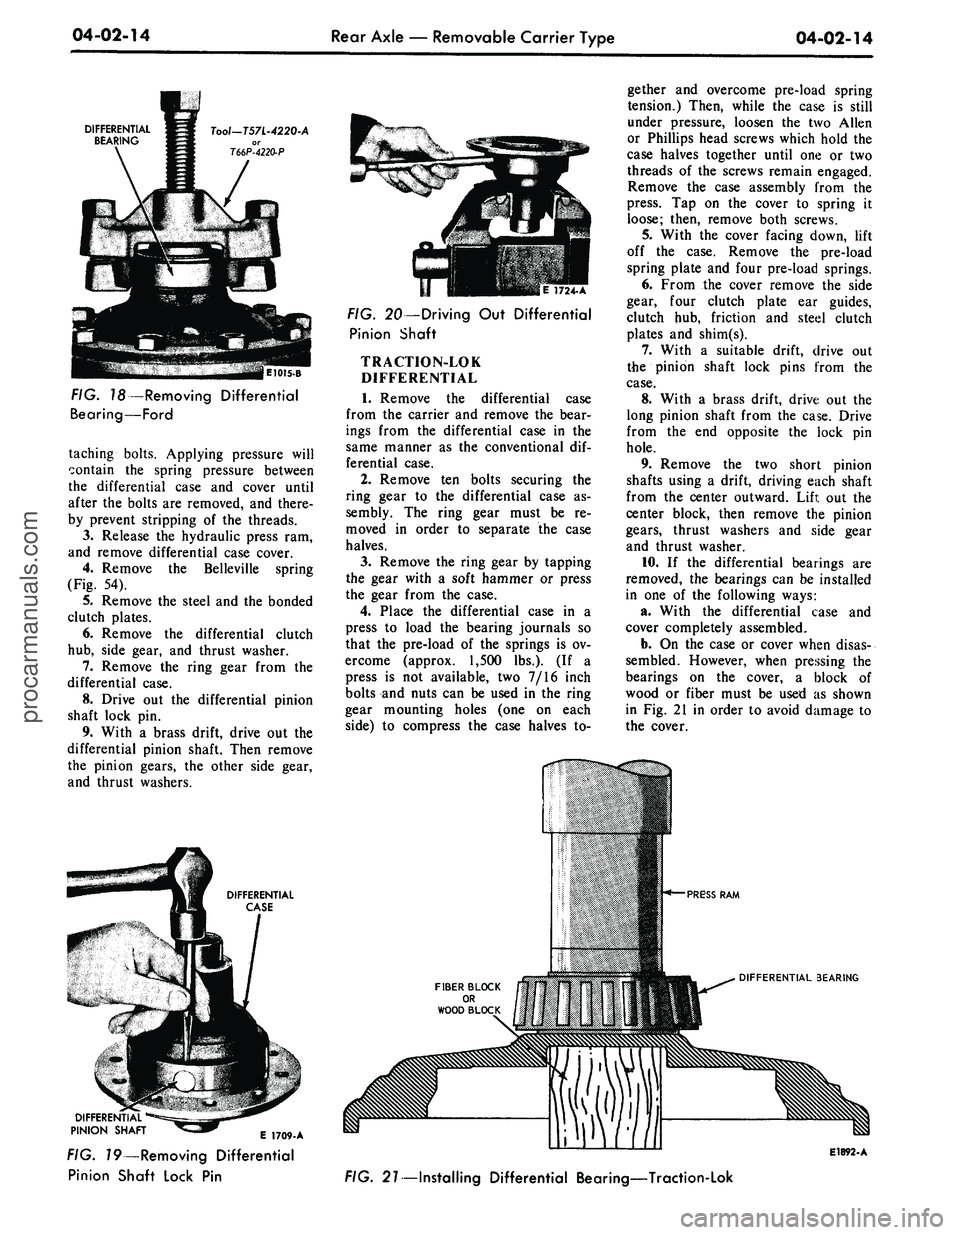
FIG. 18—Removing Differential
Bearing—Ford
taching bolts. Applying pressure will
contain
the
spring pressure between
the differential case
and
cover until
after
the
bolts
are
removed,
and
there-
by prevent stripping
of the
threads.
3.
Release
the
hydraulic press
ram,
and remove differential case cover.
4.
Remove
the
Belleville spring
(Fig.
54).
5.
Remove
the
steel
and the
bonded
clutch plates.
6. Remove
the
differential clutch
hub,
side gear,
and
thrust washer.
7.
Remove
the
ring gear from
the
differential case.
8. Drive
out the
differential pinion
shaft lock
pin.
9. With
a
brass drift, drive
out the
differential pinion shaft. Then remove
the pinion gears,
the
other side gear,
and thrust washers.
E 1724-A
FIG. 20—Driving
Out
Differential
Pinion Shaft
TRACTION-LOK
DIFFERENTIAL
1.
Remove
the
differential case
from
the
carrier
and
remove
the
bear-
ings from
the
differential case
in the
same manner
as the
conventional
dif-
ferential case.
2.
Remove
ten
bolts securing
the
ring gear
to the
differential case
as-
sembly.
The
ring gear must
be re-
moved
in
order
to
separate
the
case
halves.
3.
Remove
the
ring gear
by
tapping
the gear with
a
soft hammer
or
press
the gear from
the
case.
4.
Place
the
differential case
in a
press
to
load
the
bearing journals
so
that
the
pre-load
of the
springs
is ov-
ercome (approx.
1,500
lbs.).
(If a
press
is not
available,
two 7/16
inch
bolts
and
nuts
can be
used
in the
ring
gear mounting holes
(one on
each
side)
to
compress
the
case halves
to-
gether
and
overcome pre-load spring
tension.) Then, while
the
case
is
still
under pressure, loosen
the two
Allen
or Phillips head screws which hold
the
case halves together until
one or two
threads
of the
screws remain engaged.
Remove
the
case assembly from
the
press.
Tap on the
cover
to
spring
it
loose; then, remove both screws.
5.
With
the
cover facing down, lift
off
the
case. Remove
the
pre-load
spring plate
and
four pre-load springs.
6. From
the
cover remove
the
side
gear, four clutch plate
ear
guides,
clutch
hub,
friction
and
steel clutch
plates
and
shim(s).
7.
With
a
suitable drift, drive
out
the pinion shaft lock pins from
the
case.
8. With
a
brass drift, drive
out the
long pinion shaft from
the
case. Drive
from
the end
opposite
the
lock
pin
hole.
9. Remove
the two
short pinion
shafts using
a
drift, driving each shaft
from
the
center outward. Lift
out the
center block, then remove
the
pinion
gears,
thrust washers
and
side gear
and thrust washer.
10.
If the
differential bearings
are
removed,
the
bearings
can be
installed
in
one of the
following ways:
a. With
the
differential case
and
cover completely assembled.
b.
On the
case
or
cover when disas-
sembled. However, when pressing
the
bearings
on the
cover,
a
block
of
wood
or
fiber must
be
used
as
shown
in Fig.
21 in
order
to
avoid damage
to
the cover.
E 1709-A
FIG. 79—Removing Differential
Pinion Shaft Lock
Pin
DIFFERENTIAL BEARING
E1892-A
FIG. 21—Installing Differential Bearing—Traction-Lokprocarmanuals.com
Page 217 of 413
04-02-20
Rear Axle — Removable Carrier Type
0402-20
THRUST WASHER
E1175-B
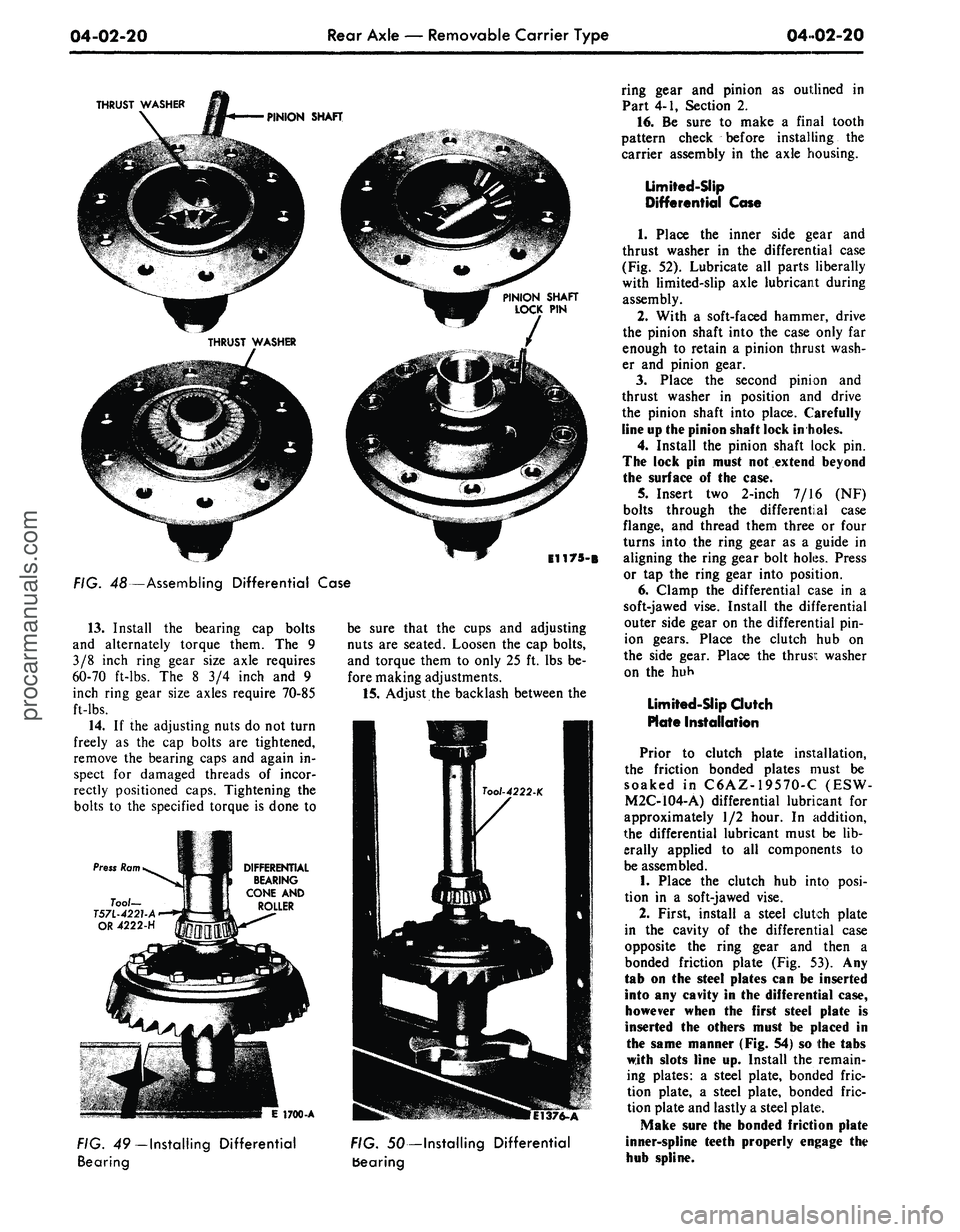
FIG. 48—Assembling Differential Case
13.
Install the bearing cap bolts
and alternately torque them. The 9
3/8 inch ring gear size axle requires
60-70 ft-lbs. The 8 3/4 inch and 9
inch ring gear size axles require 70-85
ft-lbs.
14.
If the adjusting nuts do not turn
freely as the cap bolts are tightened,
remove the bearing caps and again in-
spect for damaged threads of incor-
rectly positioned caps. Tightening the
bolts to the specified torque is done to
be sure that the cups and adjusting
nuts are seated. Loosen the cap bolts,
and torque them to only 25 ft. lbs be-
fore making adjustments.
15.
Adjust the backlash between the
DIFFERENTIAL
BEARING
CONE AND
ROLLER
E 1700-A
FIG. 49—
Installing
Differential
Bearing
1376-A
FIG. 50—Installing Differential
bearing
ring gear and pinion as outlined in
Part 4-1, Section 2.
16.
Be sure to make a final tooth
pattern check before installing the
carrier assembly in the axle housing.
Limited-Slip
Differential Case
1.
Place the inner side gear and
thrust washer in the differential case
(Fig. 52). Lubricate all parts liberally
with limited-slip axle lubricant during
assembly.
2.
With a soft-faced hammer, drive
the pinion shaft into the case only far
enough to retain a pinion thrust wash-
er and pinion gear.
3.
Place the second pinion and
thrust washer in position and drive
the pinion shaft into place. Carefully
line up the pinion shaft lock in holes.
4.
Install the pinion shaft lock pin.
The lock pin must not extend beyond
the surface of the case.
5. Insert two 2-inch 7/16 (NF)
bolts through the differential case
flange, and thread them three or four
turns into the ring gear as a guide in
aligning the ring gear bolt holes. Press
or tap the ring gear into position.
6. Clamp the differential case in a
soft-jawed vise. Install the differential
outer side gear on the differential pin-
ion gears. Place the clutch hub on
the side gear. Place the thrusi: washer
on the huh
Limited-Slip dutch
Plate Installation
Prior to clutch plate installation,
the friction bonded plates must be
soaked in C6AZ-19570-C (ESW-
M2C-104-A) differential lubricant for
approximately 1/2 hour. In addition,
the differential lubricant must be lib-
erally applied to all components to
be assembled.
1.
Place the clutch hub into posi-
tion in a soft-jawed vise.
2.
First, install a steel clutch plate
in the cavity of the differential case
opposite the ring gear and then a
bonded friction plate (Fig. 53). Any
tab on the steel plates can be inserted
into any cavity in the differential case,
however when the first steel plate is
inserted the others must be placed in
the same manner (Fig. 54) so the tabs
with slots line up. Install the remain-
ing plates: a steel plate, bonded fric-
tion plate, a steel plate, bonded fric-
tion plate and lastly a steel plate.
Make sure the bonded friction plate
inner-spline teeth properly engage the
hub spline.procarmanuals.com
Page 218 of 413
04-02-21
Rear Axle
—
Removable Carrier Type
04-02-21
SITION IN WHICH GEARS WERE LAPPED
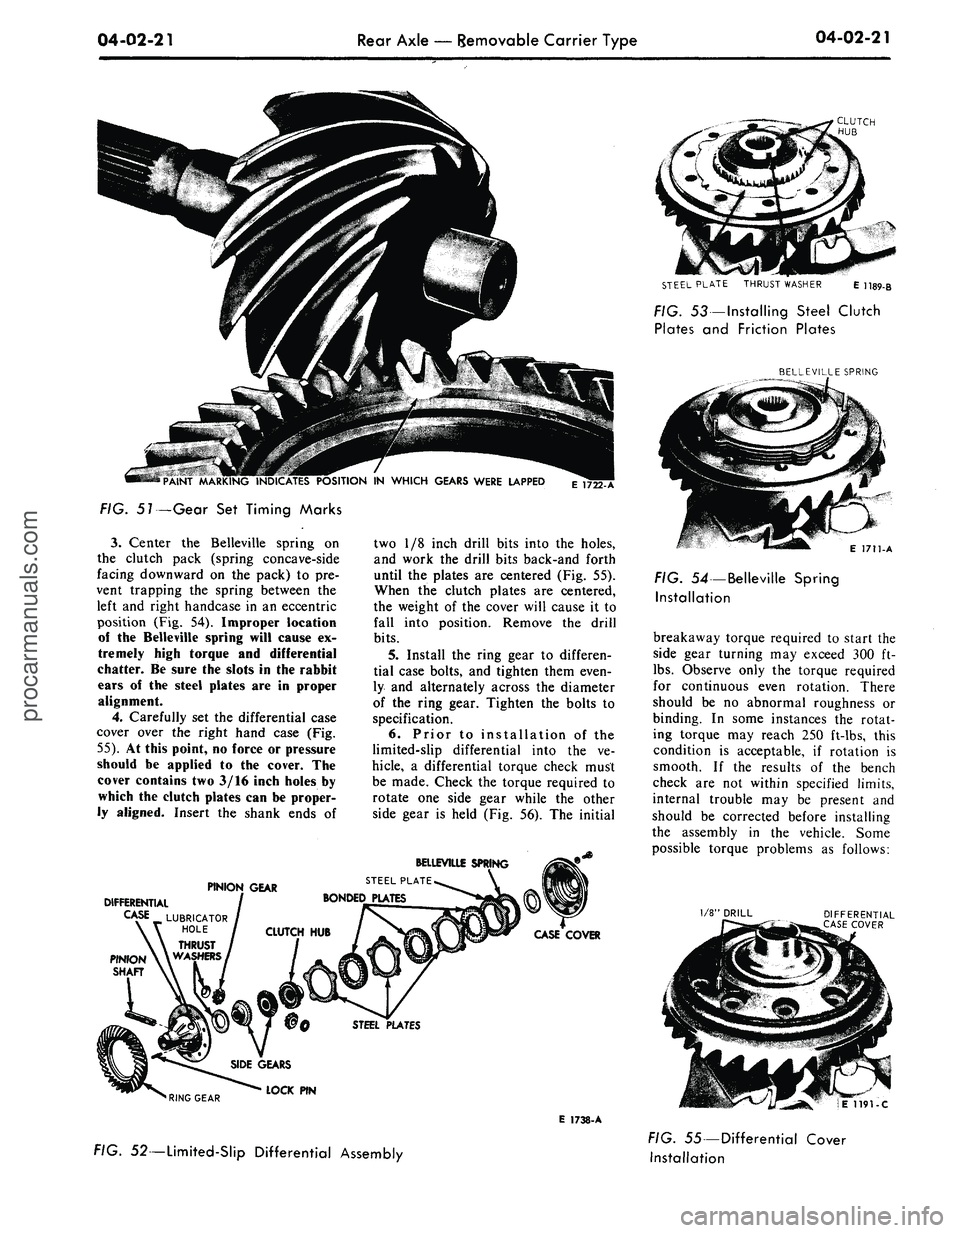
FIG. 51—Gear
Set
Timing Marks
3.
Center
the
Belleville spring
on
the clutch pack (spring concave-side
facing downward
on the
pack)
to pre-
vent trapping
the
spring between
the
left
and
right handcase
in an
eccentric
position
(Fig. 54).
Improper location
of
the
Belleville spring will cause
ex-
tremely high torque
and
differential
chatter.
Be
sure
the
slots
in the
rabbit
ears
of the
steel plates
are in
proper
alignment.
4.
Carefully
set the
differential case
cover over
the
right hand case
(Fig.
55).
At
this point,
no
force
or
pressure
should
be
applied
to the
cover.
The
cover contains
two 3/16
inch holes
by
which
the
clutch plates
can be
proper-
ly aligned. Insert
the
shank ends
of
two
1/8
inch drill bits into
the
holes,
and work
the
drill bits back-and forth
until
the
plates
are
centered
(Fig. 55).
When
the
clutch plates
are
centered,
the weight
of the
cover will cause
it to
fall into position. Remove
the
drill
bits.
5.
Install
the
ring gear
to
differen-
tial case bolts,
and
tighten them even-
ly
and
alternately across
the
diameter
of
the
ring gear. Tighten
the
bolts
to
specification.
6. Prior
to
installation
of the
limited-slip differential into
the ve-
hicle,
a
differential torque check must
be made. Check
the
torque required
to
rotate
one
side gear while
the
other
side gear
is
held
(Fig. 56). The
initial
PINION GEAR
DIFFERENTIAL
CASE
_
LUBRICATOR
HOLE / CLUTCH HUB
THRUST /
PINION \\WASHERS/
SHAFT
BELLEVILLE SPRING
STEEL
PLATE.
BONDED PLATES
CASE COVER
STEEL PLATES
RING GEAR
SIDE GEARS
LOCK
PIN
E 1738-A
STEEL PLATE THRUST WASHER
E 1189-
FIG. 53—Installing Steel Clutch
Plates
and
Friction Plates
BELLEVILLE SPRING
E 1711-A
FIG.
54
— Belleville
Spring
Installation
breakaway torque required
to
start
the
side gear turning
may
exceed
300 ft-
lbs.
Observe only
the
torque required
for continuous even rotation. There
should
be no
abnormal roughness
or
binding.
In
some instances
the
rotat-
ing torque
may
reach
250
ft-lbs, this
condition
is
acceptable,
if
rotation
is
smooth.
If the
results
of the
bench
check
are not
within specified limits,
internal trouble
may be
present
and
should
be
corrected before installing
the assembly
in the
vehicle. Some
possible torque problems
as
follows:
1/8" DRILL
DIFFERENTIAL
CASE COVER
E 1191-C
FIG. 52—Limited-Slip Differential Assembly
FIG.
55—
Differential Cover
Installationprocarmanuals.com
Page 219 of 413
04-02-22
Rear Axle — Removable Carrier Type
04-02-22
Too/-T59L-4204-A
or
44211
and
44211-A
EH92-C
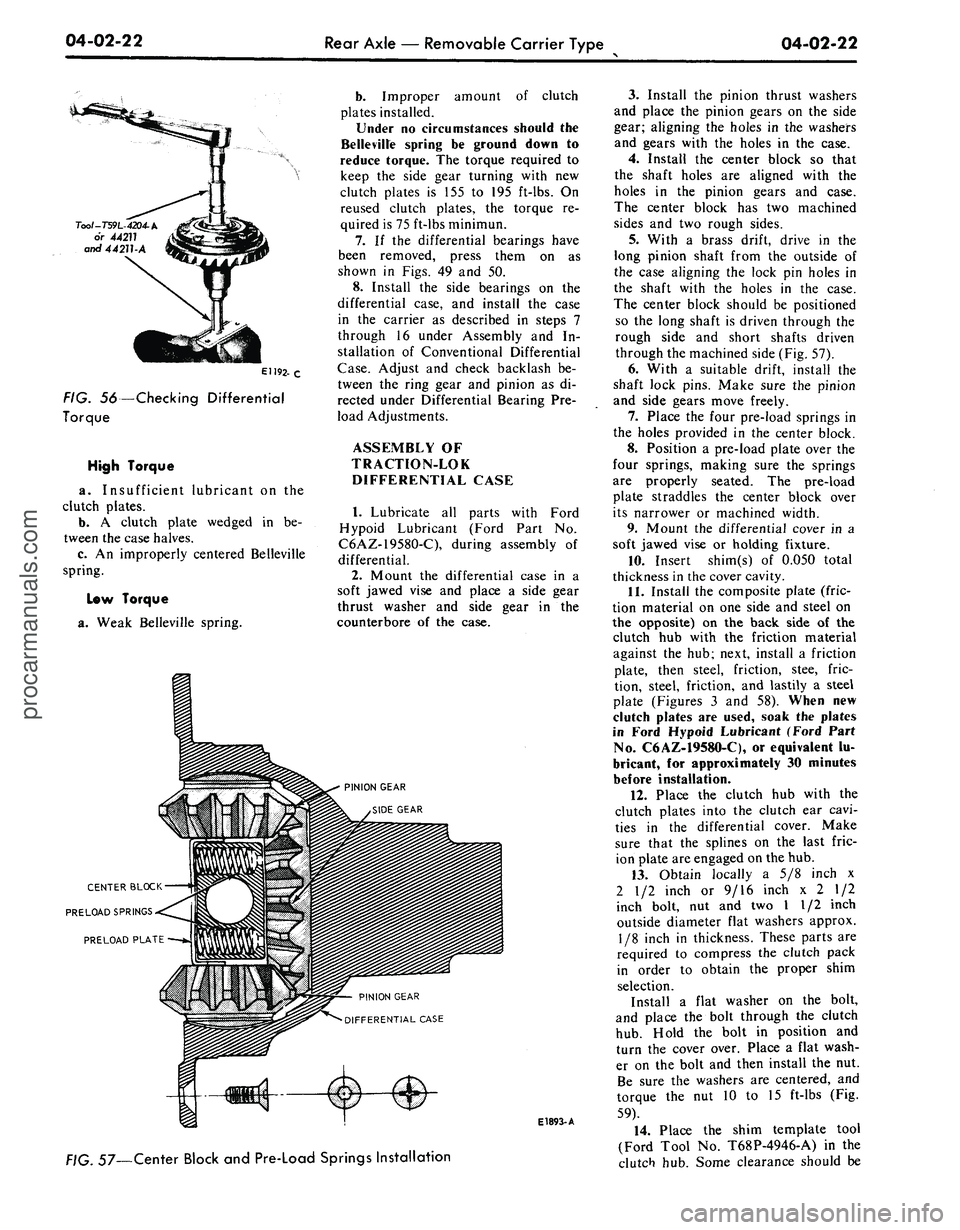
FIG. 56—Checking Differential
Torque
High Torque
a. Insufficient lubricant on the
clutch plates.
b.
A clutch plate wedged in be-
tween the case halves.
c. An improperly centered Belleville
spring.
Low Torque
a. Weak Belleville spring.
b.
Improper amount of clutch
plates installed.
Under no circumstances should the
Belleville spring be ground down to
reduce torque. The torque required to
keep the side gear turning with new
clutch plates is 155 to 195 ft-lbs. On
reused clutch plates, the torque re-
quired is 75 ft-lbs minimun.
7.
If the differential bearings have
been removed, press them on as
shown in Figs. 49 and 50.
8. Install the side bearings on the
differential case, and install the case
in the carrier as described in steps 7
through 16 under Assembly and In-
stallation of Conventional Differential
Case. Adjust and check backlash be-
tween the ring gear and pinion as di-
rected under Differential Bearing Pre-
load Adjustments.
ASSEMBLY OF
TRACTION-LOK
DIFFERENTIAL CASE
1.
Lubricate all parts with Ford
Hypoid Lubricant (Ford Part No.
C6AZ-19580-C), during assembly of
differential.
2.
Mount the differential case in a
soft jawed vise and place a side gear
thrust washer and side gear in the
counterbore of the case.
CENTER BLOCK
PRELOAD SPRINGS
PRELOAD PLATE
PINION GEAR
DIFFERENTIAL CASE
E1893-
A
. 57—Center Block and Pre-Load Springs Installation
3.
Install the pinion thrust washers
and place the pinion gears on the side
gear; aligning the holes in the washers
and gears with the holes in the case.
4.
Install the center block so that
the shaft holes are aligned with the
holes in the pinion gears and case.
The center block has two machined
sides and two rough sides.
5.
With a brass drift, drive in the
long pinion shaft from the outside of
the case aligning the lock pin holes in
the shaft with the holes in the case.
The center block should be positioned
so the long shaft is driven through the
rough side and short shafts driven
through the machined side (Fig. 57).
6. With a suitable drift, install the
shaft lock pins. Make sure the pinion
and side gears move freely.
7.
Place the four pre-load springs in
the holes provided in the center block.
8. Position a pre-load plate over the
four springs, making sure the springs
are properly seated. The pre-load
plate straddles the center block over
its narrower or machined width.
9. Mount the differential cover in a
soft jawed vise or holding fixture.
10.
Insert shim(s) of 0.050 total
thickness in the cover cavity.
11.
Install the composite plate (fric-
tion material on one side and steel on
the opposite) on the back side of the
clutch hub with the friction material
against the hub; next, install a friction
plate, then steel, friction, stee, fric-
tion, steel, friction, and lastily a steel
plate (Figures 3 and 58). When new
clutch plates are used, soak the plates
in Ford Hypoid Lubricant (Ford Part
No.
C6AZ-19580-C), or equivalent lu-
bricant, for approximately 30 minutes
before installation.
12.
Place the clutch hub with the
clutch plates into the clutch ear cavi-
ties in the differential cover. Make
sure that the splines on the last fric-
ion plate are engaged on the hub.
13.
Obtain locally a 5/8 inch x
2 1/2 inch or 9/16 inch x 2 1/2
inch bolt, nut and two I 1/2 inch
outside diameter flat washers approx.
1/8 inch in thickness. These parts are
required to compress the clutch pack
in order to obtain the proper shim
selection.
Install a flat washer on the bolt,
and place the bolt through the clutch
hub.
Hold the bolt in position and
turn the cover over. Place a flat wash-
er on the bolt and then install the nut.
Be sure the washers are centered, and
torque the nut 10 to 15 ft-lbs (Fig.
59).
14.
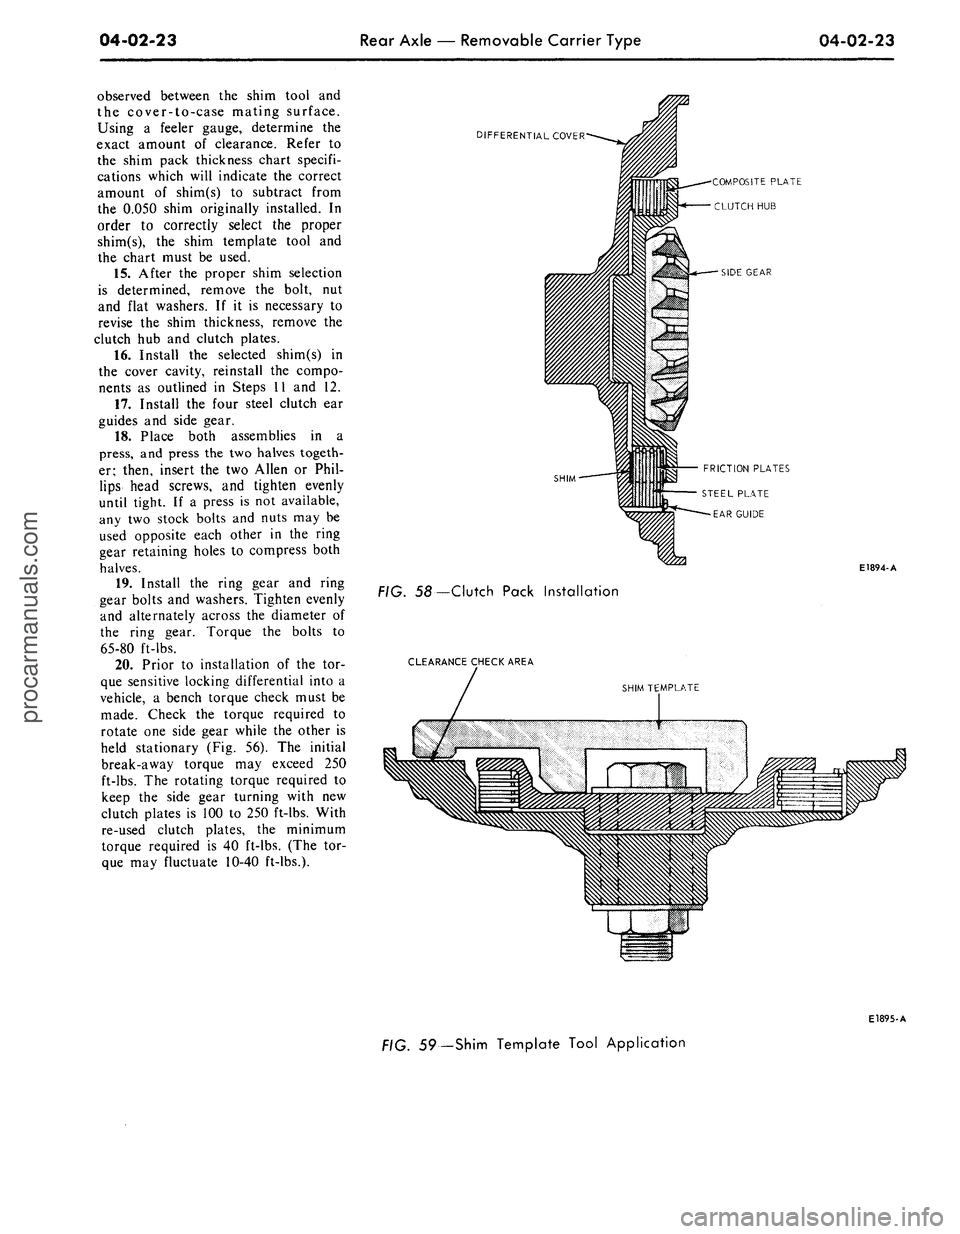
Place the shim template tool
(Ford Tool No. T68P-4946-A) in the
clutch hub. Some clearance should beprocarmanuals.com
Page 220 of 413
04-02-23
Rear Axle — Removable Carrier Type
04-02-23
observed between the shim tool and
the cover-to-case mating surface.
Using a feeler gauge, determine the
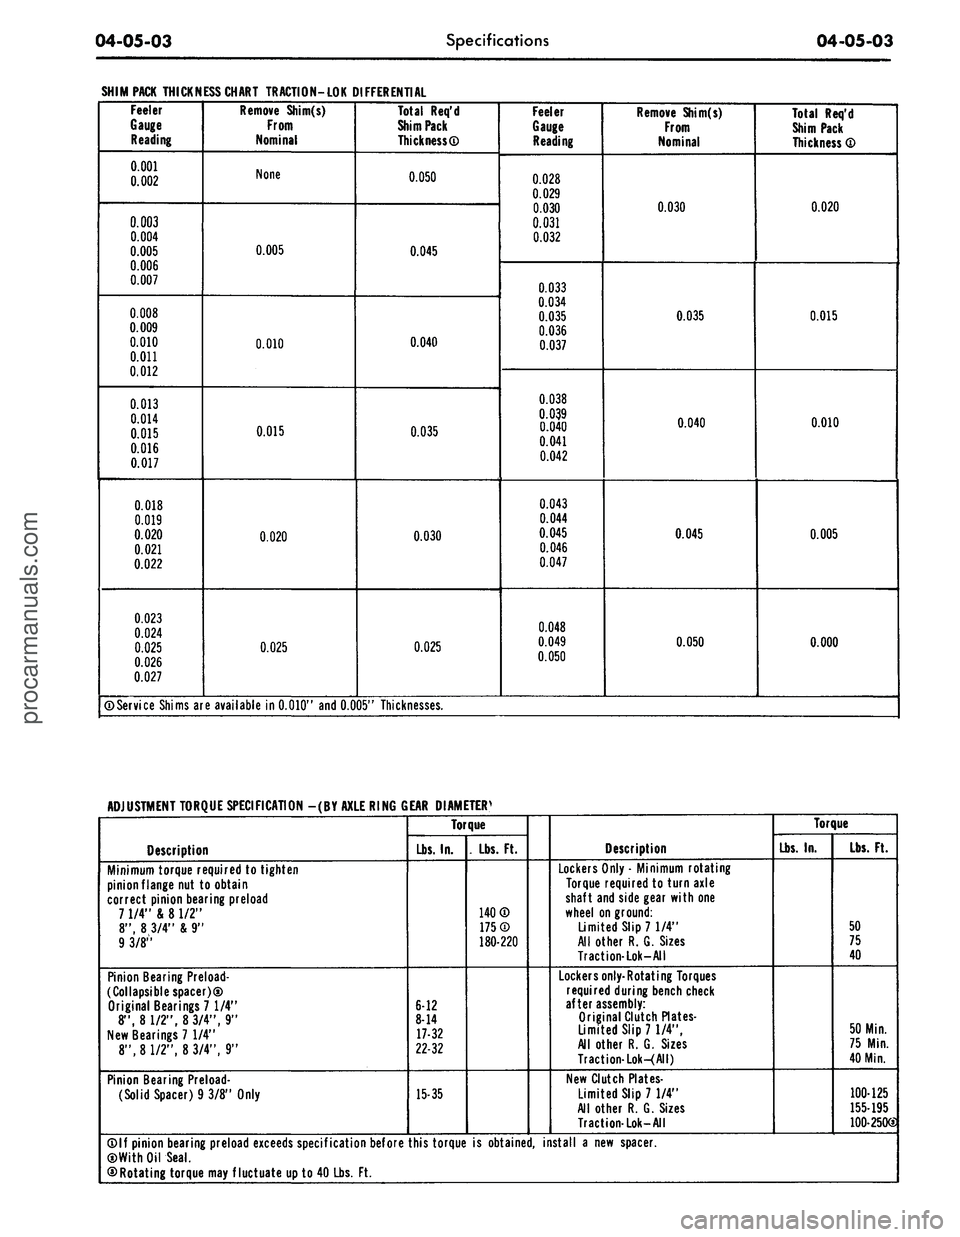
exact amount of clearance. Refer to
the shim pack thickness chart specifi-
cations which will indicate the correct
amount of shim(s) to subtract from
the 0.050 shim originally installed. In
order to correctly select the proper
shim(s), the shim template tool and
the chart must be used.
15.
After the proper shim selection
is determined, remove the bolt, nut
and flat washers. If it is necessary to
revise the shim thickness, remove the
clutch hub and clutch plates.
16.
Install the selected shim(s) in
the cover cavity, reinstall the compo-
nents as outlined in Steps 11 and 12.
17.
Install the four steel clutch ear
guides and side gear.
18.
Place both assemblies in a
press,
and press the two halves togeth-
er; then, insert the two Allen or Phil-
lips head screws, and tighten evenly
until tight. If a press is not available,
any two stock bolts and nuts may be
used opposite each other in the ring
gear retaining holes to compress both
halves.
19.
Install the ring gear and ring
gear bolts and washers. Tighten evenly
and alternately across the diameter of
the ring gear. Torque the bolts to
65-80 ft-lbs.
20.
Prior to installation of the tor-
que sensitive locking differential into a
vehicle, a bench torque check must be
made. Check the torque required to
rotate one side gear while the other is
held stationary (Fig. 56). The initial
break-away torque may exceed 250
ft-lbs.
The rotating torque required to
keep the side gear turning with new
clutch plates is 100 to 250 ft-lbs. With
re-used clutch plates, the minimum
torque required is 40 ft-lbs. (The tor-
que may fluctuate 10-40 ft-lbs.).
DIFFERENTIAL COVER
SHIM
-COMPOSITE PLATE
CLUTCH HUB
SIDE GEAR
FRICTION PLATES
E1894-A
FIG. 58— Clutch Pack Installation
CLEARANCE CHECK AREA
SHIM TEMPLATE
E1895-A
59—Shim Template Tool Applicationprocarmanuals.com
Page 244 of 413
04-05-03
Specifications
04-05-03
SHIM PACK THICKNESS CHART TRACTION-LOK DIFFERENTIAL
Feeler
Gauge
Reading
0.001
0.002
0.003
0.004
0.005
0.006
0.007
0.008
0.009
0.010
0.011
0.012
0.013
0.014
0.015
0.016
0.017
0.018
0.019
0.020
0.021
0.022
0.023
0.024
0.025
0.026
0.027
Remove Shim(s)
From
Nominal
None
0.005
0.010
0.015
0.020
0.025
Total Req'd
Shim Pack
Thickness®
0.050
0.045
0.040
0.035
0.030
0.025
Feeler
Gauge
Reading
0.028
0.029
0.030
0.031
0.032
0.033
0.034
0.035
0.036
0.037
0.038
0.039
0.040
0.041
0.042
0.043
0.044
0.045
0.046
0.047
0.048
0.049
0.050
Remove Shim(s)
From
Nominal
0.030
0.035
0.040
0.045
0.050
Total Req'd
Shim Pack
Thickness ®
0.020
0.015
0.010
0.005
0.000
©Service Shims are available in 0.010" and 0.005" Thicknesses.
ADJUSTMENT TORQUE SPECIFICATION -(BY AXLE RING GEAR DIAMETERS
Description
Minimum torque required to tighten
pinion flange nut to obtain
correct pinion bearing preload
7 1/4" & 8 1/2"
8", 8 3/4" & 9"
9 3/8"
Pinion Bearing Preload-
collapsible spacer)®
Original Bearings 7 1/4"
8", 8 1/2", 8 3/4", 9"
New Bearings 7 1/4"
8", 8 1/2", 8 3/4", 9"
Pinion Bearing Preload-
(Solid Spacer) 9 3/8" Only
Torque
Lbs.
In.
6-12
8-14
17-32
22-32
15-35
. Lbs. Ft.
140®
175®
180-220
Description
Lockers Only • Minimum rotating
Torque required to turn axle
shaft and side gear with one
wheel on ground:
Limited Slip 7 1/4"
All other R. G. Sizes
Traction-Lok-All
Lockers only-Rotating Torques
required during bench check
after assembly:
Original Clutch Plates-
Limited Slip 71/4",
All other R. G. Sizes
Traction-Lok-(All)
New Clutch Plates-
Limited Slip 7 1/4"
All other R. G. Sizes
Traction-Lok-All
Torque
Lbs.
In.
Lbs.
Ft.
50
75
40
50 Min.
75 Min.
40 Min.
100-125
155-195
100-250G
©If pinion bearing preload exceeds specification before this torque is obtained, install a new spacer.
©With Oil Seal.
©Rotating torque may fluctuate up to 40 Lbs. Ft.procarmanuals.com
Page 248 of 413
05-01-01
05-01-01
Clutch
GROUP
5
PART
5-1
PAGE
Drive Shaft 05-01-01
PART
5-2
General Clutch Service 05-02-01
PART
5-3
Clutch
PART
5-4
Specifications
PAGE
05-03-01
05-04-01
PART
5-1
Drive Shaft
COMPONENT INDEX
DESCRIPTION
DRIVE SHAFT ANGLE CHECK
DRIVE SHAFT BALANCE CHECK
DRIVE SHAFT BALANCING
(Single Universal Joint)
DRIVE SHAFT DISASSEMBLY
AND
OVERHAUL
Single Universal Joint — Ford Design
Double Cardan Joint — Dana Design
Double Cardan Joint — Saginaw Design
DRIVE SHAFT REMOVAL
AND
INSTALLATION
DRIVE SHAFT RUNOUT CHECK
MODEL APPLICATION
All
Models
01-01
01-01
01-01
01-02
01-01
Ford
01-04
01-04
N/A
N/A
Mercury
01-04
01-04
N/A
N/A
Meteor
01-04
01-04
N/A
N/A
Cougar
01-04
01-04
N/A
N/A
Fairlane
01-04
01-04
N/A
N/A
Falcon
01-04
01-04
N/A
N/A
Montego
01-04
01-04
N/A
N/A
Mustang
01-04
01-04
N/A
N/A
Lincoln-
Continental
N/A
N/A
01-04
N/A
Thunderbird
N/A
N/A
N/A
01-05
Continental-
Mark
III
N/A
N/A
N/A
01-05
A page number indicates that the item
is for the
vehicle listed
at the
head
of
the column.
N/A indicates that
the
item
is not
applicable
to the
vehicle listed.
DRIVE SHAFT TESTS
DRIVE LINE BALANCE CHECK
If detailed parts
of the
drive shaft
are replaced
and
shaft vibration
is en-
countered after installation, disconnect
the shaft
at the
slip yoke. Rotate
the
slip yoke
180
degrees; then, reconnect
the shaft
to the
slip yoke.
If the
vibra-
tion persists, disconnect
the
shaft
at
the rear axle companion flange.
Ro-
tate
the
companion flange
180
degrees
and reconnect
the
shaft
to the
flange.
DRIVE LINE ANGLE CHECK
Vibration
or
"shudder" which
is no-
ticeable either
on
fast acceleration
or
when coasting, using
the
engine
for a
brake,
may be
caused
by the
rear axle
housing being loose
on the
rear
springs
or by
improper pinion angle.
Refer
to
Group
3,
Part
2 for
pinion
angle checking procedures.
If the
rear
axle U-bolts (Fairlane, Montego,
Mustang, Cougar, Falcon models
only)
are
loose, torque
the
nuts
to
specification.
DRIVE SHAFT RUNOUT CHECK
Using
a
dial indicator, check
the
runout
at
each
end and in the
middle
of
the
driveshaft.
The
rear check
should
be
made
on the
small tube
sec-
tion
of the
shaft between
the
balance
weights
and the
yoke welds. Drive-
shaft runout should
not
exceed 0.035
inch
at any one
point.
DESCRIPTION
The drive shaft
is the
means
of
transferring power from
the
engine,
through
the
transmission,
to the dif-
ferential
in the
rear axle,
and
then
to
the rear wheels.
The
drive shaft incor-
porates
two
universal joints
and a
slip
yoke
(Fig. 1) or two
double cardan
universal joints,
one at
each
end of the
shaft (Figs.
2 and 3).
Each double
procarmanuals.com
Page 255 of 413
05-02-01
General Clutch Service
05-02-01
PART
5-2
General Clutch Service
COMPONENT INDEX
MODEL APPLICATION
3
a>
1
o>
il
•U
i
!-
II
CLUTCH DISC
Cleaning and Inspection
02-04
02-04
02-04
02-04
02-04
02-04
02-04
02-04
N/A
N/A
N/A
CHECKING FLYWHEEL HOUSING
ALIGNMENT
02-01
02-01
02-01
02-01
02-01
02-01
02-01
02-01
N/A
N/A
N/A
CORRECTING FLYWHEEL HOUSING
ALIGNMENT
02-03
02-03
02-03
02-03
02-03
02-03
02-03
02-03
N/A
N/A
N/A
PILOT BUSHING
Cleaning and Inspection
02-04
02-04
02-04
02-04
02-04
02-04
02-04
02-04
N/A
N/A
N/A
PRESSURE PLATE AND COVER
Cleaning and Inspection
02-04
02-04
02-04
02-04
02-04
02-04
02-04
02-04
N/A
N/A
N/A
RELEASE BEARING
Cleaning and Inspection
02-04
02-04
02-04
02-04
02-04
02-04
02-04
02-04
N/A
N/A
N/A
A page number indicates that the item is for the vehicle listed at the head of the column.
N/A indicates that the item is not applicable to the vehicle listed.
l
FLYWHEEL HOUSING ALIGNMENT
Alignment of the flywheel housing
bore and rear face with the engine
should be checked as a possible cause
of any of the following troubles- ex-
cessive transmission gear wear, ..ans-
mission jumping out of gear, especial-
ly third gear, drive line vibration, ex-
cessive pilot bushing wear, noisy re-
lease bearing, or excessive clutch spin
time.
INSPECTION
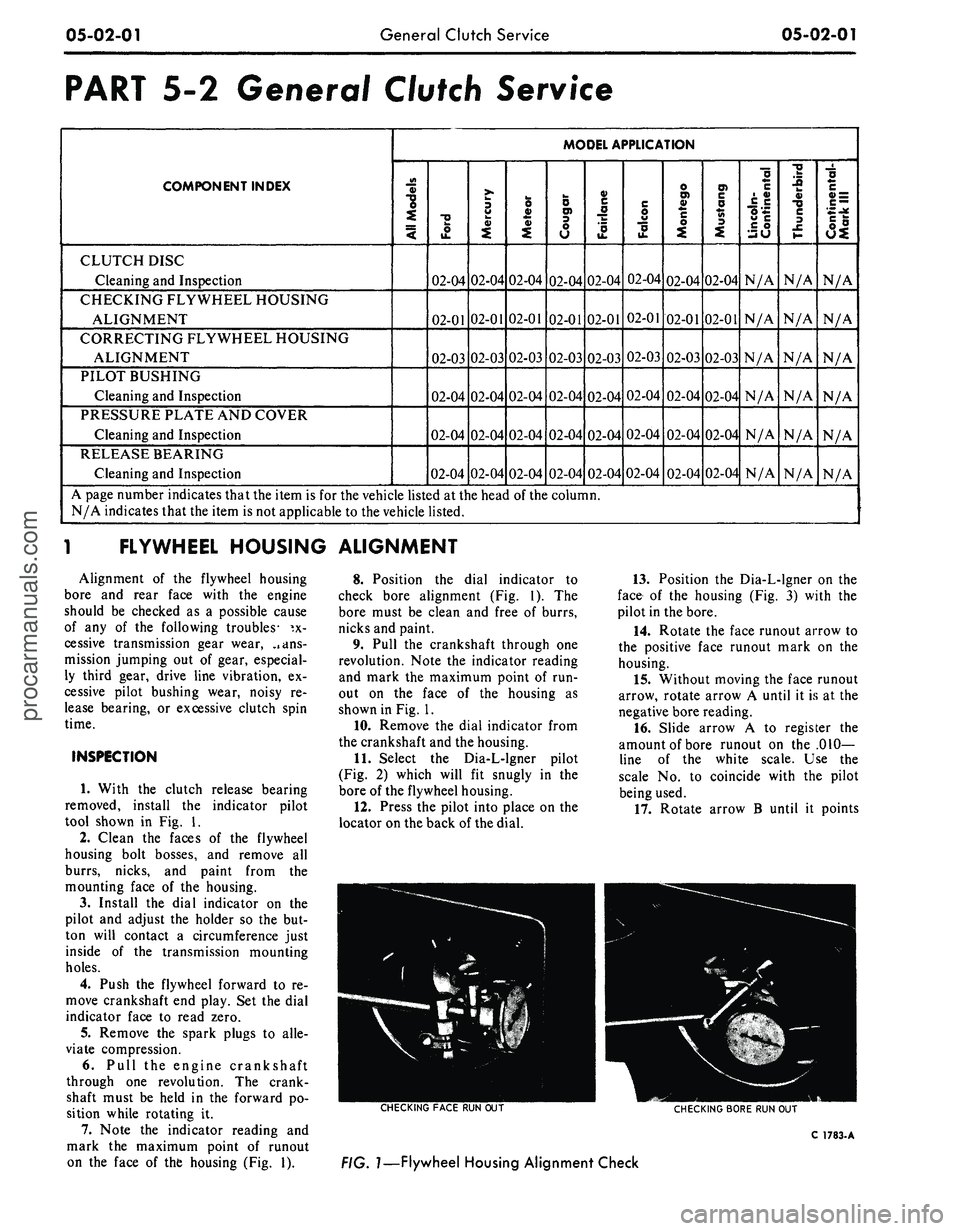
1. With the clutch release bearing
removed, install the indicator pilot
tool shown in Fig. 1.
2.
Clean the faces of the flywheel
housing bolt bosses, and remove all
burrs, nicks, and paint from the
mounting face of the housing.
3.
Install the dial indicator on the
pilot and adjust the holder so the but-
ton will contact a circumference just
inside of the transmission mounting
holes.
4.
Push the flywheel forward to re-
move crankshaft end play. Set the dial
indicator face to read zero.
5.
Remove the spark plugs to alle-
viate compression.
6. Pull the engine crankshaft
through one revolution. The crank-
shaft must be held in the forward po-
sition while rotating it.
7. Note the indicator reading and
mark the maximum point of runout
on the face of the housing (Fig. 1).
8. Position the dial indicator to
check bore alignment (Fig. 1). The
bore must be clean and free of burrs,
nicks and paint.
9. Pull the crankshaft through one
revolution. Note the indicator reading
and mark the maximum point of run-
out on the face of the housing as
shown in Fig. 1.
10.
Remove the dial indicator from
the crankshaft and the housing.
11.
Select the Dia-L-lgner pilot
(Fig. 2) which will fit snugly in the
bore of the flywheel housing.
12.
Press the pilot into place on the
locator on the back of the dial.
13.
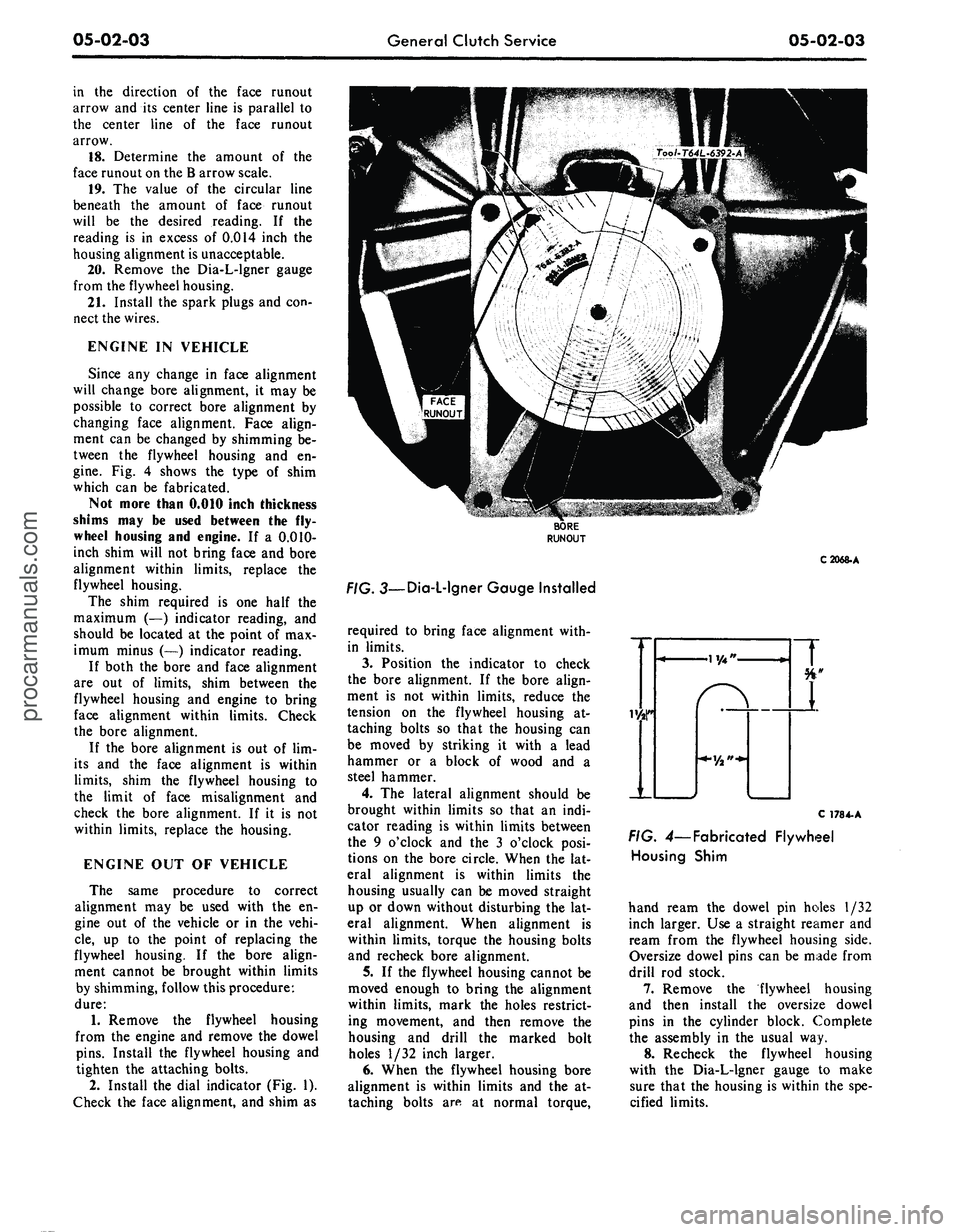
Position the Dia-L-lgner on the
face of the housing (Fig. 3) with the
pilot in the bore.
14.
Rotate the face runout arrow to
the positive face runout mark on the
housing.
15.
Without moving the face runout
arrow, rotate arrow A until it is at the
negative bore reading.
16.
Slide arrow A to register the
amount of bore runout on the .010-
line of the white scale. Use the
scale No. to coincide with the pilot
being used.
17.
Rotate arrow B until it points
CHECKING
FACE
RUN OUT
CHECKING
BORE
RUN OUT
C
1783-
A
FIG.
1—Flywheel
Housing Alignment Checkprocarmanuals.com
Page 256 of 413
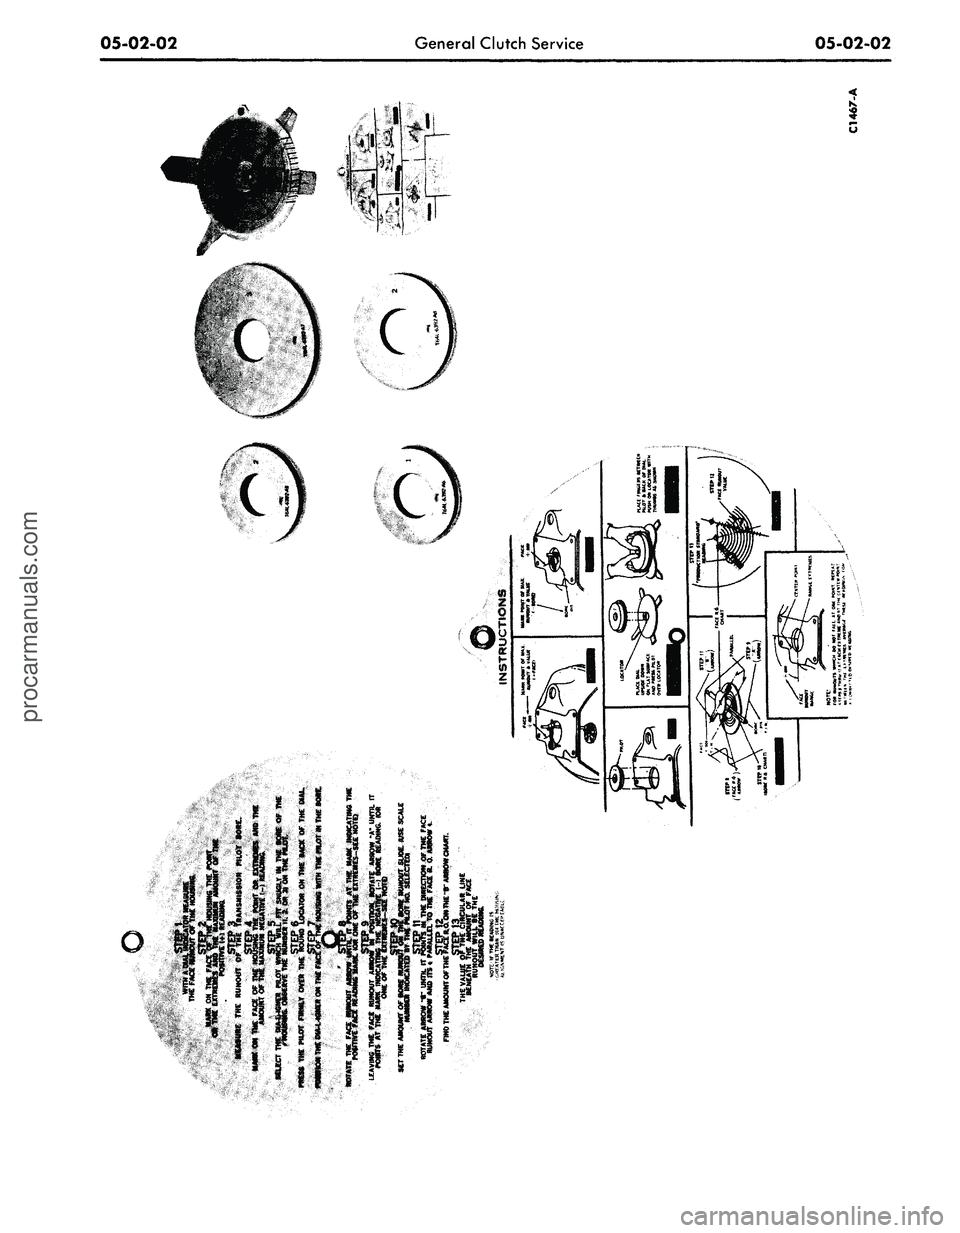
05-02-02
General Clutch Service
05-02-02procarmanuals.com
Page 257 of 413
05-02-03
General Clutch Service
05-02-03
in the direction of the face runout
arrow and its center line is parallel to
the center line of the face runout
arrow.
18.
Determine the amount of the
face runout on the B arrow scale.
19.
The value of the circular line
beneath the amount of face runout
will be the desired reading. If the
reading is in excess of 0.014 inch the
housing alignment is unacceptable.
20.
Remove the Dia-L-lgner gauge
from the flywheel housing.
21.
Install the spark plugs and con-
nect the wires.
ENGINE IN VEHICLE
Since any change in face alignment
will change bore alignment, it may be
possible to correct bore alignment by
changing face alignment. Face align-
ment can be changed by shimming be-
tween the flywheel housing and en-
gine.
Fig. 4 shows the type of shim
which can be fabricated.
Not more than 0.010 inch thickness
shims may be used between the fly-
wheel housing and engine. If a 0.010-
inch shim will not bring face and bore
alignment within limits, replace the
flywheel housing.
The shim required is one half the
maximum (—) indicator reading, and
should be located at the point of max-
imum minus (—) indicator reading.
If both the bore and face alignment
are out of limits, shim between the
flywheel housing and engine to bring
face alignment within limits. Check
the bore alignment.
If the bore alignment is out of lim-
its and the face alignment is within
limits,
shim the flywheel housing to
the limit of face misalignment and
check the bore alignment. If it is not
within limits, replace the housing.
ENGINE OUT OF VEHICLE
The same procedure to correct
alignment may be used with the en-
gine out of the vehicle or in the vehi-
cle,
up to the point of replacing the
flywheel housing. If the bore align-
ment cannot be brought within limits
by shimming, follow this procedure:
dure:
1.
Remove the flywheel housing
from the engine and remove the dowel
pins.
Install the flywheel housing and
tighten the attaching bolts.
2.
Install the dial indicator (Fig. 1).
Check the face alignment, and shim as
C2068-A
. 3—Dia-L-lgner Gauge Installed
required to bring face alignment with-
in limits.
3.
Position the indicator to check
the bore alignment. If the bore align-
ment is not within limits, reduce the
tension on the flywheel housing at-
taching bolts so that the housing can
be moved by striking it with a lead
hammer or a block of wood and a
steel hammer.
4.
The lateral alignment should be
brought within limits so that an indi-
cator reading is within limits between
the 9 o'clock and the 3 o'clock posi-
tions on the bore circle. When the lat-
eral alignment is within limits the
housing usually can be moved straight
up or down without disturbing the lat-
eral alignment. When alignment is
within limits, torque the housing bolts
and recheck bore alignment.
5.
If the flywheel housing cannot be
moved enough to bring the alignment
within limits, mark the holes restrict-
ing movement, and then remove the
housing and drill the marked bolt
holes 1/32 inch larger.
6. When the flywheel housing bore
alignment is within limits and the at-
taching bolts are at normal torque,
C 178 4-A
FIG. 4— Fabricated Flywheel
Housing Shim
hand ream the dowel pin holes 1/32
inch larger. Use a straight reamer and
ream from the flywheel housing side.
Oversize dowel pins can be made from
drill rod stock.
7.
Remove the flywheel housing
and then install the oversize dowel
pins in the cylinder block. Complete
the assembly in the usual way.
8. Recheck the flywheel housing
with the Dia-L-lgner gauge to make
sure that the housing is within the spe-
cified limits.procarmanuals.com