FORD MUSTANG 2003 Workshop Manual
MUSTANG 2003
FORD
FORD
https://www.carmanualsonline.info/img/11/56942/w960_56942-0.png
FORD MUSTANG 2003 Workshop Manual
Trending: battery location, engine overheat, overheating, rocker, wipers, transmission fluid, relay
Page 3961 of 4378
REMOVAL AND INSTALLATION
Hydraulic System, Lift Cylinder and Motor
Removal
NOTE:
The convertible top hydraulic components are removed from the vehicle as an assembly. The
hydraulic components are individually repaired and the system must be bled before being installed into
the vehicle.
Hydraulic system
1. Unlatch the convertible top.
2. Remove the rear quarter trim panel. For additional information, refer to Section 501 - 05 .
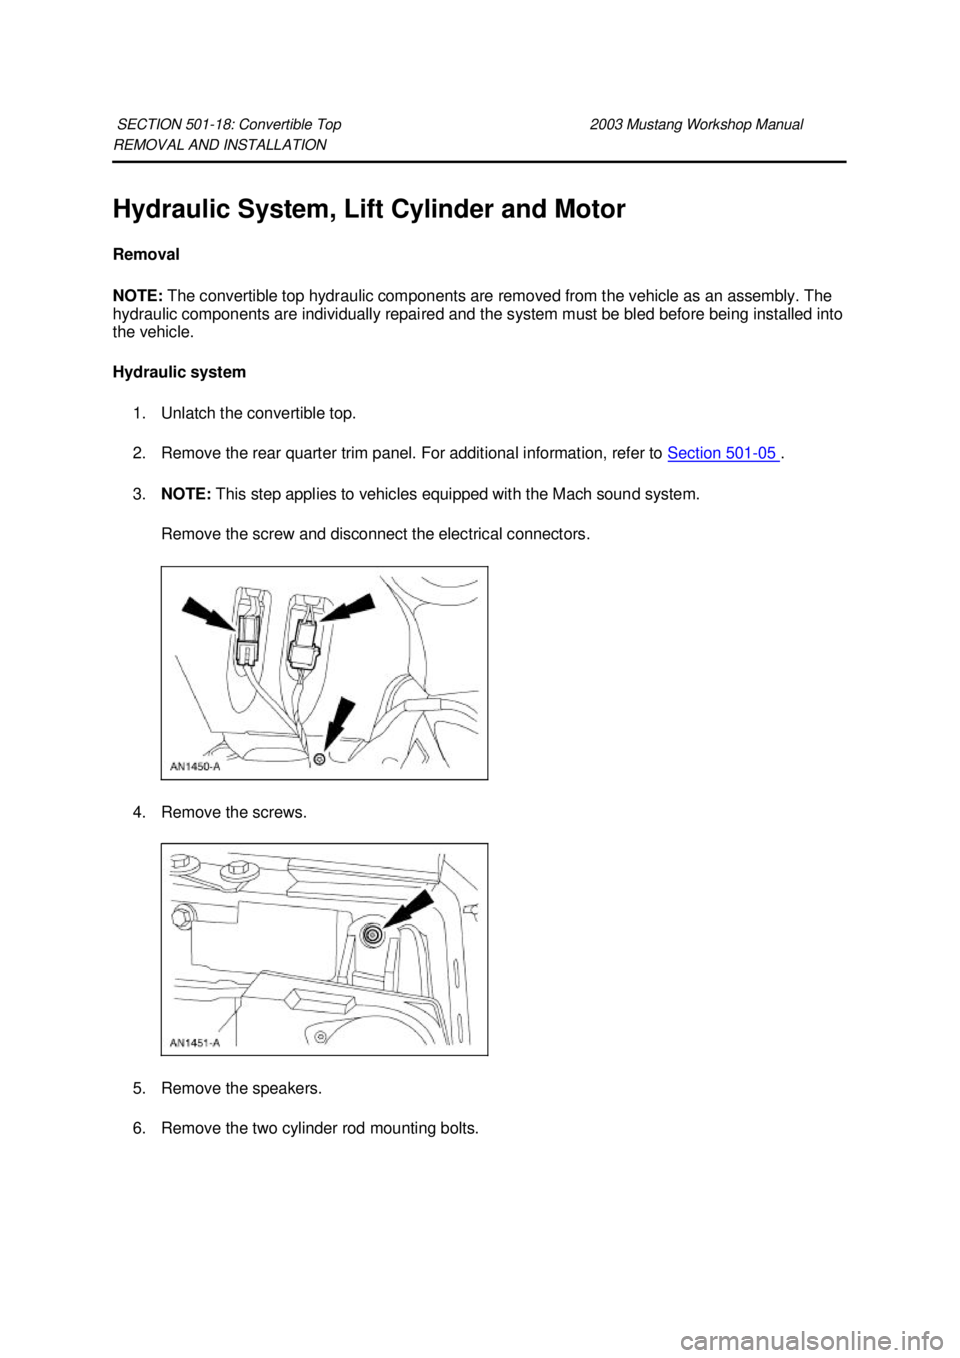
3. NOTE: This step applies to vehicles equipped with the Mach sound system.
Remove the screw and disconnect the electrical connectors.
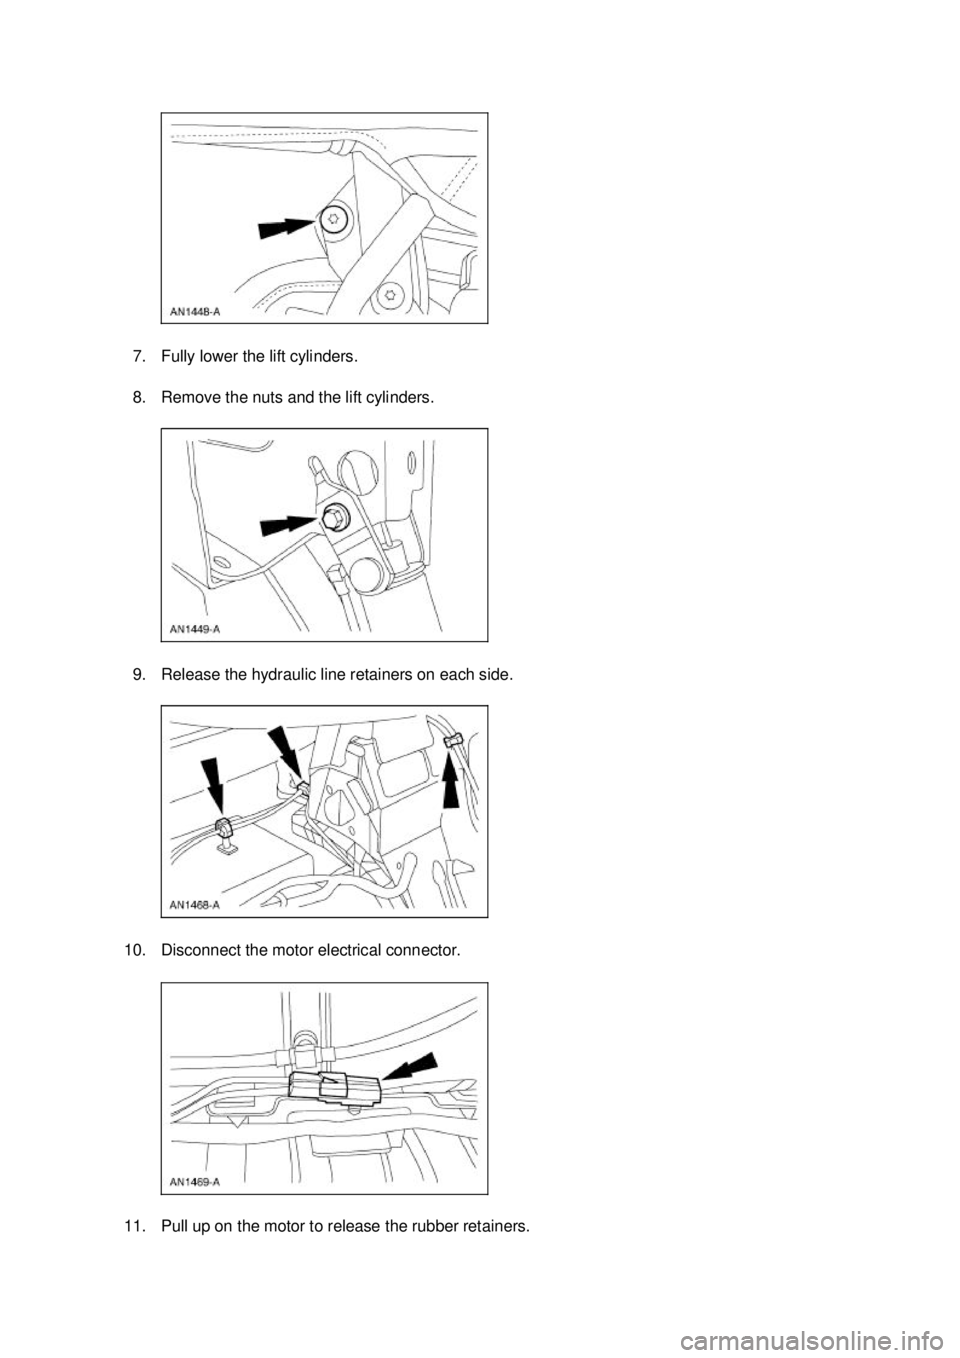
4. Remove the screws.
5. Remove the speakers.
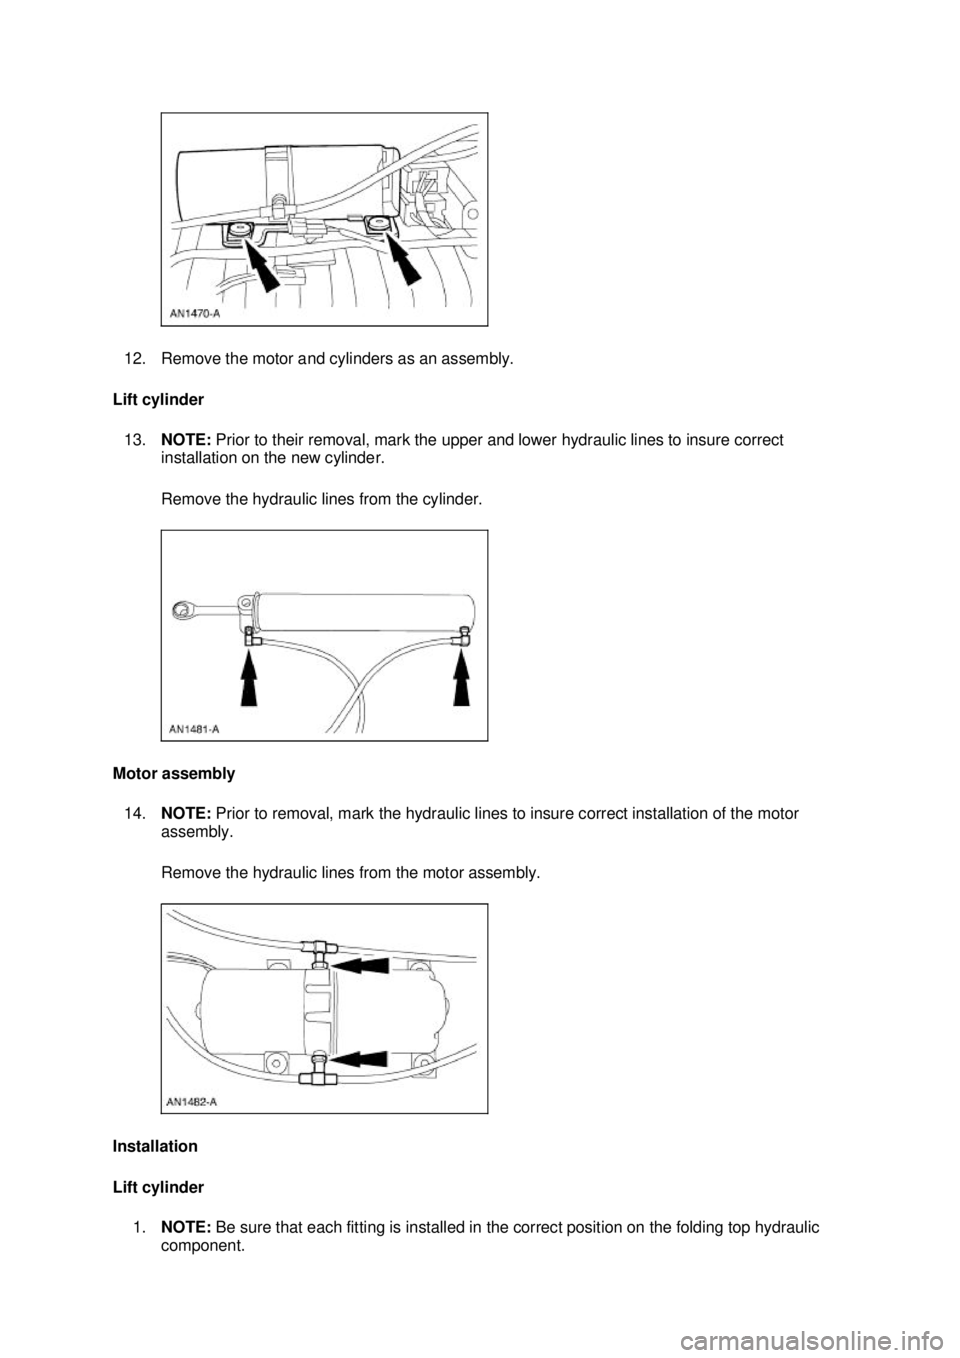
6. Remove the two cylinder rod mounting bolts.
SECTION 501-
18: Convertible Top 2003 Mustang Workshop Manual �K�l�j . 1 �b�a
62003 Mustang Workshop Manual
18. 11. 2011file:///C:/Ford/2000 - 2004/tsocache/SHEF_5108/S3B~us~en~ ...
Page 3962 of 4378
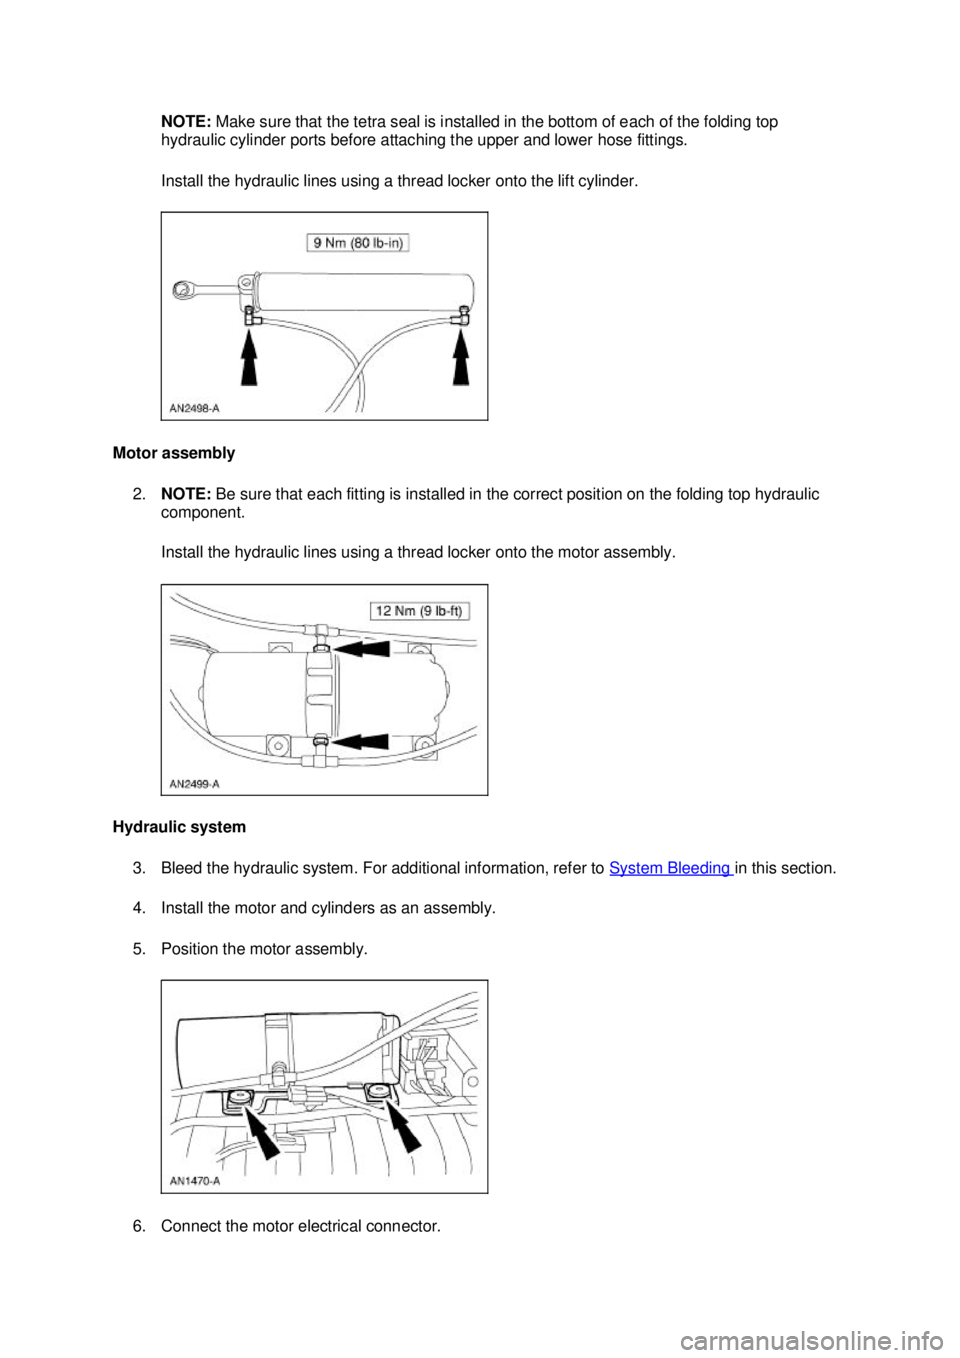
7. Fully lower the lift cylinders.
8. Remove the nuts and the lift cylinders.
9. Release the hydraulic line retainers on each side.
10. Disconnect the motor electrical connector.
11. Pull up on the motor to release the rubber retainers. �K�l�j . 2 �b�a
62003 Mustang Workshop Manual
18. 11. 2011file:///C:/Ford/2000 - 2004/tsocache/SHEF_5108/S3B~us~en~ ...
Page 3963 of 4378
12. Remove the motor and cylinders as an assembly.
Lift cylinder 13. NOTE: Prior to their removal, mark the upper and lower hydraulic lines to insure correct
installation on the new cylinder.
Remove the hydraulic lines from the cylinder.
Motor assembly 14. NOTE: Prior to removal, mark the hydraulic lines to insure correct installation of the motor
assembly.
Remove the hydraulic lines from the motor assembly.
Installation
Lift cylinder 1. NOTE: Be sure that each fitting is installed in the correct position on the folding top hydraulic
component. �K�l�j . 3 �b�a
62003 Mustang Workshop Manual
18. 11. 2011file:///C:/Ford/2000 - 2004/tsocache/SHEF_5108/S3B~us~en~ ...
Page 3964 of 4378
NOTE:
Make sure that the tetra seal is installed in the bottom of each of the folding top
hydraulic cylinder ports before attaching the upper and lower hose fittings.
Install the hydraulic lines using a thread locker onto the lift cylinder.
Motor assembly 2. NOTE: Be sure that each fitting is installed in the correct position on the folding top hydraulic
component.
Install the hydraulic lines using a thread locker onto the motor assembly.
Hydraulic system 3. Bleed the hydraulic system. For additional information, refer to System Bleeding in this section.
4. Install the motor and cylinders as an assembly.
5. Position the motor assembly.
6. Connect the motor electrical connector. �K�l�j . 4 �b�a
62003 Mustang Workshop Manual
18. 11. 2011file:///C:/Ford/2000 - 2004/tsocache/SHEF_5108/S3B~us~en~ ...
Page 3965 of 4378
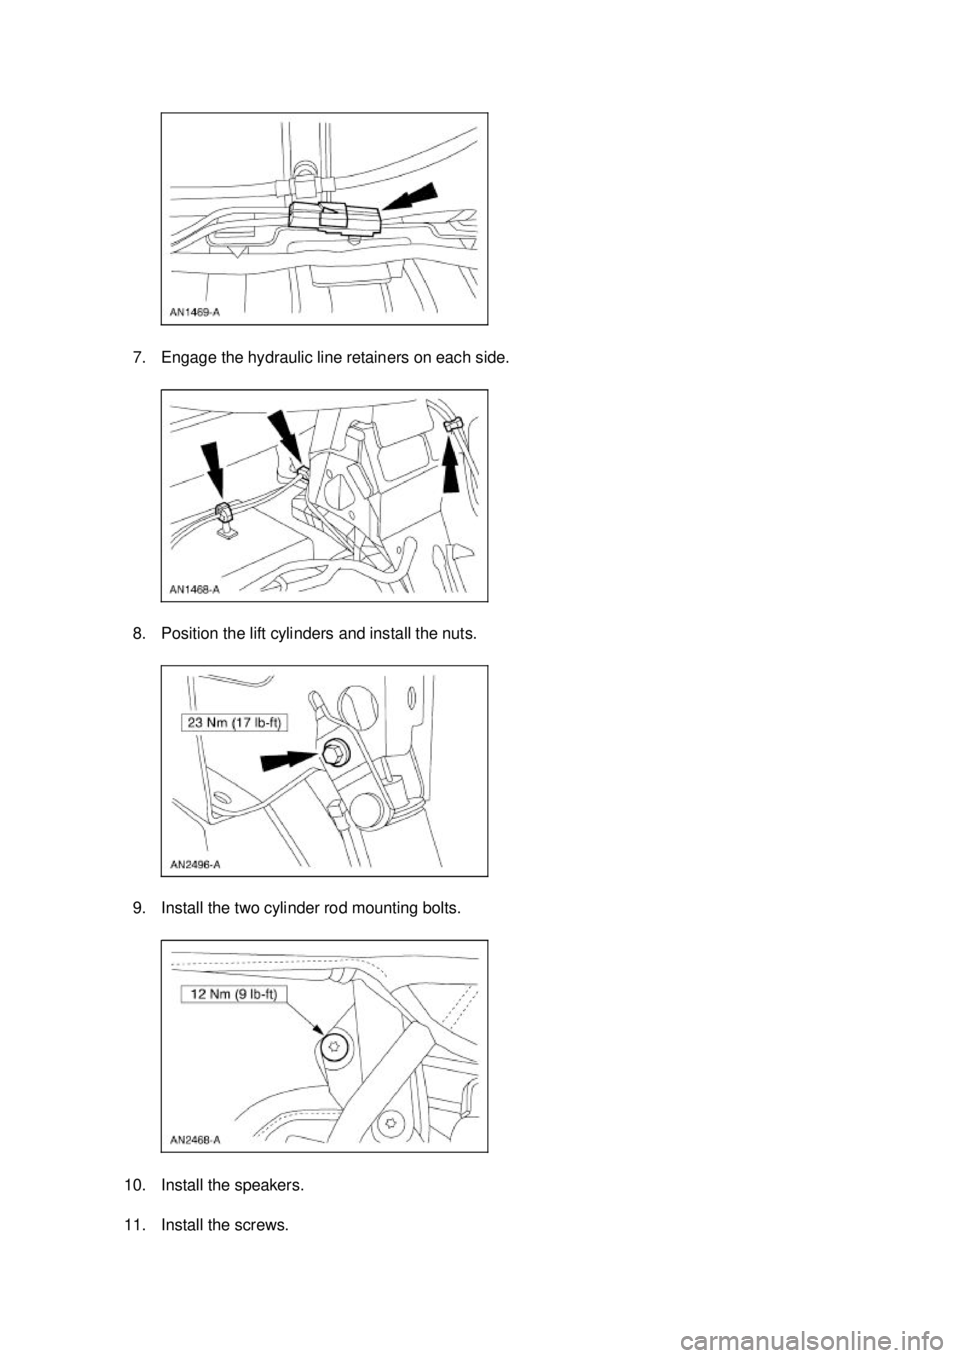
7. Engage the hydraulic line retainers on each side.
8. Position the lift cylinders and install the nuts.
9. Install the two cylinder rod mounting bolts.
10. Install the speakers.
11. Install the screws. �K�l�j . 5 �b�a
62003 Mustang Workshop Manual
18. 11. 2011file:///C:/Ford/2000 - 2004/tsocache/SHEF_5108/S3B~us~en~ ...
Page 3966 of 4378
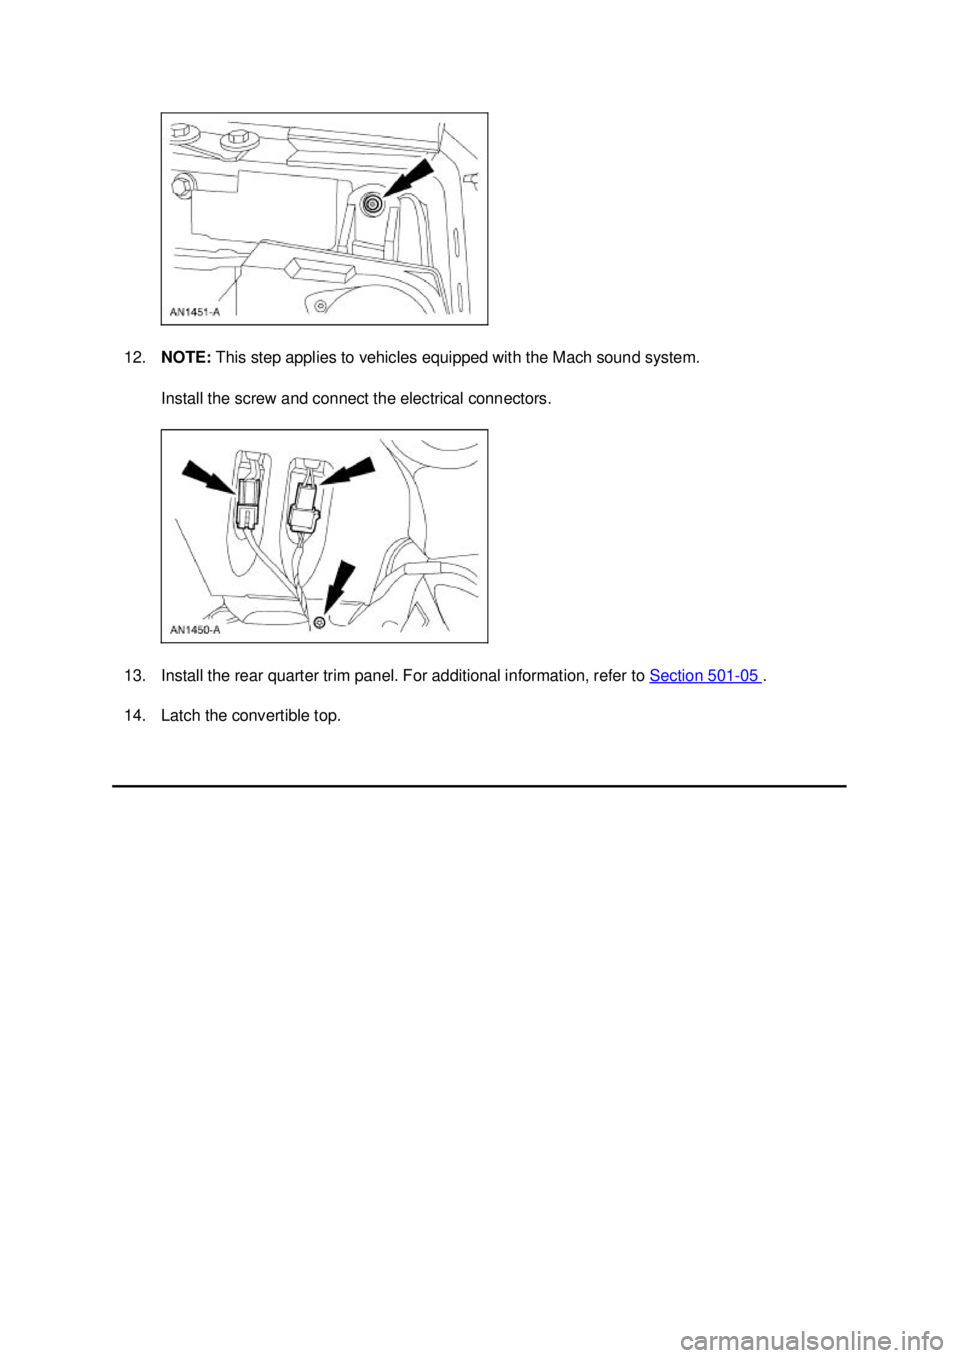
12.
NOTE: This step applies to vehicles equipped with the Mach sound system.
Install the screw and connect the electrical connectors.
13. Install the rear quarter trim panel. For additional information, refer to Section 501 - 05 .
14. Latch the convertible top. �K�l�j . 6 �b�a
62003 Mustang Workshop Manual
18. 11. 2011file:///C:/Ford/2000 - 2004/tsocache/SHEF_5108/S3B~us~en~ ...
Page 3967 of 4378
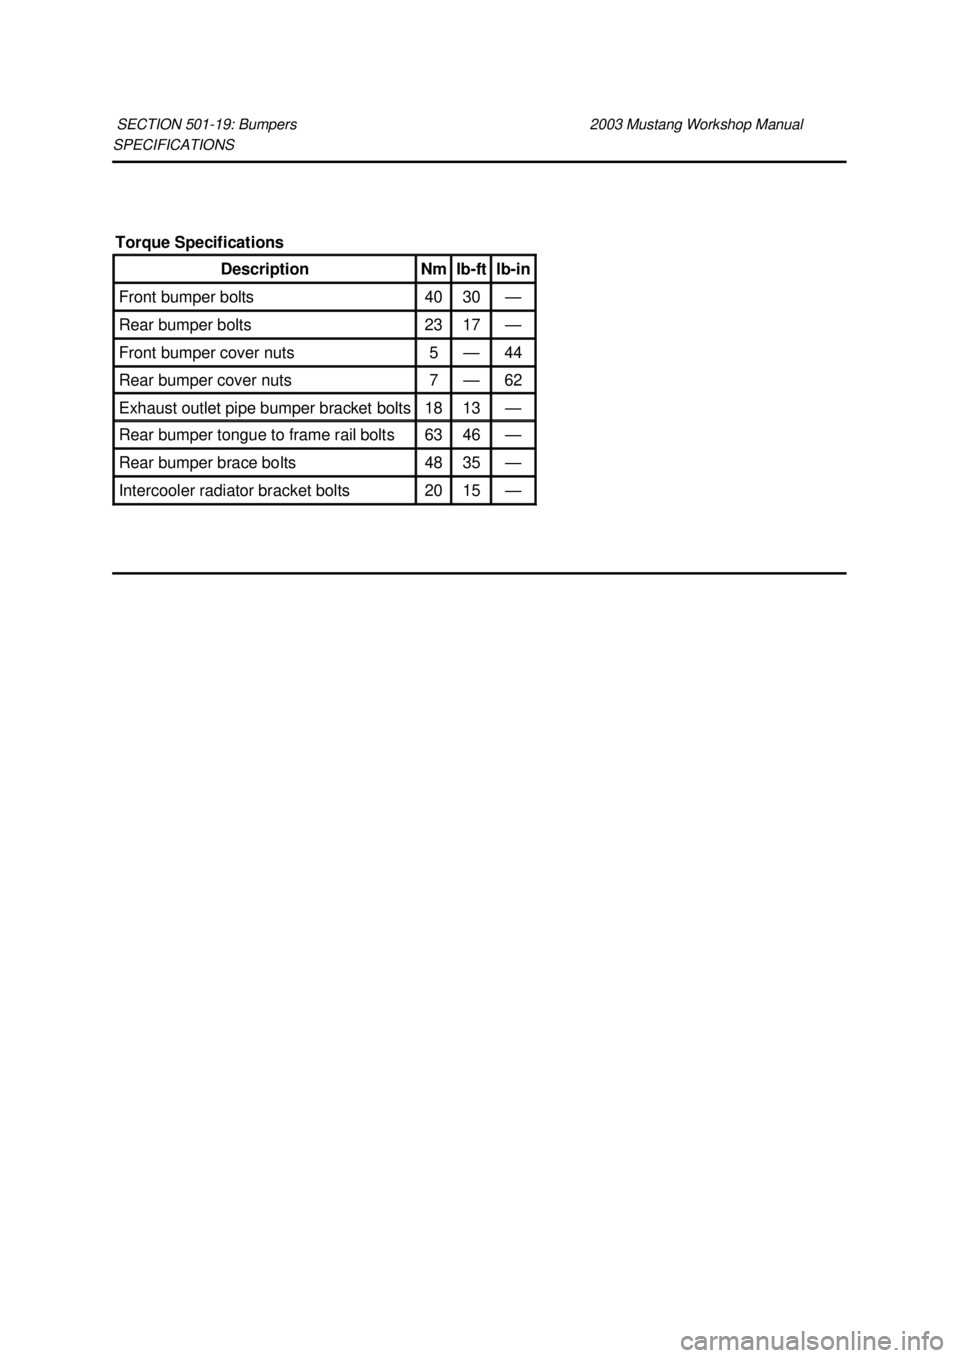
SPECIFICATIONS
SECTION 501-
19: Bumpers 2003 Mustang Workshop Manual Torque Specifications
Description Nm lb-
ft lb-
in Front bumper bolts 40 30 —
Rear bumper bolts 23 17 —
Front bumper cover nuts 5 — 44
Rear bumper cover nuts 7 — 62
Exhaust outlet pipe bumper bracket bolts 18 13 —
Rear bumper tongue to frame rail bolts 63 46 —
Rear bumper brace bolts 48 35 —
Intercooler radiator bracket bolts 20 15 — �K�l�j . 1 �b�a
12003 Mustang Workshop Manual
18. 11. 2011file:///C:/Ford/2000 - 2004/tsocache/SHEF_5108/S3B~us~en~ ...
Page 3968 of 4378
DESCRIPTION AND OPERATION
Bumpers
CAUTION: Never apply excessive heat to the bumper cover surface. Heat could cause
distortion of the bumper cover.
The bumper systems consist of the following components:
�zfront bumper
�z front bumper cover
�z front bumper cover (Cobra)
�z front bumper isolator
�z rear bumper
�z rear bumper brace
�z rear bumper cover
�z rear bumper cover (Cobra)
�z rear bumper isolator
SECTION 501-
19: Bumpers 2003 Mustang Workshop Manual �K�l�j . 1 �b�a
12003 Mustang Workshop Manual
18. 11. 2011file:///C:/Ford/2000 - 2004/tsocache/SHEF_5108/S3B~us~en~ ...
Page 3969 of 4378
REMOVAL AND INSTALLATION
Front Bumper Cover
Removal and Installation
NOTE:
Mustang shown, GT and Cobra similar.
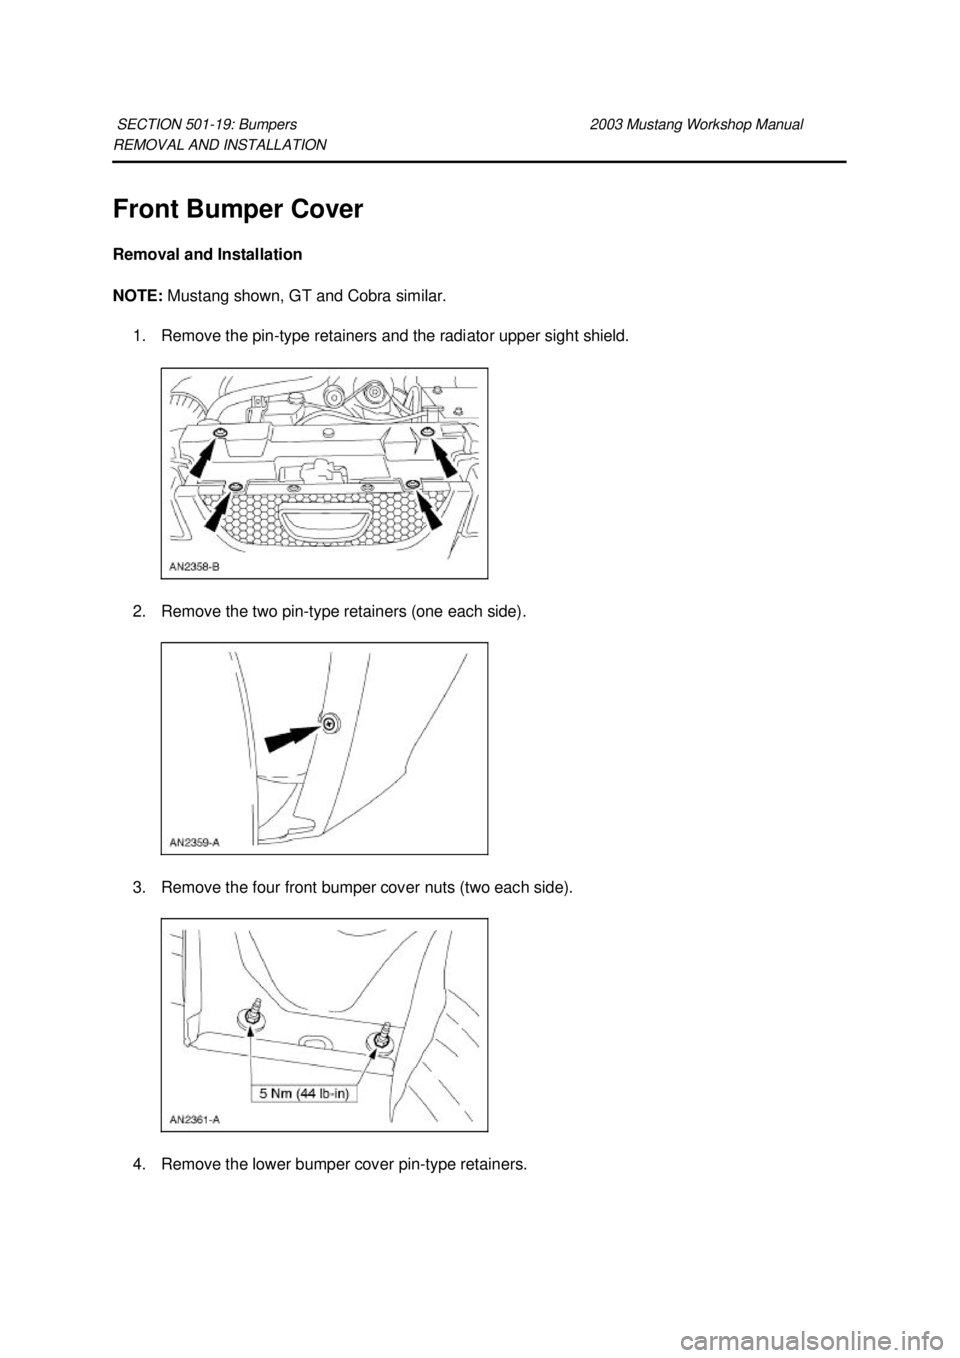
1. Remove the pin- type retainers and the radiator upper sight shield.
2. Remove the two pin- type retainers (one each side).
3. Remove the four front bumper cover nuts (two each side).
4. Remove the lower bumper cover pin- type retainers.
SECTION 501-
19: Bumpers 2003 Mustang Workshop Manual �K�l�j . 1 �b�a
32003 Mustang Workshop Manual
18. 11. 2011file:///C:/Ford/2000 - 2004/tsocache/SHEF_5108/S3B~us~en~ ...
Page 3970 of 4378
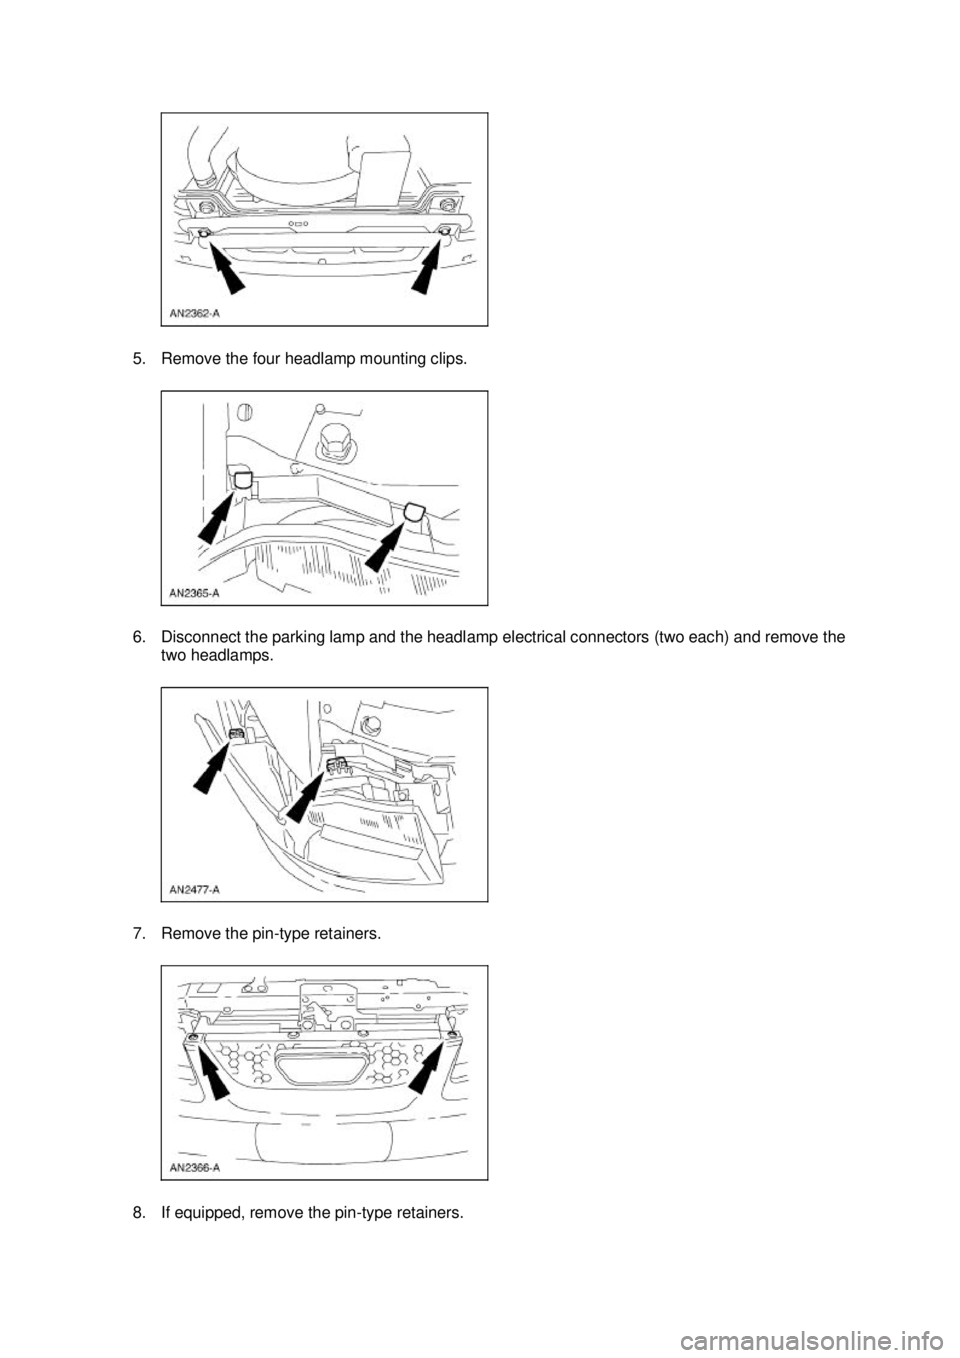
5. Remove the four headlamp mounting clips.
6. Disconnect the parking lamp and the headlamp electrical connectors (two each) and remove the
two headlamps.
7. Remove the pin- type retainers. 8. If equipped, remove the pin - type retainers. �K�l�j . 2 �b�a
32003 Mustang Workshop Manual
18. 11. 2011file:///C:/Ford/2000 - 2004/tsocache/SHEF_5108/S3B~us~en~ ...
Trending: display, wiper fluid, battery, clutch, reset, jump start, coolant level
