FORD TRANSIT 2006 7.G Body And Equipment Mounting Section Manual
Manufacturer: FORD, Model Year: 2006, Model line: TRANSIT, Model: FORD TRANSIT 2006 7.GPages: 234, PDF Size: 33.19 MB
Page 161 of 234
The software in the PCM responds to the change
of state, so it is recommended that these 3
middle switches be non-latching push button
micro switches. When going from idle to an
elevated RPM the execution of the command
will occur as the button is released. When going
to idle the execution of the command occurs as
the button is pressed.
The final button (the one on the left in Fig. 4) acts
as an ‘emergency’ vehicle engine stop. It is
recommended that this be a red & oversize
non-latching micro switch button. The execution
of this command will occur as the button is
pressed.
All wiring connecting the PCM to the resistance
ladder control box should be shielded & twisted
(33 twists / m) to reduce EMC effects
All resistors should have a tolerance of +/- 5% or
better
Switch contact, connectors & loom (loom
between the green/white wires & the control
box) total resistance must be no greater than 5
ohm max.
The PCM to resister ladder control switch box
loom should not come within 100mm of any other
harness, especially any carrying heavy loads.
Designs which do not require all the button
switches must still have the complete resistor
network with the switches positioned correctly
within the network.
The resistance ladder is acting as a potential
divider
The 220 nF capacitor is used in the circuit to
reduce EMC effects on the system
A suitable two way quality connector should be
used to connect the control box to the two
green/white wires
How to change the default settings
By default, when the feature is first enabled
(either via factory order or via dealer IDS tools),
it will be set to the 3 speed mode of operation
with preset RPM values of 1100, 1600 & 2030rpm
for the 3 speeds.
There are two methods by which these defaults
can be modified:
1.via the IDS diagnostics system at a Ford dealer
(there may be a charge for this)
2.via an inbuilt vehicle ‘learn mode’
Via the IDS system the mode of operation can
freely be changed between any of the 3 modes
of operation, the feature can even be turn off
(disabled). The 3 default RPM speeds can also
be modified.
Via the vehicle ‘learn mode’ the 3 speed mode
& the variable speed mode can be freely
interchanged, however it is not possible to select
the idle up speed mode via the vehicle learn
mode. The 3 default RPM speeds can also be
modified via ‘learn mode’
It is not possible via either method above, to
change the step value of 25rpm per press or the
250 rpm per sec for a held down button, in the
variable rpm speed mode.
Via IDS The RPM Speed Controller menu is under
the tool box tab, then Powertrain, then service
functions, then PCM. The IDS on screen menus
will guide the dealer through the options & setup.
How to enter vehicle ‘Learn mode’
1.Make sure that the RPM Speed controller
switch box is connected but turned off (not
‘armed’)
2.Start the engine (vehicle out of gear & no foot
pedals being pressed, handbrake on)
3.Wait a couple of seconds for the instrument
panel start up diagnostic lights to extinguish
4.Press & release the clutch pedal
5.Press & release the brake pedal
6.Repeat steps 4) & 5) a further four times
(clutch & brake pressed a total of five times
sequentially each)
NOTE: Steps 4) to 6) have to be started within
10 seconds of the engine start
The vehicle should now be in ‘learn mode’
How to Select between modes
1.Enter ‘learn mode’ (see directions above)
2.Arm the RPM speed controller (turn the key
switch to ‘on’)
If the vehicle is already in 3 speed mode (the
initial default):
3.Press & release the brake pedal five times
The vehicle should now be in variable speed
mode. The new settings can be saved & learn
mode exited (see below)
Alternatively
4.Press & release the brake pedal once
The vehicle should now be in 3 speed mode.
The new settings can be saved & learn mode
exited (see below)
Using this method it is easy to change between
these two modes of operation for the RPM
speed controller
NOTE: If the engine stalls out at the initial brake
pedal input then the vehicle was not in, or has
dropped out of ‘learn mode’ & you will have to
restart the procedure.
FordTransit 2006.5 (April 2006–)
Date of Publication: 12/2006
4 Electrical
161
Page 162 of 234
How to change the 3 pre-set default
RPM values in the 3 speed mode
1.Enter ‘learn mode’ (see directions above)
2.Arm the RPM speed controller (turn the key
switch to ‘on’)
3.Press & release the brake pedal once
4.Press & release the RPM button that requires
re-programming
5.Use the accelerator pedal to rev the engine to
the new desired RPM speed & hold at this
speed (only speeds between 1200 to 3000
rpm can be selected in 3 speed mode)
6.Press & release the same RPM button to reset
the stored RPM speed to the current engines
RPM
7.Release the accelerator pedal
8.Repeat steps 4) to 7) for the remaining RPM
buttons
The 3 RPM speeds should now be
re-programmed to the new RPM speeds. The
new settings can be saved & learn mode exited
(see below)
NOTE: If the engine RPM responds to the initial
RPM button press, then the vehicle has not
entered ‘learn mode’ correctly & you will have to
restart the procedure. If the engine stalls out at
the brake or accelerator pedal inputs then the
vehicle was not in, or has dropped out of ‘learn
mode’ & you will have to restart the procedure.
How to save new settings & exit
from ‘Learn mode’
1.From within the ‘learn mode’ & with the RPM
Speed Control switch box ‘armed’, press the
clutch pedal repeatedly until the engine stalls.
2.Restart the engine & test the new settings,
repeat above procedures if necessary
NOTE: The engine stalling indicates that the
settings should have been saved & the vehicle
has exited from ‘learn mode’. Learn mode
however is very specific that the exact steps are
taken in the correct order & within certain time
limits otherwise the learn procedure fails & it may
take several attempts to get this order & timing
correct & a successful modification from the
default settings.
Some Reasons why RPM speed
Control operation may stop or fail
The RPM Speed control software monitors
vehicle information during operation in RPM
speed control mode & will drop out of RPM speed
control and / or stall the engine should any
adverse signals be detected. For example:
•If the engine temperature becomes too hot
then RPM speed control will stop in order to
protect the engine.
•If the engine oil light illuminates then RPM
speed control will stop in order to protect the
engine
•If the low fuel level light illuminates then RPM
speed control will stop so that the vehicle can
be driven to a refueling point.
•If the vehicle speed exceeds approx 2.5 mph
wile in 3 speed or variable speed modes, then
RPM speed control may stop. RPM speed
control should normally be operated with the
hand brake on, but some uses may require a
low level of vehicle ‘creep’ during RPM speed
control operation. Note that there is no sensing
of the park brake on this version of RPM speed
controller to facilitate this type of operation.
•The software monitors for ‘stuck on’ buttons
on the control switch box, this may result in
RPM speed control being halted. A button that
is held down for too long may be registered
by the software as a ‘stuck’ button.
•The software monitors the foot pedals, if
depressed these may stall the engine if in 3
speed mode or variable speed mode (does
not apply to idle up speed)
•If the control switch box circuitry significantly
exceeds 2110 ohms or there is a short circuit
then RPM speed control will not be possible.
•If a PTO conversion has been attempted on a
vehicle with a non ABS braking system then
RPM speed control will fail due to vehicle
speed being registered via a transmission
speed sensor and / or the need to press the
clutch in order to put the vehicle in gear while
in RPM speed control mode.
4.14.10 Adding Connectors,
Terminals and Wiring
Additional Rear Speakers
NOTE: The connectors on the Instrument Panel
harness (14K024) and the main harness (14401)
are reversed between Left Hand Drive (LHD) and
Right Hand Drive (RHD) vehicles, hence different
sets of terminals/wires are required to cover all
the markets.
FordTransit 2006.5 (April 2006–)
Date of Publication: 12/2006
4 Electrical
162
Page 163 of 234
![FORD TRANSIT 2006 7.G Body And Equipment Mounting Section Manual For Information Only
3F2T-14474-R* (RHD)Terminal part number: 1L2T-14421-A* (LHD)
5L5T-14489-A* (RHD – female)]Connector: 4L5T-14A459-A* (LHD – male)
Wire size and Color: 0.75 CSA
Right RR+ brown- FORD TRANSIT 2006 7.G Body And Equipment Mounting Section Manual For Information Only
3F2T-14474-R* (RHD)Terminal part number: 1L2T-14421-A* (LHD)
5L5T-14489-A* (RHD – female)]Connector: 4L5T-14A459-A* (LHD – male)
Wire size and Color: 0.75 CSA
Right RR+ brown-](/img/11/5471/w960_5471-162.png)
For Information Only
3F2T-14474-R* (RHD)Terminal part number: 1L2T-14421-A* (LHD)
5L5T-14489-A* (RHD – female)]Connector: 4L5T-14A459-A* (LHD – male)
Wire size and Color: 0.75 CSA
Right RR+ brown-white
Right RR– brown-blue
Left RR+ brown-green
Left RR– brown-yellow
57-Way Connector - used for connecting two additional Rear Speakers (RHD
shown)
DescriptionItem
Speaker Left PositivePin
44
Speaker Left NegativePin
45
Speaker Right PositivePin
46
Speaker Right NegativePin
47
FordTransit 2006.5 (April 2006–)
Date of Publication: 12/2006
4 Electrical
163E8470947464544
Page 164 of 234
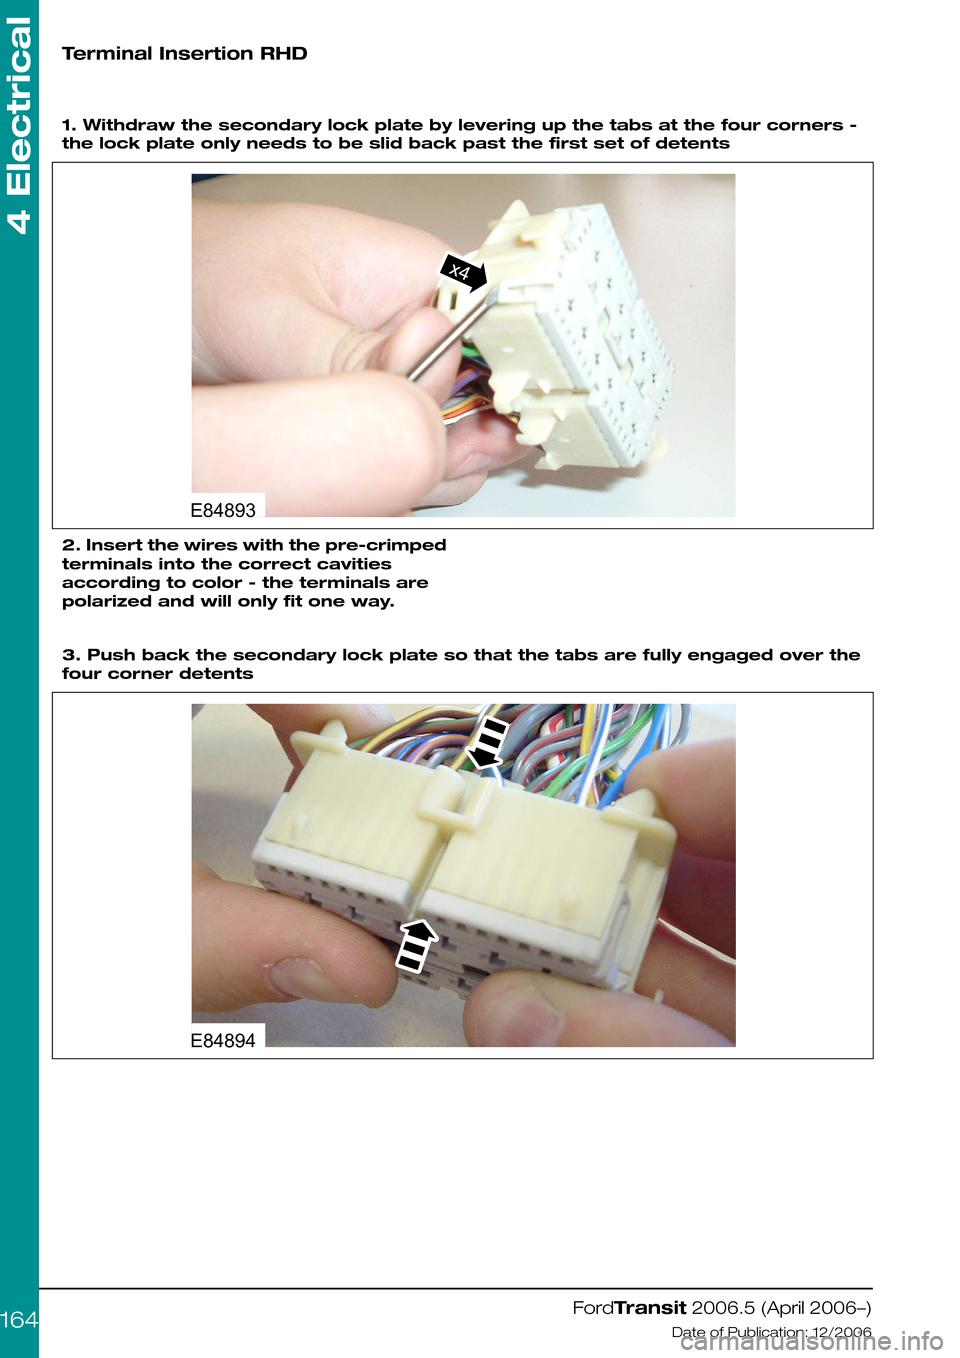
Terminal Insertion RHD
1. Withdraw the secondary lock plate by levering up the tabs at the four corners -
the lock plate only needs to be slid back past the first set of detents
2. Insert the wires with the pre-crimped
terminals into the correct cavities
according to color - the terminals are
polarized and will only fit one way.
3. Push back the secondary lock plate so that the tabs are fully engaged over the
four corner detents
FordTransit 2006.5 (April 2006–)
Date of Publication: 12/2006
4 Electrical
164E84893x4 E84894
Page 165 of 234
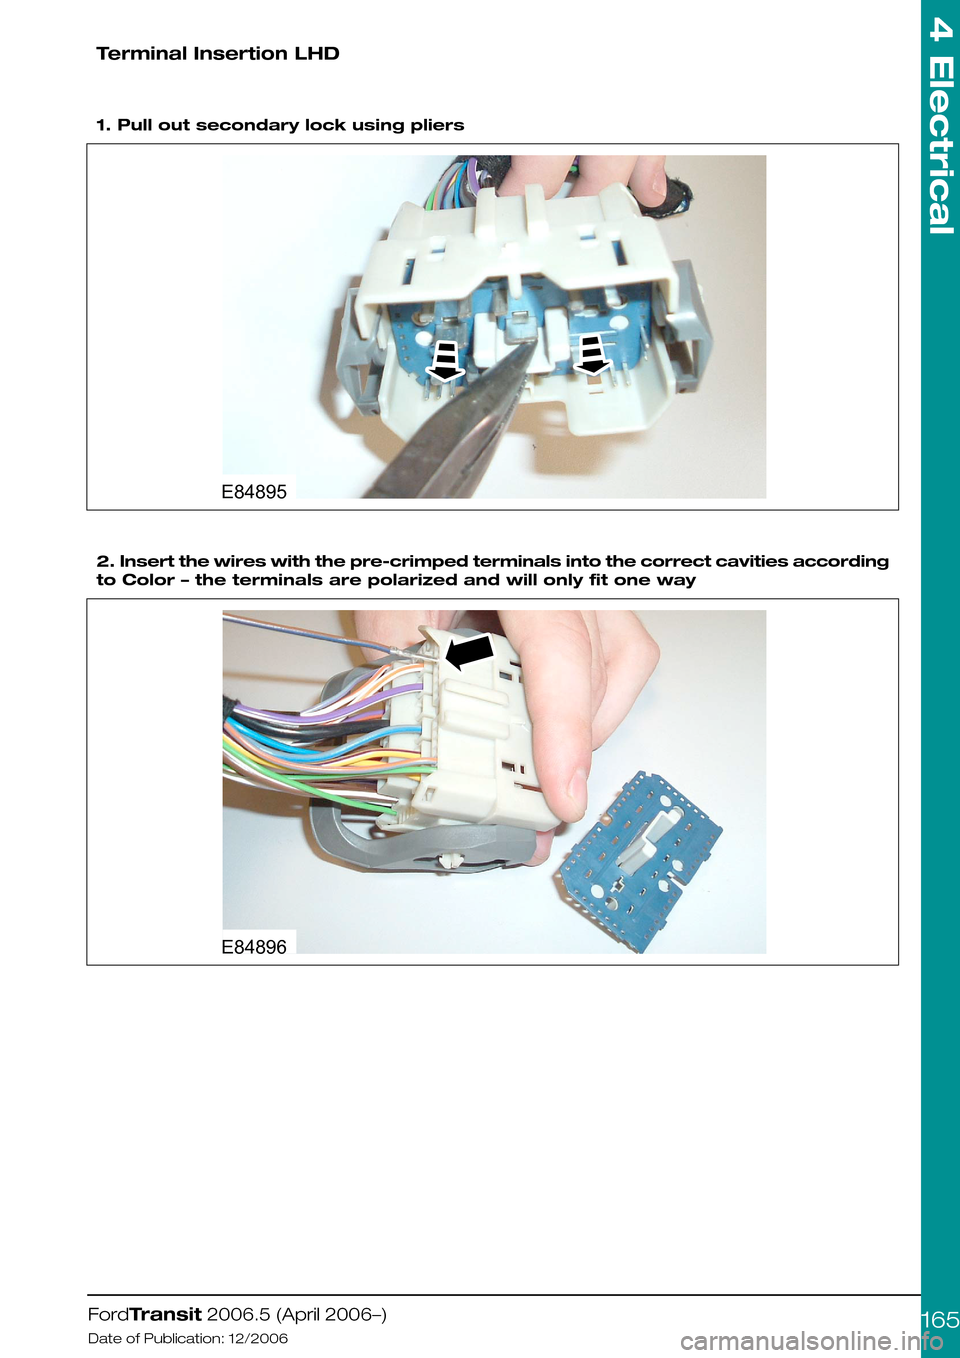
Terminal Insertion LHD
1. Pull out secondary lock using pliers
2. Insert the wires with the pre-crimped terminals into the correct cavities according
to Color – the terminals are polarized and will only fit one way
FordTransit 2006.5 (April 2006–)
Date of Publication: 12/2006
4 Electrical
165E84895 E84896
Page 166 of 234
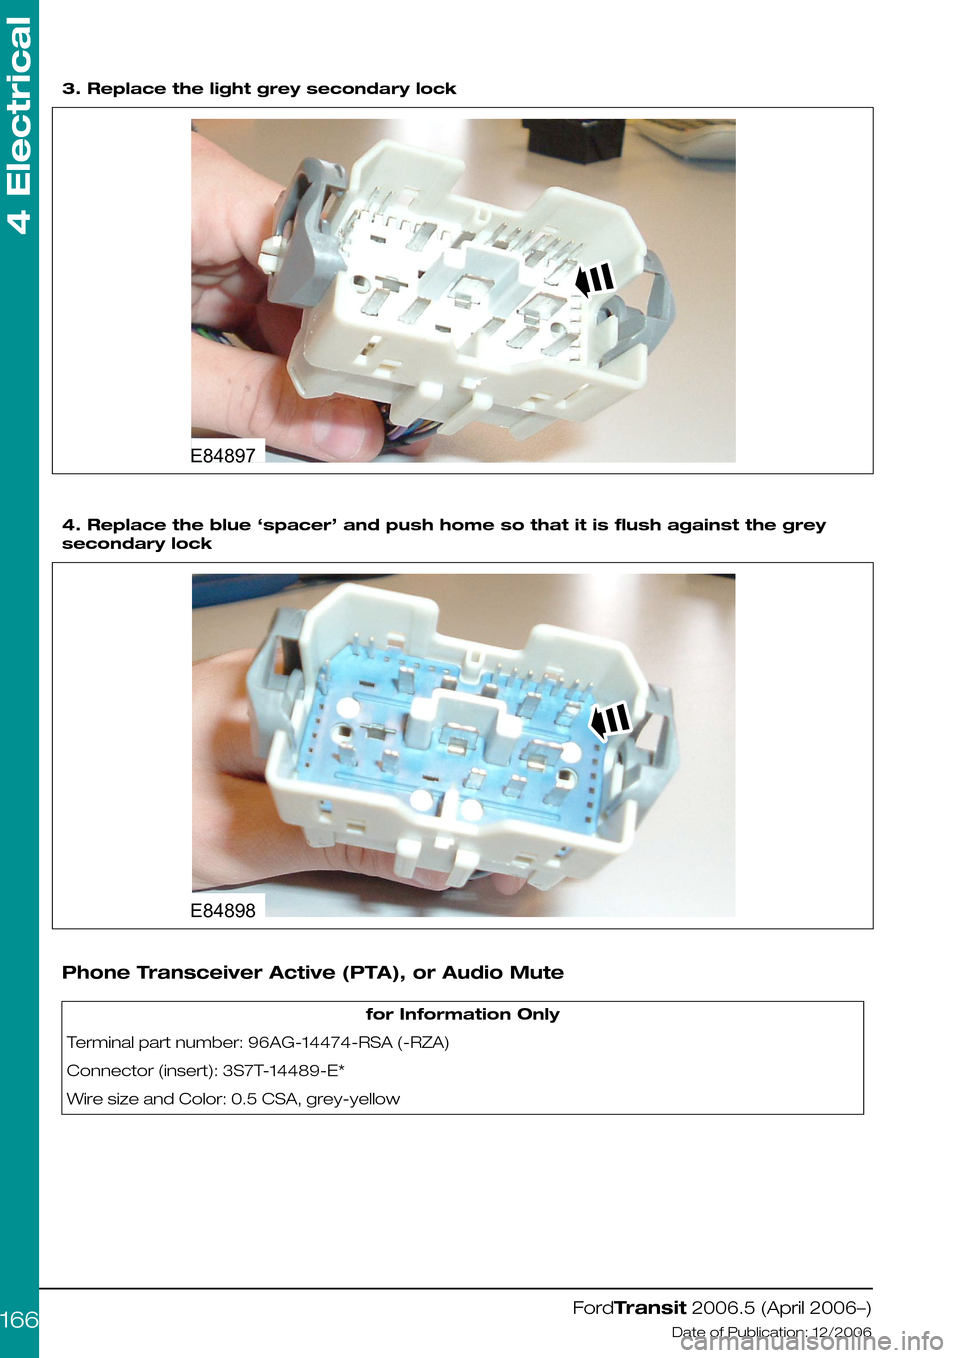
3. Replace the light grey secondary lock
4. Replace the blue ‘spacer’ and push home so that it is flush against the grey
secondary lock
Phone Transceiver Active (PTA), or Audio Mute
for Information Only
Terminal part number: 96AG-14474-RSA (-RZA)
Connector (insert): 3S7T-14489-E*
Wire size and Color: 0.5 CSA, grey-yellow
FordTransit 2006.5 (April 2006–)
Date of Publication: 12/2006
4 Electrical
166E84897 E84898
Page 167 of 234
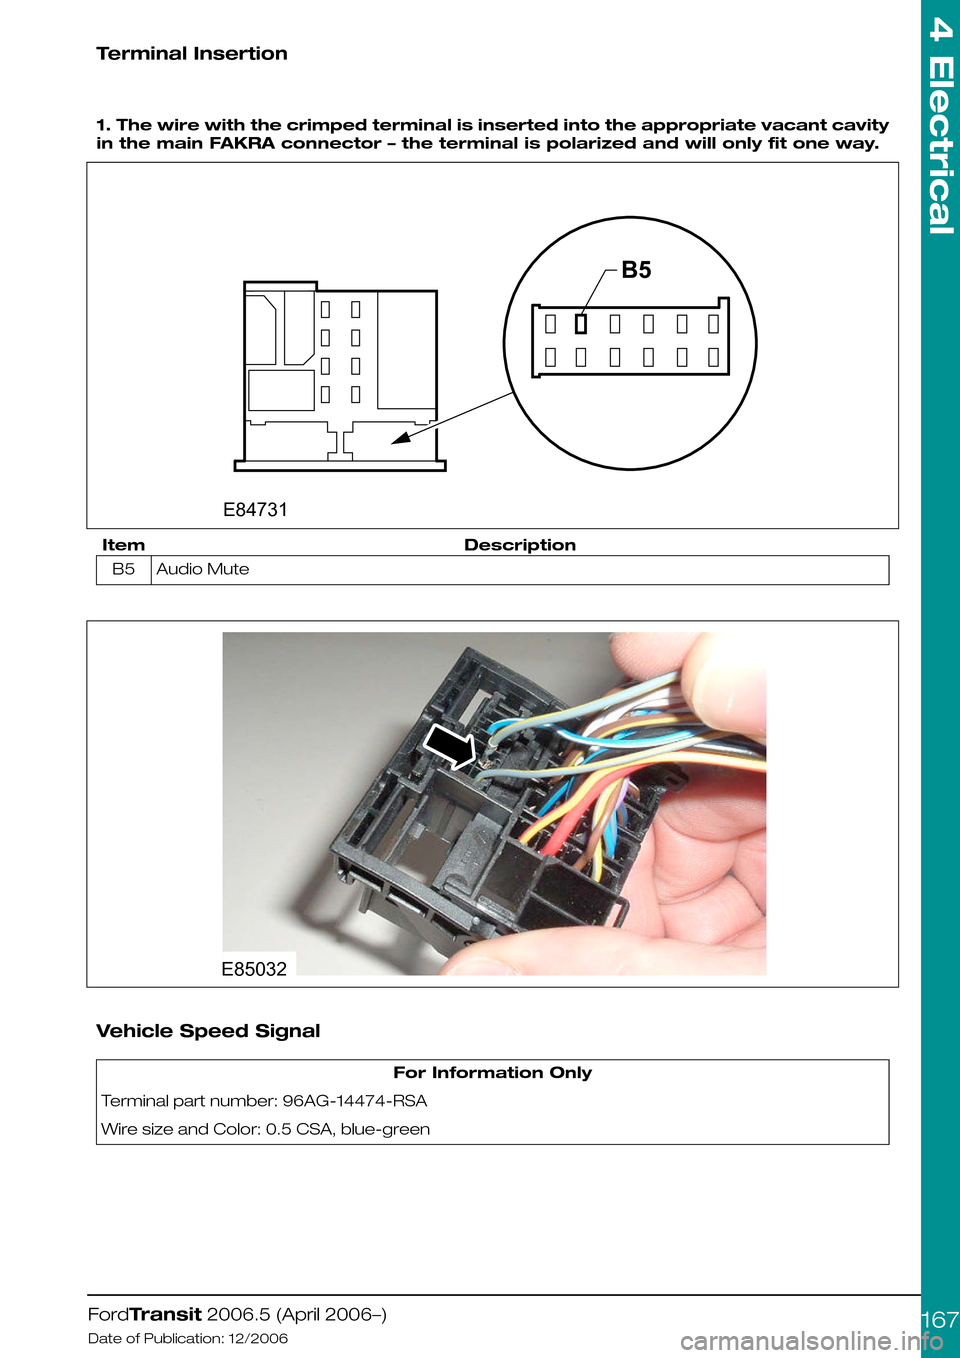
Terminal Insertion
1. The wire with the crimped terminal is inserted into the appropriate vacant cavity
in the main FAKRA connector – the terminal is polarized and will only fit one way.
DescriptionItem
Audio MuteB5
Vehicle Speed Signal
For Information Only
Terminal part number: 96AG-14474-RSA
Wire size and Color: 0.5 CSA, blue-green
FordTransit 2006.5 (April 2006–)
Date of Publication: 12/2006
4 Electrical
167E84731 E85032
Page 168 of 234
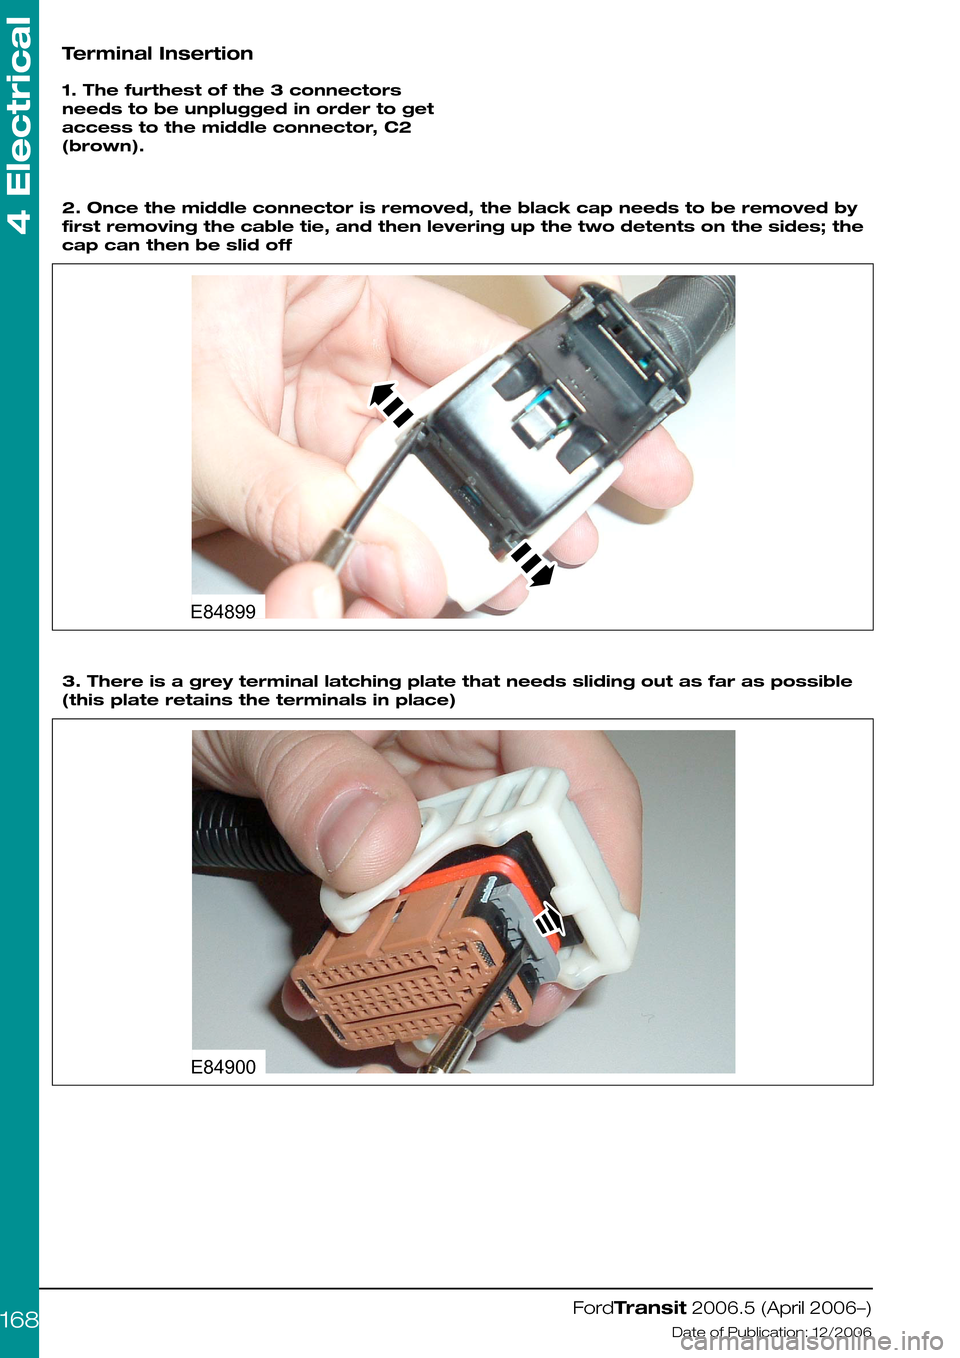
Terminal Insertion
1. The furthest of the 3 connectors
needs to be unplugged in order to get
access to the middle connector, C2
(brown).
2. Once the middle connector is removed, the black cap needs to be removed by
first removing the cable tie, and then levering up the two detents on the sides; the
cap can then be slid off
3. There is a grey terminal latching plate that needs sliding out as far as possible
(this plate retains the terminals in place)
FordTransit 2006.5 (April 2006–)
Date of Publication: 12/2006
4 Electrical
168E84899 E84900
Page 169 of 234
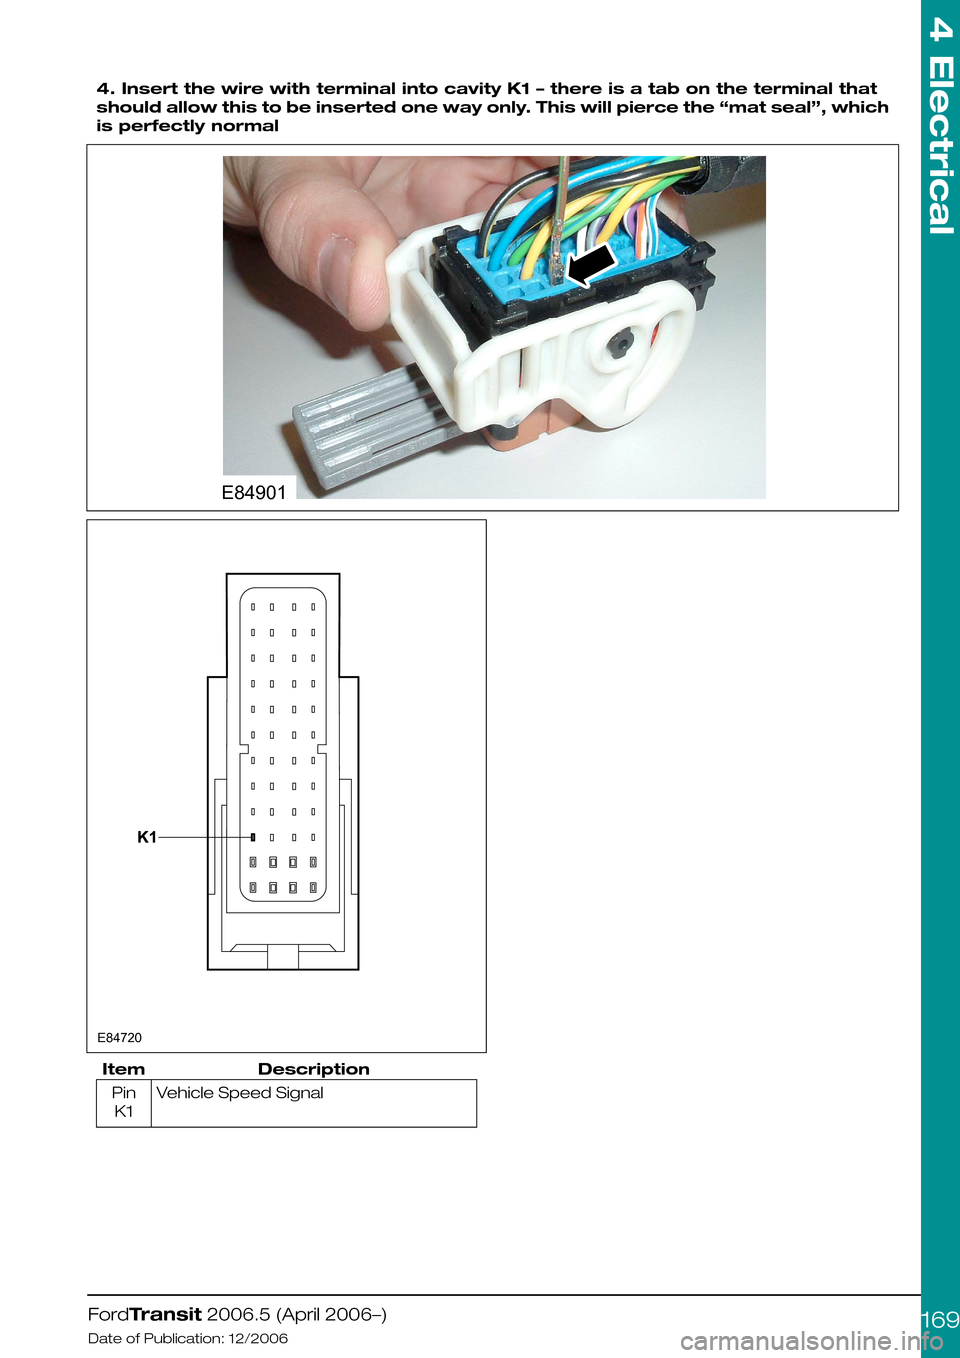
4. Insert the wire with terminal into cavity K1 – there is a tab on the terminal that
should allow this to be inserted one way only. This will pierce the “mat seal”, which
is perfectly normal
DescriptionItem
Vehicle Speed SignalPin
K1
FordTransit 2006.5 (April 2006–)
Date of Publication: 12/2006
4 Electrical
169E84901 E84720
Page 170 of 234
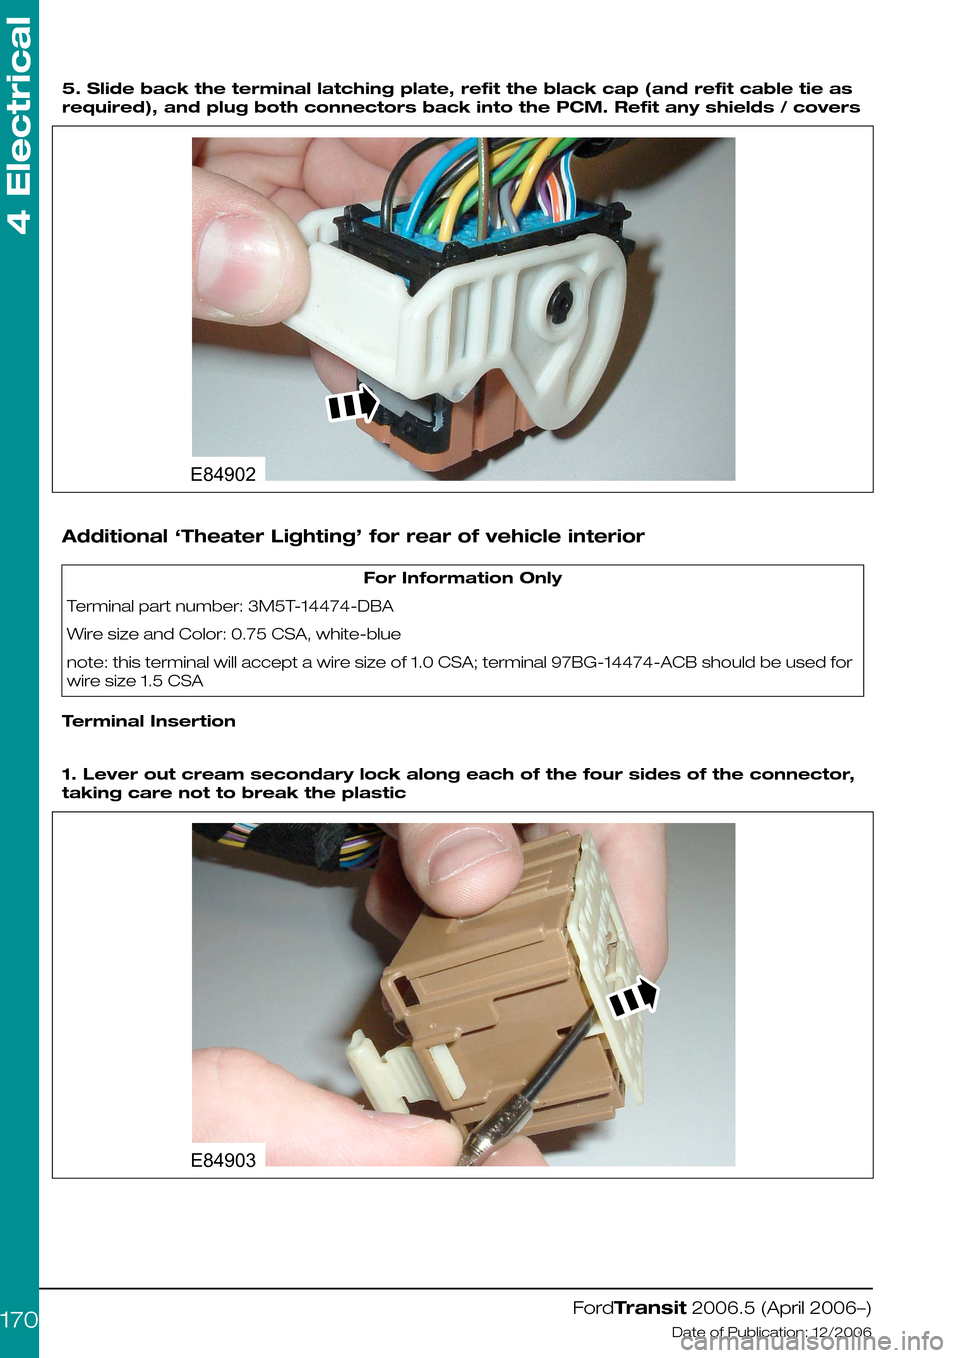
5. Slide back the terminal latching plate, refit the black cap (and refit cable tie as
required), and plug both connectors back into the PCM. Refit any shields / covers
Additional ‘Theater Lighting’ for rear of vehicle interior
For Information Only
Terminal part number: 3M5T-14474-DBA
Wire size and Color: 0.75 CSA, white-blue
note: this terminal will accept a wire size of 1.0 CSA; terminal 97BG-14474-ACB should be used for
wire size 1.5 CSA
Terminal Insertion
1. Lever out cream secondary lock along each of the four sides of the connector,
taking care not to break the plastic
FordTransit 2006.5 (April 2006–)
Date of Publication: 12/2006
4 Electrical
170E84902 E84903