FORD TRANSIT 2015 5.G Owners Manual
Manufacturer: FORD, Model Year: 2015, Model line: TRANSIT, Model: FORD TRANSIT 2015 5.GPages: 461, PDF Size: 5.82 MB
Page 211 of 461
Used engine coolant should be disposed
of in an appropriate manner. Follow your
community
’s regulations and standards
for recycling and disposing of automotive
fluids.
Severe Climates
If you drive in extremely cold climates:
• It may be necessary to have a Ford
authorized dealer increase the coolant
concentration above 50%.
• A coolant concentration of 60% will
provide improved freeze point
protection. Engine coolant
concentrations above 60% will
decrease the overheat protection
characteristics of the engine coolant
and may cause engine damage.
If you drive in extremely hot climates:
• It may be necessary to have a Ford
authorized dealer decrease the coolant
concentration to 40%.
• A coolant concentration of 40% will
provide improved overheat protection.
Engine coolant concentrations below
40% will decrease the corrosion or
freeze protection characteristics of the
engine coolant and may cause engine
damage.
Vehicles driven year-round in non-extreme
climates should use prediluted engine
coolant for optimum cooling system and
engine protection.
What You Should Know About Fail-
Safe Cooling
If you deplete the engine coolant supply,
this feature allows you to temporarily drive
your vehicle before you incur incremental
component damage. The fail-safe distance
depends on ambient temperatures, vehicle
load and terrain. How Fail-Safe Cooling Works
If the engine begins to overheat, the engine
coolant temperature gauge will move to
the red area and: The coolant temperature
warning light will illuminate.
The service engine soon
indicator will illuminate.
If the engine reaches a preset
over-temperature condition, the engine
will automatically switch to alternating
cylinder operation. Each disabled cylinder
acts as an air pump and cools the engine.
When this occurs the vehicle will still
operate. However:
• The engine power will be limited.
• This will disable the air conditioning
system.
Continued operation will increase the
engine temperature and the engine will
completely shut down, causing steering
and braking effort to increase.
Once the engine temperature cools, the
engine can be re-started. Take your vehicle
to an authorized dealer as soon as possible
to minimize engine damage.
When Fail-Safe Mode Is Turned On WARNING
Fail-safe mode is for use during
emergencies only. Operate the
vehicle in fail-safe mode only as long
as necessary to bring the vehicle to rest in
a safe location and seek immediate repairs.
When in fail-safe mode, the vehicle will
have limited power, will not be able to
maintain high-speed operation, and may
completely shut down and lose power
steering assist, and power brake assist,
which may increase the possibility of a
crash resulting in serious injury. 208
Transit (TTH) Canada/United States of America, enUSA, Edition date: 03/2014 Maintenance
Page 212 of 461
The engine is capable of completely
shutting down automatically to prevent
engine damage, if this situation occurs:
1. Stop your vehicle as soon as it is safe
to do so and switch the ignition off.
2. Have your vehicle towed to an authorized dealer.
3. If this is not possible, wait a short period for the engine to cool.
4. Check the coolant level and replenish if low.
5. Re-start the engine and take your vehicle to an authorized dealer.
Note: Driving the vehicle without repairing
the engine problem increases the chance of
engine damage. Take your vehicle to an
authorized dealer as soon as possible.
Engine Fluid Temperature
Management (If Equipped) WARNING
To reduce the risk of a crash and
injury, be prepared that the vehicle
speed may reduce and the vehicle
may not be able to accelerate with full
power until the fluid temperature reduces. When towing a trailer the vehicle
’s engine
may temporarily reach a higher
temperature during severe operating
conditions, for example ascending a long
or steep grade in hot ambient
temperatures.
You may notice a reduction in vehicle
speed caused by reduced engine power.
The design of your vehicle allows it to enter
this mode if certain high-temperature and
high-load conditions take place in order to
manage the engine fluid temperatures. The amount of speed reduction will depend on
the vehicle loading, towing, grade, ambient
temperature and other factors. If this
occurs, there is no need to pull off the road.
You can continue to drive your vehicle
while this message is active.
The air conditioning may also cycle on and
off during severe operating conditions to
protect overheating of the engine. When
the engine coolant temperature decreases
normal operating temperature, the air
conditioning will turn on. If you notice any
of the following:
•
The engine coolant temperature gauge
moves fully into the red area.
• The coolant temperature warning light
illuminates.
• The service engine soon indicator
illuminates.
1. Stop your vehicle as soon as it is safe to do so and place the vehicle in park
(P).
2. Leave the engine running until the coolant temperature gauge needle
moves away from the red area. After
several minutes, if this does not
happen, follow the remaining steps.
3. Switch the engine off and wait for it to
cool before checking the coolant level.
4. If the coolant level is normal, you may restart the engine and continue on.
5. If the coolant is low, add coolant, restart the engine and take your vehicle
to an authorized dealer.
AUTOMATIC TRANSMISSION
FLUID CHECK
Note: Transmission fluid should be checked
by an authorized dealer. If required, fluid
should be added by an authorized dealer.
The automatic transmission does not have
a transmission fluid dipstick.
209 Transit (TTH) Canada/United States of America, enUSA, Edition date: 03/2014 Maintenance
Page 213 of 461
Have an authorized dealer check and
change the transmission fluid and filter at
the correct service interval. See
Scheduled Maintenance (page 433). Your
transmission does not consume fluid.
However, the fluid level should be checked
if the transmission is not working properly,
(i.e., if the transmission slips or shifts
slowly) or if you notice some sign of fluid
leakage.
Do not use supplemental transmission
fluid additives, treatments or cleaning
agents. The use of these materials may
affect transmission operation and result
in damage to internal transmission
components.
BRAKE FLUID CHECK
Fluid levels between the MIN and MAX
lines are within the normal operating range;
there is no need to add fluid. If the fluid
levels are outside of the normal operating
range, the performance of the system
could be compromised; seek service from
your authorized dealer immediately.
POWER STEERING FLUID
CHECK
WARNING
Do not allow the fluid to touch your
skin or eyes. This could cause serious
personal injury. Rinse the affected
areas immediately with plenty of water
and consult a physician. If the power steering fluid level is not
between the MAX and MIN marks, add
power steering fluid that meets the correct
specification. See
Capacities and
Specifications (page 271). Adding Power Steering Fluid
1. Remove the filler cap.
2. Add power steering fluid to the
MAX
mark. Do not overfill.
3. Replace the filler cap. Turn it until you feel a strong resistance.
WASHER FLUID CHECK
Note: The reservoir supplies the front and
rear washer systems.
When adding fluid, use a mixture of washer
fluid and water to help prevent freezing in
cold weather and improve the cleaning
capability. We recommend that you use
only high quality washer fluid.
For information on fluid dilution, refer to
the product instructions.
DRAINING THE FUEL FILTER
WATER TRAP WARNING
Do not dispose of fuel in the
household refuse or the public
sewage system. Use an authorized
waste disposal facility. Your vehicle is fitted with a diesel fuel
conditioner module located behind the fuel
tank. A warning lamp will illuminate and a
message will be displayed when
approximately
3.38 (100 ml) of water
accumulates in the module. If you allow
the water level to exceed this level, the
water may pass through to the engine and
may cause fuel injection equipment
damage.
Note: To drain the fuel filter water trap,
access the underside of your vehicle.
210 Transit (TTH) Canada/United States of America, enUSA, Edition date: 03/2014 Maintenance
Page 214 of 461
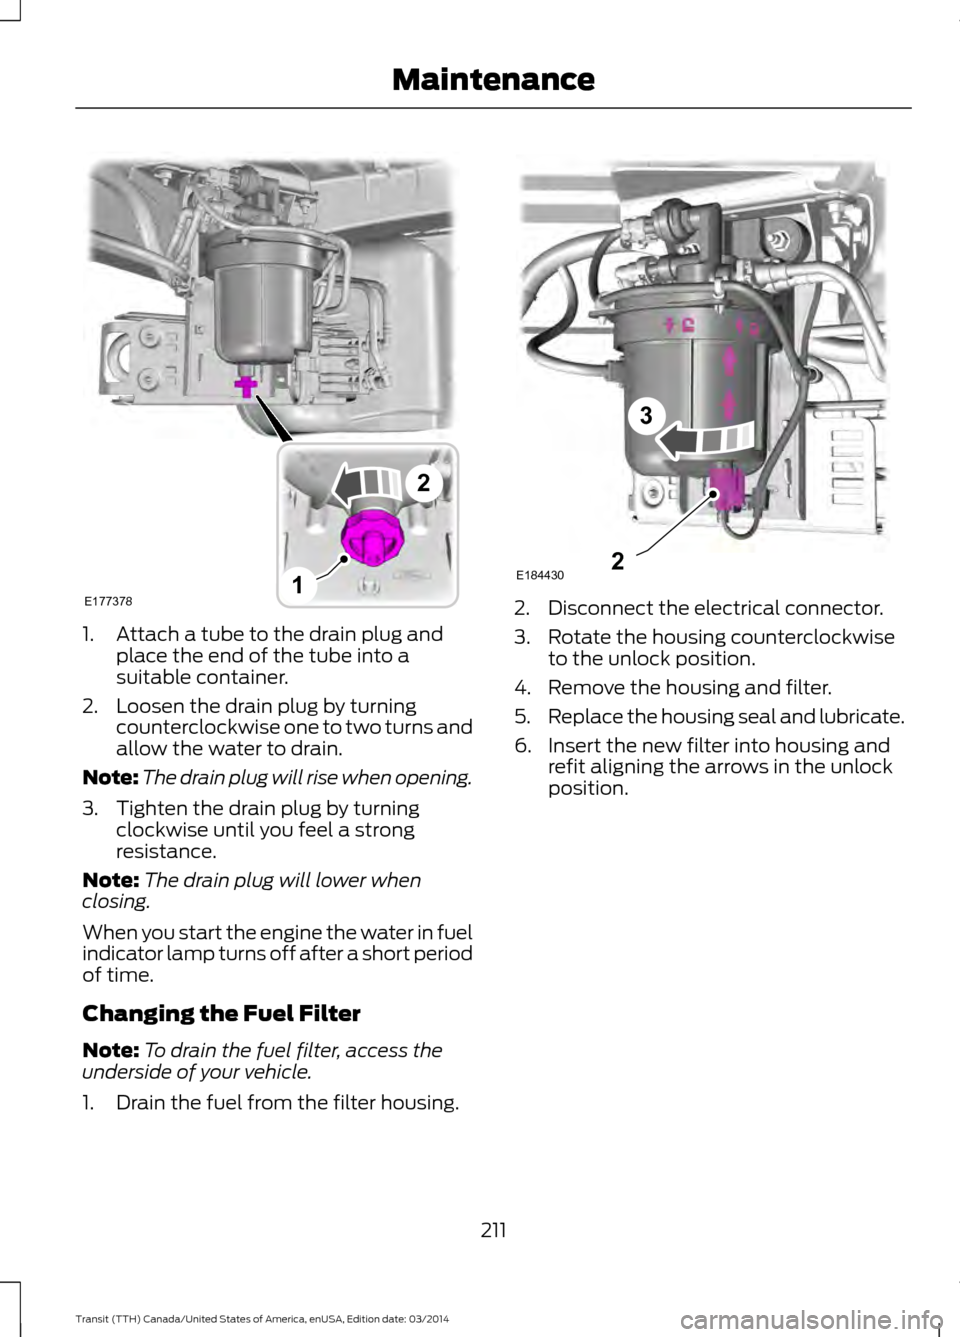
1. Attach a tube to the drain plug and
place the end of the tube into a
suitable container.
2. Loosen the drain plug by turning counterclockwise one to two turns and
allow the water to drain.
Note: The drain plug will rise when opening.
3. Tighten the drain plug by turning clockwise until you feel a strong
resistance.
Note: The drain plug will lower when
closing.
When you start the engine the water in fuel
indicator lamp turns off after a short period
of time.
Changing the Fuel Filter
Note: To drain the fuel filter, access the
underside of your vehicle.
1. Drain the fuel from the filter housing. 2. Disconnect the electrical connector.
3. Rotate the housing counterclockwise
to the unlock position.
4. Remove the housing and filter.
5. Replace the housing seal and lubricate.
6. Insert the new filter into housing and refit aligning the arrows in the unlock
position.
211 Transit (TTH) Canada/United States of America, enUSA, Edition date: 03/2014 MaintenanceE177378
2
1 E1844302
3
Page 215 of 461
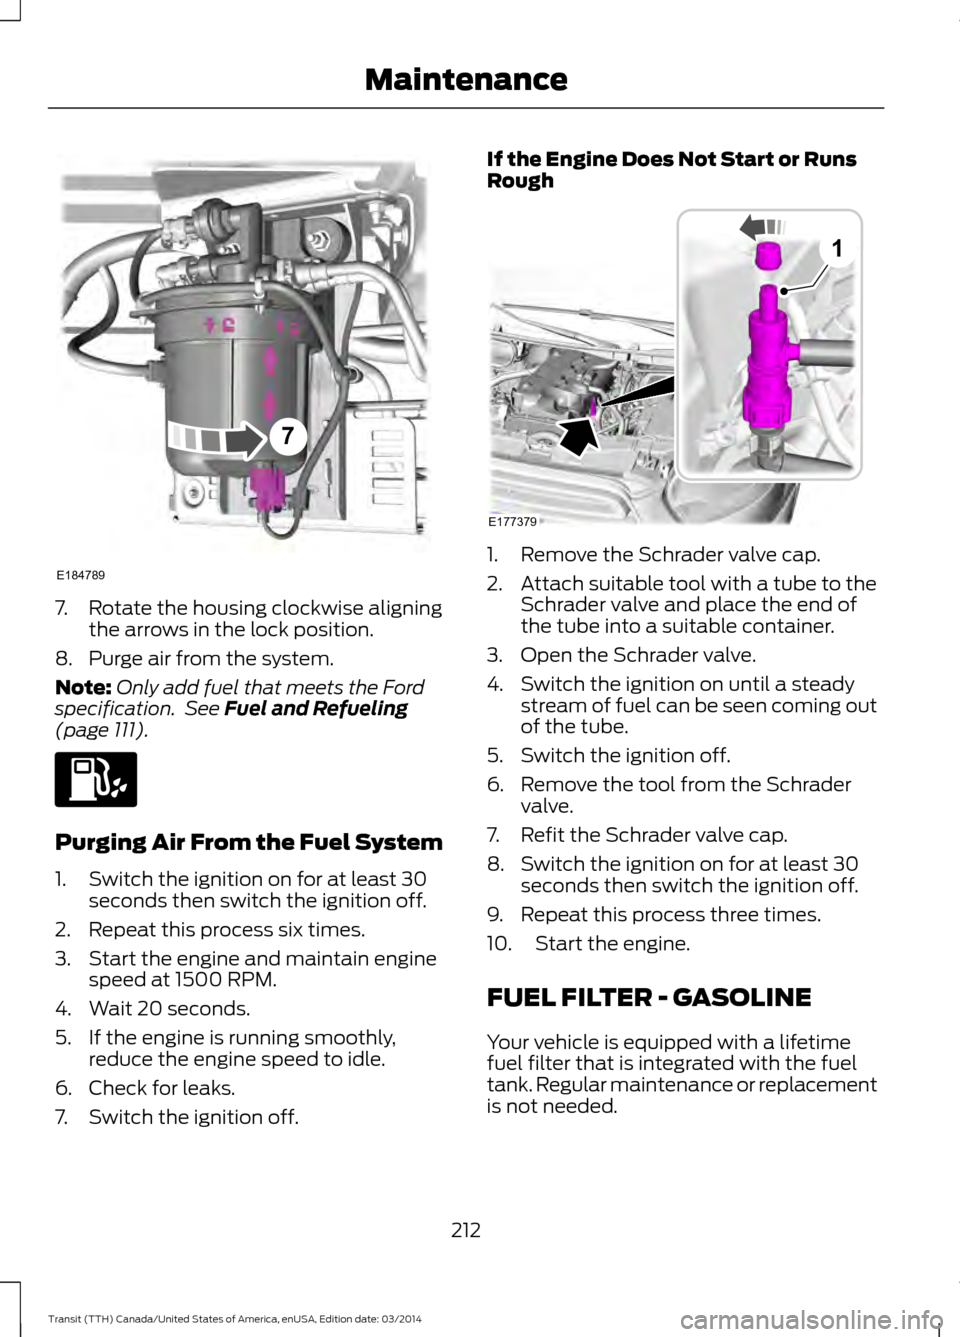
7. Rotate the housing clockwise aligning
the arrows in the lock position.
8. Purge air from the system.
Note: Only add fuel that meets the Ford
specification. See Fuel and Refueling
(page 111). Purging Air From the Fuel System
1. Switch the ignition on for at least 30
seconds then switch the ignition off.
2. Repeat this process six times.
3. Start the engine and maintain engine speed at 1500 RPM.
4. Wait 20 seconds.
5. If the engine is running smoothly, reduce the engine speed to idle.
6. Check for leaks.
7. Switch the ignition off. If the Engine Does Not Start or Runs
Rough
1. Remove the Schrader valve cap.
2. Attach suitable tool with a tube to the
Schrader valve and place the end of
the tube into a suitable container.
3. Open the Schrader valve.
4. Switch the ignition on until a steady stream of fuel can be seen coming out
of the tube.
5. Switch the ignition off.
6. Remove the tool from the Schrader valve.
7. Refit the Schrader valve cap.
8. Switch the ignition on for at least 30 seconds then switch the ignition off.
9. Repeat this process three times.
10. Start the engine.
FUEL FILTER - GASOLINE
Your vehicle is equipped with a lifetime
fuel filter that is integrated with the fuel
tank. Regular maintenance or replacement
is not needed.
212 Transit (TTH) Canada/United States of America, enUSA, Edition date: 03/2014 MaintenanceE184789
7 E177379
1
Page 216 of 461
CHANGING THE 12V BATTERY
Removing the Battery
WARNINGS
You must replace your vehicle
battery with one of exactly the same
specification.
Make sure the battery box is correctly
sealed.
Your vehicle battery is heavy; take
care when lifting and removing.
Note:
If you have power seats and the
battery has no charge, jump-start your
vehicle to move the seat. See Jump
Starting the Vehicle (page 178).
Note: Where applicable you must
reprogram the audio system using the
keycode.
The battery is located inside your vehicle
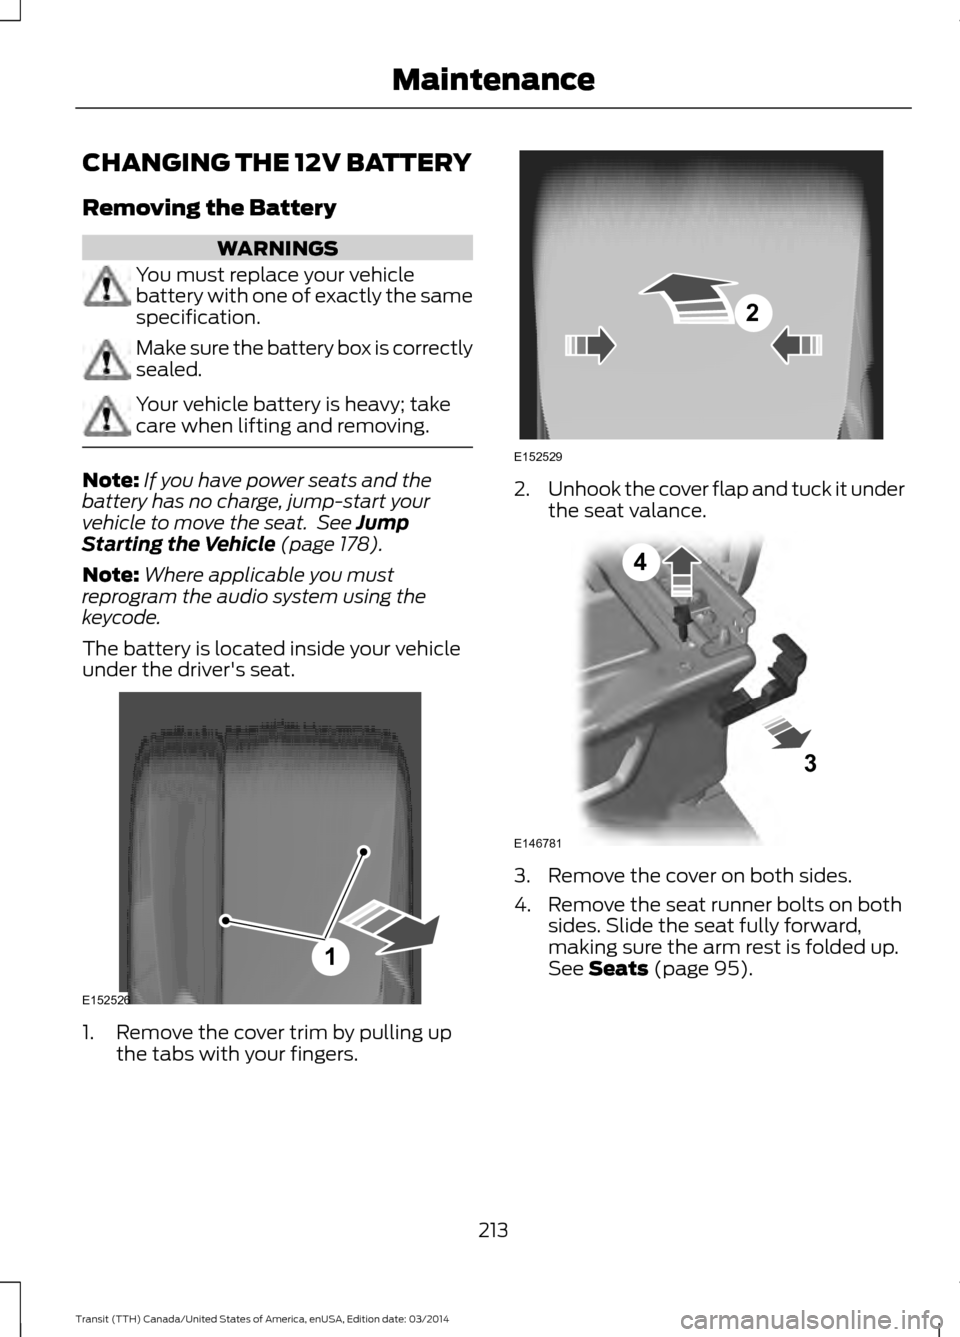
under the driver's seat. 1. Remove the cover trim by pulling up
the tabs with your fingers. 2.
Unhook the cover flap and tuck it under
the seat valance. 3. Remove the cover on both sides.
4. Remove the seat runner bolts on both
sides. Slide the seat fully forward,
making sure the arm rest is folded up.
See Seats (page 95).
213 Transit (TTH) Canada/United States of America, enUSA, Edition date: 03/2014 MaintenanceE152526
1 2
E152529 E146781
3
4
Page 217 of 461
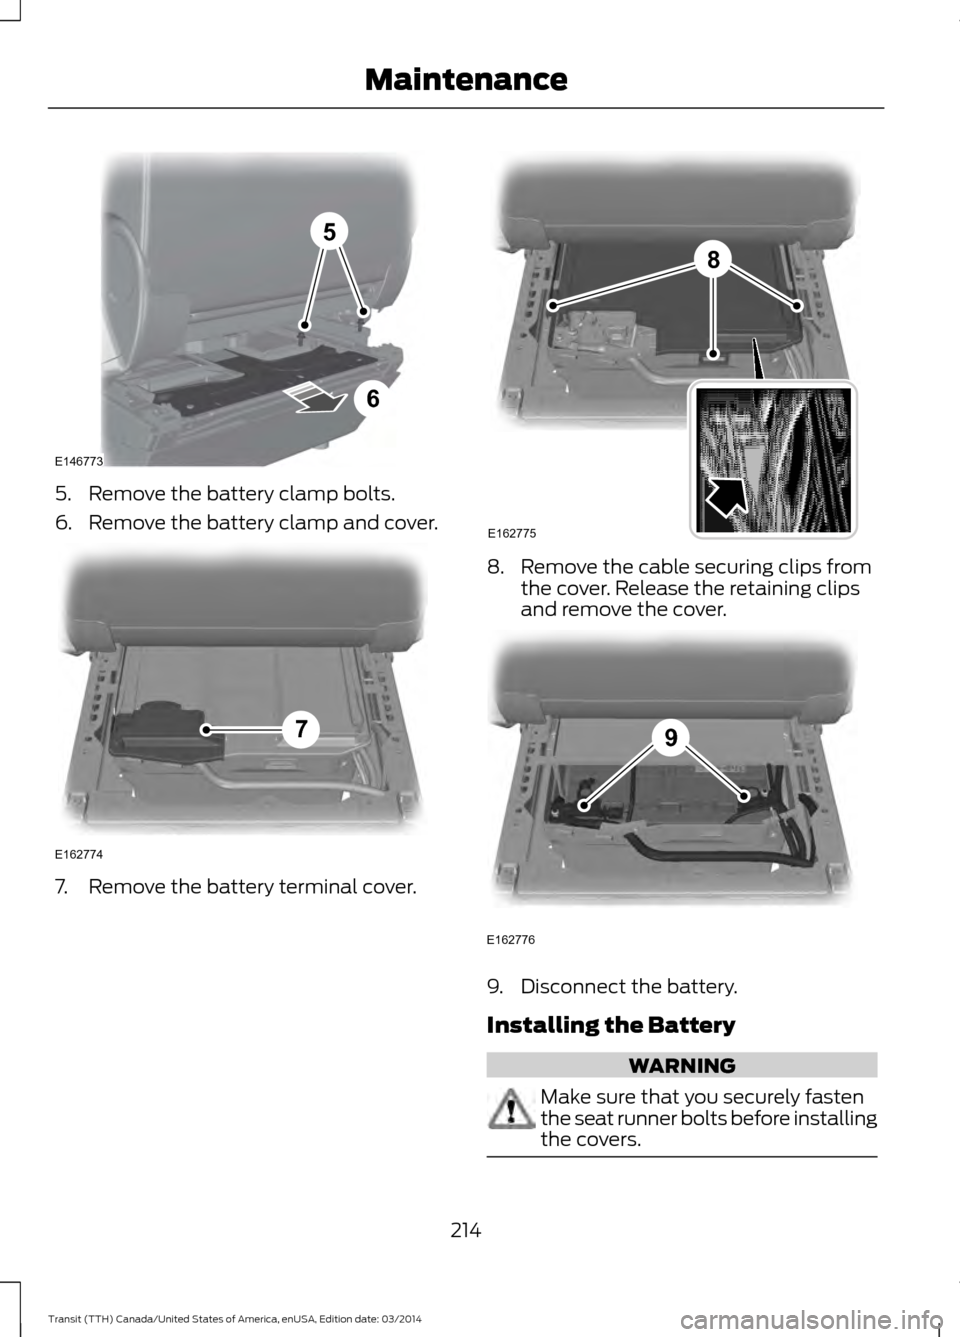
5. Remove the battery clamp bolts.
6. Remove the battery clamp and cover.
7. Remove the battery terminal cover. 8. Remove the cable securing clips from
the cover. Release the retaining clips
and remove the cover. 9. Disconnect the battery.
Installing the Battery
WARNING
Make sure that you securely fasten
the seat runner bolts before installing
the covers.
214
Transit (TTH) Canada/United States of America, enUSA, Edition date: 03/2014 Maintenance5
6
E146773 E162774
7 8
E162775 E162776
9
Page 218 of 461
Install in the reverse order.
CHECKING THE WIPER
BLADES
Run the tip of your fingers over the edge of
the blade to check for roughness.
Clean the wiper blades with washer fluid
or water applied with a soft sponge or
cloth.
CHANGING THE WIPER
BLADES
Changing the Windshield Wiper
Blades
Lift the wiper arm.
1. Press the locking button.
2. Remove the wiper blade.
3. Install in the reverse order. Make sure
that the wiper blade locks into place. Note:
The windshield wiper blades are
different in length. If you install wiper blades
of the wrong length, the rain sensor may not
work correctly.
ADJUSTING THE HEADLAMPS
Vertical Aim Adjustment
If your vehicle has been involved in a crash,
have the aim of the headlamp beam
checked by an authorized dealer.
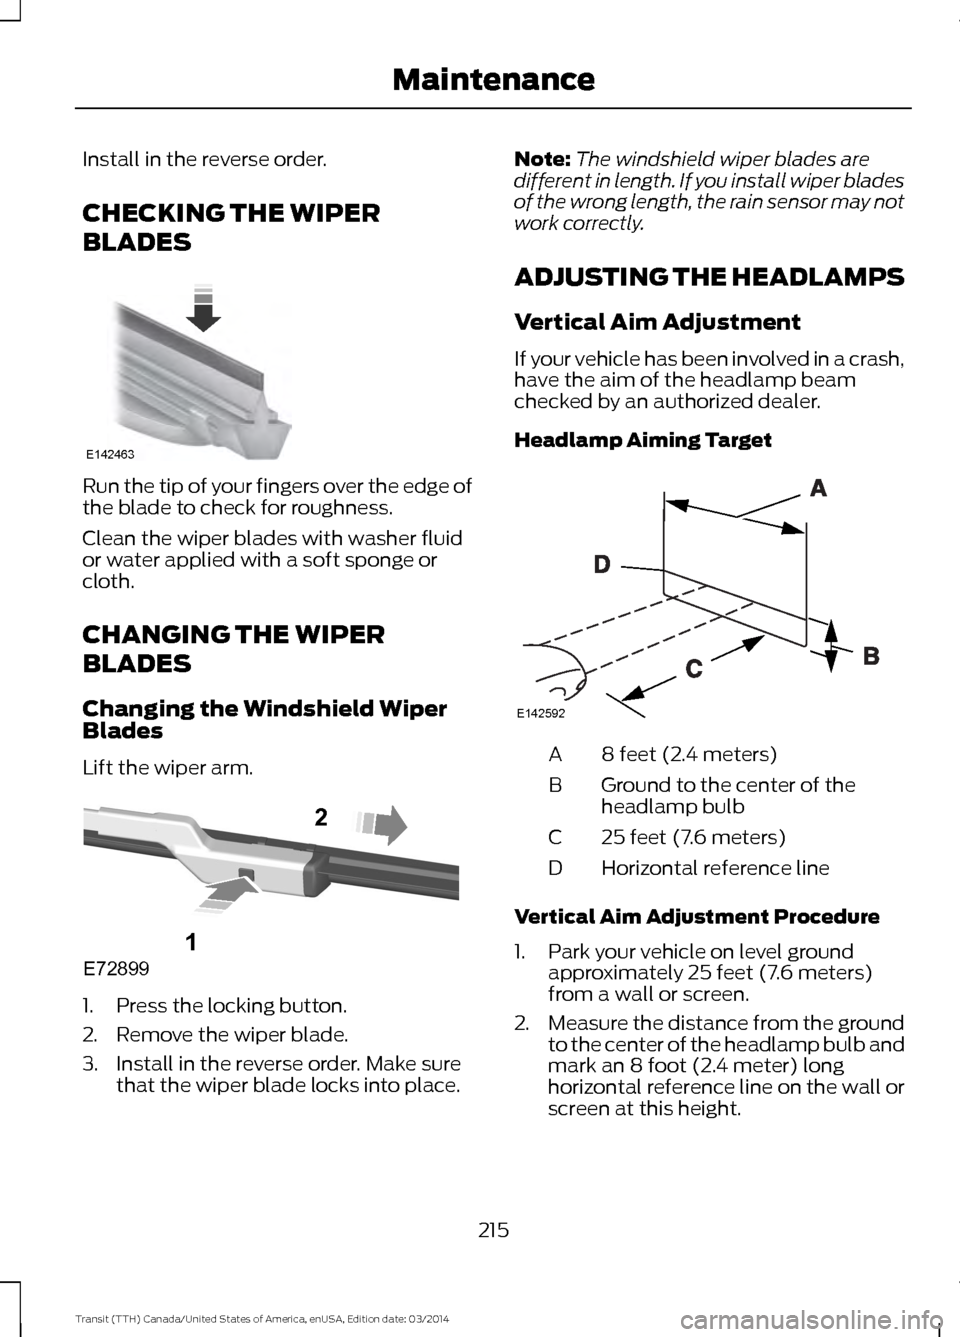
Headlamp Aiming Target 8 feet (2.4 meters)
A
Ground to the center of the
headlamp bulb
B
25 feet (7.6 meters)
C
Horizontal reference line
D
Vertical Aim Adjustment Procedure
1. Park your vehicle on level ground approximately 25 feet (7.6 meters)
from a wall or screen.
2. Measure the distance from the ground
to the center of the headlamp bulb and
mark an 8 foot (2.4 meter) long
horizontal reference line on the wall or
screen at this height.
215 Transit (TTH) Canada/United States of America, enUSA, Edition date: 03/2014 MaintenanceE142463 E72899
1
2 E142592
Page 219 of 461
Note:
To see a clearer light pattern while
adjusting one headlamp, you may want to
block the light from the other headlamp.
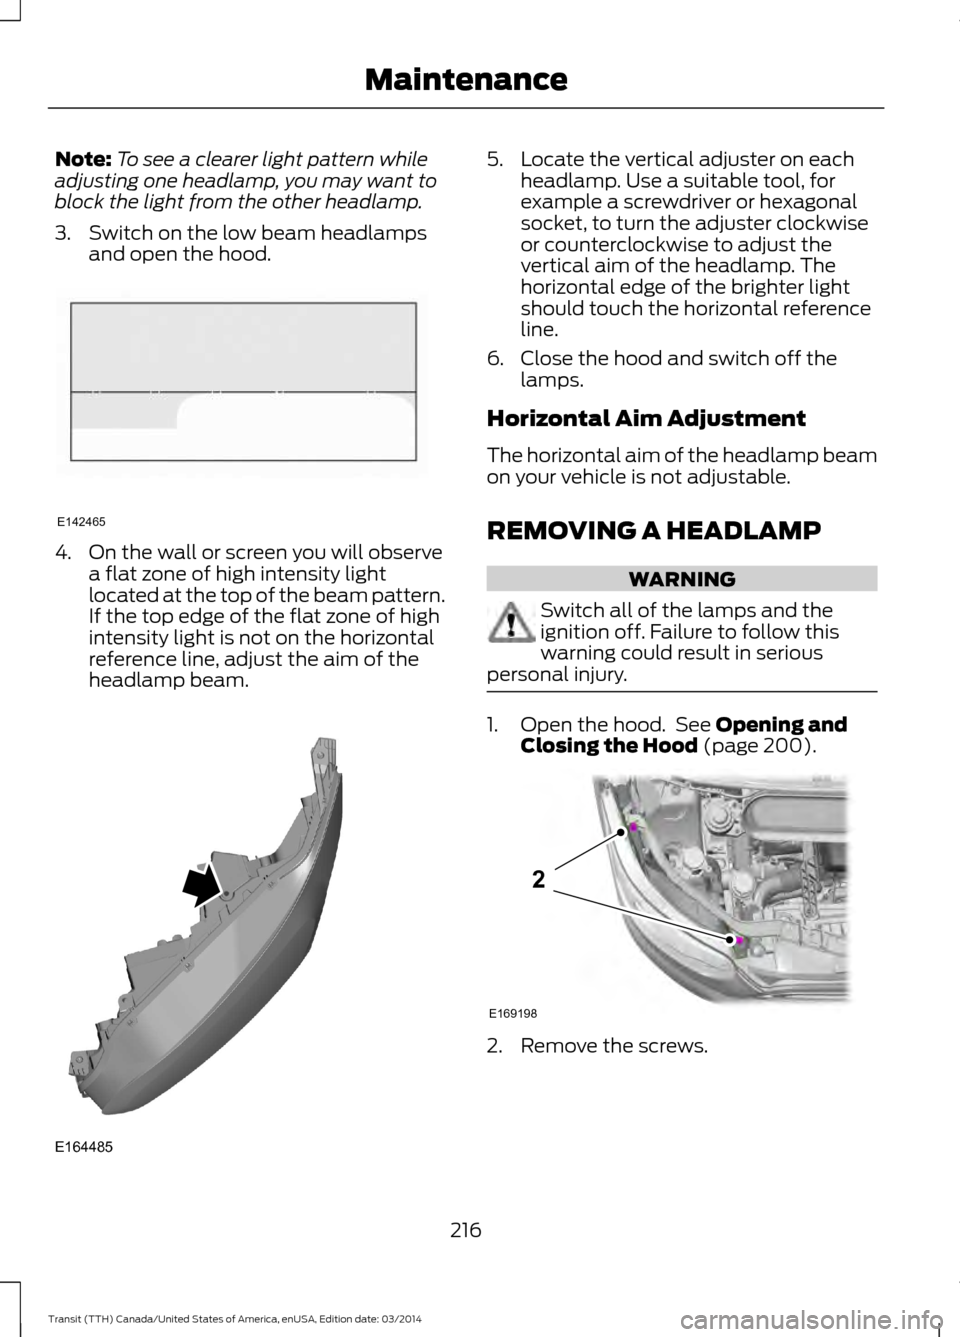
3. Switch on the low beam headlamps and open the hood. 4. On the wall or screen you will observe
a flat zone of high intensity light
located at the top of the beam pattern.
If the top edge of the flat zone of high
intensity light is not on the horizontal
reference line, adjust the aim of the
headlamp beam. 5. Locate the vertical adjuster on each
headlamp. Use a suitable tool, for
example a screwdriver or hexagonal
socket, to turn the adjuster clockwise
or counterclockwise to adjust the
vertical aim of the headlamp. The
horizontal edge of the brighter light
should touch the horizontal reference
line.
6. Close the hood and switch off the lamps.
Horizontal Aim Adjustment
The horizontal aim of the headlamp beam
on your vehicle is not adjustable.
REMOVING A HEADLAMP WARNING
Switch all of the lamps and the
ignition off. Failure to follow this
warning could result in serious
personal injury. 1. Open the hood. See Opening and
Closing the Hood (page 200). 2. Remove the screws.
216 Transit (TTH) Canada/United States of America, enUSA, Edition date: 03/2014 MaintenanceE142465 E164485 E169198
2
Page 220 of 461
3. Pull the headlamp toward the front of
your vehicle to disengage it from its
locating points and then lift the
headlamp up. 4. Disconnect the electrical connectors.
Note:
When you install the headlamp, make
sure that you correctly attach the electrical
connector.
Note: When you install the headlamp, make
sure that you correctly engage its locating
points.
CHANGING A BULB WARNINGS
Switch all of the lamps and the
ignition off. Failure to follow this
warning could result in serious
personal injury. WARNINGS
Bulbs become hot when in use. Let
them cool down before you remove
them.
Use the correct specification bulb. See
Bulb Specification Chart (page 221).
The following instructions describe how to
remove the bulbs. Install in the reverse
order unless otherwise stated.
Note: LED lamps are not serviceable. See
an authorized dealer.
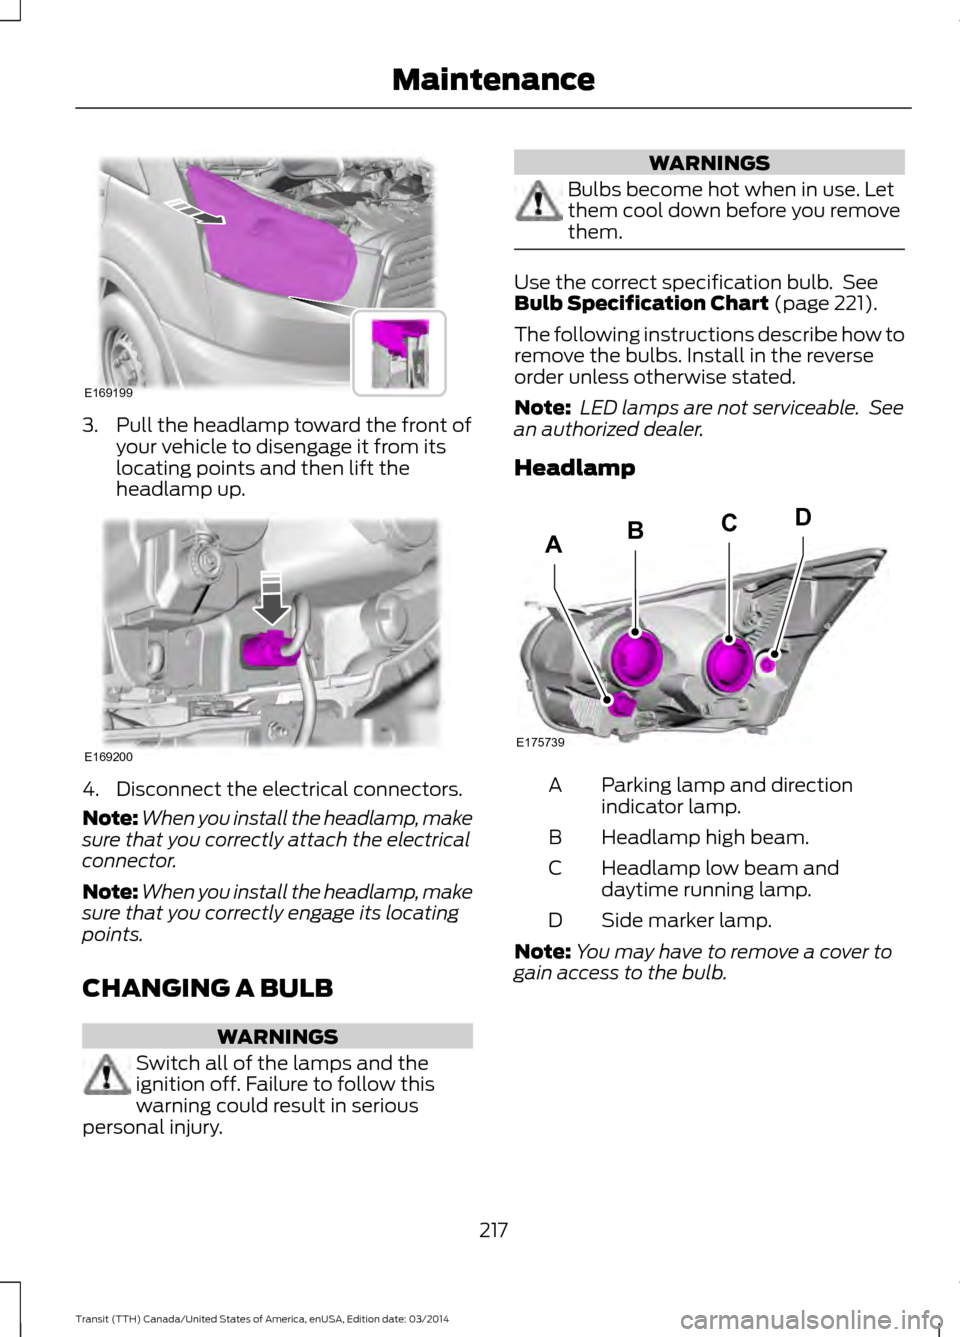
Headlamp Parking lamp and direction
indicator lamp.
A
Headlamp high beam.
B
Headlamp low beam and
daytime running lamp.
C
Side marker lamp.
D
Note: You may have to remove a cover to
gain access to the bulb.
217 Transit (TTH) Canada/United States of America, enUSA, Edition date: 03/2014 MaintenanceE169199 E169200 E175739
BCD
A