check engine HONDA CIVIC 2003 7.G Owners Manual
[x] Cancel search | Manufacturer: HONDA, Model Year: 2003, Model line: CIVIC, Model: HONDA CIVIC 2003 7.GPages: 1139, PDF Size: 28.19 MB
Page 334 of 1139
WC OilControl Solenoid Valve Removal/Test
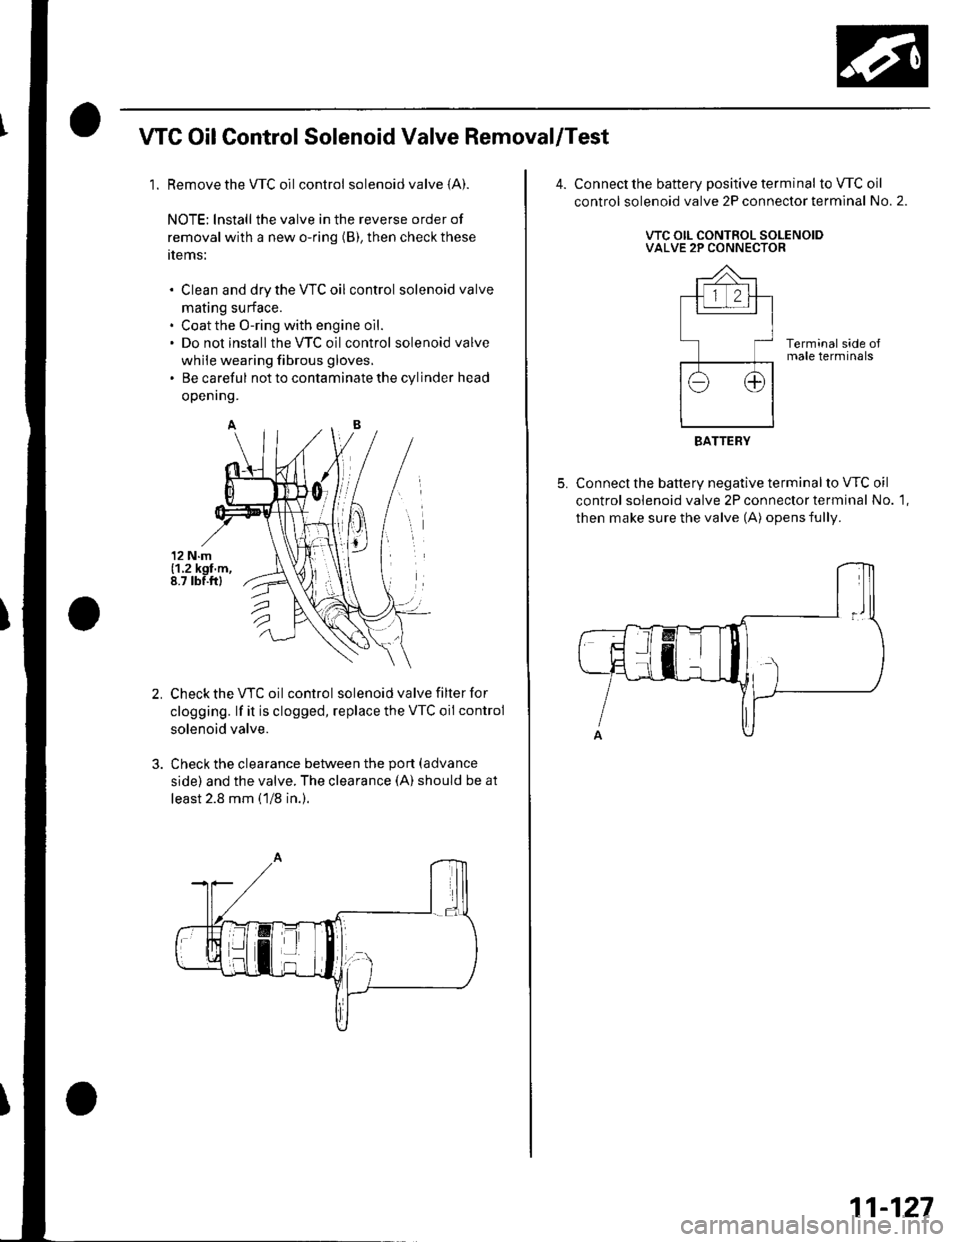
1. Remove the WC oilcontrol solenoid valve (A).
NOTE: lnstall the valve in the reverse order of
removal with a new o-ring (B), then check these
tlems:
Clean and dry the VTC oil control solenoid valve
mating surface.
Coat the O-ring with engine oil.
Do not install the VTC oilcontrol solenoid valve
while wearing fibrous gloves,
Be careful not to contaminate the cylinder head
openrng.
Check the VTC oil control solenoid valve filter for
clogging. lf it is clogged, replace the VTC oil control
solenoid valve.
Check the clearance between the port (advance
side) and the valve. The clearance (A) should be at
least 2.8 mm (1/8 in.).
Connect the battery positive terminal to VTC oil
control solenoid valve 2P connector terminal No. 2.
VTC OIL CONTROL SOLENOIDVALVE 2P CONNECTOR
Terminal side oJmale terminals
Connect the battery negative terminal to VTC oil
control solenoid valve 2P connector terminal No. 1,
then make sure the valve (A) opens fully.
BATTERY
11-127
Page 335 of 1139
VTEC/WC
1.
CMP Sensor A Replacement
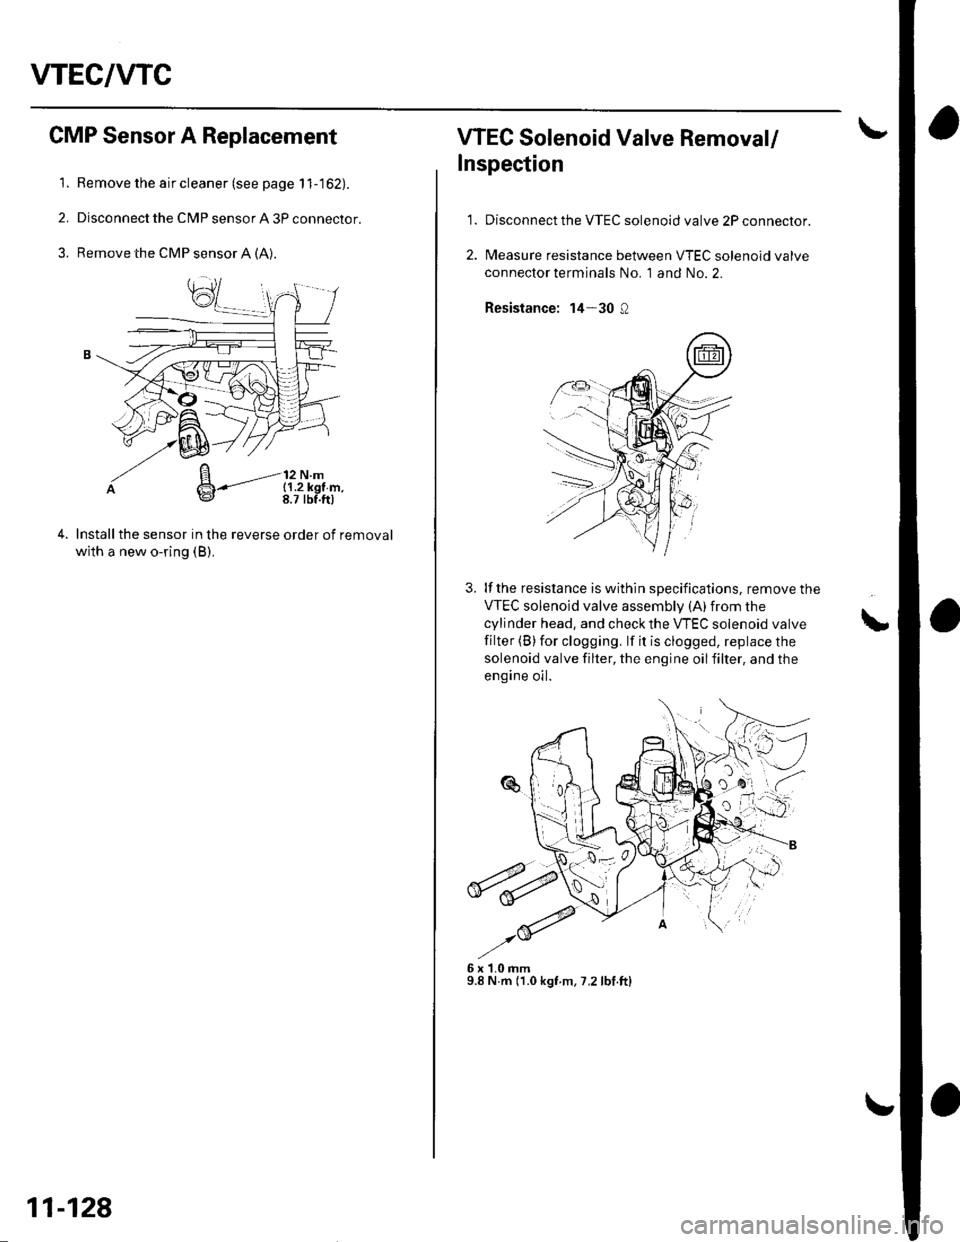
Remove the air cleaner (see page 1 1-162).
Disconnect the CMP sensor A 3P connector.
Remove the CMP sensor A (A).
Installthe sensor in the reverse order of removal
with a new o-ring (B).
B-'-----'-l:,",14*
11-128
WEC Solenoid Valve Removal/
Inspection
1.Disconnect the VTEC solenoid valve 2P connector.
Measure resistance between VTEC solenoid valve
connector terminals No. 1 and No. 2.
Resistance: 14-30 Q
3. lf the resistance is within specifications, remove the
VTEC solenoid valve assemblv (A)from the
cylinder head, and check the VTEC solenoid valve
filter (B)for clogging. lf it is clogged, replace the
solenoid valve filter, the engine oilfilter, and the
engine oil.
6x1.0mm9.8 N.m (1.0 kgf.m, 7,2 lbf.ftl
L
Page 337 of 1139
ldle Control System
DTC Troubleshooting
DTC P0505: ldle Control System Malfunction
NOTE: lf DTC P1519 is stored atthe same time as DTC
P0505, troubleshoot DTC P1519 first, then recheck for
DTC P0505.
1. Start the engine. Hold the engine at 3,000 rpm with
no load (in neutral) until the radiator fan comes on,
then let it idle,
2. Checkthe engine speed at idle with no,load
conditions: headlights, blower fan, rear defogger,
radiator fan, and air conditioner off.
Is the engine running at 750t50 rpm?
YES - Intermittent failure, system is OK at this
trme.I
NO lf the idle speed is less than 700 rpm, go to
step 3; if it's 800 rpm or higher, go to step 4.
3. Disconnect the idle air control {lAC) valve3P
connector.
Does the engine speed increase or fluctuate?
YES- Check the idle speed {see page 1 1-138). lf the
idle will not adjust properly, clean the passage in
the throttle body, and then adjust the idle. I
NO- Replace the IAC valve.I
4. Turn the ignition switch OFF.
5. Remove the intake air duct from the throttle body.
6. Start the engine, and let it idle.
11-130
(
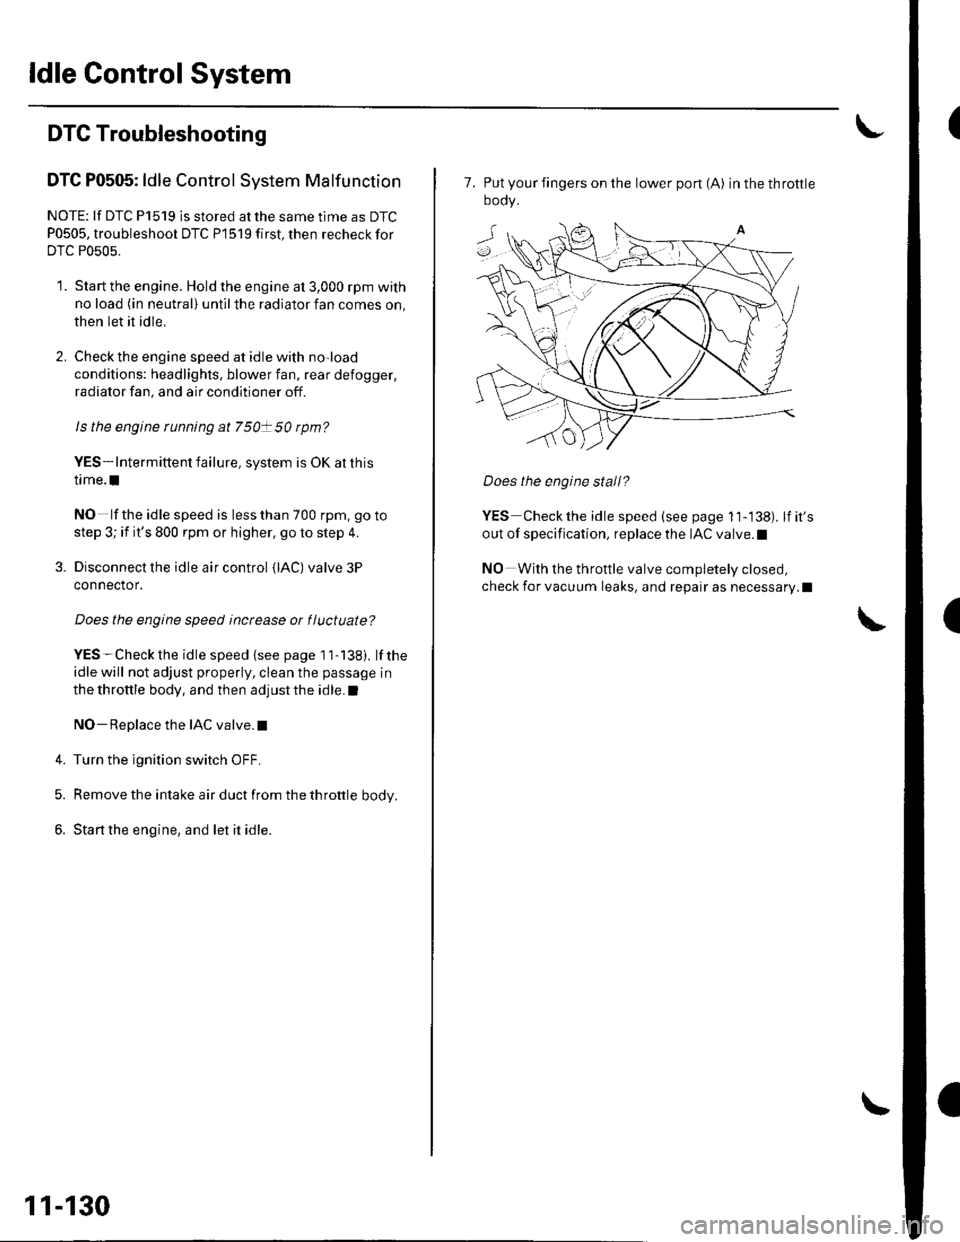
7. Put your fingers on the lower pon (A) inthethrottle
oooy.
Does the engine stall?
YES Checkthe idle speed (see page 11-138). lfit's
out of specification, replace the IAC valve.l
NO With the throttle valve completely closed,
check for vacuum leaks, and repair as necessary.l
Page 340 of 1139
A/G Signal Circuit Troubleshooting
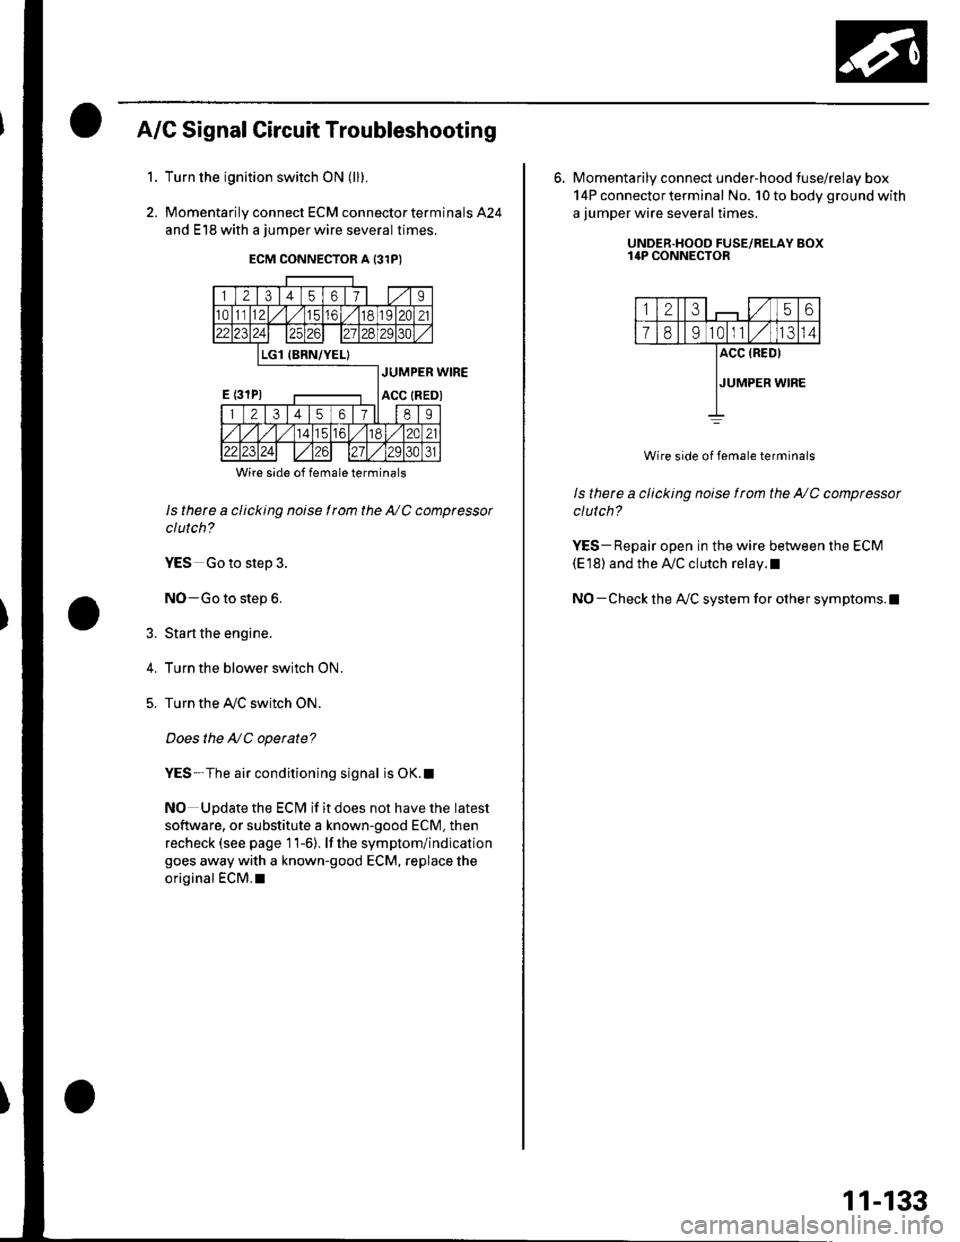
Turn the ignition switch ON (ll).
Momentarily connect ECM connector terminals 424
and E18 with a jumper wire several times.
1.
2.
5.
Wire side of female terminals
ls there a clicking noise I rom the NC compressor
clutch?
YES Go to step 3.
NO-Go to step 6.
Sta rt the engine.
Turn the blower switch ON.
Turn the Ay'C switch ON.
Does the NC operate?
YES-The air conditioning signal is OK.I
NO Update the ECM if it does not have the latest
software, or substitute a known-good ECM. then
recheck (see page 11-6). lf the symptom/indication
goes away with a known-good ECM, replace the
original €CM.l
6. Momentarily connect under-hood tuse/relay box
14P connector terminal No. 10 to body ground with
a jumper wire several times.
UNDER.HOOD FUSE/RELAY BOXI4P CONNECTOR
12356
1891011IJ14
ACC (RED)
JUMPER WIRE
Wire side of female terminals
ls there a clicking noise f rom the NC compressor
clutch?
YES- Repair open in the wire between the ECM(E'18) and the Ay'C clutch relay.l
NO- Check the A/C system for other symptoms.l
11-133
Page 341 of 1139
ldle Gontrol System
't.
Alternator FR Signal Circuit Troubleshooting
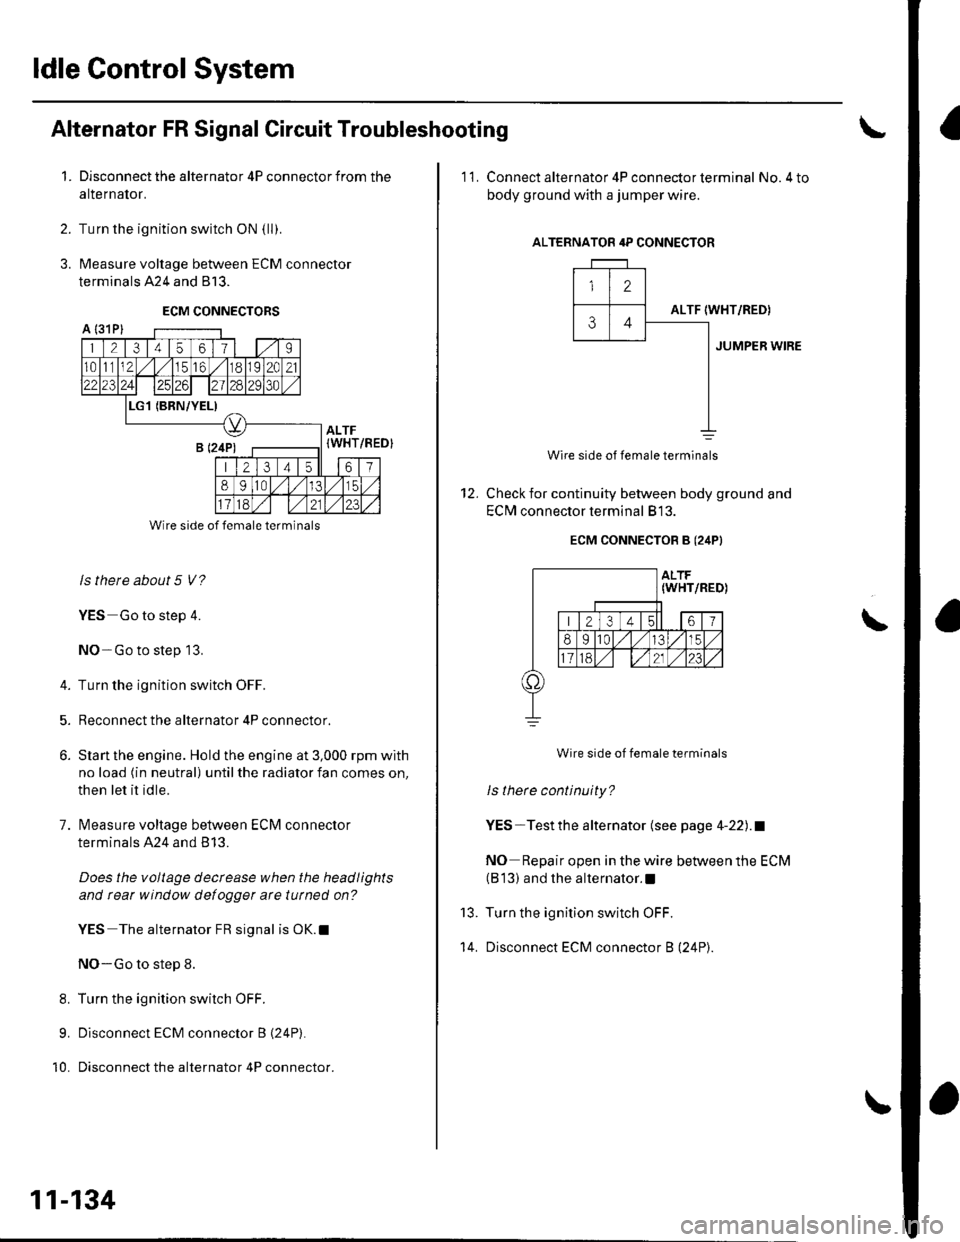
Disconnect the alternator 4P connector from the
alternalor.
Turn the ignition switch ON {ll).
Measure voltage between ECM connector
terminals 424 and 813.
ECM CONNECTORS
2.
3.
A l31Pl
1 21345611 | 1.,'I
1011112,/56,/r8119l2C21
2312428129130
L(BRN/YEL)
ALTF(WHT
213 4t561
89ltal,/l/15
Wire side of female terminals
ls there about 5 V?
YES Go to step 4.
NO-Go to step 13.
4. Turn the ignition switch OFF.
5. Reconnect the alternator 4P connector.
6. Slan the engine. Hold the engine at 3,000 rpm with
no load (in neutral) until the radiator fan comes on,
then let it idle.
7. lvleasure voltage between ECM connector
terminals A24 and B 13.
Does the voltage decrease when the headlights
and rear window defogger arc tutned on?
YES The alternator FR signal is OK.l
NO-Go to step 8.
8. Turn the ignition switch OFF.
9. Disconnect ECM connector B (24P).
10. Disconnect the alternator 4P connector.
/REDI
11-134
'11. Connect alternator 4P con necto r term inal No.4 to
body ground with a jumper wire.
ALTERNATOR 4P CONNECTOR
12
ALTF34IWHT/RED)
JUMPER WIRE
12.
Wire side of female terminals
Check for continuity between body ground and
EClvl connector terminal 813.
ECM CONNECTOB B (24PI
Wire side of female terminals
ls there continuity?
YES-Testthe alternator (see page 4-22).1
NO Repair open in the wire between the ECM(B 13) and the alternator.l
Turn the ignition switch OFF.
Disconnect ECM connector B (24P).
\
13.
't 4.
Page 342 of 1139
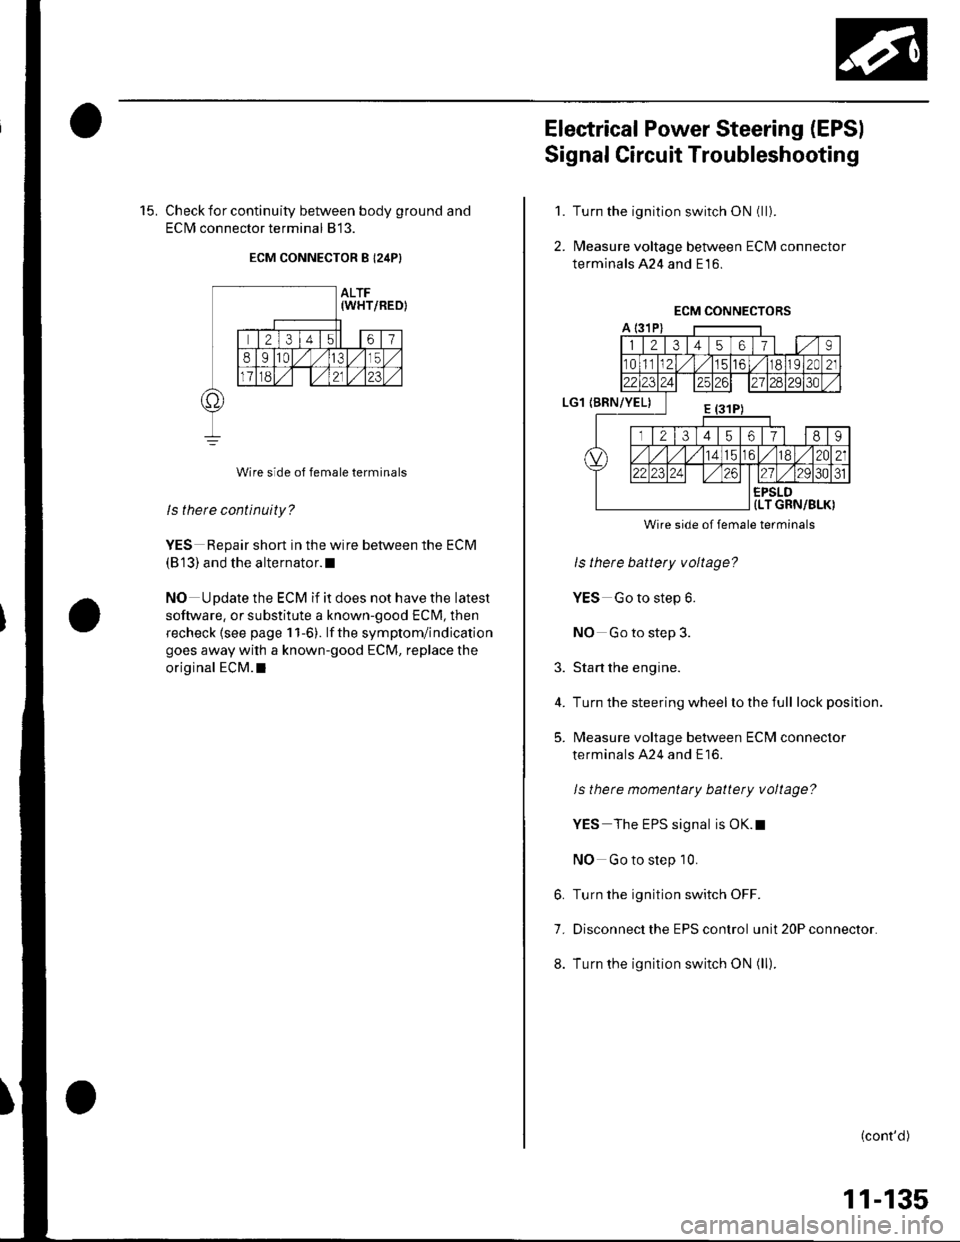
15. Check for continuity between body ground and
ECIM connector terminal 813.
ECM CONNECTOR B I24P}
Wire side of female terminals
ls there continuity?
YES Repair short in the wire between the ECM
(813) and the alternator.l
NO Update the ECM if it does not have the latest
software, or substitute a known-good ECM, then
recheck lsee page 1 1-6). lf the symptom/indication
goes away with a known-good ECM, replace the
original ECM.I
Electrical Power Steering (EPSI
Signal Circuit Troubleshooting
Turn the ignition switch ON (ll).
l\4easure voltage between ECM connector
terminals 424 and E16.
1.
2.
3.
4.
5.
Wire side of female terminals
ls there battery voltage?
YES Go to step 6.
NO Go to step 3.
Start the engine.
Turn the steering wheel lo the full lock position.
l\4easure voltage between ECM connector
terminals A24 and E16.
ls there momentaty battery voltage?
YES The EPS signal is OK.t
NO Go to step 10.
6. Turn the ignition switch OFF.
7. Disconnect the EPS control unit 20P connector.
8. Turn the ignition switch ON (ll).
(cont'd)
11-135
Page 345 of 1139
ldle Control System
ldle Speed lnspection
NOTE:' Leave the idle air control (lAC) valve connecled.. Before checking the idle speed, check these items:- The malfunction indicator lamp (MlL) has not been
reported on.- lgnition timing- Spark plugs- Air cleaner- PCV system. Pullthe parking brake lever up. Start the engine, and
make sure the headlights are off.
1. Disconnect the evaporative emission (EVAP)
canister purge valve 2P connector.
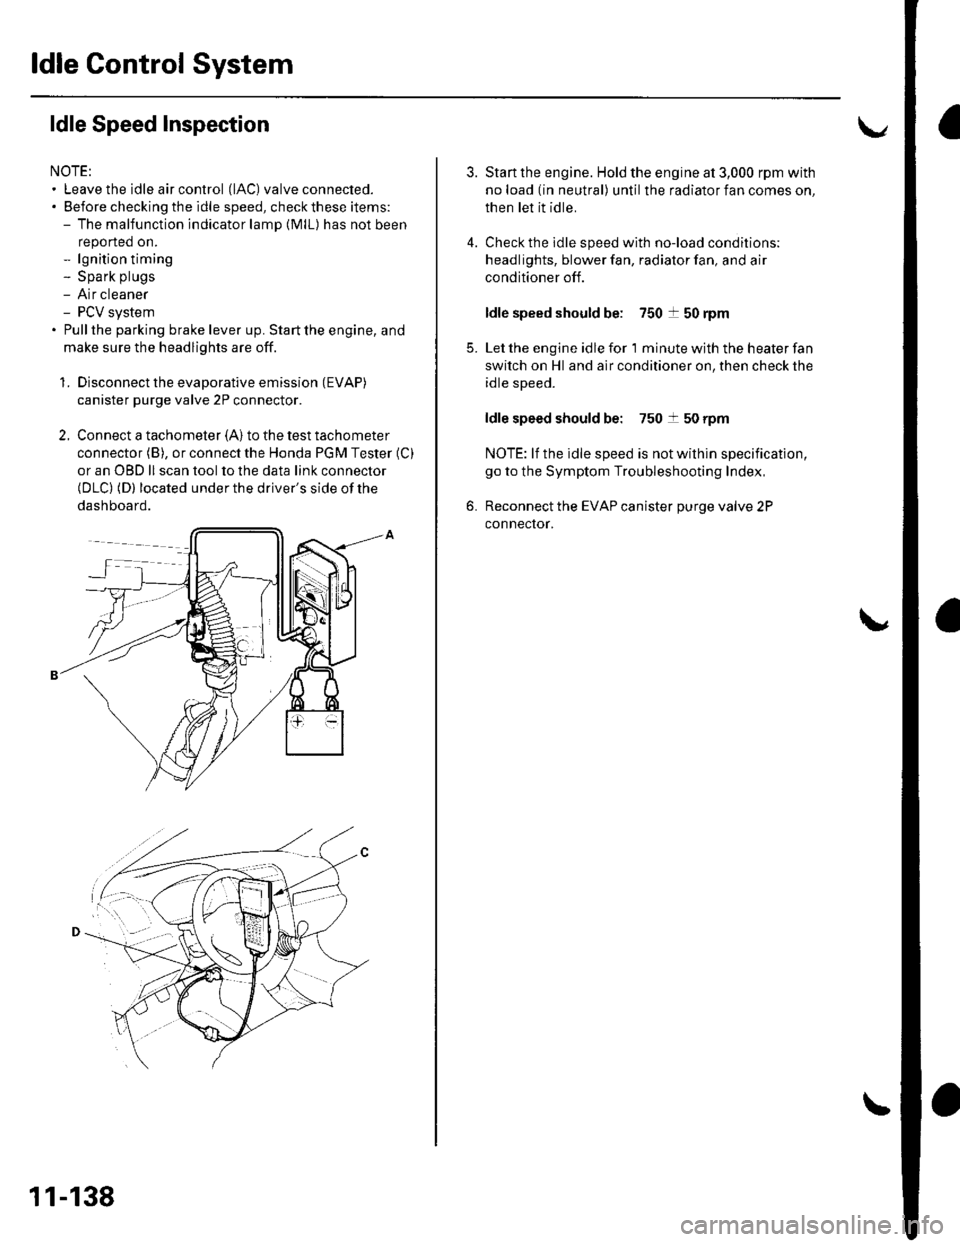
2. Connect a tachometer (A)to the test tachometer
connector (B), or connect the Honda PGM Tester (C)
or an OBD ll scan tool to the data link connector(DLC) (D) located under the driver's side of the
dashboard.
11-138
4.
3.
5.
6.
Start the engine. Hold the engine at 3,000 rpm with
no load (in neutral) until the radiator fan comes on,
then let it idle.
Check the idle speed with no-load conditions;
headlights, blower fan, radiator fan, and air
conditioner off.
ldle speed should be: 750 t 50 rpm
Let the engine idle for 1 minute with the heater fan
switch on Hl and air conditioner on, then check the
idle speed.
ldle speed should be: 750 t 50 rpm
NOTE: lf the idle speed is not wilhin specification,
go to the Symptom Troubleshooting Index,
Reconnect the EVAP canister purge valve 2P
connector.
Page 351 of 1139
FuelSupply System
Fuel Pressure Relieving
Before disconnecting fuel lines or hoses, relieve
pressure from the system by disconnecting the fuel
tube/quick connect fitting in the engine compartment.
1. Turn the ignition switch OFF,
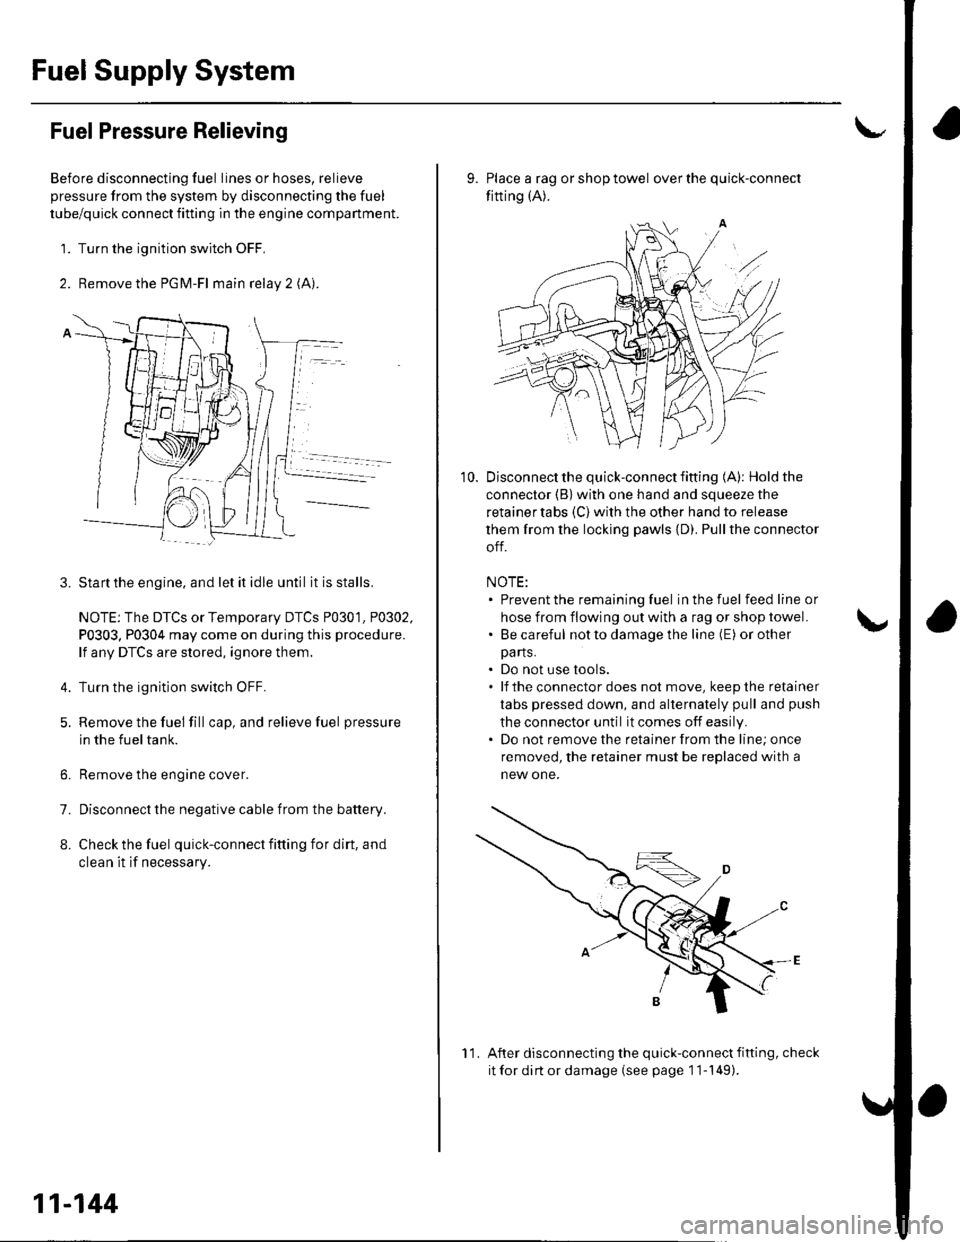
2. Remove the PGM-Fl main relay 2 (A).
Startthe engine, and let it idle until it is stalls.
NOTE: The DTCS or Temporary DTCS P0301. P0302,
P0303, P0304 may come on during this procedure.
lf any DTCS are stored, ignore them.
Turn the ignition switch OFF.
Remove the fuel fill cap, and relieve fuel pressure
in the fueltank.
Remove the engine cover.
Disconnect the negative cable from the battery.
Check the fuel quick-connect fitting for dirt, and
clean it if necessary.
3.
4.
6.
7.
8.
11-144
11
10.
9. Place a rag or shop towel over the quick-connect
fitting (A).
Disconnect the quick-connect fifting (A): Hold the
connector (B) with one hand and squeeze the
retainer tabs (C) with the other hand to release
them from the locking pawls {D). Pullthe connector
off.
NOTE:. Prevent the remaining fuel in the fuel feedlineor
hose from flowing out with a rag or shop towel.. Be careful notto damage the line (E) or other
pa rts.. Do not use tools.. lf theconnectordoes not move, keepthe retainer
tabs pressed down, and alternately pull and push
the connector until it comes off easily.. Do not remove the retainer from the line; once
removed, the retainer must be replaced with a
new one.
After disconnecting the quick-connect fifting, check
it for dirt or damage (see page 1 1-149).
Page 352 of 1139
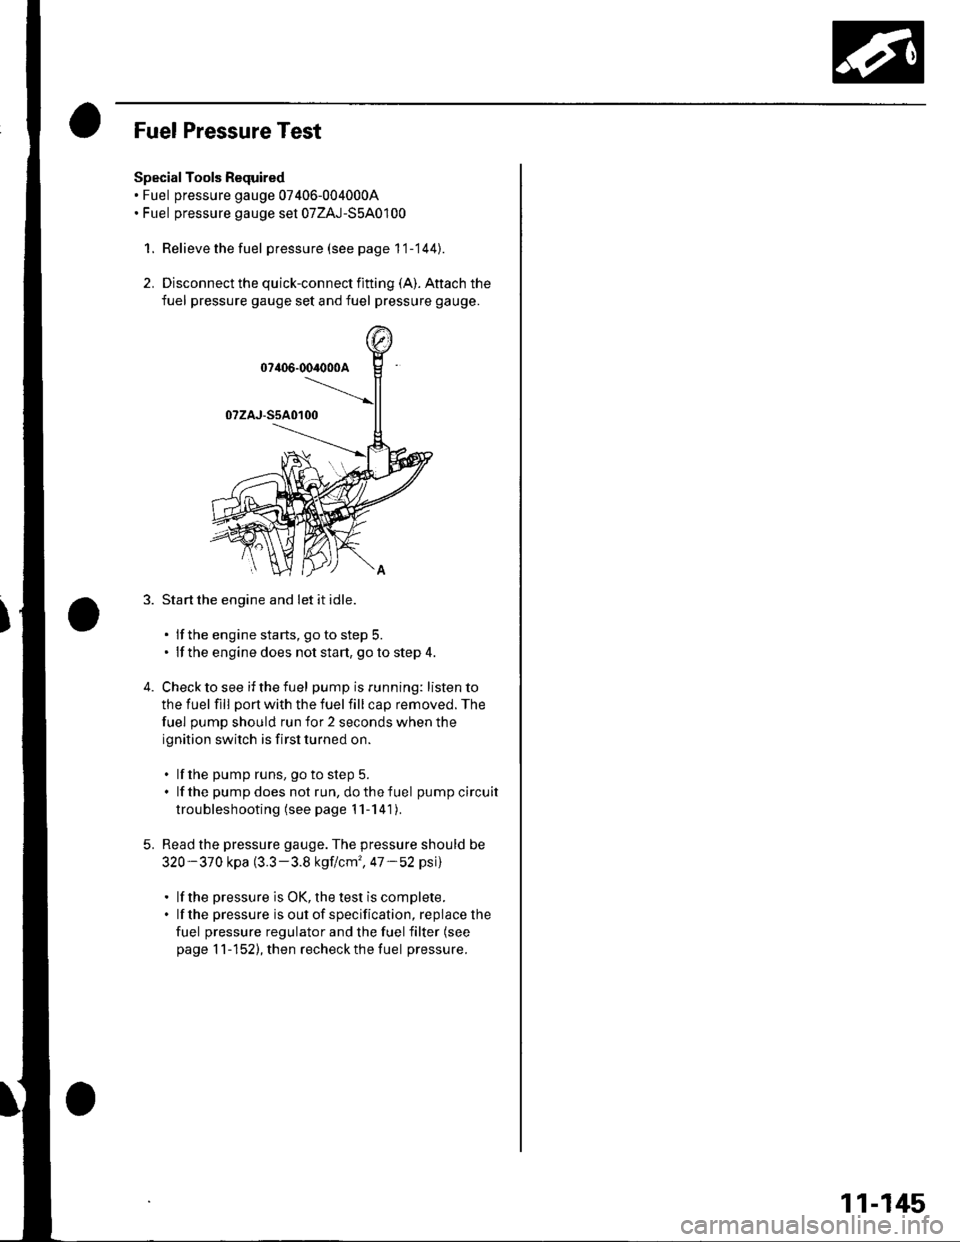
Fuel Pressure Test
Special Tools Required. Fuel pressure gauge 07406-0040004. Fuel pressure gauge sel 07ZAJ-S5A0100
1. Relieve the fuel pressure (see page 1'1-144).
2. Disconnect the quick-connect fitting (A). Aftach the
fuel pressure gauge set and fuel pressure gauge.
Start the engine and let it idle.
. lf the engine starts, goto step 5.. lf the engine does not start, goto step 4.
Check to see if the fuel pump is running: listen to
the fuel fill port with the fuel fill cap removed. The
fuel pump should run for 2 seconds when the
ignition switch is first turned on.
. lf the pump runs, go to step 5.. lf the pump does not run, do the fuel pump circuit
troubleshooting (see page 1 1-1 41 ).
Read the pressure gauge. The pressure should be
320-370 kpa (3.3-3.8 kgf/cm', a7-52 psi)
. lf the pressure is OK, the test is complete.. lf the pressure is out of specification, replace the
fuel pressure regulator and the fuel filter (see
page 11-152), then recheck the fuel pressure.
5.
11-145
Page 358 of 1139
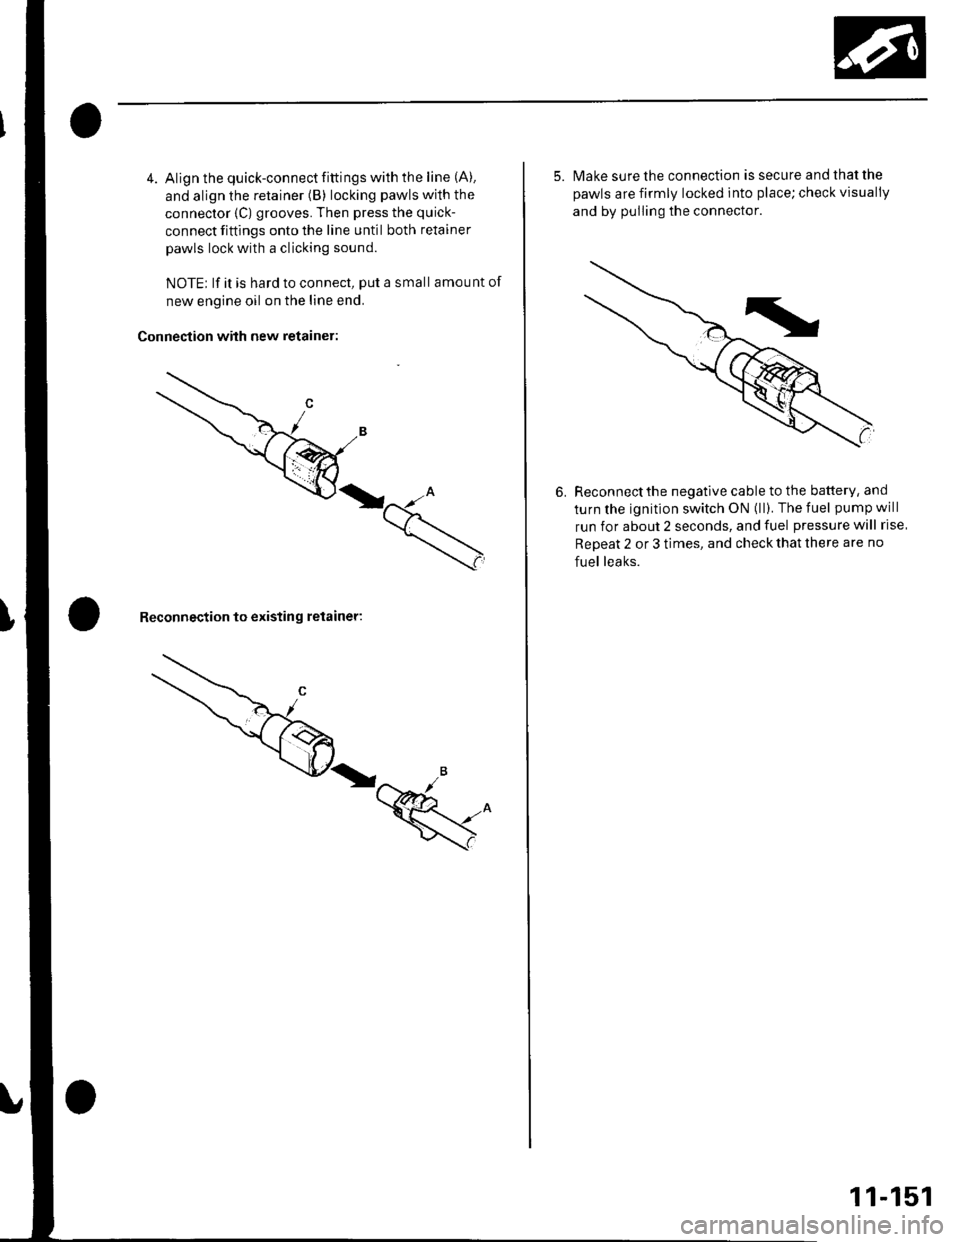
4. Align the quick-connect fittings with the line (A).
and align the retainer (B) locking pawls with the
connector {C) grooves. Then press the quick-
connect fittings onto the line until both retainer
pawls lock with a clicking sound.
NOTE; lf it is hard to connect, put a small amount of
new engine oil on the line end.
Connection with new retainer:
Reconnection to existing retainer:
5. lvlake sure the connection is secure and that the
pawls are firmly locked into place; check visually
and by pulling the connector.
6. Reconnectthe negative cable to the battery, and
turn the ignition switch ON (ll). The fuel pump will
run for about 2 seconds, and fuel pressure will rise
Repeat 2 or 3 times, and check that there are no
fuel leaks.
11-151